
Chapter 10
Journey Builder
IN THIS CHAPTER
![]() Using Automation Studio versus Journey Builder
Using Automation Studio versus Journey Builder
![]() Understanding the types of automations and automation activities
Understanding the types of automations and automation activities
![]() Creating and scheduling activities through automations
Creating and scheduling activities through automations
![]() Getting started with Journey Builder
Getting started with Journey Builder
As a digital marketer, you know that your campaigns contain many repetitive tasks that you need to perform. Tasks such as importing and exporting data, running reports, and executing recurring campaigns have a legitimate place on your agenda, but they take up time and energy that you could be using to solve problems.
Salesforce Marketing Cloud can save you some of the busywork by automating the simple tasks that you must repeat exactly the same way every day. Not only does automation make it possible for you to set up a lot more campaigns, but it also prevents the human error that tends to happen when a person is asked to do the same mundane task over and over again.
Salesforce Marketing Cloud has developed multiple tools for process automation over the years. The Journey Builder category on the app switcher contains two powerful automation tools: Automation Studio and Journey Builder.
Automation Studio is Marketing Cloud’s digital workhorse. With it, you set up automated processes to run on a schedule or as a result of an event trigger. For example, you could set up a daily automation that creates a list of subscribers who are having a birthday that day and then sends them a happy birthday email. Or you could set up an automation to detect when a file has been added to an FTP site and then to import that file.
Journey Builder is the application you’ll use for multiple component campaigns. It enables you to take advantage of channels from across Marketing Cloud to build comprehensive, dynamic experiences for your subscribers.
Even though this chapter is titled “Journey Builder,” the Journey Builder app is so central to your online marketing efforts in Marketing Cloud that just one chapter cannot contain it! See Chapters 16 and 17 for additional information about Journey Builder.
Automation Studio versus Journey Builder
Automation Studio and Journey Builder are both powerful automation tools. But how do you decide when to use each one? Each has strengths, so you want to choose the tool that best matches the requirements and complexity of your campaign.
Automation Studio is simpler and more straightforward to use, and it is best suited to campaigns that proceed in a linear fashion. For example, a linear campaign might contain the following steps:
- You upload a file of subscriber data to an FTP location, which triggers the campaign.
- The campaign uploads the content of the file to your data extension.
- The campaign segments the data extension for sending.
- The campaign sends a series of messages to the subscribers on that data extension, with a fixed time interval between each message.
Figure 10-1 illustrates what this simple linear campaign would look like in Automation Studio.

FIGURE 10-1: Automation Studio is best suited to campaigns where only one path is possible.
On the other hand, if your campaign is more complex, you should probably use Journey Builder. Although Journey Builder is more complicated to set up, it has more power and flexibility, so it's the better choice when your campaign includes variable paths.
In Journey Builder, you can set up a journey, which is a tool to decide when, what, and whether to send a subscriber a message based on conditions such as the following:
- Random segmentation of your audience
- Value of a subscriber attribute
- How the subscriber interacted with a message sent earlier in the sequence of events
Journey Builder uses a drag-and-drop interface in which you model a subscriber's path through the journey. Figure 10-2 shows the interface.

FIGURE 10-2: A view of a Journey Builder canvas.
You can also use both Automation Studio and Journey Builder together on the same campaign. For example, you might want to use Automation Studio to import subscriber records before inserting them into a Journey Builder interaction. In this situation, you can create an automation in Automation Studio in which the last step is to load subscribers into a journey.
Understanding Automation Studio
In Automation Studio, you create an automation, which is a linear progression of steps to complete, one after the other. A step contains one or more activities that the system completes before moving to the next step. Previously, you had to create activities in the Email app before you could include them in your automations, but now you can create activities directly in Automation Studio.
To get to Automation Studio, pause your mouse pointer on Journey Builder in the app switcher and click Automation Studio. The Overview screen appears, as shown in Figure 10-3.

FIGURE 10-3: The Overview screen in Automation Studio is where you view all automations and activity.
The Overview screen shows you the status of all the automations that you've created. This is the screen where you can create, start, edit, and delete automations.
On the left side of this screen is a navigation pane, where you can browse for an automation within the folder structure. Click a folder, and its subfolders appear in the navigation pane and the automations in that folder appear to the right, in the list pane. You can search for a particular automation using the search field that appears above the navigation pane.
![]()
![]() As mentioned, the list pane (see Figure 10-4) is where the automations in the folder you chose or that match your search criteria appear. You can filter the list of automations by using the View by Status drop-down menu, which appears above the list, on the right side. The two buttons next to the menu — Detail View and List View (both shown in the margin) — help you control the information you see about each automation in this list. Use the page selector in the bottom right of the screen to advance through the listings.
As mentioned, the list pane (see Figure 10-4) is where the automations in the folder you chose or that match your search criteria appear. You can filter the list of automations by using the View by Status drop-down menu, which appears above the list, on the right side. The two buttons next to the menu — Detail View and List View (both shown in the margin) — help you control the information you see about each automation in this list. Use the page selector in the bottom right of the screen to advance through the listings.
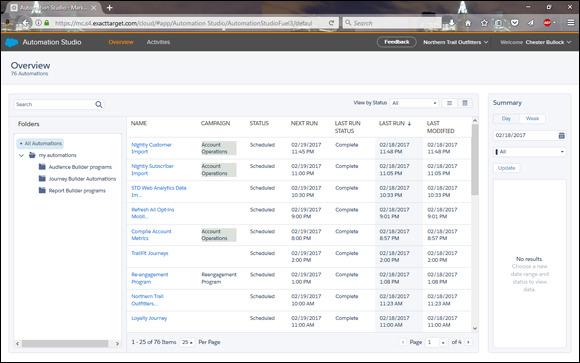
FIGURE 10-4: Find your desired automation.
Click the name of an automation to open the editor view. Pause your mouse pointer over the name to see Run Once and Delete buttons.
On the right side of the Overview screen, you can see a Summary pane of the automations that are running or scheduled to run, as shown in Figure 10-5. You can use the buttons and fields near the top of the pane to set parameters for what to display. You can control whether you see information for a single day or an entire week, the day or week for which you want to see information, and what kinds of activities appear in the pane. Click the Update button to refresh the summary to reflect the parameters you chose.

FIGURE 10-5: Detail view of a daily automation activity summary.
Creating Activities
With a few exceptions, you must create activities in a separate process before you can include them in an automation. After you create an activity, it becomes available to select and include in any number of automations. Eventually, Marketing Cloud plans for activities to replace the Interactions tab in Email Studio for creating user-initiated sends, file imports, exports, extracts, and other automations.
The kinds of activities that you can create vary based on your account configuration; this section covers the core activities that appear in any account. To access the screen where you can create an activity from Automation Studio, click the Activities menu on the toolbar. The Activities screen appears, as shown in Figure 10-6.

FIGURE 10-6: The list of activities you've created appears in the Activities screen.
Testing activities
It's possible to run an activity without including it in an automation, but you should do that only when you're testing the activity. Except for a few activities that alert you when they are complete, such as file imports, monitoring the progress of an activity running outside an automation is difficult or even impossible.
For example, if you run a query activity outside an automation, the only way for you to know when the activity is complete is to check whether the results of the query have appeared. This isn't a practical approach because, depending on the query's complexity, it could finish in as little as a few seconds or as much as many hours. You might find yourself checking for results over and over, never knowing whether they haven't appeared because an error caused the query to stop prematurely or simply because it hasn't completed yet.
By executing the query in a step in an automation, even if it's the only step in the automation, you can easily see whether the step is failing to progress or has encountered an error.
File-naming patterns
Some activities, such as the file import, file transfer, and data extract activities, require you to specify a file name when you're setting them up. However, because automations run periodically on their own, you might need to include a date in the file name so you can tell at a glance whether the file is the right one.
To help you have unique names for your files, Marketing Cloud lets you indicate a file-naming patterns instead of a static file name when you're setting up activities that need one. In the naming pattern, you include placeholders for the year, month, and day in the file name. The system replaces the placeholder with the current year, month, and day (as needed) so you can have different file names on different days.
For example, instead of entering subscribers.csv in the file name field, you would enter subscribersMMDDYYYY.csv. When the system processes the file name, it replaces the MM with the two-digit month, the DD with the two-digit year, and the YYYY with the four-digit year of the current day.
Data extract activity
Use the data extract activity to bundle a file of Marketing Cloud data to transfer it out of Marketing Cloud so you can use it in a different business system. For example, you might extract tracking data to import it into a separate analytics system.
Interestingly, you can use this activity also to transform an XML file to a comma-delimited, tab-delimited, or pipe-delimited file. This can be a convenient activity to use before importing an XML file into your Marketing Cloud account.
To create a data extract activity, use the following steps:
- From the Activities screen, click the Create Activity button, near the top right of the screen.
-
In the Create New Activity window that appears, select Data Extract and then click Next.
The Create New Data Extract Activity window appears.
-
Complete the information on the Properties tab, and then click Next.
Specify a name and description for the activity, and also a file-naming pattern for the file that results from the extract. Don't forget to include the file extension (for example, CSV, ZIP, or TAB) in the file-naming pattern.
The list of extract types that you can choose from depends on what is available in your account. Commonly available types include tracking data and data extensions.
 For the file transfer activity to find and move the file that results from a data extract activity, you must use the same file name when you're setting up both activities.
 -
Complete the information on the Configuration tab, and then click Next.
The fields on this tab vary depending on the extract type you chose in the preceding step.
- Review the information on the Summary tab, and then click Finish.
File transfer activity
You can use the file transfer activity to upload to Marketing Cloud a file that you created elsewhere, or to download a file from Marketing Cloud. For example, you might use this activity right after the data extract activity to move a file of analytics data to a transfer location.
When you're using the file transfer activity to upload a file, the same activity can decrypt the file, or decompress the file, or both.
 This activity only makes the file available to Marketing Cloud; it does not update your subscriber data with the information from the file. See the “Import file activity” section, later in this chapter, for instructions on updating your subscriber information.
To create a file transfer activity, use the following steps:
- From the Activities screen, click the Create Activity button, near the top right of the screen.
-
In the Create New Activity window that appears, select File Transfer, and then click Next.
The Create New File Transfer Activity window appears.
-
Complete the information on the Properties tab, and then click Next.
Specify a name and description for the activity. Also choose one of the following for the file action:
- Manage File: Choose this option to use the activity to get content into Marketing Cloud from an outside file.
- Move a File from Safehouse: Choose this option to use the activity to get a file out of Marketing Cloud.
-
Complete the information on the Configuration tab, and then click Next.
Indicate the file-naming pattern and the location where you want to transfer the file to or from. Don't forget to include the file extension (for example, CSV, ZIP, or TAB) in the file-naming pattern.
For the file transfer activity to find and move the file that results from a data extract activity, you must use the same file name when you're setting up both activities.For Manage File activities (file into Marketing Cloud), the Configuration tab is also where you tell Marketing Cloud if you want it to decompress and decrypt your file. A few additional controls help you prevent importing old data or overwriting data in your Marketing Cloud account too soon.
For Move a File from Safehouse activities (content out of Marketing Cloud), the Configuration tab is also where you tell the activity how to encrypt your file.
- Review the information on the Summary tab, and then click Finish.
Filter activity
To create a group from a subscriber list, you set up the filter logic in a filter activity. When the automation runs, the system applies that logic to the subscriber list you've indicated and creates a group of subscribers that satisfy the criteria.
You have to set up your data filter separately before you can use it as part of an activity. See Chapters 11 and 17 for more information about filters.
To create a filter activity, use the following steps:
- From the Activities screen, click the Create Activity button, near the top right of the screen.
-
In the Create New Activity window that appears, select Filter, and then click Next.
The Create New Filter Activity window appears.
-
Complete the information on the Properties tab, and then click Next.
Specify a name and description for the activity, as well as the location of the data filter that you want to use.
-
Complete the information on the Configuration tab, and then click Next.
Choose the list to which you're going to apply the filter logic. Also choose the name you want to give the resulting group and where you want to store that group.
- Review the information on the Summary tab, and then click Finish.
Import file activity
You use the import file activity after you've transferred a file into Marketing Cloud using the file transfer activity. The import activity uses the information from the file you transferred to update your subscriber data.
To create an import file activity, use the following steps:
- From the Activities screen, click the Create Activity button, near the top right of the screen.
-
In the Create New Activity window that appears, select Import File, and then click Next.
The Create New Import Definition window appears.
-
Complete the information on the Properties tab, and then click Next.
Specify a name and description for the activity as well as the file-naming pattern of the file to import. Also specify information about the file, such as where Marketing Cloud can find it and which delimiter it uses. You can use the other options to prevent the import from importing bad or old data. You can also set up the activity to alert you when the import is complete.
If you set up your automation to import files on a schedule, problems can occur outside your control that cause the file you're importing to not post to the FTP site on time. The options on this tab are great safeguards to prevent duplicate imports of the same file if that happens. -
Complete the information in the Destination tab, and then click Next.
Choose the subscriber list or data extension to import the data into. Also choose whether you want to add, update, or overwrite the information you already have.
-
Complete the information on the Destination tab, and click Next.
Map the columns from your import file to the columns in your subscriber list or data extension:
- If you choose Map by Header Row, the names of the columns in your source file must match the names of the fields in your subscriber list or data extension.
- If you choose Map by Ordinals, you can choose to map the first, second, third, and so on field in your import file to the field that you want the content imported to.
- If you choose to Map Manually, you upload a sample file so that the system can show you all the columns to map to the subscriber attributes or data extension columns.
- Review the information on the Summary tab, and then click Finish.
Refresh group activity
In the Email app, you can create a group to contain a subset of a subscriber list. The system populates the group based on either a data filter or a number of randomly selected subscribers. However, the group you create remains static; you need to use the refresh group activity to reapply the logic and generate an up-to-date subset of the list.
For example, if you create a group of subscribers whose birthday is today and send them a happy birthday message, you should refresh the group tomorrow to get the new subset of subscribers who should receive the birthday greeting.
You have to set up your group separately before you can use it as part of an activity. See Chapters 8 and 11 for more information about groups.
Because of the simplicity of this activity, you do not create a stand-alone refresh group activity. Instead, you specify the details of the activity directly in the automation. See the procedure for creating an automation in the following section.
To create a refresh group activity, use the following steps:
- From the Automation Studio Overview screen, create or open an automation, and then click the Workflow tab.
- Drag the Refresh Group activity from the Activities list to a step on the automation canvas.
- Click the Choose button, select the group you want to refresh, and then click Done.
SQL query activity
The SQL query activity is similar to the filter activity: Both create a subset of records based on logic that you've set up. The SQL query activity must be used with data extensions, though; you can't use it to filter subscribers in a subscriber list. The SQL query activity can filter any data extensions, not just those that contain subscriber records.
Before you begin, make sure you have nearby the name of the data extension you're going to query. You can't easily look up the name of a data extension when you're creating the activity.
You have to set up your data extensions separately before you can include them in this activity. See Chapter 6 for more information about data extensions.
To create an SQL query activity, use the following steps:
- From the Activities screen, click the Create Activity button, near the top right of the screen.
-
In the Create New Activity window that appears, select SQL Query, and then click Next.
The Create New Query Activity window appears.
-
Complete the information on the Properties tab, and then click Next.
Specify a name, description, and storage location for the activity. Also enter the SQL of the query.
-
Complete the information on the Target Data Extension tab, and then click Next.
Choose the data extension where you want the system to put the results of the query. You can choose to add, update, or overwrite the information that's already in the data extension.
- Review the information on the Summary tab, and then click Finish.
Send email activity
Use the send email activity to automatically send an email that you've created previously. See Chapter 11 for information about creating emails.
To create a send email activity, use the following steps:
- From the Activities screen, click the Create Activity button, near the top right of the screen.
-
In the Create New Activity window that appears, select Send Email, and then click Next.
The Create New Send Email Activity window appears.
-
Complete the information on the Choose & Configure Email tab, and then click Next.
Select the email message you want to send, specify the subject line, and select the sender and delivery profile.
-
Complete the information on the Choose Recipients tab, and then click Next.
Choose the lists and groups to which you want to send the message.
- Review the information on the Summary tab, and then click Finish.
Wait activity
The wait activity tells Marketing Cloud to wait for a period of time before proceeding to the next step in an automation. Because this activity makes sense only in the context of an automation, you can't create a stand-alone wait activity. See the procedure for creating an automation in the following section.
To create a wait activity, use the following steps:
- From the Automation Studio Overview screen, create or open an automation, and then click on the Workflow tab.
- Drag the Wait activity from the Activities list to a step on the automation canvas.
-
Complete the Wait window that appears, and then click OK.
Specify an amount of time to wait or a time of day to resume the automation.
Creating an Automation
You can include all the activities described in the preceding section in your automation. The editor view, where you create or edit automations, offers a drag-and-drop interface to add activities to steps in your automation.
The edit view of a scheduled automation appears in Figure 10-7.

FIGURE 10-7: Tabs on the edit view provide an almost wizard-style path to creating your automation.
Use these steps to create an automation:
- From the Automation Studio Overview screen, click the New Automation button, near the top right.
- In the Create Automation window that appears, select one of the following, and then click OK:
- Scheduled: As the name implies, this automation will run on a recurring basis using a schedule you’ll define. Or not; you’ll want to select this option also if you need to create an automation that you'll start manually by using the Run Once function. You’ll likely use this option frequently.
- File Drop: This kind of automation starts when a file is added to a designated folder on your Enhanced FTP location. This is a great option if you need to bring in data from an external location that isn’t being posted on a reliable schedule.
-
For a file drop automation, click the Trigger Setup button on the Workflow tab.
Complete the Trigger Setup window that appears and click Save.
This window is where you:
- Indicate the location where adding a new file triggers the automation. You can specify a file-naming pattern so that only a new file that matches the pattern initiates the automation.
- Have the option to Disable Queuing. If you select this check box and the automation is already running when another new file is dropped in the folder location, then Marketing Cloud stops the current instance of the automation and starts working on the new instance of the automation instead.
-
On the Workflow tab, drag the kind of activity you want from the Activities pane on the left to the canvas. The activity appears in Step 1. You can drag additional activities into Step 1 to instruct Marketing Cloud that it can work on both activities at the same time. You can drag activities into subsequent steps to indicate that Marketing Cloud needs to complete all the activities in the previous step before moving on to the next one.
 Activities that need to be run sequentially, such as a file extract and file transfer for the same data, should not be placed in the same step. All activities within a step are run at the same time, not in any sequence.
 - Click the Choose button on the activity (Configure on the Send Email activity) to set up the specific information about that activity. If you have created reusable activities, you can select the arrow next to this button and choose the activity you created. See the procedures for creating different types of activities in the previous section.
- For a scheduled automation, click on the Schedule tab and indicate when you want the automation to run. You can choose the date and time and how often the automation repeats, if at all.
- Click Save. If you have not given a name to the automation, the Save Automation window appears to prompt you to add a name, include an optional description, and choose the location in the folder structure where you want to store the automation.
If you're creating a complex automation, it is a good idea to incrementally save the workflow as you are constructing it. We have created workflows that contained 100 or more steps, and the last thing you want is to have to start over due to a time-out or connection problem.
Error Reporting
After you save an automation in Automation Studio, you have the option to go to the Activity tab and enter notification email addresses. You can enter a separate list of email addresses to receive notification if the automation fails or is skipped versus if the automation completes successfully.
The “set it and forget it” nature of some automations makes it particularly important for you to set up a notification email address; otherwise, you might never notice that the automation failed. The notification email tells you the step that was running when the error occurred. You can find more specific troubleshooting information by opening the automation in Automation Studio and reviewing the step mentioned in the notification email.
The successful completion email notifications are useful when running “one-time” ad hoc automations or for monitoring new or mission-critical automations.