
Chapter 8
Audience Builder and Contact Builder
IN THIS CHAPTER
![]() Creating database table relationships
Creating database table relationships
![]() Making contact data available across apps
Making contact data available across apps
![]() Segmenting audiences with sophisticated logic
Segmenting audiences with sophisticated logic
Contact Builder and Audience Builder, the apps that appear under the Audience Builder category on the app switcher, are the future of the data model for keeping and finding information about the people who are the target of your marketing campaigns.
The first app we talk about in this chapter, Contact Builder, is still a young addition to Salesforce Marketing Cloud, but it's important to get the most out of Journey Builder. You can read more about Journey Builder in Chapters 10, 16, and 17.
Marketing Cloud designed Audience Builder to handle the variety and complexity of contact data. Even if you have millions of contacts and manage hundreds of attributes about each one, Audience Builder can tell you, in real time, how many of your subscribers meet the filter criteria you set up. Marketers use Audience Builder to investigate the composition of their subscriber lists, analyze customer behavior, and create lists for sending marketing messages.
Contact Builder
Contact Builder is the data hub of Marketing Cloud, through which data moves back and forth between other apps, as well as back and forth with other integrated systems, such as your customer relationship management (CRM) system. Through Contact Builder, you have a single, centralized place where you can see all the data you have about each person in your database.
Contact Builder is not just a viewing tool, though. It includes tools that you can use to create and manage the sophisticated database structures that you design when you imagine your data model (see Chapters 5 and 6).
 At the time of this writing, Marketing Cloud had not yet fully integrated Contact Builder into all the Marketing Cloud apps where it will eventually be useful. Its primary practical use is to create attribute groups that Journey Builder (Chapters 10, 16, and 17) uses. Mobile Connect (Chapter 12) also uses Contact Builder for list management. Plus, you can use it as an alternative method to create data extensions (Chapter 6) that you use in your Email app (Chapter 11).
Menus
You open Contact Builder by pausing your mouse pointer on the Audience Builder category in the app switcher and choosing Contact Builder. Contact Builder appears, open to the first menu option: Data Designer. The other menu options are All Contacts, Data Sources, Data Extensions, Imports, and Contacts Configuration.
Data Designer
Data Designer contains a visual representation of all your attribute groups. Each attribute group appears as a spoke off the center Contacts hub, as shown in Figure 8-1. From this screen, you can create new attribute groups.

FIGURE 8-1: Attribute groups appear as spokes off the Contacts hub.
By default, Data Designer shows you attribute groups, but you can switch to see events and populations by clicking the links in the white toolbar near the top of the screen.
The events view is where you can define an event data extension for the Marketing Cloud API to use. The API is a set of developer tools that programmers can use to make Marketing Cloud functionality available to external systems. The API is outside the scope of this book.
The Populations view is where you can associate a master data extension that holds a very large number of a particular type of contact to the All Contacts list. For example, you could create a data extension of all customers and another one of all prospects, and then set up each as a population to make the columns in the data extension available to Journey Builder. Salesforce recommends that you create no more than two or three populations. In any event, now that audiences are the recommended journey entry method, the concept of a population is less significant.
All Contacts
The All Contacts screen, shown in Figure 8-2, displays all the contacts in your account. You can search for a particular contact or filter the entire population using the filter options on the left.

FIGURE 8-2: All the contacts in your account appear in a single, massive list on this screen.
You can click the Contact Key value to see more details about a contact, including all the messages you sent the contact up to the past 365 days. For each message, you can see whether the contact opened or clicked any links in the message. This view of data is much more robust than the one you get by looking up a subscriber’s history using the properties available from the Email app's All Subscribers list.
Data Sources
You can use data sources when integrating Marketing Cloud with other Salesforce platform accounts, such as Service Cloud. However, integrations are outside the scope of this book, so we'll skip this menu.
Data Extensions
The Data Extensions screen is similar to the screens you use to work with data extensions in the Email app. You can access existing data extensions, build new ones, and import or export data.
Looking at a list of data extensions through Contact Builder versus Email differs somewhat. If you're accustomed to using the Email app to manage data extensions, you'll immediately notice that the number of rows doesn't appear next to the name of the data extension. You have to use the detail view of the data extension to see the row count.
However, there are advantages to accessing data extensions through Contact Builder. From the record view tab, you can search in the data extension as long as the data extension has a primary key value set (see Chapter 6). Additionally, you have to view your data extensions through Contact Builder if you want to
- Edit a selected row.
- Clear (delete) a selected row.
- Manually add additional rows.
These options can be tremendous time-savers when creating data for testing.
Imports
The Imports screen offers identical functionality to the Import File activity available in Automation Studio. See Chapter 10 for information about the Import File activity and Automation Studio.
Contacts Configuration
The Contacts Configuration menu contains some configuration settings that control how the system deals with contacts that have more than one email address. At this point in your experience with Marketing Cloud, it's probably best to use the default settings. Even after you're very experienced, you'll almost always use the defaults here anyway.
Contacts
The concepts we talk about in this section rely heavily on the relational data model concepts introduced in Chapter 6. If you're not already comfortable throwing around terms like data extension and primary key, you should review that chapter before you proceed.
Contact Builder is, intuitively enough, where you build contacts. In this context, a contact is a person whom you keep data about. It might be a person who has subscribed to your emails, someone who receives your SMS messages, or a prospect who doesn't receive any communications from you.
Marketing Cloud parlance refers to making the contact the central concept of your database design as using a contact model or a person model. As opposed to thinking about your data as a bunch of channel-specific lists that contain people, you think of it as a bunch of people with whom you communicate in various ways.
In a person-model data structure, each person has a row in the All Contacts list. That row contains a unique identifier, the Contact Key, for the person. Other fields, called attributes, in the All Contacts list contain demographic information and contact information.
You may have data extensions that contain information about the person, such as which lists they have subscribed to or what orders they have placed. In those data extensions, a Subscriber Key identifies the person. For the system to know that the Subscriber Key in the Orders data extension is the same as the Contact Key in the All Contacts list, you need to create a relationship between the two.
Relationships and cardinality
Data Designer is the feature in Contact Builder where you create relationships between data extensions. An attribute group is the result when you create relationships among multiple data extensions.
When you create an attribute group, you choose a data extension that contains the Contact Key field or another data field that matches a value in the Contacts list. You indicate which fields correspond to each other in each data extension and set the cardinality.
The cardinality of the relationship is a description of how many of the values you can expect to find in that data extension. In Marketing Cloud, the cardinality can be one to one, one to many, or many to many.
In a one-to-one relationship, a single row of data in one data extension corresponds to a single row of data in another data extension. For example, if you created a separate data extension to contain your contacts' email subscription preferences, it would have a one-to-one relationship with the All Contacts list. The All Contacts list and the Email Subscriptions data extension each contain no more than one row for each contact.
In a one-to-many relationship, a single row of data in one data extension corresponds to one or multiple rows in the other data extension. For example, in a data extension that contains an order history, the contact may appear many times, depending on how many times the contact ordered from you.
In a many-to-many relationship, you can match on multiple instances of data occurring in both data extensions. For example, your order history data extension containing the details of multiple orders for a contact could be matched to a data extension that contains more details about the items included in each order.
You can add more than one data extension to your attribute group. For example, your Orders data extension can connect back to the Contacts data extension using the Contact ID but also connect to a ZIP code look-up table using a ZIP code value. If you needed any fields from the ZIP code look-up table to use in your Journey Builder journeys, you would need to make sure to include the data extension in an attribute group this way.
Creating attribute groups
To link data extensions in an attribute group, you must first establish a one-to-one relationship between the Contacts data extension and your data extension. From there, you can add additional data extensions as you need them.
 You must add a data extension to an attribute group before the data in that data extension is available to Journey Builder's filters as contact data.
Use the following steps to link data extensions:
-
In Data Designer, click Create Attribute Group.
You can click either the button on the top right or the Create Attribute Group spoke on the data map. The Create New Attribute Group window appears.
- Name your new attribute group and choose an icon to represent the attribute group on the data map.
-
Click Create.
A workspace appears with the Contacts data extension already available on the left side of the workspace.
-
Click Link Data Extension.
The Link Data Extension window appears with your Contacts fields on the left (under the Customer Data heading) and a navigation tree on the right.
You can create a new data extension from this screen if the one you want to link doesn't exist. Click Create New Data Extension instead of Link Data Extensions. -
Navigate to the data extension that you want to link and click it.
A list of the columns in that data extension appears on the right.
- Click the fields from each list that correspond to each other.
-
Select One in the drop-down list next to the name of each data extension.
The system doesn't restrict you from using a one-to-many relationship, but the initial mapping of a data extension to the contact record should always be a one-to-one relationship. A typical use case would be to link the email address or subscriber key from your data extension to the Contact ID field in Contacts.
-
Click Save.
The screen shows a representation of the data extension with a linked path connecting it to Contacts.
You can add an additional data extension to the attribute group by clicking the link icon with a plus sign that appears on the right side of the data extension and then repeating the mapping sequence just described.
After you add a data extension to an attribute group, you can no longer edit the data extension in the Email app. You must make any updates, including adding fields, from the Data Extensions link in Contact Builder. If a data extension is part of an attribute group, it must be removed from that attribute group to delete a field. This can have consequences to your data model, especially if Journey Builder is using the data extension, so deleting fields isn’t recommended.
Audience Builder
Audience Builder starts with your entire population of contacts for a channel. You add filters to limit that population based on the contacts' attribute values and ultimately build an audience. For example, you can create a filter to cut the population of all the contacts for whom you have email addresses to only the contacts who live in Indiana.
You might use Audience Builder for data analysis, in which case the audience you build might never leave Audience Builder. However, if you want to send a message to an audience, you need to publish the audience. Some Marketing Cloud users like to use the feature in Audience Builder that shows a real-time count of contacts that satisfy the filter criteria to continue filtering only until the audience contains the desired number of subscribers to receive a particular email promotion.
Audience Builder deals with contacts, not subscribers. Whereas a subscriber has made a point of indicating a willingness to receive messages from you, a contact can be anyone about whom you have contact information. Whenever you create an audience that you intend to use for sending, make sure to include filter criteria to limit the list to only those people who have said they want to receive messages from you.
When you publish your audience, Marketing Cloud takes a snapshot of the data for the contacts in the audience at that moment and puts it in a data extension for you to use for sending. See Chapter 6 for more information on data extensions.
Because the published audience is just a snapshot of the contact data, any updates to the contact after you publish don't appear in the data extension with the audience data. You need to update your audience if you want to have the latest data.
Audience Builder requires substantial setup initially, but Marketing Cloud has a special team dedicated to configuring the data. You can choose among a variety of dimension packages that make specific contact attributes available to use in Audience Builder. In addition, your own contact attributes appear in Audience Builder. The experience of using Audience Builder is specific and personalized for each account.
Dashboard
You get to Audience Builder by clicking Audience Builder from the app switcher. The first screen you see is the dashboard, shown in Figure 8-3.

FIGURE 8-3: The dashboard offers an overview of the audiences you've already created.
On the Audience Builder dashboard, you see all your existing audiences. For each audience, you see the following:
- Name of the audience
- Number of subscribers in the audience
- Date and time of the last update of the contact data in the audience
- Date and time the audience was published
- Date and time of the most recent changes to the filter rules that define the audience
- User who created the audience
An Actions column also appears on this screen. This column contains buttons you can use to edit the audience or create a copy that you can modify without affecting the original.
Audience workspace
When you create a new audience or open an existing audience to edit, you see several tabs, as shown in Figure 8-4.

FIGURE 8-4: The tabs take you through the steps to create an audience.
The following tabs contain tools you use to create your audience:
- Summary: Information about the audience itself, such as its creation date and who created it. You don't use this tab when creating an audience; the system populates it with information about the audience. You can refer to it later when you need a quick overview.
- Filter: The canvas where you create the audience. This tab is the most important one because this is where you define the filter criteria that narrow down your entire population to just the contacts whom you want to target. The attributes that you set up in your particular account appear in the Attribute Library on the left, and you drag them into the work area on the right to filter based on that attribute.
- Exclusions: The canvas where you choose contacts to leave out of the audience. For example, you could create a filter that includes all contacts in Indiana, and then create an exclusion to suppress all contacts with an email address that matches your competitor's company name.
- Segments: The canvas where you divide the audience into subsections. You can use the segments for things such as A/B testing.
- Publish: The tool to take a snapshot of the data for the contacts in the audience, put it in a data extension, and make the data extension available for other apps to use. For example, you might publish an audience so that your email app can send an email using the email addresses in the published audience data extension.
The tabs act as a wizard to take you through each step of the process of creating an audience and making it available for apps in Marketing Cloud to use.
The Filter, Exclusions, and Segments tabs use a canvas where you can drag attributes from the Attribute Library on the left into the workspace on the right. Some attributes are preconfigured, but usually the Edit Criteria window appears.
Although the fields in this window may vary depending on the nature of the attribute you select, generally you enter the value that you want the attribute to equal. For example, to filter your audience to include only contacts in Indiana, you drag the State attribute to the workspace and use the Edit Criteria window to indicate that State must equal IN for a contact to be included in the audience.
When you save the Edit Criteria window, Audience Builder immediately applies the filter to let you know how many contacts met the criteria. While the system is calculating, an updating icon appears next to the count on the Filter tab. When the calculation is complete, the updated number appears and a green check mark replaces the orange updating icon, as shown in Figure 8-5.
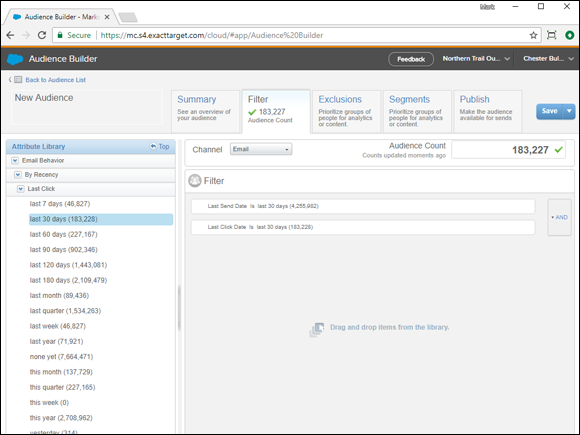
FIGURE 8-5: The system has calculated the number of contacts in your audience.
When you add more than one attribute to the canvas, an AND button appears to the right of both attributes to indicate that only contacts who match both criteria appear in the audience. You can click the AND button to change it to OR or INC (includes).
You can reorder the attributes on the canvas. Click an attribute and drag it to the new position in the list. Reordering is particularly relevant on the Segments tab because the system adds the contact to the first segment for which the contact qualifies. For example, if you created one segment for all email subscribers and a second for only email subscribers in Indiana, none of the contacts would make it to the Indiana segment because they all already qualified for the first segment. Instead, move the more restrictive segment to be first so it can contain some contacts and the rest can end up in the all-subscribers segment.
Creating an audience
Use the following steps to create an audience:
-
From the Audience Builder overview screen, click the Create Audience button.
The Audience Builder canvas appears with the Filter tab open.
- Click the words Untitled Audience (in the upper-left corner) and type a name for your audience. Then click Done.
-
Select the channel of contacts that you want to start with.
Choose a value from the Channel drop-down menu near the top of the screen.
-
In the Attribute Library on the left, navigate to the attribute you want to use in your filter.
You may need to open multiple categories to find the attribute that you want. The exact attributes and attribute categories that you see in the Attribute Library vary depending on your Audience Builder configuration.
-
Click the attribute in the Attribute Library and drag it to the workspace on the right side of the screen.
If a number in parentheses appears next to the attribute name, the attribute is preconfigured and you can skip to Step 8. The number indicates how many contacts satisfy that filter. - Complete the Edit Criteria window that appears, and click Done.
- Repeat Step 6 for as many filter criteria as you want to add to the audience.
- Click the Exclusions tab.
-
In the Attribute Library, click each attribute that you want to exclude from the audience, and drag the attribute to the workspace. Click Done.
You may need to click the Refresh button that appears above the workspace, on the right side of the screen, to see the updated audience count after applying your exclusion. The number of contacts excluded by the exclusion criteria that you added appears on the right side, as shown in Figure 8-6. - Click the Segments tab.
-
Click the New Segment button.
The Segments workspace appears with the Segments tab open, as shown in Figure 8-7.
- If you want to name your segments, click in the field and replace Segment 1 with the name you want to use.
-
As in the Filter and Exclusions tabs, click and drag each attribute from the Attribute Library to the workspace and complete the Edit Criteria window, if applicable.
You may need to click the Refresh button to see how many contacts from the audience qualify for this segment. The number of contacts in the segment appears on the Segments tab.
-
Click Done after you've finished defining the first segment.
Alternately, if you want another segment, repeat Steps 11–14.
-
Click the Publish tab.
A summary of the audience definition appears, as shown in Figure 8-8.
- Complete the fields on the Publish tab.
- Save Location: Choose the folder where you want to save the audience.
- Save Behavior: Select the option of overwriting the records in existing data extensions or generating new data extensions.
- Tracking Code: Enter a value to use to track this audience. When the system generates the data extension with the audience, this value appears in a column in the data extension.
- Publish Activity: Select this box to create a publish activity for the audience. Later, you can schedule the publish activity by adding a Publish Audience activity to a step in Automation Studio. (See Chapter 10 for details on Automation Studio.) Each time the automation runs, the system will republish the audience.
- Segments to be published check boxes: If you've created multiple segments as part of the audience setup, you use these boxes to select which ones to publish.
- Attributes to be appended: Choose which contact attributes you want the system to include in the data extension.
- Click Save and Publish.

FIGURE 8-6: The number of contacts excluded by a filter criterion can give you an idea of whether your exclusions are too restrictive.

FIGURE 8-7: The Segments workspace is a mini-dashboard, where you can see the list of segments you already created, edit the segment definitions, and create new segments.

FIGURE 8-8: Check the details of your audience definition before publishing it.
Together, Contact Builder and Audience Builder give you control of all the data you store about the people with whom your brand communicates online. Contact Builder is where you put the data in; Audience Builder is where you get the data out. With this information safely stored but easily available, you are ready to focus on excellent, targeted marketing communications that get measurable results.