
Chapter 4
Dashboard Tools
IN THIS CHAPTER
![]() Seeing your past and future scheduled marketing activities
Seeing your past and future scheduled marketing activities
![]() Managing your marketing campaigns
Managing your marketing campaigns
![]() Evaluating your online marketing efforts
Evaluating your online marketing efforts
Although apps are powerful, flexible, and customizable components of functionality in Salesforce Marketing Cloud, they rely on the foundation of the Marketing Cloud platform. For users of Marketing Cloud, the dashboard tools make up the core functionality of the platform.
Calendar, Campaigns, and Playbooks are the dashboard tools. They are available in every Marketing Cloud account, regardless of which apps you've licensed. You access any one of these tools from any screen in Marketing Cloud by choosing its name from the toolbar.
In this chapter, we focus on the Calendar and Campaigns tools. Salesforce Marketing Cloud has added features to the Journey Builder app that make some of the functionality of Playbooks redundant. You can find more details about Journey Builder in Chapter 10.
Using the Calendar
The Calendar tool provides a view of your scheduled marketing activities. A calendar ribbon, including just the current week, appears on the dashboard, as shown in Figure 4-1.

FIGURE 4-1: The calendar ribbon on the dashboard shows just the current week.
When you pause your mouse pointer on the calendar ribbon, arrows appear on the left and right ends of the ribbon so you can change which week is displayed. You can also click the Fullscreen link in the upper right of the ribbon or click Calendar from the toolbar to open the Calendar tool and see the entire month, as shown in Figure 4-2.

FIGURE 4-2: The Calendar tool shows the full month, plus it includes filters.
Pause your mouse cursor over an event on the calendar, as shown in Figure 4-3, to see more information about that event, including the event type and its scheduled time. For past email-sending events, you also see whether the event ran successfully and you can click the event name to go to tracking details. For future email-sending events, you can click the event to edit the parameters.

FIGURE 4-3: Drill down to event details through the calendar.
Calendar event sources
The events you see on the calendar come from two sources:
- Other apps in Marketing Cloud: For example, if you use the Email Studio app to schedule an email to be sent on a specific date, that email send appears automatically on the calendar. The following types of events from other apps appear on the calendar:
- User-initiated sends through the Email app (see Chapter 11 for full details).
- Guided user sends through the Email app (see Chapter 11).
- Sends through Content Builder (see Chapter 7).
- Programs (see Chapter 16).
- Automation Studio programs (see Chapter 10).
- Sends scheduled through the API. A developer can use the API to initiate a send that you create in Marketing Cloud. API sending is outside of the scope of this book.
- Scheduled MobileConnect events (see Chapter 12).
- You: You can create an event in your calendar so that you see it in the schedule alongside your automated activities. For example, you might add a trade show to the calendar, even though you attend trade shows in person rather than online.
Creating a calendar event
Many events on the calendar appear automatically when you create and schedule a marketing activity from a Marketing Cloud app. However, you can also create events directly on the calendar.
Events that you schedule in the calendar don't cause anything to occur in Marketing Cloud. Instead, they serve as reminders to your team that an event is happening — or needs to happen — on a certain date. For example, you might add an event to the calendar to represent the date you're sending a brochure in the mail. You include this event on the calendar, even though it's done entirely outside Marketing Cloud, so that everyone on you team knows about the brochure.
 You must have the Create and Edit permission for the Calendar to schedule an event.
To schedule an event in the calendar, follow these steps:
-
Move your cursor to the day for which you want to schedule an event.
The window in Figure 4-4 appears, prompting you to add a campaign or an event.
-
Select Add Event.
A new window appears, asking for details about the event.
-
Add the details and then click Save.
The event is saved on your calendar.
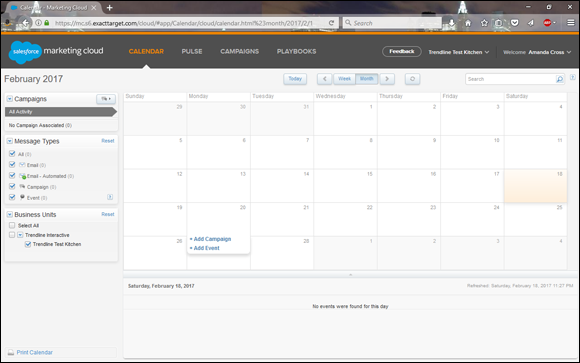
FIGURE 4-4: Add an event.
Managing Campaigns
A key to a successful marketing campaign is keeping track of the components that make up your campaign. Salesforce Marketing Cloud includes a dashboard tool intuitively called Campaigns, where you can group the email, mobile, social, and other marketing efforts related to the same campaign.
By grouping the campaign components in the Campaigns tool, it's easier to plan, execute, and measure the various kinds of efforts all in one place. For example, by associating multiple email sends with a campaign, you can easily review the performance of all the emails, as shown in Figure 4-5.

FIGURE 4-5: Separate email sends brought together in a campaign.
Campaign associations
The process for creating a campaign has two distinct phases. First you must define the campaign itself, and then you must select the associations (email, mobile, social, and other marketing efforts) that belong to the campaign.
You have to create the associations in the appropriate Marketing Cloud apps before you can add them to the campaign. You can add the following association types to your campaigns:
- From Email Studio (see Chapter 11):
- Email: A regular email that you create and send to a list of subscribers
- Triggered send: An email that Marketing Cloud sends automatically in response to a subscriber action, such as completing a support form
- From Mobile Studio (see Chapter 12):
- Mobile message: An SMS (text) message
- Push message: A message sent to subscribers through a mobile app
- From Social Studio (see Chapter 13):
- Twitter update: A tweet sent from your corporate Twitter account
- Facebook update: A status update added to your Facebook page
- Facebook tab: Facebook fan pages managed through the SocialPages app
- From Web Studio (see Chapter 15):
- Sites: Collections of website pages hosted through your Marketing Cloud account
- Landing page (email): A single website hosted through Marketing Cloud
- Audiences (see Chapter 6):
- Subscriber list: A collection of email subscribers
- Subscriber group: A filtered subset of a subscriber list
- Data extension: A collection of email records stored in a configurable data table
- Other content:
- Automation: A series of tasks performed in sequence (see Chapter 10)
- Event: A calendar event that you created using the steps in the “Creating a calendar event” section, earlier in this chapter
 You can add associations to a campaign from the Campaigns tool (described later in this chapter) or from the app where the association was initially created. For example, you can add an email as an association to a campaign from the Email app. See the chapter on the relevant app for details.
Touring the campaign screen
Like the calendar, the Campaigns tool has a ribbon view that appears on the Marketing Cloud dashboard. To open the full Campaigns tool, shown in Figure 4-6, select a campaign name from the ribbon or choose Campaigns from the toolbar and then click a campaign.

FIGURE 4-6: The details of a campaign.
The Campaigns tool is divided into three horizontal sections:
- The top section shows the information you entered when you created the campaign: The name, description, campaign code, tags, deployment date, campaign owner, and campaign status. To edit any of these details, select the pencil icon on the right side of the screen. (You need the Create and Edit permission for Campaigns to see the pencil icon.) You can delete the campaign by selecting the trash can icon, which appears next to the pencil. (You need the Delete permission for Campaigns to see the trash can icon.)
- The center section consists of the storyboard, which displays the number of each type of association added to this campaign.
- The bottom section displays a summary of each association in the campaign. You can filter the associations by type by using the category list on the left side of the section. Three columns appear for each association:
- Summary: Displays the association name, the group it belongs to (such as Mobile), and the type (for example, Mobile Messages). Additional association-specific information, such as the subject line of an email, may also appear.
- Details: Contains viewable or actionable information, such as counts of sent messages for an email or the number of subscribers in a list, along with links to view more information or quickly access an action (such as set up an email send) in the appropriate app.
- Actions: Enables you to jump directly to the association's details in its app by selecting Go To. For example, if you select Go To for an email association, you'll go directly to the message edit view in the Email app. (Unfortunately, when you're finished, you must navigate back to the Campaigns tool through the toolbar.) To remove an association from a campaign, select the chain link icon next to Go To.
Creating the campaign
Before you can associate marketing activities to a campaign, you have to define the campaign itself. You provide just a small amount of information in the Create Campaign dialog box, shown in Figure 4-7, so that Marketing Cloud has something to add associations to.

FIGURE 4-7: Defining a campaign gives Marketing Cloud an umbrella to put your marketing efforts under.
You need the Create and Edit permission for Campaigns to perform this procedure.
To define a campaign, follow these steps:
-
On the toolbar, select Campaigns.
The Campaigns tool appears.
-
In the upper-right corner of the Campaigns tool, select Create Campaign.
The Create Campaign dialog box opens (refer to Figure 4-7).
- Complete the following fields:
- Name: Enter the name of your campaign. Choose a name that is unique and lets a user know right away what the campaign is about.
- Description: (Optional) Describe your campaign, including its intent.
- Calendar Color: Use the color picker to assign a color to the campaign. Items in this campaign appear in this color on the calendar. Colors are a good way to create a visual link between similar types of campaigns.
- Deployment Date: Assign a campaign start date and time. These dates determine where the campaign appears on the Calendar tool but do not affect the actual campaign deployment.
- (Optional) Complete any of the following fields:
- Campaign Owner: Assign a Marketing Cloud user as the owner. The owner is the only person who can make modifications to the campaign settings.
- Campaign Code: Assign a campaign code. Marketing Cloud does not assign campaign codes, but it provides this field so you can store a campaign code generated by another system you use, such as Aprimo.
- Tags: Assign applicable tags. You also can add tags to a campaign later if you need to.
- Click Create.
Adding associations to a campaign
After you've defined the campaign, it's time to add the associations.
You need the Associate permission for Campaigns to perform this procedure.
To add associations to a campaign, follow these steps:
- In the Campaigns tool, open the campaign to which you want to add associations.
-
In the storyboard section, click the down arrow next to the Add to Campaign button.
A drop-down list of associations appears, as shown in Figure 4-8.
-
Select the association you want to add, and then click Add to Campaign.
The system adds the association to your campaign. Repeat these steps for each association you want to add.

FIGURE 4-8: To see the association in this list, you must create it in the appropriate app.
Tagging a campaign
Tags are descriptive keywords that you add to your campaign to help categorize it. You can use tags on a campaign to filter the list of campaigns that appears in the Campaigns tool and the events that appear on the calendar. You can use the tags on a campaign also in the Reports app to retrieve analytics on multiple campaigns with the same tag.
For example, you might add tags to the campaign to identify the following:
- The marketing channels you use in the campaign, such as email, mobile, or web
- The campaign type, say, monthly newsletter
- The type of offer or content that the campaign promotes, such as one-day sales
Figure 4-9 shows a sample of tags that you might use in your campaign.

FIGURE 4-9: Tags on a campaign give you information at a glance.
To create a new tag to use in your campaigns, follow these steps:
-
Pause the mouse pointer on your username in the upper-right corner of the Marketing Cloud toolbar, and select Administration from the drop-down list.
A new window appears, listing several administrative options.
-
In the top navigation bar, select the Account drop-down menu and choose Tags.
The Tags overview screen appears, displaying any existing tags and the number of campaigns with those tags. There's also an option to delete each tag.
- Select Create Tag.
-
Type the tag's name and an optional description.
Tag names must be unique.