Chapter Ten
Process Tools for Facilitators

Imagine a carpenter trying to build a house without the proper tools. It would certainly be ineffective, if not altogether impossible! Fortunately for facilitators, there is a rich set of tools available to help them do their work.
Process tools allow facilitators to bring needed structure to complex decision-making conversations. These tools also increase the objectivity of discussions because they encourage people to think analytically about all aspects of an issue.
When you draw a chart, grid or graph on a flip chart, it signals that you've done your homework and that you have a clear plan for the meeting. Once the conversation gets going, process tools help you keep things on track. In this way, process tools are useful for avoiding common pitfalls like people repeating their favorite points or going off on tangents.
Process tools also help with decision-making. Instead of allowing a vocal few to dominate, tools like multi-voting and impact/effort grids ensure that everyone's opinions have been taken into account.
Since scores of process tools exist, it would be impossible to explain them all. Only the most commonly used tools will be highlighted in this chapter. This set represents the basic processes that every facilitator should know how and when to use. You'll find a detailed description of the following tools in this chapter:
- Visioning
- Sequential questioning
- S.W.O.T.
- S.O.A.R.
- Facilitative listening
- Appreciative review
- Brainstorming
- Written brainstorming
- Affinity diagrams
- Gap analysis
- Needs and offers dialogue
- Force-field analysis
- Root-cause analysis
- The five whys
- Gallery walk
- Multi-voting
- Decision grids
- Exit surveys
- Survey feedback
- Systematic problem solving
- Troubleshooting
In addition to these tools, all facilitators should learn the techniques associated with quality improvement such as process mapping, storyboarding, histograms, scatter diagrams, and critical path charts.
Visioning
What is it? A highly participative approach to goal setting.
When to use it? When members need to clarify their own thoughts and then share those ideas with each other to create a shared statement of the desired future.
What's its purpose? Allows people to put forward their ideas. Makes sure everyone is involved and heard from. Creates energy. Helps people to align. Gives people an interactive method to identify a group goal.
What's the outcome? The visioning process is very participative and energizes everyone in the room. It also creates buy-in because the group's direction is coming from the members themselves. Everyone is involved at once. All ideas are heard. This is a great way to conduct goal setting with a group.
How to Do Visioning
Step 1. Post a series of questions that relate to the task and ask how the final outcome ought to look at a future point in time. The vision questions will always be different, of course, depending on the situation.
Step 2: Ask each person to write down his or her own responses to the questions. Allow at least five minutes. Give more time if needed. Ask people not to speak to each other during this writing phase.
Step 3: Ask everyone to find a partner. Ideally, this is the person he or she knows least. Allocate three to five minutes for the first partner to share his or her vision. Ask the other partner to facilitate. After three to five minutes, ask the partners to switch roles so that the second person can talk.
Step 4: When time is up, ask everyone to find a second partner. Repeat the process outlined in Step 3, only allow slightly less time per person. Encourage people to steal any good ideas they heard from their last partners and incorporate these into their own visions.
Step 5: Repeat the process again with new partners. This time, limit the exchange to one to three minutes per person in order to encourage people to prioritize and share key points.
You can stop after only a few rounds or continue until everyone has spoken to everyone else.
Step 6: Ask people to return to their original seats, and then begin facilitating a discussion to pull the ideas together. You'll find that ideas have become fairly homogenized by this point. In a very large group, you can gather ideas by using the Gallery Walk method described later in this chapter.
Sequential Questioning
What is it? An assessment exercise in the form of a series of closed-ended questions, which are posed to the whole group at the start of a workshop.
When to use it? To uncover important information about the group, their issues, or their activities. To test and probe in a challenging manner. To raise issues and create awareness of shared needs.
What is its purpose? Yields information, lets you test assumptions, and engages people. Allows people to safely surface complex issues. Vents negative feelings and creates an obvious need to take action. Helps the facilitator anticipate the issues that might come up throughout the day. When done well, this technique creates a shared desire for change. It also acts as a group warm-up.
What's the outcome? Sequential questioning is a challenging technique that creates sparks. It raises issues and starts people talking about the barriers. It raises people's consciousness about what the important problems are. It sets the stage for problem solving and solution development.
Since there is potential for disagreement, if you plan to use sequential questioning, you have to be prepared to make interventions and manage differing opinions.
How to Do Sequential Questioning
Step 1: Analyze the overall topic and create five to ten questions working from macro to micro issues. Build questions around issues people identified in pre-workshop interviews. Pose the questions as closed-ended questions or items to be rated on a scale. Choose someone to answer yes or no to each item. Each question should probe the situation in a challenging way so that the ensuing discussion reveals honest information that is important to the issue at hand.
Step 2: Write each question at the top of a separate sheet of flip-chart paper.
Use the rest of the sheet to record reactions. Don't let people see the questions until you pose them. As you turn over each sheet, read the question, pause, then ask one person in the group to respond. Record that person's response.
Then, invite others to add their thoughts. Discuss people's reasons until you have recorded all comments. It's not always necessary to get agreement, but strive to create a summary statement that expresses key ideas.
Sample questions are offered on the next page, but remember that questions always have to be created to fit the particular situation.
A Sample of Sequential Questions
Topic: Business Improvement
Answer yes or no, then explain your response.
| yes or no | The overall business environment for the next five years is going to be advantageous for our business. |
| Rationale |
|
| yes or no | We are fully prepared to handle all the opportunities that will occur in the next five years. |
| Rationale |
|
| yes or no | Our current business development strategy is dynamic and flexible enough to respond to constant changes in the business environment. |
| Rationale |
|
| yes or no | Our business strategy should be developed by people at the higher levels. |
| Rationale |
|
| yes or no | Our staff are ready and motivated to overcome barriers. |
| Rationale |
|
| yes or no | We completely understand our customers' needs and wants. |
| Rationale |
|
| yes or no | We have an early-warning and performance-measurement system that lets us track our progress and make timely corrections. |
| Rationale |
|
| yes or no | There is a high level of harmony and cooperation that ensures synergy and teamwork inside our organization. |
| Rationale |
|
| yes or no | We have the best products on the market. We own the market in our field. |
| Rationale |
|
| yes or no | We have a fairly flawless delivery system for getting our product to our customers. |
| Rationale yes or no |
We often have creative business development discussions during our regular meetings. Better customer service is a topic we discuss all the time. |
| Rationale |
S.W.O.T.
What is it? A fundamental analysis tool useful at the start of strategic conversations. The letters stand for strengths, weaknesses, opportunities, and threats.
When to use it? To provide a framework at the start of a strategic planning activity. To gather data about the environment.
What's its purpose? To create a balanced picture of both the positives and negatives that need to be taken into consideration during the planning process.
What's the outcome? S.W.O.T. fosters a constructive, growth-oriented and possibility-focused understanding of the organization's potential.
How to Do a S.W.O.T. Analysis
Step 1: Circulate the questions associated with the four categories of inquiry to allow participants time to reflect and prepare.
Step 2: For groups of fewer than twelve individuals, facilitate a group discussion in which the questions are explored and discussed in depth. Record key ideas. In a large group, create small groups of three or four people. Allow fifteen to twenty minutes for discussion of the questions in all four categories.
Step 3: Create areas around the room where people can gather in small groups to share and record their ideas. Use the steps described in this chapter for the Gallery Walk process to encourage dialogue and to gather ideas.
A Sample S.W.O.T. Analysis
Strengths
- What are we doing really well?
- What are our greatest assets?
- What are we most proud of accomplishing?
- What makes us unique?
- What do our strengths tell us about our skills?
- How do we use our strengths to get results?
Weaknesses
- What aren't we doing well?
- What are our greatest liabilities?
- In what areas have we underperformed?
- What are our limitations in the areas of resources, staff, technology, and so on?
- What do our weaknesses tell us about ourselves?
- What are some of the reasons that we have not yet overcome our weaknesses?
Opportunities
- What are the most profound changes shaping our environment?
- What innovation out there inspires us to change?
- How can we make a difference for the organization and its stakeholders?
- What are the top three opportunities on which we should focus our efforts?
- How can we reframe weaknesses or threats so they become opportunities?
- What are our customers asking us to do?
- What synergies can we create with other groups?
Threats
- Who or what is our biggest competitor or danger?
- What is the competition doing that could harm us?
- What would be the worst thing that we could do?
- What threat have we underestimated or failed to consider?
- What threats do our weaknesses expose us to?
S.O.A.R.
What is it? A strength-based analysis tool useful at the start of strategic conversations. A more positive version of the well-known S.W.O.T. analysis. The letters stand for strengths, opportunities, aspirations, and results.
When to use it? To set a positive tone for planning conversations. At the start of strategic retreats. To reframe the current situation in positive terms in situations where issues of low morale need to be addressed.
What's its purpose? To create an upward spiral of thought, action, and behavior. To encourage creativity and out-of-the-box thinking. To guide strategic thinking toward the possible, without being hampered by the negatives.
What's the outcome? S.O.A.R. fosters a constructive, growth-oriented, and possibility-focused understanding of the organization's potential.
How to Do a S.O.A.R.
Step 1: Circulate the questions associated with the four categories of inquiry to allow participants time to reflect and prepare.
Step 2: For groups of fewer than twelve, facilitate a group discussion in which the questions are explored and discussed in depth. Record key ideas. In a large group, create small groups of three or four people. Allow fifteen to twenty minutes for discussion of the questions in all four categories.
Step 3: Create areas around the room where people can gather in small groups to share and record their ideas. Use the steps described in this chapter for the Gallery Walk process to encourage dialogue and to gather ideas.
A S.O.A.R. Sample
Strengths
- What are we doing really well?
- What are our greatest assets?
- What are we most proud of accomplishing?
- What makes us unique?
- What do our strengths tell us about our skills?
- How do we use our strengths to get results?
Opportunities
- How do we collectively understand outside threats?
- What are the top three opportunities on which we should focus our efforts?
- How can we reframe them to see opportunities?
- What is the organization asking us to do?
- How can we best partner with our customers?
- What synergies can we create with other groups?
Aspirations
- When we explore our values and aspirations, what are we deeply passionate about?
- What's our most compelling aspiration? Who should we become?
- How do we allow our values to drive our vision?
- How can we make a difference for the organization and its stakeholders?
Results
- Considering our strengths, opportunities, and aspirations, what meaningful measures would indicate that we are on track for achieving our goals?
- What do we want to be known for?
- How do we tangibly translate our strengths, opportunities, and aspirations?
Facilitative Listening
What is it? A technique for getting people to listen to each other and really hear each other's ideas. A way of teaching people effective listening skills.
When to use it? To ensure that people really understand each other in situations in which there are opposing ideas and people have a history of not hearing each other's views. As a key first step in mediating a conflict.
What does it do? Allows everyone to receive a fair hearing and feel understood by the “opposing side.” Circumnavigates conflicts by placing people in pairs and limiting their interactions to either presenting views or listening to understand.
What's the outcome? This structured approach to listening ensures that people listen to, comprehend, and acknowledge the opposing views of others. Because counterarguments are not allowed, people have an opportunity to hear each other's views. Feeling heard relieves tension and sets a positive tone for tackling issues together.
How to Do Facilitative Listening
Step 1: Announce that you will be asking participants to take part in facilitative listening. Tell group members that they will be selecting partners. Review the following rules:
- One person will be speaking and expressing his or her thoughts about the subject at hand.
- The second person will not be expressing any thoughts on the subject, but only doing the following things:
- Staying neutral no matter how he or she feels about what the other person is saying.
- Listening actively by maintaining eye contact and using attentive and open body language.
- Asking probing questions after each point made by the other person, to encourage the person to dig deeper.
- Paraphrasing what the first person is saying to help him or her clarify his or her thoughts.
- Summarizing what the other person has said to let the other person know that his or her ideas have been understood.
Step 2: Clarify the topic to be addressed. Then ask everyone to find a partner. It's important that people select a partner from the “opposing” group. Ask the partner pairs to spread out around the room so that they feel they have some privacy.
Step 3: Determine how much time is appropriate for the particular topic. Set a timer and have the pairs begin their conversations. After about ten to fifteen minutes, stop the action and have partners switch roles and repeat their conversations. This will allow each person a chance to speak as well as a turn being the facilitator.
Step 4: After both people have had turns to speak, ask everyone to find a second partner. Tell people to take what they learned from the first discussion and share it in the second session. Set the timer for the second session. When finished, you can ask group members to repeat with another partner if desired.
Step 5: If you are working with two individuals, ask each to make a short presentation back to the other person, summarizing his or her new understanding of the situation. Make sure these summaries are acceptable to both parties.
Step 6: If you're working with a group, gather up the comments by either facilitating a discussion (in groups under twenty) or use the Gallery Walk process (for groups over twenty), described later in this chapter.
Appreciative Review
What is it? A positive discussion about the past in which group members answer questions about recent events to explore all of the good things that have happened.
When to use it? When the morale of a group has sagged. Very useful during the midpoint check meeting of any project. When it supports the effectiveness of the team to remember all of the positive things that they have accomplished and to appreciate each other. Great at the start of a strategic planning meeting before looking forward. Should be part of any discussion to help restart a team that has fizzled out.
What does it do? It encourages group members to reflect on all that they have accomplished and all of the positive things that they have going for them. Also gives individual group members a feeling that they have contributed and are valued by others.
What's the outcome? Group members have an opportunity to reflect on the good things that have taken place. They also receive public recognition for their contributions. This lifts the spirits of the members and reenergizes them for the work ahead.
How to Use Appreciative Review
Step 1: Create a series of questions similar to the ones below:
- “Looking back over the last few months, what have we accomplished?”
- “What has been our greatest achievement? What makes us most proud?”
- “What outside factors helped us achieve those successes?”
- “What role did each of us play to achieve that?”
- “What lessons did we learn during our recent work?”
- “What excites us about the opportunities ahead?”
Step 2: If the group has fewer than six members, facilitate a discussion of all of the questions in the total group. If the group is larger, break the group into subgroups of three or four members. Ask these subgroups to answer the first three questions and make notes so they can share their answers with the larger group.
Step 3: Bring the members back together and ask each subgroup to share what they discussed while you record answers on a flip chart or electronic board.
Step 4: Pose the question about what each person contributed to the whole group. Allow a minute or two for quiet reflection. Invite each person to speak about his or her contribution to the success of the group. If someone is downplaying his or her role, invite others to point out what they've seen that person contribute. It's not necessary to record this conversation. What matters is that it takes place publicly.
Step 5: Ask group members to form new subgroups so that they get to talk to others in the group. Pose the remaining two questions. Ask someone in each subgroup to take notes.
Step 6: Bring the members back together again to share their answers to the last two questions. Record all comments at the front of the room.
Brainstorming
What is it? A synergistic technique that frees people to think creatively and generate innovative ideas.
When to use it? When it's advantageous to generate a free flow of creative ideas that are not bound by the usual barriers. To involve everyone. To create energy. To generate a wide range of potential ideas.
What's its purpose? Allows people to explore new ideas and challenge traditional thinking. Lets people put ideas on the table without fear of being corrected or challenged. It separates the creation of ideas from the evaluation activity.
What's the outcome? A wide range of creative ideas. Because brainstorming frees people from practical considerations, it encourages them to think creatively. It's also an energizing process that helps move people to take action. Because it's highly participative, brainstorming makes everyone feel that he or she is an important part of the solution.
How to Do Brainstorming
Step 1: Announce that you will be using brainstorming. Review the rules:
- Let ideas flow
- There are no bad ideas
- Be creative
- Think in new ways
- Build on others' ideas
- Break out of old patterns
- Keep discussion moving
- No evaluation until later
Step 2: Clarify the topic being brainstormed, then allow some quiet time while people think about solutions.
Step 3: Ask members to let their ideas flow. While you can brainstorm by going round-robin around the group, brainstorming is best done spontaneously with members offering ideas as they come to mind.
Step 4: Record ideas as they're generated. Do not discuss or elaborate on them. Keep it moving.
Step 5: When people have run out of ideas, generate additional ideas by asking probing questions such as:
- “What if money were no object?”
- “What would our competitors wish we would do?”
- “What's the opposite of something already suggested?”
Step 6: When the flow of ideas has stopped, explore each brainstormed idea in detail so that it's fully developed and clearly understood. Combine like ideas that are simply worded differently.
Step 7: Use a decision grid, affinity diagram, or multi-voting to sort the ideas.
Written Brainstorming
What is it? A private and individual idea-generation technique in which people write down their ideas, then pass them to other group members, who build on them.
When to use it? When people are reluctant to speak in front of others, or when there are outspoken members who might dominate a traditional brainstorming session. Also useful if the issue or topic is sensitive, since the initial idea-generation step is anonymous and private.
What's its purpose? The anonymity of this tool provides the freedom to encourage people to express their ideas.
What's the outcome? A lot of ideas are generated in a short time. It also allows people to learn others' ideas in an anonymous setting.
How to Do Written Brainstorming
Step 1: Clarify the topic or issue for which ideas will be generated. Explain the process to members.
Step 2: Give each person small slips of sticky paper. Ask members to work alone to they think of ideas that relate to the topic being discussed. Allow anywhere from three to ten minutes for the idea-generation step.
Step 3: Ask members to fold their idea slips and toss them onto the center of the table. (Slips should not have names on them.)
Step 4: Mix the slips and ask each person to take back as many as he or she tossed in. If anyone pulls out his or her own slip, that person can toss it back or exchange it with a neighbor.
Step 5: Each person now has three to five minutes to think of additional ideas based on the thoughts stimulated by reading the ideas picked from the pile. These new slips should be thrown into the middle of the table and then tossed and also distributed.
Step 6: Once all ideas have been distributed, ask members to read aloud all the ideas on the slips they drew from the pile.
Step 7: Discuss each idea so that it is fully understood. Do not try to find out who suggested each idea. Stick all the slips on a wall or on flip charts.
Step 8: Use a decision grid (page 209) or multi-voting (page 208) to sort the most effective ideas to fit the situation.
Affinity Diagrams
What is it? A tool for organizing ideas into common themes. A visual tool for organizing a large amount of information into themes so that the ideas are more manageable.
When to use it? When there are a lot of ideas being generated. This can be during problem analysis as a way of sorting all of the contributing factors. It can also be used to sort ideas after a brainstorming session.
What's its purpose? To draw out common themes from a large amount of information. To discover previously unseen connections between various ideas or information.
What's the outcome? Turns random ideas into coherent themes. Allows the best ideas to emerge naturally.
How to Use Affinity Diagrams
Step 1: Help the group write a clear statement of the topic or problem situation being discussed and the purpose of the discussion. Clarify whether the group is analyzing a problem, generating solutions, or simply listing the elements of an event or project.
Step 2: Set up a large wall space with flip-chart paper or divide the surface of a whiteboard into sections. Hand out sticky note pads and markers. Have large sticky pads on hand to create headings.
Step 3: Allow quiet time while group members write ideas on their sticky notes. Go around the group and invite members to read their ideas. After all ideas are read aloud, allow more quiet time during which people can write the additional ideas that occurred to them while they were listening to the suggestions of colleagues.
Step 4: Help group members identify the headings or categories that will fit the ideas generated. Some examples of header cards are human resources, training, budgeting, policies, culture, resources, and so on. Write the headings on the larger sticky notes and post these header cards on the wall or the electronic board.
Step 5: Invite group members to place each idea card in the category it most closely fits. Clarify the placement of any ideas that may be unclear or seem to fit in two places.

Step 6: Review and ratify the organization of ideas. Stick duplicate ideas over one another. Allow people to add any new ideas that come to mind. Facilitate a discussion to see whether any obvious themes are emerging. Which categories have the most ideas? What does that indicate?
Step 7: Rank ideas within each topic area. Hand out markers or multi-voting dots and allow members to select the three to five best ideas for implementation in each topic area. Review these ranking and ratify the results. Organize members to create action plans for the top-rated items.
Gap Analysis
What is it? A planning tool that lets groups identify the steps they need to take in order to achieve a goal.
When to use it? When a group needs to understand the gap between where they currently are and where they ultimately want to be.
What's its purpose? Gap analysis encourages a realistic review of the present and helps identify the things that need to be done to arrive at the desired future.
What's the outcome? Gap analysis creates a shared view of what needs to be done to eliminate the gap between the present state and the desired future.
How to Do Gap Analysis
Step 1: Identify the future state. Use a tool like visioning or any other approach that generates a picture of where the group wants to be at a specific time. The description of the future must be detailed. Post the information on the right-hand side of a large blank wall.
Step 2: Identify the present state. Describe the same components featured in the future state, only do so in present terms. Again, be very detailed. Post the ideas generated on the left-hand side of the wall workspace.
Step 3: Ask members to work with partners to identify the gap between the present and the future. Ask questions such as:
- “What are the gaps between the present and the future?”
- “What are the barriers or obstacles to achieving the future?”
Step 4: Once partners have finished their deliberations, share ideas as a total group and post the gaps between the “present” and the “future.”

Step 5: Once there's consensus on the gaps, divide the large group into subgroups. Give each subgroup one or more of the gap items to solve or develop an action plan.
Step 6: Reassemble the whole group to hear recommendations and action plans. Ask members to ratify the plans, then create a follow-up mechanism.
Needs and Offers Dialogue
What is it? A constructive dialogue between two parties to identify action steps they can take to improve their relationship. A positive and constructive dialogue that lets people express past and present concerns about the relationship in totally constructive terms.
When to use it? To encourage dialogue between parties to either resolve a conflict or improve relations proactively before problems occur.
What's its purpose? To vent concerns and resolve interpersonal issues in a low-risk manner. To negotiate a new, more positive relationship.
What's the outcome? An improved understanding of each other's views and feelings. Mutually agree to action plans that will enhance relations.
How to Do Needs and Offers Dialogue
Step 1: Clarify who will be the focus of the exercise. This can be a team and its leader, two subgroups of the same team, a team and management, or two individuals.
Step 2: Set a positive climate for the exercise by talking about the value of giving and receiving feedback. Make sure that the appropriate norms are in place to encourage members to speak freely and honestly.
Step 3: Explain the rules of the exercise. The two parties will be separated for a period of twenty to thirty minutes. During that time, each party will identify what he or she needs from the other party in order to be effective. This process is identical whether the parties are two individuals or a team and its leader.
Step 4: When each party has written its “needs list,” bring them back together to share their thoughts, one at a time. While one party is sharing his or her needs, the other must listen actively, then provide a summary of the other party's needs.
Step 5: Once parties have heard and acknowledged each other's needs, separate them again for twenty or thirty minutes while they consider what they're prepared to offer to the other party.
Step 6: Bring the parties back together and have them take turns sharing their offers. Allow for discussions or clarification. End the conversation by having members ratify what they have heard and make commitments to follow through.
Force-Field Analysis
What is it? Force-field analysis is a structured method of looking at the two opposing forces acting on a situation.
When to use it? When you need to surface all of the factors at play in a situation, so that barriers and problems can be identified.
What's its purpose? Clarifies the resources available the barriers or obstacles. Helps the group understand the forces acting on their work.
What's the outcome? Force-field analysis is a valuable tool for analyzing situations and identifying problems that need to be solved. It lets members look at both positive and negative forces at play.
How to Do Force-Field Analysis
Step 1: Identify a topic, situation, or project, for example: computer training.
Step 2: Help the group state the goal of the discussion: “All staff to receive training in the new operating system in three weeks.”
Step 3: Draw a line down the center of a flip-chart sheet. Use one side to identify all of the forces (resources, skills, attitudes) that will help reach the goal. On the other side, identify all the forces that could hinder reaching the goal (barriers, problems, deficiencies, etc.).

Step 4: Once all the help and hinder elements have been identified, use multi-voting or a decision matrix to determine which of the hindrances or barriers are a priority for immediate problem solving.
Step 5: Address the priority barriers using the Systematic Problem-Solving Model (page 215).
Variations of Force-Field Analysis
Force-field analysis has a number of variations. Each is used in approximately the same way as previously described.
These variations include:

Root-Cause Analysis
What is it? A systematic analysis of an issue to identify the root causes rather than the symptoms.
When to use it? When you need to delve below surface symptoms and uncover the underlying causes of problems.
What's its purpose? Leads to more complete and final solutions.
What's the outcome? Root-cause analysis enables groups to look more deeply at problems and to deal with the underlying causes. This often means that problems are more likely to be definitively resolved.
How to Do Root-Cause Analysis
Step 1: Explain the difference between causes and their effects to group members. For example, you can ask whether a noisy muffler is a cause or an effect. Once people have identified that it's an effect, ask them to list all of the causes. Point out that effects can't be solved, but underlying causes can.
Step 2: Use either of the two basic methods for identifying root causes: Cause and Effect Charting or Fishbone Diagrams.
Cause and Effect Charting
- To use this method, divide a flip-chart sheet in half and write Effect on the left side and Causes on the right.
- Example: Noisy Muffler.
- Effect: Noise and smoke when accelerating
- Causes: Corrosion, loose clamp, puncture
- Whenever anyone offers a point of analysis, ask whether it's a cause or an effect. Write each item in its appropriate column. Uncover underlying causes by asking “Why? Why? Why?” about each effect. Continue until all causes have been identified. Use a tool like multi-voting to rank causes.
Fishbone Diagrams
A fishbone diagram is a visual tool to identify and then sort all of the contributing causes for the situation being analyzed. The cause categories within fishbone charts vary, but usually include people, machinery/equipment, methods, materials, policies, environment, and measurement. The number of categories will vary by subject.
Start by placing the observed effect at the “head” of the fish. Determine the major cause categories, then ask members to brainstorm all of the possible causes to link to each “rib” of the fish.

Step 3: Regardless of which approach is used, once all of the root causes have been identified, apply multi-voting to identify which causes are the highest priority for resolution.
Step 4: Once you have identified all of the high ranked issues, refer to the process for Systematic Problem Solving on page 215.
The Five Whys
What is it? A simple technique for getting to the root of a problem.
When to use it? During the analysis step of problem solving.
What's its purpose? To uncover root causes layer by layer.
What's the outcome? Gets past symptoms to the deeper, underlying issues.
How to Do the Five Whys
Step 1: Clarify the symptom that's being explored to ensure that everyone is clear about what's being discussed.
Step 2: Ask the group: “Why is this happening?” Record all responses.
Step 3: Ask: “Why is this happening?” about either the original topic or about the newly recorded information.
Step 4: Repeat the last step three more times, each time recording all comments.
Step 5: Stop to review the notes. Ask members if they think the information generated reflects the root cause of the original issue. If there are multiple root causes identified, you can hand out voting dots and allow members to mark the three to five most significant root causes identified.
A Five Whys Example
Gallery Walk
What is it? A safe and participative means of engaging a large number of people in productive conversations about specific issues. A way of using the walls in a room to gain a lot of input from a large group in a short time.
When to use it? When you want to explore a wide range of topics with a large number of people and have little time to do it. To energize a group and bring everyone into the conversation. When there is a topic that people may not want to talk about in open conversation. When a large open space with useable walls is available and you have a group of at least twenty people.
What does it do? Creates a relatively safe and anonymous setting for conversation. Provides an alternative means of generating group synergy because people read and then build on each other's ideas.
What's the outcome? A large number of issues are explored. Group ideas are developed. Everyone participates and their ideas are added into the mix.
How to Do a Gallery Walk
Step 1: Set up the room by posting blank sheets of flip-chart paper in separate locations around the room. Electronic boards can also be used.
Step 2: Clarify the topic or series of topics to be discussed. Then divide the topic into segments or subtopics.
Step 3: Post one topic segment or subtopic at the top of its own flip-chart sheet.
Step 4: Instruct people to wander the room and gather at a flip chart that features a topic about which they have knowledge. Be clear that there must always be no fewer than three and no more than five people at each flip-chart. Once there, the participants discuss the topic and record their collective thoughts for a specified period, typically in the range of five minutes.
Step 5: At the end of five minutes invite everyone to wander to another flip-chart station, read what the first group has written, and confer with whomever else wandered there in order to add more comments to the sheet. This process can be repeated until all of the flip-chart sheets are filled. It is not necessary that each person visit each station.
Gallery Walk Variations and Applications
In planning exercises, the flip-chart topics can coincide with various key questions in the planning process, such as: What are the key consumer trends? What competitive forces do we face? What are our manufacturing strengths? What are our manufacturing weaknesses? What are the next technological innovations we need to prepare to adopt? and so forth.

In a problem-solving exercise, it's possible to solve a large number of problems by posting each in a different area and then having participants wander to first analyze each problem. When all of the problems have been analyzed by at least three sets of wandering visitors, have people retrace their steps to read the completed analysis sheets and then begin to brainstorm solutions. After everyone has wandered to at least three stations to add solutions, give everyone a colored marker and invite the participants to tour all of the sheets of brainstormed solutions to check off the three ideas they think should be implemented.

Multi-Voting
What is it? A priority-ranking tool that enables a group to quickly sort through a long list of ideas.
When to use it? After any idea-generating discussion.
What's its purpose? Rapidly establishes priorities in a participative manner. Allows a group to sort a great number of ideas without having to discuss and compare them.
What's the outcome? Multi-voting is democratic and participative. Since most members will see several items they favored near the top of the priority list, multi-voting tends to result in a sense of “I can live with it.”
How to Do Multi-Voting
Step 1: Clarify the items being prioritized. This may be a list of barriers from a force-field analysis or a list of ideas from a brainstorming session. Have members discuss each item to ensure everyone understands the choices.
Step 2: Identify the voting criteria to ensure that everyone votes with the same criteria in mind. Many situations benefit from voting several times, applying different criteria to each vote. Examples of criteria include:
- the most important items
- the lowest cost items
- the easiest items to complete
- the first items in a logical sequence the most innovative items
- the most significant given the strategic direction
- the most important to our customers
Step 3: Once the criteria are clear, there are various methods for conducting a multi-vote.
Voting with Sticker Dots
- Purchase sheets of file folder dots from an office supply store. Cut the sheets into strips.
- Distribute strips of from four to seven dots to each person. Use slightly fewer dots than half the items to be sorted to force people to make choices (for example, give out four dots to sort ten items).
- Ask members to place their stickers on their top four choices. Ensure that no one puts more than one sticker on any one item.
- When everyone has voted, tally the dots in order to arrive at the priorities.
Distributing Points
- Give each person points to distribute among the items to be sorted. The number of points is typically either 10 or 100.
- Members then write their points beside the items they favor. It's wise not to allow anyone to place more than 50% of their points on any single item.
- When everyone has voted, add the scores to arrive at the priorities.
Weighted Multi-Voting
In some prioritizing activities, it's advantageous to assign weights to the voting dots. these weights could be as simple as numbering the dots from one to four. A more advantageous approach is to give some dots an even greater weighting. This results in a more clear differentiation of the ranked items.
- An example of simple weighting:

- An example of differentiated weighting:

Note: To avoid having people influence each other in how they are voting, consider asking people to mark their dots with the item they will be placing it beside before they approach the flip chart. This will cause all votes to be locked in and will eliminate what is known as “herding.”
Decision Grids
What is it? A matrix that uses criteria to assess a set of ideas in order to determine which are most likely to be effective.
When to use it? To bring more objectivity and thoroughness to a decision-making process.
What's its purpose? To provide a structured decision-making process for dealing with a complex issue involving multiple elements. Transforms a random debate into one in which solutions are judged against an objective set of criteria.
What's the outcome? Random ideas are sorted into categories in a systematic way. Since everyone votes, the outcome is collaborative.
How to Use Decision Grids
Impact/Effort Grids
Step 1: Re-create the chart on a flip-chart paper or electronic board.

Step 2: Discuss the various choices, then place each in one of the four boxes:
- Easy to do and yielding a big improvement for immediate implementation
- Easy to do but yielding a small improvement for immediate implementation
- Difficult to do and yielding a big improvement action as major projects
- Difficult to do and yielding small improvement/discarded
Step 3: Once all ideas have been placed in one of the four boxes, help group members to develop action plans, starting with those ideas that were identified to be easy to do.
Impact/effort grids are somewhat simpler to use than criteria-based grids because the grid has already been designed and there's no need to create criteria.
The major difficulty in using an impact/effort grid lies in clarifying exactly what is meant by the terms “easy to do,” “difficult to do,” “small improvement,” and “big improvement.” Being clear about terminology at the start will avoid much heated debate.
Criteria-Based Grids
Step 1: Ask members to identify the criteria against which potential solutions will be judged. Examples are:
- saves time
- supports the strategic plan
- saves money
- is something we can control
- reduces stress
- represents the right sequence
- is timely
- doesn't disrupt our operation
- is feasible
- will get management support
- is affordable
- satisfies customer needs
Step 2: The relevant criteria are chosen from this list and placed along the top of a grid. The options being considered are placed down the left column.
Note that some criteria may be more important than others, and hence given more weight. An example of weighted criteria uses the following scale:
- (x 1) = does not meet the criteria
- (x 2) = somewhat meets the criteria
- (x 3) = good at meeting the criteria
Step 3: The choices are then evaluated as to the extent each meets the criteria. Scores are tallied to identify the best choice.
Example: Decision grid for assessing solutions to the challenge of training fifty people in new software in fourteen days.
Sample decision grid for assessing solutions to the challenge of training fifty people in new software in fourteen days.

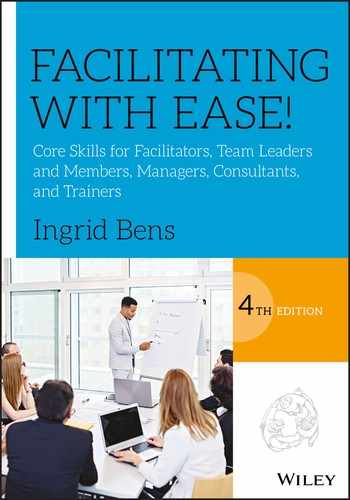
Exit Surveys
What is it? An anonymous survey posted near the exit used to take the pulse of a group in order to find out how satisfied members are with overall progress.
When to use it? At the midpoint of a meeting or workshop. Whenever there's a need to uncover hidden issues and concerns.
What does it do? Provides data about the effectiveness of the meeting or event so that issues can be further explored and addressed. Allows for venting concerns.
What's the outcome? An exit survey acts as a safety valve for releasing anxieties or concerns. It channels concerns into solutions and in this way empowers the group to resolve its own issues.
How to Use Exit Surveys
Step 1: Identify two to four questions. Write these on a flip-chart sheet that can be brought forward when the meeting resumes. The following are typical examples of exit survey questions:
Step 2: Post the survey sheet on a wall near the exit so group members can mark it as they leave the room. To provide anonymity, place the survey on a flip-chart stand and turn it against the wall to protect the privacy of raters. Provide markers and ask people to rate each survey item.
Step 3: When the group meets again, review the survey results with the group using the Survey Feedback process on the next page.
Survey Feedback
What is it? A process that involves gathering information and feeding it back to members so that they can interpret the data and identify action steps.
When to use it? When there's a problem that group members need to address, about which they lack information. Can be implemented when a problem has been identified. Can also be used periodically as a preventative measure.
What's its purpose? Provides the group with a means of assessing the efficiency and effectiveness of a meeting or activity. Also provides a method for generating actions to resolve any identified problems.
What's the outcome? Creates a sense of commitment and accountability among members for making improvements. Acts as a catalyst for making improvements.
How to Do Survey Feedback
Step 1: Design and conduct a survey. This can take an anonymous form or be an open process, such as an exit survey. The survey can be about:
- meeting effectiveness
- team/group effectiveness
- leader performance
- process effectiveness
- customer satisfaction
- a recent event or project
Step 2: After the surveys have been individually completed, they're returned to a designated member of the group. This person tabulates the survey results by combining all of the responses onto a blank survey form. The person doing the tabulation doesn't interpret the results; he or she only combines the ratings from the individual surveys.
Step 3: Tabulated survey results are fed back to the group. After members have had an opportunity to read the results, two categories of questions are posed:
- “What is the survey data telling us is going well? Which items received high ratings? Why did these items receive high ratings?”
- “What is the survey data telling us are problems or issues? Which items received low ratings? Why did these items receive low ratings?”
Step 4: Once members have identified the items that received sufficiently low ratings to be of concern, have them rank these in terms of priority to determine which should be addressed.
Step 5: Once the top priorities are clear, divide the members into subgroups of no fewer than four individuals. Give each subgroup one issue to work on for twenty to thirty minutes. Deal with as many issues as group size allows. In subgroups, members will answer two sets of questions about the item they have been given:
- “Why did this item get a low rating? What's wrong here? What is the nature of the problem?” (Group members analyze the problem.)
- “What are possible solutions for this problem? What will remedy the situation?” (Group members generate solutions.)
Step 6: Reassemble the total group and ask subgroups to share their recommendations. Encourage everyone to add their ideas and to ratify their final actions. Select the best ideas and implement them.
Step 7: Ask members to briefly return to their subgroups to complete any action plans that might be needed to ensure that improvements are implemented.
Systematic Problem Solving
What is it? A step-by-step approach for resolving a problem or issue.
When to use it? When members need to work together to solve a problem.
What's its purpose? Provides a structured and disciplined means for groups to explore and resolve an issue together. In-depth analysis ensures that groups understand the problem before jumping to solutions.
What's the outcome? Systematic problem solving results in doable action steps that members of the group take responsibility for implementing. Because the process is systematic, it discourages members from randomly suggesting ideas. Problem solving is at the heart of collaborative conflict resolution. It's also a key activity in any organization that is dedicated to improving its processes and service to customers.
How to Do Systematic Problem Solving
Step 1: Name the problem. Identify a problem that needs to be solved. Analyze it briefly to ensure that there's a common understanding of the issue. Then support the group in writing a one- or two-sentence description of the problem. This is called the problem statement.
Step 2: Identify the goal of the problem-solving exercise. Ask the group questions such as: “If this problem were totally solved, how would you describe the ideal situation” or “How will things look if we solve this problem?” Summarize this in a one- to two-sentence goal statement.
Step 3: Analyze the problem. If the problem is fairly technical, do a detailed analysis using a fishbone diagram (see page 202). Otherwise, ask a series of probing questions to help members think analytically about the problem. Categorize the observations as either causes or effects.
The goal is to get to the underlying root causes of the problem.
Some useful questions during analysis could include:
- Describe this problem to me in detail, step-by-step.
- What is it? How does it manifest itself?
- What are the noticeable signs of it?
- What makes this happen?
- How are people affected?
- What other problems does it cause?
- What are the most damaging aspects?
- What stops us from solving it?
- Who gets in the way of solving it?
- What are the root causes of each symptom?
Step 4: Identify potential solutions. Use brainstorming (page 192) or written brainstorming (page 194) to generate potential solutions. When the ideas stop flowing, ask probing questions to encourage members to dig deeper. Some useful probing questions include:
- What if money were no object?
- What if you owned this company?
- What would the customer suggest?
- What if we did the opposite of the ideas suggested so far?
- What is the most innovative thing we could do?
Step 5: Evaluate solutions. Use multi-voting, a criterion-based decision grid, or an impact/effort grid to sift through the brainstormed ideas to determine which are most applicable to the situation.
Step 6: Create an action plan. Identify the specific steps needed to implement the chosen solutions. Specify how things will be done, when, and by whom. Each action step should also feature performance indicators that answer the question, “How will we know we have been successful?” This will help focus the action step and make it easier to measure results.
Step 7: Troubleshoot the plan. Use the Troubleshooting Worksheet to identify all of the things that could get in the way and then ensure that there are plans in place to deal with them.
Step 8: Monitor and evaluate. Identify how the action plans will be monitored and when and how the results will be reported on. Create and use a monitoring and report-back format.
Systematic Problem Solving Worksheet 1
Step 1. Name the Problem
Identify the problem that needs to be solved. Analyze it in just enough detail to create a common understanding. Use the space below to explore the general nature of the problem.

Now narrow in and select the specific aspect you wish to solve. Write a one- or two-sentence problem statement to define the problem clearly.
Problem statement:
__________________________________________________________________
__________________________________________________________________
__________________________________________________________________
Systematic Problem Solving Worksheet 2
Step 2. Identify the Goal of the Problem-Solving Exercise
Describe the desired outcome. Ask:
- “What would things look like if the problem disappeared?”
- “How would things look if this problem were resolved?”
Use the space below to record the ideas generated.
Now narrow in and write a one- or two-sentence goal statement.
Goal statement:
__________________________________________________________
__________________________________________________________
Systematic Problem Solving Worksheet 3
Step 3. Analyze the Problem
Dissect the problem thoroughly. Avoid coming up with solutions. Instead, concentrate on making sure that everyone is clear about the specific nature of the situation. Don't focus on symptoms, but delve behind each effect to determine the root causes.
Use a fishbone diagram if the problem is a complex technical issue that has many contributing factors. If it isn't a mechanical problem, use cause and effect charting by asking questions such as:
- “How would we describe this problem to an outsider?”
- “What is taking place? What are the signs and symptoms?”
- “How are people affected? What makes this happen?”
- “What are the root causes of each symptom?”
- “What other problems does it cause?”
- “What are the most damaging aspects?”
- “What and who stops us from solving it?”
- “How do we contribute to the problem?”
Systematic Problem Solving Worksheet 4
Step 4. Identify Potential Solutions
Use brainstorming or anonymous brainstorming to generate a range of potential solutions to the problem. When brainstorming, remember the rules:
- Let ideas flow: be creative, don't judge
- All ideas are good, even if they're way-out
- Build on the ideas of others
Probing questions to ask once the initial flow of ideas has stopped:
- “What if money were no object?”
- “What if I owned this company?”
- “What would the customer suggest?”
- “What's the opposite of something already suggested?”
- “What is the most innovative thing we could do?”
Record brainstormed ideas here:
Systematic Problem Solving Worksheet 5
Step 5. Evaluate the Solutions
Use multi-voting, a criterion-based decision grid, or the impact/effort grid shown below to sort through the brainstormed ideas and identify a course of action.

| List all of the type 1 and 2 activities together for quick action |
List all of the type 3 activities here for development into action plans |
| |
|
Systematic Problem Solving Worksheet 6
Step 6. Plan for Action
Create detailed action plans for items to be implemented. Ensure that action plans adhere to a logical sequence of steps. Provide details about what will be done, how, and by whom. Always include target dates for completion. Identify the performance indicator that answers the question, “How will we know we did a good job?”
| What will be done and how? | By whom? | When? | Performance indicator |
| |
|
|
|
| |
|
|
|
| |
|
|
|
| |
|
|
|
| |
|
|
|
| |
|
|
|
| |
|
|
|
Systematic Problem Solving Worksheet 7
Step 7. Troubleshoot the Action Plan
Identify the things that could get in the way of successful implementation of the action plan. Create anticipatory strategies to deal with each blockage.
Use the following questions to help identify trouble spots:
- “What are the most difficult, complex, or sensitive aspects of our plan?”
- “What sudden shifts could take place to change priorities or otherwise change the environment?”
- “What organizational blocks and barriers could we run into?”
- “What technical or materials-related problems could stop or delay us?”
- “Should we be aware of any human resources issues? Which ones?”
- “In which ways might members of this team not fulfill their commitments?”

Systematic Problem Solving Worksheet 8
Step 8. Monitor and Evaluate
To ensure that action plans are actually implemented, identify:
- How will progress be reported? Written _______ Verbal ________________
- When and how often will reports be made? _____________________________
- Who needs to be informed? ____________________________________________
- How will results be monitored? _______________________________________
- Will there be a final report? ________________________________________
- Who will take responsibility for the above actions? __________________
- ______________________________________________________________________
- ______________________________________________________________________
Reporting on Results
- What activities have been implemented?
- What results have been achieved?
- Remaining items
- Expected dates for completion
Troubleshooting
What is it? A process for identifying potential blocks and barriers so that plans can be formulated to overcome them.
When to use it? When it's important to identify barriers to success and create action plans to deal with them. When the group has a history of poor follow-through on actions.
What's its purpose? Helps ensure that action plans are well thought out. To improve the likelihood of follow-through.
What's the outcome? Groups are less likely to be surprised by hidden circumstances, and hence, gain more control over their work.
How to Do Troubleshooting
Step 1: After a group has created action plans, ask members to consider a series of questions. These questions force a critical look at the circumstances that might impede the activity. For example:
- “What are the difficult, complex, or sensitive aspects of our action plan?”
- “What shifts in the environment, like a change of priorities, should we keep our eye on?”
- “What organizational blocks or barriers could we encounter?”
- “What technical or materials-related problems could stop or delay us?”
- “What human resource issues should we anticipate?”
- “In what ways might members of this team not fulfill their commitments?”
Step 2: Once potential barriers have been identified, ask members to identify strategies and action plans to overcome each one.
Step 3: Help the group write up its troubleshooting plans. Identify who will monitor follow-through. The following worksheet will help you lead this discussion.
Troubleshooting Worksheet
| What could go wrong, block us, or change suddenly? | What actions will overcome each block? (what, how, by whom, when) |
| |
|