
Visiting the Neighborhood
Walking Adventures
A walking adventure gives your students tasks such as searching for arrays or words with vowel teams to complete while walking around the neighborhood. These walks are a simple way to get your class outside and help them see how math and written language are everywhere! Walking adventures also provide children with new experiences that build background knowledge, which is key for reading comprehension and helps develop oral language and observation skills (see Figure 3.1). Most walks require few materials beyond a pencil and a notebook! These activities can be done in any season.
Math walks
This section will help your students notice how math is all around us, particularly in their school neighborhood. They get students moving and actively looking for math in the real world! Math walks are a simple way to take your class outdoors in any season while reinforcing target math skills.
Geometry walks
Shapes are all around us! Often, we do not notice how important shapes and geometry are until we start looking closer. More developed environments offer many examples of shapes in architecture and other structures. Your students will likely be surprised just how important geometry is in the design of buildings and structures when they start looking closely. Shapes can also be found in the natural world. Your students may be surprised to find these math concepts in nature and delight in finding examples!
Materials
- Pencil
- Small ruler (to assist in drawing shapes)
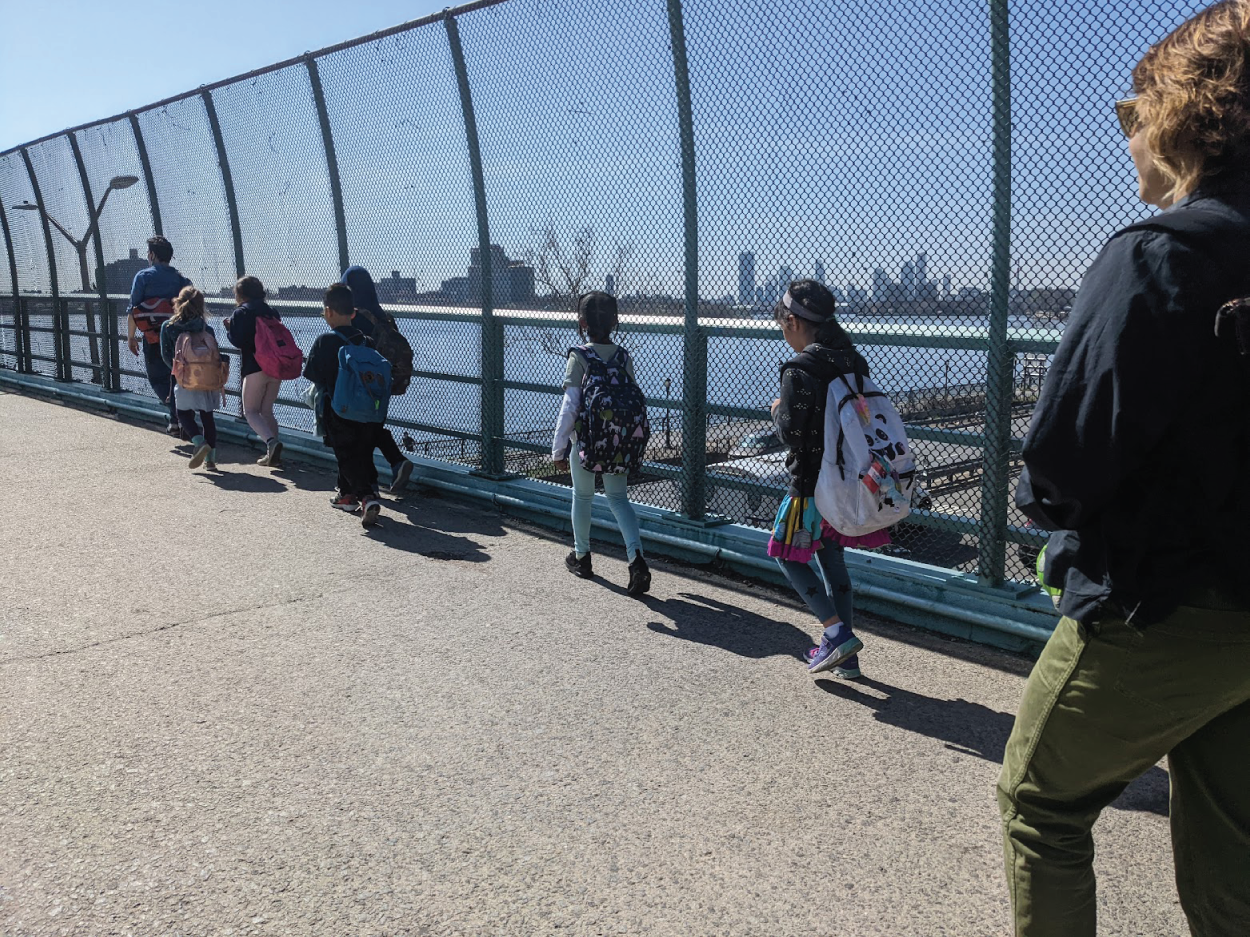
Figure 3.1 Bridge walk: Students exploring their neighborhood in Brooklyn, New York
Source: Andrew Chiappetta
- Notebook or paper
- Clipboard
- Optional: City Shapes by Diana Murray
- For advanced variations: protractor, compass, measuring tape
Activity
- The picture book City Shapes by Diana Murray is the perfect introduction to this activity, particularly for younger students. Before heading out, read the suggested picture book aloud and/or explain to your class that today they will be walking around the neighborhood looking for shapes. Lead a quick discussion with your students. Questions you may want to pose: What shapes do you think you will find the most of as you walk around the neighborhood today? Record some of their answers on chart paper to compare their findings afterward.
- Lead your class on a walk through the neighborhood looking for geometric shapes. Have your class walk in a single line if students are working individually, or a double line if they are working in pairs. Make stops to observe and look for shapes along the route (see Figures 3.2 and 3.3). Ask your students to keep track of the number and type of shapes they find in a notebook. Encourage them to look for shapes that are part of a larger shape, such as windows in a large rectangular building, or the triangle portion of the roof of a house. Once they start looking, they will be amazed at all the shapes they find!
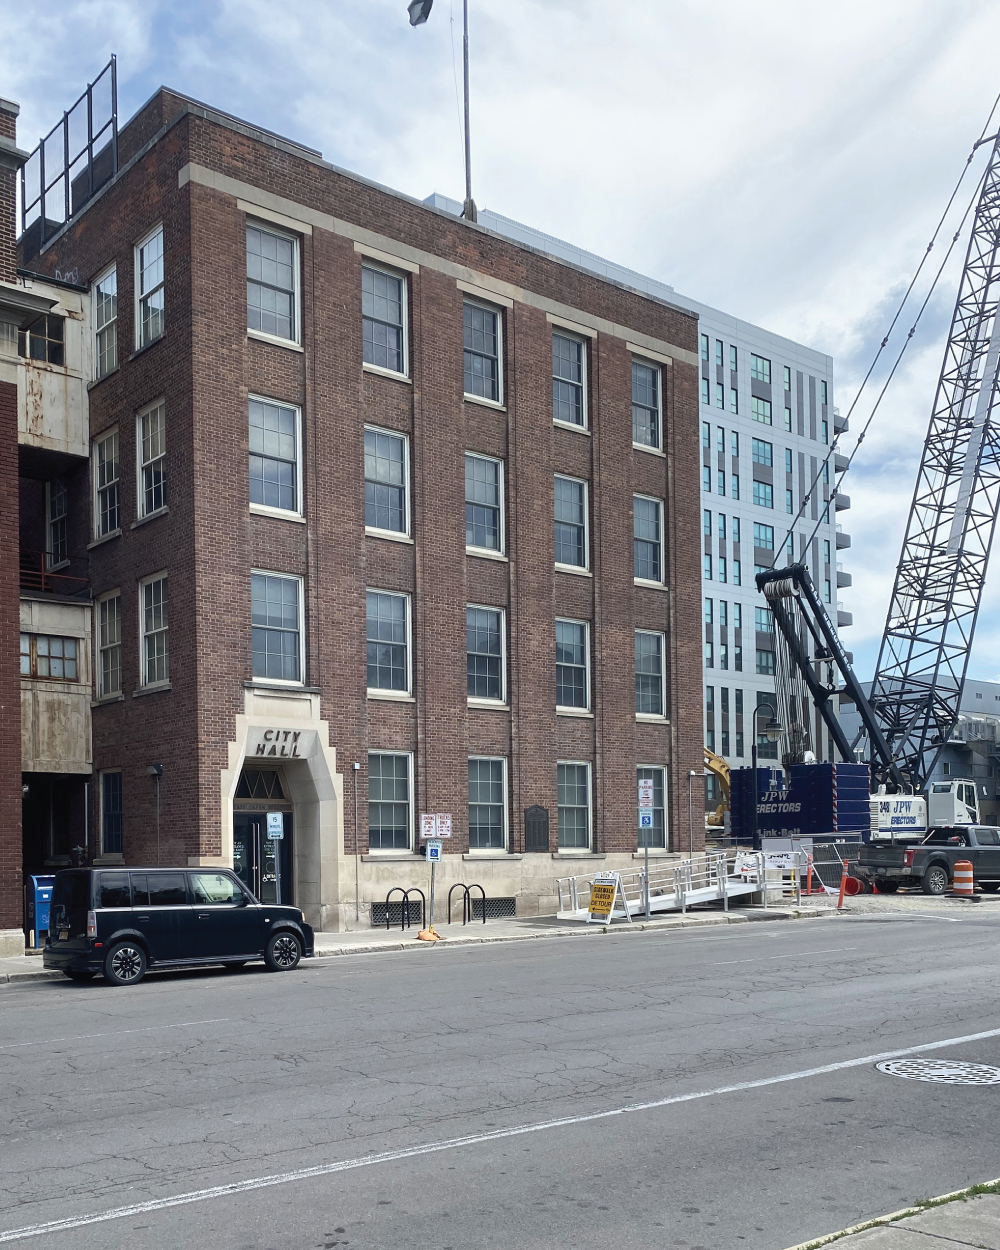
Figure 3.2 Look at all the rectangles and squares on buildings and the triangles on the crane
Source: Rachel Tidd
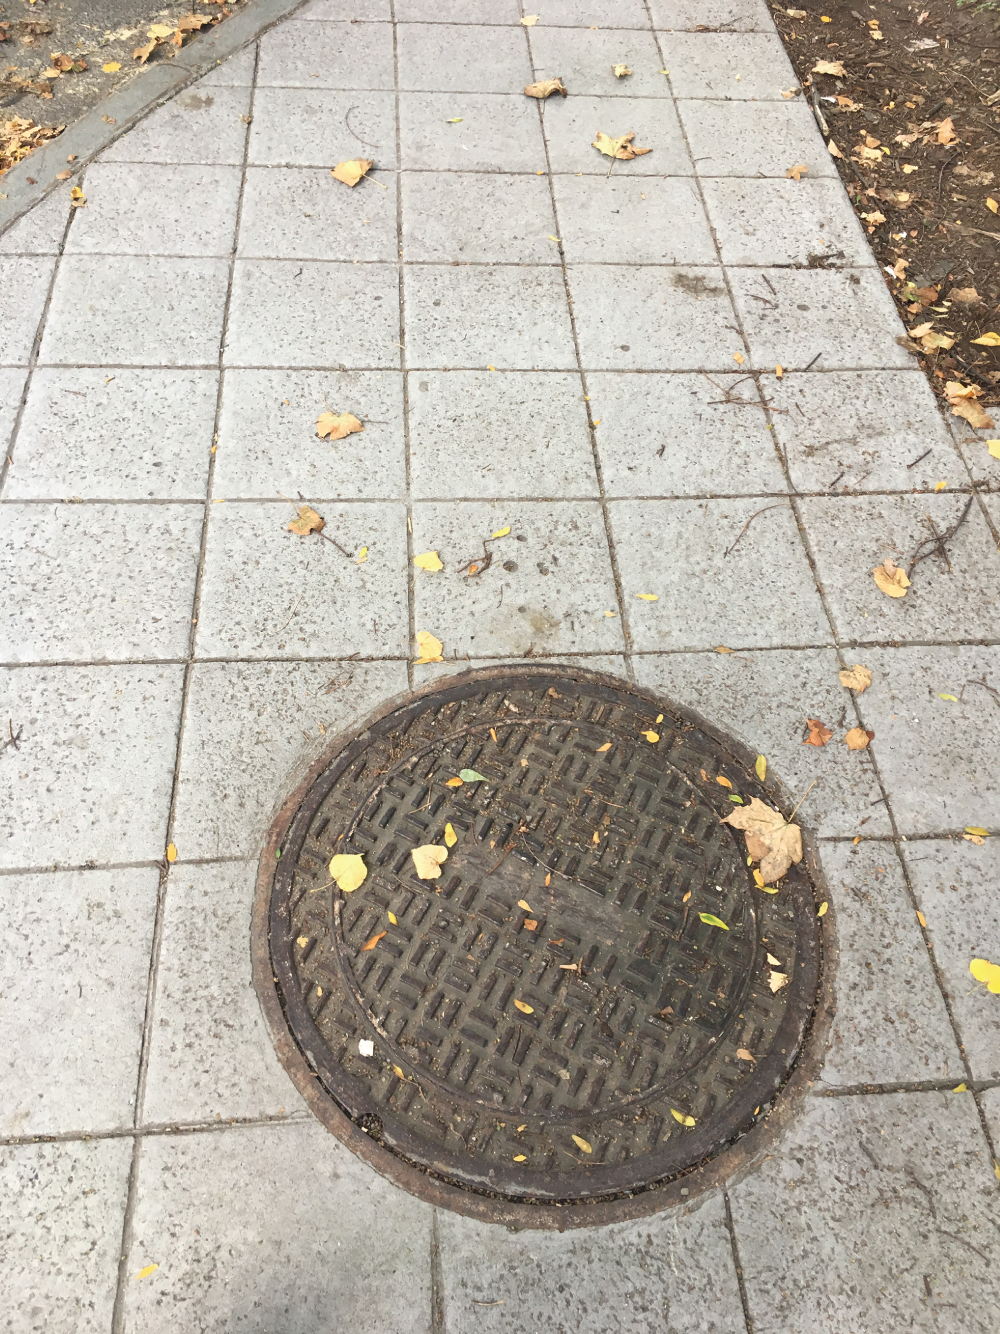
Figure 3.3 This utility hole is a great example of a circle. It is also surrounded by square tiles.
Source: Rachel Tidd
- You may wish for them to make a tally chart or graph of the shapes. They can also choose one or two shapes to investigate further by recording the number of sides, measuring the sides (or diameter), and sketching the shape. Each student can record the shapes they find, or they can work in pairs.
- After the walk, ask the students in your class to share what shape they saw the most. Make a quick tally chart compiling their class data. You may wish to discuss questions such as, How does the data compare to your predictions? Did anything surprise you during the walk? Did you see more of certain shapes than you expected?
Variations
- Angle hunt: For an angle walk have your students bring protractors and measure angles they find in the neighborhood. Sidewalk cracks, bricks, gates, playground structures, and more are all interesting places to discover angles (see Figure 3.4). See if they can find at least four different angle measurements. Have them record the measurement of the angle, where it was located (e.g. the metal railing), and geographic location (e.g. 254 State Street). Have them compare and discuss results in groups or a whole group.
- Symmetry search: Have students look for shapes containing at least one line of symmetry. Can they find shapes with two, three, or more lines of symmetry? They should record an example of each shape and its lines of symmetry in their notebooks. Have students work in pairs and spread out along the street, allowing each group enough space to look for shapes for a few minutes. Then move to a different street to look for more symmetrical shapes. Have them share some examples!
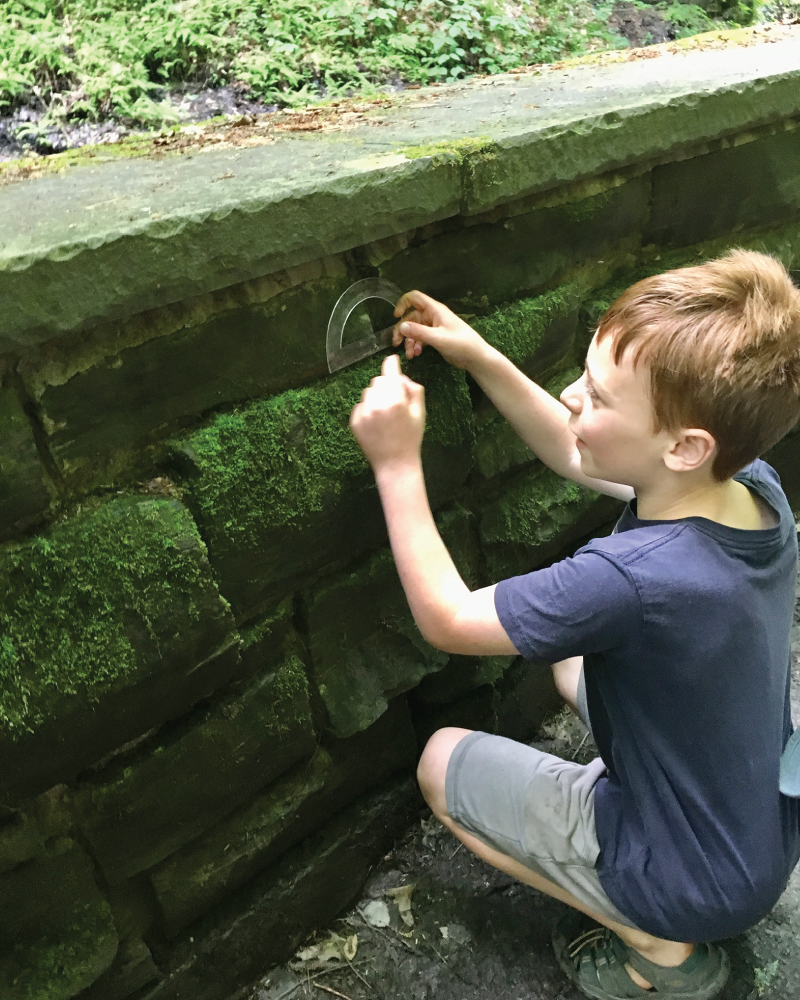
Figure 3.4 Measuring the angles between rocks on a retaining wall
Source: Rachel Tidd
- Circumference hunt: Ask students to search for two or three examples of circles. They should measure and record the diameter of the circle, the general location (e.g. on a sign), and the geographic location/address. Then have them calculate the circumference.
Number walks
Number‐themed walks ask your students to search for specific categories of numbers, such as decimals, even and odd numbers, or to round all the numbers found. This is a great activity that you can adapt and use to reinforce many different math skills and grade levels. If your school is in a more rural area or on a campus, there are still numbers to be found if you look closely! One of the best places is the license plates in the school parking lot.
Materials
- Pencil
- Notebook or paper
- Clipboard
Activity
- Here is a description of a number walk for your youngest students. For advanced students, see the following variations listed. You can adjust number walks for varying grade levels by changing what kind of numbers students look for.
- Lead your class on a walk looking for numbers (see Figure 3.5). Ask students to record all the numbers they see in their notebooks. This activity is best done individually with each student recording their own numbers. Lead a class discussion about what students found and noticed and how numbers are used in the neighborhood to wrap up the activity.
Other numbers you may ask them to look for
- What is the largest and smallest number they can find?
- Can they find a number in the ones, tens, hundreds, or thousands? Larger?
- Can they find a number with an 8 in the tens place?

Figure 3.5 These parking signs have numbers written in words and numerals
Source: Rachel Tidd
Variations
- Even and odd numbers: Ask students to make two columns on their paper and label one column even and one odd. As they spot numbers, have them record and identify if the number is even or odd, and record it in the correct column. After the walk, lead a discussion about what students noticed about even and odd numbers and how they are used. Are even or odd numbers more common? Did they notice how even and odd numbers are used on the street (usually odd numbers are on the left, even on the right)?
- Rounding: Ask students to round numbers to a specified place value. For example, for the first five minutes of a walk have children round the numbers they see to the nearest ten. Then for the next five minutes, have children round the numbers they see to the nearest hundred. Have them record both the original number and the rounded number in their notebook. Lead a discussion about their findings.
- Comparing numbers: Designate a number and have students compare all the numbers they see in the neighborhood to the designated number. They should write both numbers and use a greater than, less than, or equal sign symbol to compare the designated number to the found number.
- Running total: Have students calculate a running total of ten numbers that they see in the neighborhood. They should record each step in their notebooks.
- Decimals: How are decimals used in the neighborhood? This is often easier in a location with stores and businesses in the area. Common places that decimals are used are gas stations, signs, prices, distances, etc. Lead a discussion about when and where decimals are used. Why or when are they useful?
- Time: While walking around the neighborhood, children can practice telling time by carrying small clocks (the kind used in the classroom to learn how to tell time). Every so often stop and either have them show the current time or give them a time to show on the clock. You can also have students calculate elapsed time. This can be a great add‐on activity or when walking to another destination!
Finding arrays and groups
Real‐life arrays (objects, numbers, shapes, or pictures arranged in rows and columns) or examples of things that come in groups are everywhere! This activity will open your students’ eyes to how this multiplication concept can be found in a surprising number of places around the neighborhood!
Materials
- Pencil
- Notebook or paper
- Clipboard
Activity
- If needed, introduce the idea of an array and how it relates to multiplication to your students and discuss or model a few examples. Then lead your class on a walk through the neighborhood. Explain that they will be looking for examples of arrays. Some examples of arrays they may see in the neighborhood are windows on the side of a building, panes of glass in a window, cars parked along the road, paving stones on a walkway, tile patterns, or flowers planted in rows (see Figures 3.6, 3.7, and 3.8).
- After pointing out a few examples as you walk, ask your students to record each example. They can draw or write a description and the multiplication fact that each array represents.
Variations
- Repeat the activity looking for things that occur in groups. For example, five daisies growing in each bunch, three benches, four swings on each swing set, six windows on each car, or five petals on each flower. They should draw each example and calculate the total.
- Students in the lower grades can draw and discuss the arrays that they find.
Skip counting walk
Skip counting is an important and useful skill for students to learn. Learning and practicing more advanced skip counting patterns, such as 4s, 6s, and 9s, will also help your students become more fluent with multiplication facts. A skip counting walk is a great way to incorporate movement and outdoor time into the school day and practice skip counting.
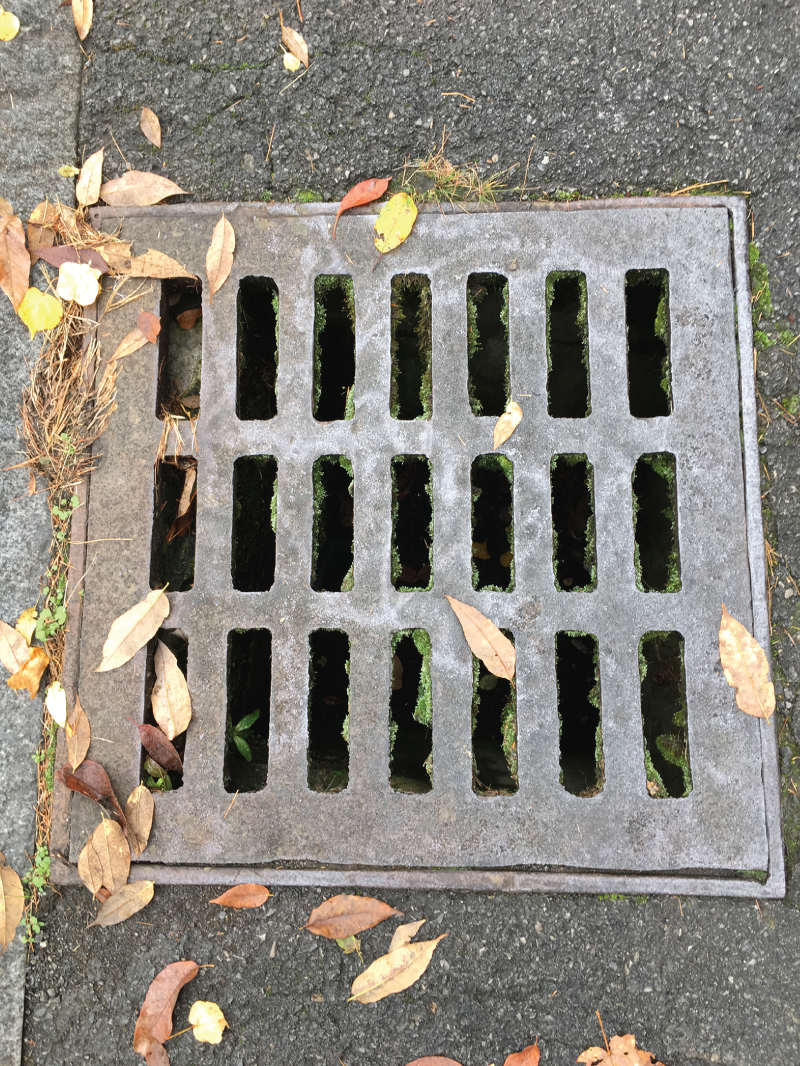
Figure 3.6 This grate is an excellent example of an array
Source: Rachel Tidd
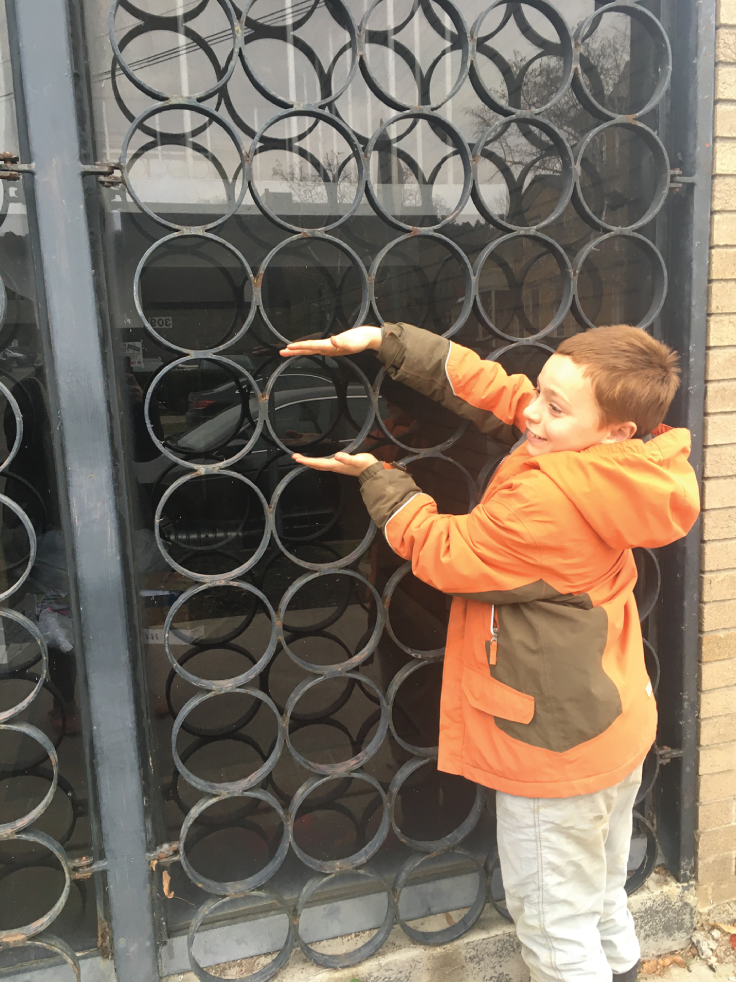
Figure 3.7 This building has a giant array of circles on the front
Source: Rachel Tidd
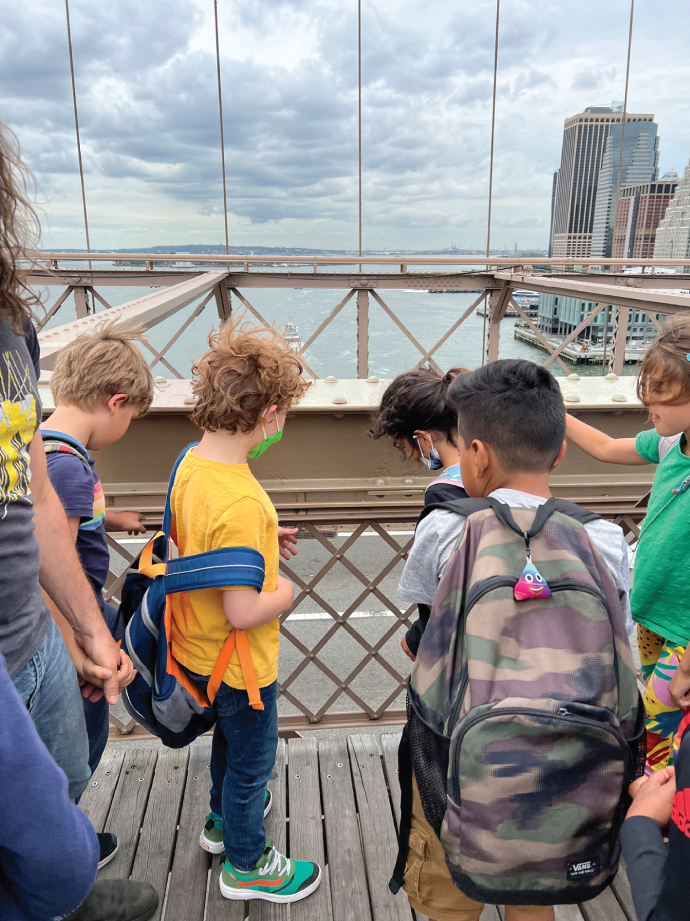
Figure 3.8 Students looking at the many examples of arrays on the structure of the Brooklyn Bridge
Source: Andrew Chiappetta
Materials
- Chalk
Activity
- Take your class for a walk through the neighborhood (or even around school property). While walking, lead the class through a skip counting sequence and pair it with a movement. For example, count by fives and hop for each number, or count by twos and punch twice toward the sky. After a few rounds, choose a student to lead the group.
Variation
- Locate stairs that your students are allowed to write on with chalk. There should be enough room for each group of students to do this activity simultaneously. Have each group write a different skip counting sequence going up the stairs using chalk. Then have the students in each group line up in front of their number sequence. Students take turns hopping up each stair while chanting the number sequence. When they reach the top, have them turn around and hop back down while counting backward! When they have finished, they move to the back of the line of the adjacent group (and a different number sequence). If your class has difficulty with or has just learned a new number sequence, have all the groups work on the same number sequence.
Measuring distances
Estimating distance can be difficult for students because they often lack experience using distances in real life. This activity will help your students gain hands‐on experience with various distances by personally measuring them. This will give them a personal reference they can draw upon when estimating distances in the future.
Materials
- Pencil
- Notebook or paper
- Clipboard
- Measuring tape or yard/meter stick
- Optional for variation: measuring/trundle wheel
Activity
- Divide your students into pairs or groups. Each group should have a measuring tape or yard/meter stick. Before your students begin measuring, have them choose three locations and estimate how far they think each destination is from the starting point. They will work together using the measuring stick or tape end over end to measure the distance. Have students measure each distance and record them in their notebooks. Afterward, have students share their results and reflections.
Possible topics to bring up during the reflection discussion
- Were their estimates close to the actual distance or were they way off?
- Did they over‐ or underestimate?
- What surprised them?
- Did the groups have different results? Why might that have happened?
Variations
- Steps: Try the same activity but have students count steps. Have students measure the number of steps to the same locations. Afterward, have students share their results and compare them to other groups. Record each group's step number on chart paper so the whole group can see the data. What do they notice? Why do the numbers vary? Are steps a good way to measure distance?
- Measuring wheel or trundle: If you have access to measuring or trundle wheels, it can be fun for children to repeat these activities using this tool and compare the results (see Figure 3.9). Which method do they think is more accurate? Which is easier to use?
- Converting units: Have more advanced students convert the distances to different units. Convert measurements to kilometers, meters, centimeters, inches, and feet.
Reading and writing walks
Noticing words and recognizing print patterns such as common letter combinations, syllables, and morphemes is foundational for learning to read. Environmental print found in the neighborhood is a useful resource to apply these skills by looking for phonics patterns, practicing writing words, and creating maps in a real‐world context. This section shows you how to use words in your neighborhood to reinforce phonics, spelling, and writing skills.
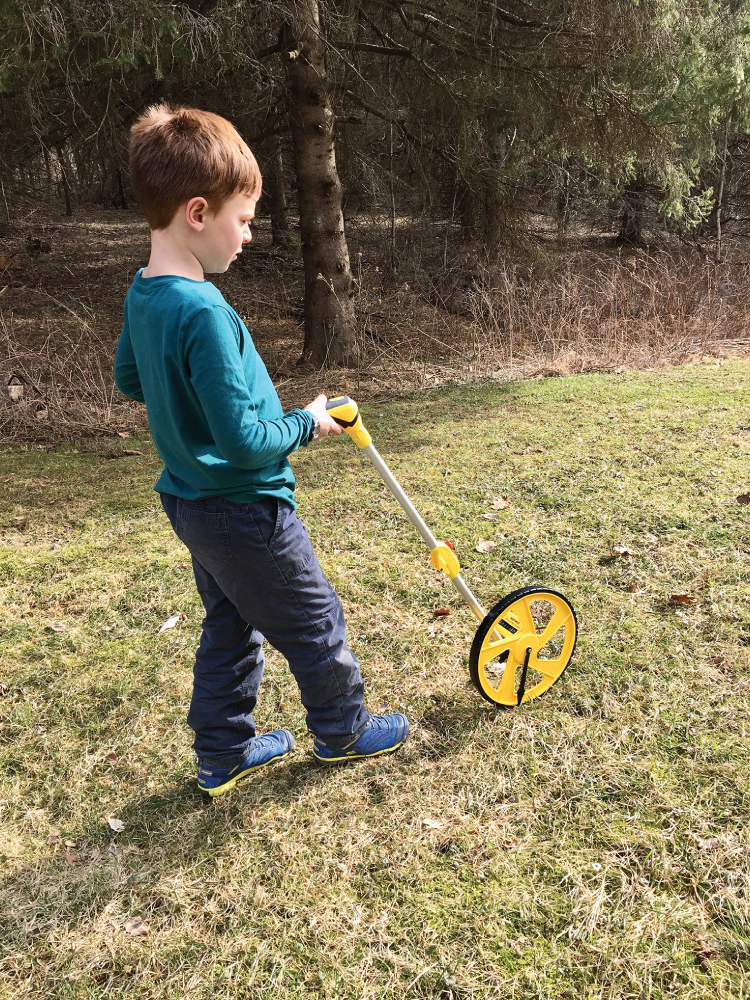
Figure 3.9 Using a trundle wheel to measure distances
Source: Rachel Tidd
Words in our neighborhood
Words are everywhere on town, city, and neighborhood streets! This activity is similar to “write the room” activities usually completed inside the classroom. Looking for letters, phonemes, words, or phonics patterns in the neighborhood helps your students increase their awareness of the words around them. You may focus on different phonics patterns, spelling rules, or categories that are relevant for your students, for variety, or to differentiate the activity.
Materials
- Pencil
- Notebook or paper
- Clipboard
- Chart paper or something to record student findings for display and discussion
Activity
- Lead your students on a walk to look for and record words they see in the neighborhood! Have them record each word found in their notebooks. You can discover words together or as a whole group. You can also have your students find and record words on their own (or in pairs) in a specified area.
- After the walk, discuss the words they found. If desired, you can make a huge list of all the words that your students found. Some questions you may wish to ask them might be, What kinds of words were the most common? Labels? Signs? Other? Why are words helpful in the neighborhood? What would happen if there were no words? No street signs?
Variations
- Word sort: Sort the found words into categories. Have students look at their words and decide on ways they could organize or sort them. Do words have similar letter patterns, beginning sounds, or ending sounds? What about different categories of words, such as words used on road signs, in advertising, warnings, street signs, etc.?
- Street names: Lead a walk having students focus on recording street signs. This can be a great way to focus on one category of environmental print without overwhelming beginning writers. Additional categories to consider are signs, business names, or building names.
- Phonics pattern: Go on a scavenger hunt to find examples of particular phonics skills your students are learning. Look at signs, ads, car brands, and other environmental print for examples of silent E words (fire, drive, ahead), vowel teams (street, road, speed, school), R‐controlled vowels (park, meter), multisyllable words (hydrant, ticket, limit), suffixes (parking, closed), and more!
- Block play: Consider taking pictures or adding laminated labels with business, building, and street signs from the school neighborhood and adding them to the block area. This can inspire some amazing block play based on your neighborhood walks!
- Letters or sounds: Students can look for letters or sounds and then copy the letter or draw a picture of where they saw it.
Finding small bits of nature in unexpected places
Small bits of wild can be found anywhere, even in urban locations. In this activity, students will learn to look closely for small or unexpected examples of nature in the school's neighborhood.
Materials
- A book about nature in urban areas or unexpected places (see box)
- Pencil
- Notebook or paper
- Clipboard
Activity
- To introduce the idea of small bits of nature, begin with a read‐aloud featuring nature in unexpected places.
- After reading the book take your class on a walk to look for bits of nature in surprising or unexpected places. What new bits of nature are revealed when looking at the neighborhood through this new lens?
Depending on the age and abilities of your students, you may ask students to
- Draw and write a sentence or a few sentences describing what they found.
- Write a paragraph describing the bit of nature in detail, the location, and why they think it is important.
Wrap up the lesson by having students share their work and discuss why these small bits of nature might be important.
Extension
- Have students look for bits of nature at different times of the year and/or in different locations. Have them write a new paragraph describing what they found for each trip. After several walks, they can compile their writing into a book showcasing nature in the neighborhood. A great mentor text for this activity is Nature in the Neighborhood by Gordon Morrison. This story highlights examples of nature in a neighborhood through the seasons. It also integrates scientific facts about plants and animals, which could be an excellent way to incorporate science standards.
Mapping the neighborhood
Mapmaking helps children build spatial reasoning skills and make sense of the world around them. Learning to read a map is an important skill even in the digital age! Plan several walks focusing on different aspects of the neighborhood and have students add more details to their maps during each session. Locations such as a street or several streets, school grounds, the whole neighborhood, a main street, or a nearby park all work well for this project.
Materials
- Large pieces of paper for the map
- Paper or notebook for sketches and notes
- Pencils
- Colored pencils
- Clipboards
- Rulers
- Examples of maps
- Compass for labeling directions
- Optional: use digital cameras or tablets with cameras to take pictures to use as a reference if you plan on working on maps in the classroom
Activity
- Depending on your students’ familiarity with maps, you may wish to begin this activity by examining and comparing different kinds of maps. What do they have in common? What information do they show?
- Explain to your class that they will make a map of the neighborhood, street, park, or school grounds. Walk through the area together to get a feel for it. Then walk through the area again, but this time have students look for specific features or landmarks in the area. As students walk around the area a second time, they should make quick sketches and notes on paper or in a notebook about the important features and landmarks they see. If you have access to digital cameras, have your students take pictures of the area to refer to later if working on their map back in the classroom.
- Children can then begin working on a rough outline of their maps while still at the location. This rough draft will be used to make a larger map in the classroom (or outside, if you prefer). Make sure they add important labels such as street names, buildings, and directions (use a compass).
- Once your students have drawn their maps, have them begin working on a larger map. Make sure they do this work in pencil to allow for modifications. You may have your students work individually or in small groups. Because of the larger paper size, you may find that this part of the project works best when done on tables or even indoors on the floor. Your students will use their rough draft outlines and memory to sketch the basic features of the map on large paper.
- Depending on how detailed you would like the final maps to be and how much class time you devote to the project, schedule several additional walks focusing on a specific element each time. For example, for the first walk, you may have students focus on drawing the outline of all the streets and labeling them with their names. On subsequent walks, you can have your students focus on locating major landmarks such as parks, landmarks, and important buildings and labeling them in the correct location on their maps. You may wish to plan additional walks focusing on specific elements such as trees, parking, stores, and signs.
- When your students have finished adding details to their maps, have them outline the pencil in black marker or a black colored pencil, add color, a compass rose, and a legend. If these map features are new to your students, introduce them one at a time and have everyone add them to their map.
Adjusting the Activity
- To scale: Students in the upper grades can make their map using a scale. This will require measuring distance physically or using a map or resource such as Google Maps. Constructing and using a scale is an excellent way for students to practice and use ratios in real life!
Variation
- 3D model: If you are lucky enough to have wooden unit blocks in your classroom, have students construct a model of the neighborhood. They can add to the model as they learn and notice new details. Older students often enjoy using smaller blocks such as Lego or Keva planks. If you don't have unit blocks, you can also have students build a model using recycled materials, paper, and other materials. Building models is a great way for students to visualize and synthesize information they have learned through different activities in the neighborhood.
Our friends the trees
Trees are an often overlooked natural resource, which makes them a perfect subject for students to study. While teaching in New York City, my students and I discovered the vast array of city tree species planted there! Most people do not realize that a forester or arborist manages the tree species in many towns and cities. The activities in this section can be combined to create a long‐term unit study on trees.
Leaf guide
Children find leaves fascinating. Learning to identify common tree species by their shape and physical features helps children build their knowledge of the natural world while developing research and writing skills, learning scientific classification, and practicing observation skills. This leaf guide project can be a stand‐alone activity or can be combined with the tree inventory or tree tour guide.
Materials
- Tree field guides for the local geographical area (at least one guide for each group)
- Leaf samples collected by students
- Glue
- Materials for preferred preservation method
- Colored pencils
Activity
- Take your class on a walk and have them collect 5–10 different tree leaves. Explain that they will identify each tree's species and use them to create a leaf guidebook (see Figure 3.10). Remind children to collect leaves that have already fallen from the tree when possible.
- The leaf book will feature one page for each leaf, the tree's species, the leaf's critical features (lobes, points, vein patterns, edge patterns), and any other information they would like to include.
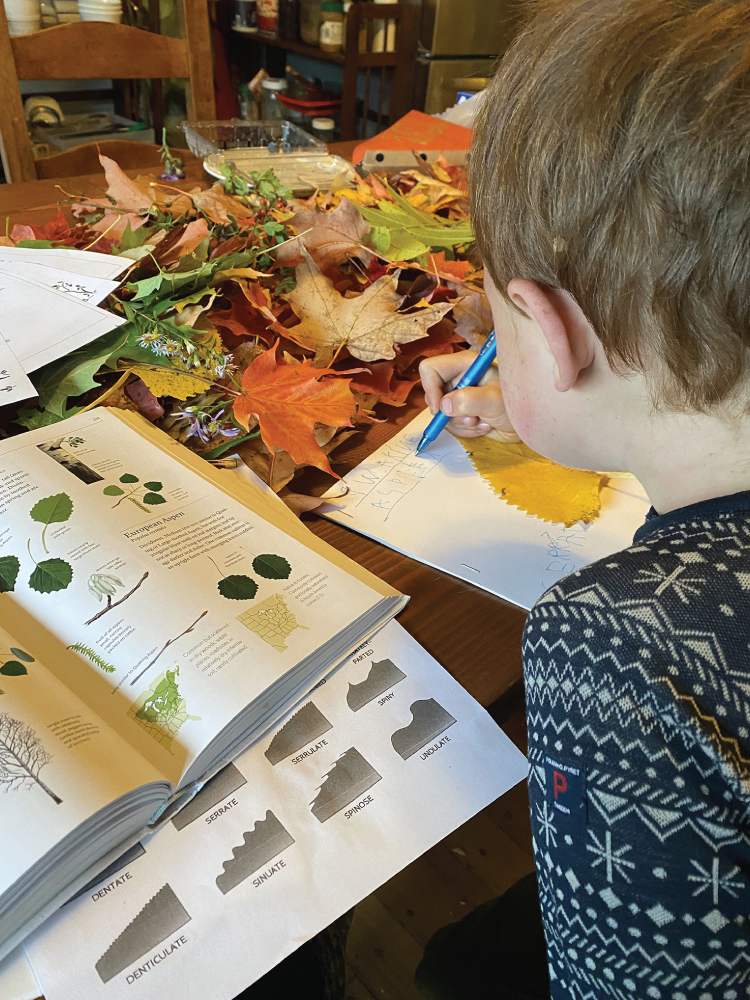
Figure 3.10 A student working on a leaf book
Source: Rachel Tidd
- If you would like children to use the actual leaves in their book (versus just a drawing of the leaf), you can place leaves between the pages of a heavy book, so they remain flat. Fresh leaves become brittle and curl when they dry out, so pressing them will make it easier to glue or tape into a book. You can also have children preserve the leaves by pressing them between wax paper. Place a towel on top of the wax paper and use a warm iron on top of the towel. This will coat the leaves in a thin coating of wax and help preserve them. Leaves can also be laminated or pressed between contact paper (see Figure 3.11).
Adjusting the activity
- Create a template of a leaf guide page to scaffold this activity for students who require more in writing support.
- You may wish students to include important nonfiction features such as a table of contents, diagrams with labels, and a glossary in their books.
- Have older students include the scientific names and add more details about the trees that each leaf comes from to their books.
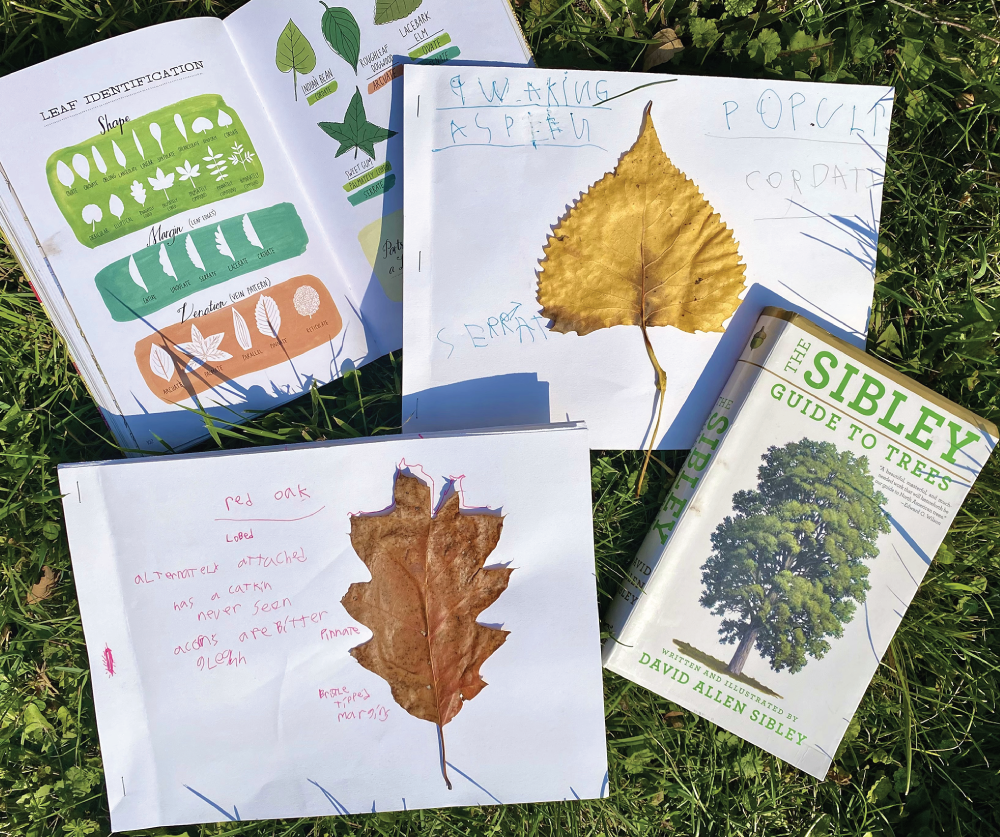
Figure 3.11 Examples of student leaf books
Source: Rachel Tidd
Leaf shape resources
- Leaf shapes and characteristics are often found at the beginning of field guides.
- Upper grade students may like this detailed chart by the Central Yukon Species Inventory Project found at https://www.flora.dempstercountry.org/Leaf.Glossary.html
- Britannica Kids has a simple diagram of a leaf. You can find it at https://kids.britannica.com/kids/article/leaf/433080
My tree through the year
Choosing a tree, learning more about it, and watching it change over time can be a special experience for a child. By the end of this project, students will be an expert on their tree and showcase their newfound knowledge with an accordion‐style book.
Materials
- Tree guides and other books about trees for research
- Paper/clipboard or notebook
- Pencil
- Colored pencils
- Tape
- Paper for making the accordion book
- Measuring tape
Activity
- For this activity, students will choose a street tree and visit the tree several times over the school year, observing how it changes. Students will create an accordion that features drawings and observations of the tree. After each observation students will add another page to the accordion. Each page will feature a drawing of the tree and a paragraph (or sentence) describing their observations. You may also wish students to add a page featuring any information learned about the tree through research. Since this is an ongoing project, you will need to collect and store the pages until the final observation page is added.
First visit: selecting a tree
- Take the class to an area where there are many street trees. Ask each student to select a tree. Explain that they will learn about this tree and visit it throughout the year.
- Students should make careful observations about the tree and record them (see Figure 3.12). They should record leaf shape and bark texture. They can measure the circumference of the trunk and record it. They should also include sketches of the whole tree, leaves, and bark, making their drawings and notes as detailed as possible. This will help them identify the tree or confirm their identification using a field guide.
- After making their initial observations, have children use field guides to identify the tree species and learn more about them. Have them create a page for their accordion that includes a detailed picture of their tree and a paragraph describing their observations below it (see Figure 3.13). You may wish to have students work on their book pages on‐site or back in the classroom. This project's level of detail and complexity can be adjusted to fit your students’ needs.
Follow‐up visits later in the year
- Visit their trees at least once each season. Have students write observations and draw a detailed picture of the tree for each visit. They should note any changes since their last visit and have the children create another page for their accordion book. It should include a drawing of the tree's appearance and a sentence or paragraph describing what they saw and any changes they noticed.

Figure 3.12 Students from The Brooklyn New School observing and drawing trees
Source: Andrew Chiappetta

Figure 3.13 Example of a drawing for the tree accordion book
Source: Rachel Tidd
Assembling the book
- You can have students add additional pages to the accordions as you go or assemble the entire accordion book after the final visit. To attach pages with a bendable seam, lay pages next to each other. Make sure the edges are touching but not overlapping. Place a long strip of tape over the area where the pages meet.
- They will also need to make the starting page or cover for the accordion book (see Figure 3.14). It should include the title and the author of the project, as well as an illustration of the tree.
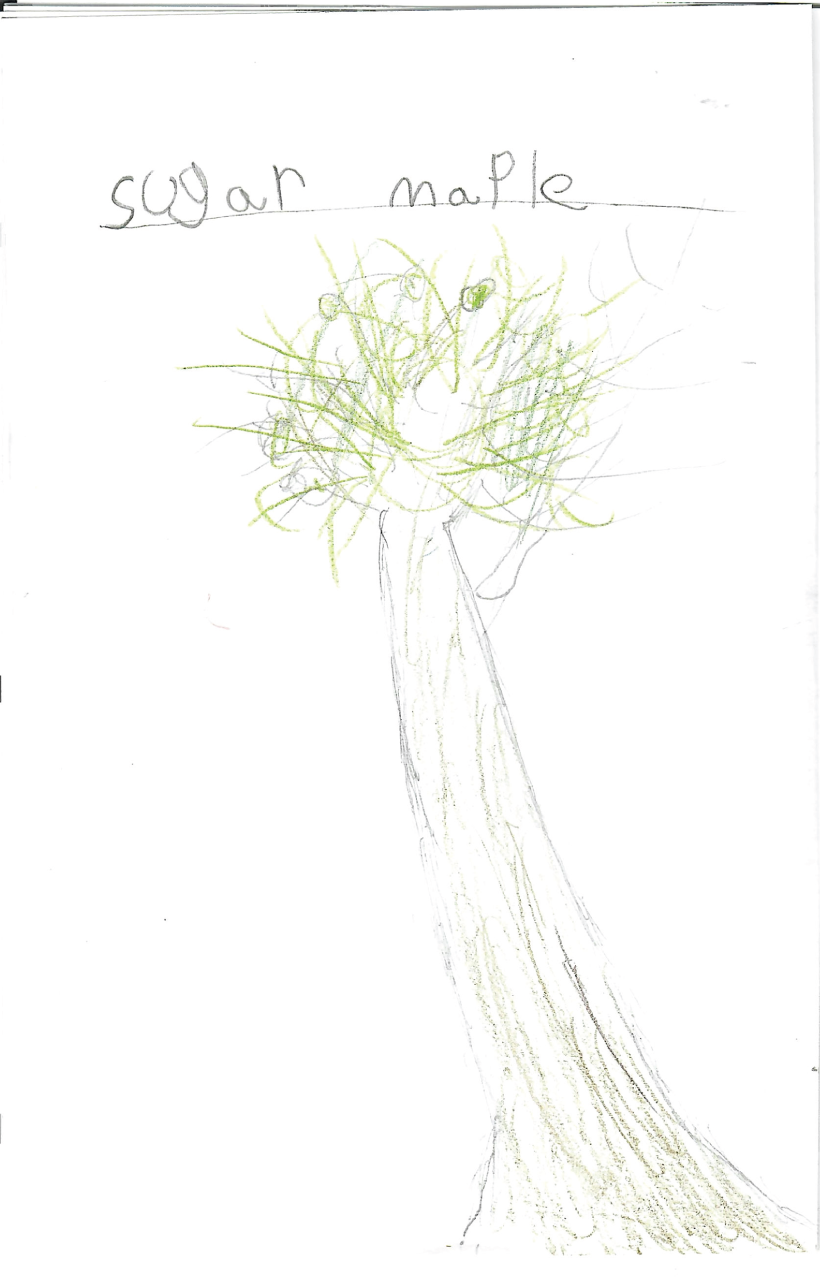
Figure 3.14 Example cover of an accordion book featuring a Sugar Maple tree
Source: Rachel Tidd
Variations
- A tree is a home: Look for signs of animals, insects, lichen, and other living things that make their home in their tree. Students may wish to learn more about them and add this information to their books.
- Further research: Research optimal growing conditions for their tree. Do they think the tree will do well in its current location? Why or why not?
- Meditation: Have them sit by their tree and meditate or tune into how the tree makes them feel. Have them touch the trunk and take a few minutes to reflect. Does the tree make them feel calmer? Peaceful? Do they feel they are friends with their tree? Ask them to journal their thoughts, feelings, and reflections on their tree.
Tree arborist or expert
Having an expert visit your classroom can be an amazing experience for your students. Many cities have a city forester or arborist. If you live in a small town, consider asking a local tree arborist, tree surgeon, forester, landscape architect, or another person who works with, maintains, or studies trees in your community to speak to your class about trees and what role trees play in their job. Often city arborists or other tree experts are also willing to give your class a tour of trees! It never hurts to inquire.
Materials
- Chart paper or another way to record student questions
- Marker
- Community expert relating to trees to visit the class
Activity
- Brainstorm together and, if needed, have students research the benefits of trees before the visit.
- Why are trees important?
- Why do we want trees in towns and cities?
- To prepare for the expert's visit, lead a class brainstorming session, making a list of questions they would like to ask the expert when they visit. You may need to give them a little information on the person and their job to help guide their questions. Record these questions and review them before the visitor arrives. Display the questions for children to see during the visit to help them remember their questions.
Adjusting the activity
- Have older students research different jobs relating to trees, such as an arborist, forester, landscaper, landscape architect, horticulturist, dendrologist, orchard manager, ecologist, environmental or forest engineer, paper scientist, and more. Have students research what the job responsibilities are, the education needed, and other details. Students or pairs of students can then give an informal presentation sharing their findings with the class.
Tree inventory
In this activity, students will learn to identify trees and become experts on the trees around their neighborhoods. Your students may be surprised at the variety of tree species they find!
Materials
- Tree field guides based on your geographical area (at least one guide for each group)
- Notebook or paper/clipboard
- Pencil
- Colored pencils
- Simple map of the area selected either drawn or printed/copied where students can plot their trees
- One “class map” where each group's tree can be added
- Optional: cameras or tablets for taking pictures of trees
Activity
- Explain that a tree inventory counts, identifies, and shows the location of each tree in a specified area. City foresters often create maps of all the trees in the whole city or town.
- Explain to your class that they will take an inventory of street trees today. Each group will work together to identify one to two trees. Working in pairs, have students choose a street tree to identify using a tree guide. Ask them to record the common name, species, and important facts about the tree. They should also sketch a picture of the whole tree, the bark, and a leaf. Students should use the map provided to locate their tree and place a point on their map to show its location. Students can also describe the tree's features using words. They should also record the location of the tree using the nearest address. Have students select a second tree and repeat the process if there are enough trees in the area. If you have digital cameras or devices with a camera available, have students take pictures of the trees.
- Afterward, have students come together and ask each group to share the species of tree(s) they found, mention a noteworthy fact, and add their tree to the class map. Make a class list of all the different types of trees the students identified and the total number of trees.
Adjusting the activity
- Provide students with a packet of information limited to only the tree types that they are likely to encounter. Make your own or print/photocopy pages from a beginner's tree guide. This will make it easier for them to identify the tree species. A simple worksheet that lists each fact you would like them to find and provides boxes for sketches can also help scaffold the activity for different levels.
Variations
- Class book: Have each group create a page about their tree and create a class book.
- Try another location: Repeat the inventory activity in a different area and compare the results.
- Wall display: Place the class tree map on a bulletin board and have each student or pair write a paragraph about their tree. Hang the paragraphs around the map and use string to connect the paragraph to the tree's location on the map.
Tree tour
Having students create a tree tour is an excellent way to build on the tree inventory. This activity asks students to design a walking tour of different trees in the neighborhood, synthesize the information learned, and present it in a way that educates others. The information can be presented in a book, booklet, pamphlet, or audio tour format.
Materials
- Tree field guides based on your geographical area (at least one guide for each group)
- Notebook or paper/clipboard
- Pencil
- Colored pencils
- Simple map of the area selected, either made by the class during the tree inventory or a satellite image printed from an online website such as Google
- Materials for various project formats such as paper, booklets, stapler, or recording devices for audio tours
Optional materials
- Camera/s for taking images of specific trees
- Printer to print pictures to add to finished projects
Activity
- Using the information from the tree inventory (or have students identify trees as part of this project), ask your students to select five neighborhood trees and then create an informational tour. They may choose to feature trees because of their size, species, location, or history. You will find that this activity is best done in small groups.
- Ask students to write an introduction to the tour, describe the location, briefly describe each tree, and write a concluding paragraph. You may specify the number of trees and particular details to be included based on the grade level of your students and available class time to devote to the project.
- Have your students select the format that they wish to present the tour in (or you can specify the method). Creating a booklet, pamphlet, or audio tour are excellent format options for this type of project. If students choose to create an audio tour, ensure they write the script first and that all members contribute to the recording.
Adjusting the activity
- Depending on the age and ability of your students, select an appropriate number of trees to profile for the tour to include. Adjust and define the information they should include.
- You can extend this activity by having students estimate the tree's age and size, and research when trees were planted or other historical facts about the trees (see Figure 3.15). For example, a huge oak tree may have existed when the town or city was founded or was planted in front of a building or house of significance.
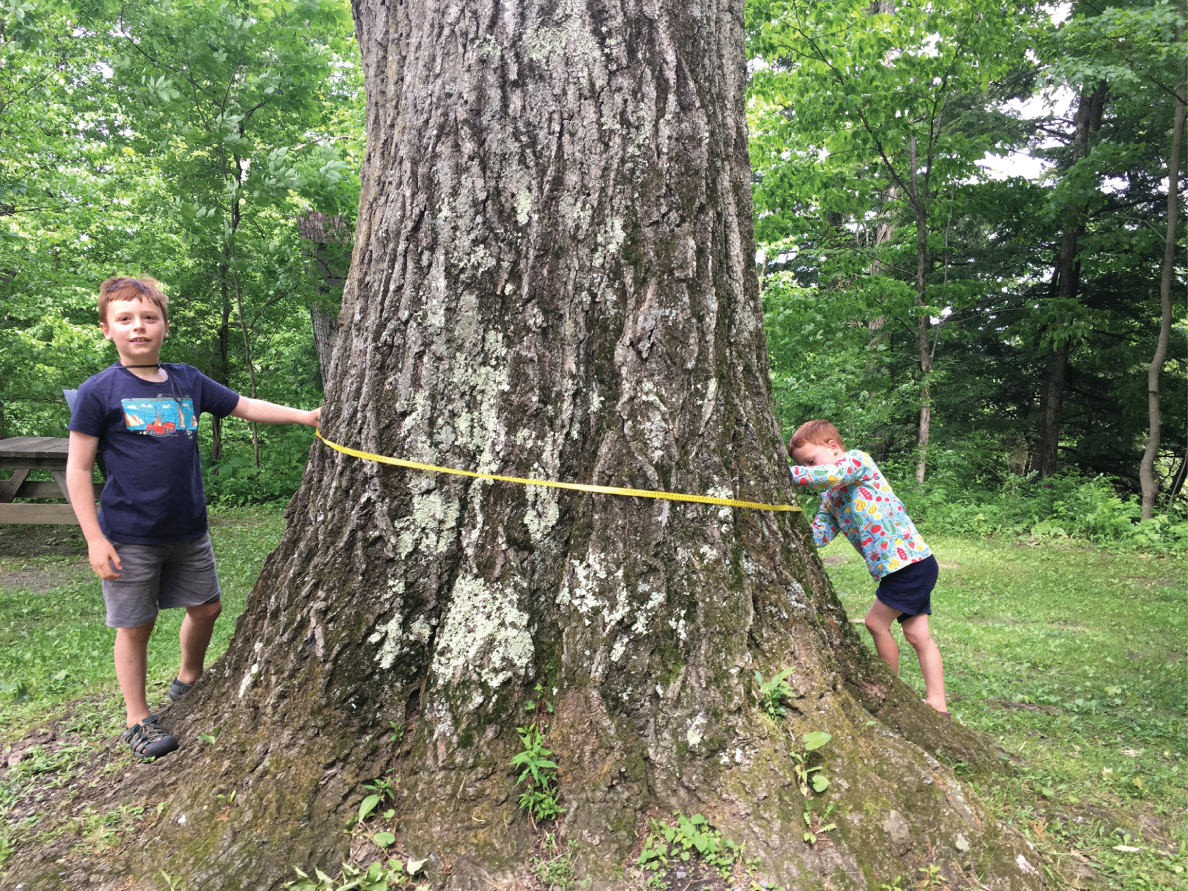
Figure 3.15 Working together to measure a giant tree located in a neighborhood park
Source: Rachel Tidd
Writing and the neighborhood
The neighborhood around your school can be a fantastic way to inspire your writers! Taking writing out of the classroom provides your students with new experiences and environments to write about. It can be a springboard for new ideas and connections. Writing prompts using the neighborhood as the setting for a story, creating riddles, writing odes, practicing descriptive writing, and creating pamphlets and tour guides will encourage your students to view the area surrounding their school with a new perspective!
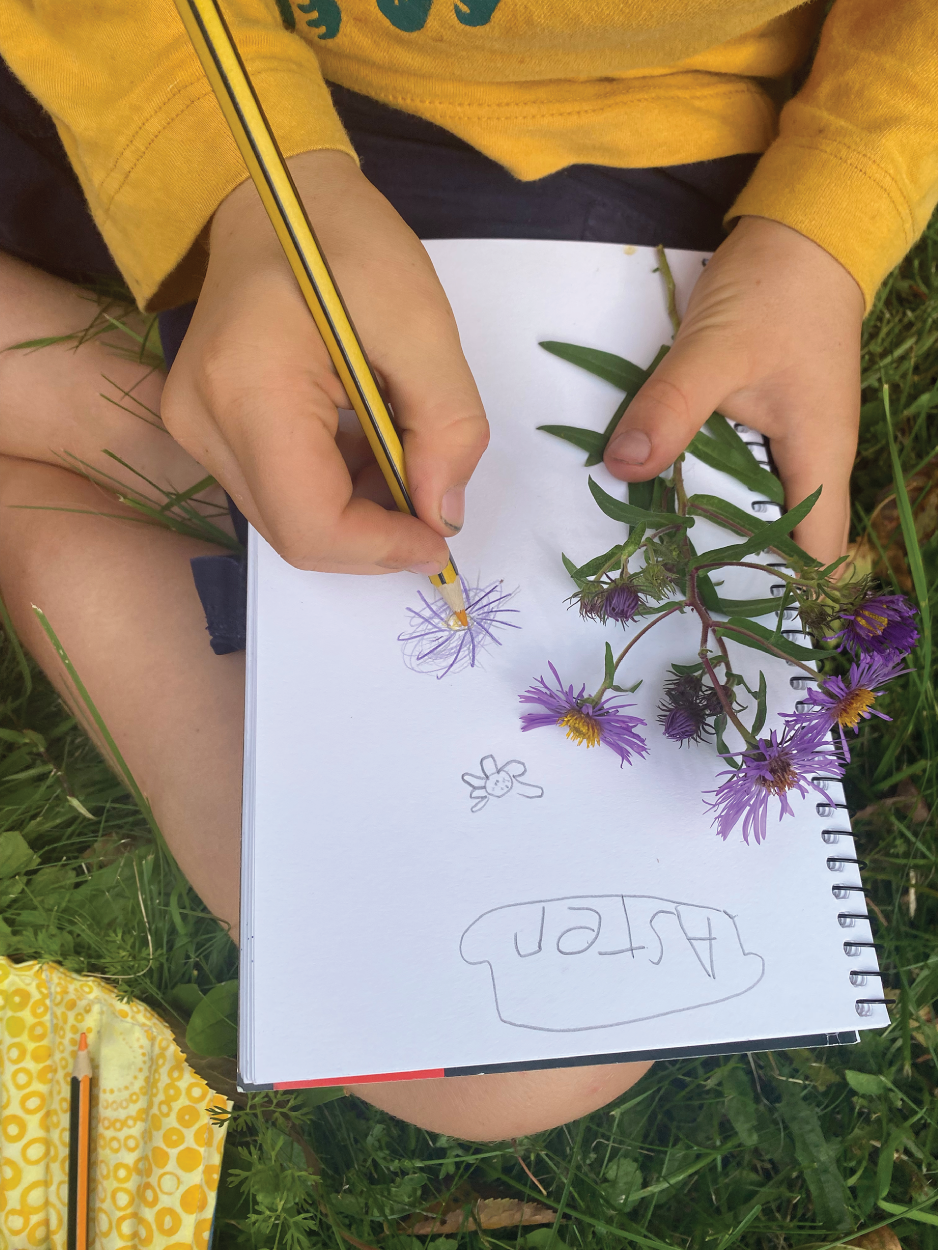
Figure 3.16 A student works on their nature journal
Source: Rachel Tidd
Descriptive writing
Capturing a person, place, emotion, or object through descriptive writing involves paying attention to detail and using as many of your senses as possible to describe the object. In this activity, students will choose a subject from the neighborhood environment to practice descriptive writing.
Materials
- Paper and clipboard or notebook
- Pencil
Activity
- This activity assumes your students have already been introduced to descriptive writing. If this is a new style of writing for them, take time to introduce this type of writing and then move on to the lesson with the following exercise.
- Allow students to choose an object, feature, person, or location in the neighborhood to be the focus of their descriptive writing. Remind them to use as many senses as possible when describing their chosen subject.
Example topics for descriptive writing in the neighborhood:
- A natural object such as a flower, tree, plant, rock, nut, animal, or bird
- Neighborhood objects such as a statue, mailbox, mural, sign, sidewalk, or bike rack
- A location such as a store, park, corner, bus stop, intersection, stoop, bus loop, bridge, empty lot, or playground
- Person in the neighborhood such as a crossing guard, street food seller, newsstand clerk, shopkeeper, park ranger, friendly neighbor, parking lot attendant, etc.
- When your students have finished their writing, ask for a few volunteers to share their work with the class. They should not tell the class the subject that they were writing about. Instead, ask your class to listen and see if they can guess what the writer was describing. They can raise their hands if they would like to guess the subject of the writing.
Adjusting the activity
- You can modify this assignment by changing the amount of writing required. It can range from a few sentences to a short essay. You can also have students draw and label important details of the object.
The neighborhood as the setting of a story
Just as sentence starters can help students get started writing, providing other story elements can have a similar effect. In this activity, the neighborhood is the setting for today's writing. This supplies some structure while allowing students to be creative.
Materials
- Paper and clipboard or notebook
- Pencil
- Optional: Read a book aloud featuring neighborhoods or streets as the setting before beginning this activity.
Read‐aloud suggestions
- Dream Street by Tricia Elam Walker
- Last Stop on Market Street by Matt de la Peña
- The Big Orange Splot by Daniel Pinkwater
- The Snowy Day by Ezra Jack Keats
- The Vanderbeekers of 141st Street by Karina Yan Glaser (This is a chapter book – you may read a selection.)
Activity
- Discuss setting and its importance in stories with your students. In some stories, the setting is central to the story itself, and in others, the setting is minor. If desired, read aloud an example of a story set in a neighborhood to the students. Explain that today they will write a story that takes place in the neighborhood around the school. Together venture out to choose a location for their stories and begin writing. (See Figure 3.17.)
- A great writing style for this activity is a free write. A free write is an easy and relaxed writing method that helps students get their thoughts down without worrying about spelling, punctuation, or even if it makes sense. It is a great way to get reluctant writers writing! Later, students can work on the writing they generated during this activity by revising, editing, adding detail, and expanding on their ideas to improve the story.
- Today is about taking one small idea (setting), spinning a story about it, and getting it down on paper. The only rule for free writes are that they begin writing and they do not stop the whole time. Usually, five to ten minutes is sufficient. You can set a timer and let everyone know to begin writing. If students are too far apart, have them estimate the time or keep writing until they finish at least one side of the paper (adjust to what works best for your students and situation).
- To wrap up the activity, ask for volunteers to share their free writes with a small group or as a whole group. Free writes are often funny when read aloud because they are written very fast, are spontaneous, and may have completely nonsensical parts. Therefore, they are a great way for reluctant writers to feel comfortable sharing their work.
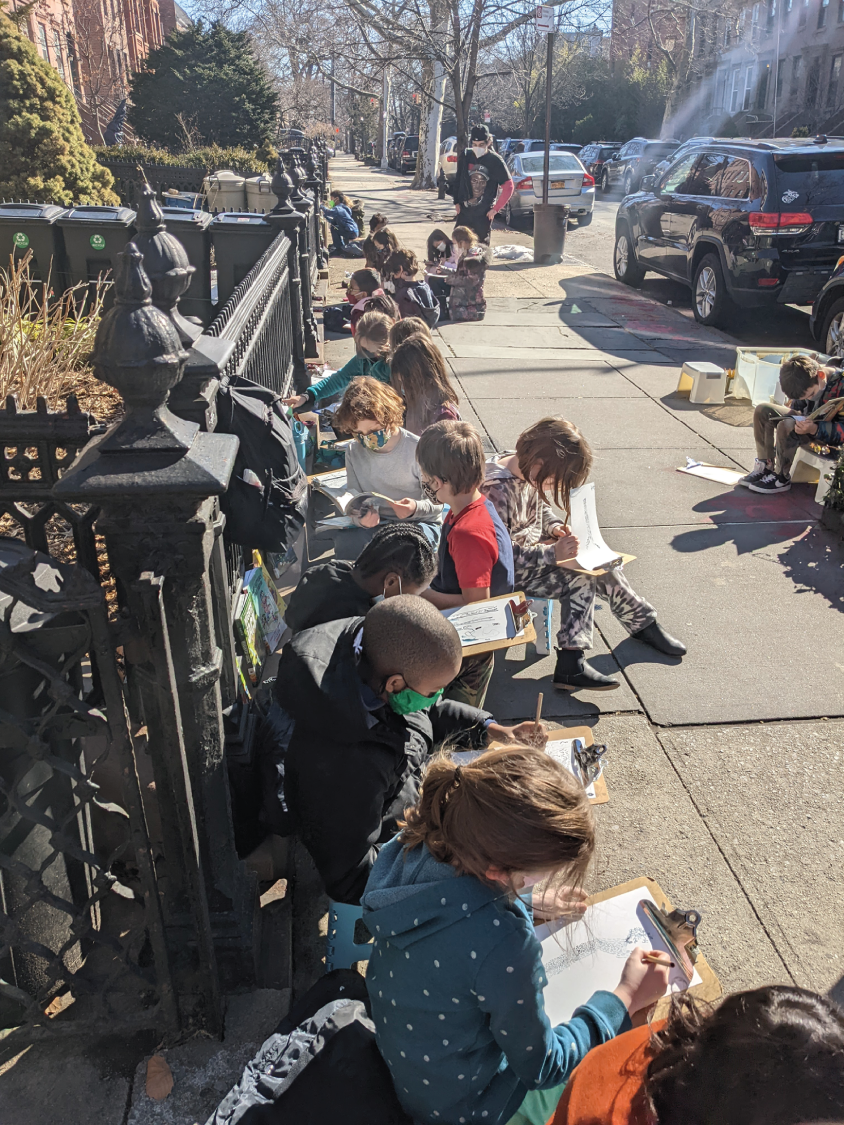
Figure 3.17 Students using the street as inspiration for writing stories
Source: Andrew Chiappetta
Adjusting the activity
- Alternatively, students can write a few sentences and draw a picture. They could also add to their story over several sessions.
Variation
- Students can write several free writes over several neighborhood visits. Then choose one story to revise and develop into a longer, more formal writing piece.
What is beyond that door?
This activity is inspired by the picture book The Neighbors by Einat Tsarfati. This book follows a curious girl who wonders and imagines what is behind the doors in her apartment building. For this activity, you will ask your students to pick a door in the neighborhood and imagine what could be behind it.
Materials
- The Neighbors by Einat Tsarfati
- Notebook
- Pencil
Activity
- Begin by reading aloud the book The Neighbors by Einat Tsarfati to your class. After reading, ask if they have ever wondered what was behind a closed door. Explain that today the class will be visiting the neighborhood near the school. While there, they will choose a door and imagine what might be behind it (see Figure 3.18). Older students can write detailed descriptions. You can adjust this activity for beginning writers by having students draw a picture and add sentences describing what they think is behind the door.
Variations
- Have students revise and edit their work into final pieces. Compile the students’ writing into a class book.
- Have each child or pair of students use the book The Neighbors by Einat Tsarfati as a mentor text. They can use the book as inspiration for writing their version of the story using doors from the neighborhood. This activity is especially popular with older students.
Nature riddles
Children love telling and guessing the answers to riddles! This activity allows children to write and share their riddles based on nature or observations of the neighborhood. Riddles are a fantastic task for reluctant writers because they are short and not overwhelming.
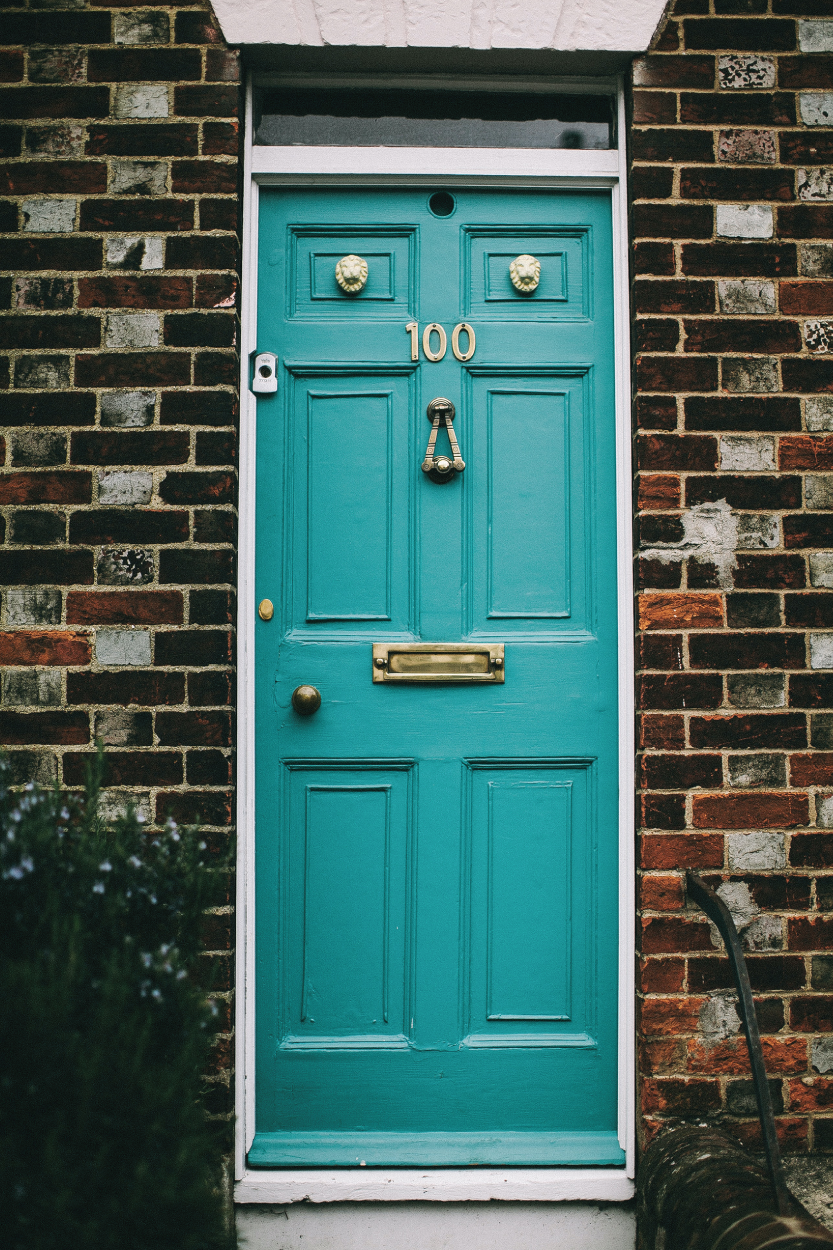
Figure 3.18 What will you find behind door number 100?
Source: Lina Kivaka / Pexels
Materials
- Paper and clipboard or notebook
- A few example riddles and/or the book So Imagine Me: Nature Riddles in Poetry by Lynn Davies
Activity
- Talk about what a riddle is and either read the example riddles and have students guess the answers or read the book So Imagine Me: Nature Riddles in Poetry by Lynn Davies aloud and have students guess the answers to each riddle. Discuss how riddles give just enough information in the clues for someone to guess without giving away the answer. Sometimes the clues included can have multiple meanings.
- Explain that as they venture out into the neighborhood today, they will write their riddle about something in the neighborhood. It can be related to nature or the neighborhood itself. After students have written their riddle(s), divide them into groups and have them take turns sharing and guessing each other's riddles.
Example riddles
- I am short and squat.
- You rarely need me, but I am ready in an emergency.
- What am I?
Answer: A fire hydrant
- I am light gray.
- I pick up after your snack.
- I have two legs.
- What am I?
Answer: A pigeon
Adjusting the activity
- Ask students to write more than one riddle.
- To work on reading skills, give students several teacher‐created riddles using decodable text based on the neighborhood to solve while in the neighborhood. You can differentiate between reading levels by making separate sets of riddles for different groups.
Tourism agency
Children love to give tours and are eager to tell people why their town, neighborhood, or section of the world is unique. This project uses a variety of media formats as a way for students to show others why their neighborhood is special or highlight features that they think are important.
Materials
- Sample tourism brochures, audio tours, and commercials as models
Materials that may be needed depending on chosen project mediums
- Camera or device to take pictures
- Glue stick
- Paper
- Colored pencils
- Computer
- Printer
- Device to record sound and/or video
Activity
- Explain to students that their task is to highlight the great things about their neighborhood and tell people why they should visit. This kind of project is often the job of a chamber of commerce or welcome center. They are often part of local government, and their job is to show people why their city, town, or area is a great place to visit.
- This activity is best after completing several activities in the neighborhood, so they are familiar with its assets. You should plan at least two or three additional visits to the community for planning, research, writing, or filming. This project will typically require some indoor class time as well.
- Have groups of students examine different types of ads for tourism. Have them evaluate them for effectiveness. What kind of information do they include? Have them briefly share their findings with the class.
- Here are some ideas for projects that you can offer to your students. You can modify this list based on the resources available. Most of these options work best as group projects.
Project options
- Design a neighborhood walking tour. The final project can be written and/or an audio version.
- Writing a pamphlet or ad to encourage people to visit our neighborhood or town (see Figure 3.19).
- Write and film a commercial advertising the neighborhood or an aspect of it.
- Write a magazine or travel article about spending an afternoon in your neighborhood or review a park, shop, or other location of interest.
- Interview with a community member.
After groups have chosen a project format, have them brainstorm ideas and begin work on their project. Students working on walking tours or commercials will likely need an extended work period in the neighborhood to record/film.
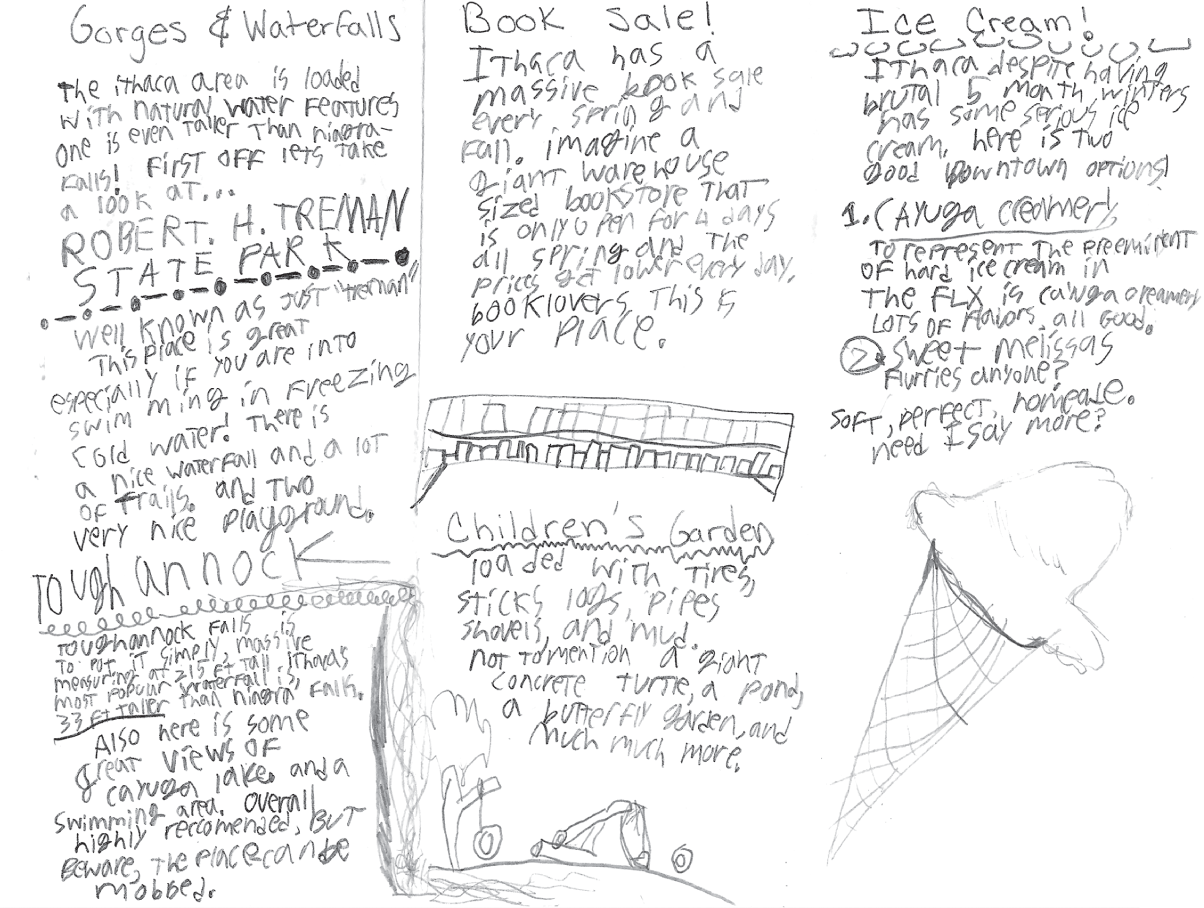
Figure 3.19 Example of pamphlet focusing on Ithaca, New York
Source: Rachel Tidd
Example project class schedule
- Neighborhood visit #1: brainstorming and planning
- Neighborhood visit #2: taking photos, filming, recording, writing
- Neighborhood visit #3: finishing writing/filming
- Classroom: finish writing, audio/video editing
After students have completed the project, have them present their work to their peers or a different class.
Adjusting the activity
- Provide a choice of only one or two types of projects if this type of work is new to your class.
- Provide templates or a list of items that must be included and/or a rubric to provide more structure and guidance for students to follow.
Can you hear snow?
This activity is based on the book Ten Ways to Hear Snow by Cathy Camper. This book is a touching story about a young girl's relationship with her grandmother, who cannot see well. Walking to her grandmother's house she discovers all the many ways you can hear snow. After listening to the story students will write their own version of the story, such as ten ways to hear the rain, see wind, or another idea.
Materials
- Ten Ways to Hear Snow by Cathy Camper
- Notebook
- Pencil
Activity
- Begin by reading the book Ten Ways to Hear Snow by Cathy Camper aloud to the class. Discuss the story and any personal connections they may have to it. Have they ever thought about ways you can tell something is there, even if it is quiet? As a class, brainstorm and record a list of other things that are quiet or silent but can be “heard” in other ways, like snow. You can also extend this to something you know is there even if you can't see it. Some examples are wind, rain, and sun.
- After brainstorming, ask students to pick an item and write their version of “ten ways.” Students may find it easier to work in pairs. Students can take their “ten ways” list and create a short book, adding illustrations.
Adjusting the activity
- Have older students create their own “ten ways” picture book based on rain, wind, or another idea. This can be done individually or in pairs. Then arrange visits to younger classes for them to read their story aloud to the students.
Personification
The outdoor environment is the perfect place to introduce and apply the concept of personification. Personification is giving an object or idea human characteristics. Students will choose an item in the neighborhood to write sentences or a story using personification.
Materials
- Pencil
- Paper
- A picture book with examples of personification such as: The Little Red Pen by Janet Stevens and Susan Sevens Crummel, The Little Engine That Could by Watty Piper, The Curious Garden by Peter Brown, Click, Clack, Moo: Cows That Type by Doreen Cronin, and Sweet Tooth by Margie Palatini
Activity
- Introduce or review the idea of personification and give examples. Then read and discuss with your class the book that features personification. The use of personification is very common in picture books and students are often surprised how they never really noticed it before! Many of your students may already be familiar with the book titles listed, but they will be surprised how looking at the stories through this new lens reveals a new dimension to the story.
- After reading, take a walk in an area of the neighborhood. Have students spread out and choose an object to personify in their writing. Beginning writers may write a sentence or two and add an illustration, while older students can write a short paragraph or story.
Neighborhood odes
Gary Soto is a Mexican American author who writes books, poems, and short stories focusing on Mexican American or Chicano culture and characters. He often incorporates Spanish words into his writing. This book of odes uses descriptive language to highlight the significance of seemingly ordinary objects. This activity will encourage children to think and write creatively about the items and places in their neighborhood!
Materials
- Paper and clipboard or notebook
- Neighborhood Odes: A Poetry Collection by Gary Soto
- Copies of a poem for each student or pair of students
- Chart paper or another method to record student answers
- Pencil
Activity
- Read a few of Gary Soto's odes aloud to your students. Together discuss why they think Gary Soto chose these objects to write an ode about. How does he feel about these items? How can they tell? (Ask them to give examples.)
- Give each student or pair of students a copy of one of the odes. Have them examine the ode for descriptive words, metaphors, repeating words, and words in a different language. Do the lines rhyme? Are there stanzas? How does the author's word choice affect the meaning, tone, or imagery of the ode?
- After students have had time to read and analyze the ode, lead a discussion about what they found. Make a list of student responses to refer to later.
- After they have shared, explain that today they will be writing their own ode about something they like, enjoy, or feel is important in the neighborhood around the school. The class will visit the neighborhood together and have time to choose and write an ode featuring their selected object, place, or person. Odes can come in many different forms. Their ode can be similar in style and structure to Gary Soto's ode or their own creation. Allow time for writing the odes outdoors. (See Figure 3.20.)
- If time allows, ask for volunteers to share their odes with the class. Students can revise and edit their odes into more polished pieces later in the classroom if desired.
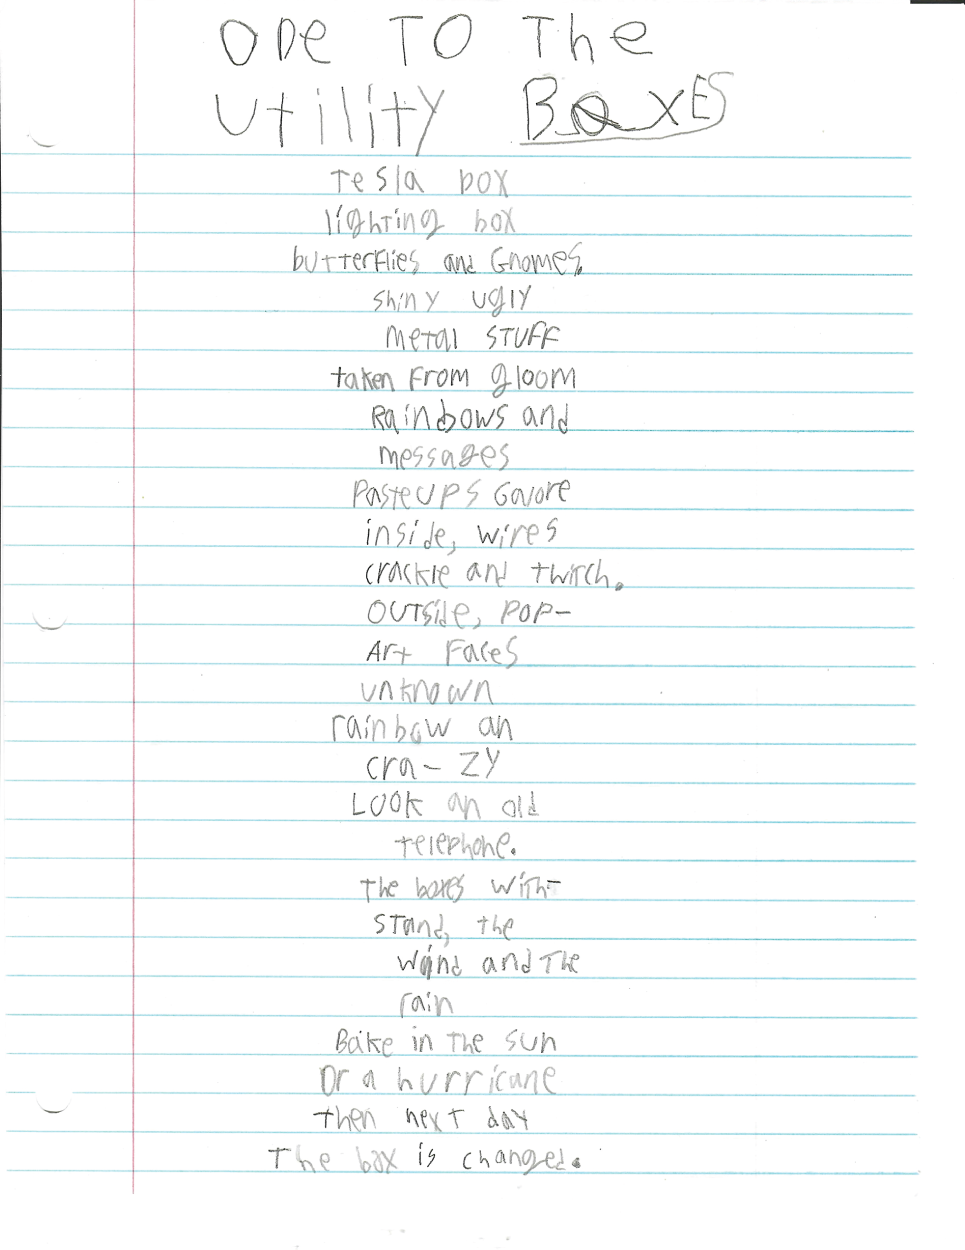
Figure 3.20 Student work sample: An Ode to Painted Utility Boxes
Source: Rachel Tidd
Adjusting the activity
- Try using a simpler poem style such as acrostic, or haiku for beginning writers.
- If the odes are too difficult for students to read independently, read a few odes aloud and analyze them together.
Extensions
- Using words to show importance: Have students write another ode about something important to them. How can they use words to convey this to the reader? How did Gary Soto use words to show the reader why the objects he chose were important?
- Reading odes by other authors: Extend the study of odes by learning about Pablo Neruda's poetry. Older students may enjoy reading Ode to an Onion and Ode to My Socks by Pablo Neruda or Ode to Kool‐Aid by Marcus Jackson, both of which are easily found online. Younger students may enjoy hearing the picture book adaptation Ode to an Onion: Pablo Neruda and His Muse by Alexandria Giardino, or Crown: an Ode to the Fresh Cut by Derrick Barnes.
Final Thoughts
In this chapter, you learned how to use the features around your school to enhance your lessons. You learned how to use environmental print to support reading skills, how to look for arrays around the neighborhood, and even how to use street trees in a yearlong study! In the next chapter, we go farther afield to explore parks and other natural areas for a more immersive learning experience in nature.