
Exploring Farther Afield
The Plants and Animals Around Us
Many children do not have much background knowledge about their habitats in their local area. Getting out and visiting new places gives students a chance to learn more about the plants and animals in their local area. Activities in this section help children practice essential academic skills while gaining a deeper knowledge of the plant and animal world.
Math activities
Math can be found everywhere, even in the most natural habitats. These activities will help students see how math can be found in flowers and leaves and when doing activities such as sledding races!
Flower geometry
Flowers are a fantastic example of how geometry and nature are intertwined. When you look closely at flowers, geometric shapes and patterns reveal themselves. Observing these patterns in the natural environment can be an excellent way to link geometry skills with real‐life examples. Students are often amazed at how many shapes and patterns they find in nature when they begin looking!
Materials
- Paper or notebook
- Pencil
- Optional: camera or tablet capable of taking pictures to examine later
Activity
- Begin by showing examples of flowers that form geometric shapes. These shapes can be observed by looking at the shape created by the outside edges of the flowers. For example, flowers with five petals make a pentagon shape around the outside of the petals, and a five‐pointed star can be made by connecting the petals (see Figures 4.2, 4.3, and 4.4).
- Have them sketch the flowers and the geometric shapes they discover in their notebook or on paper. They should label their drawings with the geometric shape(s) and the flower species. Students may want to investigate the number of shapes they can find in flowers or which shapes are most common.
Collect 100
It is through the process of performing this activity that learning and mathematical thinking happen! Collecting 100 natural items sounds deceptively simple, but it requires students to devise a plan, organize, recount, group, and keep track of the items they have and how many more they need (see Figure 4.5). Another layer of complexity is added to this task when working in pairs or small groups. This activity also builds number sense by building an understanding of the quantity of 100.

Figure 4.2 The petals of a daffodil form a hexagon
Source: Rachel Tidd

Figure 4.3 Examples of triangles observed on a tulip
Source: Rachel Tidd
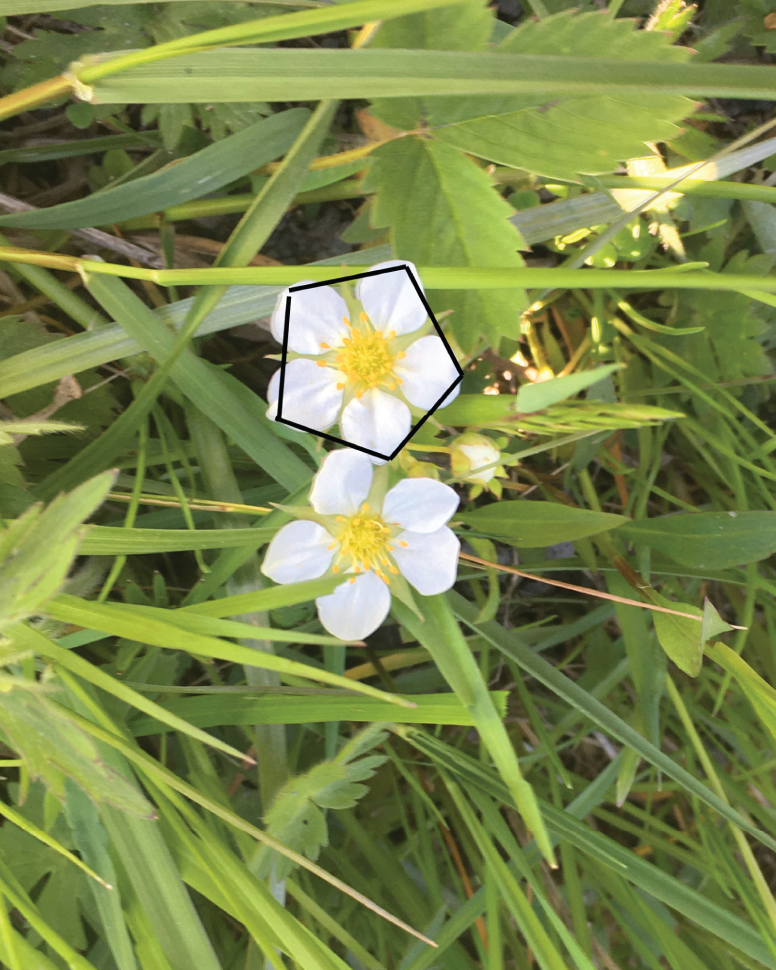
Figure 4.4 The petals of a wild strawberry flower form a pentagon
Source: Rachel Tidd
Materials
- Area to collect natural materials
- A way to keep track of items found such as ten frames drawn in the sand/dirt or chalk
- A large 100 chart (fabric, laminated, or drawn) or simply rows of ten items each
Activity
- The amount of structure and support you provide your students for this activity will vary based on the needs of your students. For students who need more support, provide more direction on how to keep track of the items they are collecting. For example, you may suggest they draw ten frames, make piles or rows of ten, or use a 100 chart (see Figures 4.6 and 4.7). For more advanced students, you may simply ask them to collect 100 items and leave the organization and planning up to them!
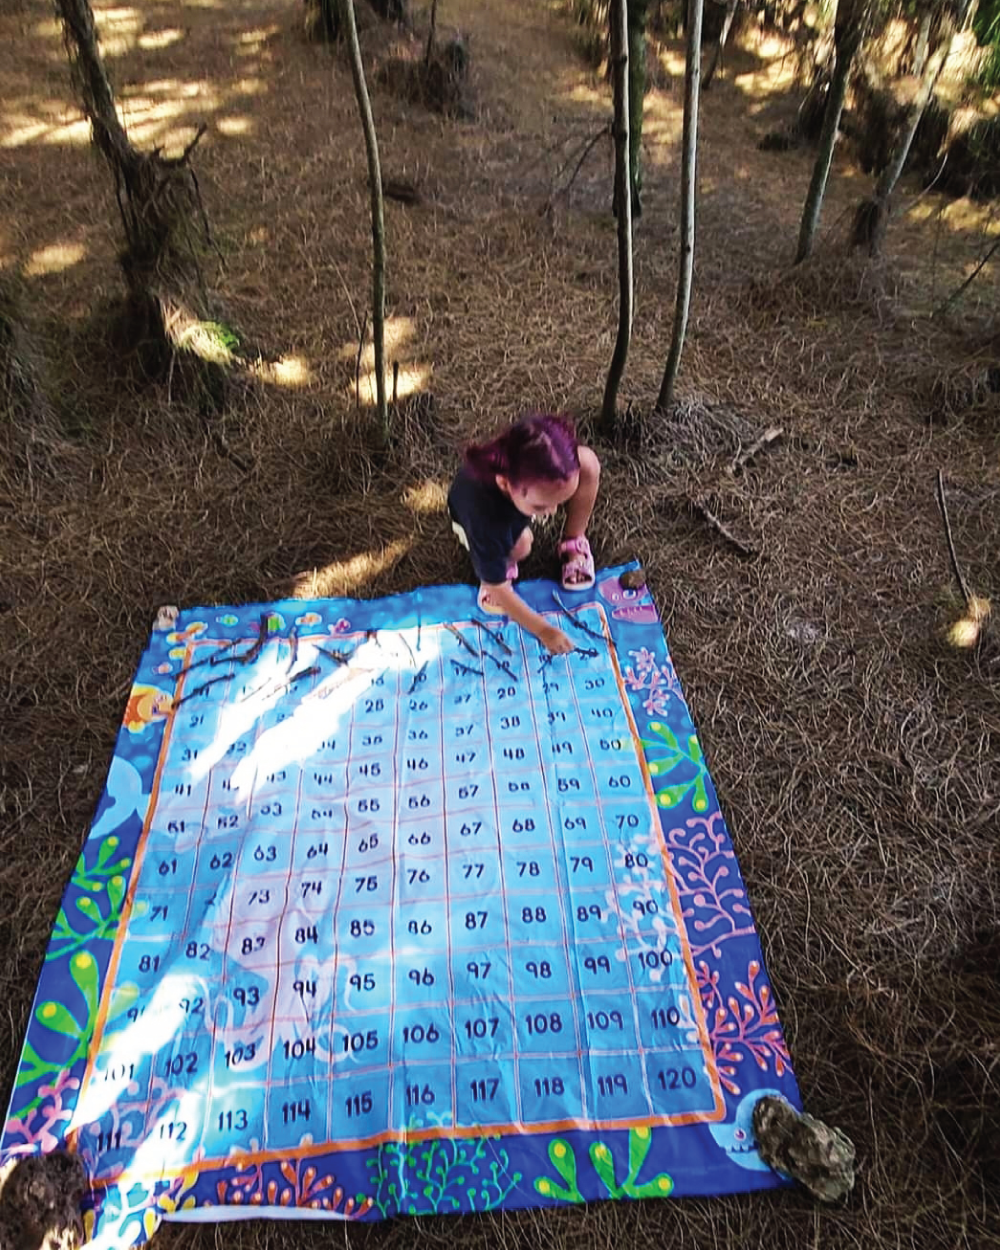
Figure 4.5 Using a giant 100 chart to collect 100 nature items
Source: Elizabeth Snyder
- Lead a short discussion once everyone is finished with the activity. What strategies did students or groups use to keep track of the materials as they collected items? Was this activity more difficult or easier than they initially thought? How many items did the class collect altogether?
Variations
- Have groups or even the entire class collect a much larger number such as 500 or even 1,000. Doing a number this size is best done in a group as it is more time‐consuming. However, collecting the larger number helps students conceptualize the difference in magnitude between 100 and 1,000!
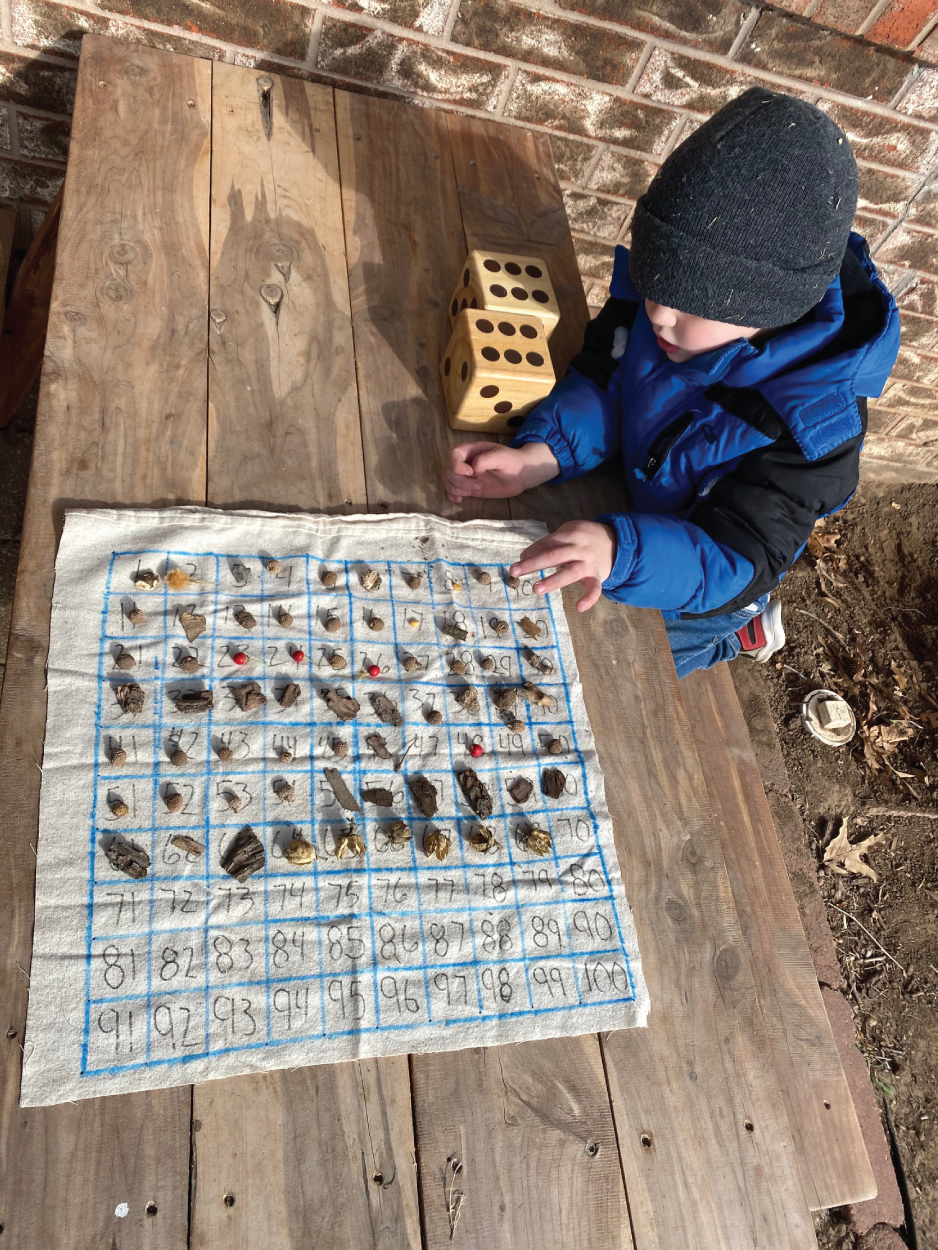
Figure 4.6 Collecting 100 rocks using a 100 chart
Source: Alyssa Conley
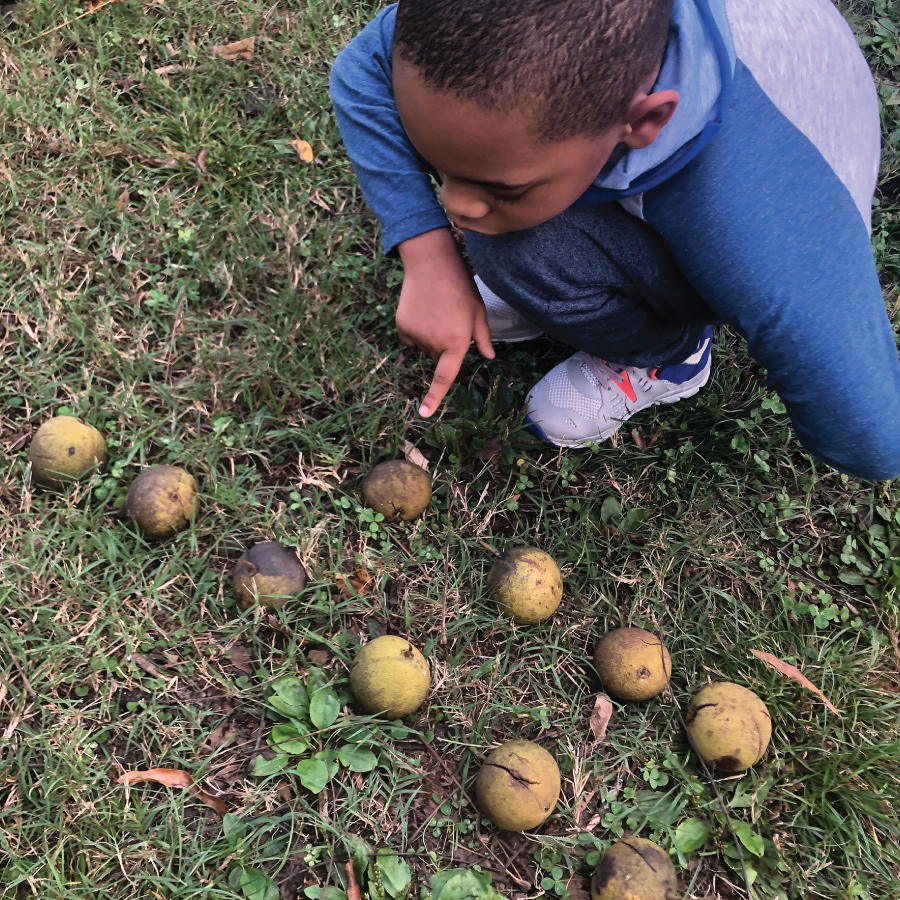
Figure 4.7 Collecting and counting black walnuts for the collect 100 activity
Source: Christal Gamble
Skip counting and multiplication using flowers and leaves
Flower petals and leaves are a fantastic way to model and practice skip counting and multiplication. This is a great way to show examples of math in the natural world. Petals, leaves, and pine needles all grow in groups. For example, wild strawberry petals, violets, white pine needles, and apple blossoms have five petals, clover leaves grow in threes, many maple leaves have three points, and many types of daffodils have six outer petals (see Figure 4.8). This activity can also be done in parks, community gardens, or streets with plantings and landscaping.
Figure 4.8 Students observing groups of daffodils for multiplication practice
Source: Andrew Chiappetta
Materials
- Location with a variety of trees, flowers, plants
- Plant field guides
- Notebook or paper
- Pencil
- Additional materials for specific activities
Activities
- Make a pressed flower fact book: Choose a multiplication fact family. Collect flowers, leaves, or needles and glue or tape on the page to visually model a math fact. For example, two sets of clover leaves (grow in threes) show the multiplication fact 2 × 3. Ask students to make one page for each fact up to 10 or 12 and include the fact and answer. Pressing the leaves or flowers between pages in a large book, between layers of newspaper with a heavy book on top, can make the plants stay flat. This makes them easier to glue or tape into a book. This activity can be differentiated by showcasing addition facts or counting.
- Nature journaling and multiples: Integrate math into nature journaling by having students find and record multiples and/or skip counting by using examples of flowers and plants for each number. When students find an example for a number, they draw the flower or leaves 10 times in their journals. Then label each flower with the multiple and/or the multiplication fact (see Figure 4.9). Challenge them to find as many examples as possible or an example of each of the numbers 1–10.
- Finding groups: Find and observe groups or collect several flowers with a set number of petals. Ask students to find the total number of petals by adding, skip counting, or using multiplication to find the total number of petals. Have them record their calculations in their notebooks. You can also do this activity using leaves and pine needles that grow in groups or by counting the lobes or points of leaves such as maple and oak and bunches of five needles on the white pine tree (see Figure 4.10).

Figure 4.9 Example of writing multiplication fact families using daffodils
Source: Rachel Tidd

Figure 4.10 Using the points on leaves to practice skip counting by threes
Source: Rachel Tidd
Calendar of bloom
Have you ever noticed that you can tell what time of year it is by what is blooming? Where I live the first daffodils and dandelions announce spring, the chicory and daisies welcome summer, and the deep mustard yellow goldenrods and purple asters put on a show for fall. By tuning into these changes and recording which flowers are in bloom on a calendar, students will start making connections between the month, what is blooming, and the seasonal cycles of the year.
Materials
- Copies of a blank calendar
- Pencil
- Colored pencils
- Areas with flowers to observe
Activity
- This ongoing project tracks when flowers bloom throughout the year. Students will record which flowers are blooming over time, looking for trends and making connections between the current season and past seasons they have experienced.
- Begin by taking a class walk and noticing what is in bloom now. Model for students how to fill out the calendar for the current month/year if the calendar is blank. They should add numbers and label the days of the week and the year. Then show them how to record the flowers in the day's square on the calendar. Ask them to draw a picture of the flower and write the name of one or more species of flowers blooming (see Figure 4.11).
- As the school year progresses, continue taking a weekly or biweekly class walk to observe any new species of flowers that are blooming and record them on their calendar. Over time, they will be able to see how different flowers bloom at other times. You may wish to pause periodically so they can examine their observations and discuss them as a class. One pattern students may notice is that the colors of flowers are similar during the same time of year. Think of all the golden hues in the fall, for example. And white flowers in spring!
Variations
- Color‐coded calendar: You can also simply write the species name in the box and color the square the primary color of the flower. To see color patterns more easily, students may wish to color the whole week, reflecting on the most common or prominent color observed.
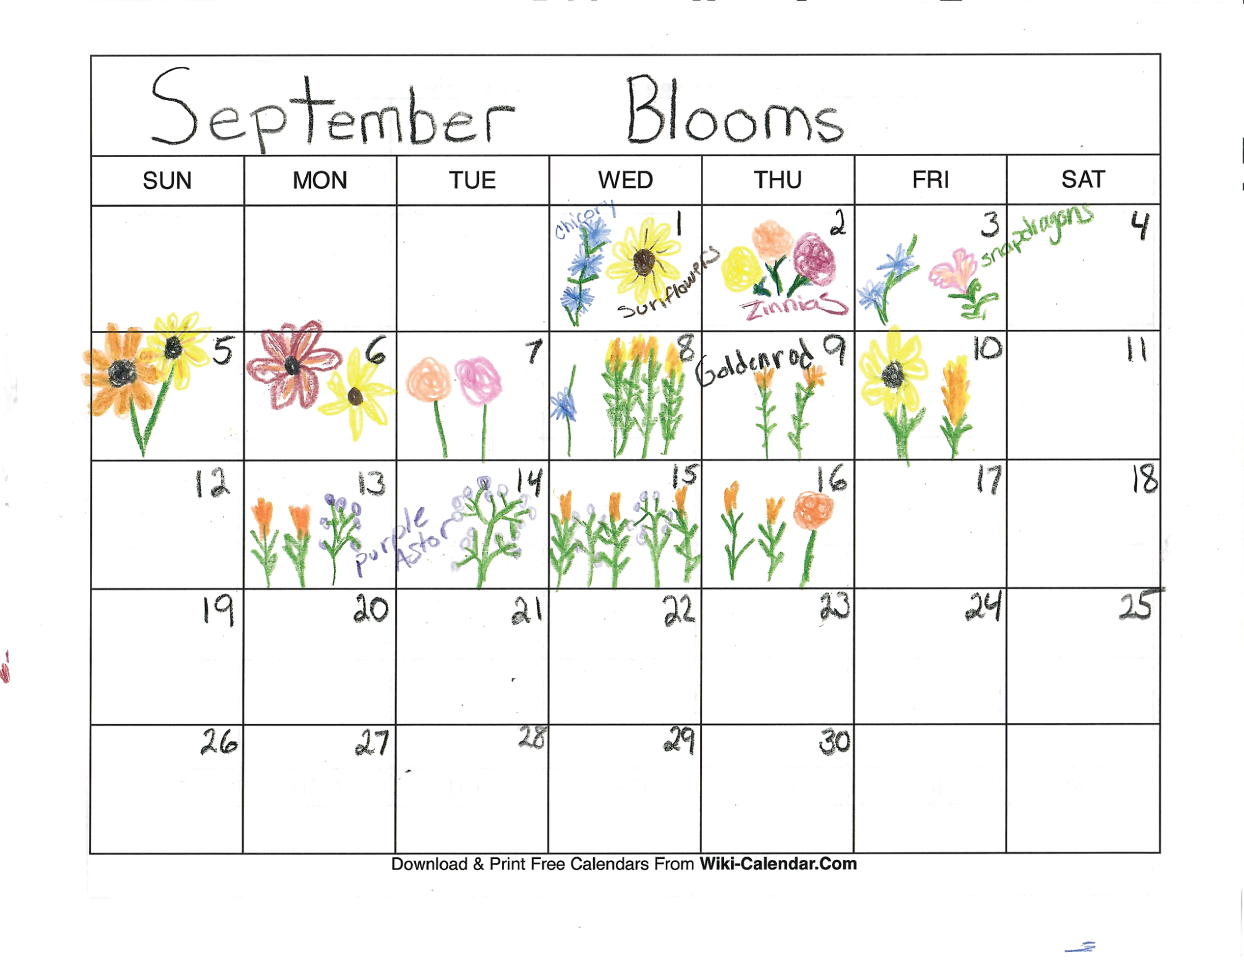
Figure 4.11 An example calendar of bloom
Source: Rachel Tidd
- Class calendar: Add this information to your class calendar or make a class calendar of bloom for display.
- Make predictions: Have children predict what will be the next flower to bloom!
- Nature journal: Ask students to write a nature journal entry detailing all the flowers they saw and add illustrations for each walk.
- Research: Have students research the flowers they observe. Are they native, invasive, or planted? What is the history of the plant? Special features? Where does it grow well? Is it common or rare? Does it grow in your area normally or was it planted?
- Watercolor art: Take watercolors outside and have students paint and re‐create the colors they see! Then label each color with the flower name or a new name they create.
- More data: To collect more data, consider sending the calendar of bloom home with students to record the flowers they see during a specified month.
Sledding races
This activity is always a hit with students! Integrating math, graphing, and science concepts into sledding make for a fun and educational afternoon outside.
If your school does not have sleds, you may want to ask families if they have sleds that the class could borrow for this activity. Another potential option is to have students design their sleds in a separate STEAM project. Consider other items such as hard plastic lunch trays or cookie sheets that might make interesting “sleds.” It can be fun to try different items and see which works best and is the fastest! If you do not have snow where you live, consider sack, scooter, or toy car races.
Materials
- Stopwatches for each group
- A hill or snow pile created by a plow to sled down
- Sleds (store‐bought or DIY)
- Sticks or another object to mark the run distance
- Measuring tape
- Notebook or laminated paper
- Writing utensil appropriate for the method of recording
Activity
- Before planning to do this activity with your class, scope out a suitable location with a hill. Large piles of snow created when plowing can also work as an alternative location if a suitable hill is difficult to find. Always evaluate the area for potential hazards such as trees, roads, and large objects.
- Introduce and explain to your class that today they will be experimenting with sleds to see how fast they can make them travel down the hill. If using a stopwatch is new for your students, give a brief explanation of how to use them.
- Have students measure and mark off their sledding track by marking the start and the finish with a stick. These reference sticks will ensure each run is the same distance and helps the students time runs consistently. They should measure and record the distance between the two sticks.
- Groups should sled down the hill a few times to pack down the snow before collecting data. Have each group member take a turn going down the hill to ensure fairness. Have them check to ensure their sled travels past the reference stick placed at the bottom of the hill. Adjust the location of the reference stick if necessary.
- Have students take turns going down the hill and recording how long it takes for them to travel from the top stick to the bottom stick. They should start the timer when the tip of the sled passes the top stick and then stop the timer when the tip of the sled reaches the stick at the bottom of the hill. In addition, they should record the name of the rider.
- After everyone has had a turn, experiment with the number of passengers, passenger position, and type of sled to see which combination is fastest. They should record the data and specific combinations for each run.
- Encourage students to actively interpret their data after each run and adjust their trial combinations if desired. Questions they may wish to consider might be: Which sled run was the fastest so far? Why do you think it was the fastest? Are the individual passenger runs getting faster as time goes on? Why do you believe that was happening? They can apply the knowledge gained from their data to try new combinations of passengers and other alterations in real time to help them make the sled runs faster! (See Figure 4.12.)
- Graphing, calculating, and analyzing the data can be done on‐site or when back inside the classroom, particularly if you want students to graph their results on paper. To graph their results outside, laminate graph paper so it is waterproof and use dry‐erase crayons or colored pencils for recording.
- Ask each group to compile their data and create a graph showing the run times. They can then calculate the group average, the fastest (shortest time) and slowest (longest time) run, the mode, and the median run time for their group. If the distance/runs of the groups were similar, you may choose to compile the data, make a graph, and calculate the statistics as a whole class.
Have students interpret the data and discuss/answer questions such as:
- What was the fastest run?
- Why do you think it went the fastest?
- What factors seemed to impact the time/speed it took for a sled to travel down the run?
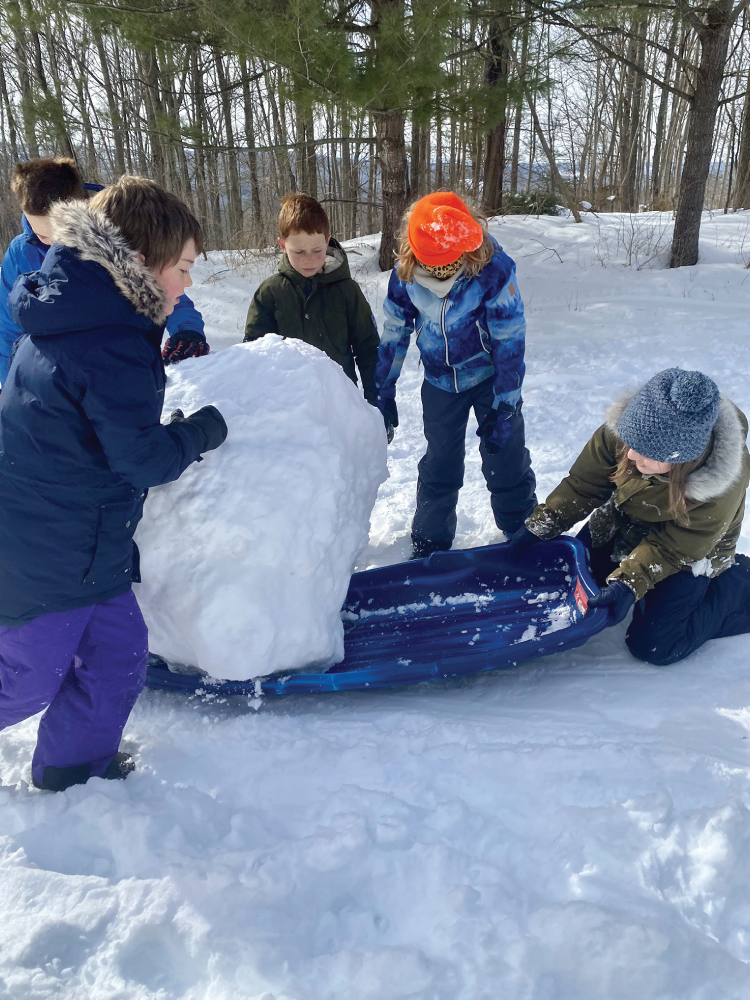
Figure 4.12 A sledding experiment using a giant snowball as the load
Source: Rachel Tidd
- Based on today's experience, what would you do differently if you went back to sled more and why?
- Did you notice anything else about the data?
- How do you think changing the hill's incline would impact the sled's speed? Explain.
- Compare your data with other groups or with the class data. How is it different? How is it similar? Discuss and formulate some possible reasons that the data was similar or different.
Adjusting the activity
- Students in upper grades can calculate the sled's speed and graph the data. The equation for speed = distance/time.
Measuring snow people
Children of all ages enjoy building snow people and snow creatures! Put a mathematical twist on this classic activity by having children measure the height, width, and circumference. Advanced students can calculate the volume of each section and/or the whole creation. Extend this activity by having students write a story using their snow creation as the main character in their story. If you do not have snow in your location, try using sand or other natural materials.
Materials
- Packable snow (or sand, clay, or other materials)
- Measuring tape for each group of students
- Laminated paper
- Dry‐erase crayons or colored pencils
- Natural materials for decorating
- Book about snow people to read aloud
Suggestions for books about snow people:
- The Biggest Snowman Ever by Steven Kroll
- The Biggest, Best Snowman by Margery Cuyler
- Snowzilla by Janet Lawler
- Making a Friend by Tammi Sauer
- All You Need for a Snowman by Alice Schertle
- Making a Friend by Alison McGhee
Activity
- Set the stage for this fun activity by reading a book about building snow people, such as Snowzilla by Janet Lawler. Then explain that today they will work together to build their snow person or snow creature and measure them (see Figure 4.13). Review the metrics you want them to measure or calculate for their creature when they have finished building. You can have students measure each ball's height, width, and circumference and record the numbers on their laminated paper. Divide the class into groups and have them spread out and begin creating their snow people.
- To make a traditional snow creature out of giant balls of snow, students should start by making a ball of snow approximately 6–12 inches in diameter. Next, roll the ball in the snow. As the ball rolls, it picks up a layer of snow and grows larger. Keep rolling until the ball is the desired size (see Figure 4.14).
- When finished building their snow creation, they can measure and calculate its height, length, and circumference. After completing their measurements and/or calculations, they may add details to their creations using natural materials that they find nearby.
Figure 4.13 A snow cat
Source: Rachel Tidd
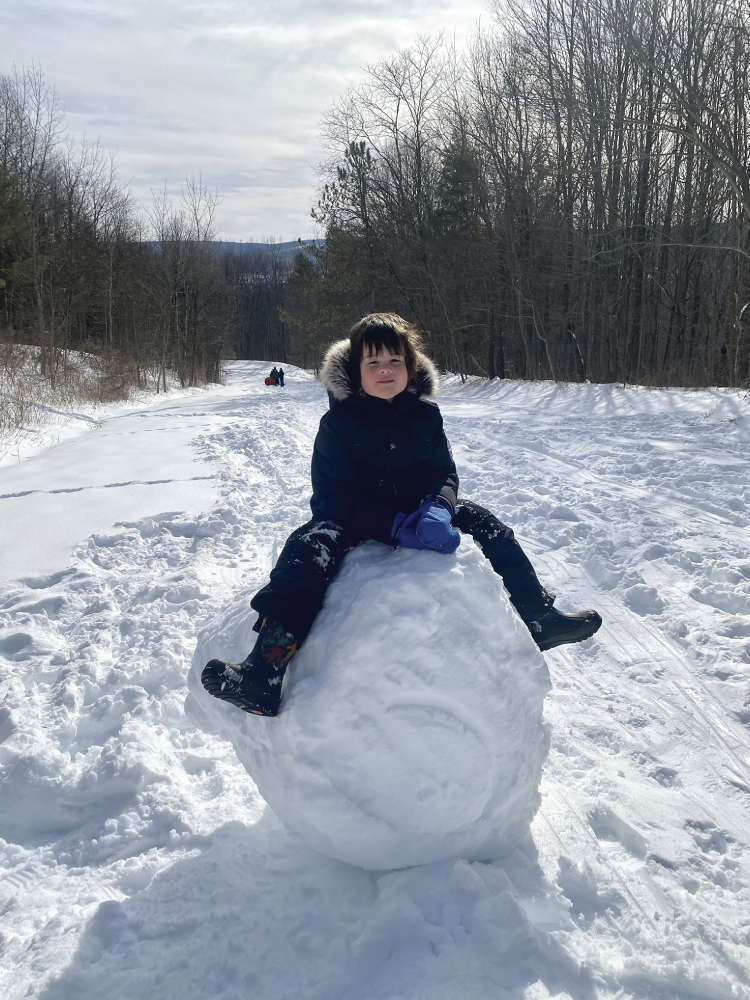
Figure 4.14 Building a giant snow person
Source: Rachel Tidd
Adjusting the activity
- Upper grade students can calculate the volume of each sphere and the total volume of the creation.
Extensions
- Have students write a story about their snow person or creature as the main character.
- Have students write a how‐to that describes how to make a snow person or creature.
Variation
- Have students compete to make the largest snowball, tallest creation, or the most creatively decorated snowperson, creature, or cake (see Figure 4.15). Then have them write a story about or including their creation.
Figure 4.15 Building and decorating a snow cake is a fun alternative to snow creatures
Source: Rachel Tidd
Reading and writing activities
A range of exciting activities to engage children in reading and writing can be found farther afield! These activities utilize these environments’ diverse experiences and natural resources to practice and teach essential literacy skills.
Collect the alphabet
While an alphabet activity may sound like something for younger students, this activity can be quite challenging for all ages! Finding a natural item or plant to represent each letter of the alphabet requires knowledge of the natural world, creative thinking, phonemic awareness, and more!

Figure 4.16 Warm drinks can help keep you warm in cold weather
Source: Rachel Tidd
Materials
- A grid with a space for each letter of the alphabet drawn with chalk on a paved surface, on a large piece of paper, or on fabric with a permanent marker (make sure there is space for each letter)
- Pencil or chalk
- Area to collect natural items
- Flower, tree, and weed field guides for more difficult variations
Activity
- The most basic form of this activity involves groups of students working together to collect a natural item representing each letter the alphabet. You can specify that the item found begins with the sound (or one of the sounds) that the letter can make, the spelling of the item begins with the letter, or both. Draw a large grid on a hard surface, fabric, or on a piece of paper. Using a large grid allows students to place the item in the square representing the letter. Alternatively, you can provide each student with a piece of paper with boxes for each letter. Students can record the name of each item or sketch a picture of it in the appropriate box.
- Finding an item representing all the letters can be quite challenging. Some letters will take creativity to find something that represents them (see Figure 4.17). Finding something for every letter may not be possible depending on the time of year and location. You can have groups compete against each other to see who can find the most items!
Variations
- Define a category from which the items must come, such as trees, plants, and flower species. This will likely require students to use field guides to identify plants. This is an excellent way for students to learn more species of plants! They also can pool their knowledge as a group to identify plant species and find more letters.

Figure 4.17 Natural items collected by students and placed on the letter sound that they begin with
Source: Rachel Tidd
Similes and metaphors
Using nature and natural elements is a fantastic way to learn about and practice writing similes and metaphors. Writing on leaves with a permanent marker provides novelty and the temporary nature of the material often appeals to reluctant writers.
Materials
- Leaves or paper on which to write similes and metaphors
- Permanent marker or pencil
- Example similes and/or metaphors to share with your class
Activity
- Similes compare two things using the words like or as. For example, the tree's branches sheltered the creatures below like an umbrella. We use a metaphor as a comparison that refers to a person, place, or thing as being something else. This type of comparison does not use the words like or as. For example, an apple is nature's candy. Share a few examples of similes and metaphors with your class and discuss the differences. If similes and metaphors are new to your students, focus on one type at a time and extend this activity to two days.
- Then have them venture out to write an example of a simile and a metaphor inspired by the natural environment. They can use a permanent marker to write the similes and metaphors on leaves or use a pencil and record their work on paper. Have them share their writing in groups or with the whole class.
Variations
- Have students select one of their similes or metaphors and write it on paper. Then they can add an illustration. Collect and bind all the papers into a class nature simile and metaphor book.
- Have students write similes and/or metaphors about different categories such as plants, animals, houses, buildings, etc.
Creating a wild seed catalog
Each spring, gardeners look forward to receiving seed catalogs in the mail and planning out their gardens. In this activity, students will collect different seeds and create their own seed catalogs.
Materials
- Examples of seed catalogs
- Paper
- Stapler
- Collected seeds or time and location to collect seeds
- Plant field guides
- Container to collect seeds in, such as an empty egg carton
Activity
- Have students look at examples of seed catalogs and discuss how the companies describe the seeds, the plant that grows from the seed, how they use pictures, and other information included on the page. Explain that today they will work in groups designing and writing their seed catalog for the seeds they collected.
- Have groups of students look for and collect samples of seeds. For this activity, it is important to know what plant the seed came from. Students may use field guides or the internet to assist in identifying any seeds they are unsure of. After they have collected and identified several different seeds, have them each select one seed and design a page of a seed catalog showcasing the seed(s). Their page should include the plant's name, drawing, a description, and a price.
- Have students assemble everyone's finished pages into a book. Add a blank paper for the cover. Choose a title for their seed catalog as a group and illustrate the cover.
Variations
- You can also make a class seed catalog instead of group seed catalogs by having each child choose a different kind of seed and create their catalog page. To do it this way you will need to make sure that there is a different seed specimen for each student in your class. Depending on your geographic location, class size, biodiversity of the area, and season, this may not be possible.
- Instead of a catalog, you may wish to have students design a seed packet. For this, you will need some example seed packets and small envelopes. They can place the seeds inside the envelopes, illustrate the front, and write important information on the back of the envelope.
Adjusting the activity
- For beginning writers or those who need more support, create a simple outline of the page layout.
Tracks tell a story
This activity encourages children not only to identify animal tracks but also to consider the story behind the tracks. Using critical thinking skills and inferences, children can construct either a realistic or a fantastical tale based on the tracks!
Materials
- Paper or notebook
- Pencil
- Access to an area to find tracks of animals (squirrels, dogs, and cats work fine!)
- Animal track field guide
- Optional: camera
Activity
- Have groups venture out and look for animal tracks. Flat muddy areas near streams, ponds, or lakes are excellent locations to look for tracks because many kinds of animals are drawn to water. Looking for tracks on trails after it rains can also be a good strategy. When students find animal prints, have them look carefully at where the tracks are located and the plants and land features nearby and record these details (see Figure 4.18).
Questions to consider when observing tracks:
- What direction was the animal going?
- What direction did the animal come from?
- Does it look like the animal was moving fast or slow?
- Are there any clues as to what the animal was doing? Passing through, browsing for food (deer/rabbits), getting water, or hunting?
- If students do not know what type of animal made the tracks, have them use a field guide to identify the animal. You may wish to have them take a picture of the tracks and the area if you do not plan to complete the writing assignment at the location.

Figure 4.18 Observing animal tracks found in a creek bed
Source: Rachel Tidd
- Once groups have found and identified their tracks, discuss with students how animal tracks are evidence of animals and their movement. By looking closely at the clues, we can construct a possible story of what the animal may have been doing. A great way to record relevant information about the animal tracks is by answering the five W questions: Who? What? Where? When? And why?
- Have groups work together to answer the questions and create a possible story behind the animal tracks. Then have each student work on writing a story that explains the background behind the animal tracks. The story can be realistic or fantasy. The only requirement is to include the facts they gathered about the tracks today.
Adjusting the activity
- Differentiate this activity for the lower grades by having children only work on answering the five W questions.
- Provide a simple graphic organizer to help them organize their answers to the five W questions and their story writing.
Extension
- Pair this with the track casting activity in the science section.
Write from a leaf's perspective
This writing activity can help students understand perspective and its role in how stories are told.
Materials
- Paper
- Pencil
- Colored pencils
- In this activity, have students imagine what it would be like to be a leaf. Then they will make up a story that describes the leaf's perspective and tell it to you. Perspective is the lens through which someone sees the world or from which the story is told. Every person or character's perspective is unique. Often students mix perspective up with the point of view, which is who is narrating or telling the story (first, second, or third person).
Questions to inspire
- What would it feel like to suddenly drop from a tree that had been your only home?
- What might it be like to experience a thunderstorm as a leaf?
- What kinds of things might happen to a leaf? (bugs eating it, changing color in the fall, getting a fungus)
- Have students write their stories and share in groups or ask for volunteers to share with the whole class. You can choose to have students further revise and edit their stories over the next few days or simply use this as a quick, informal writing assignment. Specify the length and expectations appropriate for your student's grade and writing levels before students begin writing.
Build a setting
Building a miniature house or village using natural materials inspires children's creativity. We can then build on this hands‐on activity by having students write a story inspired by their creations.
Materials
- Natural materials
- Paper
- Pencil
- Optional: a camera or tablet to take photos of their creations
Activity
- For this activity, have students find a spot to build a house, or other structure using natural materials they collect nearby (see Figure 4.19). Students can work on the construction individually, in pairs, or groups. After they have finished building their structures, have students imagine a story that takes place in the building/s that they created. Often students like to imagine these small structures as housing magical creatures such as fairies or gnomes, but anything goes! (See Figure 4.20.)
To help students generate ideas, you may want to pose questions such as:
- Who lives here?
- What do they do here?
- Why are they here? Did they choose to be here or are they here for another reason?
- What is a problem that they might face?
- Use a generic graphic organizer to help children brainstorm vital elements of their story such as the characters, problem, and solution. If you want students to add to their writing at a later time, have them take a photo of their creations. When finished, students may share their stories with the class or in smaller groups.
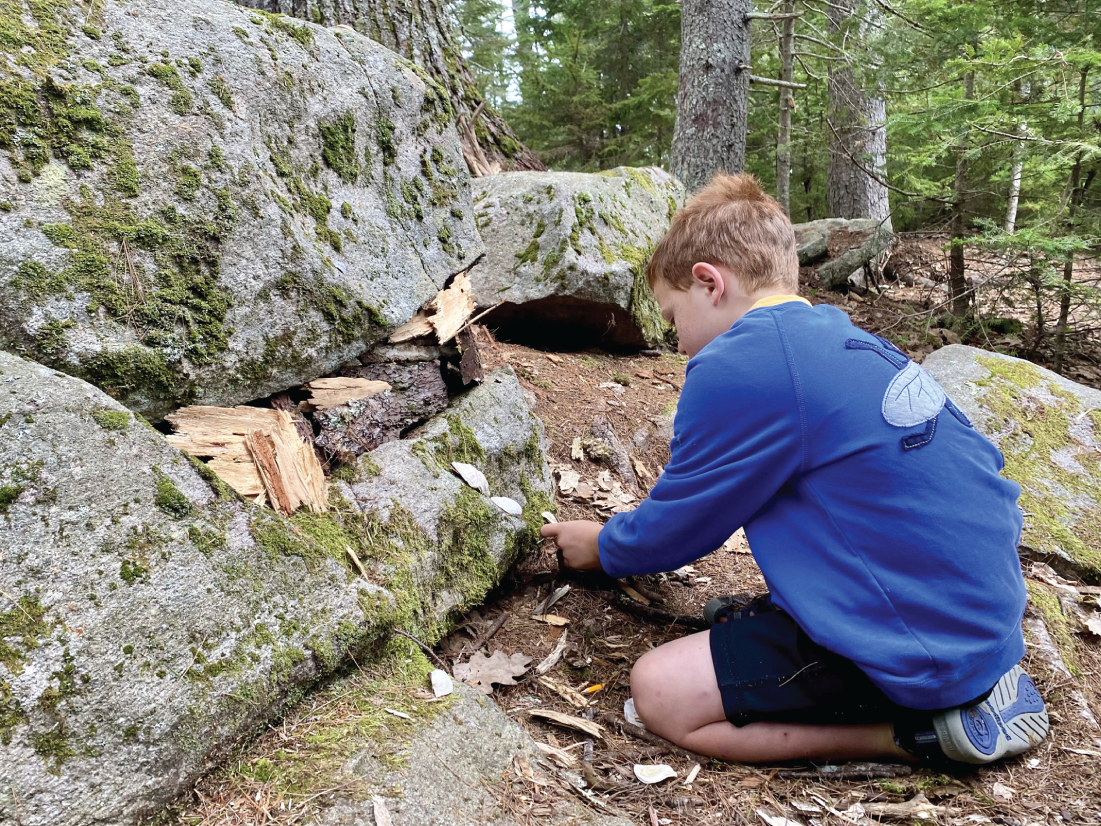
Figure 4.19 Students love to build miniature houses and write about who lives there
Source: Rachel Tidd
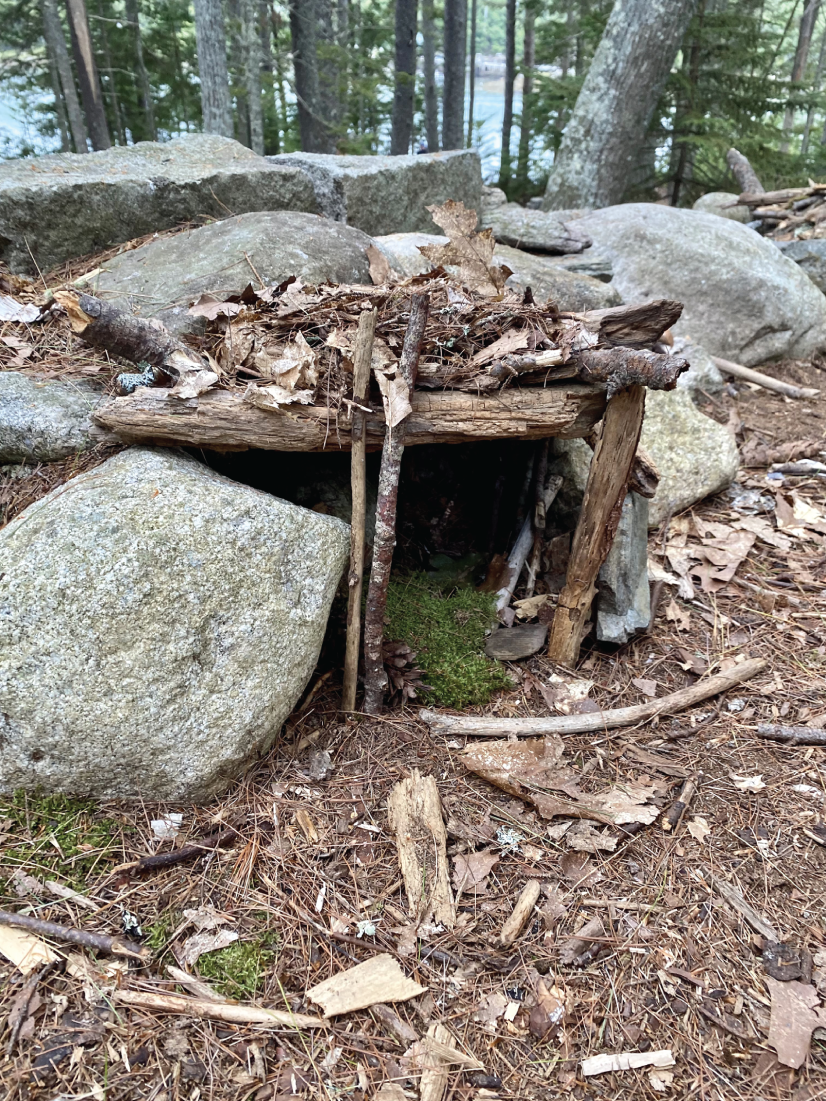
Figure 4.20 A cozy fairy house
Source: Rachel Tidd
Variation
- To practice expository writing skills, students can write a “how‐to” on the process of building a small house using natural materials.
Science
Seeing habitats and the plants and animals that live there firsthand is the best way to learn life science! The following section uses the resources found in most natural areas to learn about plants, birds, and insects.
Plant classification with a dichotomous key
Classification is an important concept in both math and science. Dichotomous keys are often used to identify plants. Often these types of keys can be found in field guides. In this activity, students learn about classification by creating a simple dichotomous key for classification based on the features of plants that they have collected.
Materials
- Collected samples of plants such as leaves or flowers
- Large sheet of paper
- Glue/tape
- Pencil
- Marker
- Field guide with an example of a dichotomous key or copies of a dichotomous key
Activity
- To begin, give examples and explain how a dichotomous key works (see Figure 4.21). Then ask pairs or groups of students to collect 8–10 different samples of plants such as flowers or leaves. They should decide what to call their collection as a whole. This is their starting point. In the following example, all the samples were leaves. This became the starting point for their dichotomous key. Other options could be “plants found in Smith Park” or “flowers in a meadow.” Whatever they choose to call their main category, they should write it on the top of their paper.
- You may wish to model the process for students or lead the class through each step of the activity.
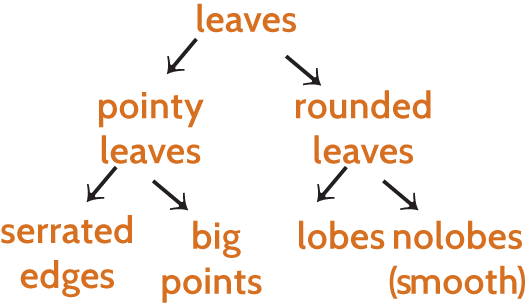
Figure 4.21 Example of a simple dichotomous key
- Once students have collected their plant samples, and chosen a category, they sort the plants they gathered into two main categories according to a single characteristic. The characteristic could be shape, plant parts (leaves, flowers, stem), texture, color, etc. The characteristic should be something physical that can be observed. In the example key, the first two categories are pointy leaves and rounded leaves. Have them label and draw arrows from the main category to two new categories. Be sure to leave space to glue or tape an example specimen for each category onto the paper.
- Next, have them examine the plants in each new category and decide on what feature of the plants they should sort by. In the example, we further sorted the rounded leaves category into leaves with lobes and those without lobes. Have them draw arrows and label the two new categories on the paper. There should be a total of four new categories in this step. As before, make sure they leave room to glue or tape a plant specimen under or next to each category names.
- Stop here or repeat the process until only one plant remains in each category. Then have students choose examples for each category and glue or tape the plant samples next to each category label (see Figure 4.22).
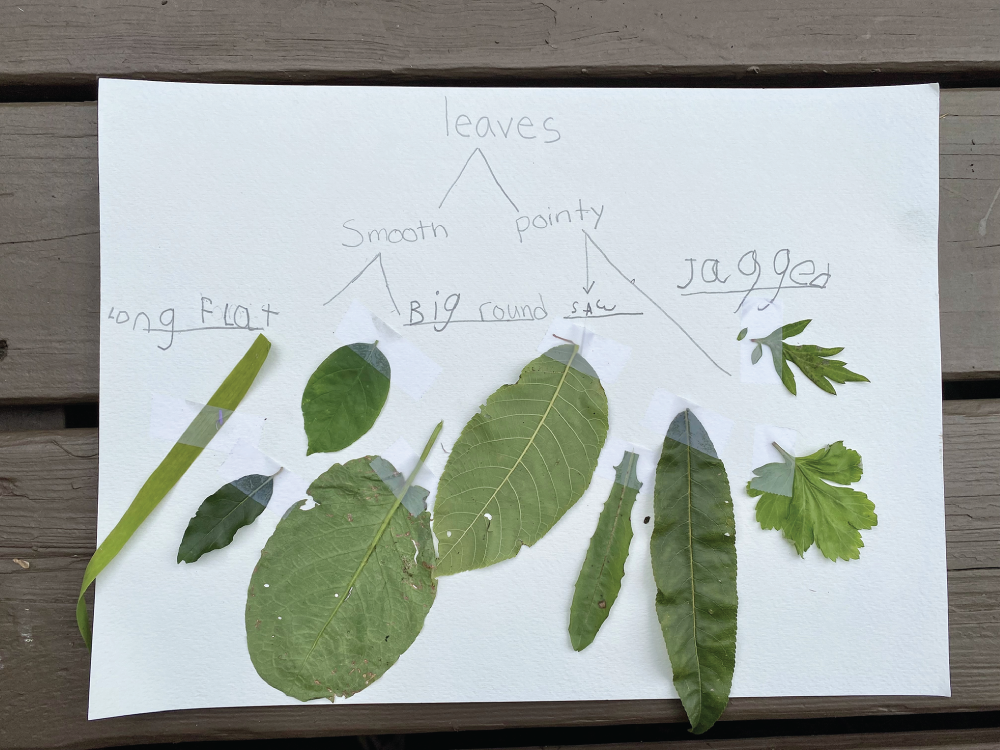
Figure 4.22 Example of a dichotomous key made by a student
Source: Rachel Tidd
Variations
- Have students use a field guide or official dichotomous key to identify and label each plant at the end step of their dichotomous key.
- Focus on one category such as leaves or flowers to create a dichotomous key that helps people identify the type of tree or plant.
- Have students use a dichotomous key to identify trees or plants in the local area. How is this kind of key useful? What are the similarities and differences between the keys that they made?
How seeds spread scavenger hunt
The wide range of methods plants have evolved to spread their seeds is fascinating. Students will look for examples of how seeds spread in this scavenger hunt.
Materials
- Container to collect seeds
- Clear tape
- Pencil
- Clipboard
- How Seeds Spread worksheet or paper for recording (worksheet can be found at discoverwildlearning.com/wild-learning-book-resources)
- Book about how seeds travel such as Flip, Float, Fly: Seeds on the Move by JoAnn Early Macken, Seeds Move by Robin Page, or A Seed Is Sleepy by Dianna Aston.
Activity
- Introduce and discuss how seeds can spread or travel by reading a book about seeds and how they travel before the activity. Together with students, make a list of the main ways seeds spread. The most common categories are wind, water, animal scat, attached or carried by animals, and gravity. Some seeds are spread after fire or explosion.
- Have students work in pairs to find an example of a seed for each method that plants use to spread seeds. Have students use the worksheet or divide their paper into boxes and label (5–6) boxes with one way that seeds can spread (wind, water, animal scat, attached to or carried by animals, gravity, and optional fire or explosion). When they find an example seed, they can tape or sketch the seed in the box that corresponds to how they are spread. If they know what plant the seed is from, have them label it! If they are unsure, provide field guides to help them identify them.
- Afterward, have students share some of the seeds they found and how they spread with the whole class. Some questions you may wish to discuss together might be, what is the most common way that seeds are spread based on their findings? Do some seeds spread in more than one way? Which category do you think is the most successful for spreading seeds? Why?
Variations
- Have students find five different seeds and record the methods that they spread. They can draw or tape the seeds into their notebooks and add labels.
- Have students collect and graph data showing how many plants use each distribution method.
Insect inventory
The insect world is vast and often is mostly invisible to us. Having students look for insects in a specified area and creating graphs of the results will help children understand this important group of living things.
Materials
- Location to look for insects
- Paper
- Graph paper
- Pencil
- String
- Sticks
- Insect field guides that cover your geographic area
Activity
- Before embarking on the insect activity, ensure that the students understand what an insect is. Key physical features of insects are a head, thorax, abdomen, and six legs. They also have an exoskeleton. Review guidelines on interacting respectfully with insects and other living things.
- Divide the class into groups and give them each a 24‐foot piece of string. They will use this string to mark off a square‐ or rectangle‐shaped area for their insect inventory. Once they have laid the string on the ground in the area they want to inventory, they can use small sticks to hold each of the four corners of the rectangle and tie the two ends of the string together (see Figure 4.23).
- Have the students start at one end of the square, identifying and recording the insects found. They should list each species they find and add tallies when they find more of the same species. Students can use field guides to look up unfamiliar species. They should keep cataloging the number and species of insects until they have finished looking through the entire area.
- When they have finished their inventory, they should create a graph using graph paper to show their data. Scientists often must present their data in graphs to help people understand their findings.
Adjusting the activity
- Use a tally chart or graph of only a few of the species found.
- Have students write a paragraph explaining their findings or an entire lab report.
- Posters can also be a great way to display graphs and findings.
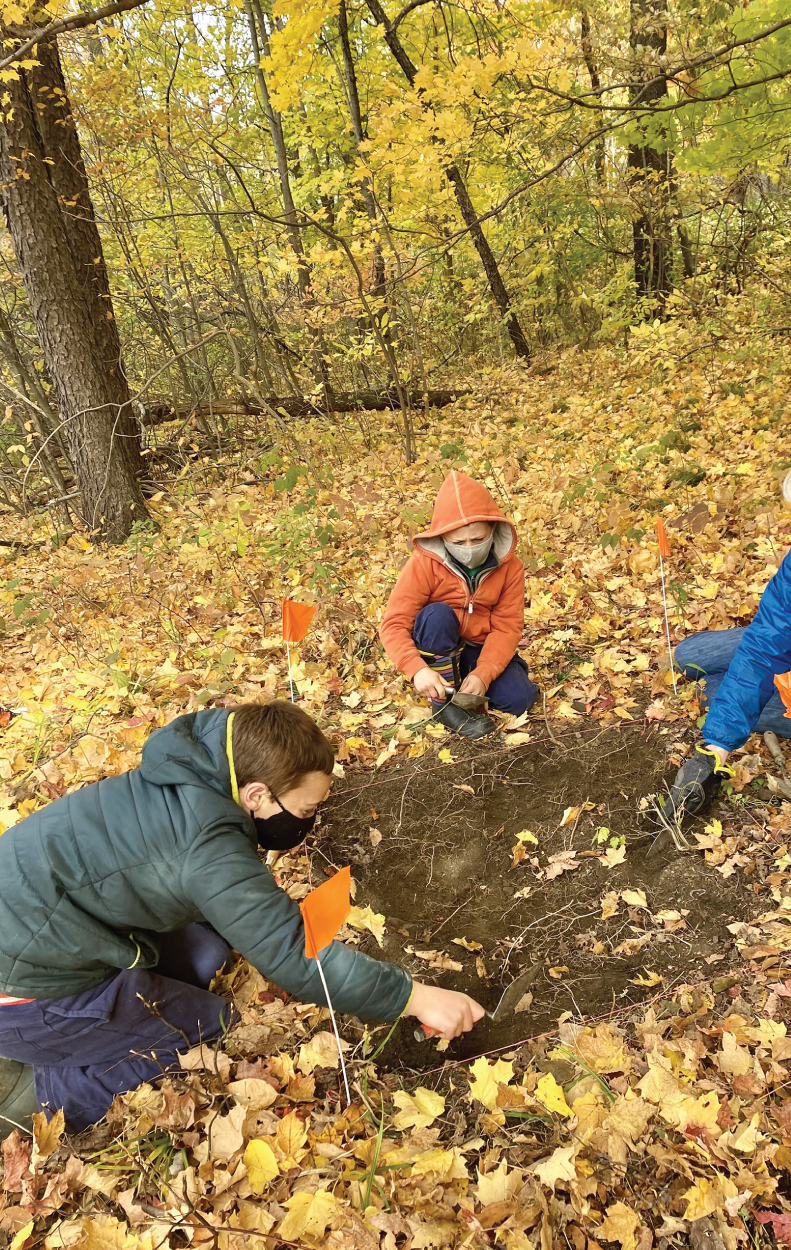
Figure 4.23 Conducting an insect inventory
Source: Rachel Tidd
Variations
- This type of inventory is often called a bio blitz. For variety, you can have students search for plants or other categories such as fungus, lichen, birds, etc.
Bird talk
Students delight in being able to interpret bird language! Once they listen closely to birds and learn a few key attributes of bird communication, it opens up a new awareness of the natural world.
Materials
- The book Bird Talk by Ann Jonas
- Paper
- Pencil
- Access to a location with a variety of birds
- If your students are new to bird calls, you may want to prepare some audio clip examples of the five categories of bird language
Activity
- In this activity, children will listen to birds and record their sounds using phonetic spelling. Introduce the activity by reading the book Bird Talk by Ann Jonas. After reading, discuss how birds have a language of their own and pose the following questions to the class:
- How do birds sound when there is a predator nearby?
- How do they sound when they are happy and greeting the day?
- What other sounds do they make?
- After the discussion, introduce the five main categories of bird language.
- Song
- Alarm
- Aggression
- Companionship/mating
- Juvenile begging
- Talk about each category and give (or have students come up with) examples of each type. If bird language is very new for your students, you may want to prepare some audio samples ahead of time to give more concrete examples.
- Next, explain that today they will listen to birds and write the sounds they hear on paper. They can use letters and words to represent the sounds they hear birds make in their notebooks. If they know what bird species made the sound or what category the sound falls in, they can also record that information. Remind students to stay quiet and try not to move around too much so that they hear as many birds as possible.
- After the observation time is finished, bring the class together to discuss what they saw and heard. You may wish to record their observations on chart paper using columns for each category of bird language.
Suggested discussion questions include:
- What kind of sounds did the birds make?
- What category were the sounds in?
- What do you think they were trying to communicate?
- What types of birds were making them? (They can describe the bird if they are unsure.)
- Were there sounds you heard that you had never heard before?
- Can you re‐create any of the sounds made?
Sample of what an observation may look like
- September 24, 9:00 a.m.
- Cheese‐bur‐ger cheese‐bur‐ger – chickadee – song
- Tweet tweet tweet – sparrow – song?
- Jeer – blue jay – alarm
- Caw Caw Caw – crow – alarm because we were in the woods
Extensions
- Consider having your students share their knowledge with another class by creating a presentation about bird language. Students love sharing their newfound abilities to understand the birds!
- Repeat this activity several times over the month or year. You will be surprised at how fast you and your students can understand bird language!
Bird behavior
Bird watching is a fantastic way to learn about the behavior of birds. Learning how and why animals behave helps us better understand human behavior as well (see Figure 4.24).
Figure 4.24 Observing birds
Source: Rachel Tidd
Materials
- A place to observe birds
- Bird field guide
- Bird Behavior worksheet, available at discoverwildlearning.com/wild-learning-book-resources
- Pencil
- Optional: binoculars
Activity
- In this activity, children will observe bird behavior and record their observations. They will be looking for and recording information about bird behaviors that they observe such as:
- Walking/branch hopping
- Feeding/drinking
- Preening/bathing
- Aggression or territorial behavior
- Nesting
- Mating/courtship
- Parenting
- Singing/alarm calls
- Flying
- Foraging
- Flocking
- Give students a list of these bird behaviors and briefly discuss and solicit examples of each type of behavior from students. It can be fun to ask different groups of students to demonstrate each type of behavior by acting them out briefly in front of the class. To do this you can ask for volunteers or divide the class into groups and give each group a specific bird behavior for which to think of a way to “act it out” for the class. Then have groups take turns showing the class their “bird behaviors.”
- When finished presenting, hand out the behavior checklists and have students head out to observe bird behavior for 5–10 minutes (see Figure 4.25). They should be looking for as many different examples as they can during the allotted time. They should record the behavior, where they saw it, and the birds involved.
- When the time is up, gather as a group and ask for students to share examples of each behavior. Discuss what surprised them or what they learned about bird behavior from this activity. What was the most common bird behavior they saw? The least common behavior?
Extension
- Ask students to come up with a question about bird behavior that they can try to solve through more observations. After observing, students can then use their observations to try and answer the question. They can write a short lab report or paragraph describing their findings.
Track casting
This fun activity pairs well with “Tracks Tell a Story” in the “Reading and Writing Activities” section. Children love having their very own plaster cast of the animal tracks they found to take home!
Materials
- Plaster of Paris
- Access to animal tracks (creeks and other water bodies are great places to look)
Figure 4.25 Observing waterbirds
Source: Rachel Tidd
- Resealable sandwich bag for each track or child
- If the site has limited access to water, bring a jug or container filled with enough water to cast tracks for your students.
- Several ½‐cup measuring cups
- Animal track field guide or resource
- Large container for transporting tracks safely
Preparation
- Typically, plaster of Paris requires two parts plaster to one part water. Place one cup of plaster in a resealable sandwich bag for each student. You will need to take a total of one‐half cup of water for each student. You can carry a gallon jug of water (ask students to help carry it) and measuring cup or bring only measuring cups with you if you plan on being near enough to a source of fresh water such as a creek, lake, or pond.
Activity
- In this activity, children will use plaster of Paris to make a hard cast of an animal track. The best tracks for this activity are those that leave deep imprints in the mud or sand. An ideal place for track casting is in flat muddy areas near streams, ponds, or lakes. Animals are drawn to water, and the soft sand and mud found in these areas are the perfect medium for animal tracks (see Figure 4.26).
- Have students work in groups looking for a good animal track for casting. Once a suitable track has been found, they can make a dam or barrier around the track using sand/mud to hold the plaster. When the dam is finished, they can pour one‐half cup of water into the bag containing the plaster and mix. Once the plaster is mixed, they have about 5–10 minutes to pour and work with it. Make sure to emphasize that they should not mix their plaster until they are ready to pour it into the track!
- After they pour the mixture of plaster and water into the track, they should use a stick to spread it evenly in the area around the track and up to the sides of the dam. It will take about 20–30 minutes to harden. When the plaster has almost hardened, have them use a thin stick to write their name or initials on the back carefully. Once the plaster has fully hardened, they can remove the sand dam and carefully lift out the plaster mold. They can scrape some of the sand and dirt off with their finger and carefully transport it back to the classroom. You may wish to have a plastic container or bucket to transport the tracks home safely.
- If students are careful and the animal track holds up, more than one student can use it for casting. If there are not enough tracks for each student to make a cast, have students work in groups and display the casts in the classroom for everyone to enjoy.
- While students wait for the plaster to harden and others to have their turn, have them use field guides to identify the tracks they found. They should also record the date and location of the tracks. They can also record facts from the field guide about the animal that made them. Once back in the classroom, place the tracks in a safe place to dry fully.
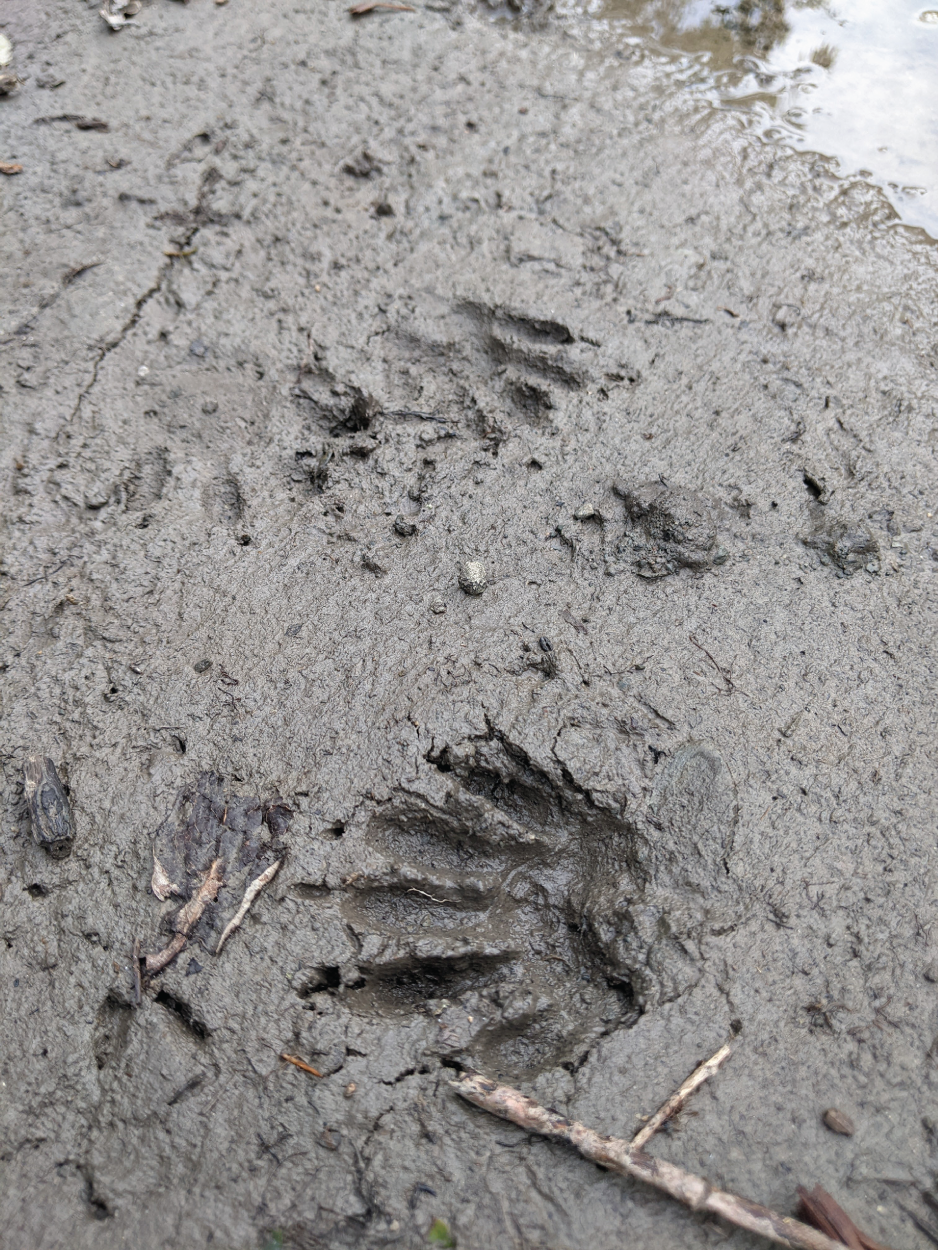
Figure 4.26 Raccoon tracks left in the mud
Source: Rachel Tidd
- The YouTube video on track casting from MyNatureApps is helpful: https://youtu.be/Y4WTmgo4zeA
Developing a Sit Spot Practice
Taking time to slow down and connect with the natural world can be challenging in our day‐to‐day lives. Sit spots are simply a spot to sit and quietly observe nature. They can be anywhere that a bit of nature can be observed. Some good locations are the base of a tree, a park bench, a porch or balcony, a backyard corner, up on a tree branch, a picnic table, or a rock by a stream. Each location will reveal its own unique secrets.
Students will develop a deeper connection to nature and hone their observation skills by noticing and tracking changes and paying attention to the small details, such as who lives and grows at their particular spot. Students will return to this special spot throughout the year, noticing new changes and focusing on a different element. A sit spot can be meditative and help children relieve stress.
Sit spot journaling
By journaling about sit spots, students create a record of their observations. These journal entries can help them notice subtle changes and remember observations over the year. Children love looking back at their sit spot journal entries at the end of the year and marveling at all the changes that took place.
Materials
- Pencil
- Notebook
- Sit spot location
Activity
- Explain what a sit spot is to your students and ask them to find their special place. Make sure to clearly define how far children may venture to find their spots (see Figure 4.27). Once everyone has found their spot, announce it is time to start. Have students sit in the spot and observe for at least five minutes. You may need to work up to a longer observation time. Start by observing for only a few minutes and over time gradually increase the time.
- After five minutes, have students note any animals they have seen, plants growing there, the weather, sounds they may have heard, etc. These observations can be as detailed as they like. Modify your requirements based on the age and writing level of your students.
- Afterward, have students share some of their observations with the whole class or in small groups. They can share what they saw and how they felt during this experience.
Questions that might help them reflect on their experience are:
- Did your feelings change as time progressed?
- Did you feel more relaxed?
- Did your mind wander?
- How did it feel to be alone in nature?
Variations
- Writers for websites, social media, museum exhibits, and other public places often write descriptions of images for those that have visual impairments. Have students describe their sit spot for someone who is visually impaired. Make sure they describe their location using multiple senses and as much detail as possible.
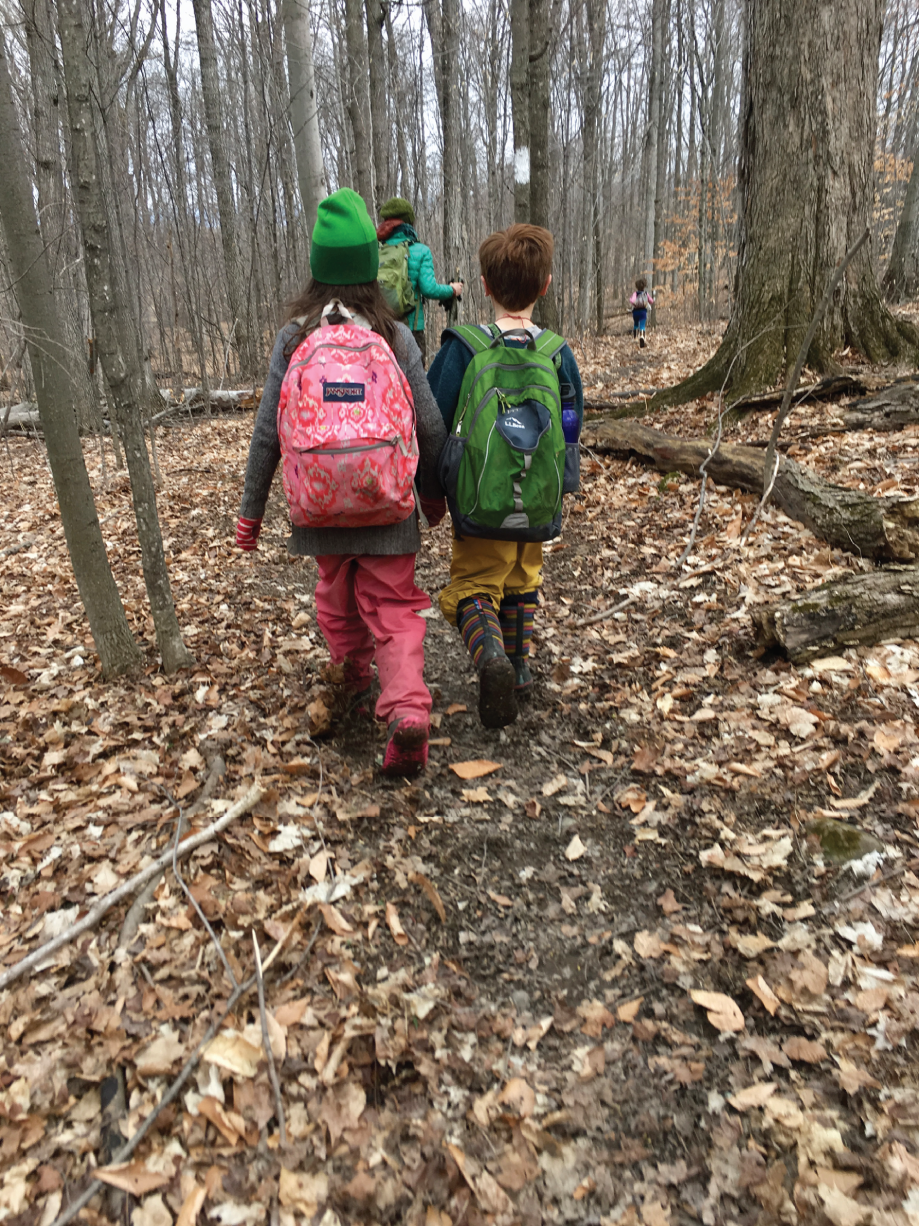
Figure 4.27 Students heading out to their sit spots
Source: Rachel Tidd
Mapping sit spots
When mapping a sit spot, students examine their sit spots through a new lens. They take their observations and translate them into map form. At the same time, they are applying concepts such as direction, scale, orientation, and more in the process.
Materials
- Pencil
- Notebook or paper
- Colored pencils
- Sit spot location
Activity
- Begin by asking students to sit in their sit spot and observe for a few minutes. While observing, ask them to pay special attention to the main features of your spot. Is there a large oak tree on the left? A fence running behind it?
- After observing for a few minutes, have them sketch a map of their sit spot location. Make sure they include all the major landmarks – trees, streams, fences, bushes, paths, where you are sitting, buildings, if any, etc.
- Once students have drawn the major landmarks, encourage them to add details such as plants, flowers, and any animal friends that often visit their spot. Finally, have students add labels to all the main features of their sit spot and add color (see Figure 4.28).
Adjusting the activity
- Encourage older students to consider using a rough scale to make their map more accurate and to add details such as a compass rose.
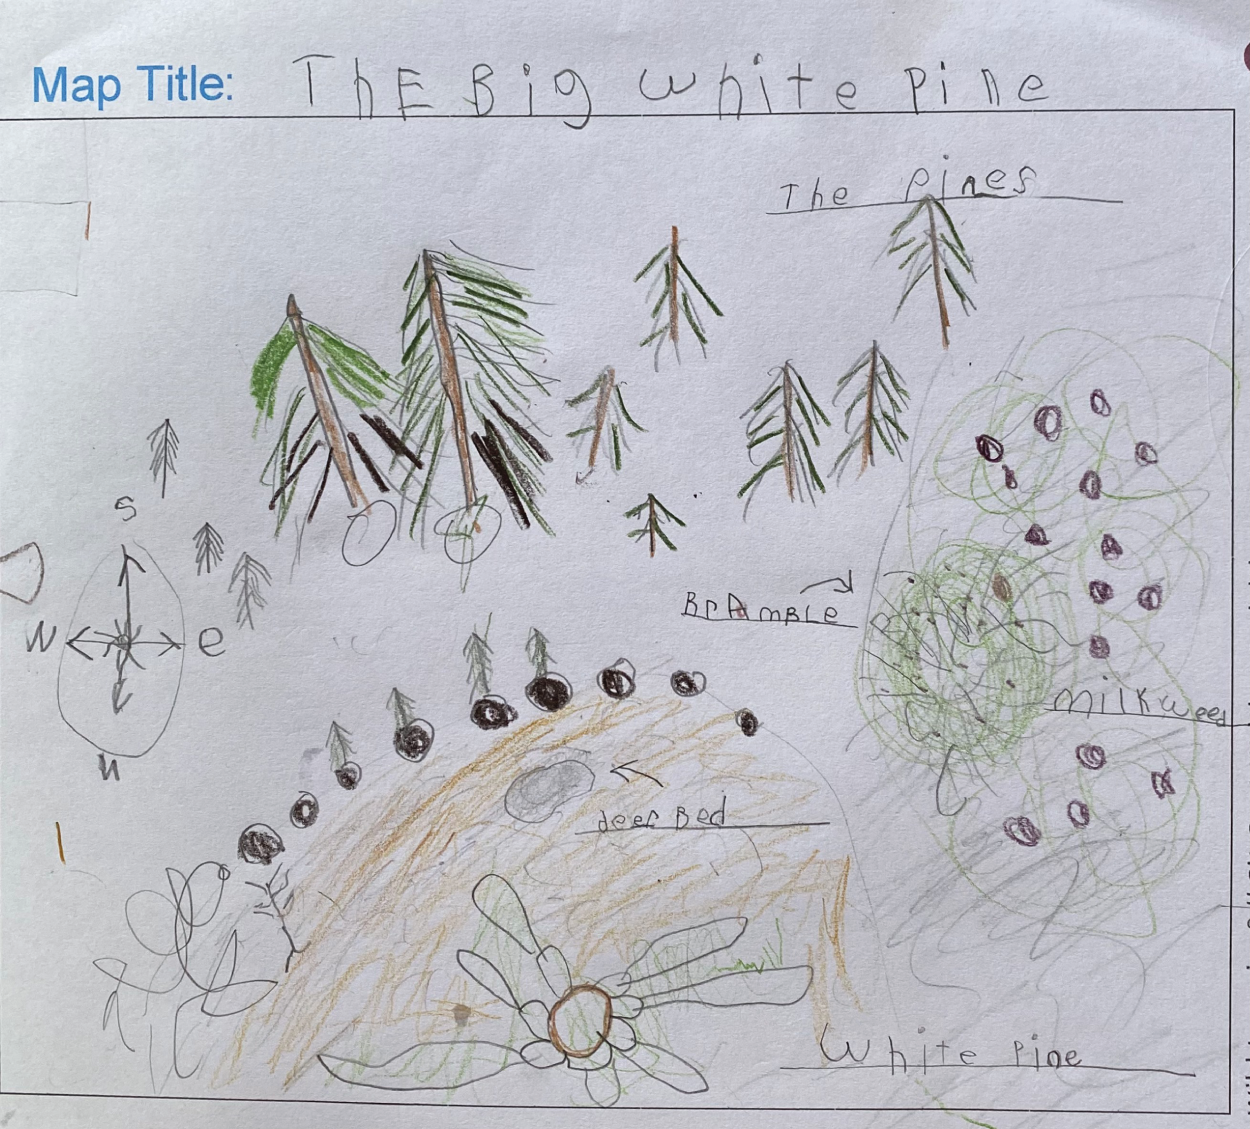
Figure 4.28 A student map of their sit spot
Source: Rachel Tidd
Sit spot news
Students always love this activity because they can pretend they are reporters for a newspaper. They use their observations to create headlines and/or write short articles for their imaginary newspaper.
Materials
- Pencil
- Paper or Sit Spot Times worksheet, available at discoverwildlearning.com/wild-learning-book-resources
- Sit spot location
Activity
- Pose this question to your students: If there was a newspaper that covered the events and changes in your sit spot, what would the headlines be? When students observe their sit spots today, have them view their spot through the lens of a reporter (see Figure 4.29).
- After making their observations, students will use them to write headlines for a newspaper. Explain that headlines are like the title of a book: They help draw a reader's attention to what is happening in the city, town, or in this case, their sit spot! After observing, you may have students simply record their headlines on paper or use the Sit Spot Times worksheet to record their headlines and draw a picture of one of the events (see Figure 4.30).
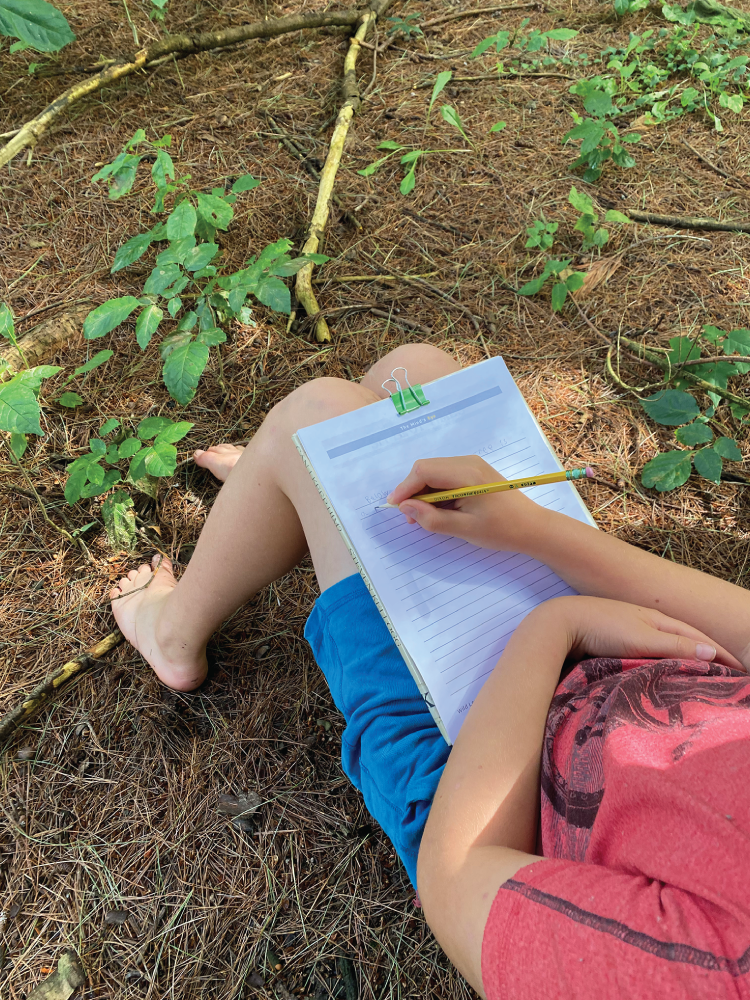
Figure 4.29 Writing sit spot news headlines
Source: Rachel Tidd
Questions that may help them when observing their sit spots
- What changes have there been?
- Are there any signs of a changing season?
- Are some plants no longer at their peak and others now blooming?
- What visitors have you seen today?
- What are the current weather conditions?
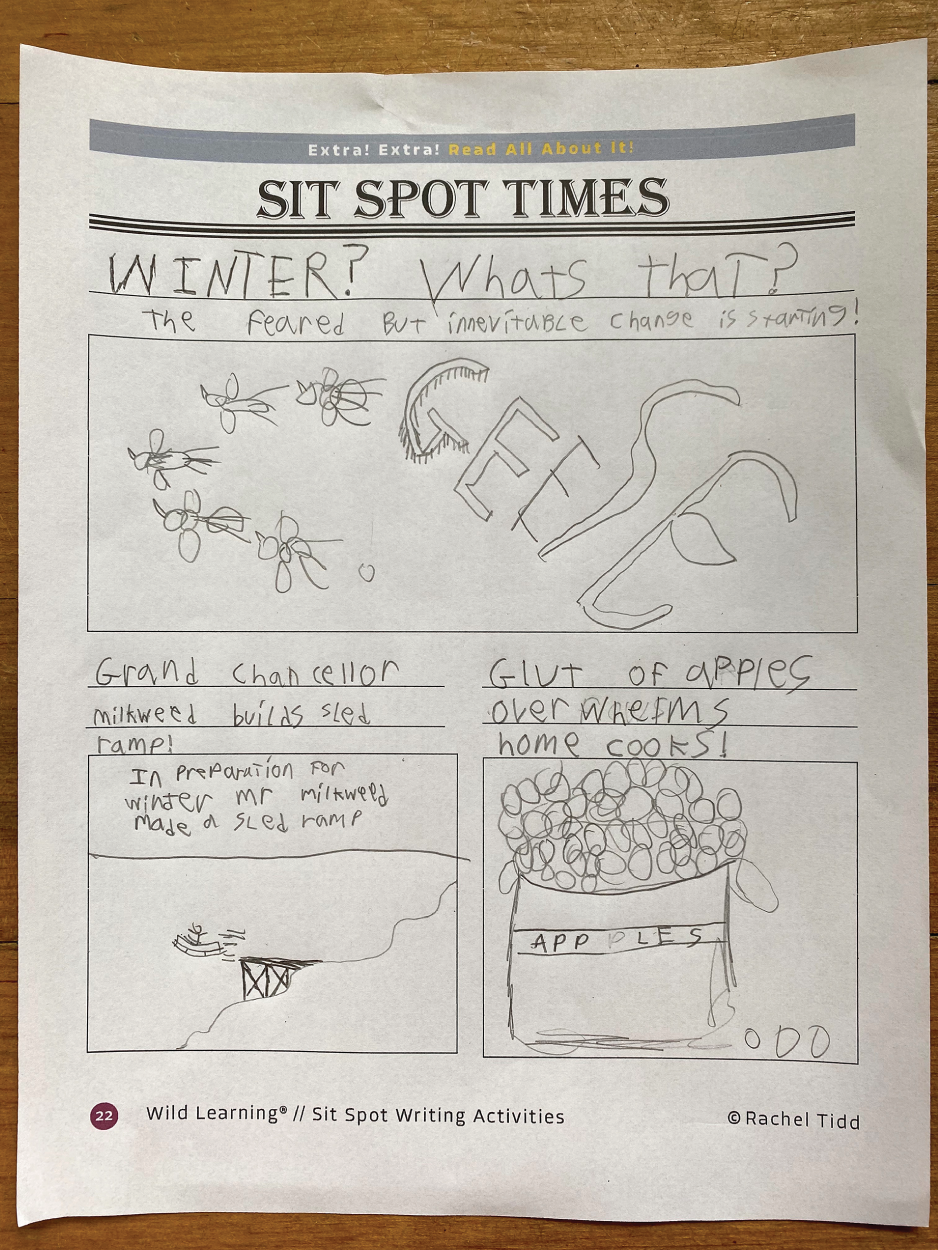
Figure 4.30 Student work example: Sit Spot Times
Source: Rachel Tidd
Example headlines
- Sparrow Rushes to Finish Nest!
- First Frost Kills Flowers!
- Maples Put on Fiery Display for Autumn!
Adjusting the activity
- You can take this activity to the next level by having students choose one of their headlines and write a short article about it. Combine articles from the class to make a class newspaper!
Sit spot as the setting
When writing a story, we often begin with creating the plot or characters. In this activity, students will instead use their sit spot as a setting to inspire a story.
Materials
- Pencil
- Paper
- Sit spot location
Activity
- After a few minutes of observations at their sit spots, ask students to create a story that takes place in their sit spot. It can be in any style or genre they wish! The only requirement is that the story's setting is their sit spot.
- After writing, have some students share their pieces with the class. The creative ways that children weave the sit spots into stories are entertaining and can inspire their classmates' writing. This may be an activity you wish to repeat more than once (see Figure 4.31).
Adjusting the activity
- Beginning writers may draw a picture of the story at their sit spot, then work on the writing portion in a subsequent outdoor session or during writing time in the classroom.
- Provide graphic organizers to help students brainstorm and organize the major parts of the story.
- Have students revise and fine‐tune their stories until they have a polished final version.
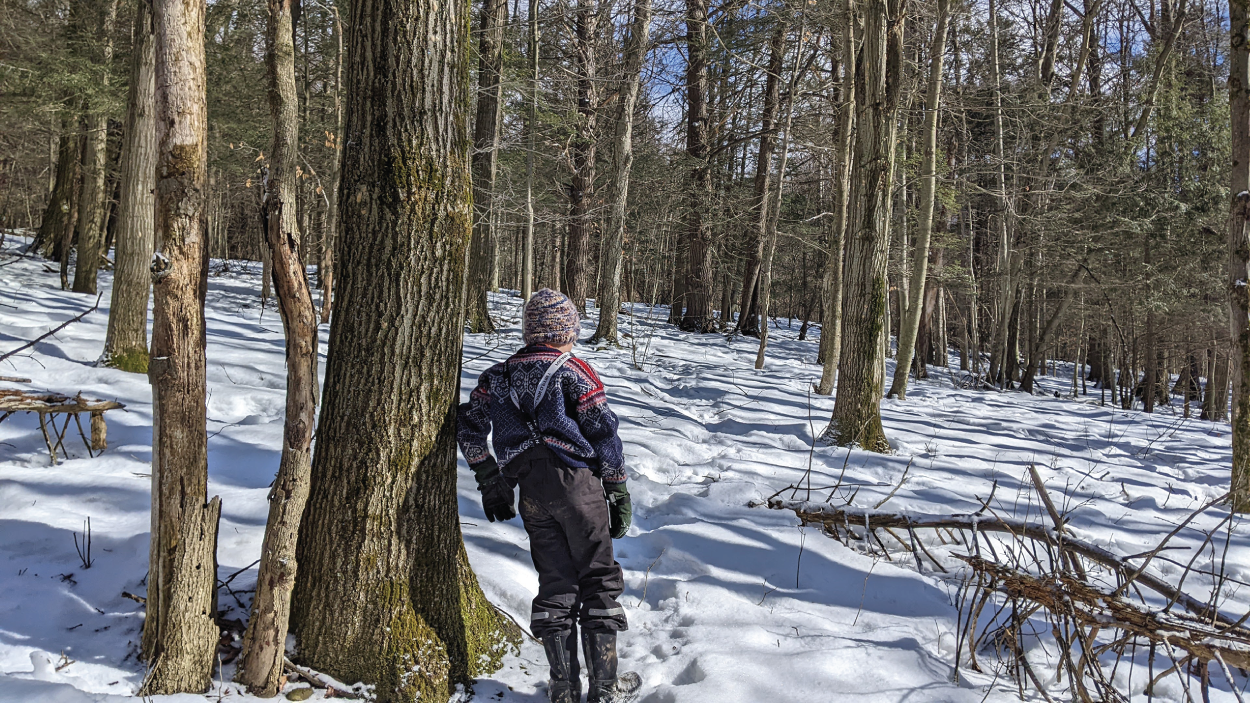
Figure 4.31 Sit spots are also a great activity in the winter
Source: Rachel Tidd
Final Thoughts
While taking your class on expeditions farther afield requires a little more planning and preparation, the learning opportunities and experiences they provide students are worth it. Activities such as sled races and writing in sit spots provide students the chance to immerse themselves in an activity and learn from it. These special lessons and trips will be what your students will remember long after their year with you! In the next chapter, you will learn how to bring a little nature inside your classroom through classroom routines and activities.