
Lessons in the Schoolyard
The Wonders of Chalk
Chalk is one of the best outdoor learning materials! It is affordable, and it can be used on artificial and natural surfaces and for a variety of activities. It is particularly useful for schools that have entirely paved outdoor spaces. In this section, you will find simple examples of activities that use chalk (see Figure 2.1). Many of these activities are based on similar activities you may already be doing inside the classroom, making them easy to integrate into preexisting lessons and curriculums. Using chalk outdoors for these activities can increase engagement and provide a multisensory element to the activities! If you plan to incorporate lots of chalk activities, you may wish to add sidewalk chalk and regular chalk (for finer detail and writing) to your school supply lists or ask if any parents would like to donate some to the class.
Math activities
Chalk is one of the easiest ways to bring math outdoors. It can transform nearly any problem, worksheet, or concept into a multisensory outdoor activity! In this section, you will find some familiar activities and math strategies, such as ten frames and the lattice method of multiplication that can easily move outside. You will also find games and plenty of variations to meet the needs of students at different levels/grades.
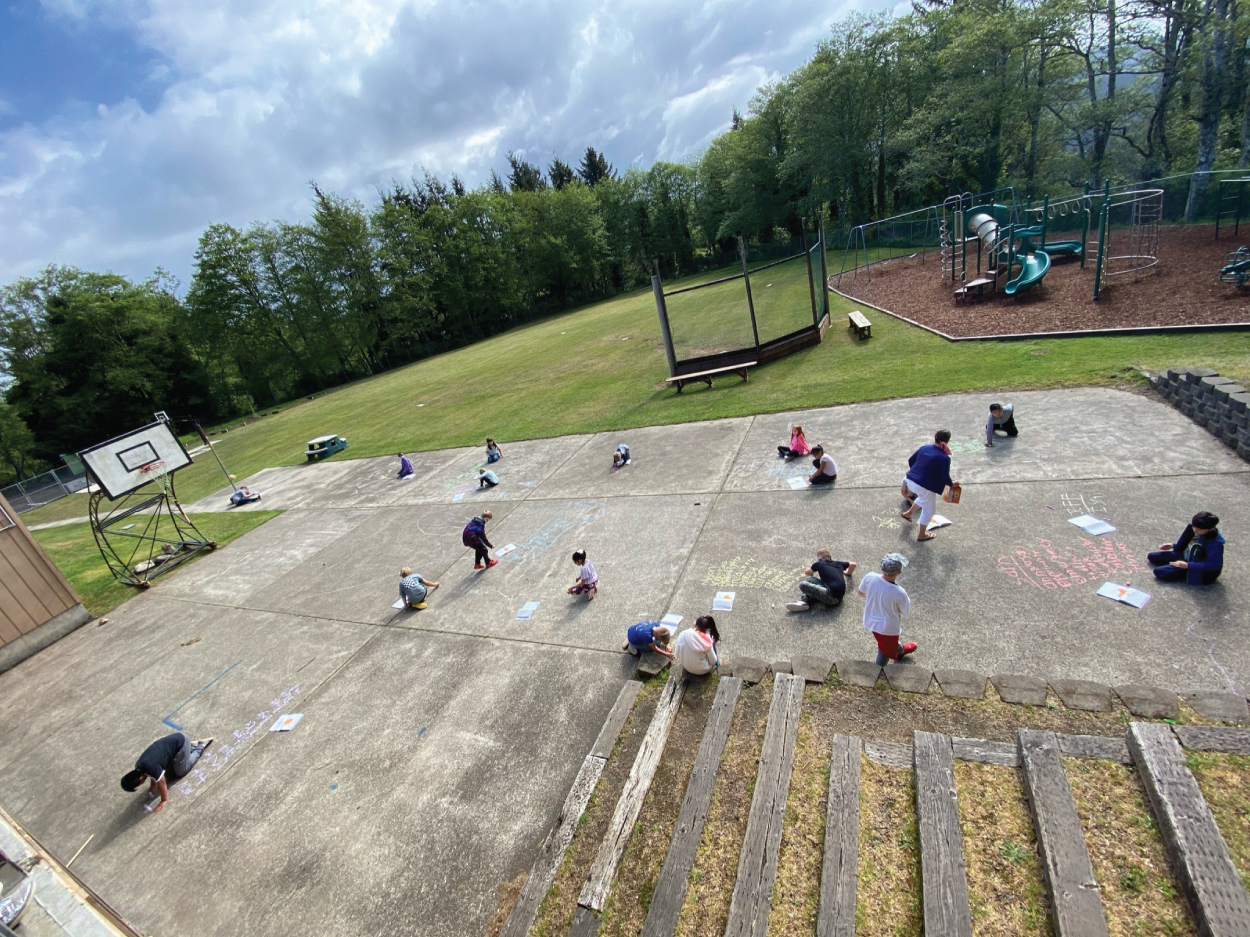
Figure 2.1 Students using chalk in the schoolyard
Source: Angie Wright
Ten frames
Bring your ten‐frame lessons and activities outdoors by making chalk ten frames and using natural materials as counters (see Figure 2.2).
Materials
- Draw ten frames with chalk or pieces of fabric with two ten frames drawn on it (with a permanent marker) for each student
- Natural materials such as rocks, acorns, or pinecones to use as counters (or bring your counters outdoors)
- Die or dice for the Roll to Twenty game
Activities
- Model math facts: Have students show math facts on a ten or twenty frame using two different natural materials and record the answers on paper or using chalk on the pavement.
- Roll to Twenty: Use two ten frames and a die for each pair of children to play the game Roll to Twenty. Players take turns rolling a die and placing the number of items indicated by the roll onto the ten frames. The first student to fill all twenty squares (or higher) wins the game. Play in reverse to practice subtraction.

Figure 2.2 Chalk ten frame filled with flowers
Source: Rachel Tidd
- Combinations: Use chalk ten frames with two types of manipulatives to show all the possible combinations of ten or twenty.
- Play collect 100: Have children draw 10 ten frames and work together in groups to collect 100 natural items.
- Skip counting: Fill squares with multiple items or place value sticks for practicing skip counting (see Figure 2.3). (See the section on natural materials in this chapter to learn more about making place value sticks.)

Figure 2.3 Chalk ten frame filled with place value sticks to practice counting by tens
Source: Elizabeth Snyder
Adjusting this activity
- For higher grades, try using chalk ten frames to practice repeated addition, multiplication, or adding fractions.
Number lines
Number lines are a common strategy to model addition, subtraction, skip counting, integers, and more inside the classroom. Number lines are a great example of how the teaching methods you are likely already using can easily be moved outdoors.
Materials
- Chalk
- Notebook
- Pencil
- Targeted numbers or math problems on cards or paper
Activity
- Ask students to create a number line. You can specify the minimum, maximum, and intervals you would like the number line to have, or you may give the students the numbers they will need to place on the number line and have them construct it themselves.
- Students should then place the numbers on the number line in the correct locations. You may wish to provide questions based on the finished number line for students to answer. For example, what is the number between 3 and 5? Which is larger, 2/3 or 5/6? Or what is 27 + 18?
Variations
- Skip counting: Have groups or pairs of students draw a large number line and then practice skip counting by walking or jumping along the number line. Older students may practice skip counting with fractions or decimals such as ½ or 0.25.
- Fractions and decimals: Try using outdoor number lines to place fractions, decimals, or a combination of both in order. This activity is great for building number sense with these more complex numbers!
- Integers: Introduce positive and negative numbers and have students practice adding and subtracting them.
- Open number line: Have students practice adding and subtracting multidigit numbers using an open number line. An open number line does not have a preset maximum, minimum, or interval. Instead, students write the first number of the problem on the line, then draw a series of “jumps” to add the second number. Usually, these jumps are in benchmark numbers, such as tens and ones (see Figure 2.4).
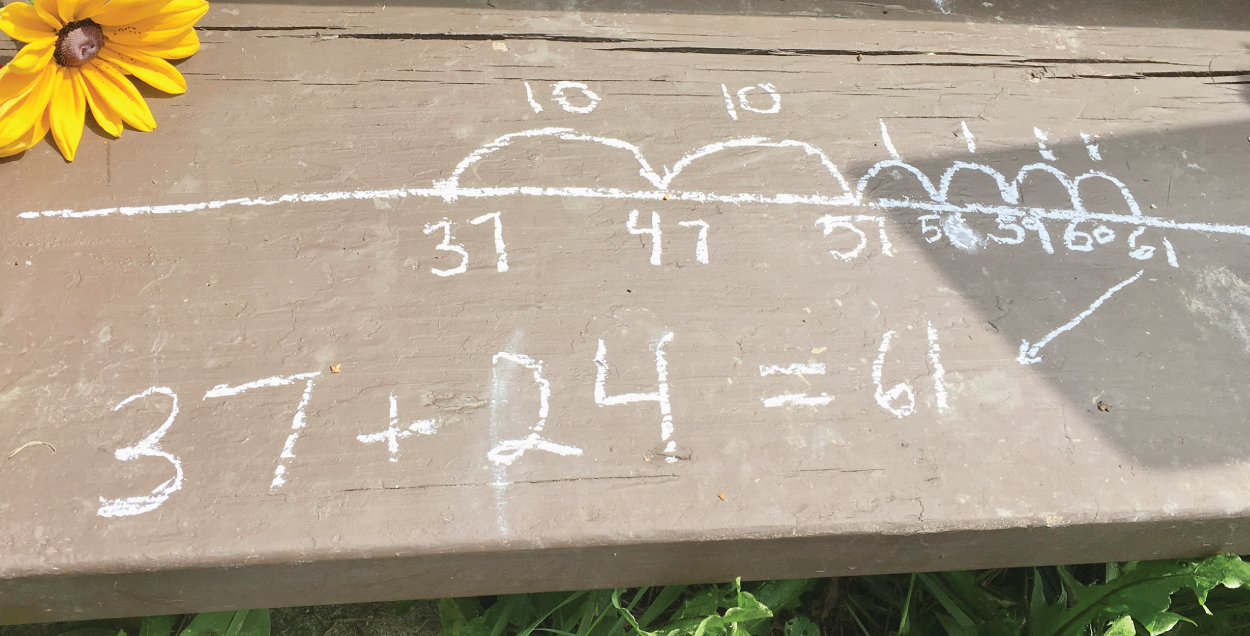
Figure 2.4 Using chalk to create an open number line
Source: Rachel Tidd
Number ladders
This activity is similar to word ladders, but the students use math operations to get to the next rung. These puzzles can be a great way to review skills and practice mental math skills outdoors!
Materials
- Chalk
- Pencil
- Paper
- Cards with numbers written or printed on them, such as 12 and 54
Activity
- Divide students into pairs. Have them use chalk to draw a ladder with 6–8 rungs. Give them a card with two numbers. The first number listed is a starting number, and the second number is the ending number. Ask them to write the starting number on the top rung and the ending number on the bottom rung (see Figure 2.6). Their job is to move from the starting number to the ending number using mathematical operations. They can only perform one operation per step. Students record the operations next to each rung on the ladder and write the new number on the rung. When they are finished, they can switch with another group. The new group checks their work.
Adjusting this activity
- To make this activity easier, give students clues in the form of problems for each rung on the ladder (see Figure 2.6, 2.7). Depending on your students' needs, clues can vary from very basic to more complex.
- More advanced students can include fraction and decimal operations in their calculations.

Figure 2.6 Example of a number ladder and the clues provided to the student
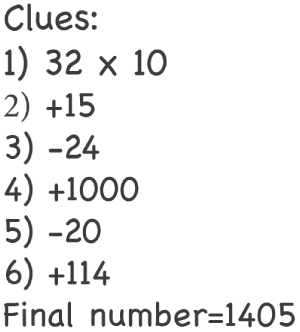
Figure 2.7 Number ladder clues
Lattice multiplication
Students often prefer this method for solving multidigit multiplication problems. Why not take it outdoors?
Materials
- Sidewalk chalk
- Multiplication problems on cards or from a worksheet
Activity
- Lattice multiplication can be practiced in all kinds of places when you use chalk! Sidewalks, walls, basketball courts, rocks, and more! Where will your students choose to do their multiplication work today? (See Figure 2.8.)
- Give students cards or slips of paper with a few multiplication problems written on them and a piece of chalk. Then have them choose a location (or locations) to use the lattice method to solve their problems. Have them record their answers on the card or paper.
Adjusting this activity
- Math problems of any type of strategy can be done outdoors. Using chalk to make number lines and traditional algorithms to solve math problems works well for any computation problem!
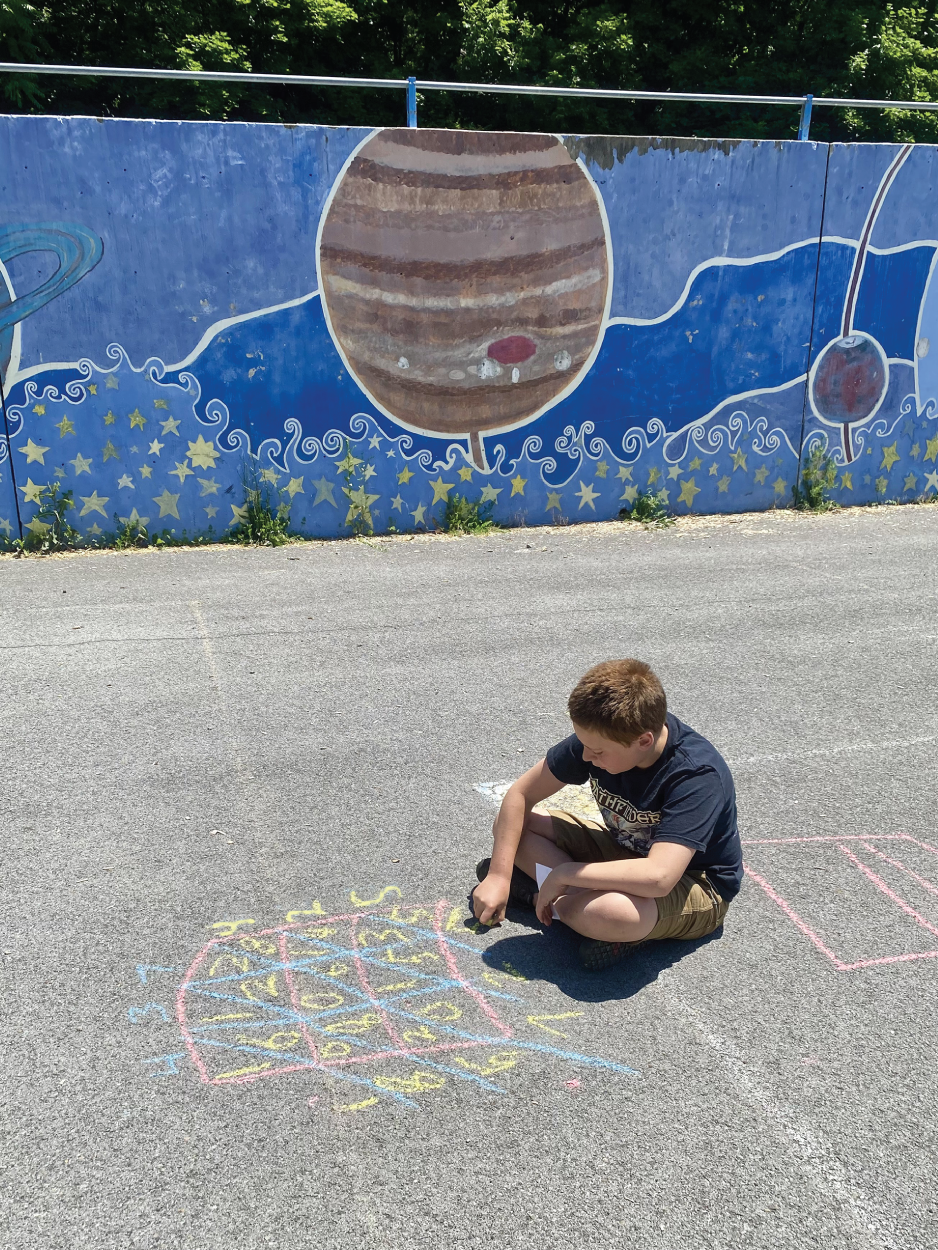
Figure 2.8 Lattice method for multiplication
Source: Rachel Tidd
Area method of multiplication
The area method of solving multidigit multiplication problems can be powerful for visual learners! It is also a strategy that students will be able to use all the way up to algebra! Using chalk to make large models of problems outdoors adds a new dimension to this strategy.
Materials
- Sidewalk chalk
- Multiplication problems
Activity
- You may introduce the area method outside or simply have children practice using the area method outdoors using chalk. Use or provide different colors of chalk to show different sections.
- Have children work in pairs or individually to solve a word problem that lends itself to the area method or simply give them a multidigit multiplication problem to solve (see Figure 2.9). Then have them “show and tell” how they solved the problem to another group.
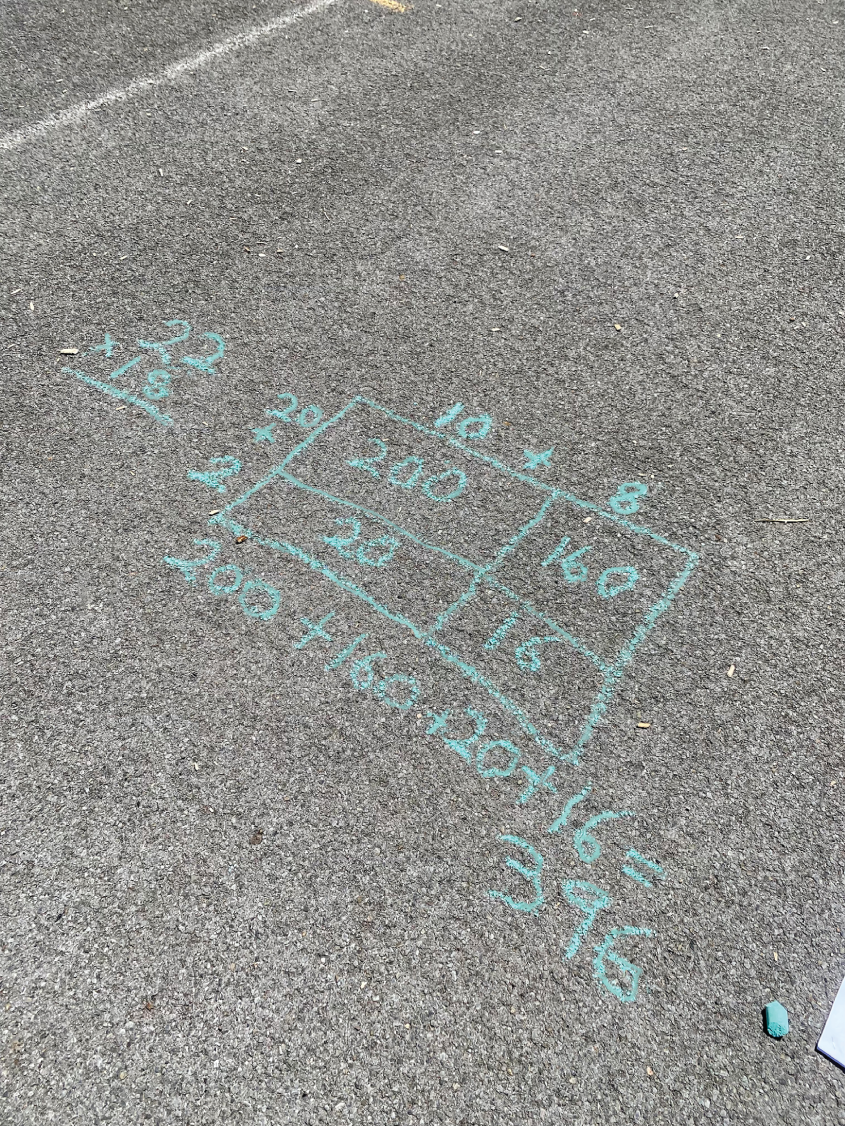
Figure 2.9 Area method of multiplication
Source: Rachel Tidd
Reading and writing activities
Using chalk to practice phonics skills, word morphology, and spelling is a great way to get kids moving. Writing with chalk uses more muscle groups and provides more sensory feedback than writing with pencil and paper. It is often more appealing than paper‐based writing activities in the classroom. Here are some activities to try with your class using chalk to practice reading and writing skills.
Word squares
Phonics squares are a great way for students to practice manipulating letters, graphemes, and spelling patterns, such as vowel teams, to create words.
Materials
- Sidewalk chalk
- Prepared cards with word squares for students to copy
Activity
- Prepare small cards that show the word squares for children to copy the square onto the pavement using chalk. Giving groups different squares with phonics patterns selected based on students' needs can be a great way to differentiate and meet a wide range of reading levels.
- Have children draw a 3 × 3 grid on a hard surface. Have them fill in the squares with the letters shown on the card (see Figure 2.10).
- After they have recreated the word square, they can begin working together to find all the words that can be made using the letters. When they discover a word, they should record the words in chalk next to the square or write them on paper.
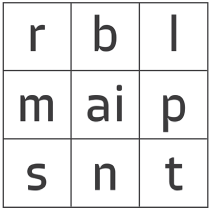
Figure 2.10 Example of a word square featuring the AI vowel team
How to make words using a word square:
- To find words, start with one of the letters on the outside such as M, then slide over to AI, and then down to the letter N. What word does it make? MAIN! How many other AI words can they make from this square? They can move up, down, and diagonally (see Figure 2.10).
Adjusting this activity
- Have older students work with prefixes and affixes. Ask groups to write the prefix or affix in the center box and then brainstorm or use a dictionary to find words that contain the prefix/affix in the surrounding boxes (see Figure 2.12). Have groups “solve” another group’s square.
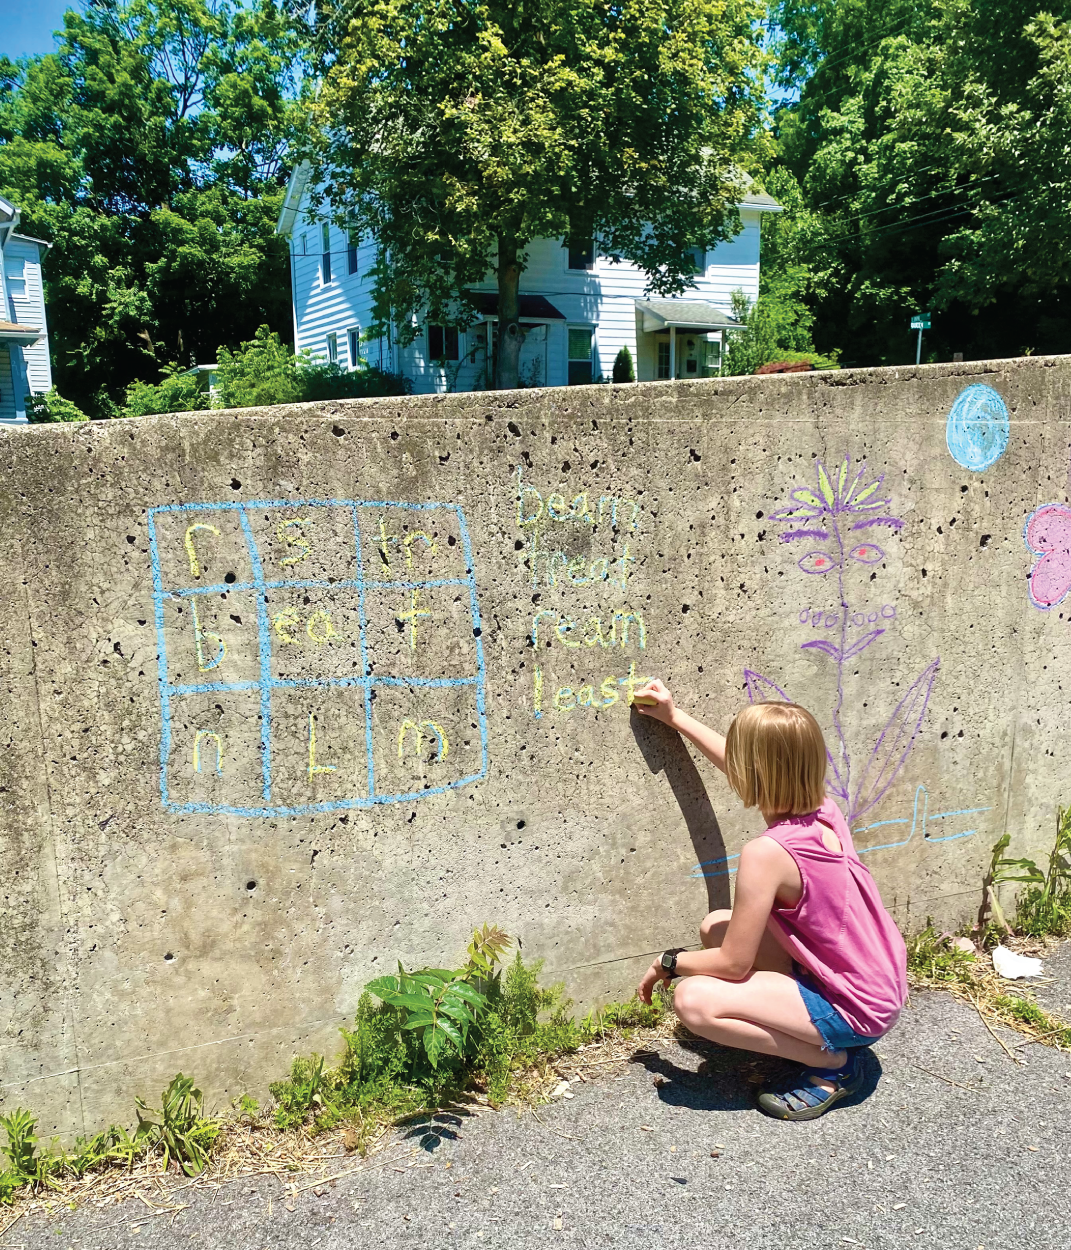
Figure 2.11 A student working on a word square
Source: Rachel Tidd
Figure 2.12 Example of a word square featuring prefixes
Word ladders
Word ladders are puzzles that help students practice segmenting and manipulating phonemes and graphemes to create words. Using chalk to bring this work outdoors, we transform a typical pencil‐and‐paper activity into one incorporating larger muscle groups and different writing textures.
Materials
- Sidewalk chalk
- Paper
- Pencil
- Cards with starting words and directions
Activity
- Divide students into groups. Give each group a card with the starting word and directions for each new rung on their ladder (see Figure 2.13, 2.14). Have the students work together to figure out each word on the rung. They should write each answer on the rung. Then they apply the next clue to this word. This activity can be differentiated by giving groups different cards and directions.
Adjusting this activity
- Word ladders are adaptable for many grade levels:
- Use CVC words and make the directions simple such as changing only one letter at a time.
- Select more complex words, affixes, prefixes, or verb forms and more complex directions for more advanced students.

Figure 2.13 Example of a word ladder and clues provided to the student
Figure 2.14 Image of word ladder clues
Variation
- Have students work in groups to design their word ladder. They can then write the directions on a card and exchange them with another group. Groups then draw a ladder and solve the puzzle designed by the other group!
Additional resources
- There are many word ladder puzzles available online and in books such as the series Daily Word Ladders by Timothy Rasinski. These resources can be used to create more outdoor word ladders.
Word graffiti
Children love practicing spelling patterns, high‐frequency words, phonics patterns, and vocabulary words when creating temporary chalk graffiti! This activity can be adapted for any grade level.
Materials
- Sidewalk chalk
- List of target words
Activity
- Have children work individually or in pairs. Give them a list of words to practice by creating chalk graffiti (see Figure 2.15). After students have completed the activity, have the whole class tour everyone's new street art installations.
Adjusting this activity
- Have older children write vocabulary words from other subjects or have them choose a new word from the dictionary. They could also make a symbol or picture to show the word's meaning. When students finish their work, go on a street art tour and visit each student's work. They can then share their word and the definition with the class. The youngest students can practice forming letters in the form of graffiti.
Extensions
- If your class is interested in street art and graffiti, many online lessons and resources can help you capitalize on this interest! Consider having students research the history of graffiti, debating the pros and cons, writing a persuasive essay outlining their argument for or against graffiti, etc.
- Look for street art in the neighborhood around your school or farther afield and take students on a walking tour/field trip to view the works. It can be fun to see how this influences their own art style! Look for murals, statues, tags, graffiti, and more (see Figure 2.16).
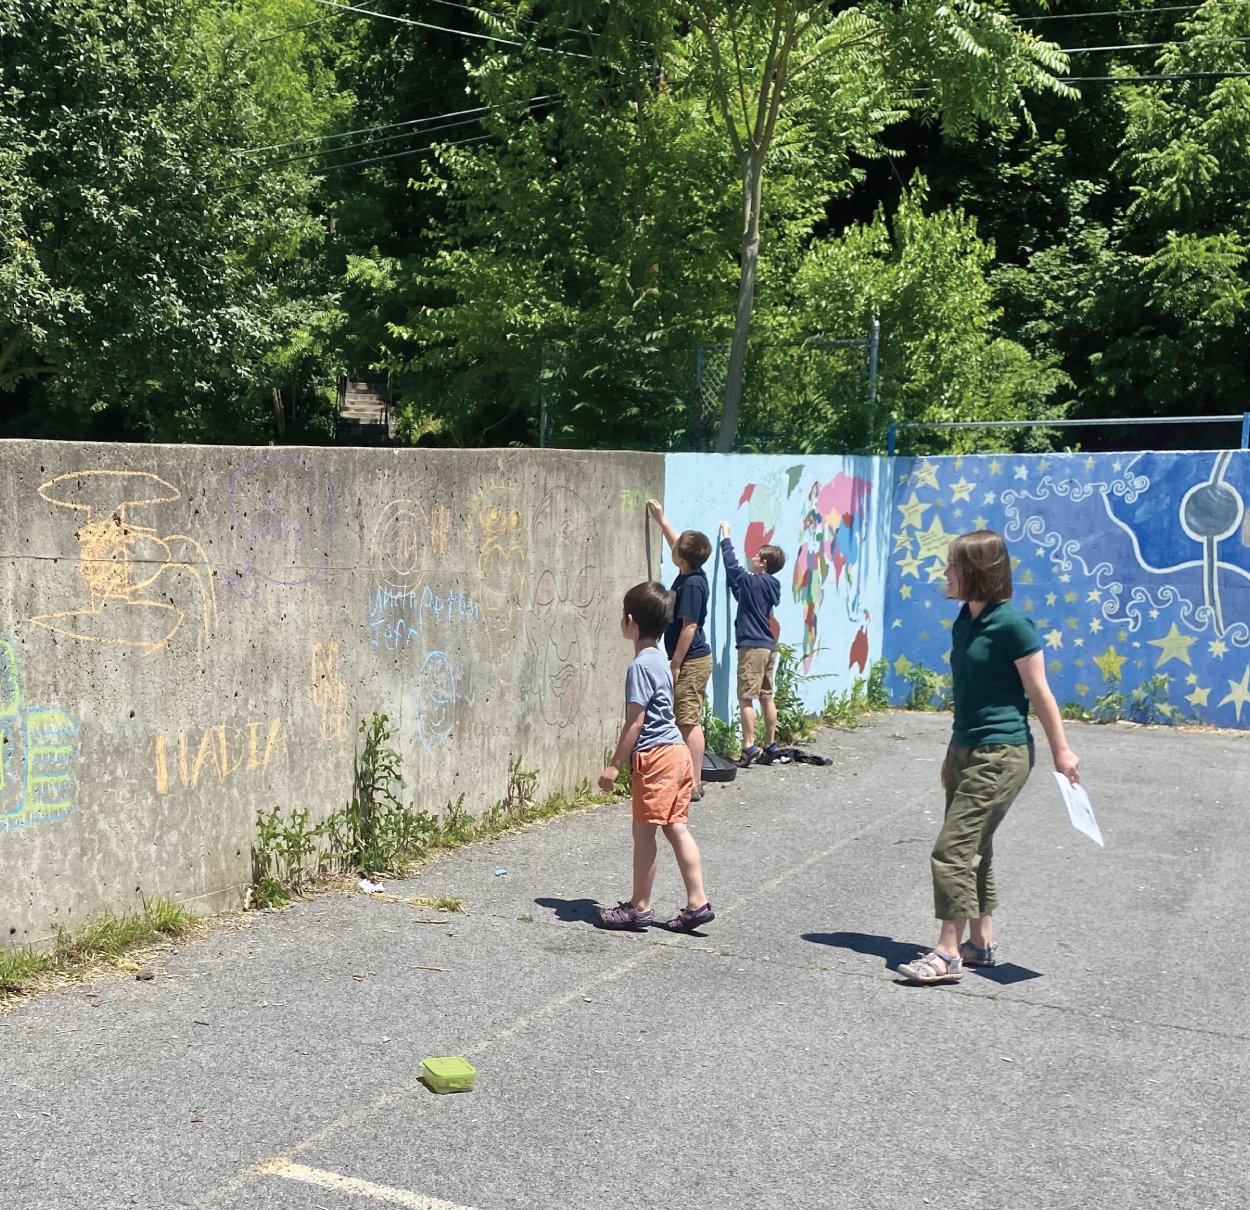
Figure 2.15 Students working on word graffiti in the schoolyard
Source: Rachel Tidd
- Lead a discussion about graffiti. Is it art? Should people be allowed to make graffiti? Does it add positively to the environment or does it detract?
- Use street art as a writing prompt. Students can write a story about the art or how the street art came to be there.
Learn more about street art and graffiti by sharing these books with your students:
- Drawing on Walls: A Story of Keith Haring by Matthew Burgess
- Banksy Graffitied Walls and Wasn't Sorry by Fausto Gilberti (recommended for upper grades as Banksy can be controversial)
- Hey, Wall: A Story of Art and Community by Susan Verde
- Maybe Something Beautiful: How Art Transformed a Neighborhood by F. Isabel Campoy and Theresa Howell
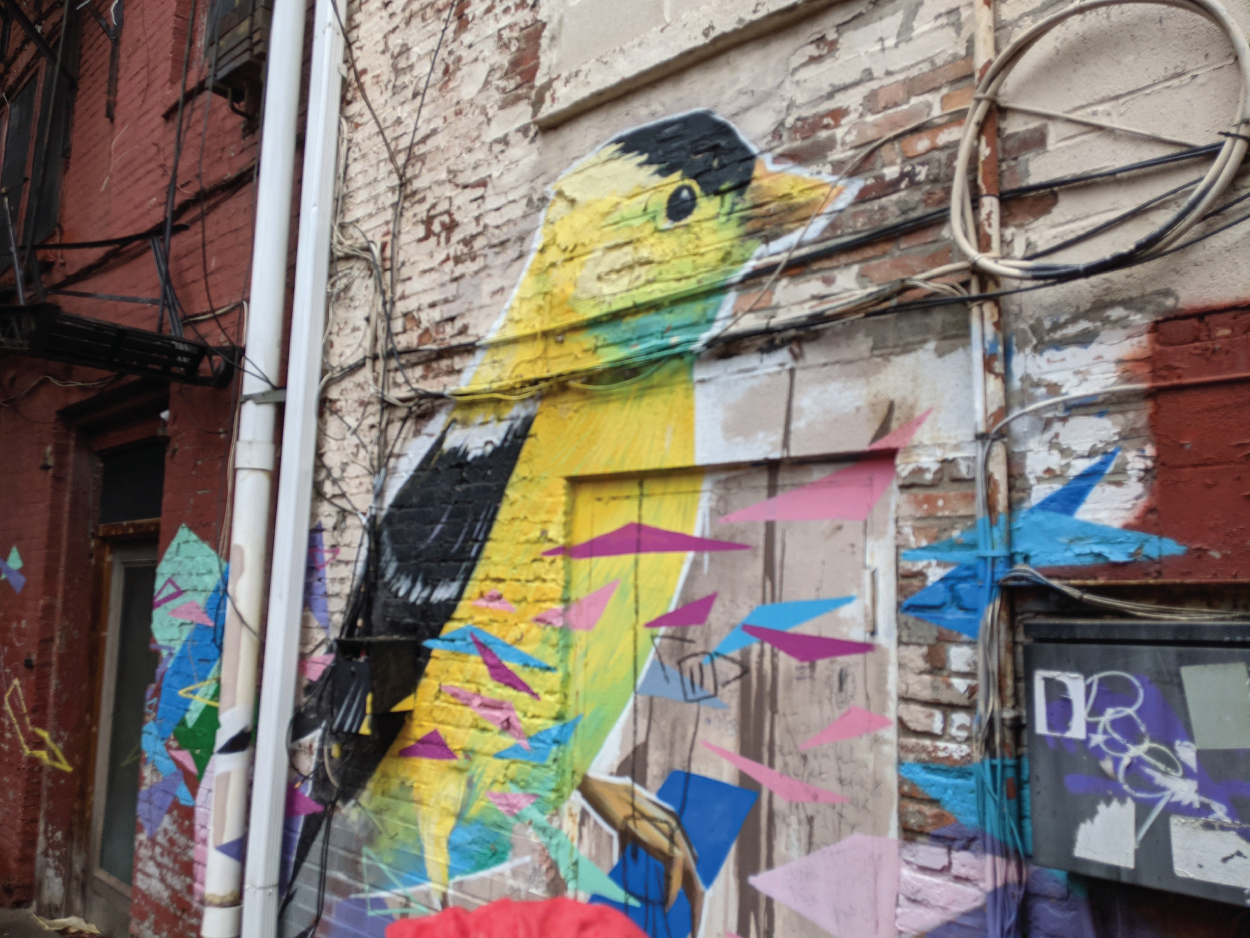
Figure 2.16 Murals and graffiti can inspire students' writing
Source: Rachel Tidd
Storyboards
Storyboards help students keep track of a story's main idea, plot, sequence, problem, solution, and more by having them illustrate the sequence of the story.
Storyboards allow children to visually break a story up into its main components. Storyboards can be made after read‐alouds or following independent reading. In this version of storyboarding, children use natural materials and/or chalk to create their storyboards.
Materials
- Chalk
- Natural materials
- A story to summarize in a storyboard (this can be a story told orally, read out loud, or read independently)
- Optional: camera for taking pictures of the finished works
Activity
- Depending on the age and preferences of your students, read, tell, or have pairs of students write a story. Then have them use chalk to draw rectangles that will form the “storyboard.” Each rectangle represents a different part or event in the story. Students can use natural materials to create pictures representing each event and then use chalk to label each section. When finished, they can present their storyboard to the class. If you want permanent records of your students' work, I suggest taking photos of each group's work. Consider taking pictures of the entire board (or, if too large, several photos) and each panel. This will allow students to refer to the work in the classroom if you choose to extend the activity later.
Variations
- History: Try using storyboarding to break down historical events and periods.
- Summarize: Extend the activity by having students write a summary of the story using the storyboard for reference.
- Story elements: Instead of illustrating the events, have students use chalk/natural materials to show story elements.
- Photo display: Have students use the photos to create a display showing their work for a bulletin board or hall display. Adding a summary can add another element to the display as well. This can be a great way to show parents, other teachers, and even administrators how you integrate the outdoors into your classroom.
- Natural materials: Storyboard pictures can also be created using natural materials. For more permanent work or if created in an area without pavement, you can glue them on paper (see Figure 2.17).
Learning Games for the Schoolyard
Games always make learning more fun! Games are a great way to provide practice with math facts, high‐frequency words, and spelling without worksheets. Taking games outside allows children to move more and be a bit louder than they can inside the classroom!
Math games
Math games are one of my favorite ways to get students to practice math facts, mental math, and other skills without worksheets or drills. Using stairs and jump ropes to practice skip counting gets kids moving. Games such as Scoot and snowball toss are fun, active alternatives to worksheets for skill practice.
Figure 2.17 Illustrating story elements and the beginning, middle, and end with natural materials glued on to paper
Source: Rachel Tidd
Skip counting
Skip counting is more fun outside! Use jump ropes, stairs, and bean bags to add movement when learning this math skill! Skip counting can help reinforce multiplication facts in higher grades.
Materials
- Individual or longer group jump ropes
- Chalk
- Outdoor steps that you can write on with chalk
- Bean bags
- Various materials for variations
How to play
- Have children stand in a circle and pass the bean bag to the player on their right, saying the following number in the sequence. You can switch it up by changing how the bean bag is passed, making smaller groups, tossing it to students after saying their names, etc.
Variations
- Stairsteps: Have children use chalk to write each number in the skip counting sequence on the steps of an outdoor staircase. Then have them jump or step up, each one chanting the numbers to a rhythm.
- Rhythm: Have each student find two sticks and tap a rhythm while they chant (as a group) each number in the sequence.
- Jump rope: Practice skip counting by teaching children to jump rope. Jump roping combines large motor skills, coordination, rhythm, and skip counting in one activity. Jumping rope can be difficult for the youngest students. Model and teach students how to jump individually or with two people swinging the rope and one player jumping. Have them count to the rhythm of the rope hitting the ground. Many rhymes include counting. See the list of skip‐counting rhymes in the sidebar. If you have children who are unable to jump, many of these rhymes can be chanted while tossing bean bags, clapping, or tapping to the rhythm.
- Counting: Prekindergarten through first grade students can use stairsteps, bean bags, and rhymes to practice counting forward and backward.
Bean bag toss
You can combine bean bags and chalk to create learning games! This version uses them to practice converting numbers into expanded form.
Materials
- 5–10 bean bags or stones (for each student)
- dice or cards with numbers written on them
- Chalk
Bean bags make a fun and easy activity for students to work on in class. They do not have to be perfect, just usable. If you are lucky enough to have a parent that likes to sew, this could be an excellent way for them to help! Bean bags can be used in all kinds of ways in the classroom, so having a class set can be a great resource.
If you do not have bean bags, rocks, pennies, or even some math manipulatives can be used. Test any potential material to ensure it does not roll or bounce too much. It can be frustrating during play!
How to play
- The object of this game is to have students read a number and then break it into its components. For example, if the child drew a card with the number 326, they would need to convert it to expanded form: 300 + 20 + 6.
- To set this game up, each group of students draws and labels a circle for each place value amount included in the game. For the preceding example, they would draw one circle for the hundreds, one circle for the tens, and one circle for the ones place. Then they decide on how far back they must stand to throw the bean bags from and draw a line. Players must be behind this line when it is their turn to throw.
- When ready to play, the first player rolls three dice (or any number desired) or draws a number card. They then convert the number into expanded form.
- They throw a bean bag at each place value spot equal to the number of hundreds, tens, or ones in their number. So, they get three shots at the hundreds because the number they drew has three one‐hundreds. Then they get two tries at the tens and six attempts at the ones. They earn one point for each time their bean bag lands in the circle.
- A few students in the group can return the bean bags or rocks to the player throwing. Others can keep track of points. The player with the most points after five rounds wins the game.
Playing with dice
- Players roll the dice and make a three‐digit number by arranging the dice. They can either make the largest number they can with the numbers they rolled OR roll each die one at a time. The first die is the hundreds place, the second die is the tens, and the final the ones. Use the number of dice appropriate for the number of digits you want in the game.
Variations
- Write numbers in the circle to have children to work on computation skills (see Figure 2.18). Players toss the bean bags into two different circles and add them together (or any desired operation). Students use estimation skills to aim for the largest numbers. The player with the largest total for each round gets one point. The student with the most points after five rounds wins.
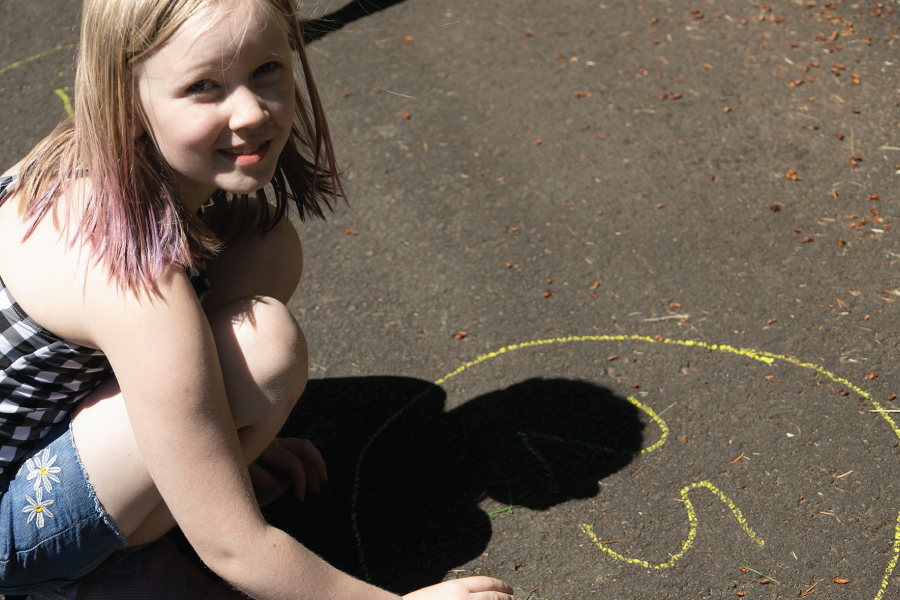
Figure 2.18 Drawing circles for a variation of the bean bag toss game
Source: Jen Jensen
- Adjust the game to represent decimal place value. You can also change the points earned to contain decimal numbers to practice adding decimals.
Math fact toss‐up
This can be a great whole group activity. Having students say each other's names aloud before throwing the ball helps keep everyone focused and engaged in the game!
Materials
- Large beachball or lightweight ball with multiplication (or other math facts) written on it
- Permanent marker
How to play
- Have students stand in a circle. Students will toss the ball to each other. Before tossing the ball, they call out the name of the person they are tossing it to. After catching the ball, the student must answer the math fact that their right hand (or pointer finger if it is a smaller ball) lands on. After saying the answer, the student shouts another student's name and tosses the ball to them.
Variations
- Elimination: If students get the answer wrong, they sit down and are eliminated from the game. The last one standing wins.
- Silent: See if students can make sure everyone catches the ball and answers a problem without help or talking. They must pay close attention for this to work!
- Dots and Shapes: This game can be modified for the youngest students by drawing groups of dots on the ball to practice subitizing skills. (Subitizing is the ability to look at a group of objects and instantly know how many there are without counting them.)
Scoot
This is a great math game that can be used to practice any math skill! It can be done as a whole group or differentiated by breaking your class into two or three groups and giving different levels of problems or adjusting the time allowed before yelling “SCOOT!”
Materials
- Chalk for each student
- Paper with boxes numbered (for a large class, make a double‐sided worksheet to ensure the boxes are big enough for calculations)
- Clipboards
- Pencils
- Timer
How to play
- Line students up or arrange them in a large circular shape. Have them draw a large square on the pavement in front of them using chalk and then fill it with a math problem. You can give them parameters such as “fill the box with a multiplication problem” if you like or leave it up to the students! While they are writing, walk around and assign each student's square a number. The numbers should go in order. Have them write the number in the top left corner of their square. These numbers will help them know where to move next and where to record their answers. When they are finished writing the problems, it is time to play (see Figure 2.19).
- Have students move to the square to their right (or the next number after their square) and set the timer. One or two minutes is usually perfect unless you have students doing more difficult problems. Have students begin solving the problem in the square right away! They can do calculations and write the answer in the box on their paper that matches the box number on the pavement.
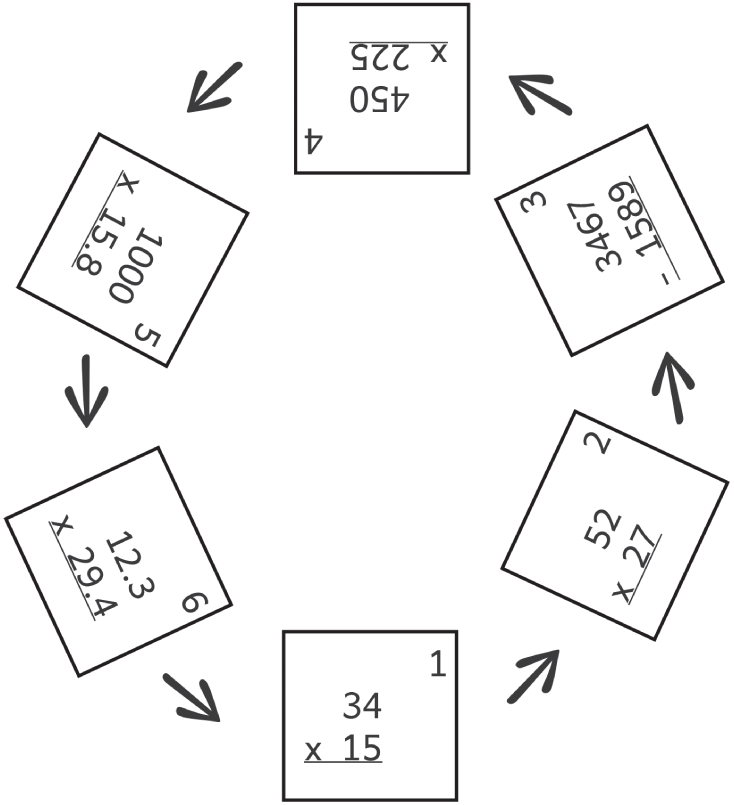
Figure 2.19 Example of scoot game setup
- When the timer goes off, the teacher yells, “SCOOT!” Students take their paper and pencil and move to the next number. Keep playing until students have completed all the squares or time is up.
Variations
- You can premake cards with problems and arrange them on the ground. This allows you to have more control over the problems that the students solve. It also works well if you don't have a surface you can write on with chalk.
- Don't limit this game to math facts; try converting decimals to/from fractions, word problems, and measuring angles.
- You can also play this game with picture cards and have students write the word on their answer sheets.
Snowball target games
Harness students' love of snowball throwing and games with this activity. Snowball games are versatile and can be used to review or practice a range of academic skills!
Materials
- Packable snow
- Targets: bucket, bin, snow structure, etc.
- Area marked in the snow
- Labels to show points on the buckets or targets
- Set of cards with questions/problems that you would like students to practice for each group
- Laminated paper and writing utensil if problems require writing to find the answer (such as multidigit multiplication)
Activity
- There are several ways you can approach this activity. For a teacher‐directed approach, set up the bins or make targets and label them with points. Divide students into groups of four. Have students take turns drawing cards and answering the questions on the cards. If they get their question right, they can make and throw a snowball at the target. If they hit the target, they win the number of points indicated. Have students keep track of their points on laminated paper. You can use pictures drawn on the cards or targets for children not yet reading.
Variation
- An alternative way to do this activity is for each group to develop a different version of a game using the materials provided (plus snowballs) to help them review the questions on the cards. Once they have come up with a game idea, they should play and test it out. To extend this version of the activity, have students record the game's rules so they can play again later, or groups can take turns teaching the class how to play their game and review different skills later.
Reading and writing games
Word games are a fantastic way for students to practice phonics, spelling patterns, high‐frequency words, and grammar skills in a fun and engaging manner! Classic games such as hopscotch can be adjusted to practice a range of skills such as phonics patterns, high frequency words, and affixes. Games such as Change a Word give students hands‐on practice with spelling, phonics, and phonological awareness.
Word tic‐tac‐toe
This is a fun variation on tic‐tac‐toe that is a great way to practice high‐frequency and spelling patterns.

Figure 2.20 Example of word tic‐tac‐toe game
Materials
- Chalk
- Preselected words
How to play
- Play just like regular tic‐tac‐toe, except instead of X's and O's, assign each player a high‐frequency or spelling word they need to practice. They then write this word to mark their square (see Figure 2.20)!
Hopscotch
This classic game works great for practicing new phonics patterns, high‐frequency words, and syllabication.
Materials
- Chalk
- Paved surface
- Rock or another object to be used as a marker
How to play
- Hopscotch is typically played on a set of squares drawn in chalk on a paved surface. The most common pattern is a single square followed by two squares centered over the last square. This pattern repeats several times, creating the hopscotch path. Children often enjoy making creative hopscotch boards.
- Once the board is complete, the first player throws a rock or other marker aiming for the first square. The player loses a turn if it lands on the line or outside the square.
- The player then hops on the squares, skipping the square with the rock (see Figure 2.2). They hop on one foot when landing on single squares and put both feet down on double squares. They hop past their rock to the end and then hop back, picking up their rock at the end (stay on one foot!). Then skip over the square that held the rock and finish the path. If the player steps on a line or out of the square, they lose their turn. When finished, they pass the marker to the next player. The goal is to complete the course with the marker on each square. The first person to do this wins the game.
- You can shorten the game for classroom play by limiting the number of rounds. To do this, decide on the number of rounds you would like the groups to play. Then have students label random squares with numbers up to the set limit. For example: If you wanted students to play four rounds, the students label four of the squares 1–4. The numbers can be written on any of the squares. Students begin play by throwing the rock on the square labeled with the number one.
Variations
- Writing words with a phonics or spelling pattern or high‐frequency word: Follow the basic rules, but when a student throws a rock on the first square, they hop to the rock, write a high‐frequency or spelling word, and then finish hopping back.
- Reading high‐frequency words: Write high‐frequency words in each square and have students read each word as they hop, skipping the square with the rock on it.
- Sounds: For beginning readers, write letters, digraphs, and blends on the squares and have them say the sounds as they hop.
- Advanced options: Fill in the squares with affixes, parts of speech, or literary devices (simile, metaphor, alliteration, personification, etc.). When they pick up the rock, they must give an example of a word or literary device indicated on the square.
- Spell it out: Write letters from a group of selected words on the squares. Have children draw a card with a picture of the word. They then must hop on the letters to spell the word without falling or going out of the lines!
- Crazy boards: Children often like to experiment with making the squares smaller (and therefore harder to hop on without falling or going over the line) or with new shapes and movements (spin, double‐hop) (see Figure 2.22).
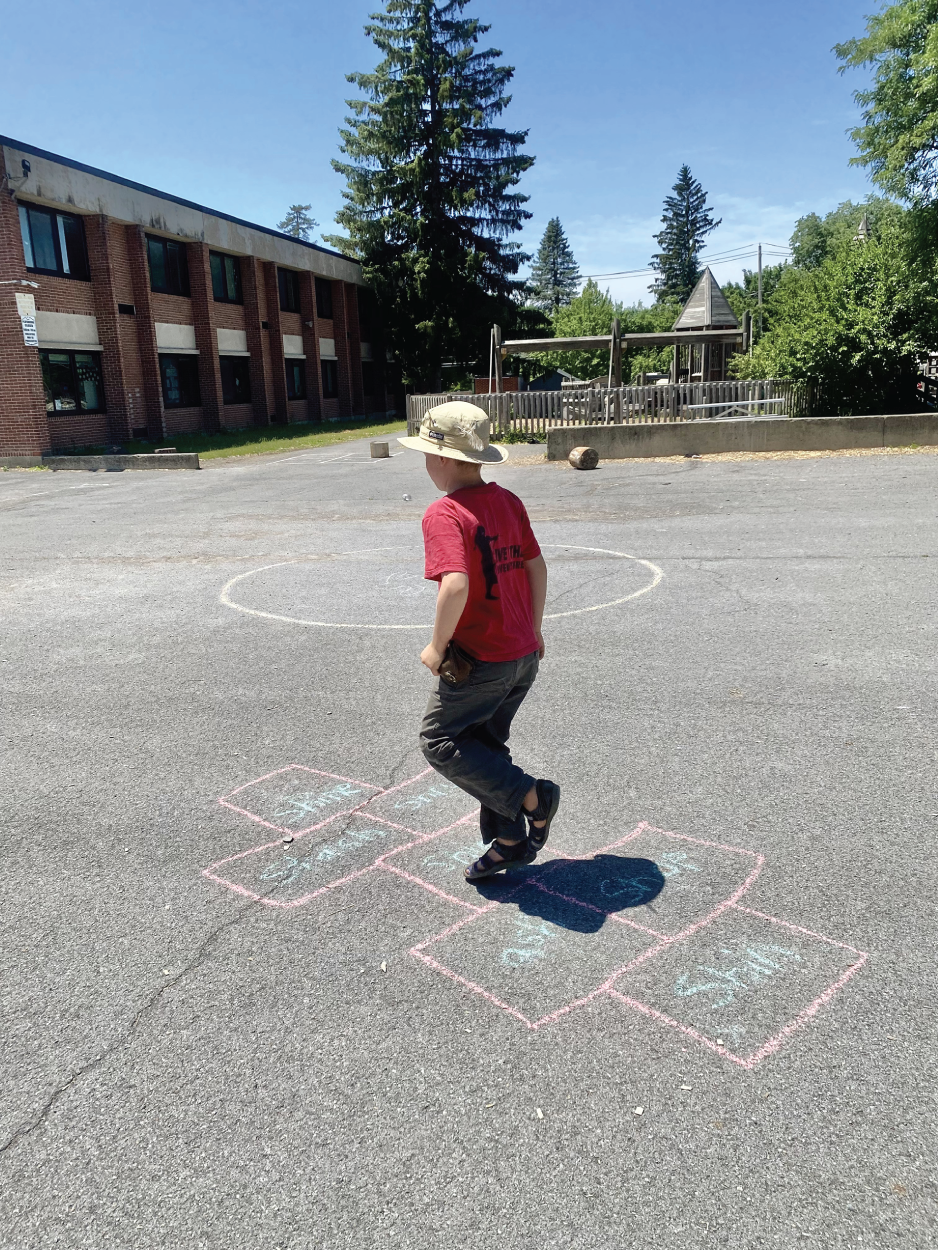
Figure 2.21 Playing hopscotch to review the digraph SH
Source: Rachel Tidd
- Math: Try playing the game using math facts. Write math facts on each square. Children have to say the answer to the fact where the rock lands.
Change a Letter game
The Change a Letter game is similar to word ladders; however, since it utilizes the movable alphabet, students can physically manipulate the letters to spell the word. This is a great way to work on manipulating phonemes, graphemes, phonics patterns, and spelling. To play, children switch out letters one step at a time, creating a whole chain of new words. They will see new connections and strengthen their ability to recognize parts of words as they play.
Materials
- Movable alphabet for each pair of students
- Cards or papers with directions for each round
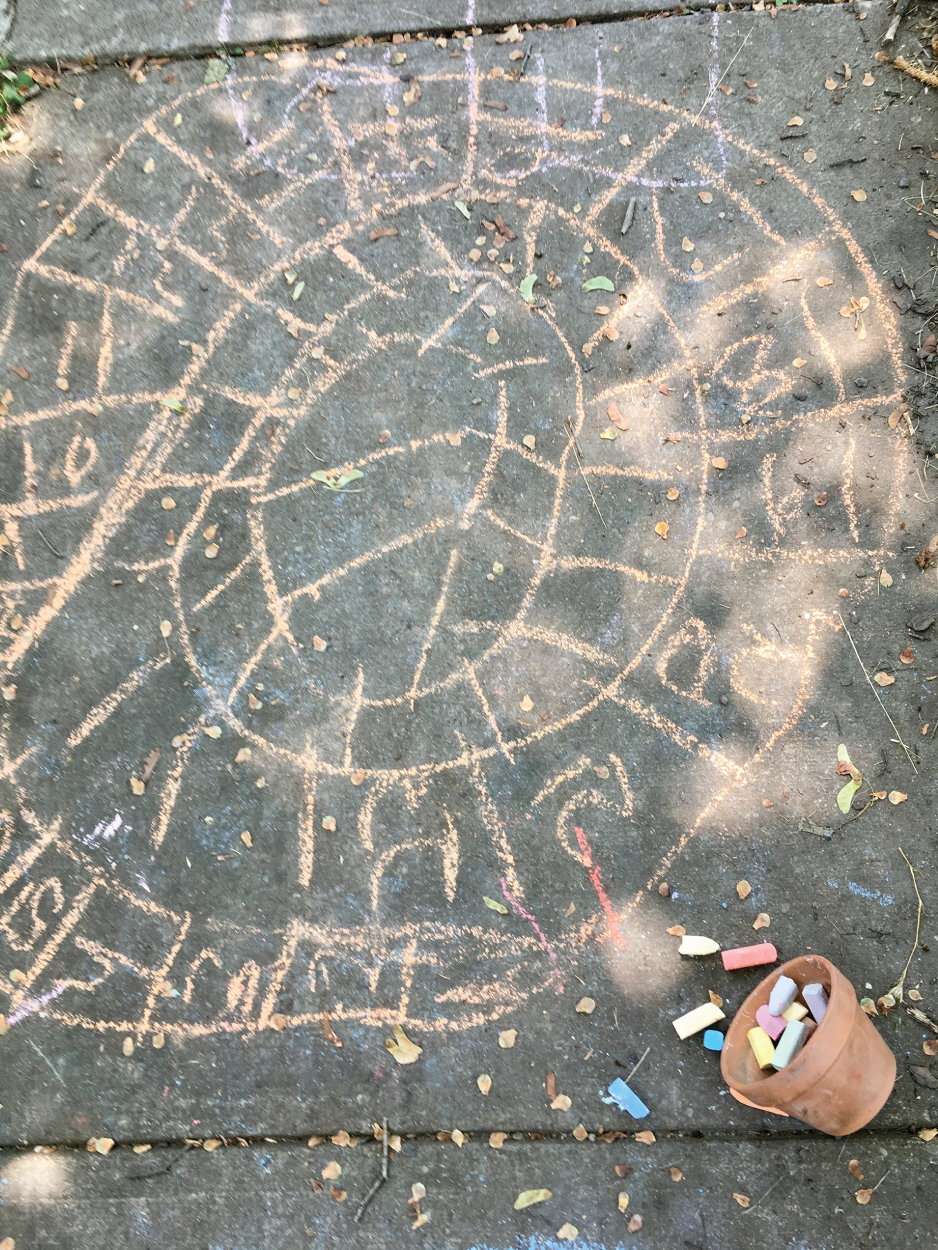
Figure 2.22 A student's crazy hopscotch board
Source: Rachel Tidd
Preparation
- You will need to create directions for at least two different games. Divide students into pairs. Have one student read the directions and the other follow them. After the player solves the final clue, players switch roles and play the second game.
How to play
- Directions for the Change a Letter game can range from simple (changing only one letter at a time) to changing more than one letter in more than one location (see Figure 2.23). Differentiate and adjust for different levels by modifying the difficulty of the directions and the words. See the following examples.
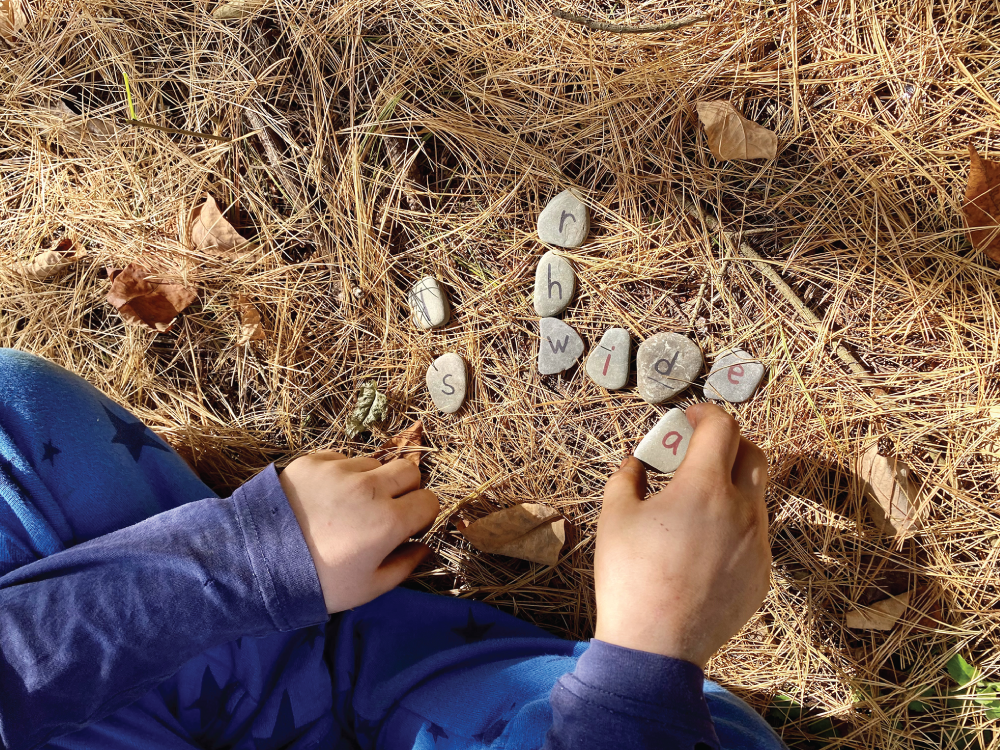
Figure 2.23 Playing the change a letter game
Source: Rachel Tidd
Variation
- After playing one round each, have pairs of students write their own series of directions. Then have them trade directions with another pair of students and then both groups play using the new directions.
Playground words
Here is a quick and easy way to practice a variety of skills such as reading words, sequencing, and vocabulary words by having students search the playground for word cards.
Materials:
- Index cards or squares of paper
- Markers
- Tape
To differentiate groups or pairs of students' cards when searching for them on the playground, write the words in different color markers OR use different color index cards/paper for each group.
How to play
- This activity is similar to a scavenger hunt. Prepare cards with words that practice the target skill ahead of time (see variations below). Make a set of cards for each group. Make sure the cards for each group are in different colors. Have the students in each group hide a different group's cards around the playground and/or the schoolyard (see Figure 2.24).
- Once all the cards are hidden, have each group find their cards. Depending on your goal for the activity, they may be copying the words, sorting the sounds, writing sentences or stories with the words, or defining vocabulary words.
Variations
- Word reading: Write target words or words with new phonics skills on cards for children to read and copy.
- Vocabulary: Write vocabulary words on cards and have students write the definitions or write the definitions and have the students come up with the vocabulary word.
- Word sort: Have the students sort words according to a phonics or spelling rule.
- Sentences: Use each word found in a sentence and record it.
- Sequencing: Put the sentences on the cards in sequential order to practice reading comprehension and sequencing skills.
- Timeline: Have students find historical events or events from a story and put them together in the form of a timeline.
Figure 2.24 An older student hiding words on the playground for a younger class
Source: Rachel Tidd
- Riddles: Read and guess the riddles.
- Parts of speech: Sort words into nouns, verbs, and adjectives.
- Scrambled words: Write letters or words on the cards and have students unscramble and find the message.
- Try other locations: This scavenger hunt can be done in almost any location, parks, neighborhood, woods, and cemeteries.
Sentence challenge
This simple game can be adapted for use in many grades and skills! You can use it to reinforce punctuation skills, semantics, spelling, homophones, and more.
Materials
- Chalk for each student or pair of students
How to play
- Divide students into groups. Give or tell them various components of a sentence, all mixed up. Groups need to reconstruct the sentence and record it with chalk on the pavement. The first team to raise their hand reads their sentence aloud. If it is correct, they get the point. If it is incorrect, the next fastest team receives a chance to win the point. The team with the most points wins.
Variations
- Punctuation matters: Read or say a sentence, have students write it, and include punctuation that matches the tone or way you said it.
- Homophones: Announce a homophone. Students need to write a sentence showing the different meanings of the word and spell them correctly! (See Figure 2.25.)
- Parts of a sentence: Give a verb, adjective, and noun and have students construct a creative sentence using the words.
- High‐frequency word sentences: Have the youngest students write a sentence using a high‐frequency word.
- Spelling word sentences: Have pairs of students take turns writing sentences using spelling words or a targeted phonics pattern. For an extra challenge, have them make the sentences tell a story!

Figure 2.25 Writing sentences using the homophones know and no
Source: Rachel Tidd
Using Natural Materials
Children cannot resist natural materials such as pinecones, shells, acorns, and small rocks! Using natural materials as manipulatives in your lessons increases student engagement. The best part is that natural material manipulatives are readily available, can be used indoors or out, and are usually free! In this section, you will find simple ways to use natural materials as manipulatives in your lessons (see Figure 2.26). You can also perform many of these activities in locations farther afield.
Depending on where your school is located, you may collect natural materials right in your schoolyard, in nearby parks, the neighborhood (nuts, seeds, leaves, and sticks often fall onto the sidewalk), or even plan a short trip farther afield to gather materials. Children love to help collect natural learning materials. Assign groups to collect materials such as sticks, pinecones, small rocks, etc. Use materials that are found or grow locally and are plentiful. You can also enlist help from students' families to collect items for both the indoor and outdoor classroom and have them send them to school. Storing the collected materials in clear containers or baskets makes them accessible and visually appealing. You may find that children prefer using natural materials (especially if they helped gather them) over traditional plastic manipulatives. Common natural materials for use as manipulatives are:
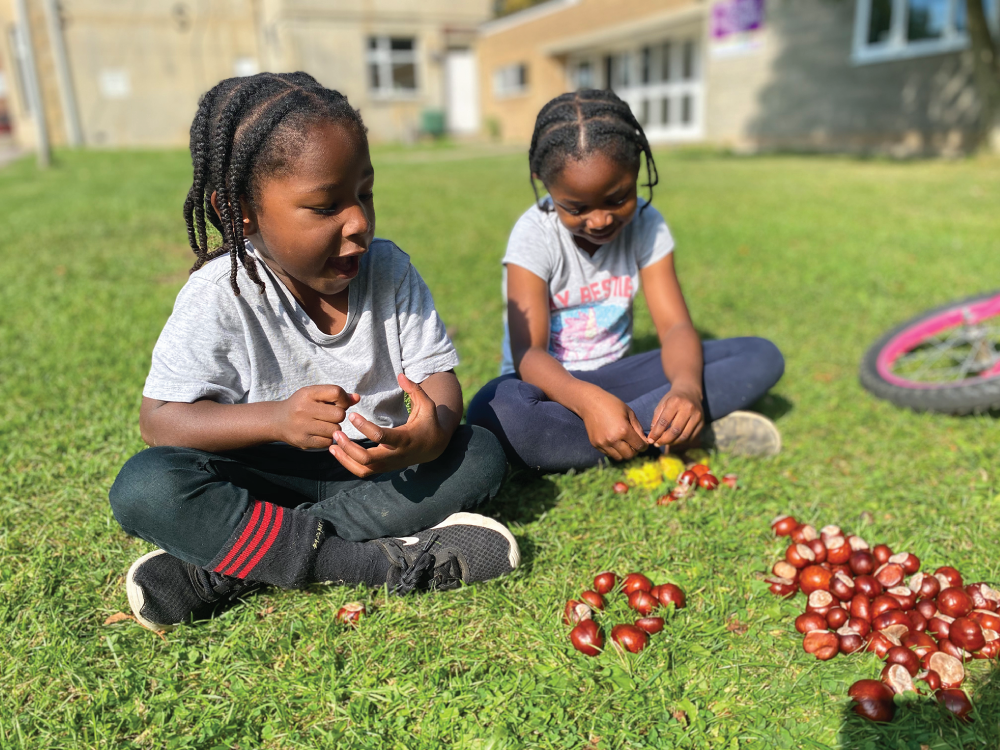
Figure 2.26 Children counting and grouping horse chestnuts
Source: Remona St. John
- Small rocks
- Leaves
- Pinecones
- Acorns, chestnuts, butternuts, sweetgum, walnut shells
- Maple seed “helicopters”
- Seashells
- Sticks (see place value sticks in the math section)
- Flowers or petals (use common flowers such as dandelion)
- Tree cookies (slices of a branch cut with a saw)
- Clover blossoms or clover leaves
- Pine needles
General activities
Students can use rocks and leaves with numbers and letters written on them to practice math, reading, and writing skills in a variety of ways! This section provides guidance for making your own set of letter and number rocks and ideas for using them. Activities such as leaf flower sorts to practice math and phonics skills make learning hands‐on and fun.
Letter and number rocks
Students learning to read can get hands‐on practice reading and manipulating words by using a set of letters (see Figure 2.28). Montessori schools use a movable alphabet, which is a set of letters A–Z. Each letter has multiple copies, and the consonants and vowels are typically different colors. Using movable letters helps target reading or spelling skills without layering on writing skills. This method benefits all students but can be particularly helpful for children with dyslexia or dysgraphia.
Figure 2.28 Practicing high‐frequency words with letter rocks
Source: Rachel Tidd
Using sets of letters outdoors to write, read, and practice spelling works extremely well on a variety of surfaces and weather conditions. Many teachers use plastic or wooden letters in a similar way inside their classrooms.
Movable alphabets do not have to be made of natural materials. They can also be constructed from plastic magnetic letters, wooden letters, letters written on wooden disks, or other creative solutions! Plastic containers for crafting typically have many compartments and work well to keep letters organized and are easily taken outdoors.
Creating a few sets of movable alphabets for your classroom is relatively simple. Rocks are a great choice as they are easy to gather or purchase. For this project, rocks with a smoother surface are best, as you will need to write letters and numbers on them. If you have trouble finding suitable rocks, the floral department of craft stores or even the dollar store sells bags of rocks suitable for this project.
Once you have your rocks, simply write the letters on the rocks. Make several copies of each letter, especially the vowels. It can be helpful to make the vowels and consonants different colors. Typically, vowels are red, and consonants are blue (if your rocks are very dark, consider pastel colors).
If using paint markers on smooth‐textured rocks, a coat or two of Mod Podge can help make them more durable.
Consider making rock sets with the numbers 1–10 including the symbols for computation (+, –, ×, ÷) to use in outdoor math lessons. You can make rocks with dots for younger students to practice subitizing skills. In the winter, you can use letter and number silicone molds filled with colored water to make ice letters and numbers! These are fun to use in the snow!
Materials:
- Rocks or tree cookies
- Two colors of permanent markers or paint markers (typically red and blue)
Optional materials
- Paint
- Mod podge™ (can help protect the paint from chipping off)
- Various materials for specific activities
Activities using letter rocks
- Letter sound hunt: Have young children find items that begin or end with a selected sound or letter.
- Handwriting: Have young children use the letters as models for writing letters with chalk.
- Sound or Elkonin boxes: Use the letters in sound boxes (Elkonin) drawn with chalk or in the snow/dirt with a stick.
- Marking up words: Show the component parts of words by labeling words written with the movable alphabet to show vowel sounds, digraphs, vowel teams, syllables, and more (see Figure 2.29).
- Change a Letter game: Play the Change a Letter game (see the Games section in this chapter).
- Spelling: Practice spelling words or new phonics patterns. Dictate words and have children or groups spell them using the letters. This activity can be adjusted for any age!
- Crossword game: Play a version of Scrabble® outside by having players take turns to build words that connect like a crossword puzzle.
- Picture card spelling: Have children spell words shown on picture cards or identify the beginning, end, or middle sounds.
- Learn and label plant species: Have students gather flowers, leaves, and plant specimens and lay them on a flat outdoor surface. Use the rock letters to label each species. Have older students include the Latin names.

Figure 2.29 Labeling or “marking up” words to show their vowel sounds and other features
Source: Rachel Tidd
- Word scramble: Give groups one large word and have them use the letters in the word to create as many words as possible and record them. The group with the most real words wins! For example, you give the word sunshine to the class. Each group selects the letters from the movable alphabet to spell sunshine. Then they move and rearrange the letters from the word sunshine to create new words such as hen, shin, and shines.
- Silly sentences: Use the letters for children to write silly sentences.
- High‐frequency word practice: Practice writing sight or high‐frequency words.
Activities using number rocks
- Number sentences: Show a model of a problem and use the numbers to write a number sentence.
- Order of Operations: Have students write equations to practice the order of operations and how the placement of parenthesis can change the answer. For example, students could write and solve (3 + 8) × 9 = ____ And 3 + (8 × 9) = ___ (see Figure 2.30).
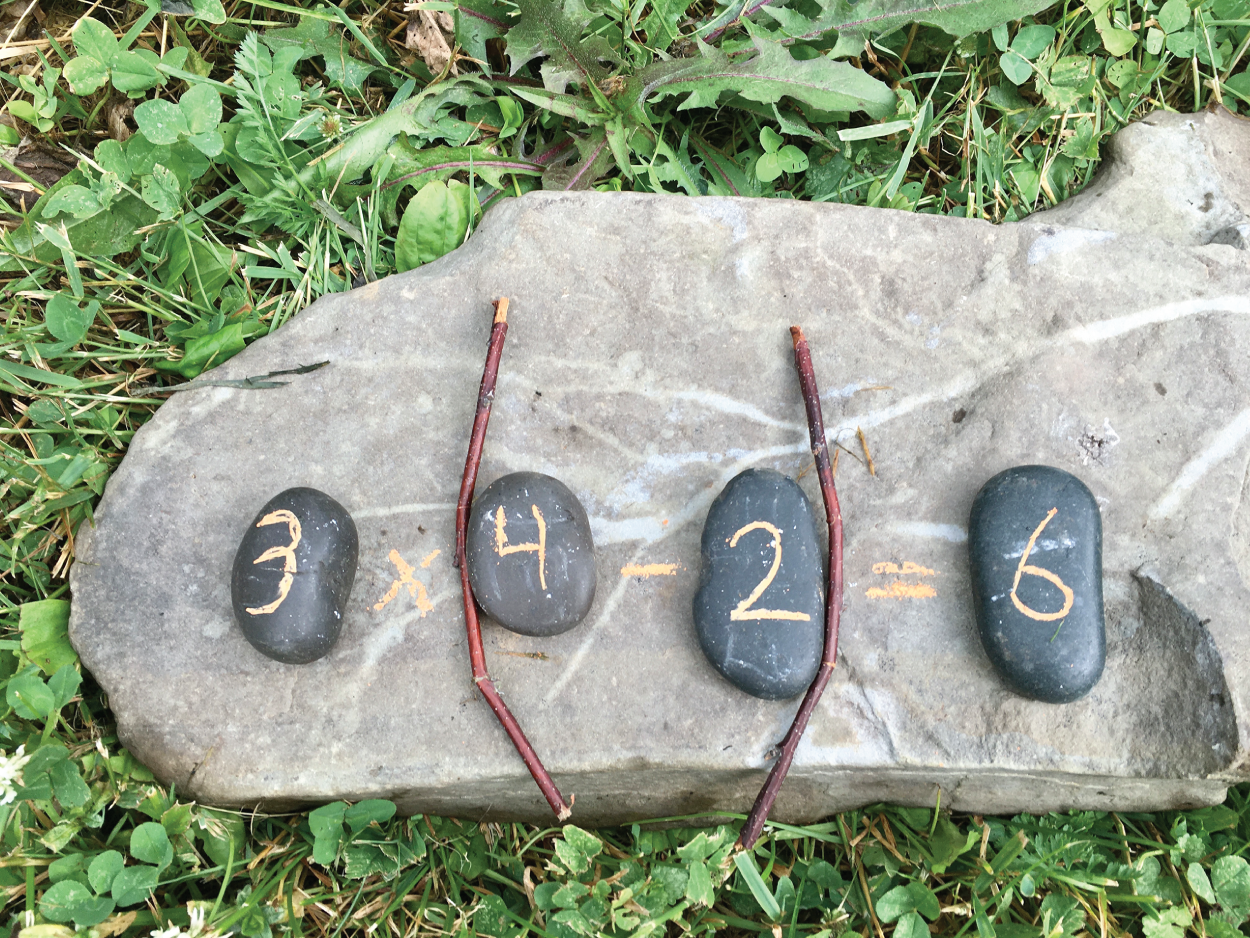
Figure 2.30 Using number rocks to practice order of operation problem – sticks are used as parentheses
Source: Rachel Tidd
- Time: Have students build a clock using number rocks and sticks as hands to practice reading and showing different times (see Figure 2.31).
- Reduce writing demands: Use number rocks to practice math facts without the added handwriting component.
- Fact families: Practice and record fact families (addition/subtraction, multiplication/division) such as 2 + 3 = 5, 3 + 2 = 5, 5 – 2 = 3, and 5 – 3 = 2.
- Record answers: Use the number rocks to record answers from a worksheet or word problem instead of writing.
Leaf flower sorts
Leaf flower sorts use leaves as petals to create flowers for each attribute or category being sorted. They are incredibly versatile and can be used to sort phonics patterns, fact families, root words or suffixes, character traits, science concepts, and more!
Materials
- Rocks for the center of the flower (you can also use paper circles or branch slices)
- Leaves for petals
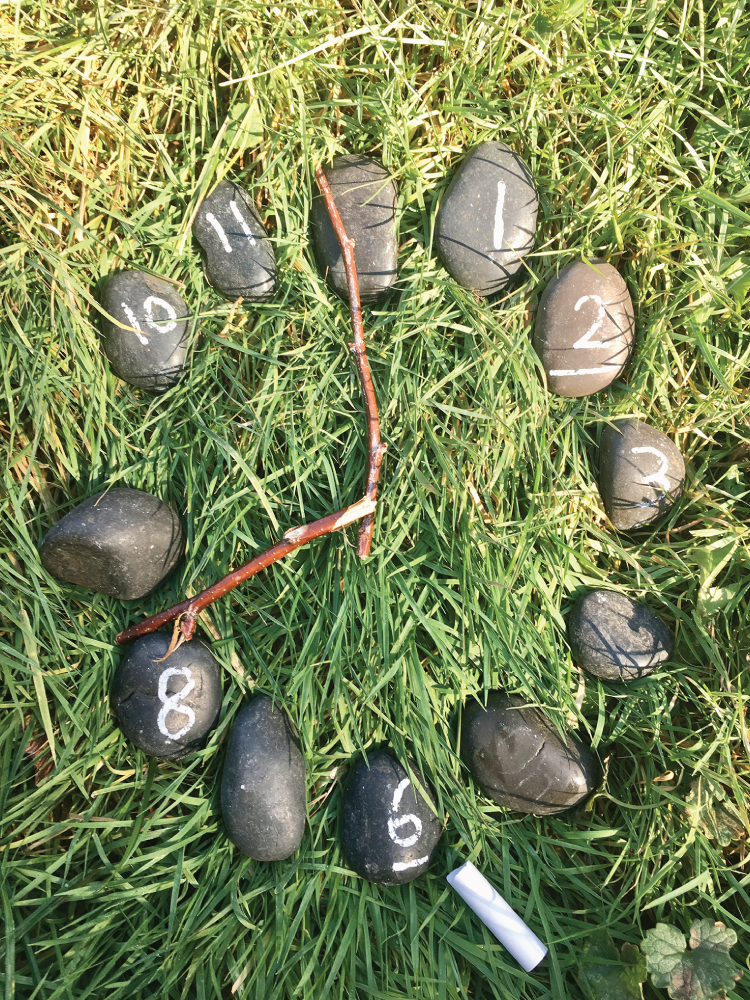
Figure 2.31 Using number rocks to create a clock and practice telling time
Source: Rachel Tidd
- Chalk
- Permanent marker
- Prepped list of words or leaves with prewritten words, facts, or other selections to be sorted
- Paper and pencil
Activity
- This activity works best when you write the words (or whatever category you are having students sort) on the leaves using a permanent marker ahead of time. More advanced students can be given a list and then can write the words or selections on the leaves.
- Divide students into pairs and ask them to label each rock with a category. Then, give students prepared leaves or a list of words/items to copy onto leaves with a permanent marker. Then have students sort the leaves, placing the stem of the leaf under the rock whose category the word or selection matches. As leaves are added to each rock, it creates a beautiful flower (see Figure 2.32)! You may wish to have students record each category and the words or selections on paper after sorting.
Variations
- Silly sentences: Write words on leaves for children to arrange into silly sentences. Have them record each sentence in their notebooks.
- Leaf paper: Leaves can be used to practice writing sentences, making flashcards, and more!
- Color sorts: Preschool and kindergarten students can sort leaves by color or create a color gradient.
Math with natural materials
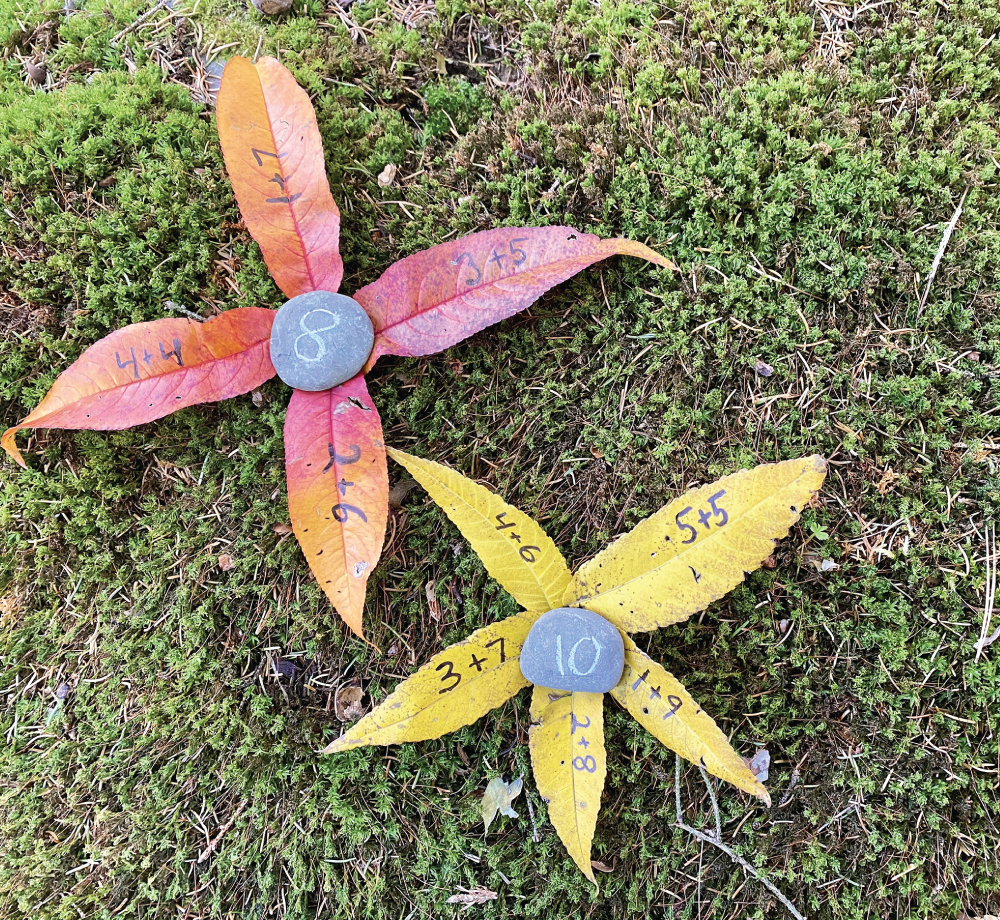
Figure 2.32 Using leaves to sort addition fact families
Source: Rachel Tidd
Using natural materials is a great way to integrate nature into your math lessons. Children often are attracted to natural materials and find them more pleasing than typical plastic math manipulatives. We can capitalize on this interest by using these materials in our math lessons.
Place value sticks
Place value sticks are bundles of ten sticks used in place of base ten blocks to teach math skills involving place value or skip counting. This activity enlists the help of students in creating a classroom set of place value sticks that can be used to practice place value indoors and outdoors. Making place value sticks is as much a part of the learning process as using them.
Materials
- At least 120 small sticks collected by students or gathered by the teacher beforehand
- Rubber bands
- Pencil (or chalk)
- Paper
- Large bin or basket for storing the completed stick bundles
Activity
- Involving students in creating a class set of place value sticks allows children to apply their math skills to solve a problem. Ask each group to collect 120 small sticks. Alternatively, divide the total number of sticks desired by the number of groups. Each stick should be approximately six inches long and about the circumference of a pencil. Make sure to emphasize that sticks should be on the ground, not taken off live trees.
- Have the groups discuss and decide how they will collect and keep track of the number of sticks they have, how many they still need, and a plan to keep them all organized! The real magic of this activity is when children are actively keeping track of how many sticks they have collected. Each time they add more sticks they must recalculate! Provide chalk or pencil and paper for any calculations they might want to make. Omit this if you would like to encourage mental math.
- Once the groups have the correct number of sticks, tell them that you need ten bundles of ten sticks and 20 single sticks and distribute the rubber bands. The rubber bands are used to bundle the groups of ten sticks together.
- Now that you have a class set of place value sticks, use them as you would using typical base ten blocks. Use them to represent larger numbers in tens and ones, show how to regroup multidigit addition or subtraction problems, and skip count by having the students re‐bundle the sticks into groups of a different quantity (see Figures 2.33 and 2.34).

Figure 2.33 Using place value sticks to add
Source: Rachel Tidd
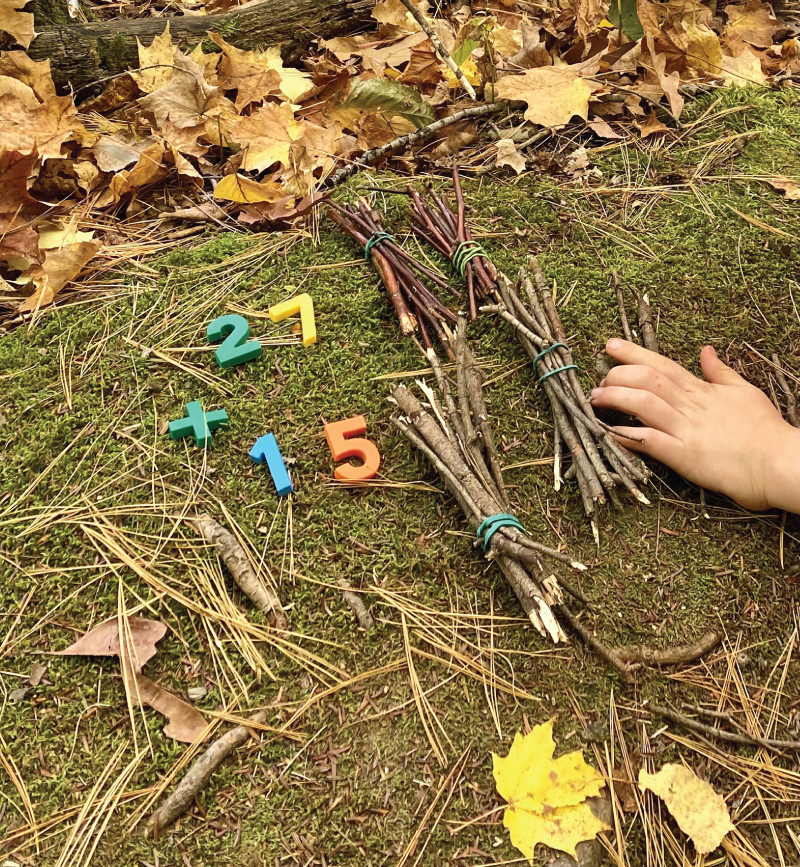
Figure 2.34 Using place value to practice regrouping in multidigit addition problems
Source: Rachel Tidd
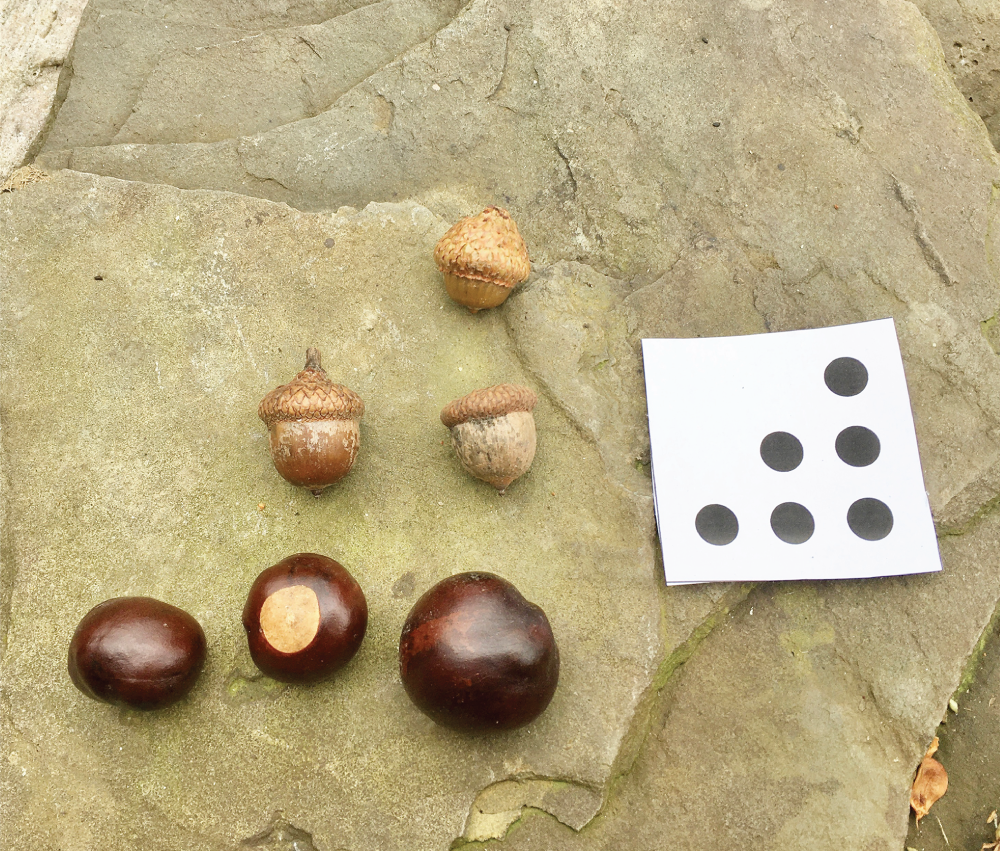
Figure 2.35 A student practices subitizing using natural materials to re‐create a dot pattern after being shown the pattern on a card for a few seconds
Source: Rachel Tidd
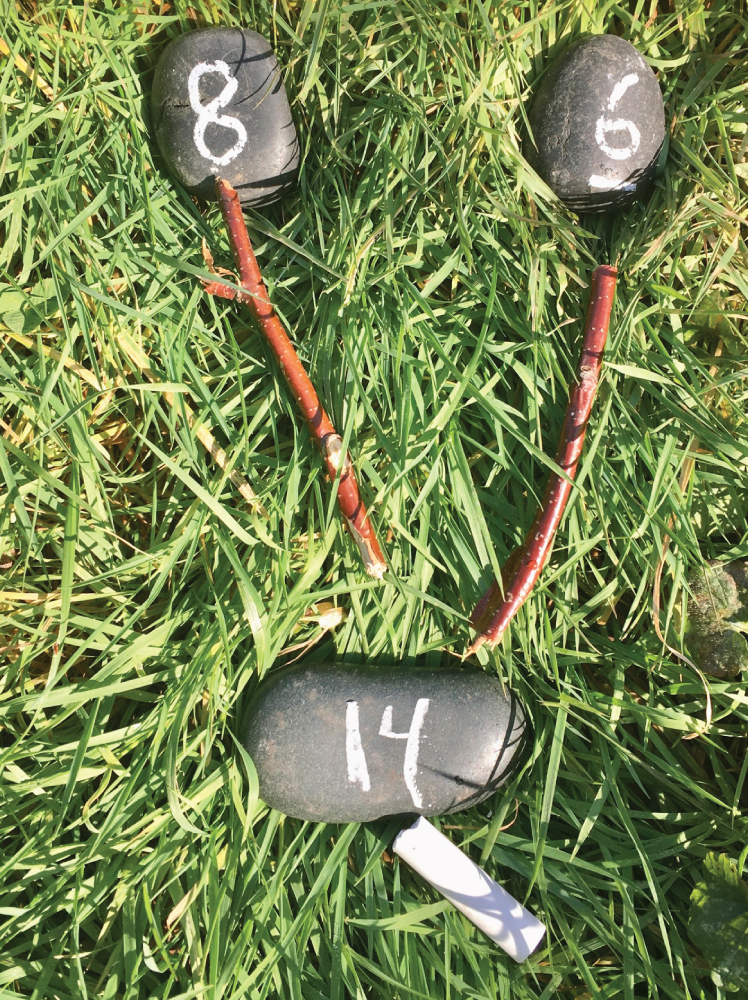
Figure 2.36 Using number rocks and sticks to model number bonds
Source: Rachel Tidd
Stick geometry
Pavement, sidewalks, and snow make excellent surfaces for using sticks to construct shapes. This activity is a fun way to learn about shapes and their attributes in a hands‐on way. This activity can be adapted for the upper grades by having students calculate the perimeter and area of each shape created.
Materials
- Enough sticks for each pair of students
- Ruler
- Laminated paper and dry‐erase writing utensil for recording
Preparation
- If your schoolyard does not have many sticks or you do not already have a collection of suitable sticks, you may need to collect sticks in a park or natural area for this activity. If you have a good supply of sticks on school grounds, you may wish to have students collect them beforehand. Make sure to emphasize that sticks should be on the ground, not taken off live trees.
Activity
- After introducing shapes and their attributes such as corners, sides, and angles, divide students into pairs. Each pair of students should have enough sticks to construct each shape and extra sticks to create a new shape.
- Ask students to make a shape with the fewest number of sticks. What is the only shape they can make? (Triangle.) Have them record the number of sides and corners using a three‐column chart on their laminated paper. Older students can also calculate and record the perimeter and area of the shape.
- What kinds of shapes can they make with four sticks? Have them record the attributes of the new shape on their chart. Discuss their findings.
- Continue the activity by adding more sticks. Which number makes the largest variety of different shapes?
- Have students create a shape larger than the shapes they previously made. Have them record the attributes and name the shape (if it is a new shape, have them create a name that is more descriptive than the term polygon!).
Variation
- A similar activity can be done using sticks to model and measure angles. For this activity, students need a protractor.
Creating arrays
Arrays are an excellent way for students to model multiplication and find the factors of numbers. Using natural materials readily available outside can allow children to practice modeling multiplication problems and help them solve them. In the lower grades, children can use arrays for counting items arranged in a line, rectangular array, or counting rows and columns.
Materials
- Natural materials (or snowballs)
- Notebook or laminated paper for recording
- Pencils or dry‐erase pencils
Activity
- Model how to construct arrays for a number using natural materials or snowballs (in winter) (see Figure 2.37). Then have students work individually or in pairs to find all the possible arrays for a given number. They should record all the combinations and write the factors/multiplication facts for each number. Ask a few students to share their work with the class (the physical arrays they made and the recorded notes).

Figure 2.37 Modeling arrays using rocks
Source: Rachel Tidd
Adjusting the Activity
- Students working on counting can build and count objects in ten frames or larger arrays. They can also count rows or columns in an array.
Modeling fractions with natural materials
Using natural materials to model fractions gives children lots of hands‐on experience creating, interpreting, and manipulating fractions.
Materials
- Circle, square, and rectangle cake pans
- Sand, mud, or snow
- Stick or plastic knives
- Natural materials
Sourcing cake pans
- Collect old cake pans from parents, thrift stores, and garage sales, or purchase aluminum or inexpensive pans at the dollar store.
Activity
- Using natural materials to model fractions is the simplest way to take fraction work outside. Use objects to model ¼ by showing one acorn and three pinecones. The acorn is ¼ of the collection.
Variation
- Have students use scissors and cut leaves to show the fractions ½ and ¼ and lines of symmetry.
Modeling fractions with mud pies
Mud pies are a fun and engaging way to teach fractions outdoors! Prefill the pans with mud, sand, or snow, depending on what you have available, and the season.
Materials
- Circle, square, and rectangle cake pans
- Sand, mud, or snow
- Stick or plastic knives
- Natural materials
Activity
- Model for students how to show different fractions on a mud pie by using a stick or plastic knife to “cut” the cake into fractional parts. Use natural materials to highlight other fractional parts (see Figure 2.38). For example, use blades of grass to cover two of the three cake pieces to show the fraction 2/3.
- Then have children make and decorate their cakes using natural materials in fractional sections of their choice. Ask them to record their decorations and the fractional part of the cake each decoration covers. These will serve as directions for another cake decorator (student). Can a friend re‐create their cake from their directions? When finished, they can also share their designs with others or the whole group.
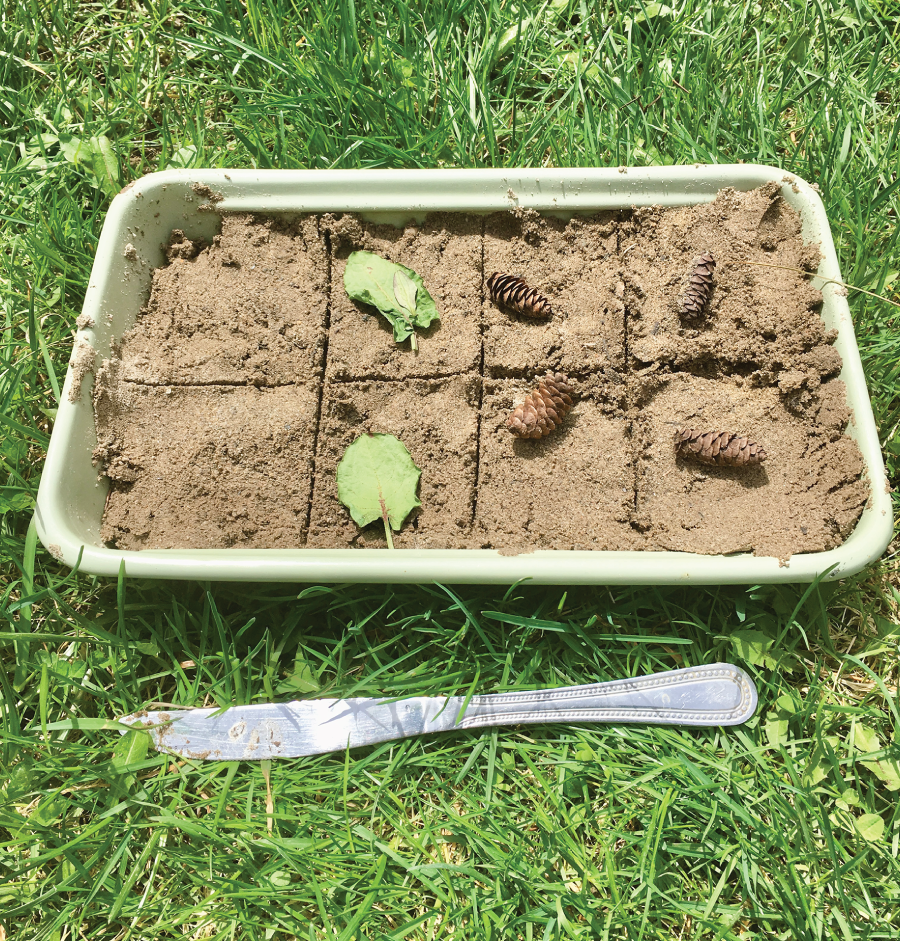
Figure 2.38 Example of using mud pies to model fractions
Source: Rachel Tidd
Modeling equivalent fractions with mud pies
You can also use cake pans to model fraction operations (see Figure 2.39)! So often students memorize how to solve fraction problems without really understanding what the steps they are performing mean. By providing plenty of opportunities to experiment with solving these types of problems using cake pan models, students will gain an in‐depth understanding of fraction operations.
Materials
- Circle, square, and rectangle cake pans
- Sand, mud, or snow
- Stick or plastic knives
- Natural materials
Activity
- Here is an example of how to model finding equivalent fractions with mud pies using cake pans. Have students begin by drawing three vertical lines on the cake (this will create fourths). Have them use natural materials such as grass or pine needles to mark three of the four parts. This will show the fraction ¾ (see Figure 2.40).

Figure 2.39 Using mud pies to model finding equivalent fractions
Source: Rachel Tidd
- Next, have them use a stick to make a horizontal line through the middle of the pan. Ask, “What size are the pieces of cake now?” The cake is now divided into eighths (see Figure 2.41). Ask, “Our original fraction was ¾. How can we describe the same fractional part of our cake in eighths?”
- The fractional part of the cake did not change. Both ¾ and 6/8 describe the same amount of cake. We call these equivalent fractions. Have them write these two fractions on paper or with number rocks or plastic numbers.
Ask your students if they see any patterns or ways in which the two equivalent fractions they wrote are related (you can see this in numerical representations I wrote under each square).
A conversation with your students might sound like this: “We can multiply the denominator by two to get eighths in our equivalent fraction. Does multiplying the numerator by two give us the correct number? Yes! To get an equivalent fraction, we multiplied the numerator and denominator by the same number. Does this rule work for finding other equivalent fractions in our other squares?”
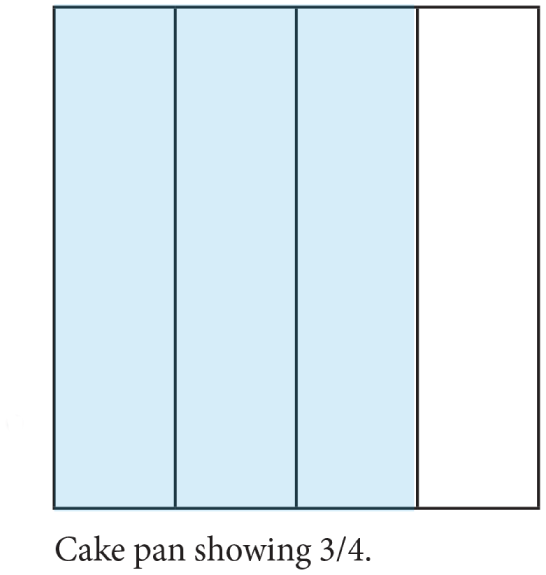
Figure 2.40 Cake pan showing the fraction 3/4
Figure 2.41 Cake pan with a stick laid across to make eighths – the fraction is now 6/8: 
Next, have them record a drawing of the fractions made in the pan and the equation in their notebook. Then, have them do the same process again. This time they will add another horizontal line to create twelfths (see Figure 2.42).
Variations
- You can use cake pan models to add, subtract, multiply, and divide fractions.
Figure 2.42 Cake pan with two sticks laid across to make twelfths – the fraction is now 9/12: 
3D shapes in the snow
Snow makes a fantastic modeling material for creating and learning about 3D shapes and volume. This hands‐on activity utilizes recycled and repurposed containers to create shapes and identify their attributes and the type of shape. Older students can calculate the shape's volume.
Materials
- Snow (wet sand or kinetic sand can also be used if snow is not available)
- Recycled or repurposed containers in various geometric shapes
- Ruler
- Laminated paper
- Dry‐erase colored pencils or crayons
Activity
- Divide students into pairs or groups and provide each group with several containers. Model how to pack the containers with snow and flip them over, resulting in a 3D shape. Explain the attributes and metrics you would like them to record for each shape created: number of sides, corners, length of sides, area of sides, shape name if known, shapes of sides, and total volume. The metrics you choose will vary depending on the age/grade of your class.
Adjusting the Activity
- Have older students calculate the surface area and volume of the shapes.
Variation
- Have students combine all the containers and sort them according to different attributes such as the shapes of the sides, the total number of corners, and if they contain a rounded edge or their general size.
Reading and writing activities using natural materials
Natural materials can also enhance lessons in reading comprehension and writing skills. Leaves are especially useful for modeling and practicing contractions, prefixes, and suffixes. Children love using natural materials such as clay to create a character and using leaves and other materials to make masks for acting out a story.
Masks and playacting
Students love acting out stories whether they are from a book or stories they have written themselves. Adding masks constructed from natural elements adds to the fun! This activity also works well for pairing older student mentors with younger students.
Materials
- Cardboard or cardstock
- Scissors
- Glue
- Tape
- Various natural materials (collect the materials ahead of time as a separate activity if you only have a paved area at your school or have children find their own as part of the activity if your schoolyard has sufficient materials available)
- Paper and pencil if students are writing their script or familiar picture books if children are acting out the stories from books
Activity: Writing emphasis
- Divide students into groups and have them create a skit. They should work together to write the script, choose parts, and practice performing. You may give them a topic or theme (based on an animal or plant they recently saw, a current topic of study, or choose to let them freely create. Once they have written the script, they can make masks for the characters using cardboard, string, and glue or tape (see Figure 2.43).
Activity: Reading comprehension emphasis
- Students can do a similar activity using familiar picture books. Have students work in groups to practice acting out the story of a familiar picture book. Children can read the text or retell the story in their own words, using the pictures for reference. While the “narrator” is reading or telling the story, the other children act it out. Have them create masks for each character to use as a costume. They can use cardboard, string, glue or tape, and natural materials to create the masks.
- Groups will need to practice their performance a few times. When they are ready, ask groups to take turns performing for the whole group!
Figure 2.43 Acting out a story wearing a mask made from natural materials
Source: Rachel Tidd
Leaf syllables
Learning to segment syllables is a vital skill for children as they learn to read. It builds phonological awareness, helps with decoding words, and supports spelling skills. Using leaves to cut words to show where each syllable divide is located is an excellent hands‐on way to practice this skill outdoors. If you do not have leaves in your schoolyard, gather them in parks, sidewalks, or other public greenspaces. This activity is best after a lesson on dividing words with a specific syllable pattern such as words with a VCCV (vowel‐consonant‐consonant‐vowel) pattern.
Materials
- Leaves
- Permanent markers
- Glue
- Paper
Activity
- Give each child or pair a list of words to divide into syllables. This can be on a piece of paper or written on a chalkboard or dry‐erase board for the whole class to see. Children copy each word onto the leaves. Next, they choose one leaf and decide where to divide the syllables. Then they can cut the leaf in the selected spot using scissors (see Figure 2.44). They should then lay each word part side by side, leaving a small space between them to visually show how the word is divided into syllables. If desired, have children copy the words, noting the syllable divisions, onto paper or glue the leaf parts onto paper.
Leaf contractions
Children often need lots of practice when learning how to combine words into a contraction. Leaves are readily available and make the perfect material to model and practice concepts. Modeling contractions using leaves provides a multisensory way to practice this skill.
Materials
- Minimum of 10 leaves per child/pair
- Permanent markers

Figure 2.44 Dividing syllables in words written on leaves
Source: Rachel Tidd
- Small natural materials for apostrophes such as a small stick, blade of grass, etc.
Optional materials
- Chalk or pencil/paper for recording the final contractions
Activity
- For this activity, you will need at least 10 leaves per child. Leaves with a long, thin shape from the same plant or tree work best.
- Provide the child or small group with a list of five word pairs that can be combined to make contractions. Have them copy each word onto a leaf. When they are ready to make a contraction, they look at the two words in a pair and decide which letters to snip off. Then they push the remaining parts of the words together and form the contraction. Use a small stick or other natural material as an apostrophe. When they have finished constructing all the contractions, they may copy them onto paper or on a hard outdoor surface using chalk (see Figure 2.45).
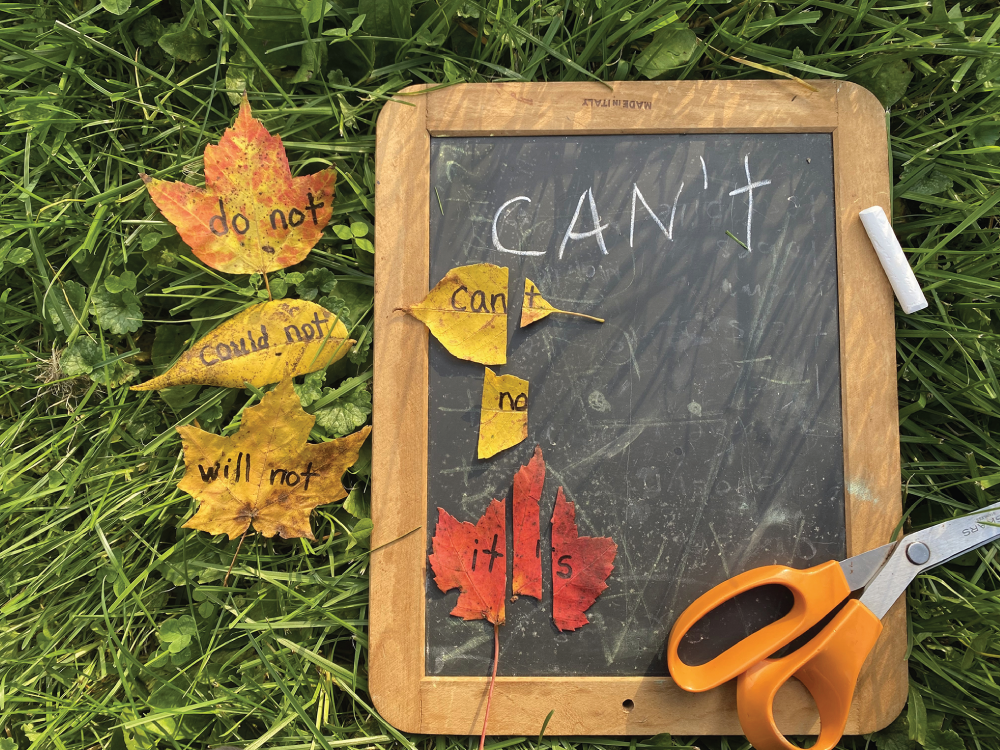
Figure 2.45 Cutting words written on leaves to create contractions
Source: Rachel Tidd
Leafixes (prefixes and suffixes with leaves)
Using leaves to model adding prefixes and suffixes to root words is another excellent way to utilize leaves. For this activity, students overlap leaves with the suffixes and prefixes on top of the leaf with the root word to form new words. This activity can be an excellent follow‐up to a spelling or vocabulary lesson.
Materials
- Leaves
- Permanent markers
- Paper or notebook
- Pencil
Activity
- Provide children with a list of root words and prefixes/suffixes. Have them write the root words, prefixes, and suffixes on leaves. Have them experiment with adding the suffixes and prefixes in different combinations to the root words. How many real words can they create? Ask students to record all the (real) words that they create!
Clay characters
Creating a brand‐new creature using clay and natural materials makes for an engaging way to teach character development, character traits, and writing skills.
Materials
- Clay (or homemade playdough)
- Natural materials
- Pencil
- Paper
Activity
- Give each student a ball of clay and access to natural materials such as sticks, leaves, rocks, bark, and mulch. Ask students to use the clay and materials to create a new character. When finished have students write about their character.
- What is their name?
- What is their personality?
- Where are they from?
- Where do they live?
- What are some of their character traits?
Then they can write a short story featuring the character they developed. Students should try to incorporate at least one of the character's traits in the story. Alternatively, you may have students act out their stories with their clay characters to practice oral language skills.
Utilizing the Schoolyard
Schoolyards and playgrounds are not just for recess! They can be excellent locations to demonstrate science concepts and practice design skills! This section shows you how to capitalize on the resources in your schoolyard and provides a few suggestions on items to enhance learning!
Math and science activities
This section contains activities that utilize the schoolyard space to learn math or science concepts. Several of the activities incorporate both math and science skills together in one activity, such as learning about birds and collecting data about them.
Attracting birds
Watching birds provides endless learning opportunities. Observing and learning about bird behavior, different species, migration patterns, and changes in plumage in different seasons are just some of the topics children can learn from a simple bird feeder. Using bird observation as the basis for graphing and data collection is another way to utilize a schoolyard bird feeder!
Materials
- Bird feeder
- Bird seed
- Bird guides
Setting up Your Feeder
- You can ask local hardware or home supply stores if they are willing to donate feeders and feed. Parents may also be willing to donate seeds or an unused bird feeder to lend or donate.
- There are many different styles of bird feeders. Some can be attached to a window; some are designed to hang from a tree or pole. Bird feeders also are designed for different types of birds: small birds such as chickadees, larger birds such as cardinals, and suet feeders for cardinals. Choose a bird feeder to attract the types of birds most common in your geographical area. If the feeder will be close to the building and/or over a paved surface, plan to sweep up the empty seed shells periodically.
- If possible, choose a location for the feeder that you can see from the classroom windows. This allows you to observe birds both outside and inside! If this is not possible, choose somewhere away from busy areas like the playground. If the feeder is not visible from your classroom, plan to visit regularly. You can have children write down observations in their nature journals.
Activity suggestions
- Track species: Track all the different species that visit your feeders over time. Make a list on chart paper and hang it somewhere accessible to the children so they can add new species independently!
- Track the number of birds: Observe and track the number of birds of each species that visit the feeder. Use the data to construct graphs.
- Bird behavior: Observe and discuss bird behavior. How do smaller birds act when larger birds fly in? Do they ever fight? How do they communicate? Does their behavior change with the weather or seasons?
- Learn bird identification: Learn to identify birds using characteristics such as size and shape, color pattern, behavior, and habitat. Learn more and watch free videos at https://www.allaboutbirds.org/news/building-skills-the-4-keys-to-bird-identification/
- Research a species: Have students research a bird species and write a report. This can be done in groups, with each group sharing with the class what they learned.
- Citizen science project: Participate in a citizen science project. The Cornell Lab of Ornithology hosts several citizen science projects such as the Great Backyard Bird Hunt. These projects have students collect and submit data about the number and species of birds observed during specific periods. This can be an excellent way for children to participate in real science research! They have a packet of resources, including an excellent bird species poster associated with Project FeederWatch, as well as many free classroom lesson ideas about birds! Some excellent resources for citizen science projects related to birds are: Project FeederWatch at feederwatch.org, Backyard Bird Count found at birdcount.org, Cornell University's K–12 Resources found at birds.cornell.edu/k12/, and Urban Birds at celebrateurbanbirds.org.
Design a playground
What would your students do if they could completely redesign the playground? This STEM activity has students redesign their school playground.
Materials
- Pencil
- Large pieces of paper
- Access to the playground or area that students wish there was a playground
Optional
- Recycled or found materials or blocks for building a model
- Glue
- Tape
Activity
- Lead a discussion with students about the playground (if you do not have one, imagine one!). What would they change or add if given a chance to redesign the playground? What needs does the playground have? Does it need a drinking fountain or more shade? What would make it more fun?
- Explain that today they will imagine and design a playground that would fit in the same space. The only design constraint is that it must stay within the confines of school property. It does not have to look like a typical playground and could even extend to places such as the roof!
- Students may work on this project individually, in pairs, or in groups. Students can write, draw, or do a combination of both.
Extension
- Have students build a model of their designs or have groups choose a single design to build a model of. Students can vote on the winning design. They can use blocks or recycled/found materials.
Physics on the playground
The playground is the perfect place to investigate the fundamental concepts of physics! Sliding down the slide, swinging on the swing, and playing on seesaws show how pendulums, simple machines, and the laws of physics relate to real life.
Materials
- Timers
- Pencil
- Paper
- Various materials depending on the activity
Activities
- Forces: Investigate forces by performing a forces scavenger hunt. Ask students to find examples of different forces on the playground. Forces to look for include push (pushing a friend on a swing, tetherball), pull (pull‐up or monkey bars), gravity (slide, jumping from the structure), and friction (slide, kicking a ball on the ground).
- Simple Machines: Look for simple machines and demonstrate them on the playground. Simple machines such as the inclined plane (slide, ramp); lever (seesaw or similar apparatus); wheel and axle (steering wheels, log rolls, rotating tic‐tac‐toe boards); pulley (if your school has a flagpole); screw (spiral fire pole, twisty slide). Have students make an informational video, pamphlet, 3D model, or poster to showcase examples of simple machines or forces on the playground or in the schoolyard.
- Friction: Experiment with friction using slides. Try sliding down the slides on different materials to see if it changes the speed as you travel down the slide. Students can record their observations and discuss the results.
- Pendulums: Explore pendulums using swings! Pendulums are simply weights suspended by a string that moves back and forth with help from gravity. Try these experiments:
- Pendulum basics: Have children start swinging and then stop pumping their legs. What happens? Is the maximum height that they go changing? Are they slowing down?
- Starting point experiment: Have one student sit in the swing with their legs out (don't bend them). Have another student stand straight behind them and hold the swing. The person standing behind the swing lets go of the swing without pushing! The person standing should not move! Will the swing hit the person standing? If they did not push, the swing should not hit them because a pendulum will not swing past its starting point unless you add energy with a push or by pumping their legs.
- Experiment with different loads: Have a child and an adult swing side by side at the same rate. Once you are swinging simultaneously, stop pumping your legs and let the swing go back and forth naturally. What happens? Do they stay together?
- Investigate rate: Will a swing make the same number of oscillations no matter who is on it? Use a one‐minute timer and have groups of students swing for one minute, counting how many times they return to the end. Have a partner pull them back and let them go. Record the number and switch. Partners or groups can try swinging “fast” with a big push or slower with a slight push. Does it make a difference? The number will be the same if the length of the swings is the same. The height that the swing starts at (amplitude) does not affect the rate.
Investigating snowflakes
While most students are familiar with snowflakes, few think about their unique geometry! This activity is best done when it is actively snowing. Dryer, fine snow works best to see the geometric crystals. But all snow reveals intricate crystal patterns and geometric shapes when examined closely!
Materials
- Snowflake Bentley by Jacqueline Briggs Martin and/or other books about snowflakes
- Magnifying glasses for each student or pair of students
- Dark pieces of cloth stretched and taped onto firm pieces of cardboard to “catch” snowflakes on
- Laminated paper
- Dry‐erase writing utensils
Activity
- Introduce the activity by reading the book Snowflake Bentley aloud to the class. Then explain that they will catch and observe snowflakes with a magnifying glass. Model making a tally chart to record the number of snowflakes for each number of points. Students can also try drawing snowflakes. Compare and discuss their observations as a whole class. What number of points had the most snowflakes? The least? What was the most unique snowflake they saw?
Variations
- Have students describe a selected snowflake with words. Students can list attributes and write 1–2 sentences or an entire paragraph.
- Consider having students write haikus or another form of poetry featuring the fascinating world of snowflakes!
Additional books about snowflakes:
- Snowflakes in Photographs by W. A. Bentley (These are the actual photographs that Bentley took and on which the picture book Snowflake Bentley by Jacqueline Briggs Martin is based. While not a children's book, the photos are fascinating and beautiful.)
- The Story of Snow: The Science of Winter's Wonder by Jon Nelson
- The Secret Life of a Snowflake: An Up‐Close Look at the Art and Science of Snowflakes by Kenneth Libbrecht
- Curious About Snow by Gina Shaw (best for younger students)
How much water is in the snow?
Volume, density, and ratios come alive with this simple experiment comparing how much water you get from a set unit of snow. Students are always surprised about how little water you get from such a large quantity of snow! The general estimate is that one inch of rain equals approximately 12 inches of snow.
Materials
- A container that is the same size on top as on the bottom and will hold water for each pair of students in your class
- Ruler
- Notebook
- Pencil
- Paper towels or cloth to put under the container to absorb any condensation
- Enough snow to collect and fill containers
- Plastic wrap to prevent evaporation if extra time is needed for melting
Activity
- Tell students you heard a weather forecaster say that an inch of rain equals approximately 12 inches of snow! Today, they are going to help you figure out if that estimate is accurate or not! Hand out a container for each pair of students and have students measure and record the height of the container. They should also guess how much (measurement in inches or centimeters) water will be at the bottom of their container after it melts and record it in their notebook.
- Next, have students put on their winter gear and head outside to fill their containers. They should fill the containers to the very top, packing them in a bit. Have students observe the snow. Is it light and fluffy? Wet and heavy? Are the crystals small and dry or big and icy? They can add these observations to their notebook when they return inside.
- Bring the containers indoors and place them in a flat, out‐of‐the‐way area to melt. Make sure students record their observations about the snow in their notebooks before moving on to the next activity.
- Periodically check on the snow and see how it is progressing. When the snow has melted, have students measure the height of the water and record this number and the ratio of snow to water that they found. For example, if the container held 5 inches of snow and they had ½ or .5 inches of snow, the ratio is 5 inches of snow to .5 inches of water/rain. Then they can compare the ratio they found to the weather forecasters' estimate using division.
Weather forecaster's ratio
- 1 divided by 12 = .084
Student ratio
- .5 divided by 5 = .1
Notice these ratios are fairly close. Have your students calculate the ratio, record their answers, and compare their results. Were they greater than, less than, or about the same as the weather forecaster's estimated ratio? Have them discuss with their partner their results and make some conclusions about the results. If your results were different from the weather forecaster’s, what do you think caused the difference?
Compare and share results as a class. Whose estimate do they think is more accurate? The weather forecaster’s result or their result? Why?
Extension
- Students may wish to repeat this activity using different types of snow and see how the ratio differs.
Writing
The writing activities in this section can be done in nearly any schoolyard. They are simple and do not require any special equipment.
Cloud Stories
When children observe the clouds and add in a little imagination, the most amazing stories emerge! All this activity requires is a day with clouds.
Materials
- Paper
- Pencil
- A day with interesting clouds
Activity
- Ask students to observe the clouds for at least five minutes. What shapes do they see? Are there animals, castles, boats, or monsters? They can take notes or make quick sketches of their observations if they like. Sketches can be useful when writing their stories because cloud shapes can change rapidly, and they may want to look at their notes or drawings for further inspiration for their stories.
- Next, explain that they will be using these observations as the starting point for a story. They can use some or all of their observations to develop a story. For example, if they saw clouds shaped like a dragon and a piece of popcorn, they may imagine a story about a dragon that loves popcorn and travels from village to village in search of every last morsel he can find. This activity can be done alone or in pairs.
Adjusting the activity
- Beginning writers can write observations or a sentence or two describing what they saw.
Variations
- Students can observe clouds and the shapes they see for a longer period, drawing and chronicling the changes. Then based on the observations, they can write a story that connects all the different objects they saw in the story!
- Pair this activity with a book appropriate for your students, such as Cloud Boy by Rhode Montijo; It Looked Like Spilt Milk by Charles G. Shaw; The Cloud Book by Tomie dePaola; Little Cloud by Eric Carle; and The Cloud Spinner by Michael Catchpool.
Procedural writing on the playground
The playground is perfect for students to practice procedural writing. Students enjoy being the expert and instructing others on how to do something! If you do not have a playground, have children focus on writing about what they do in the schoolyard (games, jump rope, etc.).
Materials
- Pencil
- Paper
- How‐to books to use as mentor texts
- Access to the playground or other activities that children can write a how‐to about
Activity
- Procedural writing, often called a “how‐to,” is a form of expository writing. In this form of writing, students must teach the reader how to do something through their writing. For this activity, students will select something that can be done on the playground and write a how‐to. These examples can be typical playground activities such as going down the slide or more advanced playground “tricks” such as doing a flip on a bar or climbing up to a special spot.
- Before your writers start writing, model what this type of writing can look like by reading aloud a mentor text.
Some favorites are:
- How to Wash a Woolly Mammoth by Michelle Robinson
- How to Read a Story by Kate Messner
- How to Make Friends with a Ghost by Rebecca Green
- How to Catch a Unicorn by Adam Wallace (series)
- How to Feed Your Parents by Ryan Miller
After reading a mentor text or two and discussing common features of how‐to books, children may head to the playground to decide on their topics. Have them get to work immediately on their writing after choosing. It may take more than one visit to the playground to finish their rough drafts. Consider having children take or draw pictures to add to their writing. You can have children revise and complete the other stages of the writing process in the classroom or outdoors.
Final Thoughts
The schoolyard is an easy‐to‐access resource that offers an array of learning opportunities. After practicing math, playing word games, and writing how‐to books on the school grounds, it is time to take your class on a learning adventure outside the schoolyard. In the next chapter, you will learn how to use the neighborhood near your school in your outdoor lessons.