

"Detailed design" is when the team really starts to make the hard decisions about how the system will be implemented. The team may also be creating prototypes to explore various facets of the design and to help produce more realistic time/effort estimates; but, ultimately, they need to gain common consensus on how the system will be put together, with a clear design agreed upon and understood by all the members of the development team.
As you can see from the chapter-opening diagram, unit tests have a close symbiotic relationship with the detailed design. A unit test "knows" about the internals of the method under test, e.g., specific variables and the other objects and methods that the code depends on. A unit test is also very fine-grained, being concerned as it is with an individual method and the results of a single call into that method.
Note
Geek Alert In the movie Avatar, if you think of the way that the N'avi connect to other creatures using their funny wiggly connector things, unit tests have a similar connection to the code: the unit test "gets inside" the code and controls it, telling it what to do and sensing both the before and after of each instruction; finally, the unit test readily disconnects from the code as soon as it's done.
By contrast, in Chapter 6 you'll learn about controller tests that manipulate and read the code from the outside. Controller tests are also broader-grained than unit tests, and are a sort of halfway house between detailed design and the requirements—in other worse, they test against the conceptual design. In that chapter we'll compare the two types of tests, and contrast the advantages and disadvantages of each. You'll find that each approach does have its place.
You'll most likely want to use unit tests for complex algorithmic logic (more about this in Chapter 12), where you want the test to have an intimate knowledge and control over each miniscule state change that takes place in the code. Such code still benefits from being designed; so in this chapter we'll show how to drive unit tests from a detailed UML design.
There are essentially two classes of unit tests: isolated tests (that is, where the code being tested is kept within a "walled garden" to keep it relevant to the particular test), and integration tests (where there are no walls, and the code is allowed to make calls to remote systems, or just to other parts of the same system). This chapter is chiefly about isolated unit tests, as these are the easier of the two to write and maintain. But integration unit tests, while they face more issues (due to the nature of what they're testing), are no less important. There will be more about these in Chapter 11.
The chapter is structured around our "top ten" unit testing "to do" list.
When you're exploring your project's detailed design, writing the corresponding unit tests, and thinking about refactoring and code maintenance, be sure to follow our top ten "to do" items.
10. Start with a sequence diagram that shows how the code satisfies the behavior requirements from a use case.
9. Identify test cases from your design.
8. Write test scenarios for each test case.
7. Test smarter: avoid writing overlapping tests.
6. Transform your test cases into UML test classes (and the test scenarios into unit test methods).
5. Start to write the unit tests and the accompanying code.
4. Write "white box" unit tests.
3. Use a mock object framework to make life easier.
2. Test algorithmic logic with unit tests.
1. Write a separate suite of unit-level integration tests.
Different UML diagrams are intended for different stages of analysis and design. Sequence diagrams, for example, are best used to think through a detailed design, and, in particular, to allocate behavior (functions/methods) to classes. With "proper" object-oriented design, you start by defining domain classes—which generally contain data—and then you allocate behavior to these data classes, so that the classes encapsulate both data and functions.[23] So, for example, when creating a ReservationDetail class with check-in and check-out dates, ReservationDetail would have at least two fields, checkInDate and checkOutDate, and during detailed design you might add the function checkDatesAreValid(), which performs a series of validation checks on the fields. To put it another way, if you want to track down some behavior related to a reservation, the first place in the code you'd go to would be the ReservationDetail class. It's just good OO design to allocate behavior to the relevant domain class.
As you might expect, allocating behavior is what sequence diagrams help you to do. And the added bonus is that this "responsibility-driven" approach to design also makes your code easier to unit test.
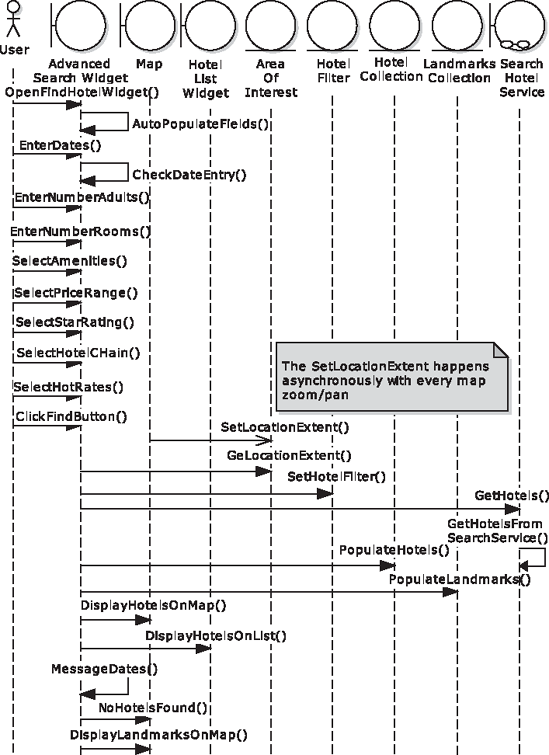
Let's use the approach we've just described to implement part of the Mapplet, complete with unit tests. The Mapplet requires an Advanced Search widget, which will allow the user to search for hotels using search fields such as city, check-in/check-out date, and so on. The user enters a search value and then clicks "Find." The Flex client contacts the Java-based search service, which, in turn, calls out to an external, XML-based search system. The Java code then compiles the XML results into a HotelCollection, which it returns to the Flex client.
Note
We will walk through the Flex-based ReservationDetail example in Chapter 6, so for this chapter we'll look at server-side code, a Java class called SearchHotelService.
Figure 5-1 shows the sequence diagram for the search request that we've just described (this is, in fact, for the Advanced Search use case, which we will show more of in Chapter 6). It's pretty clear from the sequence diagram that SearchHotelService (our server-side Java class) needs a public method called getHotels() and a private method (called on itself) called getHotelsFromSearchService(). This second method is the one that makes an HTTP call to an external hotel search service, which returns its results in a big XML stream. But it's the public method, getHotels(), that we want to unit-test. We want to test how the Java code handles some hotels being returned, and also whether it copes with no hotels being returned.
Let design diagrams drive your creation of test cases. If you're using EA, first make sure that you have the ICONIX add-in installed (it's a free download[24]). Then in your sequence diagram, right-click and choose Add-Ins... Agile ICONIX Process... Create Tests from Sequence (see Figure 5-2). This creates a test case diagram with one test case on it for each operation on the sequence diagram (see Figure 5-3).

As you can imagine, a test case for each operation means a lot of test cases—in Figure 5-3 we've deleted most of them to fit the diagram onto the page. But, in fact, you'll find that you won't need unit tests for some of the generated test cases, as many of them will already have been covered by controller tests, which we will talk about in Chapter 6. But we're getting ahead of ourselves...
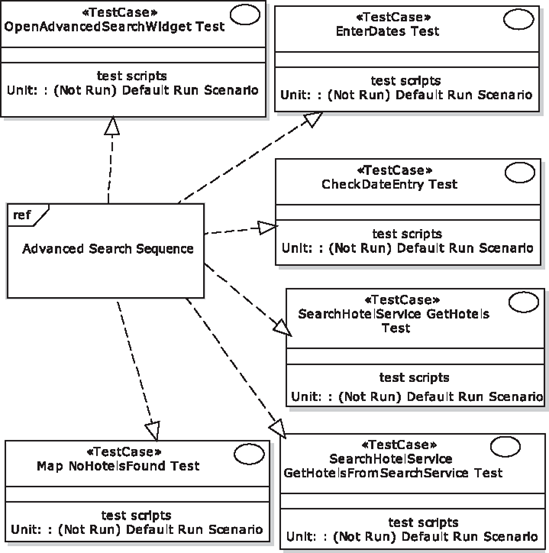
The test case that we're interested in is the one for the getHotels method—the third one down on the right in Figure 5-3. But simply creating a test called "Get Hotels" doesn't say very much: "Let's test getting hotels!" With DDT we're much more interested in "testing with a purpose," identifying specific scenarios for each test case—e.g., "Let's confirm that when the Search Service returns no hotels, the code survives it." We'll look at how to create specific test scenarios next.
Be sure to write scenarios for each test case. A test case with one default scenario is only part of the story. Additional test scenarios allow for things like alternative inputs (and, therefore, different expected outputs), creating a more comprehensive test case.
In Figure 5-3, notice that each test case has the following line on it:
Unit: : (Not Run) Default Run Scenario
"Default Run Scenario" is the name of—you guessed it—a default scenario. Each test case gets one of these by default. But we want to get more specific than that. For getHotels(), we'll replace the default scenario with two new ones.
To add these new scenarios, first zap EA into Testing Mode: either press Alt+3, or choose View... Testing, or double-click on the Default Run Scenario. You should see a Testing window appear. If you click the GetHotels test case, then you can now start adding individual test scenarios (see Figure 5-4).

Along the bottom of the screen you should see some tabs: Unit, Integration, System, Acceptance, and Scenario. Make sure you're adding the tests onto the Unit tab.
Halfway up the window, there are tabs for the current test scenario: Description, Input, Acceptance Criteria, and Results. The information you put in these will be written into comments on the unit test class, so be sure to write something good, meaningful, and unambiguous. And specific.
Table 5-1 shows the test data we've added for GetHotels.
Table 5-1. Test Scenario Details for the "Get Hotels" Test Case
Description | Input | Acceptance Criteria |
|---|---|---|
Specify a 5-star hotel in NY City for $50. Should result in an XML response containing zero hotels. | Hotel Filter with: starsMin: 5 starsMax: 5 location: New York priceMin: $50 priceMax: $50 | Should survive parsing the zero-hotel XML result and return an empty HotelCollection. |
Search for hotels in Waikiki that have swimming pools. Should result in an XML response containing lots of matching hotels. | Hotel Filter with: Location: Waikiki Amenities: Swimming Pool | The HotelCollection returned should contain as many hotels as are in the XML result. |
Notice how "up-close" these test scenarios are: we're not looking at the overall interaction, but instead a single point, one link in the chain. So, for example, this particular test isn't about whether the UI displays the result correctly; it's about whether one method successfully parses the search result.
The GetHotels test case now looks like the illustration in Figure 5-5.

If you want to get as close as possible to 100% code coverage (Fly, Icarus! Fly!), then creating test scenarios for every test case generated from each operation will pretty much get you there. Of course, you'll be a hairy old man (or woman) by the time they're all done, so it pays to be more selective about which tests you want to focus your efforts (and the customer's time, aka money) on. In Chapter 6 we will show an effective method of being selective—but we're getting ahead of ourselves again. For now, you should find that it's quite an intuitive process to look at each generated test case on the diagram and decide whether the project will benefit from turning it into a unit test class. As soon as you've determined that a particular test case isn't needed, just delete it from the model.
Let's take a closer look at why you can afford to leave some tests out.
One of the issues we have with "100% code coverage" is that you potentially end up with duplicate tests: ones that are already covered by another test. Overlapping tests represent wasted effort. One way to "test smarter, not harder," is to avoid writing two or more tests covering the same ground. It isn't always obvious that two tests overlap. To illustrate, Figure 5-6 shows a sequence diagram for a prototype version of the Hotel Search Service.

Following TDD, you would write tests for the three constructors (Hotel, HotelCollection, and HotelSearchXmlResponse) to ensure that each object was created properly. You would also write tests for the methods Hotel.populateFrom(node), HotelCollection.add(node), HotelSearchXmlResponse.queryXPath(..), and HotelSearchXmlResponse.parse(). Each of these might end up with more than one test case, to cover all the permutations and ins and outs. That's rather a lot of test code, but, ultimately, what does all of that actually buy you (aside from rather a lot of test code)?
The sequence diagram provides an important visual clue that all of those tests may not be needed. The boundary object, HotelSearchClient, is really in charge of this particular sequence: it's the orchestrator, the entry and exit point for the XML parsing and creation of a HotelCollection. It initially creates a HotelSearchXmlResponse object, then kick-starts the sequence by calling the parse() method.
If you think of the best Rube Goldberg-esque machine you've ever seen,[25] most likely the sequence is begun in quite a humble way: a toy truck being pushed into some dominos, triggering a marble rolling down a chute. The marble disappears into a more complex mechanism, and a whole sequence of events is kicked off. The final result, several buckets of multicolored paint sprayed across some musicians, is consistently the desired outcome. Each time the machine is run, the only variant might be the speed and direction at which the toy truck knocks over the dominos, right at the start. Everything in between there and the paint spray/dour musicians result is a constant: so one unit test could feasibly cover it. Inputs=toy truck velocity; acceptance criteria=grumpy paint-spattered musicians.
The principle is exactly the same for the sequence shown in Figure 5-6. HotelSearchXmlResponse.parse() is called, and everything after that is constant and predictive, right up to the point where the HotelCollection is returned. The only variations are to do with the XML passed in (e.g., different number of hotels, or the XML itself may be invalid), and the number of Hotel objects returned in the HotelCollection.
So, in theory, you could get away with just the one unit test, right at the top level of the sequence. If anything within the encapsulated code doesn't work, the HotelCollection won't return the correct result.
This is "black box testing" at its most opaque, of course. You may well find that you don't want to stretch one unit test across too big an expanse of complex or algorithmic code. Even if the measurable outcome is already covered, you might find it beneficial to add more tests within the code. Sometimes this helps to create cleaner code, and may also help the developer to understand the code more as he's writing it. There will be more about "white box testing" later in this chapter.
Sometimes finding the "sweet spot" between black box and white box tests is obvious, and other times it's subjective. In Chapter 6 we present a technique (using controller tests that are essentially "gray box") to help identify the key software functions to test.
At this stage you can quite readily take the test scenarios you've created and use them as a guide to write the unit test code. To that end, you should transform your test cases into unit test classes. Also transform your scenarios into unit test methods.
For each test case, create a unit test class, e.g., for "Get Hotels Test" you'd have a class called GetHotelsTest. For each test scenario, create a test method; for "No Hotels" you'd write a method called noHotels() and for "Return Some Hotels" you'd write a method called returnSomeHotels(). (For JUnit 3 users these would be prefixed with "test", e.g., testReturnSomeHotels().) With the test method signatures in place, you can then start to write the test code itself, writing the target/product code as you go along.
Converting the test cases into test classes and the test scenarios into test methods is almost a menial process, though: it's the sort of thing you'd think a computer could do for you. Luckily, EA has another trick up its sleeve, and can transform the test cases first into UML test classes, and from there into "real" source code.
Bring up your test case diagram. Then right-click the test case and choose Transform... (see Figure 5-7).

This brings up the Model Transformation dialog (see Figure 5-8). Choose one of the ICONIX transformations—this example is for Java code targeting JUnit 4, so we've selected "Iconix_JUnit4." Also make sure the Target Package points to a top level/root package separate from the main model.

Finally, click "Do Transform." You should see your model's package structure replicated beneath the Test Cases package, along with a new class diagram containing the test classes, and, of course, a new test class matching the test case you selected. (You can also select multiple test cases at a time, or a package full of them.) The new test class looks like that in Figure 5-9.

The class name follows this pattern:
"Name of Target Class Being Tested" + "Test Case Name"
In this case the Java class being tested is SearchHotelService, and the test case is "Get Hotels Test." The test methods themselves are simply the test scenario names, camel-cased into the Java method-naming convention.
To generate the actual Java code, right-click the UML class and choose Generate Code... (see Figure 5-10). Note that if you ticked the "Generate Code on result" check box shown in Figure 5-7, this step takes place automatically.
Tip
If you've generated the code previously and want to merge in some changes either to or from the existing code, choose Synchronize with Code... instead.

Here's the JUnit 4 test class that gets generated. As you can see, the test methods tie back precisely to what was specified in the test scenarios:
package Searching;
import org.junit.*;
import static org.junit.Assert.*;

public class SearchHotelServiceGetHotelsTest {
@Before
public void setUp() throws Exception {
// set up test fixtures here...
}
@After
public void tearDown() throws Exception {
// destroy test fixtures here...
}
/**
* Specify a 5 star hotel in NY City for $50.
* Should result in an XML response containing zero hotels.
*
* Input: Hotel Filter with:
* starsMin: 5
* starsMax: 5
* location: New York
* priceMin: $50
* priceMax: $50
*
* Acceptance Criteria: Should survive parsing the zero-hotel
* XML result and return an empty HotelCollection.
*/
@Test
public final void noHotels() throws Exception {
}
/**
* Search for hotels in Waikiki that have swimming pools.
* Should result in an XML response containing LOTS of matching hotel
*
* Input: Hotel Filter with:
* Location: Waikiki
* Amenities: Swimming Pool
*
* Acceptance Criteria: The HotelCollection returned should
* contain as many hotels as are in the XML result.
*/
@Test
public final void returnSomeHotels() throws Exception {
}
}Tip
Don't forget to substitute "Searching" with the real package where you want the test class to go.
Above each method, @Test is the JUnit 4 annotation that tags it as a unit test method. Notice also that each test method includes JavaDoc comments to remind the programmer exactly what the test needs to achieve: a summary, the inputs into the code under test, and the final acceptance criteria.
Now all that's left is to write the test code itself, along with the code that we actually want to test, and then, of course, to run the tests.
It's now time to step through the generated unit test methods, fill them in with actual test code, and write the accompanying product code, referring to the design as you go along. This is an area where DDT and TDD can be nicely complementary (yes, you read that right!). The code can be filled in by writing the tests first, and re-running the tests as you add further code to make sure you haven't broken anything that's already been written. Strictly speaking, this isn't test-first design, but it's certainly test-first coding (though it's certainly not mandatory to take a "test-first" approach to the coding at all).
Let's write the noHotels() test first.
As you can see in the sequence diagram in Figure 5-1, the method we want to test, getHotels(), is on the SearchHotelService. So we'll need to create an instance of that, call it, and assert that the result is as expected:
/**
     * Specify a 5 star hotel in NY City for $50.
     * Should result in an XML response containing zero hotels.
     *
     * Input: Hotel Filter with:
     *          starsMin: 5
     *          starsMax: 5
     *          location: New York
     *          priceMin: $50
     *          priceMax: $50
     *
     * Acceptance Criteria: Should survive parsing the zero-hotel
     *    XML result and return an empty HotelCollection.
     */
    @Test
    public final void noHotels() throws Exception {
        SearchHotelService searchService = new SearchHotelService();
        HotelFilter filter = new HotelFilter();
        filter.setStarsMin(5);
        filter.setStarsMax(5);
        filter.setLocation("40.7590,73.9845"[26]);
        filter.setPriceMin(50.0);
        filter.setPriceMax(50.0);
HotelCollection hotels = searchService.getHotels(filter);
assertEquals(0, hotels.getHotels().size());
}The first part of this test sets up the test fixtures: we create SearchHotelService, and then a HotelFilter that we populate with the search parameters specified in the test method comments above it. The second part of the test invokes the search service, gets the result, and checks that it's zero, as expected. If some kind of error occurred on the way, either an exception would be thrown or a different value would be returned; either way the test would fail. If zero is returned, then essentially (for the purposes of this particular test) the service is working.
Notice the first line in the test method:
SearchHotelService searchService = new SearchHotelService();
As you add more test methods, you may find this line being replicated each time, as each test method needs to create its own instance of the SearchHotelService. So it would make sense to create an object-level test fixture, and move this line into the setUp() method that is called before each test method, like so:
SearchHotelService searchService;
@Before
public void setUp() throws Exception {
searchService = new SearchHotelService();
}Most books on TDD or unit testing would tell you to refactor the test code as you go along, rewriting previously "finished" test methods when new ones are added. But the benefit you get from following DDT is that you already know exactly which tests you're going to write, and they're already right there in the generated test class. So you would know in advance to set up searchService so that it can be shared among tests, and this code would need to be written only once. It's almost like being clairvoyant... wonderfully powerful feeling, isn't it?
Of course, the test code as it currently stands would fail compilation, as we haven't yet written the product code that it calls. So next, we'll implement the code needed to make the test pass.
Here's the implementation of SearchHotelService:
public class SearchHotelService {
public HotelCollection getHotels(HotelFilter filter) {
String xml = getHotelsFromSearchService(filter);
HotelCollection hotels = parse(xml);
return hotels;
}
private String getHotelsFromSearchService(HotelFilter filter) {
XmlServiceClient client = new XmlServiceClient();
return client.callSearchService(filter);
}
private HotelCollection parse(String xml) {// bunch of code to parse the XML response and
// turn it into a HotelCollection
return new HotelCollection();
}
}We've omitted the nitty-gritty XML parsing code, as it could take up a chapter's worth of explanation in its own right, and doesn't really have anything to do with what we're discussing here. But just to illustrate, it consists of lots of this sort of stuff:
/**
* Construct a predicate from each name/value and include them
* all in the XPath expression to be evaluated on the hotels document.
*/
private String buildXPathExpression(NodeList queryNodes) {
StringBuilder predicates = new StringBuilder();
predicates.append("//generalInfo[");
String and = "";
// e.g. //generalInfo[city='New York' and countryCode='US']
// ("hotels" is our own root node that we've added so that all the
// hotel details can be contained in one XML document)
for (int idx=0, len=queryNodes.getLength(); idx<len; idx++) {
Node node = queryNodes.item(idx);
String name = node.getNodeName();
if (NON_SEARCH_ELEMENTS.contains(name)) {
continue; // ignore flags etc as they would prevent a match being made
}
String value = node.getFirstChild().getNodeValue();
predicates.append(and);
predicates.append(name).append("='").append(value).append("'");
and = " and ";
}
predicates.append("]");
return predicates.toString();
}In other words, it's definitely something that you'd want to cover with unit tests.
Returning to the test itself, have a look at the last two lines:
HotelCollection hotels = searchService.getHotels(filter); assertEquals(0, hotels.getHotels().size());
Calling getHotels() actually triggers an external call to a remote HTTP service. This is fine if you don't want the unit tests to be run automatically with every build. If you're planning to write a unit-level integration test (see Chapter 11), then your work on this test is pretty much done (aside from dealing with any integration issues that may arise, of course).
The rest of this chapter is mostly about how to isolate your unit tests—effectively put a walled garden around them—so that they can be run automatically without relying on external systems being available and correctly configured.
To illustrate where the code under test is making an external call (and what we can do to isolate the unit of code from the external service), we'll refer back to the design. Figure 5-11 shows a "zoomed-in" detail from the sequence diagram, with additional details added.
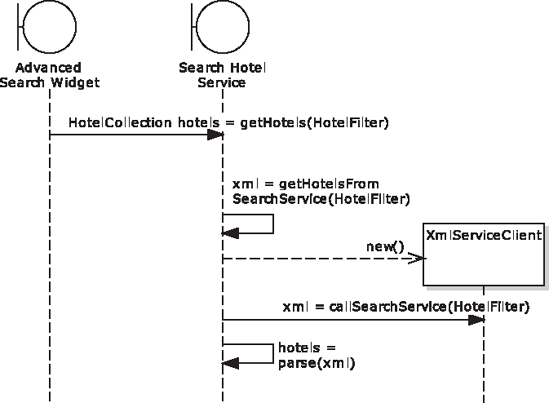
Hotel and HotelCollection (both shown back in Figure 5-1) are quick and easy to create: Hotel is, for now at least, a big bag of data (though that will change later as Hotel-specific behavior gets added in), and HotelCollection is really a big bag of Hotels, rather like the start of a game of Monopoly.
SearchHotelService is more interesting, however. Remember this contains the public getHotels() method that we want to unit-test. As you can see from Figure 5-11, getHotels() is handed a HotelFilter, a value object that specifies the user's search criteria (city, country code, amenities, nearby landmarks, etc.). getHotels() quickly calls a private method, getHotelsFromSearchService(), passing the HotelFilter along. This method then creates an XmlServiceClient, which, in turn, does some remote invocation magic over HTTP to call the Search Service. Back in SearchHotelService, a method is then called to parse the returned XML and turn it into a HotelCollection.
The problem with this picture is that you generally don't want unit tests to call out to external services. For one thing it'll make your automated build more fragile and potentially very slow (as we discuss later in this chapter); for another, it means that the test is stepping way outside the scope of the single, self-contained unit that it's meant to be testing. Unfortunately for us, calling getHotels() is always going to result in XmlServiceClient being told to call out to the external search service.
There's more than one possible solution to this problem, the two primary ones being the following:
Walk further down the sequence diagram and just test the
parse(xml)method instead.Replace the
XmlServiceClientwith a "mock" version that pretends to make an external call.
The first option seems perfectly reasonable, but it would mean exposing the private parse(xml) method so that the unit test can call it, breaking encapsulation—this is to be avoided if at all possible. The other drawback is that this option leaves the "outer" code uncovered by tests. The "test smarter" idea introduced at the start of this chapter isn't about leaving code uncovered by tests; it's about writing fewer tests that cover more code, with the same amount of "test leverage." Moving the tests solely to the "inner code" doesn't achieve this.
So that points us to the second option, passing in a mock object (or "stunt service" in this example)[27] to isolate the code under test and avoid external dependencies.
One way to avoid external dependences is to implement a stunt service. The XmlServiceClient contains the code that calls outside the company firewall to a third-party HTTP service. So it would make sense, purely while the tests are running, to replace this class with a stand-in, or "stunt service" (the term "mock objects" is just so passé...).
We'll call the mock version StuntServiceClient. Figure 5-12 shows the UML diagram for the service.
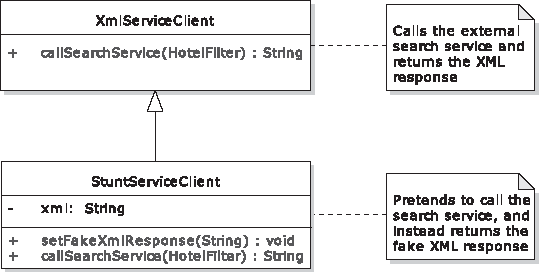
Tip
Remember, the StuntServiceClient is replacing the third-party XML/HTTP-based search service, and not our Java-based SearchHotelService. The SearchHotelService is the code being tested, so we definitely don't want to swap this out with "stunt" or mock code during the test. Live by this mantra: The stunt/mock objects are part of the test, not part of the code being tested.
Here's the new StuntServiceClient in code form:
public class StuntServiceClient extends XmlServiceClient {
private String xml;
public void setFakeXmlResponse(String xml) {
this.xml = xml;
}
@Override
public String callSearchService(HotelFilter filter) {
return xml;
}
}If we were writing this service only for the "No Hotels" test scenario, then we could simply make callSearchService(HotelFilter) return an empty XML document. But—it's that precognitive dissonance kicking in again[28]—we know from the design that there's also going to be a "Return Some Hotels" test. So we've added a slightly sneaky method, setFakeXmlResponse(xml), which the unit tests can call before the service is invoked. This might seem like cheating, but the area of the code that the design tells us these unit tests are covering is still fully operational and gets the full test treatment. The actual fetching and returning of the XML from the external service is outside the scope of these tests.
Note
That's not to say the XML-fetching won't ever get tested, but that would be the job of an integration test—more about those in Chapter 11.
We also need to add two new methods to SearchHotelService, to allow the unit tests to swap in their stunt version of the XmlServiceClient:
public class SearchHotelService {
private XmlServiceClient serviceClient = null;
public void setServiceClient(XmlServiceClient serviceClient) {
this.serviceClient = serviceClient;
}
private XmlServiceClient getServiceClient() {
if (serviceClient==null) {
serviceClient = new XmlServiceClient();
}
return serviceClient;
}The first new method allows the unit tests to set their own stunt service client. The second method will be used inside the class: any time the code wants to create or use an XmlServiceClient, it just calls this method. If no service client was set, a new one is created and returned (this will be the normal usage pattern at run-time); but if a unit test passed its own client in, that'll be returned instead.[29]
And, still in SearchHotelService, the private method getHotelsFromSearchService(), which used to look like this,
private String getHotelsFromSearchService(HotelFilter filter) {
XmlServiceClient client = new XmlServiceClient();
return client.callSearchService(filter);
}... now looks like this:
private String getHotelsFromSearchService(HotelFilter filter) {
XmlServiceClient client = getServiceClient();return client.callSearchService(filter); }
In other words, instead of simply creating its own XmlServiceClient and running with it, the code now calls the new method, which will return either the "real" XmlServiceClient, or the stunt version.
Note
If you're using an Inversion-of-Control (IoC) framework such as Spring Framework, injection of service objects is that much easier, as Spring can be configured to inject stunt services for tests, while injecting the real service objects in the live environment. However, a potential downside of such frameworks (not picking on Spring in particular) is that it's easy to fall into the "framework is king" trap, where short-term convenience is gained at the expense of a more maintainable OO design (e.g., IoC frameworks tend to encourage a functional decomposition approach to design, with one-method "action" classes and the like. So if you're already using an IoC framework, it makes sense to utilize it for stunt service/mock object injection; but we wouldn't advise adopting such a framework solely for this purpose.
We need to update the unit test to pass in the new stunt service client. We'll do this in the setUp() code:
StuntServiceClient stuntClient;
SearchHotelService searchService;
@Before
public void setUp() throws Exception {
stuntClient = new StuntServiceClient();
searchService = new SearchHotelService();
searchService.setServiceClient(stuntClient);
}To mitigate possible memory leakage, we'll also un-set the fixtures when the test has finished:
@After
public void tearDown() throws Exception {
searchService.setServiceClient(null);
searchService = null;
stuntClient = null;
}And of course, the test method itself just needs to tell the stuntClient to return the "prop" XML document when requested. The new code is shown in bold:
@Test
public final void noHotels() throws Exception {
SearchHotelService searchService = new SearchHotelService();
HotelFilter filter = new HotelFilter();
filter.setStarsMin(5);
filter.setStarsMax(5);
filter.setLocation("40.7950,73.9845");filter.setPriceMin(50.0);
filter.setPriceMax(50.0);
String xml = load("NoHotels.xml");
stuntClient.setFakeXmlResponse(xml);
HotelCollection hotels = searchService.getHotels(filter);
        assertEquals(0, hotels.getHotels().size());
    }
private String load(String name) throws Exception {
InputStream in = SearchHotelServiceGetHotelsTest.class.
getResourceAsStream(name);
StringWriter writer = new StringWriter();
IOUtils.copy(in, writer);
return writer.toString();
}The load(name) method loads up an XML file that will reside locally with the unit test classes.[30]
So that leaves us with just the second unit test method, returnSomeHotels(). Implementing this one is easy, because we've done all the setting up already for noHotels(). But in the next section we'll explore a way to make the Stunt Service implementation even easier, using returnSomeHotels() as the example.
The StuntServiceClient is a valid way of swapping in a "pretend" version of a service, in order to isolate the code being tested from the rest of the system. However, there's an easier way to do it: using a mock object framework. For a while, two Java mock object frameworks (JMock and EasyMock) battled over which of the two had the bulkiest boxing gloves. But virtually from nowhere, Mockito[31] marched in and KO'd them both with its simplicity.
Like its two predecessors, Mockito uses Java's dynamic proxy capability to swap in "virtual" implementations of classes and interfaces at runtime. It hides the complexity behind a notably simple interface.
Before we do a mocked-up version of @Test returnSomeHotels(), here's how it would look using our old, faithful StuntClientService:
/**
     * Search for hotels in Waikiki that have swimming pools.
     * Should result in an XML response containing LOTS of matching hotels.
*
* Input: Hotel Filter with:
* Location: Waikiki
* Amenities: Swimming Pool
*
* Acceptance Criteria: The HotelCollection returned should
* contain as many hotels as are in the XML result.
*/
@Test
public final void returnSomeHotels() throws Exception {
SearchHotelService searchService = new SearchHotelService();
HotelFilter filter = new HotelFilter();
filter.setLocation("21.2766,157.8284"[32]);
List<String> amenities = new ArrayList<String>(1);
amenities.add("Swimming Pool");
filter.setAmenities(amenities);
String xml = load("SomeHotels.xml");
stuntClient.setFakeXmlResponse(xml);
HotelCollection hotels = searchService.getHotels(filter);
assertEquals(10, hotels.getHotels().size());
}Very simply, it creates a SearchHotelService (the class we want to test), specifies the search filter (hotels must be in Waikiki; amenities must include a swimming pool), and tells the stunt service to return the "prop" XML response ("SomeHotels.xml") when prompted. We know in advance that the XML response will contain ten hotels, because that's what is in the local SomeHotels.xml; so the check at the end can safely assert that the XML was correctly parsed and the HotelCollection does contain ten hotels, as expected.
We'll now look at a solution that uses Mockito to create a mock client instead of StuntServiceClient. We'll need to make some changes to SearchHotelServiceGetHotelsTest. First, add this static import to the top of the unit test class:
import static org.mockito.Mockito.*;
With this version, the main point is that we no longer need to create a subclass of the real service class—so no more StuntServiceClient. Instead we just declare it as a good old XmlServiceClient:
XmlServiceClient stuntClient;
In setUp(), instead of creating a StuntServiceClient, we instead ask Mockito for a "mock version" of XmlServiceClient:
stuntClient = mock(XmlServiceClient.class);
And then in the test method itself, instead of doing
String xml = load("SomeHotels.xml");
stuntClient.setFakeXmlResponse(xml);... do this:
String xml = load("SomeHotels.xml");
when(stuntClient.callSearchService(filter)).thenReturn(xml);
The test contains virtually the same amount of code, but we don't need the additional StuntServiceClient class.
Figure 5-13 shows the result of running our two unit tests in Eclipse.
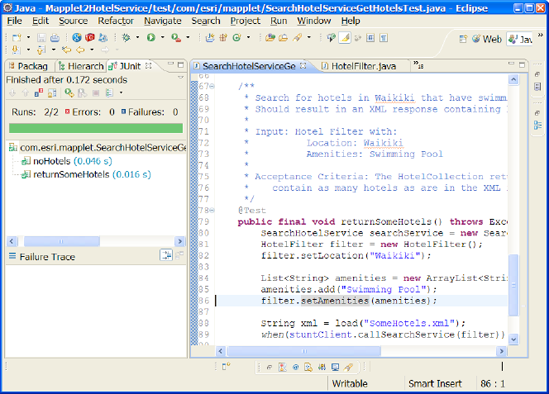
Between noHotels(), which ensures that a zero-result search will indeed produce an empty HotelCollection, and returnSomeHotels(), which ensures that a 10-result search will produce a HotelCollection with 10 hotels, the XML parsing is pretty much covered. Of course, this doesn't cover more detailed XML parsing ephemera, or certain edge cases that may only become evident while designing the XML parsing code. For example, you might want to assert that our results parser accounts for all types of amenities. In this case, something more detailed and even finer-grained is needed: a set of algorithmic tests.
Some code is definitely more "equal" than other code: in other words, some code cries out to be unit-tested, whereas with other code there would be very little point adding tests. For example, you would probably find no gain whatsoever in covering boilerplate code (e.g., property getters/setters) with unit tests; all this does is create additional code to maintain. Other code may benefit from being covered, at least at the "top level," by a test (as we discussed earlier in this chapter). Further along the scale, some code can be very intensive, where almost every character is highly significant in some way to the function's eventual output.
With this sort of code, it isn't sufficient to simply have a test that gives it an input and an expected output, with a virtual sea of significant computation taking place between the two. The tests need to get beneath the surface of the code much more, to prove that each part of the algorithm is sound. The tests can (and should) still be driven from the design, but the design needs to delve into more detail, e.g., you could use activity diagrams or state chart diagrams to map out the algorithmic logic, then base the unit tests on these diagrams.
This level of design-driven unit testing takes us somewhat beyond the scope of this chapter, though; in fact, we'd be inclined to call it advanced DDT. So we'll return to the subject in Chapter 12. See you there!
Integrating separate components is probably the most problematic aspect of development (especially when the components are remote, and developed by separate teams). What works today might not work tomorrow, because another team has published a new interface to their component. It's out of your team's control, but an automated end-to-end test running overnight would catch the problem.
So far in this chapter we've advised you to isolate the code that each unit test covers: so the code doesn't call out to remote services, or even just to an adjacent class that's outside the scope of the unit test. The benefit you get from doing this is that the test results are entirely predictive: run the tests today and they'll pass. Run the same tests tomorrow, and (assuming the code under test hasn't changed) the tests will still pass. The benefit of this benefit (if you will) is that the test suite can reliably be made a part of your automated build. So any time someone commits a code change into the source control system, a build is triggered and the tests are run as well (see the sidebar).
However, integration tests—ones that call out to systems outside your team's direct control—don't have this same predictive property. "Chaotic" might be a better description, because you can never predict when or why an integration test will fail. But the interfaces between remote systems do need to be tested (precisely because they are so chaotic and prone to breakage). When another team has made a change to their published remote interface, breaking your own project, you'll want to know about it sooner rather than later. So it makes sense to write automated integration tests, but keep them in a separate test suite that isn't tied to the automated build. (In other words, "the database is down" shouldn't count as a type of build failure, or otherwise prevent your project from building.)
Integration tests are difficult to write and maintain, though, and you'll find that the issues you encounter while writing them are fiddly and time-consuming. So we've put the details in Chapter 11, as it's really an advanced topic; however, we'd suggest that you don't view integration tests as "optional," because they might just turn out to be the most important tests that you write: they help you to tame the chaos of integrating disparate systems.
In this chapter we illustrated how to drive unit tests from a software design, identifying test scenarios in a systematic way that ensures the code is covered in all the right places. We also illustrated the use of "stunt services" and mock objects to isolate the code being tested; finally, we discussed driving unit tests deeper into algorithmic code that may benefit from finer-grained testing.
Is there a way to get 95% of the benefit of the comprehensive unit testing we did in this chapter with significantly fewer tests? In the next chapter, we'll show how to do exactly that with controller tests. As you'll see, unit tests do have their place, but controller tests can often represent a smarter, more structured approach to application testing.
[23] When we learned object-oriented design, this was actually the definition of a class... a programmatic unit that encapsulated data and functions, with said encapsulation having benefits like controlling the means of accessing a set of data. Nowadays it seems fashionable to have "data classes" (which have no behavior) and "single-method classes" (aka functions wearing "class" clothing). This seems like a giant step backwards to us, which obliterates all the (very real) benefits of doing an object-oriented design.
[24] There's a link to the download page here: http://iconixsw.com/EA/PowerUsers.html
[25] And if you haven't seen it, here it is: http://www.youtube.com/watch?v=qybUFnY7Y8w (or search for "This Too Shall Pass").
[26] 40.7590,73.9845is lat/long position of Times Square in New York.
[27] We'll outline the differences between mock objects and stunt services later in this chapter.
[28] It's almost as if developers were capable of forethought and planning...
[29] Note that getServiceClient() isn't synchronized, so there's a huge assumption here that it will only ever be called on a single thread. But if in doubt, synchronize it...
[30] This code uses Apache Commons' IOUtils to read the InputStream into a String. Apache Commons does wonders for eliminating boilerplate code. See http://commons.apache.org/io/.
[31] http://mockito.org/
[32] 21.2766,157.8284 is the lat/long position of Waikiki.
[33] There are a lot more examples listed here: http://en.wikipedia.org/wiki/Continuous_integration.