Today, consumers assume that any cell phone they purchase will be able to take photos, and that the quality of photos taken will come close to the quality of photos taken with any entry-level digital camera. Furthermore, the latest mobile devices, and especially the Windows Phone 7 device, allow for the integration of their photo capabilities with the various applications that run on them. For instance, taking a picture with the phone, adding a caption to it, and immediately uploading it to a social media web site are common capabilities of all smartphone platforms today.
In this chapter, you will learn how the Windows Phone 7 platform implements yet another level of integrated user experience when it comes to the picture-taking capabilities of the phone and your application. You will learn how to build an application that takes photos, saves them, lets the user open them, and then sends them to Twitpic, a remote cloud service where they can be embedded in Twitter messages.
A lot of the code you will write in this chapter will have to be physically deployed and debugged on a real Windows Phone 7 device—after all, it's not possible to take a real picture with the emulator or test many features of the pictures application (it is, however, possible to take a "dummy" picture of a small square moving around the emulator perimeter, which proves extremely useful for testing). We highly recommend that before you proceed with this chapter, you get your hands on an actual Windows Phone 7 device. You should also install the necessary Zune software that allows debugging on that device and connect the device to your development machine (for more information on using Zune software to debug a photo application using a physical device, see Chapter 4).
Before you delve into developing a Windows Phone 7 application that snaps photos and manipulates them, it's important to understand the model for working with photos on this device. As explained in greater detail in Chapter 19, each application deployed to the device runs in its own sandbox, or execution environment. This execution sandbox prevents third-party applications from directly accessing common data stores on the phone, such as photos or contact lists, and prevents them from directly invoking the applications that ship with a Windows Phone device, such as the camera or a messaging application. So how can you build an application that can take pictures, manipulate them, save them to the phone, and then later access those pictures for uploading to the cloud? The answer is through launchers and choosers as shown in Table 16-1 and 16-2.
Table 16.1. Launchers
Description | |
|---|---|
EmailComposeTask | Opens the default device e-mail composer. |
MarketPlaceDetailTask | Opens detailed product information. |
MarketPlaceDetailTask | Opens to the Marketplace within specified category. |
MarketPlaceReviewTask | Opens the product review for the specified product. |
MarketPlaceSearchTask | Opens the MarketPlace search result based on the search term specified. |
Opens the default device MediaPlayer. | |
PhoneCallTask | Opens the Phone application with specified number ready to dial. |
SearchTask | Opens the default search application. |
SmsComposeTask | Opens the messaging application. |
WebBrowserTask | Opens the default device web browser to the specified URL. |
Table 16.2. Choosers
Choosers | Description |
|---|---|
CameraCaptureTask | Opens the Camera application to capture the image. |
EmailAddressChooserTask | Opens the Contact application to choose an e-mail. |
PhoneNumberChooserTask | Opens the Phone application to choose a phone number. |
PhotoChooserTask | Opens the Photo Picker application to choose the image. |
SaveEmailAddressTask | Saves the provided e-mail to the Contact list. |
SavePhoneNumberTask | Saves the phone number to the Contact list. |
The Windows Phone Launchers and Choosers framework is a collection of APIs you can use to indirectly access core Windows Phone applications, like the phone or contact list, to perform a specific task. Launchers can launch a phone application but return no data. A chooser, such as a photo chooser, on the other hand, returns data to the application that calls it. In other words, the difference between launchers and choosers lies in the fact that the former do not return result to the calling function, but the latter do. Tables 16-1 and 16-2 list all of the launchers and choosers that ship with the Windows Phone platform today and how each is used. The CameraCaptureTask is a chooser that is of particular interest for you in this chapter. This chooser launches the built-in Windows Phone camera application, allowing a user of a third-party application to snap photos and for that application to retrieve them for its own purposes by handling the chooser's Completed event. You will write code to capture photos shortly, but before you do that, it's important to understand one more basic concept when working with launchers and choosers—the application execution model and application tombstoning (for a more thorough and detailed look at the Windows Phone application life cycle, refer to Chapter 10).
As you know by now, the initial version of the Windows Phone 7 platform does not support multitasking due to the excessive demands it puts on the battery and other resources on the device. Microsoft has announced that by the end of 2011, Windows Phone will receive support for multitasking; however, the principles outlined later will still be valid even after the version of Windows Phone with multitasking support ships. Launchers and choosers are, in essence, separate applications that are launched from within your application. Since, at the time of this writing, support for multitasking does not yet exist, your application effectively terminates when launchers or choosers are used. This termination is known as tombstoning, and it has direct implications on programming Windows Phone 7 devices that use launchers and choosers, such as the photo management applications you will build in this chapter. The difference between application tombstoning and application termination is that when an application is tombstoned, it is fully expected to be resumed upon completion of the launcher or chooser. Upon resuming, the application should continue in the same state that it was left off in, with data specific to the application session before tombstoning properly preserved. It is up to the application programmer to ensure that this happens and that the data gets properly restored. Therefore, if your application gathered a lot of unique data prior to launcher or chooser call, that data must be properly preserved. For thorough details on how to preserve this data, refer to Chapter 10.
The very first application that you will write will take photos and bring them inside your application. The first application will also lay the foundation for the rest of this chapter, since you will enhance and add features to this application as you go along. You will, therefore, create a basic navigation system in this first step for your application using an Application Bar and a standard set of icons that ship with the Windows Phone 7 Development Tools (which you downloaded and installed in Chapter 2). You'll find the icons for a 32-bit system at C:Program FilesMicrosoft SDKsWindows Phonev7.0Icons and for a 64-bit system at C:Program Files (x86)Microsoft SDKsWindows Phonev7.0Icons.
As mentioned, you will use choosers to implement photo manipulation features on Windows Phone 7. To take photos, you will use the CameraCaptureTask chooser to take the photo and bring that photo inside your application. Follow this demo to accomplish these tasks.
In the first part of the demo, you will create a new project and add necessary user interface elements to allow photo manipulation in the future sections of this chapter.
Launch Visual Studio 2010 Express for Windows Phone, and create a new Windows Phone Application project. Name it PhotoCapture.
You will create an Application Bar with three icons. The first button of the Application Bar will be for taking photos, which is the subject of the current demo. The second button will be for opening previously taken photos. Finally, the third button will be for saving photos to the phone.
Create a separate folder within your application to store Application Bar icons. To do that, right-click the name of the project within Solution Explorer, choose Add

You will use the standard Application Bar icons that came pre-installed with Developer Tools for Windows Phone. By default, the icons are installed in the
C:Program FilesMicrosoft SDKsWindows phonev7.0Iconsfolder. Within that folder, go to the subfolder called dark, and, using Windows Explorer, copy the following icons into theimagesfolder within your application:appbar.feature.camera.rest.png, appbar.folder.rest.png, andappbar.save.rest.png.Now you need to make the icons part of your solution. Highlight all three icons, and press F4 to bring up the Properties dialog. For the Build Action property, specify Content. Then, select Copy Always for the Copy to Output Directory property.
With icons ready for use in the Application Bar, you are ready to add an Application Bar to
MainPage.xaml(for an in-depth explanation of how to add and use an Application Bar within your application, please refer to Chapter 7). OpenMainPage.xaml, and paste the following code at the end of the XAML file just before the</phone:PhoneApplicationPage>closing tag. This XAML replaces the auto-generated template for the Application Bar:<phone:PhoneApplicationPage.ApplicationBar> <shell:ApplicationBar IsVisible="True"> <shell:ApplicationBar.Buttons> <shell:ApplicationBarIconButton x:Name="btnCamera" Text="Take Photo" IconUri="images/appbar.feature.camera.rest.png" Click="btnCamera_Click"/> <shell:ApplicationBarIconButton Text="Open Photo" IconUri="images/appbar.folder.rest.png"/> <shell:ApplicationBarIconButton Text="Save Photo" IconUri="images/appbar.save.rest.png"/> </shell:ApplicationBar.Buttons> </shell:ApplicationBar> </phone:PhoneApplicationPage.ApplicationBar>Note
The btnCamera_Click event handler will be called when the user clicks the Take Photo button. You will write code for this event handler in the next section.
Finally, you need to add an Image control to show the photos taken within your application. From the Toolbox, drag and drop an Image control onto the
MainPage.xamldesign surface, place it in the middle, and size it to be about half of the available screen space. Name it imgPhoto.
Although you may lose a bit of flexibility when programming with launchers and choosers, it is hard to dispute how easy they have made working with common phone tasks, such as taking pictures. In the following steps, you will launch a PhotoCapture application and wire up a callback event to invoke when that application completes.
Open
MainPage.xaml.cs(right-clickMainPage.xamland select View Code). Add the following using statements to the very top of the code page:using Microsoft.Phone.Tasks; using Microsoft.Phone;
Add the following class-level variables within the
MainPageclass (right above the MainPage constructor):private CameraCaptureTask cameraCaptureTask; byte[] imageBits;Add the following code for the btnCamera_Click method. This will invoke the PhotoCapture application when the user clicks the first button in the Application Bar:
private void btnCamera_Click(object sender, EventArgs e)
{
        cameraCaptureTask.Show();
        }
You are now ready to write event handler code that will be invoked when the CameraCaptureTask chooser completes its work (the user has taken a picture) and control returns to your application. When control returns to your application, the photo taken by the user is passed in as one of the arguments to the callback function; you will take that photo and show it in the imgPhoto image control that you have added previously. Add the following method, which will be executed when the chooser completes, to
MainPage.xaml.cs:private void PhotoChooserTaskCompleted(object sender, PhotoResult e) { if (e.ChosenPhoto != null) { imageBits = new byte[(int)e.ChosenPhoto.Length]; e.ChosenPhoto.Read(imageBits, 0, imageBits.Length); e.ChosenPhoto.Seek(0, System.IO.SeekOrigin.Begin); var bitmapImage = PictureDecoder.DecodeJpeg(e.ChosenPhoto); this.imgPhoto.Source = bitmapImage; } }You need to tell your application's instance of CameraCaptureTask that the
PhotoChooserTaskCompletedmethod must be invoked upon its completion. You will do this within the MainPage() constructor using the following two lines of code:cameraCaptureTask = new CameraCaptureTask(); cameraCaptureTask.Completed += PhotoChooserTaskCompleted;
You are now ready to run the application. Note that for this demo, it is not completely necessary to deploy your application to the physical device, since the emulator provides limited simulated photo-taking capabilities (the aforementioned small rectangle moving around the phone area).
Press F5 to run the application on the emulator, and then press the camera button in the Application Bar to be presented with the Windows Phone 7 PhotoCapture application. Press the button in the upper right-hand corner to simulate photo-taking within the emulator (notice how this simulation consists of a black rectangle moving around the screen's perimeter), and then press the Accept button to accept the photo. You should see a phone screen similar to the one shown in Figure 16-1 with your application displaying the captured image. Of course, if you deploy this application to the actual Windows Phone 7 device, the photos that you take will look a bit more exciting.
Throughout the rest of this chapter, you will continue enhancing this application by wiring the rest of the Application Bar icons, getting familiar with the Model-View-ViewModel pattern (covered in Chapter 3), and integrating your application within the Windows Phone 7 experience, including handy image uploads to Twitter.

In the previous section, you learned how to use the CameraCaptureTask chooser to take photos with your phone. In this section, you will learn how to open previously taken photos on your phone using the PhotoChooserTask chooser. As you have already seen, launchers and choosers do make the lives of developers a lot easier by simplifying and abstracting the most common tasks within the Windows Phone 7 Application platform.
In this section, you will enhance the application you have built by adding functionality to the second button of the Application Bar—Opening Photos. Windows Phone 7 has several locations, or "folders" so to speak, where the photos are located. Those "folders" are Camera Roll, Saved Pictures, and Pictures Library. Inside Pictures Library, there are general-purpose photos provided by Microsoft that help you in your programming efforts. Since you have already created a user interface for the application in the previous section, in this section you will add code implementing the photo browsing and retrieving functionality.
Launch Visual Studio 2010 Express for Windows Phone, and open the PhotoCapture project that you created in the previous section.
Open
MainPage.xaml.cs, and paste the following class-level variable declaration right above the MainPage() constructor:private PhotoChooserTask photoChooserTask;
You need to specify that the PhotoChooserTaskCompleted will be the callback function invoked upon completion of the PhotoChooserTask chooser. You do this via the following two lines of code inside the MainPage() constructor:
photoChooserTask = new PhotoChooserTask();
photoChooserTask.Completed +=
        new EventHandler<PhotoResult>(PhotoChooserTaskCompleted);
As the final step of this demo, you will need to add logic to launch the chooser when the user clicks the second button in the Application Bar. To accomplish this, open the
MainPage.xamlfile, locate the line of XAML code that starts with<shell:ApplicationBarIconButton Text="Open Photo", and indicate thatbtnOpenPhoto_Clickmust be called when that button is clicked.<shell:ApplicationBarIconButton Text="Open Photo" IconUri="images/appbar.folder.rest.png" Click="btnOpenPhoto_Click"/>
Now, switch back to
MainPage.xaml.csand paste thebtnOpenPhoto_Clickfunction definition, which will launch the PhotoChooserTask chooser.private void btnOpenPhoto_Click(object sender, EventArgs e) { photoChooserTask.Show(); }
Press F5 to run application. Now, if you click the Open Photo button in the Application Bar, you should be able to browse through photos on the emulator or (better) on the phone, select a photo, and have it presented to you in the application window.
Being able to navigate to a photo on the phone and display it within an application is certainly important, but hardly a useful feature by itself. However, as you will see shortly, you can use the PhotoChooserTask chooser to select photos to upload to a cloud service, such as TwitPic, as well as for loading images inside the application in order to manipulate them (by cropping, adding shapes to them, altering their color composition and such) and then resaving them back onto the phone or uploading them to a social media site. Although altering photos within an application is slightly beyond the scope of this chapter, you will learn how to save photos onto the phone in the next section. Saving photos could also be used together with CameraCaptureTask from the first demo in this chapter to save photos taken using that chooser.
In the prior sections, you have seen how choosers can be used to make the taking and opening of photos a breeze on a Windows Phone 7 device. Unfortunately, things become a bit more complicated when it comes to saving photos onto the device, since there are no choosers available to aid you with this task. In fact, the Windows Phone 7 platform does not provide any mechanism you can use to get the job done. So how can you do it? Enter the Windows Phone XNA library.
In this book, we have not covered the XNA Framework on Windows Phone 7 for a reason. The XNA Framework is a very powerful mechanism for programming graphics-intensive interfaces and, as such, is used primarily for game development, whereas Silverlight is used for the vast majority of line-of-business applications. This book is about learning to build line-of-business applications. At times, however, you have to resort to using a mix of technologies to get things done, and saving photos onto the Windows Phone 7 device is one example of such a situation. The Microsoft.Xna.Framework.Media library provides the SavePicture method, which saves a given array of bytes to the Saved Pictures location on the phone. The following demo demonstrates how to add save capabilities to the PhotoCapture application you have built so far.
The user interface built as part of the first demo of this chapter has an Application Bar button already defined for saving images. Therefore, you need to make only a small enhancement to the user interface to allow the user to see whether the status of the save was successful or not.
Open MainPage.xaml and add a TextBlock right below the image control. Name it txtStatus and clear its Text property. With user interface enhancements complete, you are ready to add the code that saves photos to the Media Library.
Before you can use a method from the XNA Framework, you must first add a reference to the Xna.Framework.Media library. To accomplish this, right-click the name of the project (PhotoCapture) in Solution Explorer, select Add Reference, and then double-click the Microsoft.Xna.Framework assembly. Notice how a warning dialog comes up, telling you that there's a possibility of unexpected behavior—click Yes to complete adding a reference. Follow the rest of the steps to implement photo-saving functionality within your application.
Open
MainPage.xaml.csand add the following using statement to the top of that page:using Microsoft.Xna.Framework.Media;
The following method does all the work of saving a photo into the Media Library. Note specifically the
SavePicturemethod, which saves the array of bytes passed into the Media Library.private void btnSave_Click(object sender, EventArgs e) { try { var library = new MediaLibrary(); library.SavePicture("PhotoCapture Photo", imageBits); txtStatus.Text = "Successfully saved photo."; } catch (Exception ex) { txtStatus.Text = "Failed to save photo. Exception: " + ex.Message; } }What remains is to tie the
btnSave_Clickmethod with the click event of the Save button on the Application Bar. You will do it by editing the XAML of theMainPage.xamlfile. Locate the line that starts with<shell:ApplicationBarIconButton Text="Save Photo"and change it to look like the following:<shell:ApplicationBarIconButton Text="Save Photo" IconUri="images/appbar.save.rest.png" Click="btnSave_Click"/>
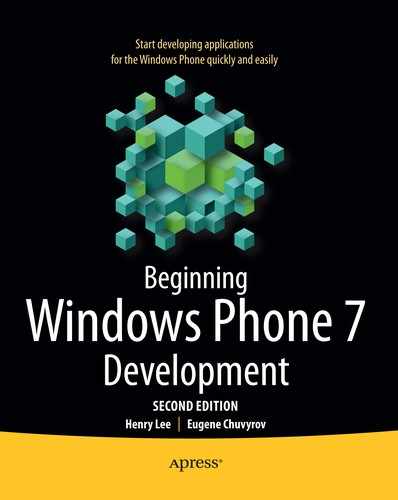
You are now ready to run the application on the Windows Phone 7 emulator. Press F5 to start the application, and then press the Camera button on the Application Bar (first button) to take a picture and have it loaded inside your application. Then, press the Save button on the Application Bar; you should get a status message that the image was successfully saved. Now, if you use the middle button of the Application Bar to see photos available, you should see a screen like the one shown in Figure 16-2, with three separate photo "folders," each displayed in a separate tile.
So far in this chapter, you have built a stand-alone application that uses choosers and parts of the XNA Framework to manage photos snapped with a Windows Phone camera. What's unique about the Windows Phone 7 Framework, however, is that it encourages you to have your application make use of built-in phone applications to perform certain tasks. The Photo application, for example, provides hooks to make the functionality of an application like PhotoCapture available to users without having to explicitly launch it. Those hooks are the Extras and the Share commands, which are found on the context menus of each photo where the context menu is displayed when you press the photo for a few seconds.
Both Extras and Share features are best explained by actually observing them at work. With the real Windows Phone 7 device in hand, click the Pictures hub, select the "folder" to view the photos from (Camera Roll, for example), and then select a specific photo from the list. Click the ellipsis (...) at the bottom of the screen. When the context menu appears, you'll see an Extras option displayed at the very bottom. This Extras option is available for you to integrate or tie into. You will use it in the next demo to launch the PhotoCapture application so that you can choose a picture, save it to your TwitPic, and share it with your Twitter friends.
Note
You will only see the Extras command if there's an application on the phone that implements the integration with Windows Phone Picture Viewer; as such, if you currently don't have any applications deployed to your Windows Phone device that implement the Extras functionality, you will not be able to see this menu option. You will learn how to build such an integration in the next section.
The context menu that pops up when you press the picture also includes a Share command. The Share option is also available when photos are being viewed as a list rather than one at a time. If you click the Share command, you will notice that it offers several ways to share the photo with the world. In the following section, you will learn to build an application that will use TwitPic as a cloud store for the photos on the phone, and as such will add TwitPic as one of the options on the Share menu.
Note
Up to this point in the chapter, it has been possible (although a bit quirky) to run code against the Windows Phone 7 emulator. The features discussed in the next two sections are not available on the emulator; to see them in action, you must deploy applications onto the real Windows Phone 7 device.
The Windows Phone 7 platform is all about providing the best possible phone usage experience to consumers. When consumers look at a photo on the phone, they are using an application known as a Single Photo Viewer (SPV) that provides applications to extend the viewer's functionality via the Extras command of the context menu. In this section, you will further enhance the PhotoCapture application to take advantage of the Extras feature within the Photos application. The PhotoCapture application will be using PhotoChooserTask or CameraCaptureTask to allow the user to select or take a picture once it has been invoked via the Extras feature.
To integrate with SPV, an application needs the following:
An
Extras.xmlfile in its root directory with markup to the Extras feature.Code to properly read and load or manipulate the photo selected in the Extras dialog.
You will implement both requirements in the next section.
Adding an Extras.xml file is very straightforward; the only potential difficulty may be in the fact that the content of that file has to be precise. Make sure you either copy and paste this content from the source code available with this book, or type it in very carefully.
Right-click the project name, select Add
Double-click the
Extras.xmlfile to open it. Paste the following contents inside that file, which will enable the Windows Phone 7 framework to locate those applications ready to implement the Extras functionality:<Extras> <PhotosExtrasApplication> <Enabled>true</Enabled> </PhotosExtrasApplication> </Extras>In the Properties window, make sure to set the Build Action property to Content and the Copy To Output property to Copy Always for the this file (click the file and press F4 to bring up the Properties dialog).
Make sure you save Extras.xml. Now you can move on to the next step.
To properly retrieve the photo that the user selected through the Extras feature, the application must override the OnNavigatedTo event in MainPage.xaml.cs. The steps here show you how to do that:
Open
MainPage.xaml.csand add the following using statement to the top of the page:using System.Windows.Navigation;
The reference to the
Microsoft.Xna.Frameworkassembly should still be in the project from the prior demos; however, if you start a new project that implements the Extras functionality, make sure to add a reference to that assembly and the following using statement to properly refer to the Media Library. You will also needSystem.Windows.Media.Imagingto work with the image source.using Microsoft.Xna.Framework.Media; using System.Windows.Media.Imaging;
Paste the following
OnNavigatedTomethod. Note how the basic operation is that of reading a QueryString passed in, determining if you have a value for the parameter token, and then trying to retrieve the photo from the Media Library by that token ID.protected override void OnNavigatedTo(NavigationEventArgs e) { try { IDictionary<string, string> queryStrings = this.NavigationContext.QueryString; if (queryStrings.ContainsKey("token")) { MediaLibrary library = new MediaLibrary(); Picture picture = library.GetPictureFromToken(queryStrings["token"]);BitmapImage bitmap = new BitmapImage(); bitmap.SetSource(picture.GetImage()); WriteableBitmap picLibraryImage = new WriteableBitmap(bitmap); imgPhoto.Source = picLibraryImage; } } catch (Exception ex) { Dispatcher.BeginInvoke(() => txtStatus.Text = ex.Message); } }Deploy the application to the phone. Then, from the phone's Start screen, select the Pictures hub, pick any picture collection, and select an individual picture of your choice. Click the ellipsis at the bottom of the screen, and select Extras. You should see the PhotoCapture application listed on the next screen that comes up. Clicking the PhotoCapture application should start the application and load the selected photo into the Image control—exactly the expected behavior.
In the next section, you will walk through the steps needed to extend the Share dialog for the photos. The concepts you use to extend the Extras and Share features are very similar; the differences, as you will see shortly, are in the details of the file name and the query string key.
In this demo, you will make more changes to the PhotoCapture application to take advantage of the Share extensibility feature within the Photos application. For simplicity, the PhotoCapture application will load the selected image onto its main screen. In the next section, you will complete the circle and write code to send the image to the TwitPic cloud service for easy reference from the Twitter messages.
As with your implementation of Extras, to extend the Share option to include it, an application needs the following:
An
E0F0E49A-3EB1-4970-B780-45DA41EC7C28.xmlfile in its root directory enabling the application's integration with the Share feature; this is not a typo—the XML file must be named exactly like that for the application to belong to the Share feature.Code to properly read and/or share the photo selected in the Share dialog.
You will implement both requirements in the next section.
Adding this strangely named XML file is very straightforward; the only potential difficulty may be the fact that the name is completely unreadable, so it's a good idea to copy and paste it from the downloadable source code for this book.
Right-click the project name, select Add
While the contents of the file may not be very important, be sure to go to the Properties window and set the Build Action property to Content and the Copy To Output property to Copy Always for the this file (click the file and press F4 to bring up the Properties dialog).
Make sure you save this XML file before moving onto the next step.
To properly retrieve the photo that the user selected through the Extras feature, the application must override the OnNavigatedTo event in MainPage.xaml.cs. The steps here show you how to do that:
If you are continuing from the Extras demo, you already have all the necessary references and using statements in place. However, if you were to start a new project, make sure that you have a reference added to
Microsoft.Xna.Frameworkand the following using statements are in place:using System.Windows.Navigation; using Microsoft.Xna.Framework.Media;
Paste the following
OnNavigatedTomethod (or add to that method if you are continuing from the Extras demo). Note how the basic operation is that of reading a query string passed in, determining whether there is a value for theFieldparameter, and then trying to retrieve the photo from the Media Library by that token ID.try { IDictionary<string, string> queryStrings = this.NavigationContext.QueryString; if (queryStrings.ContainsKey("FileId")) { MediaLibrary library = new MediaLibrary(); Picture picture = library.GetPictureFromToken(queryStrings["FileId"]); BitmapImage bitmap = new BitmapImage(); bitmap.SetSource(picture.GetImage()); WriteableBitmap picLibraryImage = new WriteableBitmap(bitmap); imgPhoto.Source = picLibraryImage; } } catch (Exception ex) { Dispatcher.BeginInvoke(() => txtStatus.Text = ex.Message); }Deploy the application to the phone.
Now you're ready to test your implementation so far. Just as you did for your Extras integration, from the phone's Start screen, select the Pictures hub on your phone, pick any picture collection, and select an individual picture of your choice. Click the ellipsis (...) at the bottom of the screen, and select Share. You should see Upload to PhotoCapture as one of the options that come up. Clicking that option should start the application and load the selected photo into the Image control—the behavior you expect.
Now you're ready to upload the photos to TwitPic, which is the primary hosting service for photos destined for Twitter, the hottest social media network today. Silverlight (in general) and Silverlight on Windows Phone 7 (in particular) differ from other applications in the fact that they rigorously enforce a non-blocking user interface principle: everything, including communications over the network, must happen asynchronously. TwitPic cloud service provides a RESTful API that allows programmers to send messages to that service as long as you conform to the expected message format. In the next section, you will write code against that API to upload the photo to TwitPic.
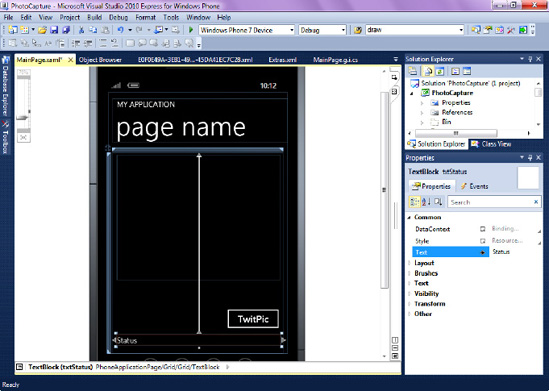
On the user interface front, you will need to add an additional button that will trigger the upload of the photo to TwitPic. Figure 16-3 illustrates one possible placement of this button. Name the button btnUpload, and set its caption to TwitPic.
Because network access on Windows Phone 7 must be performed asynchronously, it takes quite a bit of code to properly construct the RESTful web service request. Most of the code, however, is repetitive, and all of the major points are summarized in these step-by-step instructions.
Right-click the project name in Solution Explorer, select Add Reference, and then select
System.Xml.Linq.Add the following
usingstatements to the top of the page:using System.IO; using System.Text; using System.Xml.Linq;
Open
MainPage.xaml.csand paste the UploadPhoto function written here. This will be the only function that will be invoked when the photo upload needs to take place. This function sets the URL and the type of the request, and then it invokes the asynchronous BeginGetRequestStream, which packages the photo and the user credentials.public void UploadPhoto() { HttpWebRequest request = (HttpWebRequest)WebRequest.Create("http://twitpic.com/api/upload"); request.ContentType = "application/x-www-form-urlencoded"; request.Method = "POST"; request.BeginGetRequestStream(new AsyncCallback(GetRequestStreamCallback), request); }Add the following code to define the asynchronous function
GetRequestStreamCallbackthat does all of the packaging of proper parameters; note that the exact form of the message was dictated by TwitPic, and this method simply conforms to it:Note
The TwitPic API is sensitive to even slightly malformed messages, so be sure you copy/paste this method from the source code that comes with this book instead of manually retyping it and risking making a mistake.
private void GetRequestStreamCallback(IAsyncResult asynchronousResult)
{
    try
    {

        HttpWebRequest request = (HttpWebRequest)asynchronousResult.AsyncState;
        string encoding = "iso-8859-1";
        // End the operation
        Stream postStream = request.EndGetRequestStream(asynchronousResult);
string boundary = Guid.NewGuid().ToString(); request.ContentType = string.Format("multipart/form-data; boundary={0}", boundary); string header = string.Format("--{0}", boundary); string footer = string.Format("--{0}--", boundary); StringBuilder contents = new StringBuilder(); contents.AppendLine(header); string fileHeader = String.Format("Content-Disposition: file; name="{0}"; filename="{1}"; ", "media", "testpic.jpg"); string fileData = Encoding.GetEncoding(encoding).GetString(imageBits, 0, imageBits.Length); contents.AppendLine(fileHeader); contents.AppendLine(String.Format("Content-Type: {0};", "image/jpeg")); contents.AppendLine(); contents.AppendLine(fileData); contents.AppendLine(header); contents.AppendLine(String.Format("Content-Disposition: form-data; name="{0}"", "username")); contents.AppendLine(); contents.AppendLine("BeginningWP7"); contents.AppendLine(header); contents.AppendLine(String.Format("Content-Disposition: form-data; name="{0}"", "password")); contents.AppendLine(); contents.AppendLine("windowsphone7"); contents.AppendLine(footer); // Convert the string into a byte array. byte[] byteArray = Encoding.GetEncoding(encoding).GetBytes(contents.ToString()); // Write to the request stream. postStream.Write(byteArray, 0, contents.ToString().Length); postStream.Close(); // Start the asynchronous operation to get the response request.BeginGetResponse(new AsyncCallback(GetResponseCallback), request); } catch (Exception ex) { Dispatcher.BeginInvoke(() => txtStatus.Text = ex.Message); } }Add the
GetResponseCallbackfunction that will asynchronously receive the results of the upload (Success or Fail) and parse that result out using LINQ to XML:private void GetResponseCallback(IAsyncResult asynchronousResult) { try { HttpWebRequest request = (HttpWebRequest)asynchronousResult.AsyncState; // End the operation HttpWebResponse response = (HttpWebResponse)request.EndGetResponse(asynchronousResult); Stream streamResponse = response.GetResponseStream(); StreamReader streamRead = new StreamReader(streamResponse); string responseString = streamRead.ReadToEnd(); XDocument doc = XDocument.Parse(responseString); XElement rsp = doc.Element("rsp"); string status = rsp.Attribute(XName.Get("status")) != null ? rsp.Attribute(XName.Get("status")).Value : rsp.Attribute(XName.Get("stat")).Value; // Close the stream object streamResponse.Close(); streamRead.Close(); // Release the HttpWebResponse response.Close(); } catch (Exception ex) { Dispatcher.BeginInvoke(() => txtStatus.Text = ex.Message); } }Now you need to call the
UploadPhotomethod when the user clicks the TwitPic button. OpenMainPage.xamlin Design view, and double-click the TwitPic button. Inside thebtnUpload_Clickmethod, paste the following line of code:UploadPhoto();
You are now ready to run the application. Fortunately, you can test the upload to TwitPic functionality in this demo by using Windows Phone emulator; you don't need to deploy to the actual device. Set the Windows Phone 7 emulator as your deployment target, click F5, and when the application comes up, click the camera button (the first button on the Application Bar). Take a picture, accept it, and then click the TwitPic button. If no errors were reported in the status TextBlock, you should see your image on TwitPic's web site, as shown in Figure 16-4.
Note
Once you successfully upload photos from your phone to TwitPic, the response XML from TwitPic contains a mediaurl node with the URL of your image. You can parse out that URL in a way that is similar to parsing out the status in the previous code. Your application can then make use of that URL by, for example, constructing an HTML page with that URL and showing it within the Web Browser control or doing anything else with it that your imagination can dream up.

In this chapter, you worked extensively with photos on a Windows Phone 7 device. You used choosers to take pictures and loaded previously saved pictures. You also learned a bit about the XNA Framework and how it helps you work with the Media Library. You then explored the integration options available between the Windows Phone 7 built-in application for photos and your application. Finally, you uploaded photos that you took with your Windows Phone 7 device to TwitPic, a photo-sharing site used extensively by Twitter.
In the next chapter, you will look into push notifications, a powerful mechanism for mimicking multi-tasking and providing timely notifications about important events.