
Chapter 7
Integrating Graphique into the Mac OS X Desktop
Right now, Graphique is an application island in the sea of the Mac OS X desktop. You can launch it, run it, use it fruitfully, and close it, and it’s all self-contained. There’s nothing wrong with that, but Mac users have grown to expect more from an application: they want it to work with the rest of the Mac OS X ecosystem. In this chapter, you integrate Graphique into that ecosystem, expanding its borders beyond the current shoreline into Finder and the menu bar. At the end of this chapter, you’ll be able to save your equations to files, and then double-click them in Finder to launch Graphique and display their graphs. You’ll also be able to use Quick Look to see your graphs from within Finder. Finally, you’ll be able to display an icon in the menu bar and launch the most recent ten equations from it.
Dealing with Graphique XML Files
Most applications produce data that they store in files. For example, Microsoft Word produces .doc files that we commonly refer to as Word files. The expectation is that when you click to open a Word file, the operating system will know to open Microsoft Word. The same thing happens to Photoshop files, Pages files, and countless other types of files. This section illustrates how to create “Graphique files.” It then registers the newly created file type with the OS and the file preview capability built in Mac OS Finder.
Producing a Graphique File
At any time, Graphique should be able to save an equation to a Graphique file, which is a file with a .graphique extension. Rather than defining a new file format for Graphique files, though, you’ll leverage Mac OS X’s support for property list files and store Graphique files as property lists. The first step toward saving a Graphique file is to create a method to respond to user requests to save an equation.
From a design perspective, typically an application has both Save and Save As menu items. Before a document has ever been saved, the application has no idea where to save it and enables only the Save As menu item. When users select this menu item, they must specify a location to save the file. At this point, the application enables the Save menu item, which, when selected, saves the open document to the location already specified.
With Graphique, an equation is a short snippet of text. If a user changes the text, are they modifying the original equation as another version of itself, in which case subsequent Save operations should overwrite the original equation? Or are they typing in a new equation, in which case the application should prompt for a new location to save the file each time? We’ve opted for the latter, since equations are so short that we think people are more likely to type in new equations rather than fine-tune existing equations, so we implement only the Save As method.
Creating a Save As Method
Open MainMenu.xib and expand the File menu. You can see that Xcode generated only a Save menu item and not a Save As menu item. You’re going to change the Save to Save As. Select the Save menu item, open the Attributes inspector, and change the title to Save As…. Select the Key Equivalent field and press ![]() +Shift+S, the standard keyboard shortcut for Save As. See Figure 7–1.
+Shift+S, the standard keyboard shortcut for Save As. See Figure 7–1.

Figure 7–1. The Save… menu item changed to Save As…
The text now says Save As…, but if you open the Connections inspector, you see that the menu is linked to the saveDocument: method, not the saveDocumentAs: method. Delete the existing connection to saveDocument: by clicking the X next to First Responder (next to saveDocument:). Then, drag from the circle next to selector, under Sent Actions, to the First Responder object on the left. In the ensuing pop-up menu, select saveDocumentAs:, as shown in Figure 7–2.
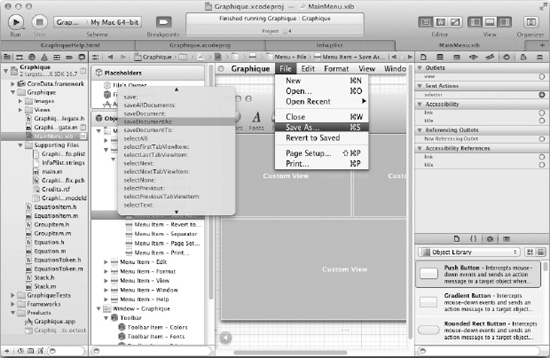
Figure 7–2. Connecting the Save As… menu item to the saveDocumentAs: method
When users select the Save As… menu item, the saveDocumentAs: action method will be sent up the responder chain. To respond, implement the saveDocumentAs: method in the first responder: the GraphiqueAppDelegate class. The implementation will perform the following steps:
- Grab the current equation.
- Prompt the user to select a location to save the new file.
- Produce the property list file.
- Save the file to the selected location.
Grabbing the Current Equation
Grabbing the current equation is as simple as querying the equation entry view controller for the current text in the text field, like this:
NSString *text = [self.equationEntryViewController.textField stringValue];
This line of code puts the text of the equation into the text variable. Since you don’t actually need an Equation object, you leave it as a string.
Prompting the User to Select a Destination File
The NSSavePanel class prompts the user for a file location for saving the data. Listing 7–1 shows how this is done.
Listing 7–1. Opening an NSSavePanel
NSSavePanel *saveDlg = [NSSavePanel savePanel];

[saveDlg setAllowedFileTypes:[NSArray arrayWithObject:@"graphique"]];

NSInteger result = [saveDlg runModal];

if (result == NSOKButton) {

}
This code creates an NSSavePanel instance, constrains the allowed file types to .graphique files only (the standard Graphique file extension) and then calls the runModal: method to display the NSSavePanel instance as a modal window. It then tests the return value of the runModal: method to see whether the user clicked OK to see whether to actually save the file or cancel the operation.
Producing the Graphique File
As mentioned, Graphique files are simply property list files. To save the file, create an NSDictionary object with a single entry:equation as the key and the text in the text variable as the value. NSDictionary objects can conveniently be serialized into a property list file and can also be reread back into the object. Listing 7–2 shows the completed saveDocumentAs: method, which you should place in GraphiqueAppDelegate.m.
Listing 7–2. The saveDocumentAs Method
- (void)saveDocumentAs:(id)sender

{

  // 1. Grab the current equation

  NSString *text = [self.equationEntryViewController.textField stringValue];


  // 2. Open the NSSavePanel

  NSSavePanel *saveDlg = [NSSavePanel savePanel];

  [saveDlg setAllowedFileTypes:[NSArray arrayWithObject:@"graphique"]];


  // Open the dialog and save if the user selected OK

  NSInteger result = [saveDlg runModal];

  if (result == NSOKButton){

    // 3. Producing the Graphique file

    NSMutableDictionary *data = [[NSMutableDictionary alloc] init];

    [data setObject:text forKey:@"equation"];

    [data writeToURL:saveDlg.URL atomically:YES];

  }

}
Launch the application and type an equation, as you normally would, in the equation entry field. Click the Graph button to view the graph so that you know it’s something worth saving. Then, select File ![]() Save As… from the menu. This will open the
Save As… from the menu. This will open the NSSavePanel, as shown in Figure 7–3.
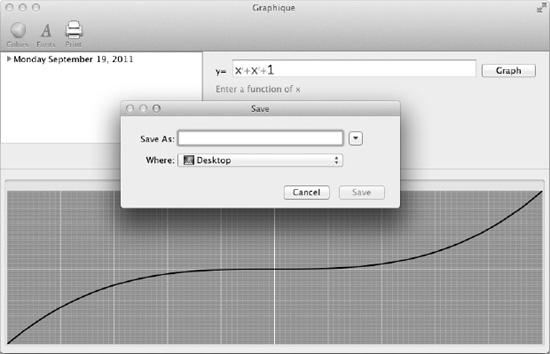
Figure 7–3. Prompting the user for a file location
Enter a file name and click the Save button. Finally, check the content of the newly created file using your favorite text editor. It should look something like the following example:
<?xml version="1.0" encoding="UTF-8"?>

<!DOCTYPE plist PUBLIC "-//Apple//DTD PLIST 1.0//EN"

"http://www.apple.com/DTDs/PropertyList-1.0.dtd">

<plist version="1.0">

<dict>

    <key>equation</key>

    <string>x3+x2+1</string>

</dict>

</plist>
As you can see, the dictionary object was serialized directly into the property list file. In fact, the Mac OS X property list files are backed by the NSDictionary class, which is why this file uses Apple’s PropertyList DTD. Notice that the file is automatically given the .graphique extension because this is how you’ve configured the NSSavePanel. Graphique can now save equations to a file.
Loading a Graphique File into the Application
Now that Graphique can save equation files, it’s only natural to provide a way to reopen the files at any time to view the equations again.
As we’ve shown in the previous section, you can use the MainMenu.xib file to find out what actions menu items are linked to. The Open menu item is automatically linked to a message called openDocument:. In GraphiqueAppDelegate.m, provide an implementation for this method, as shown in Listing 7–3. This implementation calls a new method that you haven’t implemented yet, so initially it won’t compile.
Listing 7–3. The openDocument Method
- (void)openDocument:(id)sender

{

  NSOpenPanel *openDlg = [NSOpenPanel openPanel];

  [openDlg setAllowedFileTypes:[NSArray arrayWithObject:@"graphique"]];


  NSInteger result = [openDlg runModal];

  if (result == NSOKButton)

  {

    NSMutableDictionary *data = [[NSMutableDictionary alloc] initWithContentsOfURL:openDlg.URL];

    [self loadData:data];

  }

}
The method uses the counterpart to NSSavePanel, a class called NSOpenPanel, which allows users to open files. The code configures the panel to use Graphique files and lets the user choose the file to open. It then delegates the loading of the data to a loadData method that we still need to implement. We delegate to that method to have a central place where to input data into the application, regardless of how the data got into the application. In this case, the NSOpenPanel is the way in. Later, we learn how to load files by double-clicking them. At the end of GraphiqueAppDelegate.h, add a declaration for the loadData method:
- (void)loadData:(NSDictionary*)data;
Then implement the method in GraphiqueAppDelegate.m as shown in Listing 7–4.
Listing 7–4. Loading the Graphique File
- (void)loadData:(NSDictionary*)data

{

  NSString *equationText = [data objectForKey:@"equation"];

  Equation *equation = [[Equation alloc] initWithString:equationText];


  [self.equationEntryViewController.textField setStringValue:equation.text];

  [self.graphTableViewController draw:equation];


  [self.equationEntryViewController controlTextDidChange:nil];

}
The loadData: method uses a dictionary with the same format as the one we exported earlier, so all we need to do is produce a dictionary from the file and then extract the equation from it. NSDictionary provides a very convenient way to get to the data.
Start Graphique and select File ![]() Open. Choose the file you stored earlier. It loads the equation and plots it.
Open. Choose the file you stored earlier. It loads the equation and plots it.
Graphique can now save and open Graphique files. Users expect to be able to double-click files in Mac OS X Finder to open them in the proper application, however. The next few sections show you how to launch Graphique when users double-click Graphique files from Finder, load the selected files, and display their equations.
Registering File Types with Lion
Any self-respecting operating system lets you register new file types so that users can double-click them and let the OS handle them. Some do it more elegantly than others. In Mac OS X, you have to reuse an existing or declare a new Uniform Type Identifier (UTI) to make the OS aware of file type associations. Apple defines a fairly large set of UTIs for common file formats such as PNG images or PDF documents. In our case, we need to create a new one for the .graphique extension.
NOTE: The list of default system-declared Uniform Type Identifiers is available from Apple at http://developer.apple.com/library/mac/#documentation/Miscellaneous/Reference/UTIRef/Articles/System-DeclaredUniformTypeIdentifiers.html.
You must perform three steps to properly handle the .graphique file type:
- Define the new UTI for the
.graphiqueextension. - Register the application as an editor for
.graphiquefiles. - Implement a method for handling the file.
The next sections walk through each of these steps in detail.
Defining the New UTI for the .graphique Extension
UTIs are declared in the application’s *-Info.plist file under the UTExportedTypeDeclarations key. Xcode, however, gives us a simple interface for defining UTIs on the Info tab of the Targets view. To view it, select the root Graphique project in the Project navigator, make sure the Graphique target is selected in the middle of Xcode, and select the Info tab, as shown in Figure 7–4.
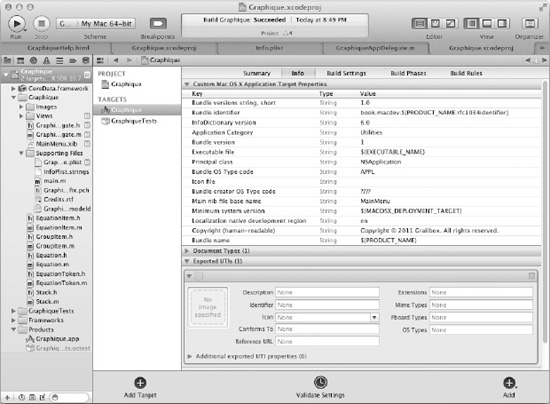
Figure 7–4. Viewing Info for the Graphique target
In there, we set some basic metadata, we set the file extensions we want to associate with the new UTI, and we give our type a unique identifier. Three fields are required:
- Identifier
- Conforms To
- Extensions
To these, we add a fourth, Description, just to make this UTI simpler to identify. Enter Graphique Equation in the Description field.
The Identifier field is what other components will use to when they want to refer to the new UTI. To ensure uniqueness, organizations typically use their inverted Internet domain identifier as a prefix for the type, usually matching the bundle identifier of the application. Often, they follow that with some basic name for the document type. For example, the UTI for PDF documents is com.adobe.pdf. The UTI for Excel spreadsheets in XLS format is com.microsoft.excel.xls. We’ll stick with the same identifier as the bundle identifier; enter book.macdev.graphique in the Identifier field.
The Conforms To field declares what other UTIs the Exported Type UTIs being defined conform to, in a hierarchy similar to an object hierarchy. The Graphique file UTI should conform to two Apple-provided system UTIs: public.content, which is the base type for all document content, and public.data, which provides the basis for byte stream data such as flat files and data on the clipboard. Enter public.content, public.data in the Conforms To field.
Finally, the Extensions field holds the valid file extensions for the UTI. Enter graphique, the only valid file extension for Graphique, in the Extensions field. The Exported UTIs section should now match Figure 7–5.
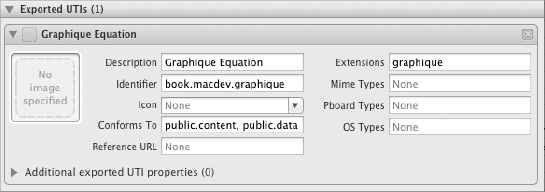
Figure 7–5. The Exported UTIs configuration screen
The Graphique application is now configured to export its UTIbut solves only half the puzzle. You must also register Graphique as an editor for Graphique files. Read on to understand how to do that.
Registering Graphique as an Editor for Graphique Files
All we’ve done at this point is tell the operating system that .graphique files are “Graphique Equation” files. The next step is to advertise that Graphique is an application that can open Graphique Equation files. We configure this information on the same screen we configured the Exported UTIs section, in the Document Types section. Open that section to see what’s shown in Figure 7–6.

Figure 7–6. The Document Types configuration screen
Give this document type a human-readable name by typing Graphique Equation in the Name field. Enter the extension, graphique, in the Extensions field. Tie the document type to the exported UTI by entering book.macdev.graphique in the Identifier field. Finally, select Editor in the Role field, indicating that Graphique can edit Graphique Equation files. The screen should match Figure 7–7.
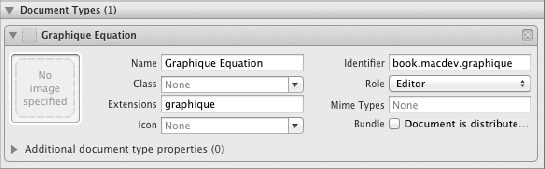
Figure 7–7. The Graphique Equation document type
Launch Graphique once to let the operating system know about the new exported UTI and document type. You can then close Graphique. Now, find a .graphique file you generated with the application earlier and Ctrl+click it. Select Open With, and see that Graphique is listed as an editor for it, as shown in Figure 7–8.
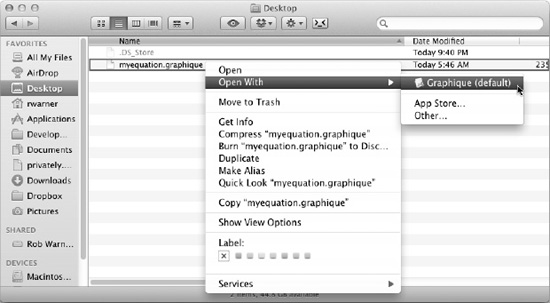
Figure 7–8. The Graphique file type registered with the operating system
Since you haven’t yet implemented any method for opening files from Finder, trying to open the file fails. When users try to open a Graphique Equation file from Finder, you have two scenarios to handle: opening the file if Graphique isn’t already running and opening the file if Graphique is already running. The next section implements code to handle both scenarios.
Handling Graphique Equation Files
When users open a file from Finder, the appropriate application is notified. More specifically, the application:openFile: method is called, passing in the name of the file that was opened. If Graphique is already running, it can just load the contents of the file and display the equation. If not, it can store the name of the file and then, when the applicationDidFinishLaunching: method is called after the application is ready to display its window, Graphique can load the contents of the file and display the equation. To store the name of the file, add a private attribute called fileName to the GraphiqueAppDelegate.h file, as shown in Listing 7–5.
Listing 7–5. GraphiqueAppDelegate.h with a fileName Attribute
#import <Cocoa/Cocoa.h>

#import <CoreData/CoreData.h>


@class EquationEntryViewController;

@class GraphTableViewController;

@class RecentlyUsedEquationsViewController;

@class PreferencesController;


@interface GraphiqueAppDelegate : NSObject <NSApplicationDelegate> {

  @private

  NSManagedObjectContext *managedObjectContext_;

  NSManagedObjectModel *managedObjectModel_;

  NSPersistentStoreCoordinator *persistentStoreCoordinator_;

  NSString *fileName;

}


@property (strong) IBOutlet NSWindow *window;

@property (weak) IBOutlet NSSplitView *horizontalSplitView;

@property (weak) IBOutlet NSSplitView *verticalSplitView;

@property (strong) EquationEntryViewController *equationEntryViewController;

@property (strong) GraphTableViewController *graphTableViewController;

@property (strong) RecentlyUsedEquationsViewController *recentlyUsedEquationsViewController;

@property (strong) PreferencesController *preferencesController;


@property (nonatomic, readonly) NSManagedObjectContext *managedObjectContext;

@property (nonatomic, readonly) NSManagedObjectModel *managedObjectModel;

@property (nonatomic, readonly) NSPersistentStoreCoordinator *persistentStoreCoordinator;


- (void)changeGraphLineColor:(id)sender;

- (IBAction)showPreferencesPanel:(id)sender;

- (void)loadData:(NSDictionary*)data;


@end
The application:openFile: method, implemented in GraphiqueAppDelegate.m, stores the name of the file in the fileName attribute. Then, if the application is already running, it loads the file using the loadData: method we’ve already implemented to load and display the equation. See Listing 7–6.
Listing 7–6. Implementing application:openFile:
- (BOOL)application:(NSApplication *)theApplication openFile:(NSString *)fileName_

{

  fileName = fileName_;


  if ([theApplication isRunning])

  {

    NSMutableDictionary *data = [[NSMutableDictionary alloc] initWithContentsOfFile:fileName];

    [self loadData:data];

  }


  return YES;

}
We can then alter applicationDidFinishLaunching: in GraphiqueAppDelegate.m to add handling for opening the file, as shown in Listing 7–7.
Listing 7–7. applicationDidFinishLaunching: with Handling for Opening a File Automatically
- (void)applicationDidFinishLaunching:(NSNotification *)aNotification

{

  self.equationEntryViewController = [[EquationEntryViewController alloc] initWithNibName:@"EquationEntryViewController" bundle:nil];

  [self.verticalSplitView replaceSubview:[[self.verticalSplitView subviews] objectAtIndex:1] with:equationEntryViewController.view];


  self.graphTableViewController = [[GraphTableViewController alloc] initWithNibName:@"GraphTableViewController" bundle:nil];

  [self.horizontalSplitView replaceSubview:[[self.horizontalSplitView subviews] objectAtIndex:1] with:graphTableViewController.view];


  self.recentlyUsedEquationsViewController = [[RecentlyUsedEquationsViewController alloc] initWithNibName:@"RecentlyUsedEquationsViewController" bundle:nil];

  recentlyUsedEquationsViewController.managedObjectContext = self.managedObjectContext;

  [self.verticalSplitView replaceSubview:[[self.verticalSplitView subviews] objectAtIndex:0] with:recentlyUsedEquationsViewController.view];

  self.verticalSplitView.delegate = recentlyUsedEquationsViewController;


  [[NSColorPanel sharedColorPanel] setTarget:self];

  [[NSColorPanel sharedColorPanel] setAction:@selector(changeGraphLineColor:)];


  if (fileName != nil)

  {

    NSMutableDictionary *data = [[NSMutableDictionary alloc] initWithContentsOfFile:fileName];

    [self loadData:data];

  }

}
Launch Graphique once to make sure the updates are sent to the operating system. Quit it immediately. Now you can double-click a .graphique file in Finder and watch the operating system launch Graphique and open the file. You can also double-click a .graphique file in Finder while Graphique is already running to display its equation.
Graphique can now respond when a user double-clicks a Graphique Equation file in Finder. Within Finder, however, Graphique Equation files look homely, with a bland, default icon. Read on to see how to improve the look of Graphique Equation files within Finder.
Using Quick Look to Generate Previews and Thumbnails
Mac OS X Leopard introduced the notion of file previews and thumbnails. When users select a file in Finder and press the spacebar, they see a preview of that file. If you do that with an image file, for example, you get a preview of the image. This technology is often referred to as “Quick Look”—you get a quick look at the file without actually opening an application to display it.
Also, Finder can display a thumbnail representing the contents of a file in place of a generic or an application-configured icon. Open a Finder window to your Pictures folder, for example, and look at the files Finder shows. For pictures or movies, it shows a thumbnail of the file, as shown in Figure 7–9.
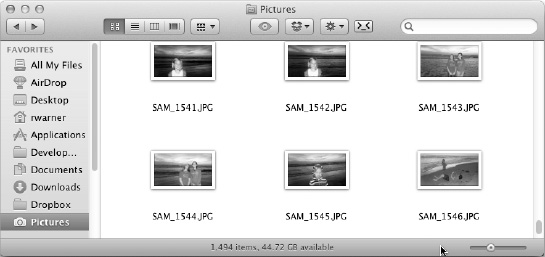
Figure 7–9. Pictures shown as thumbnails
In this section, you implement both previews and thumbnails for Graphique Equation files.
If you try to see a preview of a .graphique file by hitting the spacebar with it selected in Finder, all you get is an embarrassing reminder that we haven’t yet told the operating system how to handle previews for Graphique Equation files, as illustrated in Figure 7–10.
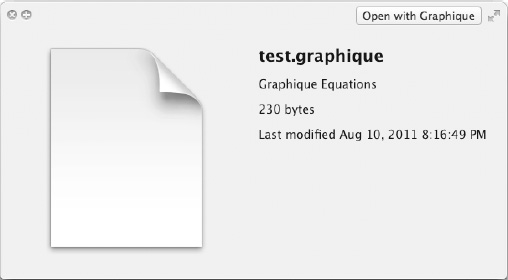
Clearly, the blank document is not very professional and literally not portraying the right image of the application. Mac OS X uses a feature called Quick Look to produce previews that we can display instead of this blank document icon. A Quick Look plug-in is a binary that is deployed in the operating system that helps Finder generate previews using your own code. Ideally, we’d want the preview for an equation file to display a graph of the equation.
The same holds true for thumbnails. Thumbnails are smaller representations of the content of a file. They are used in the various Finder views. Once again, since the operating system doesn’t know how to depict a Graphique file, it simply presents a blank generic document icon, as shown in Figure 7–11.

Figure 7–11. Default thumbnail
In this section, we show you how to implement a Quick Look preview and a thumbnail for .graphique files.
Creating the Quick Look Plug-in
A Quick Look plug-in produces an executable that is copied to /Library/QuickLook (or ~/Library/QuickLook for current user only installations). To create the plug-in, you create a new target within the Graphique project. Select the Graphique project node in the Graphique Xcode project, and choose File ![]() New
New ![]() New Target from the menu. In the list of targets, choose System Plug-In on the left and Quick Look Plug-In on the right, as shown in Figure 7–12, and click Next.
New Target from the menu. In the list of targets, choose System Plug-In on the left and Quick Look Plug-In on the right, as shown in Figure 7–12, and click Next.
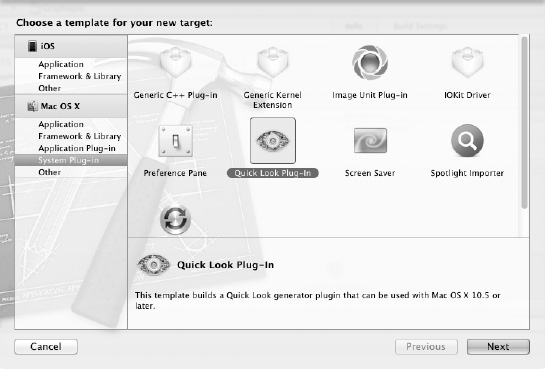
Figure 7–12. Selecting the Quick Look Plug-In target
The next screen prompts you for a product name. Enter GraphiqueQL for Product Name, enter book.macdev for Company Identifier, check the Use Automatic Reference Counting box, and make sure Graphique is selected for Project. Your screen should match Figure 7–13. Click Finish to generate the plug-in.
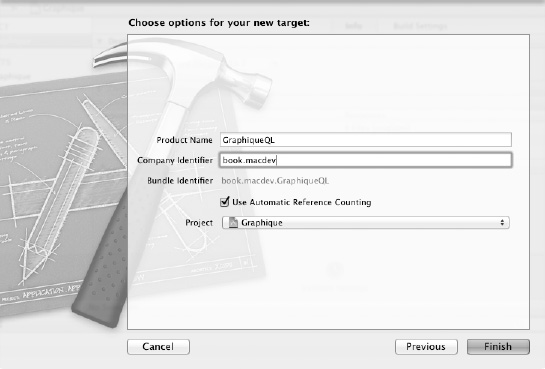
Figure 7–13. The options for the Graphique Quick Look plug-in
Xcode has generated the new plug-in with its related files in a group called GraphiqueQL, as illustrated in Figure 7–14.

Figure 7–14. The Quick Look plug-in generated
The first thing to note is that the plug-in source code GenerateThumbnailForURL and GeneratePreviewForURL comes in .c files. Simply rename them with a .m extension so that you can use Objective-C syntax. Leave main.c with the .c extension.
You must tell the plug-in the type of file it supports, so select the GraphiqueQL target and the Info tab to see the associated property list. Note that you may have to select some other target and then reselect the GraphiqueQL target to coax it to display its contents. Expand the Document types section until you see the string SUPPORTED_UTI_TYPE. Change SUPPORTED_UTI_TYPE to book.macdev.graphique, as shown in Figure 7–15.

Figure 7–15. Changing the Document Content Type UTIs
You’ve created the plug-in and told it what kind of file it supports, but your plug-in doesn’t actually generate previews or thumbnails yet. The next sections explain how to do that.
Implementing the Preview
As you might have guessed already, the code for generating the preview should be placed in GeneratePreviewForURL.m. This class bridges the Quick Look preview generator with your code.
You can follow one of two strategies for generating Quick Look previews:
- Save an image to use for the preview when you save the file from Graphique.
- Invoke the image generation code in the Quick Look preview each time a file is previewed.
Since we have an easy way to generate images from the view while Graphique is running, we opt for the first option. First, open GraphTableViewController.h and add the already-existing export: method to the public interface, as shown in Listing 7–8.
Listing 7–8. Adding the export: Method to the Public Interface
#import <Cocoa/Cocoa.h>

#import "Equation.h"


@class GraphView;


@interface GraphTableViewController : NSViewController <NSTableViewDataSource>


@property (nonatomic, retain) NSMutableArray *values;

@property (weak) IBOutlet NSTableView *graphTableView;

@property (nonatomic, assign) CGFloat interval;
@property (weak) IBOutlet GraphView *graphView;

@property (weak) IBOutlet NSTabView *tabView;


- (void)draw:(Equation *)equation;

- (NSBitmapImageRep *)export;


@end
Next, open GraphiqueAppDelegate.m and edit the saveDocumentAs: method, as shown in Listing 7–9, to create a bitmap image, in the PNG format, and store the image inside the Graphique Equation file.
Listing 7–9. The saveDocumentAs: Method Stores a Preview in the File
- (void)saveDocumentAs:(id)sender

{

  // 1. Grab the current equation

  NSString *text = [self.equationEntryViewController.textField stringValue];


  // 2. Open the NSSavePanel

  NSSavePanel *saveDlg = [NSSavePanel savePanel];

  [saveDlg setAllowedFileTypes:[NSArray arrayWithObject:@"graphique"]];


  // Open the dialog and save if the user selected OK

  NSInteger result = [saveDlg runModal];

  if (result == NSOKButton){

    // 3. Producing the Graphique file

    NSMutableDictionary *data = [[NSMutableDictionary alloc] init];

    [data setObject:text forKey:@"equation"];


    // Create the preview image

    NSBitmapImageRep *imageRep = [graphTableViewController export];

    NSData *img = [imageRep representationUsingType:NSPNGFileType properties:nil];

    [data setObject:img forKey:@"image"];


    [data writeToURL:saveDlg.URL atomically:YES];

  }

}
Open Graphique, type an equation, and save it into a .graphique file. If you open that file with a text editor, you will see that in addition to storing the equation, the file contains an image tag with the image data built in:
...

<dict>

    <key>equation</key>

    <string>x2+x3</string>

    <key>image</key>

    <data>

    iVBORw0KGgoAAAIHCAYAAAAl7UvFAAAKkmlDQ1BJQ0MgUHJvZmls

    ...

    </data>

</dict>

...
Generating the preview is now simply a matter of extracting this image data and painting it in the Quick Look graphics context. Open GeneratePreviewForURL.m and edit the GeneratePreviewForURL function to match Listing 7–10.
Listing 7–10. The GeneratePreviewForURL Function
OSStatus GeneratePreviewForURL(void *thisInterface, QLPreviewRequestRef preview,

CFURLRef url, CFStringRef contentTypeUTI, CFDictionaryRef options)

{

  NSRect canvas = {0, 0, 100, 100};


  CGContextRef cgContext = QLPreviewRequestCreateContext(preview, *(CGSize

*)&(canvas.size), false, NULL);

  if(cgContext) {

    NSGraphicsContext* context = [NSGraphicsContext graphicsContextWithGraphicsPort:(void *)cgContext flipped:YES];

    if(context) {

      [NSGraphicsContext saveGraphicsState];

      [NSGraphicsContext setCurrentContext:context];


      NSDictionary *data = [[NSDictionary alloc] initWithContentsOfURL:(__bridge NSURL*)url];

      NSData *imgData = [data objectForKey:@"image"];

      NSImage *image = [[NSImage alloc] initWithData:imgData];

      [image drawInRect:canvas fromRect:NSZeroRect operation:NSCompositeSourceOver fraction:1.0];


      [NSGraphicsContext restoreGraphicsState];

    }

    QLPreviewRequestFlushContext(preview, cgContext);

    CFRelease(cgContext);

  }


  return noErr;

}
You will need to make sure to import the Cocoa library at the top of the file:
#import <Cocoa/Cocoa.h>
Add Cocoa.framework to the list of frameworks that GraphiqueQL plug-in links to by selecting the Graphique project, the GraphiqueQL target, and the Build Phases tab. Expand the Link Binary With Libraries section, click the + button below it, and select Cocoa.framework. Xcode should look like Figure 7–16.

Figure 7–16. Adding Cocoa.framework to the libraries
Testing the Plug-in
Testing the plug-in requires a bit more setup. Quick Look comes with an executable called qlmanage located in /usr/bin. The steps required to set up Xcode 4 to run your Quick Look plug-in are detailed here.
Open a Terminal window and type the following:
cd ~ ; ln -s /usr/bin/qlmanage
You can then close the Terminal window. Go back to Xcode and do the following:
- From the menu, choose Product
 Manage Schemes to list the current schemes.
 - Select
GraphiqueQLand click the button labeled Edit…. - Select the
Runscheme on the left. - Select the Info tab.
- From the Executable drop-down, select Other….
- Select your home directory from the sidebar (Note: if your home directory isn’t currently displayed in the sidebar, go into the Finder preferences, select the Sidebar tab, and check the box next to your home directory.)
- Select the
qlmanagelink you created from the Terminal
The window should resemble Figure 7–17.
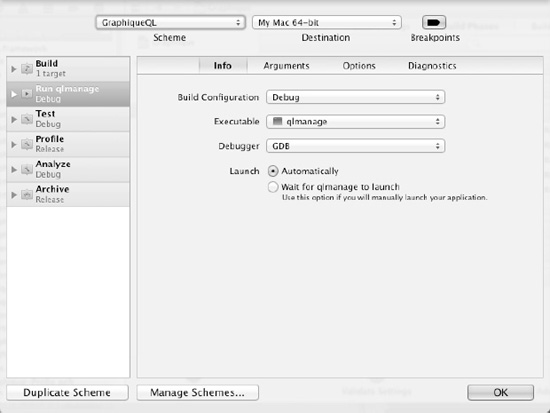
Figure 7–17. Setting up qlmanage as the QL plug-in executable
Next, go to the Arguments tab and, in the Arguments Passed on Launch section, add a -p argument with the path to your .graphique file (any such file you’ve created will work). For example, if the full path to your .graphique file were /Users/michael/Desktop/Test Files/test.graphique, you’d click the + button below the Arguments Passed On Launch section and type the following:
-p “/Users/michael/Desktop/Test Files/test.graphique”
See Figure 7–18.

Figure 7–18. Specifying the test file to preview
Click OK to validate the run scheme and dismiss the dialog.
The last step of the setup process is to put the plug-in in a place where the operating system will find it. Follow these steps:
- Select the Graphique project and select the
GraphiqueQLtarget. - Go to the Build Phases tab and add a Copy Files build phase by clicking the Add Build Phase button in the bottom-right corner of Xcode and selecting Add Copy Files.
- Expand the Copy Files sections it adds to the Build Phases.
- For Destination, select Absolute Path.
- For Subpath, enter ~/Library/QuickLook/.
- Click the + button at the bottom left of the selection.
- Scroll to the bottom of the file list and select
GraphiqueQL.qlgenerator, which you’ll find beneath Products.
Your Xcode should match Figure 7–19.
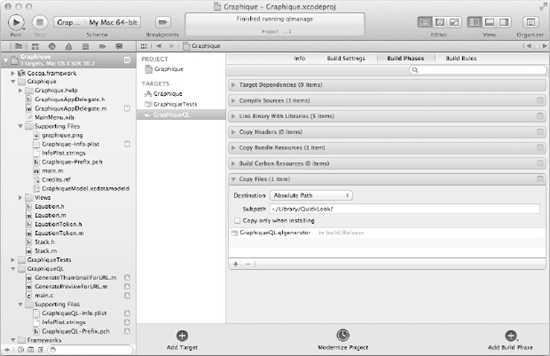
Figure 7–19. Configuring the QL plug-in build phases
Select the GraphiqueQL scheme, as illustrated in Figure 7–20, and hit the Run button to run the preview.

Figure 7–20. Selecting the GraphiqueQL scheme
If everything was configured properly, you should get a preview window like the one shown in Figure 7–21. Make sure the test file you are using was generated after amending the saveDocumentAs: method to save the preview in the file. If you don’t have a test file that contains the preview image data, launch Graphique, create a test file, and return to this step.

NOTE: You should now be able to see previews of your .graphique file from Finder. Quick Look uses a cache of known plug-ins. If it hasn’t yet discovered your new plug-in and is still showing a generic preview, open a Terminal window and run the command qlmanage -r to make it reload its plug-ins.
Implementing the Thumbnail
Generating thumbnails is almost identical to generating previews. This time, we edit GenerateThumbnailForURL.m by adding an import for <Cocoa/Cocoa.h> at the top and implementing the GenerateThumbnailForURL function, as shown in Listing 7–11.
Listing 7–11. Generating a Quick Look Thumbnail
OSStatus GenerateThumbnailForURL(void *thisInterface, QLThumbnailRequestRef thumbnail,

CFURLRef url, CFStringRef contentTypeUTI, CFDictionaryRef options, CGSize maxSize)

{

  NSRect canvas = {0, 0, 100, 100};

  CGContextRef cgContext = QLThumbnailRequestCreateContext(thumbnail, *(CGSize

*)&(canvas.size), false, NULL);

  if(cgContext) {

    NSGraphicsContext* context = [NSGraphicsContext graphicsContextWithGraphicsPort:(void *)cgContext flipped:YES];

    if(context) {

      [NSGraphicsContext saveGraphicsState];

      [NSGraphicsContext setCurrentContext:context];


      NSDictionary *data = [[NSDictionary alloc] initWithContentsOfURL:(__bridge NSURL*)url];

      NSData *imgData = [data objectForKey:@"image"];

      NSImage *image = [[NSImage alloc] initWithData:imgData];

      [image drawInRect:canvas fromRect:NSZeroRect operation:NSCompositeSourceOver fraction:1.0];


      [NSGraphicsContext restoreGraphicsState];

    }

    QLThumbnailRequestFlushContext(thumbnail, cgContext);

    CFRelease(cgContext);

  }


  return noErr;

}
You can test it in Xcode by editing the GraphiqueQL run schema, replacing the qlmanage argument from -p to –t, as shown in Figure 7–22.

Figure 7–22. Changing the QL plug-in configuration to show thumbnails
Run GraphiqueQL in Xcode, and you should get a thumbnail image of your file, as illustrated in Figure 7–23.
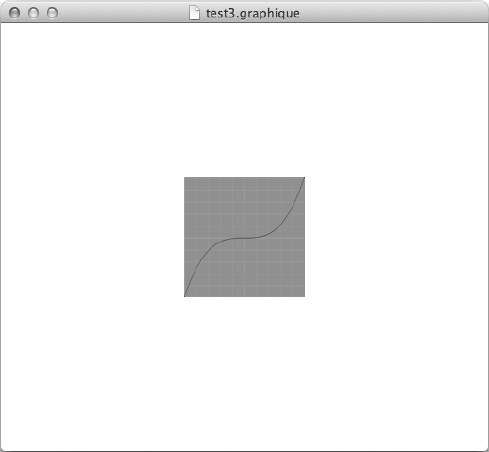
Figure 7–23. Testing the Quick Look thumbnail
Open a Terminal window and run qlmanage -r to reload the plug-ins. Then go to Finder and view your files to see the thumbnail and previews work. The Finder window should look like Figure 7–24.
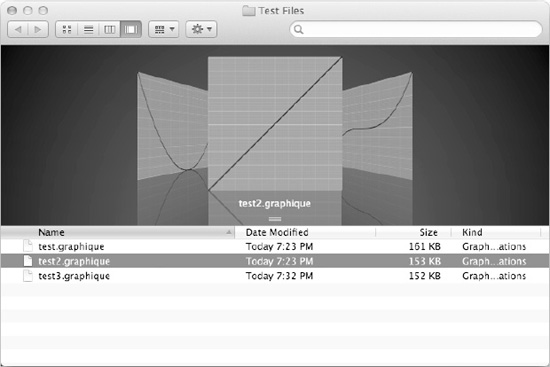
Figure 7–24. Quick Look in action
Distributing the Quick Look Plug-in with the Graphique Application
To finish your work on the Quick Look plug-in, you must set up the plug-in to be distributed with the Graphique application. First, dismantle the Copy Files Build Phase you created for testing the Quick Look plug-in by selecting the GraphiqueQLtarget and clicking the X in the upper-right corner of the Copy Files Build Phase you created.
Then, go to the Graphique target and, in the Target Dependencies section, add GraphiqueQL to the dependencies list, as shown in Figure 7–25. This will ensure that the Quick Look plug-in is built whenever Graphique is built.

Figure 7–25. Adding GraphiqueQL as a dependency of Graphique
Quick Look plug-ins are stored in one of three locations:
/Library/QuickLook~/Library/QuickLook(Your application bundle)/Contents/Library/QuickLook
Since the ultimate goal is to distribute Graphique from the Mac App Store, we want to put the Quick Look plug-in inside the Graphique application bundle. To accomplish this, we must copy the Quick Look plug-in into that directory.
Copying the Plug-in
To copy the Quick Look plug-in to the Graphique application bundle, click the Add Build Phase button and select Add Copy Files. Expand the Copy Files section that Xcode adds, select Wrapper in the Destination drop-down, enter Contents/Library/QuickLook in the Subpath field, and drag GraphiqueQL.qlgenerator from the list of files on the far left, under Products, and drop it into the Copy Files section.
The added Build Phase should match Figure 7–26.
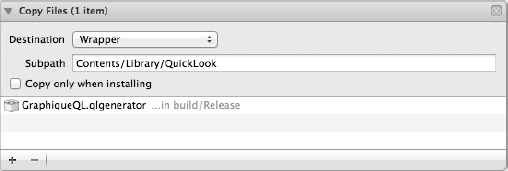
Figure 7–26. Setting up the Quick Look plug-in to copy into the application bundle
Now, when you build Graphique, the Quick Look plug-in will automatically be copied to the appropriate location within the application bundle.
Adding an Item to the Menu Bar
Across the top of screen, starting from the right corner and working left, Mac OS X displays icons in what it calls the menu bar. Some of these icons come standard with OS X, such as the ones for Spotlight or Volume Control. Others get put there by various third-party applications like Alfred or Twitter for Mac. Figure 7–27 displays a sample menu bar showing icons from both Mac OS X and from third-party applications.
Figure 7–27. Menu bar icons
These icons do various things, defined by the application that put them there. Some, like FaceTab or Blast, display the application’s only window hanging below the icon. Others, like Caffeine, incorporate the application’s entire user interface within the icon. Most, however, act like Twitter for Mac: they display a menu of actions so that you can quickly access application functions without having to switch to the application’s window. We’ll take that road for Graphique, creating a menu bar icon that, when clicked, displays the last ten recently used equations in a menu. Users will be able to click the Graphique menu bar item and then select an equation, and the application will display that equation and its corresponding graph or table.
Understanding NSStatusBar and NSStatusItem
Cocoa uses the NSStatusBar class to represent the menu bar and the NSStatusItem class to represent menu bar icons. The menu bar is a single, systemwide instance, which you can retrieve by calling NSStatusBar’s systemStatusBar: class method, like this:
NSStatusBar *statusBar = [NSStatusBar systemStatusBar];
You add icons to the system status bar using its statusItemWithLength: method, which not only creates the NSStatusItem instance but also returns it. The parameter you pass to the statusItemWithLength: method is the desired width for the icon, in pixels. To create a status item that’s 30 pixels wide, for example, you’d use code like this:
NSStatusBar *statusBar = [NSStatusBar systemStatusBar];

NSStatusItem *statusItem = [statusBar statusItemWithLength:30.0];
Cocoa provides two constants that you can pass in place of the pixel width: NSSquareStatusItemLength, to make the width of the status item the same as its height, and NSVariableStatusItemLength, to tell the status bar to determine the width to fit its contents.
We’ve been saying “icon” each time we talk about status items, but you can also make status items display text (as the menu bar’s clock does). To set a status item’s text, call its setTitle: method. You can also create your own custom view for your status item and call setView: to use it. We’ll stick with the traditional icon setup for Graphique, however, and call setImage:.
You control what happens when the user clicks your status item by either calling setAction:, passing a selector to be called anytime the user clicks the status item, or creating a menu and setting the menu on the item using setMenu:. The menu then controls the action that’s called when users click and navigate through it, just as any menu item does.
Since we now understand enough about status bars and status items, let’s add the status item to Graphique.
Adding a Status Item to Graphique
Prepare for adding the status item by securing an icon for its use, either by creating one, downloading one, or using the one we’ve supplied with the source code. It should be a PNG file about 18 pixels square to fit with the other status bar icons. The one we’ve created is shown, zoomed in, in Figure 7–28.
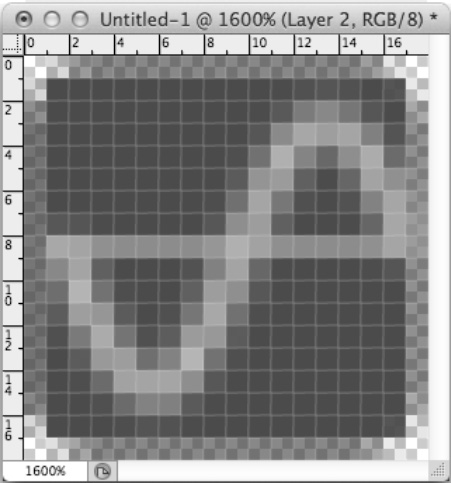
Figure 7–28. The Graphique status item icon, zoomed in
Name your icon graphique18.png, create a directory inside your Graphique project called Images, and save the icon file in that Images directory. Then, add the icon file to your project in Xcode, inside a new group called Images.
Building the Status Item Menu
Cocoa defines a protocol called NSMenuDelegate that offers methods for building menus. In this section, we create a class to implement this protocol so that we can use it from GraphiqueAppDelegate to handle menu chores. Create a new Cocoa class, derived from NSObject, called GraphiqueStatusItemMenuDelegate. This is the class that will build the menu and respond to selections on the status item’s menu, so we make it conform to the NSMenuDelegate protocol. Listing 7–12 shows the code for GraphiqueStatusItemMenuDelegate.h.
Listing 7–12. GraphiqueStatusItemMenuDelegate.h
#import <Foundation/Foundation.h>


@class GroupItem;


@interface GraphiqueStatusItemMenuDelegate : NSObject <NSMenuDelegate>


@property (weak) GroupItem *rootItem;


- (id)initWithRootItem:(GroupItem *)rootItem;

- (void)statusMenuItemSelected:(id)sender;


@end
This class is initialized from a GroupItem instance, which you’ll recognize from the Recently Used Equations view as representing a node in the tree. For our menu, we’ll pass in the root node, so that we can access all equations in the tree.
This class also contains an action method, statusMenuItemSelected:, that will be called anytime a menu item from the status item menu is selected.
You can create menus for status items in Interface Builder, just as you would with any other menu. If we were creating a static menu, with all the menu’s items and actions known at build time, we’d most likely create our menu this way. We want to populate the menu in Graphique with the ten most recent equations, however, so we must build the menu dynamically. In fact, we really should build the menu each time the user clicks it, because the contents of the menu change any time the user graphs an equation. To have the opportunity to build the menu each time the user clicks it, we implement the menuNeedsUpdate: method, which gets called right before the menu is displayed.
To build the menu with the recent equations, we must work backward, first by date and then by the equations for each date, until we get to our limit of ten items. For each equation, we add a menu item with the equation as the text of the item. We use the same action for each menu item (statusMenuItemSelected:), and we pass an empty string for the shortcut key (passing nil for this parameter will crash the application). Listing 7–13 shows the implementation.
Listing 7–13. GraphiqueStatusItemMenuDelegate.m
#import "GraphiqueStatusItemMenuDelegate.h"

#import "GroupItem.h"

#import "Equation.h"

#import "GraphiqueAppDelegate.h"


#define MAX_ITEMS 10


@implementation GraphiqueStatusItemMenuDelegate


@synthesize rootItem;


- (id)initWithRootItem:(GroupItem *)rootItem_

{

  self = [super init];
  if (self != nil)

  {

    self.rootItem = rootItem_;

  }

  return self;

}


- (void)menuNeedsUpdate:(NSMenu *)menu

{

  // Remove all the menu items to rebuild from scratch

  [menu removeAllItems];


  // Keep track of how many menu items we've added so we know when we've reached the

limit

  int numItems = 0;


  // Loop backwards through the date items

  for (NSInteger i = [rootItem numberOfChildren] - 1; i >= 0 && numItems < MAX_ITEMS; i-

-)

  {

    // For each date item, loop backward through the equations

    GroupItem *dateItem = [rootItem childAtIndex:i];

    for (NSInteger j = [dateItem numberOfChildren] - 1; j >= 0 && numItems < MAX_ITEMS;

j--)

    {

      // For each equation, add a menu item with the equation as the menu title

      GroupItem *equationItem = [dateItem childAtIndex:j];

      [[menu addItemWithTitle:[equationItem text]

action:@selector(statusMenuItemSelected:) keyEquivalent:@""] setTarget:self];


      // Increment the counter

      ++numItems;

    }

  }

}


- (void)statusMenuItemSelected:(id)sender

{

  // Get the selected menu item

  NSMenuItem *item = (NSMenuItem *)sender;


  // Graph the equation

  GraphiqueAppDelegate *delegate = NSApplication.sharedApplication.delegate;

  [delegate showEquationFromString:item.title];


  // Bring Graphique to the front

  [NSApp activateIgnoringOtherApps:YES];

}


@end
This code will not yet compile, because it expects a method called showEquationFromString: to exist in GraphiqueAppDelegate. The next section implements that method and performs the other steps necessary to integrate the status item menu.
Integrating the Status Item
To integrate the status item into the Graphique application, open GraphiqueAppDelegate.h and add members for the status item, the status item’s menu, and the menu delegate. Also, add a method to set up the status item and to show an equation from a specified string. See Listing 7–14 for the updated GraphiqueAppDelegate.h.
Listing 7–14. GraphiqueAppDelegate.h
#import <Cocoa/Cocoa.h>

#import <CoreData/CoreData.h>


@class EquationEntryViewController;

@class GraphTableViewController;

@class RecentlyUsedEquationsViewController;

@class PreferencesController;

@class GraphiqueStatusItemMenuDelegate;


@interface GraphiqueAppDelegate : NSObject <NSApplicationDelegate> {

  @private

  NSManagedObjectContext *managedObjectContext_;

  NSManagedObjectModel *managedObjectModel_;

  NSPersistentStoreCoordinator *persistentStoreCoordinator_;

  NSString *fileName;


  NSStatusItem *statusItem;

  NSMenu *statusItemMenu;

  GraphiqueStatusItemMenuDelegate *statusItemMenuDelegate;

}


@property (strong) IBOutlet NSWindow *window;

@property (weak) IBOutlet NSSplitView *horizontalSplitView;

@property (weak) IBOutlet NSSplitView *verticalSplitView;

@property (strong) EquationEntryViewController *equationEntryViewController;

@property (strong) GraphTableViewController *graphTableViewController;

@property (strong) RecentlyUsedEquationsViewController *recentlyUsedEquationsViewController;

@property (strong) PreferencesController *preferencesController;


@property (nonatomic, retain, readonly) NSManagedObjectContext *managedObjectContext;

@property (nonatomic, retain, readonly) NSManagedObjectModel *managedObjectModel;

@property (nonatomic, retain, readonly) NSPersistentStoreCoordinator *persistentStoreCoordinator;


@property (strong) NSStatusItem *statusItem;

@property (strong) NSMenu *statusItemMenu;

@property (strong) GraphiqueStatusItemMenuDelegate *statusItemMenuDelegate;
- (void)changeGraphLineColor:(id)sender;

- (IBAction)showPreferencesPanel:(id)sender;

- (void)loadData:(NSDictionary*)data;

- (void)configureStatusItem;

- (void)showEquationFromString:(NSString *)text;


@end
Move on to GraphiqueAppDelegate.m. Add an import for the new delegate’s header file:
#import "GraphiqueStatusItemMenuDelegate.h"
Add a @synthesize line for statusItem, statusItemMenu, and statusMenuItemDelegate:
@synthesize statusItem, statusItemMenu, statusMenuItemDelegate;
As the last line of the applicationDidFinishLaunching: method, add a call to the configureStatusItem: method that we’re going to implement, like this:
[self configureStatusItem];
Listing 7–15 shows the implementation of configureStatusItem:. In that method, you create the status item, set its icon, and set it to highlight when selected. Then, you create the menu, leave it blank, and add it to the status item.
Listing 7–15. The configureStatusItem: Method
- (void)configureStatusItem

{

  // Create the status item

  self.statusItem = [[NSStatusBar systemStatusBar] statusItemWithLength:NSVariableStatusItemLength];


  // Set the icon

  [statusItem setImage:[NSImage imageNamed:@"graphique18.png"]];


  // Set the item to highlight when clicked

  [statusItem setHighlightMode:YES];


  // Create the menu and delegate

  statusItemMenu = [[NSMenu alloc] init];

  self.statusItemMenuDelegate = [[GraphiqueStatusItemMenuDelegate alloc] initWithRootItem:self.recentlyUsedEquationsViewController.rootItem];

  [statusItemMenu setDelegate:self];

  [statusItem setMenu:statusItemMenu];

}
Whoa—another compiler error. The rootItem member of RecentlyUsedEquationsViewController isn’t available as a property, so add it in RecentlyUsedEquationsViewController.h:
@property (nonatomic, readonly) GroupItem *rootItem;
And in RecentlyUsedEquationsViewController.m, add this:
@synthesize rootItem;
Finally, you must implement the showEquationFromString: method in GraphiqueAppDelegate.m. This method should accept an equation as a string, create an equation from it, set its text into the equation entry field, and graph the equation. This sounds an awful lot like the existing loadData: method, except that it doesn’t have to pull the equation string out of a dictionary. To leverage the existing code, refactor loadData: to pull the equation out of the specified dictionary, and then call the new showEquationFromString: method that now contains the rest of the code that was in loadData:. Listing 7–16 shows the refactored methods.
Listing 7–16. The loadData: and showEquationFromString: Methods
- (void)loadData:(NSDictionary*)data

{

  NSString *equationText = [data objectForKey:@"equation"];

  [self showEquationFromString:equationText];

}


- (void)showEquationFromString:(NSString *)text

{

  Equation *equation = [[Equation alloc] initWithString:text];


  [self.equationEntryViewController.textField setStringValue:equation.text];

  [self.graphTableViewController draw:equation];


  [self.equationEntryViewController controlTextDidChange:nil];

}
You can build and run Graphique now (make sure to switch the scheme back to Graphique if it’s still set to GraphiqueQL) to see the status item added to the menu bar. You may need to graph a few equations to build your recently used pool, but then click the Graphique icon in the system menu. You should see a list of equations similar to Figure 7–29. Select one, and Graphique should graph it, coming to the front of your display if it wasn’t already.

Figure 7–29. The equations in the status menu
Heeding Apple’s Advice Regarding Menu Bar Icons
Apple’s documentation for NSStatusBar warns against overuse of menu bar items, pointing out that space is limited and to create them only if other alternatives aren’t appropriate. It highlights that the operating system doesn’t guarantee that the menu bar icons will always be available (it might not have sufficient space to display them all) and states that applications should always allow users to hide their menu bar icons. For Graphique, we add a user preference to hide the icon.
Adding the Preference to the Interface
To add this preference, we follow the pattern we established in Chapter 5 with the preference for which tab to display on Graphique’s launch. We won’t spend time explaining the steps, so if you have questions, refer to Chapter 5.
Start by opening PreferencesController.h, add a check box member for the preference, and add an action method for when the check box changes state. Listing 7–17 shows the updated PreferencesController.h file.
Listing 7–17. PreferencesController.h
#import <Cocoa/Cocoa.h>


@interface PreferencesController : NSWindowController

{

  NSButton *initialViewIsGraph;

  NSButton *showStatusItem;

}


@property (nonatomic, retain) IBOutlet NSButton *initialViewIsGraph;

@property (nonatomic, retain) IBOutlet NSButton *showStatusItem;


- (IBAction)changeInitialView:(id)sender;

- (IBAction)changeStatusItem:(id)sender;


@end
In PreferencesController.m, set the new check box in windowDidLoad: and add the implementation for the changeStatusItem: method to update the user defaults. In that method, we also must notify the application delegate that the check box changed so that it can either show or remove the status item. The compiler will complain after you add this code, because the updateStatusItemState: method doesn’t yet exist on GraphiqueAppDelegate, but we’ll soon rectify that. Listing 7–18 shows the updated PreferencesController.m file.
Listing 7–18. PreferencesController.m
#import "PreferencesController.h"

#import "GraphiqueAppDelegate.h"


@implementation PreferencesController


@synthesize initialViewIsGraph;

@synthesize showStatusItem;


- (id)init

{

  self = [super initWithWindowNibName:@"PreferencesController"];

  return self;

}
- (void)windowDidLoad

{

  [super windowDidLoad];


  // Get the user defaults

  NSUserDefaults *userDefaults = [NSUserDefaults standardUserDefaults];


  // Set the checkbox to reflect the user defaults

  [initialViewIsGraph setState:[userDefaults boolForKey:@"InitialViewIsGraph"]];


  // Set the status item checkbox

  [showStatusItem setState:[userDefaults boolForKey:@"ShowStatusItem"]];

}


- (IBAction)changeInitialView:(id)sender

{

  // Get the user defaults

  NSUserDefaults *userDefaults = [NSUserDefaults standardUserDefaults];


  // Set the user defaults value for the initial view

  [userDefaults setBool:[initialViewIsGraph state] forKey:@"InitialViewIsGraph"];

}


- (IBAction)changeStatusItem:(id)sender

{

  // Get the user defaults

  NSUserDefaults *userDefaults = [NSUserDefaults standardUserDefaults];


  // Set the user defaults for the status item

  [userDefaults setBool:[showStatusItem state] forKey:@"ShowStatusItem"];


  // Notify the application delegate that the preference for the status item changed

  [(GraphiqueAppDelegate *)[[NSApplication sharedApplication] delegate] updateStatusItemState];

}


@end
Open PreferencesController.xib, make the window bigger to accommodate another check box, and add the check box for setting the preference. Figure 7–30 shows the updated preferences window. Then, wire up the showStatusItem outlet and the changeStatusItem: action to the new check box.

Figure 7–30. The preferences window with the status item preference
Now, switch to the GraphiqueAppDelegate class. In the header file (GraphiqueAppDelegate.h), declare the updateStatusItemState: method:
- (void)updateStatusItemState;
In GraphiqueAppDelegate.m, register the user default in the initialize: method to display the status item. Listing 7–19 shows the updated initialize: method.
Listing 7–19. The intialize: Method
+ (void)initialize

{

  // Get the user defaults

  NSUserDefaults *userDefaults = [NSUserDefaults standardUserDefaults];


  // Set the font to a reasonable choice and convert to an NSData object

  NSFont *equationFont = [NSFont systemFontOfSize:18.0];

  NSData *fontData = [NSArchiver archivedDataWithRootObject:equationFont];


  // Set the color to a reasonable choice and convert to an NSData object

  NSColor *lineColor = [NSColor blackColor];

  NSData *colorData = [NSArchiver archivedDataWithRootObject:lineColor];


  // Set the font, color, and status item in the defaults

  NSDictionary *appDefaults = [NSDictionary dictionaryWithObjectsAndKeys:fontData,

@"equationFont", colorData, @"lineColor", [NSNumber numberWithBool:YES],

@"ShowStatusItem", nil];

  [userDefaults registerDefaults:appDefaults];


  // Change the action for the Font Panel so that the text field doesn't swallow the

changes

  [[NSFontManager sharedFontManager] setAction:@selector(changeEquationFont:)];


  // Set the color panel to show only Crayons mode

  [NSColorPanel setPickerMask:NSColorPanelCrayonModeMask];

}
The updateStatusItemState: method should look up whether to show the status item in the user defaults. If it should show the status item, it calls configureStatusItem:. If not, it removes the status item, releases the status item and menu, and sets them to nil. Listing 7–20 shows the updateStatusItemState: method.
Listing 7–20. The updateStatusItemState: Method
- (void)updateStatusItemState

{

  BOOL showStatusItem = [[NSUserDefaults standardUserDefaults] boolForKey:@"ShowStatusItem"];

  if (showStatusItem && statusItem == nil)

  {

    [self configureStatusItem];

  }

  else if (!showStatusItem && statusItem != nil)

  {

    [[NSStatusBar systemStatusBar] removeStatusItem:statusItem];

    statusItemMenu = nil;

    statusItem = nil;
  }

}
Finally, change the call in applicationDidFinishLaunching from configureStatusItem: to updateStatusItemState: so it looks like this:
[self updateStatusItemState];
Now you can build and run Graphique, open the preferences window, and check and uncheck the Show Status Item check box to hide or display the Graphique status item.
Summary
John Donne said no man is an island, and we say no application should be one either. Successful applications integrate into the Mac OS X desktop, availing themselves of the services that Mac OS X offers. By integrating Graphique with the Finder’s launcher, with Quick Look, and with the menu bar, you’ve increased Graphique’s appeal and utility.
In a general sense, you should always seek ways to make your applications more integrated into the Mac OS X desktop. Users learn patterns of how applications work, and as they move from application to application, they expect their knowledge to transfer. By making your applications behave in ways that users expect, you help users get more use from your applications.