
Chapter 8
Creating Help
You’ve made your application as easy to use as possible. You’ve thought through the various workflows in your application and tweaked the user interface to make those flows intuitive and simple to understand. You’ve considered novices and experts and everyone in between, and you’ve crafted a UI masterpiece that should be eminently straightforward, discoverable, and useful.
And yet people don’t always get it.
As much as you focus on improving your user interface (and, incidentally, that is indeed time well spent), your users likely will still need help navigating your screens and buttons and menus to accomplish the tasks they’re using your application to fulfill. Help files can provide the handholding your users need to familiarize them with your application, discover new features, and perform tasks the way you’ve designed for them to be performed.
Although the trend established by iOS apps is to make your applications intuitive and discoverable to reduce the need for help, Mac OS X applications can still improve users’ experiences by offering some guidance through help. If you run Graphique and select the Help ![]() Graphique Help menu item, however, you’ll see the dialog shown in Figure 8–1. It’s true: Graphique currently offers no help. In this chapter, we build help for Graphique.
Graphique Help menu item, however, you’ll see the dialog shown in Figure 8–1. It’s true: Graphique currently offers no help. In this chapter, we build help for Graphique.
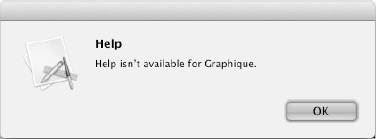
Figure 8–1. Graphique offers no help.
A Word on Help
Apple’s documentation on help files can be confusing and outdated, admonishing you to include data that in fact isn’t required, directing you to review complex examples as models for your help files (examples that break some of the rules in Apple’s own documentation), and making you feel that the help on help is not at all helpful. Its documentation hasn’t kept pace with the changes in new versions of the operating system, for whatever reason. Some apps have opted to ditch the confusion altogether and simply launch a browser and display their help from the Web, which is fine if your users are always connected to the Internet, have a fast connection, and don’t have bandwidth cap concerns. Distributing help with your application is usually the better approach. This chapter clears up the mystery of help files, opting for a straightforward approach to crafting help that works.
Understanding Help Books
The collection of files that constitute the help that an application offers is called a help book and consists of HTML and XHTML files, a property list, graphics, QuickTime movies, and even AppleScript scripts. Apple recommends, for speed purposes, that the main file you create, which stands as the entry point to your help book, should conform to the XHTML 1.0 specification, while the rest of the help page files should conform to the HTML 4.01 specification. For the Graphique help book, we’ll start by creating the main help file and then add a linked help page for one of the features. Within the text of the book, we won’t reproduce the entire text of all the files in the completed help book to save space. You can peruse the finished product in the downloaded source. Instead, we’ll focus on the essentials of help book creation so you can understand how to become a help author.
Like a Quick Look plug-in, your help book is a resource bundle that lives inside your application’s resource bundle. When you’re done adding your help book to Graphique, the resource bundle’s directory structure will look like this:
|-Graphique.app

|---Contents

|-----MacOS

|-----Resources

|-------Graphique.help

|---------Contents

|-----------Resources

|-------------English.lproj

|-------------shared

|-------GraphiqueModel.momd

|-------en.lproj

|-----Library

|-------QuickLook

|---------GraphiqueQL.qlgenerator

|-----------Contents

|-------------MacOS

|-------------Resources

|---------------en.lproj
Creating Your Help Book
You might be tempted to search for a Help Book template in Xcode’s “new file” templates, but such a search would end fruitlessly. Although help books have certain key elements and structures, you’re on your own for creating all the necessary files. Luckily, however, the files and structure are straightforward enough that you can re-create them. These are the steps to follow for creating a help book:
- Create the directory structure for your resource bundle.
- Create your main help file.
- Create the rest of your help files, graphics, movies, and so on.
- Create your help index.
- Set up your plist file describing your help book.
- Import your help book into your Xcode project.
- Update your application’s plist file to point to the help book.
- Set up Graphique’s build phases.
The order in which you perform these tasks generally doesn’t matter. As long as you do them all correctly, when you’re done, you can launch Graphique, select Help ![]() Graphique Help from the menu, and view help on Graphique.
Graphique Help from the menu, and view help on Graphique.
Creating the Directory Structure
On your file system, inside the Graphique project directory, create a directory called Graphique.help. Your project directory should now have five subdirectories:
GraphiqueGraphique.helpGraphique.xcodeprojGraphiqueQLGraphiqueTests
If you view this directory in Finder, you’ll see that Finder, as with your application bundles with the .app extension, handles this directory differently from normal directories. It gives it a different icon—a life preserver, instead of a folder—and double-clicking it doesn’t open the folder in Finder but instead launches the help viewer and tries to display any help files in that bundle. This is good for launching help books but bad for navigating the directory structure while you’re creating the help book. To get around this, you can either launch a Terminal window and perform these tasks from the command line, or you can right-click the Graphique.help directory and select Show Package Contents to drill into the directory through Finder.
Inside the Graphique.help directory, create this directory structure:
|-Contents

|---Resources

|-----English.lproj

|-----shared
Apple’s documentation suggests more directories than we show here, and indeed you can make the directory hierarchy as simple or as complex as you’d like. Smaller help books probably don’t merit complex directory structures, though, so we keep Graphique’s help book directory structure simple. As your project grows, however, you may find your help book easier to manage with more structure. Most of the directory names don’t matter. The ones that do are Contents, Resources, and English.lproj. See Table 8–1 for an explanation of each directory.

Creating the Main Help File
In the English.lproj directory, create a file called GraphiqueHelp.html. When users select Help ![]() Graphique Help from the Graphique menu, this is the first help page they see. Typically, this file gives a brief description of the app and links to specific topics about the application. Follow suit by using the code shown in Listing 8–1.
Graphique Help from the Graphique menu, this is the first help page they see. Typically, this file gives a brief description of the app and links to specific topics about the application. Follow suit by using the code shown in Listing 8–1.
Listing 8–1. GraphiqueHelp.html
<?xml version="1.0" encoding="utf-8"?>

<!DOCTYPE html PUBLIC "-//W3C//DTD XHTML 1.0//EN" "http://www.w3.org/TR/xhtml1/DTD/xhtml1-strict.dtd">

<html xmlns="http://www.w3.org/1999/xhtml">

  <head>

    <meta http-equiv="Content-Type" content="text/html; charset=utf-8" />

    <title>Graphique Help</title>

    <link rel="stylesheet" href="../shared/graphique.css" type="text/css"

media="screen">

  </head>

  <body>

    <h1>Graphique Help</h1>

    <p>Graphique is a graphing calculator that draws the equations you enter, both in

graphical and in tabular format.</p>

    <ul>
     <li><a href="equations.html">Entering equations</a></li>

     <li><a href="results.html">Seeing results</a></li>

     <li><a href="recent.html">Reviewing recent graphs</a></li>

     <li><a href="font.html">Changing the font</a></li>

     <li><a href="color.html">Changing the graph's color</a></li>

     <li><a href="status.html">Using the status item</a></li>

     <li><a href="save.html">Saving a graph</a></li>

     <li><a href="quicklook.html">Using QuickLook</a></li>

   </ul>

  </body>

</html>
You can see that this file has an XHTML 1.0 doctype and that the markup is simple. Open a browser and view this file, which you can easily do from the terminal by navigating to its directory and typing this:
open GraphiqueHelp.html
You should see a browser window that looks like Figure 8–2.

Figure 8–2. The main Graphique help file in a browser
This page references a styles heet called graphique.css in the shared directory. Create that style sheet, shared/graphique.css, to change the fonts used. See Listing 8–2 for the style sheet code.
Listing 8–2. graphique.css
body {

  background-color: #fff;

  font-family: "Lucida Grande", Helvetica, Arial, sans-serif;

  font-size: 14px;

  padding: 20px;

  margin: 0;

}
h1 {

  font-size: 1.2em;

padding-left: 42px;

  background: url(../shared/graphique32.png) no-repeat top left;

  line-height: 32px;

}
You can see that the h1 style puts a 32×32 pixel icon to the left of its text. Create a 32×32 pixel icon, or copy it from the downloaded source, called graphique32.png, and place it in the shared directory alongside graphique.css. Refresh your browser window to see the effect of your styles. Figure 8–3 shows the updated help page.

Figure 8–3. The main Graphique help file after styling
Creating the Rest of Your Help Files
This book walks you through creating one more help file—one that includes graphics. The additional help files follow the same pattern and are available in the downloaded source code for this book at www.apress.com/9781430237204. The file you’ll create is the one for the first link on the main help page: Entering Equations. This means that none of the other links in your help book will work until you either create those pages or copy them in from source.
In the English.lproj directory, create a file called equations.html and edit it to match Listing 8–3.
Listing 8–3. equations.html
<!DOCTYPE HTML PUBLIC "-//W3C//DTD HTML 4.01 Transitional//EN"

"http://www.w3.org/TR/html4/loose.dtd">

<html>

  <head>

    <meta http-equiv="Content-type" content="text/html; charset=utf-8">
    <link rel="stylesheet" href="../shared/graphique.css" type="text/css"

media="screen">

    <title>Entering Equations</title>

    <meta name="description" content="How to enter equations that Graphique can graph.">

    <meta name="KEYWORDS" content="eqaution,trig">

  </head>

  <body>

    <h1>Entering Equations</h1>

    <p>You enter equations into Graphique's equation editor as a function of x. When no

equation is present, Graphique shows an example equation: 2*x+1.</p>

    <img width="274" height="77" src="../shared/equation_editor.png">

    <p>Graphique supports addition, subtraction, multiplication, division, exponents,

and the trigonometric functions sin (sine) and cos (cosine).</p>

    <p>You can depict exponents using the caret (^). Graphique also interprets as

exponents any numbers that follow x or a closed parenthesis.</p>

    <p>Example:</p>

    <img width="332" height="77" src="../shared/equation_editor_example.png">

  </body>

</html>
Two pieces of metadata merit explanation: description and KEYWORDS. The content for the description tag shows in search results below the name of the page. The values in KEYWORDS, separated by commas, offer additional items that will provide hits for this page in a search. You shouldn’t include words that already appear in the page, because the search engine will already find those. You can see that we’ve included two keyword terms: a misspelling of equation, so that if the user mistypes the term in a search, this page will still be found. The other keyword that will find a hit on this page is trig.
This page references two graphics, shown in Figure 8–4 and Figure 8–5. Create these graphics from screenshots, or copy them from the downloaded source code, and put them in the shared directory.

Figure 8–4. equation_editor.png
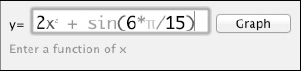
Figure 8–5. equation_editor_example.png
Go back to your browser window and click the Entering Equations link. Your browser window should now match Figure 8–6.

Figure 8–6. The Entering Equations help page
Before moving on, you need two more files: one, a 16×16 pixel icon that the help viewer uses for bookmarks, and the other, a file called InfoPlist.strings, which is used for localizing strings. Place the icon, called graphique16.png, in the shared directory. The InfoPlist.strings file goes in the English.lproj directory and has the content shown in Listing 8–4.
Listing 8–4. The Entering Equations Help Page
/* Localized versions of Info.plist keys */

HPDBookTitle = "Graphique Help";
You can set this string to whatever you want to display in the help viewer’s breadcrumb and search results.
Creating the Help Index
The help index allows users to search your help book and is a file you create and store in the localization folder of your help book (for example, English.lproj). You use a command-line utility called hiutil to create the index file. You can get more information on hiutil by viewing its man page. Any time you change the contents of your help book, you should re-create that file. You can also use a GUI app called Help Indexer.app, found in /Developer/Applications/Utilities, but its interface has quirks and serves simply as a front end for hiutil anyway.
Open a terminal and navigate to the English.lproj directory. Type the following command to create the help index:
hiutil -Cgf Graphique.helpindex .
When this command completes, verify that this command worked by using hiutil to list the files that your help index includes. At the prompt, type the following:
hiutil -Fvf Graphique.helpindex
You should see output like this:
/GraphiqueHelp.html

    Title: Graphique Help

    Descr: Graphique is a graphing calculator that draws the equations you enter, both

in graphical and in tabular format.


/equations.html

    Title: Entering Equations

    Descr: How to enter equations that Graphique can graph.
You see that both pages you’ve created are included in the index. You also see that the -g flag used when you created the help index generated a description for GraphiqueHelp.html, which you didn’t explicitly specify in its HTML file. The Entering Equations page uses the description you explicitly specified.
Setting Up Your Plist File
Your Graphique.help bundle must contain a plist file, called Info.plist, inside its Contents directory. This file contains keys that allow the Mac OS X help viewer to understand your help book and display it properly. Create the Info.plist file using Xcode, BBEdit, or some other plist-aware editor. If you’re using Xcode, you create a new Property List file and then either you can open it as source and paste in the XML content or you can go through the Property List editor’s interface and add the rows and values. If you’re using BBEdit, you can just create a file called Info.plist and paste in the XML content. Listing 8–5 shows the XML content of Info.plist, and Figure 8–7 shows Info.plist in the Xcode editor.
<?xml version="1.0" encoding="UTF-8"?>

<!DOCTYPE plist PUBLIC "-//Apple Computer//DTD PLIST 1.0//EN"

"http://www.apple.com/DTDs/PropertyList-1.0.dtd">

<plist version="1.0">

    <dict>

        <key>CFBundleDevelopmentRegion</key>

        <string>en</string>

        <key>CFBundleIdentifier</key>

        <string>book.macdev.graphique.help</string>

        <key>CFBundleInfoDictionaryVersion</key>

        <string>6.0</string>

        <key>CFBundleName</key>

        <string>GraphiqueHelp</string>

        <key>CFBundlePackageType</key>

        <string>BNDL</string>

        <key>CFBundleShortVersionString</key>

        <string>1</string>

        <key>CFBundleSignature</key>

        <string>hbwr</string>

        <key>CFBundleVersion</key>

        <string>1</string>

        <key>HPDBookAccessPath</key>

        <string>GraphiqueHelp.html</string>

        <key>HPDBookIconPath</key>

        <string>shared/graphique16.png</string>

        <key>HPDBookIndexPath</key>

        <string>Graphique.helpindex</string>

        <key>HPDBookKBProduct</key>

        <string>Graphique</string>

        <key>HPDBookKBURL</key>

        <string>http://example.com/kb.html?q='query'</string>

        <key>HPDBookTopicListCSSPath</key>

        <string>../shared/graphique.css</string>

        <key>HPDBookTitle</key>

        <string>Graphique Help</string>

        <key>HPDBookType</key>

        <string>3</string>

    </dict>

</plist>

Figure 8–7. Info.plist in Xcode’splist editor
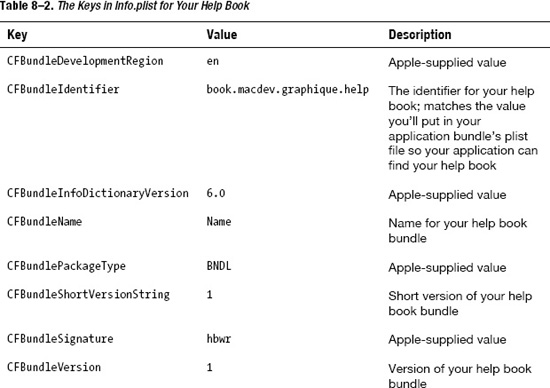
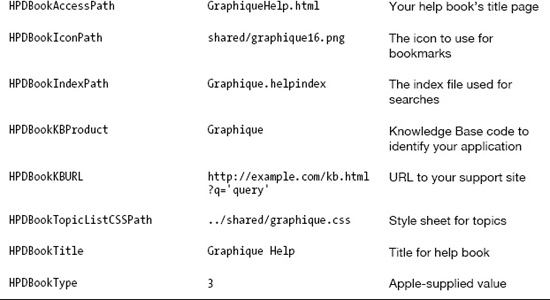
See Table 8–2 for an explanation of each of the keys in Info.plist.
Importing Your Help Book into Your Xcode Project
In Xcode, Ctrl+click the Graphique folder and select Add Files to “Graphique”… to see the Open dialog for adding files. Select the Graphique.help directory, deselect the check box for “Copy items into destination group’s folder (if needed),” select the radio button for “Create folder references for any added folders,” and select the Graphique target. Click Add. Your Graphique.help directory should now appear in your project, as shown in Figure 8–8.
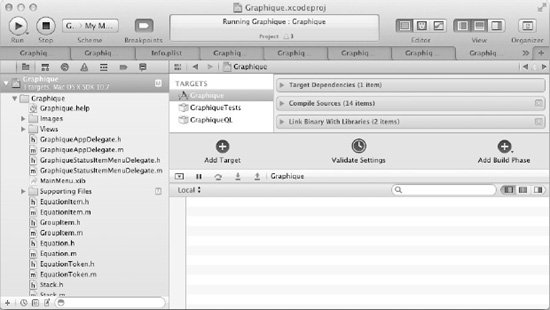
Figure 8–8. The help book files added to the Graphique project
Updating Your Application’s Plist File
Your application must know a little more about your help book so that the help viewer can find it. To tie your help book to your application, add two keys to your application’s plist file, Graphique-Info.plist. Listing 8–6 shows the code for the two keys, and Figure 8–9 shows the keys in the Xcode Property List editor.
Listing 8–6. Tying Your Help Book to Your Application
<key>CFBundleHelpBookFolder</key>

<string>Graphique.help</string>

<key>CFBundleHelpBookName</key>

<string>book.macdev.graphique.help</string>
Figure 8–9. The Help Book Files Added to the Graphiqueproject
Viewing the Help
Building and running Graphique registers your help book with the Mac OS X help viewer. You can now select Help ![]() Graphique Help to see your help book, as shown in Figure 8–10.
Graphique Help to see your help book, as shown in Figure 8–10.

Figure 8–10. The Graphique help book
Click the Entering Equations link to verify that your subtopic help displays, as shown in Figure 8–11.

Figure 8–11. The Entering Equations help
Bookmarking a Page
With the Entering Equations page displayed, click the bookmark icon in the upper right of the help viewer window. This turns the icon red and, if it’s your first bookmark, adds a book icon next to the bookmark. If you already had bookmarks, the book was already present. You can now click the bookmark icon to access all your bookmarks, as shown in Figure 8–12.
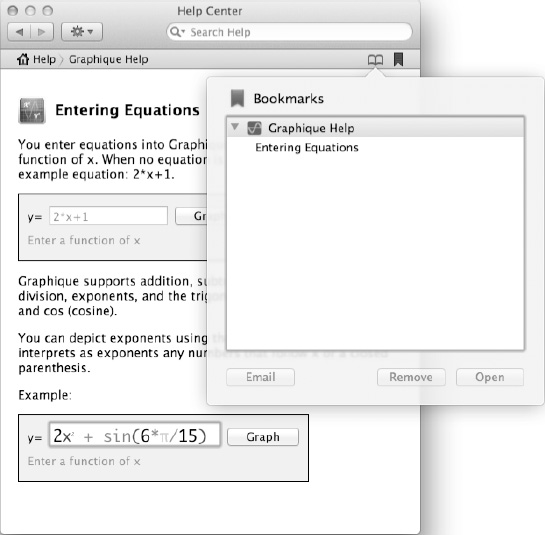
The icon displayed by the Graphique Help title is the 16×16 pixel icon you specified for the HPDBookIconPath key in Info.plist, graphique16.png. Selecting that bookmark will take you right to that help page, no matter where you are in the help viewer.
Performing a Search
The help viewer allows you to enter search terms in the search field, and it searches the current help book and all other help books on your system using their help index files. With the Graphique help showing, enter equation in the search field and press Enter. You should see both Graphique help pages listed, because they both contain the word equation. You also see the page descriptions listed below the page titles. Figure 8–13 shows the search results.

Figure 8–13. The search results for equation
Wait, the Graphique icon is missing! Actually, that’s expected. The icon used for the search results comes from the application bundle, not the help book bundle. Because you haven’t yet created an icon for Graphique, the help viewer has nothing to display. Revisit this screen in Chapter 10, after you’ve created the Graphique application icon.
Remember that you also included the misspelled eqaution as a keyword for the Entering Equations page. Try entering eqaution in the search field now, and you’ll see that the help viewer does indeed find your Entering Equations page, as Figure 8–14 shows.

Figure 8–14. The search results for the misspelled eqaution
Summary
Software engineers often claim that well-written and intuitive software does not need any documentation. Although this may be true in the eyes of a technically savvy individual, there are legions of users out there who don’t adhere to this pernicious philosophy and are silently internalizing their frustration while trying to figure out how to use an app. The App Store gives them an outlet to voice their accumulated frustration and take a shot at your rankings and profits. In a marketplace environment like the App Store, the ratings you get are paramount to your success. Anything you do to keep the users from getting frustrated with the app and leaving a bad review in the App Store will translate into higher rankings.