
Chapter 10
Submitting to the Mac App Store
With the hard work of development, debugging, and a little more debugging complete, you’re ready to apply the final polish to Graphique and submit it to the Mac App Store. This moment is both exhilarating and terrifying. It’s exhilarating to be done, to distribute your work, and to perhaps earn some money from your labors. It’s terrifying because your work now comes under the scrutiny of millions of Mac users. Will they like it? Will they pan it? How will the reviews turn out? Will they even notice your app amidst the thousands of other apps available on the Mac App Store?
In this chapter, we complete Graphique, applying an icon and sandboxing it, and then we walk you through the Mac App Store submission process. After that, the reviews are up to you and your customers.
Reviewing the Guidelines
Apple maintains a list of guidelines for Mac App Store apps at https://developer.apple.com/appstore/mac/resources/approval/guidelines.html. This list can change over time, so be sure to review that list regularly to stay within Apple’s guidelines. Apple can and will reject apps that don’t adhere faithfully to them.
The list isn’t onerously long but is still too long to include here. Despite some of the controversy these guidelines have sparked, nothing on the list should be too surprising. Useful apps that follow the practices in this book, don’t do anything out of the ordinary (such as install kernel extensions), don’t crash, and don’t fake flatulence should sail through the process. Just remember to review the list often.
Finishing the App
Although Graphique is nearly complete, the gap between “nearly” and “absolutely” can cost you sales, and even bar your entry to the Mac App Store. Users don’t want nearly done software; they want software that’s complete. Even though useful software rarely stops growing and changing as you add features, improve workflows, and fix bugs, each release of your software should feel finished.
Terminating Graphique When Its Window Closes
Because Graphique is a single window application, it should terminate if the user closes the window. To add this feature, add the code in Listing 10-1 to GraphiqueAppDelegate.m.
Listing 10-1. Telling Graphique to Terminate If Its Window Closes
- (BOOL)applicationShouldTerminateAfterLastWindowClosed:(NSApplication *)sender

{

  return YES;

}
This method will be called when Graphique’s last window, which is its only window, closes. By returning YES, we tell Graphique to terminate.
Adding the Icon
Your application’s icon parades across the Mac App Store, on web sites, in users’ Docks, and in the Mac OS X Finder. The application’s icon offers both a first and a repeated impression on both users and prospective users, and users believe the quality of the icon reflects the quality of the application. Your app’s icon should convey that professionalism and should also indicate the application’s function. Use care when creating or selecting the application’s icon, because a gross misstep could sabotage all your efforts.
If you’re facile enough with graphic design, feel free to create your icon yourself. If not, turn to one of your graphic artist friends, hire a graphic artist, or turn to one of the many crowdsourcing design sites on the Web. However you arrive at your final product, you should have images in the following sizes, measured in pixels:
- 512×512
- 256×256
- 128×128
- 32×32
- 18×18 (not in the
.icnsfile—used for the status item) - 16×16
Generally, the icons should depict the same image but at different resolutions and likely different levels of detail (especially for the smaller icons). The Graphique icon, for example, uses the same image at different sizes, except for the smallest icons; the 18x18 icon and the 16x16 icon ditch the grid, x, and y labels.
Apple publishes guidelines for your icons at http://developer.apple.com/library/mac/#documentation/UserExperience/Conceptual/AppleHIGuidelines/IconsImages/IconsImages.html that demonstrate Apple’s legendary attention to detail. This document provides invaluable information; we recommend you read it periodically to make sure your icons fit the Mac ethos.
Once you have your images assembled, you use the Icon Composer application to combine them into a single icon file with an .icns extension. Launch Icon Composer, found in /Developer/Application/Utilities. You should see a screen with some empty squares, ready to accept your image files, as shown in Figure 10-1.

Figure 10-1. Icon Composer with a blank window
Drag each of your images to the appropriate rectangles, one at a time, until all the rectangles are filled, as shown in Figure 10-2. Notice that the images for 512, 256, 128, and 32 are all resizings of the same image, while the image for 16 has the details reduced and is the image we used for bookmarks for the Graphique help book, built in Chapter 8.

Figure 10-2. Icon Composer with images added
Save this file as Graphique.icns somewhere on your local drive. Then, in Xcode, select your project in the Project navigator, select the Graphique target under Targets, and select the Summary tab. You should see an empty image well labeled App Icon, as shown in Figure 10-3. Drag and drop Graphique.icns from the Finder to the App Icon image well to copy the icon to the project and set it for the application, as shown in Figure 10-4.

Figure 10-3. Preparing to set the App Icon
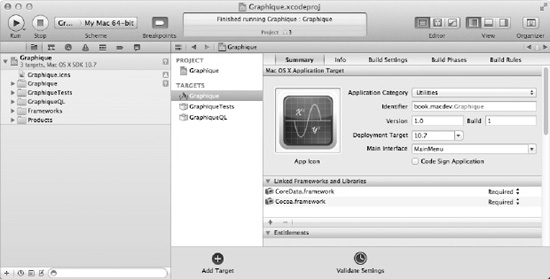
Figure 10-4. Graphique with the App Icon set
Reviewing the Property List File
With the project and target still selected, click the Info tab to display Graphique’s property list file. This file is mostly correct at this point, but the copyright string it contains is the one Xcode generated at the outset of the project, which may or may not be correct. Check the text of the copyright string, in the key “Copyright (human-readable),” and update as appropriate. Do the same for the GraphiqueQL target.
Cleaning Up the Menu
When we first generated the code for Graphique, Xcode generated a menu for us. As we’ve grown Graphique, we’ve made some changes to that menu. Some unused or incomplete vestiges remain, however, so in this section we square the menu from what it is to what it should be.
Finishing the About Box
If you run Graphique and select Graphique from the menu, you see its About Box, as shown in Figure 10-5. You can see the effects of the changes you’ve made in this chapter: it displays the icon and copyright you just configured.![]() About Graphique
About Graphique
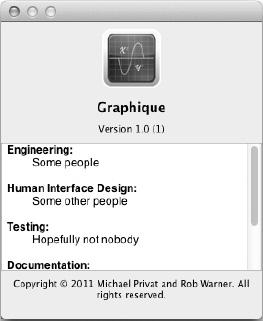
Figure 10-5. Graphique’sAbout box
Although the top and bottom parts of the About Box show correct information, the middle remains clearly unfinished. Graphique pulls that text from a file called Credits.rtf, found in the group Supporting Files. Open that file in Xcode and modify it appropriately. You can preserve the Xcode-generated headings and put appropriate information in those sections, or you can change the file entirely. See Figure 10-6 for an example.
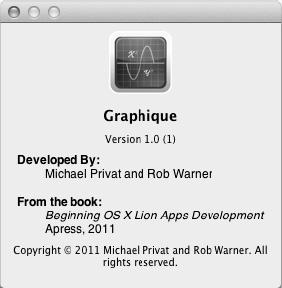
Figure 10-6. The updated About box
If the text you enter fits in the allotted space, its background will be gray, and no scroll bar will be present. Longer text, however, will have a white background with a scroll bar.
Centering the Preferences Panel
When users select Graphique from the menu, the preferences panel displays in the lower left of the screen, which is kind of odd. Let’s change it to display in the center of the screen. Open ![]() Preferences
PreferencesPreferencesController.xib in Xcode, select Panel – Preferences under Objects, and select the Size inspector. In the Initial Position section, select Center Horizontally and Center Vertically in the two drop-downs, as shown in Figure 10-7.

Figure 10-7. Centering the preferences panel
Build and run Graphique, and then select to display the preferences panel to confirm that it appears centered on the screen.
Removing Unused Menu Items
Not every menu item generated by Xcode has meaning for Graphique, and so several remain unimplemented. Rather than leave them in the menu, as if they did something, remove them. To remove them, select MainMenu.xib in Xcode, select the item menu to remove, and press the Delete key on your keyboard. The items to remove are as follows:
File New
New- File Open Recent
- File Close
- File Page Setup…
- Edit Undo
- Edit Redo
- The separator that was below
File Redo - Format Text
Cleaning up the menu to include only implemented items is always a good practice. If future versions of your application add features that require those menu items, you can always add them back.
Adding a Menu Item for Full-Screen
Graphique supports OS X Lion’s full-screen mode, offering users the standard full-screen button in the upper-right corner of its window. To conform with Apple’s interface guidelines, however, it should also offer a menu item and key equivalent for entering full-screen mode. This item should be called Enter Full Screen and have the keyboard equivalent Ctrl+![]() +F. The Enter Full Screen menu item should be under the View menu (note: applications that don’t have a View menu should put this item under the Window menu).
+F. The Enter Full Screen menu item should be under the View menu (note: applications that don’t have a View menu should put this item under the Window menu).
To create the Enter Full Screen menu item, expand the View menu in Interface Builder, and drag a Menu Item instance from the Object Library beneath it. In the Attributes inspector, type Enter Full Screen for Title and press the keys Ctrl+![]() +F for Key Equivalent. See Figure 10-8 for guidance.
+F for Key Equivalent. See Figure 10-8 for guidance.

Figure 10-8. Adding the Enter Full Screen menu item
The action that the Enter Full Screen menu item should trigger is toggleFullScreen:. To connect the menu item to the action, Ctrl+drag from the menu item to the First Responder item and select toggleFullScreen: from the menu. If you build and run Graphique, you can enter full-screen mode by selecting View or by pressing Ctrl+![]() Enter Full Screen
Enter Full Screen![]() +F. To exit full-screen mode, press Esc or Ctrl+
+F. To exit full-screen mode, press Esc or Ctrl+![]() +F.
+F.
Setting the Initial Window Size and Location
When users first launch Graphique, the initial size of the window is too narrow to adequately display the equation field, as shown in Figure 10-9. Sure, they can resize the window, but the equation entry field is the most important part of the window, at least until a graph displays, so we should make it more visible.
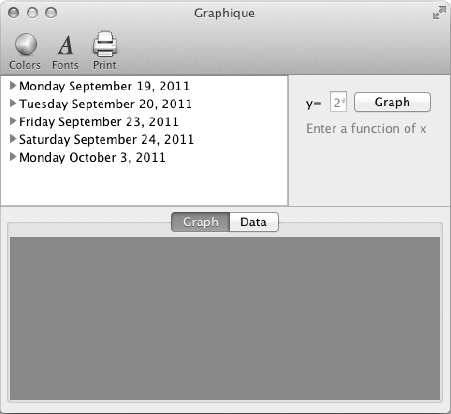
Figure 10-9. The initial Graphique window
To set the initial size and position of the Graphique window, open MainMenu.xib in Xcode, select Window – Graphique, and open the Size inspector. The Initial Position option, set to Proportional Horizontal and Proportional Vertical, is fine. Depending on where the window shows on the screen, though, you can drag it to a better location—perhaps toward the upper-left corner. In the Size section, though, change the width field from 480 to 800, as shown in Figure 10-10. Build and run Graphique to see your changes, as shown in Figure 10-11.
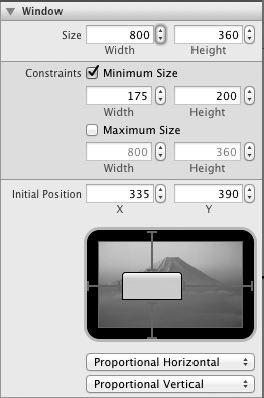
Figure 10-10. Setting the width to 800

Figure 10-11. The Graphique window set to 800 pixels wide
However you initially size and position the window, however, you should respect that your users might have their own ideas for sizing and positioning. To embrace their preferences, use OS X’s Autosave feature to remember how the user sizes and positions Graphique’s window so you can restore it on launch. To use this feature, select MainMenu.xib in Xcode, select the Window – Graphique item, and open the Attributes inspector. In the Autosave field, enter MainWindow. Graphique will now store the window’s size and position in its user defaults and will automatically restore the window to that size and position when Graphique launches.
Signing the Code
When you grab a pen and scrawl your signature on a check, your mortgage document, or an 8x10 glossy of yourself, you attest approval of the intent of the thing you signed. Signing code plays a similar role, allowing you to digitally attest that you authored the code. The operating system can detect if digitally signed code has been altered after its creation, whether by hackers, viruses, or file corruption. This provides users an additional layer of safety when using your application.
Signed code establishes that it hasn’t been altered, that it comes from a specific source, and that it can be trusted for a specific purpose, such as accessing keychain data from a previous version of the same application. Submissions to the Mac App Store must all be digitally signed.
Using the Developer Certificate Utility
To begin the code-signing process, go to http://developer.apple.com and sign in to your account. If you have not yet joined the Mac Developer Program, you can do so at http://developer.apple.com/programs/mac/. As of this writing, it costs $99 per year and is required to distribute your apps through the Mac App Store.
Once logged in, go to the Developer Certificate Utility page at http://developer.apple.com/certificates/index.action, as shown in Figure 10-12. From this page, you create App IDs for the apps you develop, create and download certificates for establishing your identity, register systems for ad hoc distributions of your apps, and create provisioning profiles to marry App IDs, certificates, and optionally systems together to distribute your applications.
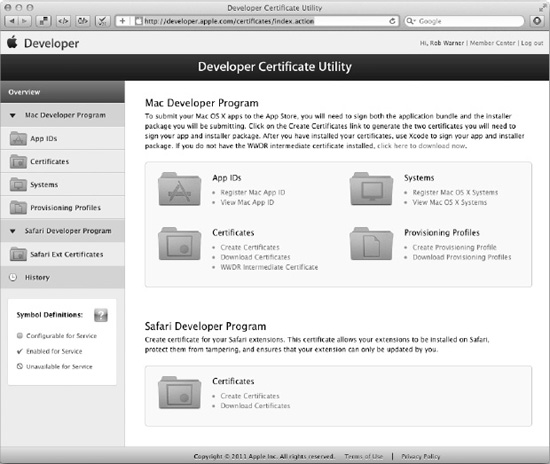
Figure 10-12. The Developer Certificate Utility screen
Registering Your App IDs
Each app you create carries a globally unique App ID that matches the bundle identifier specified in your app’s property list file. Remember that this is usually your domain name, in reverse order, followed by the name of your app in lowercase.
Click the Register Mac App ID link to see the form for registering your App ID. The first field, Name or Description, is for your benefit, to identify this App ID in a friendly way so you remember which app you’ve tied the App ID to. For Graphique, we’ve entered Graphique for the Name or Description field, and book.macdev.Graphique in the Bundle Identifier field, as shown in Figure 10-13. If you’re following along, note that you can’t register that same App ID because we already did.

Figure 10-13. Registering Graphique’s App ID
When you click Continue, you see a confirmation screen that allows you to review the App ID you’re registering. Review it carefully, because you can’t edit a registered App ID; you can only view it and delete it. If satisfied, click Submit. Apple will register your App ID, which you can review at any time by clicking the App IDs link on the left of the Developer Certificate Utility screen, as shown in Figure 10-14.

Figure 10-14. The registered Graphique App ID
Since Graphique doesn’t support iCloud services, you must verify that the App ID isn’t configured for iCloud. To do that, click the Configure button, and if the box titled Enable for iCloud is checked, uncheck it and click Done.
Installing Apple’s Certificate
Apple provides a certificate it calls the World Wide Developer Relations (WWDR) certificate that ties the certificate you will create back to Apple. Apple is the root certificate authority that vouches for your certificate. To install this certificate, return to the main Developer Certificate Utility screen by clicking the Overview link on the left. Underneath the Certificates section you see a link that says WWDR Intermediate Certificate. Click the link to download the certificate in a file called AppleWWDRCA.cer, and then double-click it in Finder to install it. Open the Keychain Access app on your computer, found in the Utilities folder under the Applications folder, and look in the login certificates to find the certificate called Apple Worldwide Developer Relations Certification Authority you just installed.
Creating Certificates
You can click the Overview link on the left to return to the main Developer Certificate Utility screen shown in Figure 10-11 to reveal the Create Certificates link, or you can click the Certificates link in the left menu to reveal the Create Certificate button. However you get there, click to create a certificate. You’ll see the screen shown in Figure 10-15.

Figure 10-15. Creating certificates
You can either create a development certificate, useful for distributing code-signed apps to a limited audience for testing, or create distribution certificates. Each Mac App Store app requires two certificates: one for the application and one for its installer. Since we’re creating certificates to submit to the Mac App Store, select the radio button next to Distribution, make sure both check boxes are checked, and click Create.
The next screen, shown in Figure 10-16, instructs you open the Keychain Access app on your computer to generate a certificate-signing request. Follow the steps it gives you:
- Within the Keychain Access drop-down menu, select
Keychain Access. Certificate Assistant Request a Certificate from a Certificate Authority - In the Certificate Information window, enter the following information:
- Click Continue within Keychain Access to complete the CSR-generating process.

Figure 10-16. Generating a certificate-signing request
When you select the menu item Keychain Access from the Keychain Access app, you see the screen shown in Figure 10-17.![]() Certificate Assistant
Certificate Assistant ![]() Request a Certificate from a Certificate Authority
Request a Certificate from a Certificate Authority

Figure 10-17. Entering certificate information for requesting a certificate
Enter your information, making sure to select the “Saved to disk” option, and click Continue. It will prompt you to save the file, a shown in Figure 10-18. Click Save to save it to your desktop, and you’ll see the dialog shown in Figure 10-19 affirming that your request was saved. Click Done to dismiss it.

Figure 10-18. Saving your certificate-signing request

Figure 10-19. Confirmation that your request was saved
Return to the Developer Certificate Utility in your web browser, and click Continue. You’ll see the screen shown in Figure 10-20 requesting you to upload the certificate-signing request file you just created. Click the Choose File button, select the file you created, and then click the Generate button to upload your request and generate the certificate. After a few moments, you’ll see the screen shown in Figure 10-21 telling you that your certificate was generated.
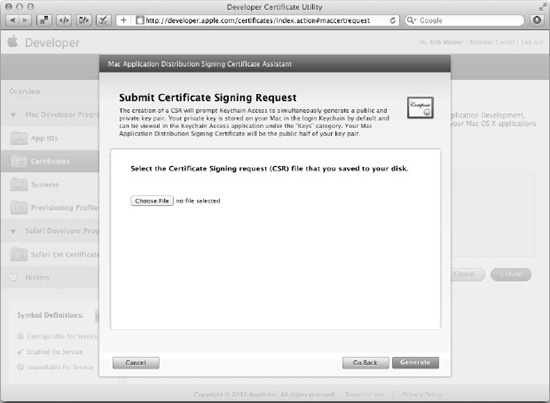
Figure 10-20. Uploading the certificate signing request file
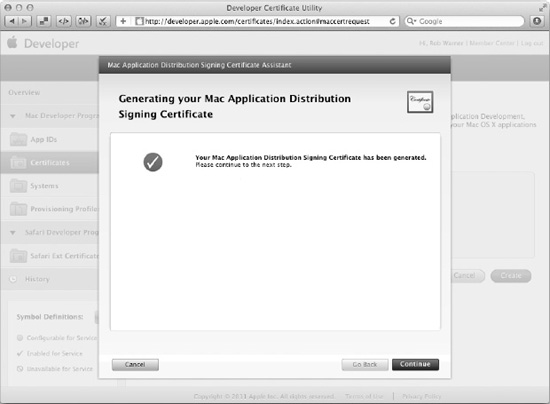
Figure 10-21. Seeing that your certificate was generated
Click Continue to see the screen shown in Figure 10-22, which allows you to click the Download button to download your certificate. Download your certificate and then double-click the certificate file in Finder to install the certificate. Then, click Continue.
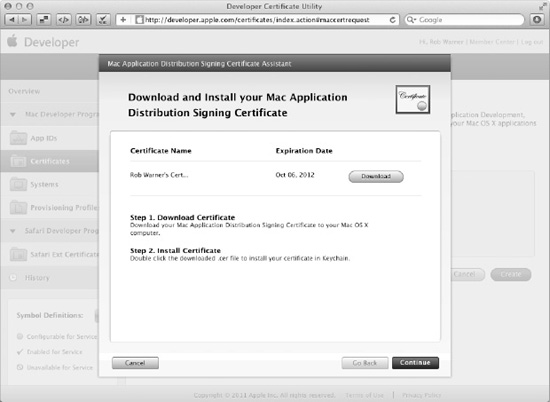
Figure 10-22. The certificate download screen
The Developer Certificate Utility takes you through the same steps again, only this time for your Mac Installer Package certificate. Go through the same steps again to generate the certificate signing request, upload it, download the certificate, and install the certificate. When you’ve completed these steps, verify that both certificates were installed by opening the Keychain Access app, selecting login under Keychains and My Certificates under Category. You should see your newly installed certificates, as shown in Figure 10-23.

Figure 10-23. The certificates installed
Creating the Provisioning Profile
A provisioning profile ties an App ID and certificates together. You can also tie the profile to specific systems by first creating the systems using the Systems section in the Developer Certificate Utility. This is useful for creating profiles to distribute your applications on an ad hoc basis to certain users, usually for testing purposes. Since we’re uploading Graphique to the Mac App Store, though, and want it available to all systems, we don’t include specific systems in the provisioning profile.
Click the Provisioning Profiles link on the left to see any existing profiles you have, as shown in Figure 10-24. Click the Create Profile link on that screen to begin creating your profile.
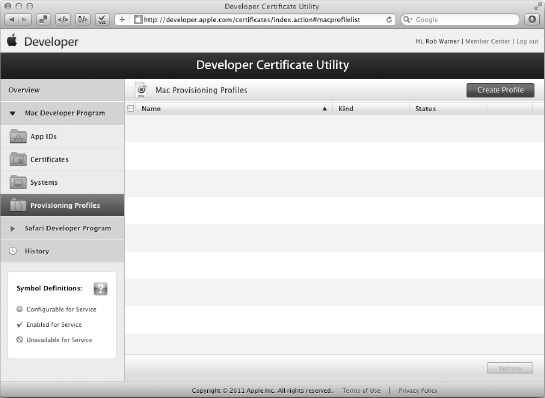
Figure 10-24. The Provisioning Profiles screen
The next screen, shown in Figure 10-25, asks for some information for the provisioning profile. For Kind, select Production Provisioning Profile. This adds a section to the screen for which certificate to use, as shown in Figure 10-26. Since we have only one production certificate, that one is listed. If we had selected Development Provisioning Profile, our development certificates would have been listed.
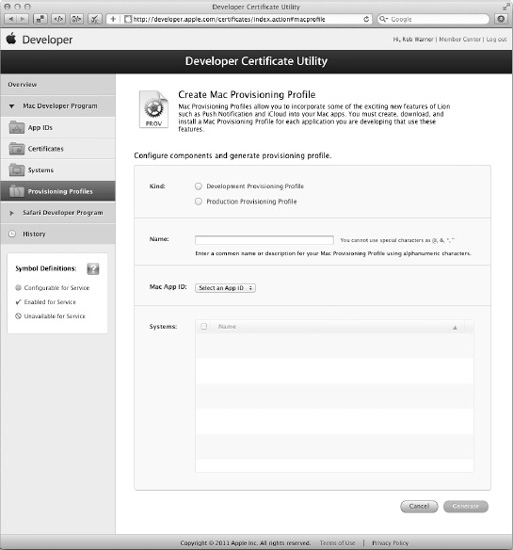
Figure 10-25. Creating a provisioning profile
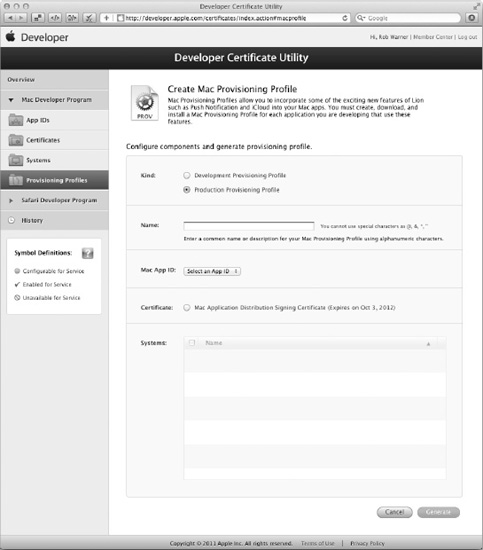
Figure 10-26. Creating a production provisioning profile
Continue to fill out the screen. For Name, enter a friendly name for the profile. For Graphique, we entered Graphique Production Distribution. Select the App ID for your app, select the proper certificate, and click Generate. Your provisioning profile is generated, and then you’re prompted to download and install the provisioning profile. Click the Download button. The provisioning profile downloads, and then the Profiles preference pane automatically launches and asks you if you want to install the provisioning profile, as shown in Figure 10-27. Click Cancel, because you can’t install this profile on your system: this profile doesn’t have any system IDs in it. It’s the profile for the production distribution, remember? You must install it in Xcode, however, so that you can use it to sign your build. You can do this by dragging the file onto the Xcode Organizer window, onto the Provisioning Profiles section, or clicking the Import button on the Xcode Organizer window and following the instructions to import the provisioning profile. You can also drag the provisioning profile file from the Finder and dropping it on the Xcode icon in the Dock.

Figure 10-27. Being prompted to install the provisioning profile
Configuring the Build to Sign the Code
Finally, you must configure the build to sign the code using the provisioning profile you just created. Go to Xcode and select your project in the Project navigator and the Graphique target under Targets. Select the Summary tab, and in the Mac OS X Application Target section, you should see a check box that says Code Sign Application. Check it, as shown in Figure 10-28. This will automatically select the provisioning profile and configure your builds to use it.

Figure 10-28. Configuring the build to code sign the application
For most of your applications, checking this box is all that’s required for configuring code signing. Because of the GraphiqueQuickLook plug-in that Graphique contains, however, you must do a little extra work to get the proper code-signing configuration. With the Graphique target still selected, click the Build Settings tab and find the Code Signing section. For the Other Code Signing Flags, enter the following:
-ibook.macdev.Graphique
This tells Xcode to ignore specific App IDs and use Graphique’s App ID when code signing all bundles within the Graphique target, which includes the GraphiqueQuickLook plug-in.
You must also configure the QuickLook plug-in to sign the code as part of its build. Xcode doesn’t provide a nice Code Sign Application check box for a QuickLook plug-in, so instead you must configure the code signing in the build settings. Select the GraphiqueQL target and the Build Settings tab. Find the section called Code Signing and, for the Code Signing Identity field, select 3rd Party Mac Application under Automatic Profile Selector (Recommended). The Code Signing section should match Figure 10-29.
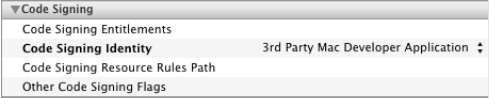
Figure 10-29. Signing the GraphiqueQuickLook plug-in code
You must do one more thing for the GraphiqueQuickLook plug-in. With the GraphiqueQL target still selected, find the section called Deployment and the entry that says Skip Install and set it to Yes.
NOTE: Don’t forget to set Skip Install to Yes for the GraphiqueQuickLook plug-in.
Sandboxing the App
Apple has introduced sandboxing to OS X application development as an additional security measure to curb applications from malicious behavior and is requiring that all submissions to the Mac App Store, as of March 1, 2012, implement sandboxing. This section explains sandboxing and its companion concept, entitlements, and sets up Graphique’s sandbox and entitlements.
What Is Sandboxing?
By default, OS X applications run with all the rights and privileges of the user account under which they run. This means that anything you can do on your Mac without entering your system password, any running app can do: silently, clandestinely, without any notice or plea for permission. Can you delete songs in your iTunes library? So can an app. Can you send an e-mail to your boss? So can an app. Can you, in a moment of delirium, zip up your documents containing private information like bank account numbers and medical history and post them on a web site for identity thieves to peruse? So can an app, and it doesn’t even require the delirium.
We rely on the honor of developers not to do any of these things, and the vast majority don’t—at least not intentionally. Whether wrongdoing happens by intent or coding error, however, the effects of bad application behavior can range from annoying to devastating. Sandboxing reins in bad behavior by limiting what an application can do. It provides the app a metaphorical sandbox, isolated from the rest of the operating system, and prevents it from the following activities:
- Reading and writing files
- Accessing the network, whether incoming or outgoing
- Accessing connected hardware devices:
- Camera
- USB drives
- Printers
- Microphones
- Reading or writing user data from the address book, calendars, or location information
Many applications can perform in such an environment, although the list of restrictions is onerous and is designed for security, not utility. Many more applications, however, can’t abide all the restrictions that a sandbox imposes. Imagine, for example, a word processor that can’t save, open, or print documents, or a web browser that can’t open web sites.
To escape the restrictions of sandboxes in a controlled way, Apple provides what it calls entitlements.
What Are Entitlements?
Entitlements grant specific permissions to applications that sandboxing prevents. As a developer, you build in the entitlements your applications receive. Sandboxing takes all privileges away, and entitlements give specific privileges back. Using entitlements, you can restore an application’s ability to read and/or write files (even to specific folders, like the Download or Music folder), access the network (incoming, outgoing, or both), print, see the world through the camera, and a handful of other privileges. See Apple’s documentation on Entitlement Keys at http://developer.apple.com/library/mac/#documentation/Miscellaneous/Reference/EntitlementKeyReference/EnablingAppSandbox/EnablingAppSandbox.html for more specific information on what privileges you can grant your application.
By sandboxing an application from the rest of the computing environment and then entitling it to access specific computing resources, you establish a trust between developer and user that establishes what the application can and cannot do.
As we set up Graphique’s sandbox, we must grant it privileges to do the following:
- Read and write files
- Print documents
Graphique should have no other entitlements.
Establishing the Sandbox
To establish a sandbox, you create what’s called an entitlements file that contains information about what your application is entitled to do. The entitlements file is a property list file for which Xcode provides a point-and-click interface. Select the project in the Project navigator, the Graphique target under Targets, and the Summary tab. Expand the Entitlements section, which looks like Figure 10-30.
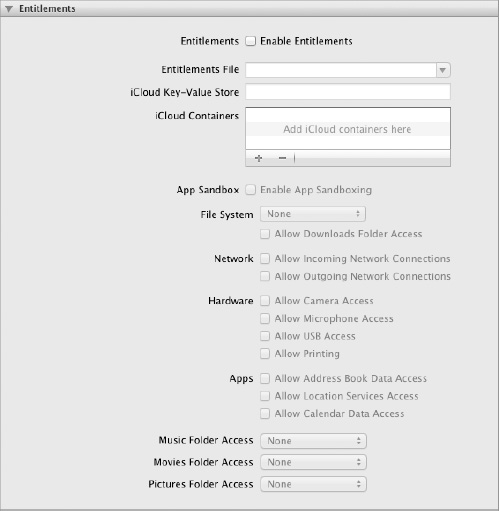
Figure 10-30. The Entitlements settings before configuration
Check the Enable Entitlements check box, and Xcode fills out a few values for you. Leave the Entitlements File set to Graphique, but erase the iCloud Key-Value Store entry. Select book.macdev.Graphique in the iCloud Containers section and click the minus button to delete it. Change the File System setting to Read/Write Access and check the Allow Printing check box. Your settings should match Figure 10-31.

Figure 10-31. The configured entitlements for Graphique
You’ll notice that Xcode added a file called Graphique.entitlements to the project that contains this configuration information as a property list.
Building for Release
With everything configured, you’re ready to build the app for release. Select Product from the Xcode menu to build and archive the release. Your computer will churn a bit and then display Xcode’s Organizer window with the Archives tab selected, as shown in Figure 10-32.![]() Archive
Archive
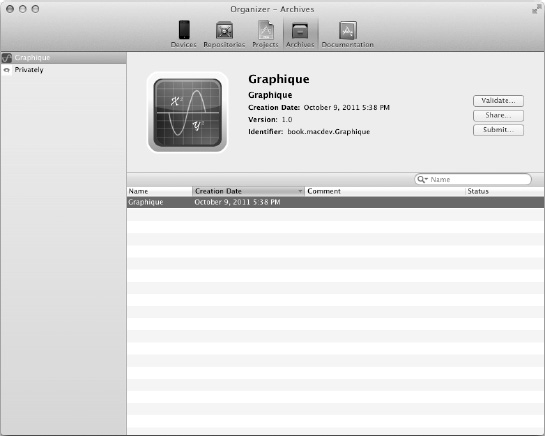
Figure 10-32. Archive for Graphique
We’ll come back to this archive later when we’re ready to submit Graphique to the Mac App Store.
Setting Up Your Web Site
Each app in the Mac App Store provides a link to the app’s web site so that users can learn more about the app and the company or developers behind it and get support for the app. The web site can be as simple or as complex as you want, using whatever technologies you want. This is your web site running on your servers; Apple just links to it from the Mac App Store.
Apple does provides some artwork for you to use on your web site and guidelines for the usage of that artwork, though. The artwork is available at http://developer.apple.com/appstore/mac/resources/marketing/, and the guidelines are found at http://developer.apple.com/appstore/mac/MacAppStoreMarketingGuidelines.pdf. You should read and understand those guidelines before setting up your web site. Read those guidelines carefully to make sure you understand and follow them.
Using the Artwork
Apple provides an “Available on the Mac App Store” logo, in Photoshop format, for you to use on your web site. The image helps you follow the spacing guidelines set forward by Apple by providing the appropriate margin around the logo. Open the image, resize it to fit your web site (minimum: 40 pixels high for the visible logo, not including the margin), hide the Background and Notes layers, and export it as a PNG (or whatever format you want to use).
Apple also provides images of computers so you can display screenshots of your application as if it were running on a computer. The images come in two versions: one for showing screenshots as windows and one for showing screenshots in full-screen mode. You can use the full-screen ones only for apps that are designed to run in full-screen mode.
Whichever set of images you use, follow the instructions in the “Placing Your Application Screen on the Apple Product Image” section in the guidelines document referenced earlier.
Creating the Web Site
Your app’s web site is an opportunity to sell your app, so focus on what your app does and why users should go download it from the Mac App Store. This isn’t a marketing book, so that’s all we’ll say about that.
You should link the “Available on the Mac App Store” logo to your app in the Mac App Store. To get the URL, after your app is configured in iTunes Connect (which you’ll do later in this chapter), you can get a link to your app on its summary screen—it’s the link behind View in App Store, under Links, as shown in Figure 10-33.
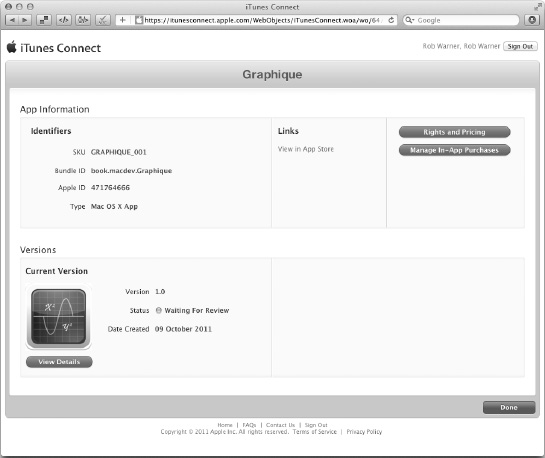
Figure 10-33. Getting the link for the Mac App Store
Figure 10-34 shows Graphique’s web site, available at http://grailbox.com/graphique.
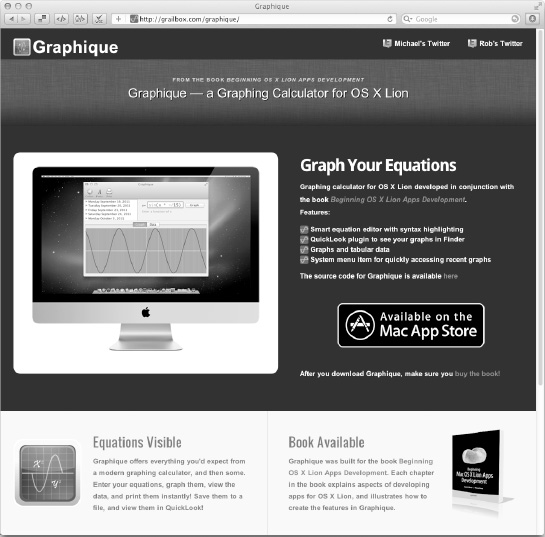
Figure 10-34. Graphique’s web site
Submitting the App
You still have a fair amount of work to do to submit your app, so plan your schedule for more than just a few minutes to get this done. The next sections walk you through the app submission process.
Setting Up Your iTunes Connect Account
Your iTunes Connect account allows you to manage the apps you have in the Mac App Store. In it, you specify information about your apps, such as the Mac App Store category to display them in, and you specify details that allow you to get paid, such as your bank account information. You can then use your iTunes Connect account to get download and sales information, among other things, for your apps.
To set up your iTunes Connect Account, point your web browser to http://itunesconnect.apple.com/, and enter your Apple ID and password when prompted. Follow the instructions to set up a contract for Mac OS X Paid Applications, including contact information and associated bank account information.
Uploading Your Application
After all the work of developing and testing your application, you’re finally ready to upload it. Click the Manage Your Applications link to see a list of all your existing apps in both the Mac App Store and the iOS App Store. To upload a new app, click the Add New App button and select Mac OS X App to begin creating your new app.
Setting the App Name
If this is your first app in an Apple App Store, you’ll next be asked for your primary language and the developer name to display for all your apps on Apple’s App Stores. Since you can’t change these values once set, choose these items with care.
On the next screen, enter an app name and an SKU number, and select the Bundle ID of your app (which you should have already configured using the Developer Certificate Utility). For App Name, enter the name of your app (Graphique, in our case). For SKU Number, enter some string that will be unique to your app. Large companies have more need for this field than small ones, and this can be whatever you want. We enter GRAPHIQUE_001, imagining that if we ever release a Pro version of Graphique we can use SKU GRAPHIQUE_002 for that. For Bundle ID, select your previously configured Bundle ID. You can also click the link to register a new Bundle ID, which will throw you back to the Developer Certificate Utility.
Selecting Availability and Pricing
The next screen has you select your availability and pricing for your app. The availability defaults to the current date, which you should leave unless you have some reason to launch your app on a specific date. For pricing, click the link to view the pricing matrix to understand the pricing tiers. The tier you select establishes the price for the app in the many countries iTunes does business in. For Graphique, we select Tier 1, which means it costs 99 cents in the United States and 85 yen in Japan, for example. Click Continue to proceed to the next screen.
Entering Additional Information
The next screen requests loads of information, so you’ll be happier if you’ve prepared some of this before you get here. Some of this information should match information in your app’s property list. Fill out the fields appropriate to your app. Read the discussion of each of the sections to understand what the fields mean and how we filled them out for Graphique.
Metadata
The Metadata section contains information about your app, some of which should match your app’s property list. The fields and their explanations are as follows:
- Version Number: This should match the Version field from your app’s property list. For Graphique, we entered 1.0.
- Description: This is your opportunity to sell your app, explaining to prospective customers what your app does and why they should download it. You have 4,000 bytes, so make them count. Feel free to review the descriptions for other apps on the Mac App Store to give you ideas for what to write. For Graphique, we entered this:
Graphique is a graphing calculator for OS X Lion that was developed in conjunction with the book Beginning OS X Lion Apps Development (Apress 2011). It features a smart, syntax-highlighting editor, results in both graph and table format, a QuickLook plugin, and printing capabilities. Complete source code is available at the Apress site.
Buy the app so you can visualize your equations. Buy the book so you can understand how to build OS X Lion applications!
- Primary Category: This should match your app’s property list. Category refers to the Mac App Store category to list your app under. For Graphique, we selected Utilities.
- Secondary Category: This is an optional field that you can use to specify an additional category. For Graphique, we selected Graphs & Design because of Graphique’s ability to display graphs.
- Keywords: When users search for apps on the Mac App Store, you want your app to pop up if they’re looking for something that your app can do. Be accurate with your keywords so your app appears for all the searches it should, but for none of the searches it shouldn’t. For Graphique, we entered graph, graphing, equation, calculator, sine, cosine, trig.
- Copyright: This should match your app’s property list. For Graphique, we entered Copyright © 2011 Michael Privat and Rob Warner. All rights reserved.
- Contact Email Address: When users have problems with or questions about your app, they e-mail you at this address. For Graphique we entered
[email protected]. - Support URL: The Mac App Store links to this site so users can quickly get help and support for your app. This URL could point to your main web site, or it could point to a specific help forum or documentation site for your app. For Graphique, we entered
http://grailbox.com/graphique. - App URL: This is an optional URL that points to your app’s web site. For Graphique, we entered
http://grailbox.com/graphique. - Privacy Policy URL: This is an optional URL that points to your privacy policy. For Graphique, we left it blank.
- Review Notes: This is an optional field that allows you to communicate information about your app to Apple’s app reviewers. The site suggests that, for sandboxed apps, you explain why your app needs the entitlements it’s requesting. For Graphique, we entered the following:
Graphique is sandboxed and requests entitlements for reading and saving files and for printing. In the app, you enter equations and see them graphed. You can save the equations to files and later read them back in to Graphique. You can also print your graphs. Graphique also includes a QuickLook plugin so you can see your graphs in Finder.
Rating
Apple will reject apps that it deems objectionable or offensive. The Ratings section gives you an opportunity to disclose how much of any potentially objectionable material appears in your apps, on a scale of None – Infrequent/Mild – Frequent/Intense. Be honest in your assessment. Apple uses this information to help potential customers know the appropriate audience for your apps. For Graphique, we selected None for all categories.
EULA
The EULA section lets you specify your own End User License Agreement (EULA) you want to attach to your app. You can also use the standard EULA for your app by not changing anything in this section. For Graphique, we left this section alone.
Uploads
You must specify at least one screenshot for your app for the Mac App Store entry to display. You can specify multiple screenshots as well. The first screenshot you specify is the one users will see first, although you can change the order of the screenshots after you upload them. Each screenshot should be 1280x800 pixels. For Graphique, we uploaded four screenshots.
When you click Save, you’re taken to a screen that identifies your app, as shown in Figure 10-35.

Figure 10-35. The Graphique app in iTunes Connect
Click the View Details button to view the information you entered, and click the Ready to Upload Binary button. You are asked whether your app uses cryptography so that Apple can make sure it complies with any export regulations. Answer the question appropriately and click Save.
The next screen talks about having the right Application Loader app, which you have with Xcode 4. Click Continue, and you’re returned to your app’s information screen, only now the status has changed to Waiting For Upload.
Performing the Upload
Go back to Xcode’s Organizer window and select the archive you produced earlier. Click the Validate button, which will ask you for your iTunes Connect login credentials. Enter them and click Next. Xcode connects to iTunes Connect and matches the archive to the app you created in iTunes Connect. Assuming it finds a match, it shows a screen that allows you to confirm that it found the right one, as shown in Figure 10-36.
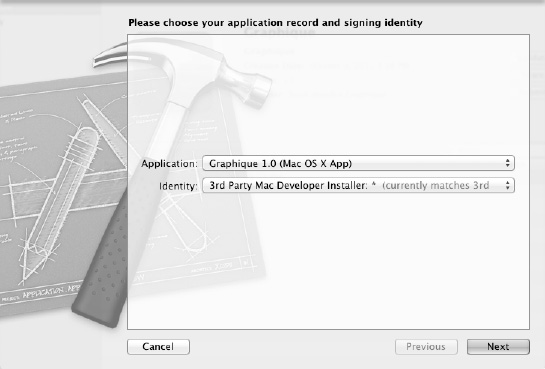
Figure 10-36. Confirming the application and signing identity
Click Next, and Xcode will validate the archive. You may get an error saying “Unable to extract package metadata.” If you do, you’re not alone. Make no changes and simply try again. You should eventually see a screen like Figure 10-37 that says your app is valid.

Figure 10-37. Successful validation
Click Finish to return to the Organizer window and, with the same archive still selected, click Submit. You’ll be asked for your application record and signing identity, as shown in Figure 10-38. When you click Next, your app is uploaded to Apple. On successful completion, you see a screen like Figure 10-39. Congratulations! Your app is waiting for review.
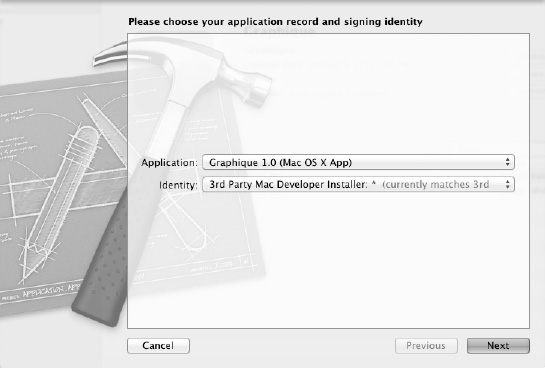
Figure 10-38. Selecting your application record and signing identity

Figure 10-39. Graphique successfully uploaded
Here we leave you, waiting on the Mac App Store reviewers to approve your app.
Summary
Submitting an app to the Mac App Store can be a daunting experience as you deal with certificates, App IDs, provisioning profiles, SKUs, and the other information you must provide to land an app in the Mac App Store. Once complete, however, you feel a sense of accomplishment as one of your creations enters the marketplace.
For an app to thrive in the Mac App Store, however, you must continue to nurture it from both a technical and a marketing perspective. Technically, you add features, fix bugs, respond to customer issues, and upload new versions. On the marketing side, you’ve got to do more than simply expect that since you’ve built it, people will come. Marketing is a never-ending task that requires diligence, time, and insight. But that’s a subject for a different book.