
![]()
Particle Systems
After completing this chapter, you will be able to:
- Understand how to create simple explosion or fire-like effects with particle systems
- Differentiate between alpha and additive blending effects when working with particles
- Understand when and how to implement a particle emitter
This chapter shows you how to implement your own basic particle system so you can create various particle effects. In games, particle systems are used for various purposes, such as displaying fire, showing a spell or explosion effect, or creating a trail for a game object. In the example projects in this chapter, the particle system will be triggered by collisions; however, that does not need to be the only case. For example, in an underwater game, you might implement a particle system that attaches to a hero character and emits bubbles over time. The implementation in this chapter is intended to function as a basic example; however, the particle system you’ll implement is flexible enough that you should be able to customize it for your own games.
Particle systems
In this section, you will create a particle system that includes the basic functionality you need to achieve common effects, such as explosions and spell effects. Additionally, you can initialize your effect at a specific location or add it to a game object and trigger it when needed. Your implementation will also include the ability to use blending effects that display more smoothly.
The Particle System project
The gameplay functionality of this project is identical to that from the previous chapter. Here, however, you’ll add particle effects that appear at points of collision. You can see an example of this project running in Figure 8-1.
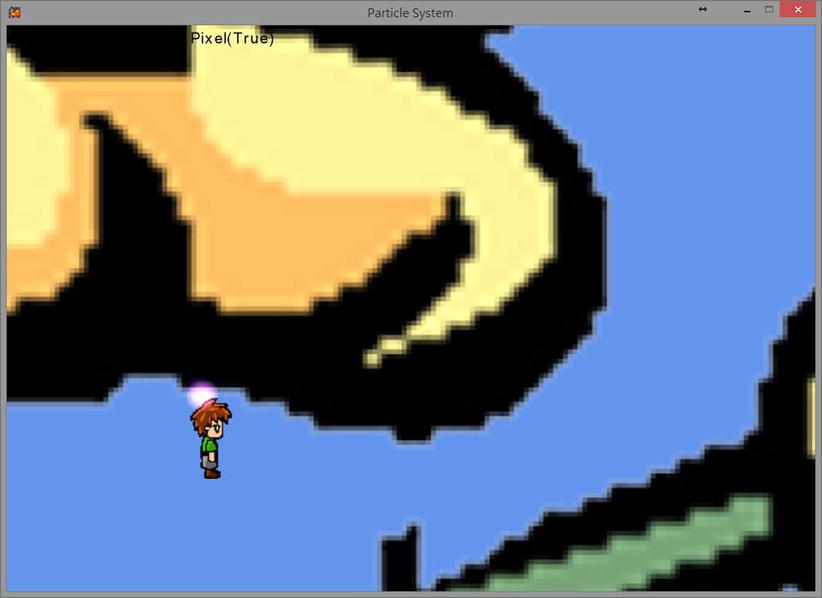
Figure 8-1. The Particle System project, with a particle effect showing at the point of collision
The project’s controls are as follows:
- Right thumbstick (arrow-keys) Moves the camera window
- Left thumbstick (WSAD-keys) Moves the hero
- Button A (K-key) Zooms out
- Button B (L-key) Zooms in
- Buttons X and Y (J and I keys) Rotate the hero
The goals of this project are as follows:
- To create a primitive object that represents a single particle
- To implement randomness
- To understand alpha and additive blending
- To understand and create a particle system
- To initialize and maintain the particle collection
- To create and draw particles when desired
The steps for creating the project are as follows:
- Learn about the components of the particle system.
- Modify the TexturedPrimitive class to support tint color.
- Create the ParticlePrimitive class to support a single particle.
- Create the ParticleSystem class to support a collection of ParticlePrimitive objects.
- Modify the GameState class to include the new particle system.
Add the following resource, which can be found in the Chapter08SourceCodeResources folder, into your content project before you begin:
- ParticleImage.png
Understanding particle systems
In its simplest form, a particle system is a collection of primitives. The primitives within a particle system are known as particles. All the particles in a particle system have a common set of properties, such as life span, size, rate of change in size, and speed. By manipulating these properties in different ways, you can achieve various effects. In general, each particle executes a behavior based on its properties until its life span is over.
Another important aspect for a particle system is randomness. To create an effect such as an explosion, game developers often use random values to initialize a particle’s properties. Without a random factor, patterns often become apparent as the particle system executes. Overall, you can think of a particle system as a group or collection of particles. By randomizing each particle’s properties, you can achieve engaging effects for a variety of purposes.
With the basic understanding of the components of a particle system, you are ready to begin adding support for the upcoming particle classes. The first modification you need to make is adding color-tinting support within the TexturedPrimitive class. Adding this allows you to tint your images.
Modifying the TexturedPrimitive class
- In TexturedPrimitive.cs, add the mTintColor variable and initialize it within the InitPrimitive() function:
protected Color mTintColor;

protected void InitPrimitive(String imageName, Vector2 position, Vector2 size, String label = null)
{
    ...

    mTintColor = Color.White;

    ...
} - In the Draw() function, locate the SpriteBatch.Draw call and modify it to include the tint color:
Game1.sSpriteBatch.Draw(mImage,
                destRect,           // Area to be drawn in pixel space
                null,               //
                mTintColor,         //
                mRotateAngle,       // Angle to rotate (clockwise)
                org,                // Image reference position
                SpriteEffects.None, 0f);
Creating the ParticlePrimitive class
- Create a new folder named ParticleSupport. Then create a new class called ParticlePrimitive that inherits from the GameObject class, and save it in the new ParticleSupport folder you just created. Add the instance variables shown following to the ParticlePrimitive class to support life span, size change, and randomness:
public class ParticlePrimitive : GameObject
{
    private float kLifeSpanRandomness = 0.4f;
    private float kSizeChangeRandomness = 0.5f;
    private float kSizeRandomness = 0.3f;
    private float kSpeedRandomness = 0.1f;

    // Number of updates before a particle disappear
    private int mLifeSpan;
    // How fast does the particle changes size
    private float mSizeChangeRate;

    ...
} - Next, create a constructor that accepts a position, size, and life span for the particle. For this example, pass the ParticleImage.png image name in the base constructor call. Lastly, set the particle properties to the default values shown in the following code:
public ParticlePrimitive(Vector2 position, float size, int lifeSpan) :
    base("ParticleImage", position, new Vector2(size, size))
{
    mLifeSpan =(int)(lifeSpan * Game1.RandomNumber(-kLifeSpanRandomness,
                                    kLifeSpanRandomness));

    mVelocityDir.X = Game1.RandomNumber(-0.5f, 0.5f);
    mVelocityDir.Y = Game1.RandomNumber(-0.5f, 0.5f);
    mVelocityDir.Normalize();
    mSpeed = Game1.RandomNumber(kSpeedRandomness);

    mSizeChangeRate = Game1.RandomNumber(kSizeChangeRandomness);

    mSize.X *= Game1.RandomNumber(1f-kSizeRandomness, 1+kSizeRandomness);
    mSize.Y = mSize.X;
} - You need to override the existing update function within the base class. In the update function, first call the base class’s update, and then decrement the life span, adjust the particle’s size, and modify its tint color:
public override void Update()
{
    base.Update();
    mLifeSpan--;   // Continue to approach expiration

    // Change its size
    mSize.X += mSizeChangeRate;
    mSize.Y += mSizeChangeRate;

    // Change the tintcolor randomly
    Byte[] b = new Byte[3];
    Game1.sRan.NextBytes(b);
    mTintColor.R += b[0];
    mTintColor.G += b[1];
    mTintColor.B += b[2];
} - Finally, create an accessor called Expired to return the particle’s current life status. Returning false indicates that the particle life span is over.
public bool Expired { get { return (mLifeSpan < 0); } }
Now that you have created the class for a particle, you can create the particle system itself.
Creating the ParticleSystem class
- Create a new class called ParticleSystem within the ParticleSupport folder. Add a collection of particles to the particle system using a list data structure. Don’t forget to initialize the list of particles within the constructor.
public class ParticleSystem
{
    // Collection of particles
    private List<ParticlePrimitive> mAllParticles;

    public ParticleSystem()
    {
        mAllParticles = new List<ParticlePrimitive>();
    }

    ...
} - Now add a function that creates a particle at a specific position. You can do this easily by passing in the desired position of the particle, creating a particle, and adding it to the collection.
public void AddParticleAt(Vector2 pos)
{
    ParticlePrimitive particle = new ParticlePrimitive(pos, 2f, 50);
    mAllParticles.Add(particle);
} - Next, create a function to update each particle within the collection. This function should iterate through each particle in the list, calling its update function. Additionally, check to see whether the particle has expired; if so, remove it from the list.
public void UpdateParticles()
{
    int particleCounts = mAllParticles.Count;
    for (int i = particleCounts- 1; i >= 0; i--)
    {
       mAllParticles[i].Update();
       if (mAllParticles[i].Expired)
           mAllParticles.RemoveAt(i);  // Remove expired ones
    }
} - Finally, create a function to draw the particle system. You do this by drawing each particle within the list. Additionally, you can apply a blend state of Additive and AlphaBlend to the particles. The details of both blend states are shown following.
public void DrawParticleSystem()
{
    // 1. Switch blend mode to "Additive"
    Game1.sSpriteBatch.End();
    Game1.sSpriteBatch.Begin(SpriteSortMode.Immediate, BlendState.Additive);

    // 2. Draw all particles
    foreach (var particle in mAllParticles)
        particle.Draw();

    // 3. Switch blend mode back to AlphaBlend
    Game1.sSpriteBatch.End();
    Game1.sSpriteBatch.Begin(SpriteSortMode.Immediate, BlendState.AlphaBlend);
}
Understanding alpha and additive blending
Blending is a process of mixing overlapping colors to produce a new color. The blending process consists of three key components. First is the source color, which is the overlaying or top color. Second is the destination color, which is the bottom color—the color underneath the source color. The last color is the blended color, which is a color calculated from the source color and the destination color. Alpha blending and additive blending are two different ways of calculating a blended color.
Typically, alpha blending is achieved with the following equation:
![]()
By inspecting this equation, you can see that when the source’s alpha is equal to 1, the Output _ Color equals the Source _ Color. Alternatively, when the source’s alpha is equal to 0, the Output _ Color equals the Destination _ Color. Logically this makes sense. If the source is completely opaque (has an alpha of 1), then the background color will not show through. However, if the source is completely transparent (has an alpha of 0), then the background color will show through unchanged. An alpha value between 0 and 1 will compute an output color that is a linear combination (blend) of the source and destination colors.
MonoGame achieves additive blending using the following equation:
![]()
By inspecting this equation, you can see that the approach to additive blending is similar to alpha blending; however, there are some differences. The first difference is that Tint _ Color is included along with Source _ Alpha. Secondly, the destination color is added without the reference to Source _ Alpha. This means the bottom color is added to the top or overlaying color.
In addition to alpha and additive blending, there are other types, such as multiplicative blending. The type of blending you should use within your games depends upon the effect you’re trying to achieve. Figure 8-2 shows examples of the effects that alpha and additive blending produce.

Figure 8-2. The difference between alpha and additive blending
You can now add the GameState class modifications necessary to use the particle system within your game.
- Start by adding an instance variable for the particle system and initializing it within the constructor:
ParticleSystem mParticleSystem;

public GameState()
{
   ...

   mParticleSystem = new ParticleSystem();
} - Next, call the particle system’s update within the game state’s update function. Additionally, create particles at the point of collision when a collision is detected. Do this by calling the AddParticleAt() function when a collision occurs. Remember that the collision detection logic has been separated into its own CollisionUpdate() function.
public void UpdateGame()
{
    ...

    mParticleSystem.UpdateParticles();
}

private void CollisionUpdate()
{
    ...

    #region Collide the hero with the flower

    ...

    if (mHeroPixelCollision)
    {
        mParticleSystem.AddParticleAt(pixelCollisionPosition);
    }

    ...

    #endregion

    #region Collide the hero with planes

    ...

    if (mHeroPixelCollision)
    {
        mParticleSystem.AddParticleAt(pixelCollisionPosition);
    }

    ...

    #endregion
} - Lastly, simply draw the particle system by calling its function within the game state’s draw function:
public void DrawGame()
{
    mFlower.Draw();
    foreach (var p in mPlane)
       p.Draw();
    mHero.Draw();

    mParticleSystem.DrawParticleSystem();

    ...
}
The particle system you just created works great for creating particles; however, useful particle systems should include the ability to control the duration of particle creation, the location where particles are created, and the behaviors of the created particles. This is where the particle emitter comes in. With control over the duration, location, and behaviors of emitted particles, you can create interesting effects such as fire, explosions, and trails by simply modifying the way particles are emitted.
The Particle Emitter project
This project allows you to implement particle emitter for your particle system. The functionality of this project is identical to that in the previous section; however, you’ll use particle emitter to control the emission of particles after creating the particle system. You can see an example of this project running in Figure 8-3.
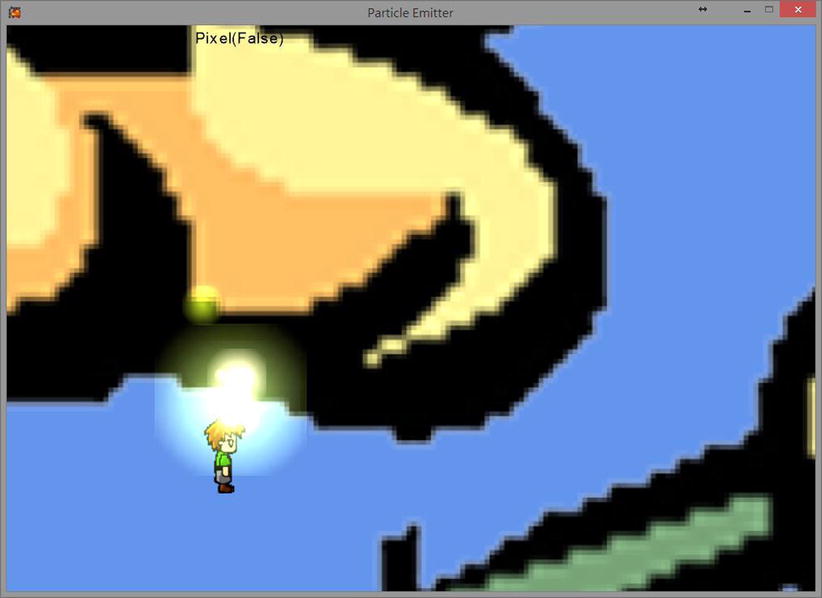
Figure 8-3. The Particle Emitter project with a large particle emission at the point of collision
The project’s controls are as follows:
- Right thumbstick (arrow-keys) Moves the camera window
- Left thumbstick (WSAD-keys) Moves the hero
- Button A (K-key) Zooms out
- Button B (L-key) Zooms in
- Buttons X and Y (J and I keys) Rotate the hero
The goals of this project are as follows:
- To create a new particle type called ReddishParticlePrimitive
- To allow continuous particle emission from the ParticleSystem class
The steps for creating the project are as follows:
- Create the ReddishParticlePrimitive class.
- Create the ParticleEmitter class to support continuous particle emission.
- Modify the ParticleSystem class to support the particle emitter.
- Modify the GameState class to support the newly created emitter.
Creating the ReddishParticlePrimitive class
- Begin by creating a new class called ReddishParticlePrimitive in the ParticleSupport folder. Have the class inherit from ParticlePrimitive.
public class ReddishParticlePrimitive : ParticlePrimitive
{
    ...
} - Within the class constructor, set the velocity direction of the particle so that it travels in an upward direction, increase the particle’s speed by a multiple of five, change the size of the particle and the rate at which it changes over time, and set the particle’s color to dark orange:
public ReddishParticlePrimitive(Vector2 position, float size, int lifeSpan) :
        base(position, size, lifeSpan)
{
    mVelocityDir.Y = 5f * Math.Abs(mVelocityDir.Y);
    mVelocityDir.Normalize();
    mSpeed *= 5.25f;
    mSizeChangeRate *= 1.5f;
    mSize.X *= 0.7f;
    mSize.Y = mSize.X;

    mTintColor = Color.DarkOrange;
} - Next, override the update function so you can modify the tint color over time. The code following modifies the RGB values individually during each update:
public override void Update()
{
    base.Update();

    Color s = mTintColor;
    if (s.R < 255)
        s.R += 1;
    if (s.G != 0)
        s.G -= 1;
    if (s.B != 0)
        s.B -= 1;
    mTintColor = s;
}
Now it is time to create the ParticleEmitter class. The emitter class gives you the ability to emit particles with a specific type of movement behavior over a finite amount of time.
Creating the ParticleEmitter class
- Begin by creating a class called ParticleEmitter within the ParticleSupport folder. Include instance variables that control the minimum number of particles emitted each cycle, the emitter’s position, and the number of particles that remain to be emitted.
public class ParticleEmitter
{
    const int kMinToEmit = 5;
    protected Vector2 mEmitPosition;
    protected int mNumRemains;

    ...
} - Now initialize the variables within the constructor and provide an accessor so you can determine whether there are any remaining particles to be emitted:
public ParticleEmitter(Vector2 pos, int n)
{
    mNumRemains = n;
    mEmitPosition = pos;
}

public bool Expired { get { return (mNumRemains <= 0); } } - Next, create a function called EmitParticles(). This function determines the number and type of particles that need to be emitted.
- The function begins by computing how many particles should be emitted. This is accomplished by checking whether all the remaining particles should be emitted (true when the remaining number is less than the minimum) or whether some random percentage of the remaining particles should be emitted. After this number is determined, the particles are emitted to the input allParticles particle list.
- Having calculated the number of particles to emit, this example next creates either a reddish-colored or normal (unmodified) particle; these have a 40 and 60 percent chance of being created, respectively. This adds a bit of randomness to the particle generation and results in a more interesting appearance.
public void EmitParticles(List<ParticlePrimitive> allParticles)
{
    int numToEmit = 0;
    if (mNumRemains < kMinToEmit)
    {
        // If only a few are left, emits all of them
        numToEmit = mNumRemains;
    }
    else
    {
        // Otherwise, emits about 20% of what's left
        numToEmit = (int)Game1.RandomNumber(0.2f * mNumRemains);
    }
    // Left for future emitting.
    mNumRemains -= numToEmit;

    for (int i = 0; i < numToEmit; i++)
    {
        ParticlePrimitive particle;
        // 40% chance emitting simple particle,
        // 60% chance emitting the new reddish particle
        if (Game1.RandomNumber(1.0f) > 0.6f)
            particle = new ParticlePrimitive(mEmitPosition, 2f, 30);
        else
            particle = new ReddishParticlePrimitive(mEmitPosition, 2f, 80);
        allParticles.Add(particle);
    }
}
Modifying the ParticleSystem class
- Now modify the ParticleSystem class by adding a particle emitter list and initializing it within the constructor:
private List<ParticleEmitter> mAllEmitters;

public ParticleSystem()
{
    ...

    mAllEmitters = new List<ParticleEmitter>();
} - Remove the AddParticleAt() function and replace it with the AddEmitterAt() function. By doing this, you can now generate a range of particles that will emit from a desired position. The code following generates some number of particles between 50 and 100:
public void AddEmitterAt(Vector2 pos)
{
    ParticleEmitter e = new ParticleEmitter(pos, (int) Game1.RandomNumber(50, 100));
    mAllEmitters.Add(e);
} - Next, you need to modify the UpdateParticles() function to account for the newly added emitters. Do this by iterating through the emitter list, emitting each particle, and removing the expired emitters:
public void UpdateParticles()
{
    int emittersCount = mAllEmitters.Count;
    for (int i = emittersCount - 1; i >= 0; i--)
    {
        mAllEmitters[i].EmitParticles(mAllParticles);
        if (mAllEmitters[i].Expired)
            mAllEmitters.RemoveAt(i);
    }

    ...
}
Finally, you can make a quick modification to the GameState class so you can use the new ParticleEmitter class.
- Modify the CollisionUpdate() function by replacing the AddParticleAt() function calls with your new AddEmitterAt() function. Now, when a collision occurs, an emitter will create particles for a set amount of time before disappearing.
private void CollisionUpdate()
{
    ...

    #region Collide the hero with the flower

    ...

    if (mHeroPixelCollision)
    {
        mParticleSystem.AddEmitterAt(pixelCollisionPosition);
    }
    ...

    #endregion

    #region Collide the hero with planes

    ...

    if (mHeroPixelCollision)
    {
        mParticleSystem.AddEmitterAt(pixelCollisionPosition);
    }

    ...

    #endregion
}
Summary
In this chapter, you saw how to implement a particle system in your game. This particle system consists of a collection of particles, each of which contains properties that determine its behavior over a specifiable life span. Additionally, you saw how you can apply blending effects to your particles to give a customized appearance to your particle system. Specifically, you were shown how to implement alpha and additive blending.
Finally, you learned how to implement a particle emitter to support continued particle emission. Continuous emission is useful for fire and other effects that need to exist for an extended period of time.
Quick reference
To |
Do this |
|---|---|
| Create an instantaneous bursting effect | Instantiate a ParticleSystem class and call the AddParticleAt() function to create the particle effect at the desired location. |
| Create a longer-lasting effect, such as fire or an explosion | Instantiate a ParticleEmitter class with the desired number of particles to be emitted and duration upon which to emit. Then add the emitter to the ParticleSystem class. |
| Create your own particle effect | 1. Subclass from the ParticlePrimitive class (as in the case of ReddishParticlePrimitive class) and implement customized initialization and update behavior to the color, travel direction, velocity, life span, and so on. 2. Create your own emitter class (for example, by subclassing from the ParticleEmitter class) and customize the creation and emitting behaviors. |