
![]()
Sprites, Camera, Action!
After completing this chapter, you will be able to:
- Understand the components of sprite sheet animation
- Create your own animation using a sprite sheet
- Manipulate the game camera
- Add audio to a game project for both music and sound effects
This chapter covers many of the additional concepts that are commonly needed to create full-featured and complete game projects, but were not introduced in previous chapters. These concepts include animation via sprite sheets, in-game camera manipulation, and audio for background music and cue effects. Animation, camera manipulation, and audio are often unnecessary for creating core game mechanics; however, including them creates a richer experience for end users by providing them with customized feedback for specific actions within your game.
Sprite animation
In games, you often want to have your characters or game objects appear as if they are in motion. While the previous chapters explained how to move game objects around the screen to create movement, because the images themselves were static they probably felt somewhat lifeless. To address this problem, you can use animation. As you may know, you create an animation by rapidly displaying related images in succession to create a sense of motion—and animation is no different in games. Typically, you use animation for simple motions such as walking and running, as well as more complex motions such as fighting strikes or dance moves. This section shows how you can add motion to your objects by using a sequence of images and a sprite sheet.
The Sprite Animation project
This project demonstrates how to move two animated characters around the screen. You are able to adjust the animation speed of each character in order to create a more fluid sense of movement across the screen. You can see an example of this project running in Figure 7-1.

Figure 7-1. The Sprite Animation project, zoomed in
The project’s controls are as follows:
- Right thumbstick (arrow-keys) Moves the character around
- Left thumbstick’s x-axis (AD-keys) Controls the animation speed
- Button A (K-key) Selects the left character
- Button B (L-key) Selects the right character
The goals of the project are as follows:
- To experience components involved in sprite animation
- To understand the support MonoGame SpriteBatch provides for sprite animation
The steps for creating the project are as follows:
- Gain an overview of sprite sheets.
- Create a SpritePrimitive class.
- Modify the GameState class to include the newly created sprite functionality.
Add the following resource, which can be found in the Chapter07SourceCodeResources folder, into your content project before you begin:
- SimpleSpriteSheet.png
To achieve animation, games often use what are known as sprites, or more specifically, sprite sheets. A sprite sheet is an image that contains an animation separated into one or more rows and columns (R×C). For example, in Figure 7-2 you can see a 4×2 sprite sheet that contains two separate animations. The animations depict a character walking right and left. In this example, the animations are separated into separate rows; however, this is not always the case. The organization of a sprite sheet is generally handled by its creator.

Figure 7-2. The individual frames needed to depict a game character walking right and left
For a more specific example, take a look at the top row of the sprite sheet in Figure 7-2. The images in this row depict the character walking to the right. To achieve this effect, each character image must to be displayed from left to right, in the sequence 1, 2, 3, 4. After the last character image has been displayed, the animation is looped back to the first image in the row. You can see an example of this in Figure 7-3.
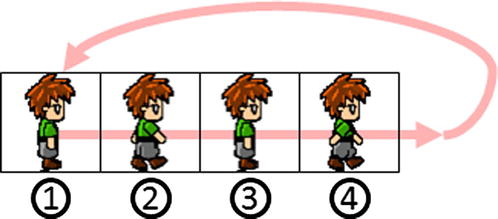
Figure 7-3. A sprite animation sequence that loops
Now that you know the general usage that sprite sheets can provide, here’s a quick look at the math you need to achieve this type of behavior.Given that the sprite sheet is 4×2 and the image has a resolution of 256×128 pixels, you can deduce that each sprite has a resolution of 256/4×128/2 or 64×64 pixels.
While that works great for this particular sprite sheet example, you’ll need a more generalized equation to implement a class that can handle sprite sheets that contain varying numbers of sprites and resolutions.
However, this is still fairly simple to calculate. Given that the pixel resolution of the sprite sheet is equal to P×Q, where P represents the pixel width and Q represents the pixel height, then each sprite’s resolution within the sprite sheet is equal to P/R×Q/C, where R and C represent the numbers of rows and columns, respectively.
For example, if a sprite sheet has a pixel resolution of 256×256 and its rows and columns are 4×4, then each sprite has a resolution of 256/4×256/2, or 64×64 pixels. In general, sprite sheets are composed of sprites of equal size to allow easy targeting of each individual sprite. Sprite sheets with varying-size sprites do exist; however, you then need a more sophisticated calculation to single out each sprite.
With the basic knowledge of sprite sheets under your belt, you can now tackle the creation of a sprite class.
Creating the SpritePrimitive class
- Begin by creating a new class called SpritePrimitive that inherits from GameObject. Add instance variables for rows, columns, padding, and the sprite sheet’s width and height. The padding variable is used to define the space between each frame or sprite if necessary.
 Note The padding of a sprite sheet depends upon its creator. Generally, a sprite sheet contains consistent padding around all sides.
public class SpritePrimitive :GameObject
{
    private int mNumRow, mNumColumn, mPaddings;
    private int mSpriteImageWidth, mSpriteImageHeight;

    #region Per Animation setting
    ...
    #endregion

    ...
} - Now create the following variables to provide support for sprite animation:
private int mUserSpecifedTicks;
private int mCurrentTick;
private int mCurrentRow, mCurrentColumn;
private int mBeginRow, mEndRow;
private int mBeginCol, mEndCol;- • mUserSpecifedTicks keeps track of the number of machine ticks before changing to the next frame.
- • mCurrentTick is for keeping track of the number of ticks since the current frame started to be displayed.
- • mCurrentRow and mCurrentColumn are for displaying the current frame’s row and column.
- • mBeginRow, mEndRow, mBeginCol, and mEndCol are used to keep track of which frame you start and end on.
- Add a constructor to initialize the variables to the default values. Make sure to support parameters for the file name, position, and size, as well as the amount of rows, columns, and padding that the sprite sheet contains.
public SpritePrimitive(String image, Vector2 position, Vector2 size,
    int rowCounts, int columnCount, int padding) :
    base(image, position, size)
{
    mNumRow = rowCounts;
    mNumColumn = columnCount;
    mPaddings = padding;
    mSpriteImageWidth = mImage.Width / mNumRow;
    mSpriteImageHeight = mImage.Height / mNumColumn;

    mUserSpecifedTicks = 1;
    mCurrentTick = 0;
    mCurrentRow = 0;
    mCurrentColumn = 0;
    mBeginRow = mBeginCol = mEndRow = mEndCol = 0;
} - Now create get and set accessors for the variables, as shown in the code that follows:
public int SpriteBeginRow
{
    get { return mBeginRow; }
    set { mBeginRow = value; mCurrentRow = value; }
}
public int SpriteEndRow
{
    get { return mEndRow; }
    set { mEndRow = value; }
}
public int SpriteBeginColumn
{
    get { return mBeginCol; }
    set { mBeginCol = value; mCurrentColumn = value; }
}
public int SpriteEndColumn
{
    get { return mEndCol; }
    set { mEndCol = value; }
}
public int SpriteAnimationTicks
{
    get { return mUserSpecifedTicks; }
    set { mUserSpecifedTicks = value; }
} - Next, create a public method that allows you to set the beginning and ending frames for the animation. To do this, you must know which row and column the beginning frame resides in. Additionally, you allow for the modification of the tick interval, which specifies how often the animation should change frames. The smaller the tick interval, the faster the animation will be.
public void SetSpriteAnimation(int beginRow, int beginCol, int endRow, int endCol, int tickInterval)
{
    mUserSpecifedTicks = tickInterval;
    mBeginRow = beginRow;
    mBeginCol = beginCol;
    mEndRow = endRow;
    mEndCol = endCol;

    mCurrentRow = mBeginRow;
    mCurrentColumn = mBeginCol;
    mCurrentTick = 0;
} - Create the Update() function. During each update, increment the current tick and check whether or not the tick time is up. If so, reset the current tick and move to next sprite frame. When the current frame is equal to the last frame in the row, set the current frame back to the first frame in the row.
public override void Update()
{
    base.Update();

    mCurrentTick++;
    if (mCurrentTick > mUserSpecifedTicks)
    {
        mCurrentTick = 0;
        mCurrentColumn++;
        if (mCurrentColumn > mEndCol)
        {
            mCurrentColumn = mBeginCol;
            mCurrentRow++;

            if (mCurrentRow > mEndRow)
                mCurrentRow = mBeginRow;
        }
    }
} - Now it is time to create the Draw() function. First and foremost, you need to create the destination rectangle where the image will be displayed by calling the Camera class’s ComputePixelRectangle() function. Then add a source rectangle that specifies the frame on the sprite sheet that will be mapped to the destination rectangle. This is done using the position of the desired frame’s top-left corner (taking padding into account) and the sprite image’s width and height. Finally, define the origin of rotation and draw the destination rectangle using the Game1.sSpriteBatch.Draw() function call.
public override void Draw()
{
    // Define location and size of the texture
    Rectangle destRect = Camera.ComputePixelRectangle(Position, Size);

    int imageTop = mCurrentRow * mSpriteImageWidth;
    int imageLeft = mCurrentColumn * mSpriteImageHeight;
    // Define the area to draw from the spriteSheet
    Rectangle srcRect = new Rectangle(
        imageLeft + mPaddings,
        imageTop + mPaddings,
        mSpriteImageWidth, mSpriteImageHeight);

    // Define the rotation origin
    Vector2 org = new Vector2(mSpriteImageWidth/2, mSpriteImageHeight/2);

    // Draw the texture
    Game1.sSpriteBatch.Draw(
        mImage,
        destRect,           // Area to be drawn in pixel space
        srcRect,            // Rect on the spriteSheet
        Color.White,        //
        mRotateAngle,       // Angle to rotate (clockwise)
        org,                // Image reference position
        SpriteEffects.None, 0f);

    if (null != Label)
        FontSupport.PrintStatusAt(Position, Label, LabelColor);
}
Now you’ll modify the GameState class to use the SpritePrimitive class.
Modifying the GameState class
- Start by adding variables for sprite animation speed, the hero primitives, and the currently selected hero primitive.
const int kSpriteSpeedFactor = 10;    // Value of 1 maps to updates of 10 ticks
SpritePrimitive mHero, mAnotherHero;
SpritePrimitive mCurrent; - Now modify the constructor to initialize the instance variables with the values shown in the code that follows:
public GameState()
{
    mHero = new SpritePrimitive(
        "SimpleSpriteSheet",
        new Vector2(20, 30), new Vector2(10, 10),
        4,  // Number of rows
        2,  // Number of columns
        0); // Padding between images

    mAnotherHero = new SpritePrimitive(
        "SimpleSpriteSheet",
        new Vector2(80, 30), new Vector2(10, 10),
        4,  // Number of rows
        2,  // Number of columns
        0); // Padding between images

    // Start mHero by walking left and mAnotherHero by walking right
    mHero.SetSpriteAnimation(0, 0, 0, 3, 10);       // Slowly
    mAnotherHero.SetSpriteAnimation(1, 0, 1, 3, 5); // Twice as fast
    mCurrent = mAnotherHero;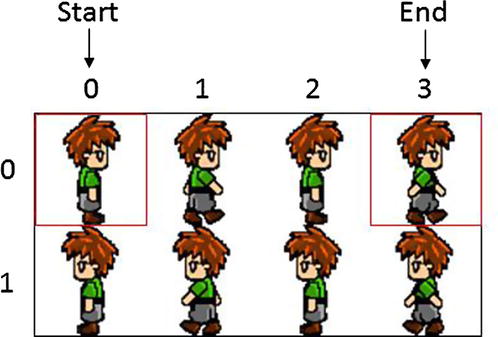
} - Remember, mHero.SetSpriteAnimation(0, 0, 0, 3, 10); means the animation will start from frame 0, 0 and continue to frame 0, 3. The 10 used indicates the number of ticks before changing to the next frame. The following image provides a visual representation of the frame-numbering system.
- Next, in the UpdateGame() function, perform the following steps:
- Update both heroes by calling their Update() functions:
public void UpdateGame()
{
    mHero.Update();
    mAnotherHero.Update();

    UserControlUpdate();
} - Implement the UserControlUpdate() function by doing the following:
- • Changing the currently selected hero via the A and B buttons
- • Rotating the image when the X or Y button is pressed
- • Mapping the current hero’s position to the right thumbstick for movement
- • Mapping the left thumbstick to the animation speed of the hero
private void UserControlUpdate()
{
    #region Selecting Hero
    if (InputWrapper.Buttons.A == ButtonState.Pressed)
        mCurrent = mHero;
    if (InputWrapper.Buttons.B == ButtonState.Pressed)
        mCurrent = mAnotherHero;
    mCurrent.Position += InputWrapper.ThumbSticks.Right;
    #endregion

    #region Specifying rotation
    if (InputWrapper.Buttons.X == ButtonState.Pressed)
        mCurrent.RotateAngleInRadian += MathHelper.ToRadians(1);
    if (InputWrapper.Buttons.Y == ButtonState.Pressed)
        mCurrent.RotateAngleInRadian += MathHelper.ToRadians(-1);
    #endregion

    #region spriteSheet Update
    if (InputWrapper.ThumbSticks.Left.X == 0)
    {
        mCurrent.SpriteEndColumn = 0;  // Stops the animation
    }
    Else
    {
        float useX = InputWrapper.ThumbSticks.Left.X;
        mCurrent.SpriteEndColumn = 3;
        if (useX < 0)
        {
            mCurrent.SpriteBeginRow = 1;
            mCurrent.SpriteEndRow = 1;
            useX *= -1f;
        }
        else
        {
            mCurrent.SpriteBeginRow = 0;
            mCurrent.SpriteEndRow = 0;
        }
        mCurrent.SpriteAnimationTicks = (int)((1f - useX) * kSpriteSpeedFactor);
    }
    #endregion
}
- Update both heroes by calling their Update() functions:
- Finally, modify the DrawGame() function so it draws both heroes:
public void DrawGame()
{
    mHero.Draw();
    mAnotherHero.Draw();
}
In the preceding project, you saw how to use the principles of sprite sheets to create animations. However, if you use textures in various stages of the animation the pixel-accurate collision-detection function you created earlier will no longer function correctly. This is because your pixel collision-detection function assumes the textures being used are static. In this section, you will see how to implement pixel-accurate collision for animated sprites.
This project demonstrates how to move a character around the screen and collide it with pixel accuracy with several other objects. The character itself will be animated via a sprite sheet. The project displays the current collision status in the top-left corner of the screen. You can see an example of this project running in Figure 7-4.

Figure 7-4. Running the Sprite Collision project; the project accurately detects collisions, even for sprite characters
The project’s controls are as follows:
- Right thumbstick (arrow-keys) Moves the selected object
- Left thumbstick (WSAD-keys) Moves the hero
- Right and left triggers (M and N keys) Rotates the selected object
- Button A (K-key) Selects the flower
- Button B (L-key) Selects the lower-left plane (the rocketlike object)
The goals of the project are as follows:
- To implement per-pixel collision for sprite images
- To use an efficient storage system for color, which is used for sharing images
The steps for creating the project are as follows:
- Modify the TexturedPrimitive class to add new accessors.
- Modify the SpritePrimitive class to add new accessors.
- Modify the TexturedPrimitivePixelCollide partial class to support per-pixel collision.
- Modify the GameState class to use the changes made to the project.
Add the following resources, which can be found in the Chapter07SourceCodeResources folder, into your content project before you begin:
- Flower.png
- Target.png
Modifying the TexturedPrimitive class
To support pixel-accurate collision detection for sprites, you’ll need to modify the TexturedPrimitive class. You do this by adding accessors for the sprite’s position and size on the sprite sheet. Set the accessors to the top-left corner of the image and sprite sheet size by default. Notice that in the following code, the accessors are defined as virtual. By defining these as virtual, you allow those classes that inherit from the TexturedPrimitive class to override the accessors to return their desired values.
protected virtual int SpriteTopPixel { get { return 0; } }
protected virtual int SpriteLeftPixel { get { return 0; } }
protected virtual int SpriteImageWidth { get { return mImage.Width; } }
protected virtual int SpriteImageHeight { get { return mImage.Height; } }
Modifying the SpritePrimitive class
Override the parent accessors to return the proper top-left position and size of the current sprite within the sprite sheet:
#region override to support per-pixel collision
protected override int SpriteTopPixel
{
    get { return mCurrentRow * mSpriteImageHeight; }
}
protected override int SpriteLeftPixel
{
    get { return mCurrentColumn * mSpriteImageWidth; }
}
protected override int SpriteImageWidth
{
    get { return mSpriteImageWidth; }
}
protected override int SpriteImageHeight
{
    get { return mSpriteImageHeight; }
}
#endregion
Next, you’ll modify the TexturedPrimitivePixelCollide partial class, which you created earlier to handle pixel-accurate collision for textures, so it can accommodate varying sprites.
Modifying the TexturedPrimitivePixelCollide partial class
- Modify the PixelTouches() function to use the newly created SpriteImageWidth and SpriteImageHeight variables. You can see this achieved in the code that follows. The rest of the function remains the same.
public bool PixelTouches(TexturedPrimitive otherPrim, out Vector2 collidePoint)
{
    ...

    if (touches)
    {
        ...

        int i = 0;
        while ( (!pixelTouch) && (i<SpriteImageWidth) )
        {
            int j = 0;
            while ( (!pixelTouch) && (j<SpriteImageHeight) )
            {
                ...
            }

            ...
        }
    }

    ...
} - Now, in the GetColor() function, you need to find the correct pixel location for the current sprite frame within the sprite sheet in order to return the correct color. To achieve this, use SpriteTopPixel and SpriteLeftPixel, as shown in the code that follows:
private Color GetColor(int i, int j)
{
    return mTextureColor[((j+SpriteTopPixel) * mImage.Width) + i + SpriteLeftPixel];
} - Next, you need to change how you convert between coordinate spaces. The overall purpose of this conversion remains the same; however, because you no longer need the entire image, you can reference the sprite size instead of the image size. You can see this reflected in the code that follows:
private Vector2 IndexToCameraPosition(int i, int j, Vector2 xDir, Vector2 yDir)
{
    float x = i * Width / (float)(SpriteImageWidth - 1);
    float y = j * Height / (float)(SpriteImageHeight- 1);

    Vector2 r = Position
        + (x - (mSize.X * 0.5f)) * xDir
        - (y - (mSize.Y * 0.5f)) * yDir;

    return r;
}

private Vector2 CameraPositionToIndex(Vector2 p, Vector2 xDir, Vector2 yDir)
{
    Vector2 delta = p - Position;
    float xOffset = Vector2.Dot(delta, xDir);
    float yOffset = Vector2.Dot(delta, yDir);
    float i = SpriteImageWidth * (xOffset / Width);
    float j = SpriteImageHeight * (yOffset / Height);
    i += SpriteImageWidth / 2;
    j = (SpriteImageHeight / 2) - j;
    return new Vector2(i, j);
} - In order to share the same color data for multiple images, use a dictionary data structure. By using a dictionary data structure, multiple instances of the same image can share the same color information, which reduces some of the performance impact of adding multiple instances of the same game object.
Note A dictionary is a data structure that contains a unique key for every value, thus providing fast lookups when looking for a specific value.
In the function that follows, you can see that along with the dictionary (sTextureData), the LoadColorInfo() function returns the necessary image data (an array of colors) depending upon the input parameters.
public partial class TexturedPrimitive
{
    ...

    #region Static support for sharing color data across same image
    static Dictionary<String, Color[]> sTextureData =
            new Dictionary<string, Color[]>();

    static private Color[] LoadColorInfo(String imageName, Texture2D image)
    {
        Color[] imageData = new Color[image.Width * image.Height];
        image.GetData(imageData);
        sTextureData.Add(imageName, imageData);
        return imageData;
    }
    #endregion

    ...
} - Lastly, modify the ReadColorData() function to use the newly created dictionary and the LoadColorInfo() function:
private void ReadColorData()
{
   if (sTextureData.ContainsKey(mImageName))
       mTextureColor = sTextureData[mImageName];
   else
       mTextureColor = LoadColorInfo(mImageName, mImage);
}
Finally, you’ll modify the GameState class to use the newly created sprite collision.
- First, add the variables for the hero sprite, the flower texture, the four texture planes, the currently selected texture, and the variables needed to display the collision status and position. You can see this reflected in the code that follows:
public class GameState
{
    const int kSpriteSpeedFactor = 10;  // Value of 1 maps to updates of 10 ticks
    SpritePrimitive mHero;              // Hero sprite
    const int kNumPlanes = 4;
    TexturedPrimitive[] mPlane;         // The planes
    TexturedPrimitive mFlower;          // The large background
    TexturedPrimitive mCurrentPrim;     // Refer to either plane or flower

    // Support for displaying of collision
    TexturedPrimitive mHeroTarget;      // Where latest hero pixel collision happened
    bool mHeroPixelCollision;           // If there is a pixel collision for the hero
    bool mHeroBoundCollision;           // If there is an image-bound collision for the hero

    public GameState()
    {
        ...
    }

    ...
} - Next, initialize the variables within the constructor with the default values shown following:
public GameState()
{
    // Set up the flower ...
    mFlower = new TexturedPrimitive("Flower", new Vector2(50, 35), new Vector2(60, 60));

    // Planes
    mPlane = new TexturedPrimitive[kNumPlanes];
    mPlane[0] =
        new TexturedPrimitive("PatrolEnemy", new Vector2(10, 15), new Vector2(5, 10));
    mPlane[1] =
        new TexturedPrimitive("PatrolEnemy", new Vector2(90, 15), new Vector2(5, 10));
    mPlane[2] =
        new TexturedPrimitive("PatrolEnemy", new Vector2(90, 55), new Vector2(5, 10));
    mPlane[3] =
        new TexturedPrimitive("PatrolEnemy", new Vector2(10, 55), new Vector2(5, 10));

    mHeroTarget = new TexturedPrimitive("Target", new Vector2(0, 0), new Vector2(3, 3));
    mCurrentPrim = mPlane[0];
    mHeroBoundCollision = false;
    mHeroPixelCollision = false;

    mHero = new SpritePrimitive(
        "SimpleSpriteSheet",
        new Vector2(20, 30), new Vector2(10, 10),
        4,  // Number of rows
        2,  // Number of columns
        0); // Padding between images

    // Start Hero by walking left and AnotherHero by walking right
    mHero.SetSpriteAnimation(0, 0, 0, 3, 10);
} - In the update function, call the upcoming CollisionUpdate() function:
public void UpdateGame()
{
    mHero.Position += InputWrapper.ThumbSticks.Left;
    mHero.Update();

    CollisionUpdate();
    UserControlUpdate();
} - Now create the CollisionUpdate() function to handle all the collisions between the various objects in the game. Notice that even though the hero uses a loop to detect the collision between itself and a plane, the logic inside the loop is essentially the same as the logic used for the flower collision.
private void CollisionUpdate()
{
    Vector2 pixelCollisionPosition = Vector2.Zero;

    #region Collide the hero with the flower
    mHeroBoundCollision = mHero.PrimitivesTouches(mFlower);
    mHeroPixelCollision = mHeroBoundCollision;
    if (mHeroBoundCollision)
    {
        mHeroPixelCollision =
            mHero.PixelTouches(mFlower, out pixelCollisionPosition);
        if (mHeroPixelCollision)
            mHeroTarget.Position = pixelCollisionPosition;
    }
    #endregion

    #region Collide the hero with planes
    int i = 0;
    while ((!mHeroPixelCollision) && (i < kNumPlanes))
    {
        mHeroBoundCollision = mPlane[i].PrimitivesTouches(mHero);
        mHeroPixelCollision = mHeroBoundCollision;
        if (mHeroBoundCollision)
        {
            mHeroPixelCollision =
                mPlane[i].PixelTouches(mHero, out pixelCollisionPosition);
            if (mHeroPixelCollision)
                mHeroTarget.Position = pixelCollisionPosition;
        }
        i++;
    }
    #endregion
} - You can now modify the UserControlUpdate() function to account for hero selection and rotation of the hero and flower. In this function, you map the controls for the hero and the flower. Remember to include buttons that swap between currently selected objects.
private void UserControlUpdate()
{
    #region Selecting Hero
    if (InputWrapper.Buttons.A == ButtonState.Pressed)
        mCurrentPrim = mFlower;
    if (InputWrapper.Buttons.B == ButtonState.Pressed)
        mCurrentPrim = mPlane[0];
    mCurrentPrim.Position += InputWrapper.ThumbSticks.Right;
    #endregion

    #region Specifying hero rotation
    if (InputWrapper.Buttons.X == ButtonState.Pressed)
        mHero.RotateAngleInRadian += MathHelper.ToRadians(1);
    if (InputWrapper.Buttons.Y == ButtonState.Pressed)
        mHero.RotateAngleInRadian += MathHelper.ToRadians(-1);
    #endregion

    #region Specifying flower rotation
    mCurrentPrim.RotateAngleInRadian += MathHelper.ToRadians(
        InputWrapper.Triggers.Left);
    mCurrentPrim.RotateAngleInRadian -= MathHelper.ToRadians(
        InputWrapper.Triggers.Right);
    #endregion

    #region Sprite Sheet Update
    ...
    #endregion
} - Finally, in the DrawGame() function, call each game object’s corresponding Draw() function and print the hero’s current collision status to the screen:
public void DrawGame()
{
    mFlower.Draw();
    mHero.Draw();
    foreach (var p in mPlane)
        p.Draw();

    if (mHeroPixelCollision)
        mHeroTarget.Draw();

    FontSupport.PrintStatus("Collisions Bound(" + mHeroBoundCollision +
         ") Pixel(" + mHeroPixelCollision + ")", null);
}
Moving and zooming the camera
In the example games you’ve built thus far, the camera view has remained in a static position and at a static zoom level. In this section, you will learn how to add zoom-and-move features to your Camera class. By creating a more fully featured Camera class, you will be able to reproduce common camera effects seen in many 2D games. For example, zooming lets users focus their attention on a particular portion of the screen. Additionally, you can employ zoom to create a zoom-out effect that lets players see more of your game world on the screen at one time. Moving the camera provides the ability to pan to points of interest and attach the camera to your hero character or game object. By attaching the camera to your hero character, you can easily reproduce the first-person point of view commonly seen in side-scrolling games and top-down adventure games.
The Camera Zoom Move project
This project demonstrates how to manipulate the camera’s position and zoom level using the gamepad. You’ll see how the camera can move relative to both a large texture and a hero character. You control the hero character. The camera will chase the hero character to keep it within the game window. You can see an example of this project running in Figure 7-5.
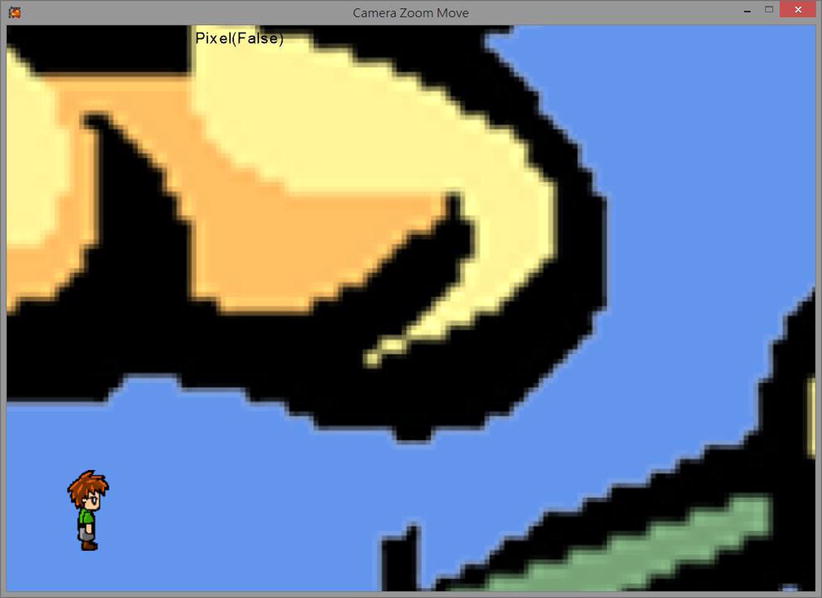
Figure 7-5. The Camera Zoom Move project, zoomed in on a portion of the flower game object
The project’s controls are as follows:
- Right thumbstick (arrow-keys) Moves the camera window
- Left thumbstick (WSAD-keys) Moves the hero
- Button A (K-key) Zooms out
- Button B (L-key) Zooms in
- Buttons X and Y (J and I keys) Rotate the hero
The goals of the project are as follows:
- To implement moving and zooming functionality in the Camera class
- To understand how to keep a game object of interest within the camera’s window
The steps for creating the project are as follows:
- Modify the Camera class to account for the new functionality.
- Modify the GameState class to use the camera’s new functionality.
Modifying the Camera class
- To begin, in your Camera class, add a static move-camera function that accepts a change in position and applies it to the camera’s origin:
static public void MoveCameraBy(Vector2 delta)
{
    sOrigin += delta;
} - Now you can create the camera’s zoom function. Start by considering the image shown following. The image shows the variables you need to achieve a zoom-out effect by increasing the size of the camera window.

Notice that the inner black rectangle is defined by variables labeled old—more specifically, an old origin, width, and height. To define the outer red rectangle, you must calculate all new values. You can calculate the new width and height easily by adding the change in width and height to the camera’s old width and height. In the image, this change is defined as dx and dy in the image. However, because the rectangle is centered, the total change is 2dx and 2dy. With that new information in hand, you can deduce the following:


Therefore, the following is true:


- Now that you have an understanding of the mathematics needed, you can create a zoom function for the camera. Do this by passing in the desired change, saving the old width and height, calculating the new width and height, and then applying the changes to the origin. You can achieve this by following the process defined in the code that follows:
static public void ZoomCameraBy(float deltaX)
{
    float oldW = sWidth;
    float oldH = sHeight;

    sWidth = sWidth + deltaX;
    sRatio = -1f;
    cameraWindowToPixelRatio();

    float dx = 0.5f * (sWidth - oldW);
    float dy = 0.5f * (sHeight - oldH);
    sOrigin -= new Vector2(dx, dy);
}
Now that your Camera class supports the required manipulation, you can take advantage of the camera’s new functionality within the GameState class.
Modifying the GameState class
- Begin by modifying the constructor to initialize your game objects with the values shown following. Notice that the flower game object is used as a reference so you can see changes to the camera. The plane objects are used to demonstrate how game objects will behave offscreen. Finally, the hero provides the camera with a target that it should keep on the screen.
public GameState()
{
    // Set up the flower ...
    mFlower = new TexturedPrimitive("Flower",
        new Vector2(50, 35), new Vector2(350, 350));

    // Planes
    mPlane = new TexturedPrimitive[kNumPlanes];
    mPlane[0] = new TexturedPrimitive("PatrolEnemy",
        new Vector2(20, -80), new Vector2(20, 40));
    mPlane[1] = new TexturedPrimitive("PatrolEnemy",
        new Vector2(150, -100), new Vector2(20, 40));
    mPlane[2] = new TexturedPrimitive("PatrolEnemy",
        new Vector2(150, 120), new Vector2(20, 40));
    mPlane[3] = new TexturedPrimitive("PatrolEnemy",
        new Vector2(20, 170), new Vector2(20, 40));

    mHeroTarget = new TexturedPrimitive("Target", new Vector2(0, 0), new Vector2(3, 3));
    mHeroBoundCollision = false;
    mHeroPixelCollision = false;

    mHero = new SpritePrimitive(
        "SimpleSpriteSheet",
        new Vector2(10, 10),
        new Vector2(10, 10),
        4,  // Number of rows
        2,  // Number of columns
        0); // Padding between images

    // Start Hero by walking left and AnotherHero by walking toward right
    mHero.SetSpriteAnimation(0, 0, 0, 3, 10); // Slowly
} - With the objects properly initialized, add the following changes to the update function. The following code shows that the update function has been subdivided into several service functions (to prevent the function from becoming too large and unreadable).
- Start by using the gamepad’s left thumbstick in order to change the hero’s current position.
- Detect any collision between the hero and the flower and between the hero and the planes. You do this using the pixel-accurate collision functions you created earlier.
- Apply the camera manipulations you created in the Camera class by binding them to the gamepad’s A and B buttons (to zoom in and out) and the right thumbstick (to change the position).
- You want to make sure that the hero character always stays within the camera’s window. To do this, you need to move the camera whenever the hero reaches the edge of the screen. The previously created camera window collision states work great for this. By detecting which camera border the hero character has collided with, you can move the camera’s position in the proper direction to keep the hero on the screen.
- Lastly, remember to support hero rotation and apply the correct sprite animation depending upon the hero character’s direction of movement.
public void UpdateGame()
{
    // Change the hero position by thumbstick
    Vector2 heroMoveDelta = InputWrapper.ThumbSticks.Left;
    mHero.Position += heroMoveDelta;
    mHero.Update();

    CollisionUpdate();

    // Back hero out of the collision!
    if (mHeroPixelCollision)
        mHero.Position -= heroMoveDelta;

    HeroMovingCameraWindow();
    UserControlUpdate();
}

private void HeroMovingCameraWindow()
{
    Camera.CameraWindowCollisionStatus status = Camera.CollidedWithCameraWindow(mHero);
    Vector2 delta = Vector2.Zero;
    Vector2 cameraLL = Camera.CameraWindowLowerLeftPosition;
    Vector2 cameraUR = Camera.CameraWindowUpperRightPosition;
    const float kChaseRate = 0.05f;
    float kBuffer = mHero.Width * 2f;
    switch (status)
    {
        case Camera.CameraWindowCollisionStatus.CollideBottom:
            delta.Y = (mHero.Position.Y - kBuffer - cameraLL.Y) * kChaseRate;
            break;
        case Camera.CameraWindowCollisionStatus.CollideTop:
            delta.Y = (mHero.Position.Y + kBuffer - cameraUR.Y) * kChaseRate;
            break;
        case Camera.CameraWindowCollisionStatus.CollideLeft:
            delta.X = (mHero.Position.X - kBuffer - cameraLL.X) * kChaseRate;
            break;
        case Camera.CameraWindowCollisionStatus.CollideRight:
            delta.X = (mHero.Position.X + kBuffer - cameraUR.X) * kChaseRate;
            break;
    }
    Camera.MoveCameraBy(delta);
}

private void UserControlUpdate()
{
    #region Specifying hero rotation
    ...
    #endregion

    #region Sprite Sheet Update
    ...
    #endregion

    #region Camera Control
    // Zooming in/out with buttons A and B
    if (InputWrapper.Buttons.A == ButtonState.Pressed)
        Camera.ZoomCameraBy(5);
    if (InputWrapper.Buttons.B == ButtonState.Pressed)
        Camera.ZoomCameraBy(-5);

    // Move the camera with right thumbstick
    Camera.MoveCameraBy(InputWrapper.ThumbSticks.Right);
    #endregion
}
- Finally, modify the DrawGame() function to draw each of the game objects and output the current collision status to the screen.
public void DrawGame()
{
    mFlower.Draw();
    foreach (var p in mPlane)
       p.Draw();
    mHero.Draw();

    if (mHeroPixelCollision)
       mHeroTarget.Draw();

    FontSupport.PrintStatus("Collisions Bound(" +
            mHeroBoundCollision + ") Pixel(" +
            mHeroPixelCollision + ")", null);
}
Adding audio
In general, audio effects used in games fall into two categories. The first category is background audio, which includes music or ambient effects, and is often used to bring atmosphere or emotion to different portions of the game. The second category is sound effects. Sound effects are useful for all sorts of things, from notifying users of game actions to hearing the footfalls of your hero character. Usually, sound effects represent a specific action, triggered either by the user or by the game itself. Such sound effects are often thought of as an audio cue.
One important difference between these two types of audio is how you control them. Sound effects or cues cannot be stopped or have their volume adjusted once they have started; therefore, cues are generally very short. On the other hand, background audio can be started and stopped at will, and you can adjust the volume during playback. These capabilities are useful for fading background audio in or out depending on the current GameState class, or for stopping the background track completely and starting another one.
In this project, as in the previous one, you can move the hero character as well as the camera; however, this version triggers sound effects as various actions are performed. Additionally, a background track will be played at the start of the project. You can see an example of this project running in Figure 7-6.

Figure 7-6. Running the Audio project; it looks the same as the previous project, but includes both background music and audio cues
The project’s controls are as follows:
- Right thumbstick (arrow-keys) Moves the camera window
- Left thumbstick (WSAD-keys) Moves the hero
- Button A (K-key) Zooms out
- Button B (L-key) Zooms in
- Buttons X and Y (J and I keys) Rotate the hero
The goals of the project are as follows:
- To understand how to implement audio into your game project
- To understand the difference between the two types of audio used
The steps for creating the project are as follows:
- Create an AudioSupport class in order to provide the new audio functionality needed.
- Modify the GameState class to include the newly added audio.
Like Font resources, as covered in Chapter 3, audio files must first be converted into xnb format before they can be included in a MonoGame project. Once again, we can use the XNAFormatter program to convert the following resources found in the Chapter07SourceCodeResources folder:
- Bounce.wav
- Mind_Meld.mp3
- Wall.wav
Once converted, the corresponding xnb files can be included in the MonoGame project. Right click over the Content folder and go to Add ![]() Existing Items, or simply drag and drop the xnb files into the Content folder.
Existing Items, or simply drag and drop the xnb files into the Content folder.
![]() Note Like with images and fonts, if you choose to drag and drop the files into the Content folder, you must remember to bring up the Properties window of each audio resource and change the Build Action field to Content, and Copy to Output Directory to Copy if newer.
Note Like with images and fonts, if you choose to drag and drop the files into the Content folder, you must remember to bring up the Properties window of each audio resource and change the Build Action field to Content, and Copy to Output Directory to Copy if newer.
Creating the AudioSupport class
- Create a new class called AudioSupport. Make the class static so you can access it easily throughout the project. Create a dictionary data structure to store all the sound effects or cues. Finally, create an instance variable to keep track of the background audio.
static public class AudioSupport
{
    // Audio effect files
    private static Dictionary<String, SoundEffect> sAudioEffects =
        new Dictionary<string,SoundEffect>();
    // Constant background audio
    private static SoundEffectInstance sBackgroundAudio = null;

    ...
} - Add a method so you can find a desired audio clip. You do this by searching the dictionary data structure for the desired audio clip by name. If the clip is found within the data structure, the code should return it, otherwise it should first load the missing clip into the dictionary and then return it.
static private SoundEffect FindAudioClip(String name)
{
    SoundEffect sound = null;
    if (sAudioEffects.ContainsKey(name))
        sound = sAudioEffects[name];
    else
    {
        sound = Game1.sContent.Load<SoundEffect>(name);
        if (null != sound)
            sAudioEffects.Add(name, sound);
    }
    return sound;
} - Now you can create a function to play an audio cue. To do this, you first find the audio cue using the function you just created, and then call its Play() function.
static public void PlayACue(String cueName)
{
   SoundEffect sound = FindAudioClip(cueName);
   if (null != sound)
       sound.Play();
} - Add functionality to start and stop the background audio. To start the clip, find the background audio and initialize your background audio instance variable by creating a new instance of the clip. Additionally, modify its settings and call the Play() function. To stop background audio, call its Pause() and Stop() functions, reset its volume to zero, and then delete the clip by calling its Dispose() function.
static private void StartBg(String name, float level)
{
    SoundEffect bgm = FindAudioClip(name);
    sBackgroundAudio = bgm.CreateInstance();
    sBackgroundAudio.IsLooped = true;
    sBackgroundAudio.Volume = level;
    sBackgroundAudio.Play();
}

static private void StopBg()
{
    if (null != sBackgroundAudio)
    {
        sBackgroundAudio.Pause();
        sBackgroundAudio.Stop();
        sBackgroundAudio.Volume = 0f;

        sBackgroundAudio.Dispose();
    }
    sBackgroundAudio = null;
} - Next, add a function to play the background audio. This function is used to stop any existing background audio and then start a new background audio file at a desired volume level. This is easily done by utilizing the functions you just created.
static public void PlayBackgroundAudio(String bgAudio, float level)
{
    StopBg();
    if (("" != bgAudio) || (null != bgAudio))
    {
        level = MathHelper.Clamp(level, 0f, 1f);
        StartBg(bgAudio, level);
    }
}
Now that the audio support class is finished, you can use it within the GameState class by playing effects for various actions.
- Start the background audio when the game initializes. You do this by calling the PlayBackgroundAudio() function within the constructor:
public GameState()
{
    ...

    // Begin background audio
    AudioSupport.PlayBackgroundAudio("Mind_Meld", 0.4f);
} - To play the Bounce.wav audio cue when the hero character collides with the flower, call AudioSupport.PlayACue("Bounce") whenever a flower-to-hero collision occurs:
public void UpdateGame()
{
    ...

    // Collide the hero with the flower
    mHeroBoundCollision = mHero.PrimitivesTouches(mFlower);
    mHeroPixelCollision = mHeroBoundCollision;
    if (mHeroBoundCollision)
    {
        mHeroPixelCollision = mHero.PixelTouches(mFlower, out pixelCollisionPosition);
        if (mHeroPixelCollision)
        {
            AudioSupport.PlayACue("Bounce");
        }
    }

    ...
} - Similarly, to play the Wall.wav cue when the hero character collides with a rocket, call AudioSupport.PlayACue("Wall") whenever a hero-to-rocket collision occurs:
public void UpdateGame()
{
    ...

    int i = 0;
    while ((!mHeroPixelCollision) && (i < kNumPlanes))
    {
        mHeroBoundCollision = mPlane[i].PrimitivesTouches(mHero);
        mHeroPixelCollision = mHeroBoundCollision;
        if (mHeroBoundCollision)
        {
            mHeroPixelCollision =
                mPlane[i].PixelTouches(mHero, out pixelCollisionPosition);
            if (mHeroPixelCollision)
            {
                AudioSupport.PlayACue("Wall");
            }
        }
        i++;
    }

    ...
}
Summary
In this chapter, you have seen how to add animation, camera manipulation, and audio to your game project. By implementing these concepts, you can provide players with an enriched experience as they interact with your game. Animation lets you give motion and add realism to your game objects by iterating through a sequence of images. Animation gives visual feedback to the user for things such as player movements and actions.
Additionally, by implementing camera manipulation, you are able to create larger and more interesting game worlds, as well as direct the player’s attention to specific game elements. You accomplish this with basic move and zoom functionality.
Finally, you saw how to implement two different types of audio: background music and audio cues (or sound effects). You can use background music to set the mood or atmosphere of the game, and you control its playback at run time. You use audio cues or sound effects to augment a specific action of the player or the game. Audio cues, once started, cannot be modified.
Quick reference
To |
Do this |
|---|---|
| Create simple animation for an object | Identify the corresponding begin and end (row, column) positions on the sprite sheet. |
| Instantiate a SpritePrimitive object | 1. Identify and include the desired sprite sheet image in your project, making sure you take note of the file name. 2. Instantiate a SpritePrimitive game object with the corresponding file name. 3. Define the size and position of the game object. 4. Configure the game object to correspond to the amount of rows, columns, and padding on the sprite sheet. |
| Define a sprite animation with SpritePrimitive | Call the SetSpriteAnimation() function, as follows: 1. Identify the beginning and end (row, column) of the animation. 2. Define the speed of the animation as a function of the number of Update() function calls. |
| Ensure sprite animation is shown | Call the Update() function of the SpritePrimitive object in GameState.UpdateGame(). |
| Support pixel-accurate collision for an animated sprite | Override the texture size and position functions of the TexturedPrimitive class to return the corresponding information for one sprite. Having the TexturedPrimitivePixelCollide class refer to these new definitions results in pixel-accurate collision support for individual sprites. |
| Move a camera | Call Camera.MoveCameraBy(deltaMovement), where deltaMovement describes the amount that the camera position will be moved in the x and y directions. |
| Zoom the camera in or out | Call Camera.ZoomCameraBy(deltaSize), where a positive deltaSize causes the camera to zoom out (see more of the game window), and a negative value causes the camera to zoom into the game window. |
| Have the camera follow an object | Continuously detect the collisions between the object and the camera (by calling Camera.CollidedWithCameraWindow()) and move the camera position accordingly. Refer to Chapter 3 for the details of Camera.CollidedWithCameraWindow(). |
| Start background audio | Call AudioSupport.PlayBackgroundAudio("file name", level). |
| Stop background audio | Call AudioSupport.PlayBackgroundAudio(null, 0). |
| Play an audio cue | Call AudioSupport.PlayACue("cueName"). |