
![]()
Getting to Know the MonoGame Framework
After completing this chapter, you will be able to:
- Use the most important features of the Microsoft Visual Studio integrated development environment (IDE)
- Use the most appropriate MonoGame project development template
- Describe the functions of all the relevant files in a MonoGame project
- Work with the MonoGame project and application structure
- Use the functions and operations of the Draw/Update loop
Before diving headlong into game creation, it is a good idea to first become familiar with the development environment you will be using. The primary tools you will work with throughout this book are Visual Studio Express and MonoGame.
The fundamental concepts behind programming games are independent from any particular operating system or mobile device. For the purposes of this book and learning the universal building blocks of 2D game development, we will build examples using a Windows Desktop template, which is accessible to anyone using a Windows machine with Visual Studio and MonoGame.
MonoGame is designed to allow maximum code reuse and ease of porting between platforms, so once you’re confident building 2D games, you will have the option to develop games for all popular operating systems including Windows, Mac OS, and Linux, and most popular mobile platforms including Windows Phone, iOS, and Android. MonoGame is even compatible with building games for Playstation Mobile and the OUYA console, and cross-platform support is improving all the time.
![]() Note MonoGame is free, but there may be other requirements and costs associated with some of the platforms you eventually want to target. For example, you will need a Mac to target Mac OS or iOS, and some mobile platforms require a paid developer license to sell or distribute your games. For more information on current requirements, see http://monogame.net/price.
Note MonoGame is free, but there may be other requirements and costs associated with some of the platforms you eventually want to target. For example, you will need a Mac to target Mac OS or iOS, and some mobile platforms require a paid developer license to sell or distribute your games. For more information on current requirements, see http://monogame.net/price.
The Visual Studio Development Environment
To follow along, you will need to download and install both Visual Studio and MonoGame. If you have yet to install either of these packages, you can refer to the download and installation instructions in the “Downloading and Installing Development Tools” section of Chapter 1 before proceeding.
After you have installed the required tools, you can start creating your first project. Luckily, Visual Studio Express with MonoGame lets you create new projects with minimal effort.
Creating a MonoGame project in Visual Studio
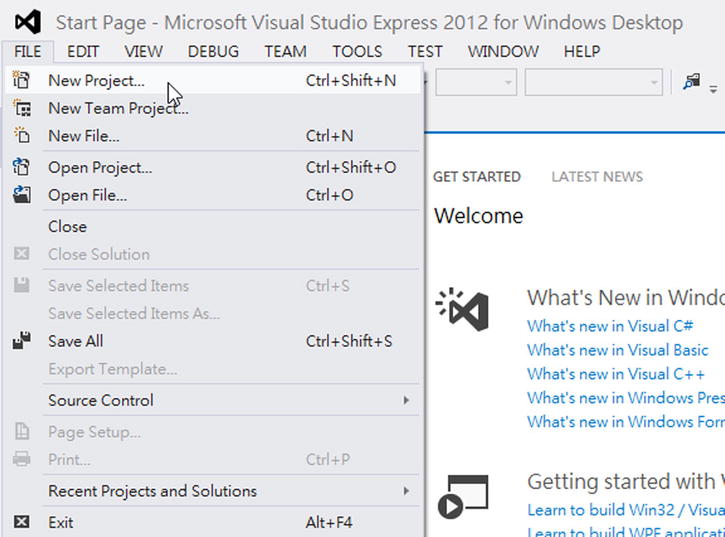
- Open Visual Studio. Press Ctrl+Shift+N on your keyboard or select File
 New Project, as shown in the following image. A New Project window will appear.
- Under the Installed Templates section, expand the Visual C# section and then select MonoGame. A list of templates for both Windows and various mobile devices will appear. You can see an example of this in the following image:
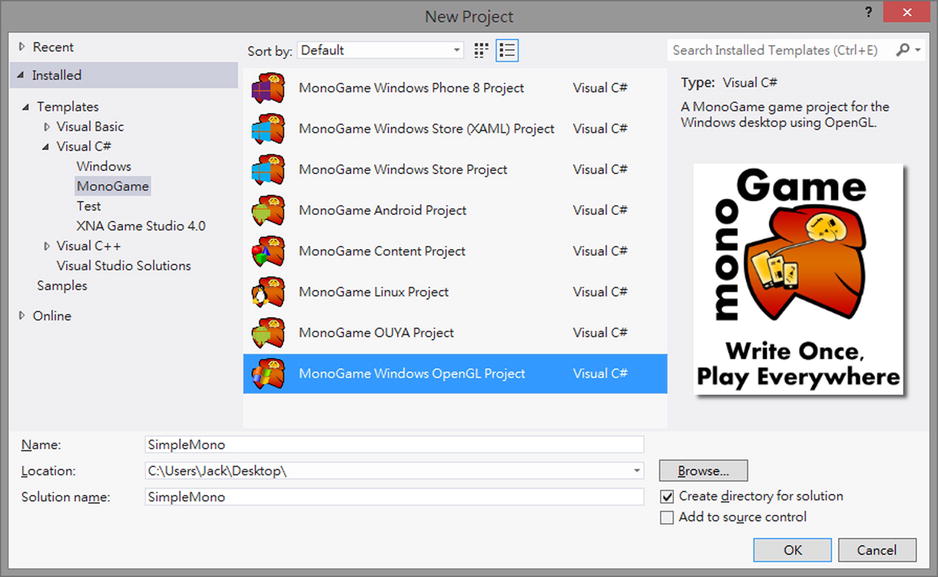
- Select MonoGame Windows OpenGL Project from the Installed Templates. A short description of the template will appear on the right.
- Name the project SimpleMono.
 Note Optionally, you can also specify the solution name of the project. (By default, the solution name will be the same as the name of the project.)
 - If you like, you may specify a location for the project on your file system (the default location is in the Projects folder under C:YourUserNameDocumentsVisual Studio 2012Projects).
- Click the OK button.
Visual Studio generates a MonoGame project named SimpleMono for you. The project contains several default files that in turn contain a minimum skeleton of code required for the project to compile and run.
Go ahead and start the program now by selecting Debug ![]() Start Debugging or by pressing the F5 key on your keyboard. A new window will appear showing an empty game world in cornflower blue. Figure 2-1 shows an example of what the default project (which has no real content yet) looks like when you run it.
Start Debugging or by pressing the F5 key on your keyboard. A new window will appear showing an empty game world in cornflower blue. Figure 2-1 shows an example of what the default project (which has no real content yet) looks like when you run it.
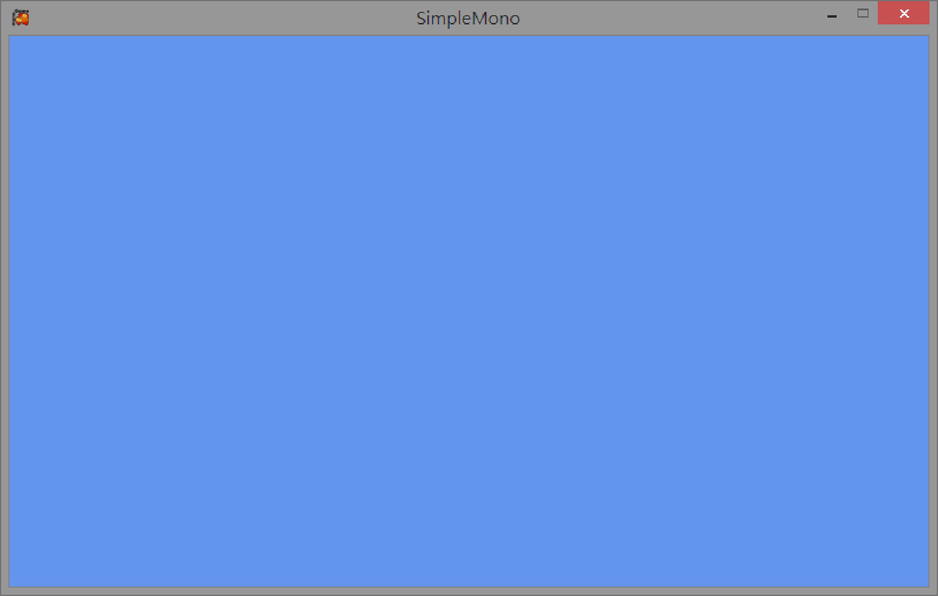
Figure 2-1. Running the default game project
![]() Note Please refer to the following troubleshooting suggestions if you should run into any trouble compiling or running your SimpleMono game project.
Note Please refer to the following troubleshooting suggestions if you should run into any trouble compiling or running your SimpleMono game project.
To stop the program, either close the game world window or select Debug ![]() Stop Debugging in Visual Studio.
Stop Debugging in Visual Studio.
You have successfully run your first MonoGame project. Now that you have a working project, you’ll use that to help you get oriented with the IDE.
If you should run into any trouble compiling or running your SimpleMono project, please refer to the following troubleshooting suggestions. You can skip the troubleshooting sections if you have not encountered any problems.
Troubleshooting: For Windows 8 machines only
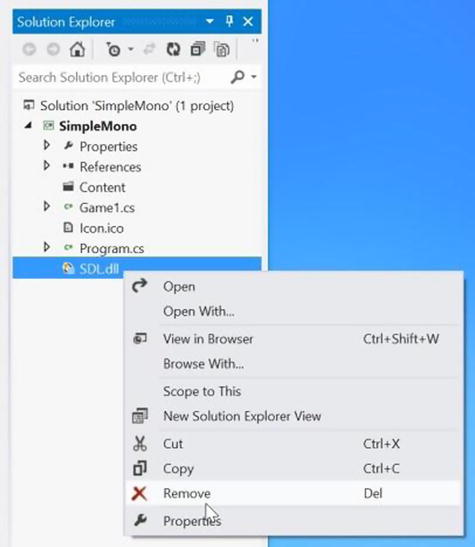
If you are working on a machine that runs the Microsoft Windows 8 operating system, you may encounter the error where upon hitting compile and run the IDE complains that the SDL.dll file cannot be found, as indicated in Figure 2-2.

Figure 2-2. Error screen in Windows 8
Fortunately, this error can be easily remedied by removing and reestablishing the correct reference to the SDL.dll file. Here are the steps to accomplishing this task.
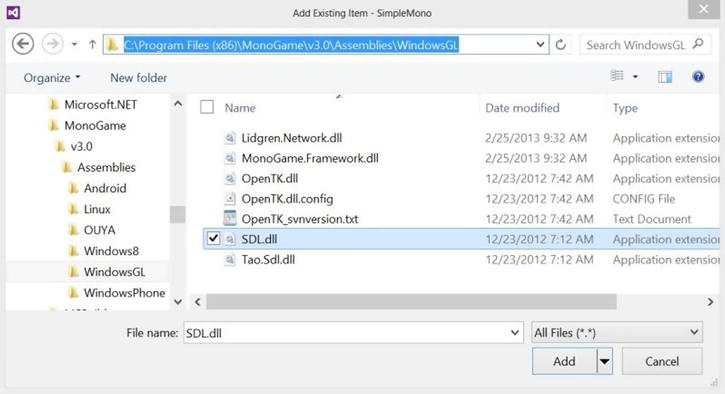
- Remove the incorrect reference by right-clicking over the SDL.dll file and removing it as indicated in the following.
- Add a new reference to the correct SDL.dll file location by right-clicking the SimpleMono project and selecting Add Existing Item as indicated in the following.

- In the file dialog, make sure you set the filter to All Files (*.*) and navigate to:
C:Program Files (x86)MonoGamev3.0AssembliesWindowsGL
select SDL.dll and click Add, as indicated in the following.
Now, your MonoGame project should compile and run.
You might encounter the error shown in Figure 2-3 when trying to run your SimpleMono project.

Figure 2-3. Error screen in Visual Studio
This means the device driver of your graphics card is not compatible with OpenGL 3. You need to update your graphics card driver, or you need to find a suitable graphics card in order to follow the rest of the examples in this book.
The Visual Studio layout and Solution Explorer
Upon first examining the Visual Studio development environment shown in Figure 2-4, you’ll notice it is divided into four main sections:
- Primary window: Displays the source code or the information of the currently selected file
- Error List window: Displays the syntax errors in the code
- Solution Explorer window: Displays the projects and files for the current solution
- Properties window: Displays the properties of the currently selected object
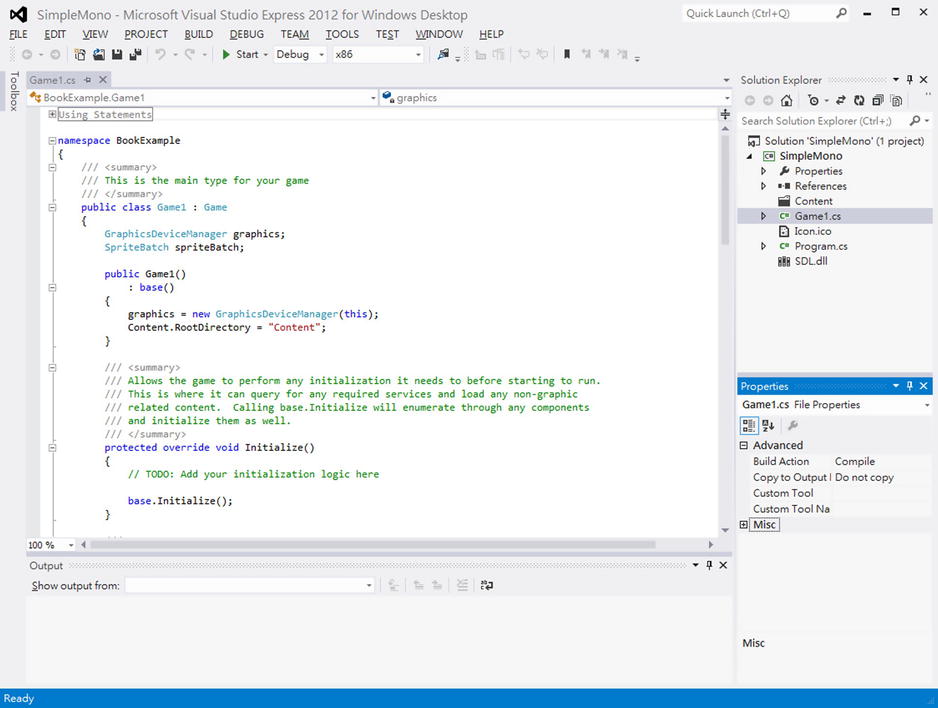
Figure 2-4. The Primary, Error List, Solution Explorer, and Properties windows of Visual Studio
![]() Note If you do not see the Error List, Solution Explorer, or Properties window in your IDE, click the View menu and then select the name of the missing window to display it in the IDE.
Note If you do not see the Error List, Solution Explorer, or Properties window in your IDE, click the View menu and then select the name of the missing window to display it in the IDE.
Because Solution Explorer is the least straightforward window in the bunch, it’s worth exploring in more detail. In Figure 2-5, you can see that the SimpleMono solution contains a single project: SimpleMono. This project represents the game project itself. Within this project is the Content folder, which will contain the game’s assets, such as art and sound. You can see the reference to the Content folder in Figure 2-5.

Figure 2-5. The Solution Explorer window
Table 2-1 describes the functions of the remaining files shown in Solution Explorer.
Table 2-1. Purpose of Each File
SimpleMono project: folder/file |
Purpose |
|---|---|
| Icon.ico | Icon image in the top-left corner of the application window |
| Properties/AssemblyInfo.cs | Configuration and information of the game—for example, the window title and the Globally Unique Identifier (GUID), which gives the game a unique name. Further coverage of the content of this file will follow. |
| Program.cs | Container of the main() function. Content to this file will follow. |
| Game1.cs | Source code of the game. Content to this file will follow. |
| References | Reference to all required system libraries (including MonoGame libraries) |
| SDL.dll | This is the Simple DirectMedia Layer runtime library. This library should be installed in C:Program Files (x86)MonoGamev3.0AssembliesWindowsGL and will be copied to the folder that contains your game when this project is compiled. |
As you develop the game, you’ll modify most of these files to suit the needs of your game, especially the file Game1.cs. Along with the source code files you create, Game1.cs is where the logic of your game resides. However, before tackling the source code in more detail, take a look at the project you created in your file system so you can see its relation to Solution Explorer.
The relationship between the file system and Solution Explorer
Open the SimpleMono project location on your file system. The folder should look similar to the one shown in Figure 2-6. Let’s examine these files a little more closely. Visual Studio generates both the SimpleNono.sln and SimpleMono.suo files when you create the project. SimpleMono.sln is the project solution description, while SimpleMono.suo records various Visual Studio settings associated with the current solution.

Figure 2-6. Contents of the SimpleMono project folder
By opening the SimpleMonoSimpleMono subfolder (Figure 2-7), you will see that it contains the files and folders you saw in Visual Studio’s Solution Explorer—along with a few additions. The bin and obj folders are hidden by default in Solution Explorer. They contain the project’s executable and compiled files, respectively. The SimpleMono.csproj file contains the project description and is also hidden by Solution Explorer. The last additional file is OpenTK.dll, the Open Toolkit runtime library. By default OpenTK.dll is also installed in C:Program Files (x86)MonoGamev3.0AssembliesWindowsGL. Together with SDL.dll, these runtime libraries allow your MonoGame projects access to low-level graphics and media functionalities. The remaining files all appear within Solution Explorer and were described in Table 2-1.

Figure 2-7. Contents of the SimpleMonoSimpleMono project folder
![]() Note To display the hidden files within Solution Explorer, toggle the Show/Hide button in the top-left corner of the Solution Explorer window.
Note To display the hidden files within Solution Explorer, toggle the Show/Hide button in the top-left corner of the Solution Explorer window.
Understanding the MonoGame Framework
The first file you should know about is AssemblyInfo.cs. You can find that file in the Properties folder in Solution Explorer. Overall, AssemblyInfo.cs is not the most interesting source file. However, there are a few important aspects that we can touch upon, the first being the title of the game window. The following code shows the contents of the file. The first line reads [assembly: AssemblyTitle("SimpleMono")]. This code, which was generated automatically, sets the game window’s title to SimpleMono when the project executes. Following this line are many other descriptors for the project, including company and trademark. Also, note the line of code that reads [assembly: Guid("64ac7fb4-d5bf-45ed-b760-92ca9bfc3905")], which represents the unique ID generated for this project.
// General Information about an assembly is controlled through the following
// set of attributes. Change these attribute values to modify the information
// associated with an assembly.
[assembly: AssemblyTitle("SimpleMono")]
[assembly: AssemblyProduct("SimpleMono")]
[assembly: AssemblyDescription("")]
[assembly: AssemblyCompany("")]
[assembly: AssemblyCopyright("Copyright © 2013")]
[assembly: AssemblyTrademark("")]
[assembly: AssemblyCulture("")]

// Setting ComVisible to false makes the types in this assembly not visible
// to COM components. If you need to access a type in this assembly from
// COM, set the ComVisible attribute to true on that type.
[assembly: ComVisible(false)]

// The following GUID is for the ID of the typelib if this project is exposed to COM
[assembly: Guid("64ac7fb4-d5bf-45ed-b760-92ca9bfc3905")]
The next file of interest is Program.cs. This is the source file that runs your game. Another way to look at it is that this file contains the main() function, or entry point for code execution. First, at the top of the following code is the using System; statement. For those with experience in other languages, the keyword using in this line is similar to the keywords include (of C++) and import (of Java). As you look inside main(), you will see that the code instantiates a Game1 object and invokes its Run() command.
![]() Note When starting out, it is a good idea to avoid making modifications to this file. Try to keep all the game code in the Game1 object and other files you create.
Note When starting out, it is a good idea to avoid making modifications to this file. Try to keep all the game code in the Game1 object and other files you create.
#region Using Statements
using System;
using System.Collections.Generic;
using System.Linq;
#endregion

namespace BookExample
{
#if WINDOWS || LINUX
    /// <summary>
    /// The main class.
    /// </summary>
    public static class Program
    {
        /// <summary>
        /// The main entry point for the application.
        /// </summary>
        [STAThread]
        static void Main()
        {
            using (var game = new Game1())
                game.Run();
        }
    }
#endif
}
The last project-generated source code file you should look at is Game1.cs. A shortened example of Game1.cs is shown in the following. First, note that the file inherits from (is a subclass of) the MonoGame’s Game class. This provides the Game1 class with access to code designed to assist in common game tasks, such as initialization, rendering, loading, and updating. You can see this reflected in the override functions that were generated for you (shown following). These functions are invoked by the MonoGame’s Game library in a fixed sequence to support proper initialization and runtime functionality. Because you will be using these Game functions often, you’ll explore them in more depth in upcoming sections.
namespace BookExample
{
    public class Game1 : Game
    {
        GraphicsDeviceManager graphics;
        SpriteBatch spriteBatch;

        public Game1()
        {
            ...
        }

        protected override void Initialize()
        {
            ...
        }

        protected override void LoadContent()
        {
            ...
        }

        protected override void UnloadContent()
        {
            ...
        }

        protected override void Update(GameTime gameTime)
        {
            ...
        }

        protected override void Draw(GameTime gameTime)
        {
            ...
        }
    }
}
![]() Note The full name of the Game class that we inherited from is actually Microsoft.Xna.Framework.Game. For this reason, you may sometimes see the Game1 class defined as follows:
Note The full name of the Game class that we inherited from is actually Microsoft.Xna.Framework.Game. For this reason, you may sometimes see the Game1 class defined as follows:
public class Game1 : Micrrosoft.Xna.Framework.Game { ... }
with the full name of the Game class spelled out. The results are the same in either case; with or without full name for the Game class, we are defining a subclass of Microsoft.Xna.Framework.Game. In the following discussion, we choose to use the full name to avoid causing confusion between Game and Game1 classes.
The Microsoft.Xna.Framework.Game Class
Like most classes, a Microsoft.Xna.Framework.Game subclass starts with a constructor. The constructor is responsible for allocating and initializing the internal memory of the game. It also handles the internal initialization of MonoGame by creating and initializing the graphics hardware. You can see this reflected in the following code, which shows the constructor of the Game1 class with the line graphics = new GraphicsDeviceManager(this). This line causes MonoGame to obtain and prepare the graphics device on your machine so you can use it for your game.
namespace Book_Example
{
    /// <summary>
    /// This is the main type for your game
    /// </summary>
    public class Game1 : Game
    {
        GraphicsDeviceManager graphics;
        SpriteBatch spriteBatch;

        public Game1()
        {
            graphics = new GraphicsDeviceManager(this);
            Content.RootDirectory = "Content";
        }

        ...
    }
}
The Initialize() function gets called next. This function initializes the game’s graphics requirements, such as the window size. However, by default, the only call within the initialize function is its superclass function call, base.Initialize(), as shown in the following example. As you will see in many of the examples in the rest of this book, you will typically add custom non-default initialization code in this function.
protected override void Initialize()
{
    // TODO: Add your initialization logic here

    base.Initialize();
}
After the initialize function, MonoGame calls the LoadContent() function shown next. This function is fairly self-explanatory; it loads all the content or assets of your project, such as the game art and audio. It is important to note that this function is called only once per execution. Similarly, UnloadContent() is also called once per execution. However, as you may have guessed, UnloadContent() is called at the end of the game. It should unload all the content loaded by LoadContent().
/// <summary>
/// LoadContent will be called once per game and is the place to load
/// all of your content.
/// </summary>
protected override void LoadContent()
{
    // Create a new SpriteBatch, which can be used to draw textures.
    spriteBatch = new SpriteBatch(GraphicsDevice);

    // TODO: use this.Content to load your game content here
}

/// <summary>
/// UnloadContent will be called once per game and is the place to unload
/// all content.
/// </summary>
protected override void UnloadContent()
{
    // TODO: Unload any non-ContentManager content here
}
The next two functions, Update() and Draw(), behave fundamentally differently from LoadContent() and UnloadContent() in that they are both called many times per second throughout game execution. For example, it’s not unusual for Draw() to be called 60 times per second and Update() to be called at an even higher rate.
The Update() function handles any change to the game state and is also responsible for polling the input devices. This means that whenever the position of a game object within the game world is modified, or an input device (such as a controller) needs its state checked, that change gets passed through the Update() function. The following code shows the Update() function polling the state of a gamepad to see if it should exit the game.
protected override void Update(GameTime gameTime)
{
    // Allows the game to exit
    if (GamePad.GetState(PlayerIndex.One).Buttons.Back == ButtonState.Pressed)
        this.Exit();

    // TODO: Add your update logic here
    base.Update(gameTime);
}
The Draw() function draws the game world to the screen each time it is called, which is often around 60 times per second. Draw() clears the screen every cycle and redraws all the rendered game objects. In the example code for this game, the screen is cleared with cornflower blue at every draw cycle.
![]() Note It is true that in general the Draw() function is called at a rate that is similar to the refresh frequency of your display monitor. However, these two rates are completely independent from each other. For example, changing your monitor’s refresh rate has no effect on how often the Draw() function is called.
Note It is true that in general the Draw() function is called at a rate that is similar to the refresh frequency of your display monitor. However, these two rates are completely independent from each other. For example, changing your monitor’s refresh rate has no effect on how often the Draw() function is called.
protected override void Draw(GameTime gameTime)
{
    GraphicsDevice.Clear(Color.CornflowerBlue);

    // TODO: Add your drawing code here

    base.Draw(gameTime);
}
It is important to note that the purposes and operations of Update() and Draw() are well defined and distinct. The Update() function should update the state of the game (typically by changing instance variables) and should never draw anything, while the Draw() function should only display the game state (typically by rendering the relevant instance variables) and never change the game state. Mixing these two functions will cause many problems.
Adding, Drawing, and Controlling Content
Now that you have a basic understanding of some of the functionality provided by MonoGame’s Game class, let’s go through the process of drawing and controlling something on the screen.
![]() Note You can develop and test MonoGame projects using a game controller or computer keyboard. For each project in the book we have listed both options. We used an Xbox 360 controller while writing the projects for this book. You can use an Xbox 360 compatible controller or you can simply use the keyboard on your computer. The Input Wrapper project later in this chapter shows you how to simplify input options so you won’t have to worry about which input type you are using.
Note You can develop and test MonoGame projects using a game controller or computer keyboard. For each project in the book we have listed both options. We used an Xbox 360 controller while writing the projects for this book. You can use an Xbox 360 compatible controller or you can simply use the keyboard on your computer. The Input Wrapper project later in this chapter shows you how to simplify input options so you won’t have to worry about which input type you are using.
This project demonstrates how to load images into a MonoGame project. Draw these image files as textures and manipulate their positions. Figure 2-8 shows an example of what the project looks like when running.

Figure 2-8. The Draw and Control project when it is running
The project’s controls are as follows:
- Back button (on the controller) or F1 key on the keyboard: Exits the program
- Left thumbstick or the WSAD keys on the keyboard: Moves the image with the white background
- Right thumbstick or the arrow keys on the keyboard: Moves the image with the transparent background
The goals of the project are as follows:
- To understand and experience working with the Content folder and external images
- To understand the differences between .jpg and .png images (the transparency)
- To work with simple game states (position of images)
- To experience the basic drawing coordinate system and the Update/Draw loop
Creating the Draw and Control project
- Start by creating a new project and naming it DrawAndControl. Recall that in this book we work with the MonoGame Windows OpenGL Project template; however, if you need to, you can refer back to the “Visual Studio Development Environment” section for a more detailed procedure.
- Next, add the images to the content project in your game. Add a .jpg and a .png file to the project. This project uses UWB.jpg and UWB.png, which you can find in the sample code, in the Chapter02ImagesUsed folder.
To add an image, right-click the Content folder and select Add
Existing Item, as shown in the following image. Images you add to the project will be copied to the bin folder when the project is built. It is essential that these images exist in the bin folder such that they can be deployed as a part of the game.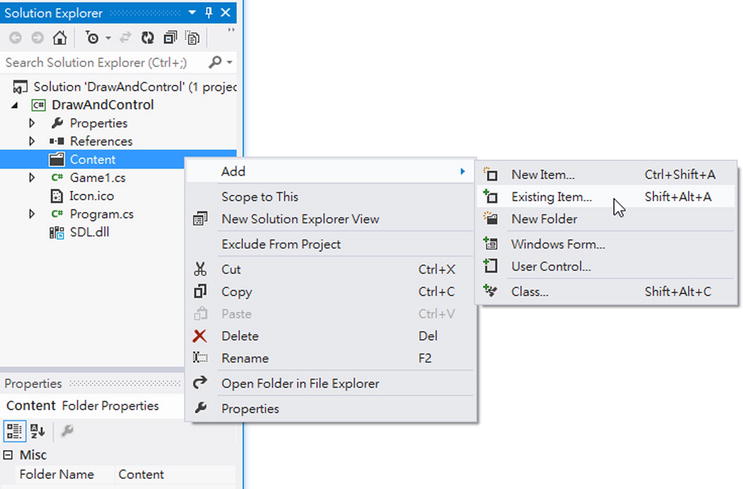 Note The .png format supports transparency, or alpha, while the .jpg format does not. Transparency support for an image format means that areas of the image can be clear or partially clear. When an image has transparent parts, it uses the background to fill in those areas. When running the Draw and Control project, as shown in Figure 2-7, the difference between having and not having transparency support is easily recognizable.
An alternative way of adding images to the Content folder is by dragging images from your file system and dropping them directly into the Content folder. However, with this approach, you must manually set the content build properties of the images added. The following steps show you the procedure.
- a. Right-click over the image you just dragged into the Content folder and select Properties, as shown in the following image.
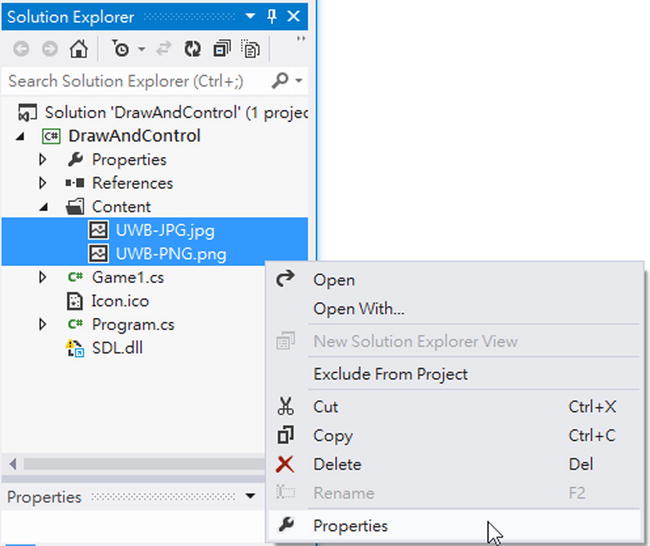
- b. In the corresponding properties window, make sure the Build Action is set to Content, as shown in the following image.

- c. In addition, still in the Properties window, ensure the Copy to Output Directory option is set to Copy if newer, as shown in the following image.

- a. Right-click over the image you just dragged into the Content folder and select Properties, as shown in the following image.
- With the images in your project, you can now define the game state. Do this by inserting the following lines of code into your Game1 class.
- a. Declare the following instance variables: Texture2D mJPGImage, Vector2 mJPGPosition, Texture2D mPNGImage, and Vector2 mPNGPosition, as shown in the following code:
public class Game1 : Game
{
    GraphicsDeviceManager mGraphics;
    SpriteBatch mSpriteBatch;

    // Support for loading and drawing the JPG image
    Texture2D mJPGImage;     // The UWB-JPG.jpg image to be loaded
    Vector2 mJPGPosition;    // Top-Left pixel position of UWB-JPG.jpg

    // Support for loading and drawing of the PNG image
    Texture2D mPNGImage;     // The UWB-PNG.png image to be loaded
    Vector2 mPNGPosition;    // Top-Left pixel position of UWB-PNG.png
    ...
}
Note This book follows the convention of naming all instance variables with names that begin with a lowercase “m.” Notice that in the preceding code listing we have renamed the template SpriteBatch and Graphics variables accordingly. - b. Next, initialize the game state by setting your images’ starting position within the Initialize() function and loading your external images in the LoadContent() function:
protected override void Initialize()
{
    // Initialize the initial image positions.
    mJPGPosition = new Vector2(10f, 10f);
    mPNGPosition = new Vector2(100f, 100f);

    // Important to let the base class perform its initialization
    base.Initialize();
}

protected override void LoadContent()
{
    // Create a new SpriteBatch, which can be used to draw textures.
    mSpriteBatch = new SpriteBatch(GraphicsDevice);

    // Load the images.
    mJPGImage = Content.Load<Texture2D>("UWB-JPG");
    mPNGImage = Content.Load<Texture2D>("UWB-PNG");
}
- a. Declare the following instance variables: Texture2D mJPGImage, Vector2 mJPGPosition, Texture2D mPNGImage, and Vector2 mPNGPosition, as shown in the following code:
- With the images loaded and ready, you can now draw them to your game world. You do this with the provided SpriteBatch object. As shown in the following code, the SpriteBatch.Begin() call initializes the drawing process, and the two SpriteBatch.Draw() calls add images to the batch to be rendered. When all desired drawing is done, you flush and display the drawn images with a call to the SpriteBatch.End() function. Notice that in the SpriteBatch.End() function, you simply draw the state of the game by rendering the images at the corresponding positions. You should avoid changing the game state information in the Draw() function.
Important Changes to the game state belong in the Update() function, with a few exceptions. Mixing the two functions will cause trouble because their calling frequencies are independent from each other.
protected override void Draw(GameTime gameTime)
{
    // Clear to background color
    GraphicsDevice.Clear(Color.CornflowerBlue);

    mSpriteBatch.Begin(); // Initialize drawing support

    // Draw the JPGImage
    mSpriteBatch.Draw(mJPGImage, mJPGPosition, Color.White);

    // Draw the PNGImage
    mSpriteBatch.Draw(mPNGImage, mPNGPosition, Color.White);

    mSpriteBatch.End(); // Inform graphics system we are done drawing

    base.Draw(gameTime);
} - The last step is to update the position of the images based on the input from the user. As you can see in the following code, at every update you add to the images’ current position by the gamepad’s thumbstick displacement values. In this case, notice that the Update() function updates the game state only by changing the various instance variables. You should avoid drawing any of the game objects in the Update() function. Additionally, if you prefer to use the mouse and keyboard, code for this is also provided. Both the keyboard and mouse are handled by polling the current state for the key or button of interest and modifying the appropriate values. From this point on, projects will use only the game controller for input. If you wish to use the keyboard and mouse, you will need to add the code to your project.
protected override void Update(GameTime gameTime)
{
    #region Game Controller
    // Allows the game to exit
    if (GamePad.GetState(PlayerIndex.One).Buttons.Back == ButtonState.Pressed)
        this.Exit();

    // Update the image positions with left/right thumbsticks
    mJPGPosition += GamePad.GetState(PlayerIndex.One).ThumbSticks.Left;
    mPNGPosition += GamePad.GetState(PlayerIndex.One).ThumbSticks.Right;
    #endregion

    #region Keyboard
    // Allows the game to exit
    if (Keyboard.GetState().IsKeyDown(Keys.Escape))
        this.Exit();

    // Update the image positions with Arrow keys
    if (Keyboard.GetState().IsKeyDown(Keys.Left))
        mJPGPosition.X--;
    if (Keyboard.GetState().IsKeyDown(Keys.Right))
        mJPGPosition.X++;
    if (Keyboard.GetState().IsKeyDown(Keys.Up))
        mJPGPosition.Y--;
    if (Keyboard.GetState().IsKeyDown(Keys.Down))
        mJPGPosition.Y++;

    // Update the image positions with AWSD
    if (Keyboard.GetState().IsKeyDown(Keys.A))
        mPNGPosition.X--;
    if (Keyboard.GetState().IsKeyDown(Keys.D))
        mPNGPosition.X++;
    if (Keyboard.GetState().IsKeyDown(Keys.W))
        mPNGPosition.Y--;
    if (Keyboard.GetState().IsKeyDown(Keys.S))
        mPNGPosition.Y++;
    #endregion

    #region Mouse
    // Poll mouse state
    MouseState mMouseState = Mouse.GetState();

    // If left mouse button is pressed
    if (mMouseState.LeftButton == ButtonState.Pressed)
        mJPGPosition = new Vector2(mMouseState.X, mMouseState.Y);

    // If right mouse button is pressed
    if (mMouseState.RightButton == ButtonState.Pressed)
        mPNGPosition = new Vector2(mMouseState.X, mMouseState.Y);
    #endregion

    base.Update(gameTime);
}
The project is now ready. Build the project to see if any errors occur. If not, run the project and explore the program by moving the images around.
![]() Note If you’re using a game controller, remember to have it connected before executing the program.
Note If you’re using a game controller, remember to have it connected before executing the program.
Wrapping Game Controller with the Keyboard
As illustrated in the previous example, MonoGame supports the game controller, keyboard, and mouse. However, to maintain the support for all three types of input devices can involve a large amount of code and can complicate the explaining and learning of new concepts. In this example, we introduce the InputWrapper class to wrap game controller functionality with the keyboard. In this way, you can continue reading and experimenting with the examples in this book by using a game controller or the keyboard. However, you will not have to be concerned with the details of either one.
This project demonstrates how to unify the interaction with game controller and keyboard input devices. Figure 2-9 shows an example of what the project looks like when running. Note that this project appears identical to the previous one with the only difference being the code that handles user’s input.
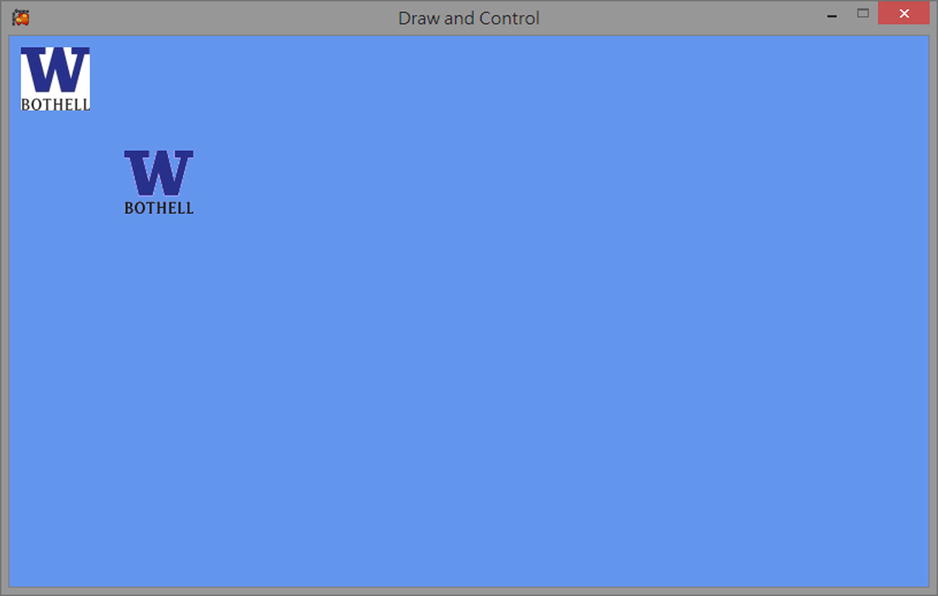
Figure 2-9. The Input Wrapper project when it is running
The project’s controls are as follows:
- Back button (on the controller) or F1 key on the keyboard: Exits the program
- Left thumbstick or the WSAD keys on the keyboard: Moves the image with the white background
- Right thumbstick or the arrow keys on the keyboard: Moves the image with the transparent background
The goal of the project is as follows:
- To understand how to design a wrapper class to unify the game controller and keyboard input
Creating the Input Wrapper project
- Start by creating a new project and naming it InputWrapper.
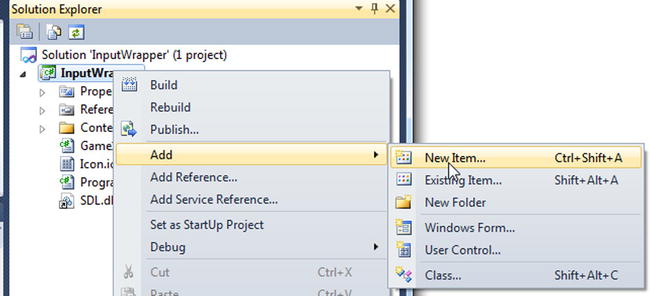
- Add a new source file into your project by right-clicking over the project name and selecting Add New Item, as shown in the following image.
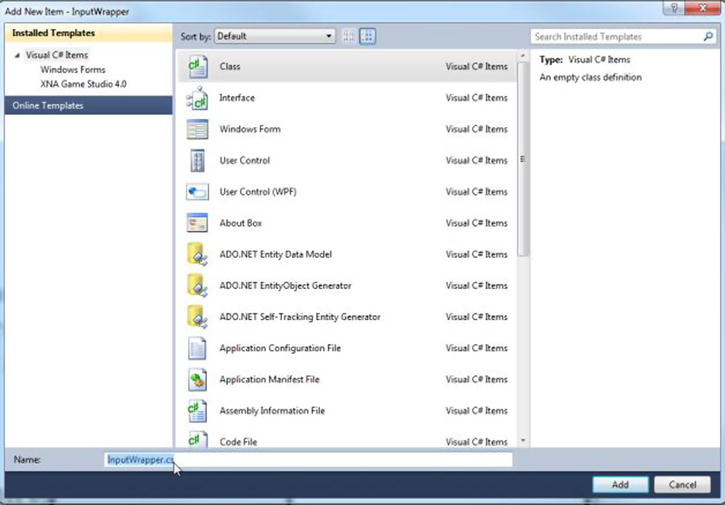
- Select a new C# class, and name the file InputWrapper.cs, as show in the following image.
- Double-click the newly created InputWrapper.cs file to open it for editing.
- a. Include all the references to necessary libraries for working with the keyboard with the following using statements.
using Microsoft.Xna.Framework;
using Microsoft.Xna.Framework.Input;
using Microsoft.Xna.Framework.Graphics; - b. Define AllInputButtons outside of the InputWrapper class, an internal structure that captures button functionality of the game controller. The internal keyword ensures that the AllInputButtons structure is accessible only from within this library.
internal struct AllInputButtons
{
              ...
} - c. Within the AllInputButtons structure, define the keys for all the buttons that we will work with. In the following, we define the K key for the game controller A button, L key for the B button, and so on.
private const Keys kA_ButtonKey = Keys.K;
private const Keys kB_ButtonKey = Keys.L;
private const Keys kX_ButtonKey = Keys.J;
private const Keys kY_ButtonKey = Keys.I;
private const Keys kBack_ButtonKey = Keys.F1;
private const Keys kStart_ButtonKey = Keys.F2;
Note Variables that begin with the letter k represent a constant. - d. Continue to work in AllInputButtons structure, define a GetState() function to poll the state of the corresponding keyboard key or the game controller button if one is connected. Notice the order upon which the states are polled: keyboard followed by game controller. This order means that when a game controller and the keyboard are both present, if a player types on the keyboard and presses the corresponding game controller button at the same time, we will process the keyboard input.
private ButtonState GetState(ButtonState gamePadButtonState, Keys key)
{
        if (Keyboard.GetState().IsKeyDown(key))
             return ButtonState.Pressed;

        if ((GamePad.GetState(PlayerIndex.One).IsConnected))
             return gamePadButtonState;

        return ButtonState.Released;
} - e. Final task in AllInputButtons structure is to define assessors with corresponding button names that will call the GetState() function. The following shows the assessors for the A, B, Back, Start, X, and Y buttons.
public ButtonState A {
        get { return GetState(GamePad.GetState(PlayerIndex.One).Buttons.A,
                                kA_ButtonKey); } }
public ButtonState B {
        get { return GetState(GamePad.GetState(PlayerIndex.One).Buttons.B,
                                kB_ButtonKey);  } }
public ButtonState Back {
        get { return GetState(GamePad.GetState(PlayerIndex.One).Buttons.Back,
                                kBack_ButtonKey); } }
public ButtonState Start {
        get { return GetState(GamePad.GetState(PlayerIndex.One).Buttons.Start,
                                kStart_ButtonKey); } }
public ButtonState X {
        get { return GetState(GamePad.GetState(PlayerIndex.One).Buttons.X,
                                kX_ButtonKey); } }
public ButtonState Y {
        get { return GetState(GamePad.GetState(PlayerIndex.One).Buttons.Y,
kY_ButtonKey); } } - f. We must repeat the preceding steps b to e to define internal structures AllInputTriggers and AllThumbSticks for wrapping game controller triggers and thumbsticks.
- g. For AllInputTriggers, the left and right triggers are defined to be the N and M keys, and a keyboard trigger will return a floating point value of 0.75. The GetTriggerState() function implements the similar priority of checking the keyboard before the game controller.
internal struct AllInputTriggers
{
        private const Keys kLeftTrigger = Keys.N;
        private const Keys kRightTrigger = Keys.M;
        const float kKeyTriggerValue = 0.75f;

        private float GetTriggerState(float gamePadTrigger, Keys key)
        {
            if (Keyboard.GetState().IsKeyDown(key))
                return kKeyTriggerValue;

            if ((GamePad.GetState(PlayerIndex.One).IsConnected))
                return gamePadTrigger;

            return 0f;
        }

        public float Left
        {
                get { return GetTriggerState(
                                GamePad.GetState(PlayerIndex.One).Triggers.Left,
                                kLeftTrigger); }
        }

        public float Right
        {
                get { return GetTriggerState(
                                GamePad.GetState(PlayerIndex.One).Triggers.Right,
                                kRightTrigger); }
        }
} - h. For AllThumbSticks, the left thumbstick’s positive and negative X movements are mapped to A and D keys, the corresponding Y movements are mapped to W and S keys. The right thumbstick’s movements are mapped to the corresponding arrow keys. The defined ThumbStickState() function polls both the game controller and keyboard to accumulate the returned movement values.
internal struct AllThumbSticks
{
        const Keys kLeftThumbStickUp = Keys.W;
        const Keys kLeftThumbStickDown = Keys.S;
        const Keys kLeftThumbStickLeft = Keys.A;
        const Keys kLeftThumbStickRight = Keys.D;

        const Keys kRightThumbStickUp = Keys.Up;
        const Keys kRightThumbStickDown = Keys.Down;
        const Keys kRightThumbStickLeft = Keys.Left;
        const Keys kRightThumbStickRight = Keys.Right;

        const float kKeyDownValue = 0.75f;

        private Vector2 ThumbStickState(Vector2 thumbStickValue,
                                Keys up, Keys down, Keys left, Keys right)
        {
            Vector2 r = new Vector2(0f, 0f);
            if ((GamePad.GetState(PlayerIndex.One).IsConnected))
            {
                r = thumbStickValue;
            }
            if (Keyboard.GetState().IsKeyDown(up))
                r.Y += kKeyDownValue;
            if (Keyboard.GetState().IsKeyDown(down))
                r.Y -= kKeyDownValue;
            if (Keyboard.GetState().IsKeyDown(left))
                r.X -= kKeyDownValue;
            if (Keyboard.GetState().IsKeyDown(right))
                r.X += kKeyDownValue;

            return r;
        }

        public Vector2 Left
        {
            get {
                return ThumbStickState(GamePad.GetState(PlayerIndex.One).ThumbSticks.Left,
                                kLeftThumbStickUp, kLeftThumbStickDown,
                                kLeftThumbStickLeft, kLeftThumbStickRight); }
        }

        public Vector2 Right {
                return ThumbStickState(GamePad.GetState(PlayerIndex.One).ThumbSticks.Right,
                                kRightThumbStickUp, kRightThumbStickDown,
                                kRightThumbStickLeft, kRightThumbStickRight); }
              }
} - i. With all the supporting structures, the InputWrapper class can simply define instances of corresponding structures with names identical to those from the GamePad class.
static class InputWrapper
{
        static public AllInputButtons Buttons = new AllInputButtons();
        static public AllThumbSticks ThumbSticks = new AllThumbSticks();
        static public AllInputTriggers Triggers = new AllInputTriggers();
}
- a. Include all the references to necessary libraries for working with the keyboard with the following using statements.
- Finally, we can poll input status by calling the newly defined InputWrapper facilities instead of checking the system GamePad and Keyboard classes. This is achieved by replacing the corresponding functions in the Update() function of the Game1 class (in Game1.cs).
protected override void Update(GameTime gameTime)
{
        // Allows the game to exit
        if (InputWrapper.Buttons.Back == ButtonState.Pressed)
              this.Exit();

        // Update the image positions with left/right thumbsticks
             mJPGPosition += InputWrapper.ThumbSticks.Left;
        mPNGPosition += InputWrapper.ThumbSticks.Right;
}
For the rest of examples in this book, we will always poll input devices using the InputWrapper class. In this way, all examples will function correctly with or without a compatible game controller.
Summary
This chapter has shown you how to create and explore a default generated MonoGame project. You saw ways to customize that MonoGame project by working with the Initialize(), Load(), Draw(), and Update() functions provided by the framework. Using those four functions, you created a simple project that allows you to interact with your own graphical objects.
In general, the Initialize(), Load(), Draw(), and Update() functions provide you with the core functionality you need to build most games. These four functions afford you the ability to create games of limitless variety and complexity while also allowing you to work within the provided framework.
Lastly, you should pay special attention to the Draw/Update loop concept, because that concept spans nearly every technology and programming language as a practical and reliable way to build games. As you will see in the next chapter, you will increasingly use these functions in various ways as the projects become more complex.
Quick Reference
To |
Do this |
|---|---|
| Create a new Mono project | In Visual Studio, select File |
| Open the Solution Explorer tab | In Visual Studio, select View |
| Change the game window title | In Solution Explorer, open the Properties tab, and in AssemblyInfo.cs, modify [assembly: AssemblyTitle("YourTitle")]. |
| Change the unique name of the project | In Solution Explorer, open the Properties tab, and in AssemblyInfo.cs, modify [assembly: Guid("Your new GUID")]. |
| Add source code to your game | Modify the Game1.cs source code file. |
| Include an image in your project | In Solution Explorer, right-click over the Content folder, select Add |
| Include an image by dragging and dropping the image directly into the Content folder | Make sure you remember to update the properties of the image: Build Action to Content, and Copy to Output Directory should be set to Copy if newer. |
| Load an image into your game | In the Game1.cs source code file, define an instance variable for referencing to the image, like so: Texture2D mTheImage; Load the image into the variable in LoadContent() function, as follows: mTheImage = Content.Load<Texture2D>("TheImageFileName"); In the Game1.cs source code file, define a variable to hold the image position, like so: Vector2 mTheImagePosition; |
| Draw the loaded image at a specific position | Draw the image in the Draw() function, as follows: mSpriteBatch.Draw(mTheImage, mTheImagePosition, Color.White); |
| Move the image in your game | Update the image position with the gamepad’s thumbstick movement in the Update() function, like so: mTheImagePosition += GamePad.GetState(PlayerIndex.One).ThumbSticks.Left; Draw the image Draw() function, as previously: mSpriteBatch.Draw(mTheImage, mTheImagePosition, Color.White); |
![]() Note Do not attempt to draw in Update(), and do not attempt to change any instance variables in Draw().
Note Do not attempt to draw in Update(), and do not attempt to change any instance variables in Draw().