
![]()
2D Graphics, Coordinates, and Game State
After completing this chapter, you will be able to:
- Control the game window size
- Create and use a custom C# class to support the drawing and simple behaviors of textures
- Differentiate between pixel and user-defined coordinate systems
- Design and create your own coordinate system that best supports your game
- Create simple game objects
- Create a simple game state
Introduction
Most games these days use graphics in some form or another to represent or communicate their state, and 2D games are no different. Whether they use a texture used to represent a hero character or particles to show an explosion, 2D games also rely on graphics and effects to bring their game world to life. This chapter will cover some of the basic building blocks needed to achieve the desired graphics and effects for your game.
As in general for this book, you can follow along with the sections using the example projects contained in the Chapter03SourceCode folder. An even better approach is to create your own project and follow along by inserting the required code as you step through the procedures. Building the projects yourself will give you both hands-on development experience and better insight into the concepts covered. It is also important to note that most of the projects build upon one another and therefore often reuse code from prior sections.
The Game Window
The first aspect to address is the game window. A game window is commonly displayed in one of two modes: windowed mode or full-screen mode. In windowed mode, you can specify the desired resolution of your game window, and it will be contained in the operating system’s (Windows) default window. Full-screen mode will fit your game to the entire screen—even if the window size does not match, which can cause the game to look stretched or pixelated unless you plan for and handle the full-screen situation carefully.
The Game Window Size project
This project demonstrates how to toggle between full-screen mode and windowed mode. Figure 3-1 shows an example of the project running in windowed mode.

Figure 3-1. Running the Game Window Size project in windowed mode
The project’s controls are as follows:
- Back button (F1-key) Exits the program
- A button (K-key) Toggles to full-screen mode
- B button (L-key) Toggles to windowed mode
The goals of the project are as follows:
- To understand how to control the application game window size using code
- To be able to toggle between full-screen and windowed mode
- To identify the need for graphical objects
- Create a new project named GameWindowSize or follow along with the example project in the Chapter03SourceCode1.GameWindowSize folder. If you need a reminder on how to create a new project with Visual Studio and MonoGame, refer back to the example in Chapter 2, “Getting to know the MonoGame Framework.”
- In the Game1 class, declare the variables kWindowWidth and kWindowHeight to hold your desired window size, as shown in the following code:
public class Game1 : Game
{
    GraphicsDeviceManager mGraphics;
    SpriteBatch mSpriteBatch;

    // Prefer window size
    const int kWindowWidth = 1000;
    const int kWindowHeight = 700;
     ...
} - Next, as illustrated in the following code, set your window size by creating a graphics device manager and setting its PreferredBackBufferWidth and PreferredBackBufferHeight in the constructor. This is all it takes to specify your initial window size!
public Game1()
{
    mGraphics = new GraphicsDeviceManager(this);
    Content.RootDirectory = "Content";

    // Set preferred window size
    mGraphics.PreferredBackBufferWidth = kWindowWidth;
    mGraphics.PreferredBackBufferHeight = kWindowHeight;

    ...
} - Now add support for toggling to and from full-screen mode by inserting the code shown following into your Update() function. This code adds an if statement that allows the game to exit, and two more if statements that support toggling to and from full-screen mode. The first of the latter two if statements is responsible for toggling into full-screen mode. The code checks the A button’s state (whether the button has been pressed) during every update cycle. If the button has been pressed, the code checks whether the game is already in full-screen mode. If not, the code uses the graphics device manager to set IsFullScreen to true, and then calls ApplyChanges() to apply the change immediately, because you are modifying the window state at run time. The second if statement is similar, but checks whether the B button has been pressed. If so, it checks to see whether the game is currently in full-screen mode, and if it is, toggles out of full-screen mode and then applies the change immediately.
protected override void Update(GameTime gameTime)
{
    // Allows the game to exit
    if (InputWrapper.Buttons.Back == ButtonState.Pressed)
        this.Exit();

    // "A" to toggle to full-screen mode
    if (InputWrapper.Buttons.A == ButtonState.Pressed)
    {
        if (!mGraphics.IsFullScreen)
        {
            mGraphics.IsFullScreen = true;
            mGraphics.ApplyChanges();
        }
    }

    // "B" toggles back to windowed mode
    if (InputWrapper.Buttons.B == ButtonState.Pressed)
    {
        if (mGraphics.IsFullScreen)
        {
            mGraphics.IsFullScreen = false;
            mGraphics.ApplyChanges();
        }
    }
}
While modifying the window size and state is useful, it is not very interesting without any graphical objects in the game to show the changes. Next, you’ll see what it takes to add some graphical objects to the game.
Textured Primitives
Most games use images, or textures, to represent characters or objects. With proper support, images or textures provide a straightforward way of getting assets or art into the game. In general, you can use textures for a wide variety of purposes within the game, including background representation and UI layout. This section guides you through the process of implementing a project designed to support textures.
The Textured Primitive project
This project demonstrates how to import textures and manipulate their position and size. It also demonstrates how to select the textures you want to control. Figure 3-2 shows the project running.

Figure 3-2. Running the Textured Primitive project
The project’s controls are as follows:
- Back button (F1-key) Exits the program
- A button (K-key) Toggles to full-screen mode
- B button (L-key) Toggles to windowed mode
- Left thumbstick (WSAD-keys) Moves the currently selected texture
- Right thumbstick (arrow-keys) Changes the size of the currently selected texture
- X button (J-key) Switches the currently selected texture
The goals of the project are as follows:
- To understand the abstraction of graphical primitives (TexturedPrimitive)
- To understand how to create and use a TexturedPrimitive
- To observe the limitations of working with the default pixel space
The steps for creating the project are as follows:
- Create a new C# class for the project.
- Define the behavior for the class.
- Use the new class.
Abstracting TexturedPrimitive into a class enables you to easily reuse, modify, and build upon the object in the future, which is the purpose of object-oriented programming.
Creating the TexturedPrimitive class
- To continue, you should use the previous project or follow along with the example project in the Chapter03SourceCode2.TexturedPrimitive folder.
- Modify the Game1 class to support static variables for SpriteBatch, ContentManager, and GraphicsDeviceManager, as shown in the following code. Making these variables static allows you to access them globally and allows convenient drawing and loading of textures and fonts.
public class Game1 : Game
{
    static public SpriteBatch sSpriteBatch;        // Drawing support
    static public ContentManager sContent;         // Loading textures
    static public GraphicsDeviceManager sGraphics; // Current display size

    ...
}
Note Variables that begin with the letter s (for example, sStaticVariable) indicate that they are static.
 - The next step is to create a new C# class to display textures. As you probably know, making a class designed for texture support lets you reuse the same code without having to write it again. For example, when your game requires multiple textures, you can simply instantiate multiple instances of the object.
- Before creating the class itself, however, you should first create a folder to keep your project organized. To create a folder, right-click the project name in Solution Explorer, and then select Add
 New Folder, as shown in the image that follows. Name the folder GraphicsSupport.

- Now that you have created the GraphicsSupport folder for organizing the class, you can create the new class. To create a new C# class, right-click the GraphicsSupport folder and select Add New Item, as shown following. A new template window will appear.
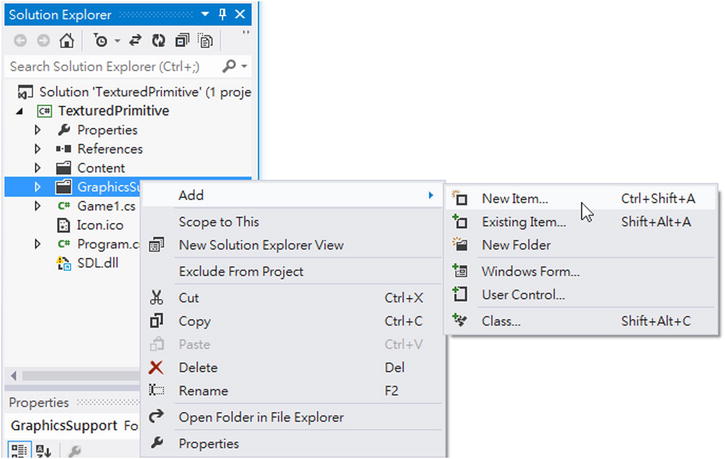
- Select the Class template as shown following and name it TexturedPrimitive. Click the Add button, and the new class will appear within Visual Studio under your GraphicsSupport folder.

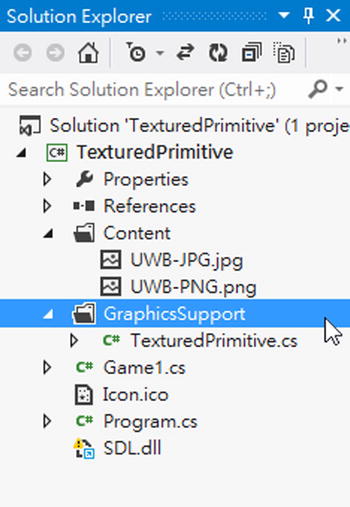
- The image that follows shows the new class file inside the GraphicsSupport folder. This file is accessible from your current project as long as it shares the same namespace with the rest of the source code files.
- Before creating the class itself, however, you should first create a folder to keep your project organized. To create a folder, right-click the project name in Solution Explorer, and then select Add
You have successfully created a new C# class file within the project. Next, you’ll define functionality and behavior for this new class.
Adding custom functionally and behavior to TexturedPrimitive enables it to handle its own draw and update cycles, which keeps the object self-contained and simpler to manage.
Adding TexturedPrimitive functionality and behavior
- You can now add the code needed to support textures in the TexturedPrimitive.cs source file. Start by declaring three instance variables: a Texture2D variable to hold the image and two Vector2 variables for the position and size of the image or texture.
protected Texture2D mImage;     // The UWB-JPG.jpg image to be loaded
protected Vector2 mPosition;    // Center position of image
protected Vector2 mSize;        // Size of the image to be drawn
Note Variables that begin with the letter m are instance variables. These variables are accessible within the scope of the class. - Next, initialize these variables in the constructor with corresponding parameters. You can see an example of this in the code shown following. Notice how you access the static sContent variable of Game1 in order to load the texture.
public TexturedPrimitive(String imageName, Vector2 position, Vector2 size)
{
    mImage = Game1.sContent.Load<Texture2D>(imageName);
    mPosition = position;
    mSize = size;
} - The next step is to create an Update() function. This function changes the position and size of the texture when it is called by applying the amounts passed in by its parameters. You can see this represented in the following code, where deltaTranslate and deltaScale are added to the current position and size. If deltaTranslate and deltaScale have not changed, then the texture will remain the same size and stationary.
public void Update(Vector2 deltaTranslate, Vector2 deltaScale)
{
    mPosition += deltaTranslate;
    mSize += deltaScale;
} - The last function you need is the Draw() function. This function is responsible for drawing the texture to the screen. You can do this by creating a rectangle object for the size and position of the texture and using the Game1.sSpriteBatch.Draw call, which accepts a texture object, a primitive (rectangle) object, and a color.
public void Draw()
{
    // Defines where and size of the texture to show
    Rectangle destRect = new Rectangle((int)mPosition.X, (int)mPosition.Y,
                                            (int)mSize.X, (int)mSize.Y);
    Game1.sSpriteBatch.Draw(mImage, destRect, Color.White);
}
Now that you have completed the TexturedPrimitive class, it can be used within the Game1 class.
Using the TexturedPrimitive class
- Open the Game1 class (by double-clicking the Game1.cs file in Solution Explorer) and declare the variables kNumObjects, mGraphicsObjects, and mCurrentIndex, as shown following. The integer kNumObjects represents the number of objects you will be working with, the TexturedPrimitive array mGraphicsObjects holds the texture objects, and the integer mCurrentIndex holds the index of the currently selected texture. The following code shows the changes in the Game1.cs file:
public class Game1 : Game
{
    static public SpriteBatch sSpriteBatch;        // Drawing support
    static public ContentManager sContent;         // Loading textures
    static public GraphicsDeviceManager sGraphics; // Current display size

    // Preferred window size
    const int kWindowWidth = 1000;
    const int kWindowHeight = 700;

    const int kNumObjects = 4;
    // Work with the TexturedPrimitive class
    TexturedPrimitive[] mGraphicsObjects; // An array of objects
    int mCurrentIndex = 0;

    ...
} - The next step is to load the textures within LoadContent(). Add the following lines of code to the LoadContent() function of Game1 to create the texture array and set its starting image, position, and size. Remember from Chapter 2 that content such as images should be loaded into the content project (in this case, TexturedPrimitiveContent) before being used. Do this by right-clicking the content project and selecting Add Existing Item. Add both UWB-JPG.jpg and UWB-PNG.png to TexturedPrimitiveContent. They can be found in this chapter’s Book_Img folder.
protected override void LoadContent()
{
    // Create a new SpriteBatch, which can be used to draw textures.
    Game1.sSpriteBatch = new SpriteBatch(GraphicsDevice);

    // Create the primitives.
    mGraphicsObjects = new TexturedPrimitive[kNumObjects];
    mGraphicsObjects[0] = new TexturedPrimitive("UWB-JPG",               // Image file name
                                                new Vector2(10, 10),     // Position to draw
                                                new Vector2(30, 30));    // Size to draw
    mGraphicsObjects[1] = new TexturedPrimitive("UWB-JPG",
                                                new Vector2(200, 200), new Vector2(100, 100));
    mGraphicsObjects[2] =  new TexturedPrimitive("UWB-PNG",
                                                new Vector2(50, 10), new Vector2(30, 30));
    mGraphicsObjects[3] = new TexturedPrimitive("UWB-PNG",
                                                new Vector2(50, 200), new Vector2(100, 100));
} - Now that you have properly prepared the LoadContent() function, the next step is to draw the textures to the screen. As you probably have guessed, this is done within Draw() function of Game1. Add the code shown following, which loops through each TexturedPrimitive and calls its Draw() function:
protected override void Draw(GameTime gameTime)
{
    // Clear to background color
    GraphicsDevice.Clear(Color.CornflowerBlue);

    Game1.sSpriteBatch.Begin(); // Initialize drawing support

    // Loop over and draw each primitive
    foreach (TexturedPrimitive p in mGraphicsObjects)
    {
        p.Draw();
    }


    Game1.sSpriteBatch.End(); // Inform graphics system we are done drawing

    base.Draw(gameTime);
} - The final portion of code needed lies within the Update() function. First, to support changing between the selected textures, use the gamepad’s X button to modify the current index variable (mCurrentIndex). Next, use the Update() function of TexturedPrimitive in combination with the gamepad’s left and right thumbstick to update the currently selected texture’s size and position. You can see this reflected in the following code:
protected override void Update(GameTime gameTime)
{
    // Allows the game to exit
    ...
    // "A" to toggle to full screen
    ...
    // "B" toggles back to window
    ...

    // Button X to select the next object to work with
    if (InputWrapper.Buttons.X == ButtonState.Pressed)
        mCurrentIndex = (mCurrentIndex + 1) % kNumObjects;

    // Update currently working object with thumb sticks.
    mGraphicsObjects[mCurrentIndex].Update(
        InputWrapper.ThumbSticks.Left,
        InputWrapper.ThumbSticks.Right);

    base.Update(gameTime);
}
Observations
With all the necessary components of the TexturedPrimitive project completed, it is time to build and run the project while making some observations. Run the project and experiment with its functionality. Observe the behavior of the images when moving each thumbstick separately, as well as when toggling to and from full-screen mode. In particular, you should make the following observations:
- Notice the inversion of the y-axis. When moving the gamepad’s left thumbstick upward, the selected image moves downward. This behavior is not intuitive for most users.
- When moving the right thumbstick, the images do not scale with respect to their centers; rather, the scaling is with respect to the top-left corner. You can identify this behavior by recognizing that the top-left corner retains its position during the scaling operation.
- Pay attention to the relative size of the images in windowed mode versus full-screen mode. As you’ll notice, the image size does not change between windowed mode and full-screen mode. This is troublesome for you as a developer because you do not know the relative size of an object in relation to the game window size. We will touch upon this concept more in the next section.
In the upcoming projects, you will learn the necessary concepts to address and correct each of these behaviors to support a more intuitive experience for the user, as well as a more straightforward game world for you to develop in.
Coordinate System and Camera
As you saw at the end of the previous section, the TexturedPrimitive project was successful in adding multiple images to the game world and supporting straightforward interaction with the images. However, it also shed light on several issues that arise when using the default pixel space. These and many other issues that will arise by using default pixel space can be addressed by creating your own user-defined coordinate system.
For the purposes of this discussion, pixel space describes the area that the game window occupies in units of pixels. Each pixel in the game window represents a point in a discrete coordinate system where the origin lies in the top-left corner of the window, the x-axis points toward the right, and the y-axis points downward. A user-defined coordinate system is a Cartesian coordinate system created by you to suit your needs for the project. The user-defined coordinate system is different from the pixel space in two unique ways: first, the unit of the user-defined system is independent of pixels; second, the y-axis of the user-defined system points upward. The user-defined coordinate system acts as a layer between the default pixel space and you, the developer, in order to standardize the game world across different window sizes and views.
![]() Note The terms user-defined coordinate system and user-defined coordinate space will be used interchangeably from here on.
Note The terms user-defined coordinate system and user-defined coordinate space will be used interchangeably from here on.
Creating a user-defined coordinate system makes your job as a developer easier from a technical standpoint as well as a design standpoint. For example, imagine you are creating a game that uses human-sized characters. Under a user-defined coordinate system, you could use a meter as your basic unit and design you characters to be two units tall. However, under a pixel-space system, a character becomes an arbitrary amount of pixels tall. The problem becomes even worse when considering effects like camera zooming, since the character’s pixel height has already been specified. A user-defined coordinate system allows the flexibility of adding new functionality while maintain the core functionality needed to standardize the game’s look.
The User-Defined Coordinate System project
This project builds infrastructure support for a user-defined coordinate system and allows you to move away from pixel space. This infrastructure support includes defining a new Camera class and building new functionality in the TexturedPrimitive class. The functionality of the project is the same as the Textured Primitive project. However, as a developer you will be able to specify the position and size of an object independent from pixel resolution. Figure 3-3 shows the project running.

Figure 3-3. Running the User-Defined Coordinate System project
The project’s controls are as follows:
- Back button (F1-key) Exits the program
- A button (K-key) Toggles to full-screen mode
- B button (L-key) Toggles to windowed mode
- Left thumbstick (WSAD-keys) Moves the currently selected texture
- Right thumbstick (arrow-keys) Changes the size of the currently selected texture
- X button (J-key) Switches the currently selected texture
The goals of the project are as follows:
- To understand the details and requirements of a coordinate system
- To understand how to create a coordinate system
- To define and work with a camera window within a user-defined coordinate system
The steps for creating the project are as follows:
- Create a user-defined coordinate system. This is accomplished by creating a new Camera class and modifying the TexturedPrimitive class.
- Use the Camera class. This allows navigation in the user-defined coordinate system.
Understanding pixel space and user-defined space
Before we go into the details of creating a user-defined coordinate system, we’ll first discuss the default pixel space, which is shown in Figure 3-4. Upon inspection, you’ll notice that the origin lies in the top-left corner of the game window rather than the bottom-left corner. Additionally, the y-axis increases in value in the downward direction rather than upward, as would generally be expected. It is also important to note that we use Wp to represent the width of the game window and Hp to represent the height of the game window.

Figure 3-4. Default pixel space
Now that you know the layout of the default pixel space, you can begin to design the user-defined coordinate system to reflect a more intuitive layout. To start, it is a good idea to first specify the desired user-defined space. Usually this is done by creating a camera region that views a specified section of the game world. In Figure 3-5 you can see an example of a user-defined space where the light-blue rectangle represents the camera region (or camera window) that should be displayed in the game window. You can see outside the camera window that the desired user-defined space has its origin located in the bottom-left corner and a y-axis that increases in the upward direction. The camera window itself is defined by its bottom-left corner (Xc and Yc), its width (Wc), and its height (Hc).

Figure 3-5. The user-defined coordinate system
With the pixel space and the desired user space defined, you can now begin addressing the task of converting from the user space to that pixel space. To transition to pixel space, you first need to shift, or translate, the camera window to the origin, as shown in Figure 3-6. This is done by subtracting Xc and Yc from the camera window’s position.
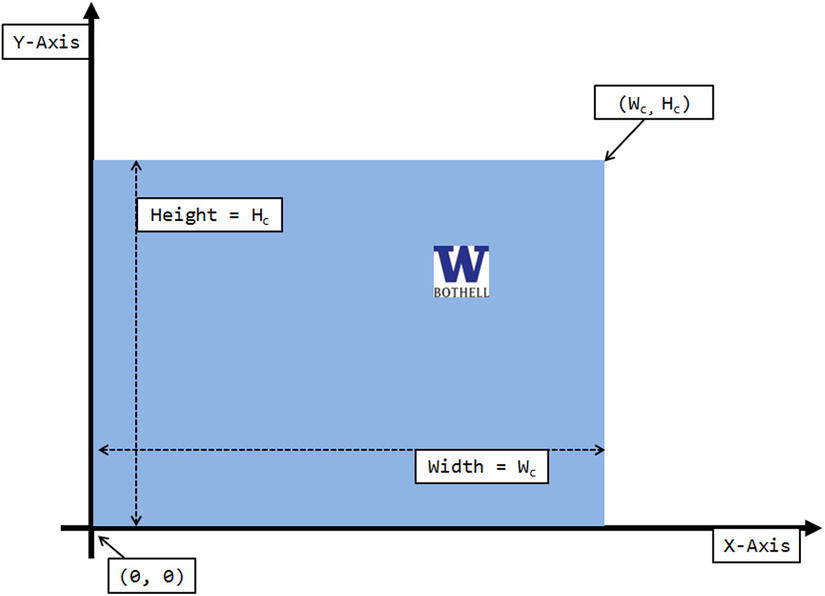
Figure 3-6. User-defined coordinate system with a translated origin
Next, the user-defined space needs to be resized (or scaled) to match the width and height of the pixel space. This can be achieved by multiplying the width Wc by Wp/Wc and the height Hc by Hp/Hc, which a leaves you with Wp , Hp for your width and height. You can see this in Figure 3-7.

Figure 3-7. User-defined coordinate system with scaling being applied
The last step for converting to pixel space is to flip the y-axis so that the origin lies in the top-left corner. This can be done by taking the height of the pixel space and subtracting the y value from it. This leaves you with an origin in the top-left corner of the window, as shown in Figure 3-8.
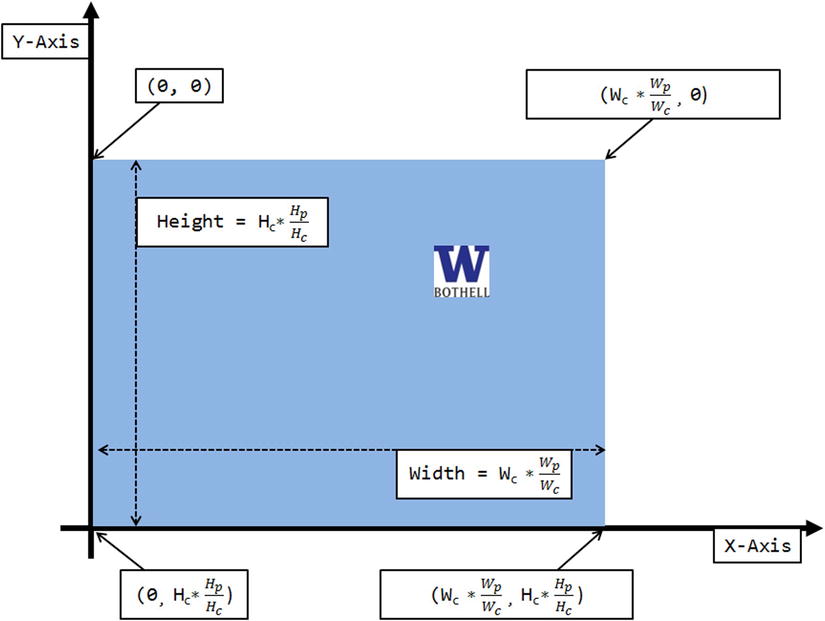
Figure 3-8. User-defined coordinate system with an inverted y-axis
Now that you know the process of converting to pixel space, take a look at the following formulas, where camera positions are represented with (Cx , Cy) in the user-defined space and the corresponding pixel space positions are presented as (Px , Py):
![]()

If you follow the equation for the y values, you can see each step in the process of conversion happen in order. First, you translate to the origin by subtracting Yc from Cy. Next, you scale to match the pixel space’s size by multiplying by (Hp /Hc). Finally, the y-axis is flipped with subtraction by Hp. The formula is similar for the x-axis values, except there’s no need to flip the horizontal axis.
Now that you have an understanding of the process and mathematics involved in converting from user-defined space to pixel space, you’ll take a look at how a Camera class can be created to support this conversion. To proceed, continue using the Textured Primitive project from earlier in the chapter as camera support is added, or follow along with the 3.UserDefinedCoordinateSystem example provided in the Chapter03SourceCode folder.
Creating a user-defined coordinate system
- Start by creating a new class in the GraphicsSupport folder in your project. Name the class Camera.
- Make the class static, since you want to avoid multiple instantiations of the Camera class.
namespace Book_Example
{
    static public class Camera
    {
        ...
    }
} - Next, add the following variables to represent the origin, the width, and the ratio between the camera and pixel window:
static private Vector2 sOrigin = Vector2.Zero;   // Origin of the world
static private float sWidth = 100f;              // Width of the world
static private float sRatio = -1f; // Ratio between camera window and pixel - Now create a private function that returns the ratio between the two windows, as shown in the following code. If you follow the code, you can see that Game1.sGraphics.PreferredBackBufferWidth / sWidth represents (Wp /Wc ) from the formula derived earlier.
static private float cameraWindowToPixelRatio()
{
    if (sRatio < 0f)
        sRatio = (float) Game1.sGraphics.PreferredBackBufferWidth / sWidth;
    return sRatio;
} - Now you need a function to set the camera window’s position and size. This is easily done by creating a set function like the one shown following:
static public void SetCameraWindow(Vector2 origin, float width)
{
    sOrigin = origin;
    sWidth = width;
}
Note Notice that only the width of camera window can be specified. This is because once the width is defined, the height of the camera window depends on the actual height of the game window. Allowing only the width to be modified guarantees that the camera can draw to the entire game window with the proper aspect ratio. - Next, you need to implement the conversion of a position from user-defined space to pixel space for drawing. This can be accomplished by implementing the Px and Py equations shown earlier in this section. Notice again that only the y-axis is flipped.
static public void ComputePixelPosition(Vector2 cameraPosition, out int x, out int y)
{
    float ratio = cameraWindowToPixelRatio();

    // Convert the position to pixel space
    x = (int)(((cameraPosition.X - sOrigin.X) * ratio) + 0.5f);
    y = (int)(((cameraPosition.Y - sOrigin.Y) * ratio) + 0.5f);

    y = Game1.sGraphics.PreferredBackBufferHeight - y;
} - The last function for the Camera class needs to convert a rectangular area from user-defined coordinate space to pixel space. This is accomplished by converting the camera window’s position and size to the corresponding pixel space. You can see this reflected in the following code:
static public Rectangle ComputePixelRectangle(Vector2 position, Vector2 size)
{
    float ratio = cameraWindowToPixelRatio();

    // Convert size from camera window space to pixel space.
    int width = (int)((size.X * ratio) + 0.5f);
    int height = (int)((size.Y * ratio) + 0.5f);

    // Convert the position to pixel space
    int x, y;
    ComputePixelPosition(position, out x, out y);

    // Reference position is the center
    y -= height / 2;
    x -= width / 2;

    return new Rectangle(x, y, width, height);
}
Using the Camera class
- Use the Camera class by defining a camera window with the SetCameraWindow() function inside the LoadContent() function of Game1. Set its origin to (10, 20) and width to 100. Notice how the width is independent from how many pixels are covered by the game window in pixel space.
protected override void LoadContent()
{
    // Create a new SpriteBatch, which can be used to draw textures.
    Game1.sSpriteBatch = new SpriteBatch(GraphicsDevice);

    // Define camera window bounds
    Camera.SetCameraWindow(new Vector2(10f, 20f), 100f);

    // Create the primitives
    mGraphicsObjects = new TexturedPrimitive[kNumObjects];
    mGraphicsObjects[0] = new TexturedPrimitive("UWB-JPG",
                                            new Vector2(15f, 25f), new Vector2(10f, 10f));
    mGraphicsObjects[1] = new TexturedPrimitive("UWB-JPG",
                                            new Vector2(35f, 60f), new Vector2(50f, 50f));
    mGraphicsObjects[2] = new TexturedPrimitive("UWB-PNG",
                                            new Vector2(105f, 25f), new Vector2(10f, 10f));
    mGraphicsObjects[3] = new TexturedPrimitive("UWB-PNG",
                                            new Vector2(90f, 60f), new Vector2(35f, 35f));
    // NOTE: Since the creation of TexturedPrimitive involves loading of textures,
    // the creation should occur in or after LoadContent()
} - Finally, it is important to convert all positions and sizes from user-defined coordinate to pixel space before each drawing. As shown in the following code of the Draw() function from the TexturedPrimitive.cs file, Camera.ComputePixelRectangle() is called to perform the proper transformation:
public void Draw()
{
   // Defines where and size of the texture to show
   Rectangle destRect = Camera.ComputePixelRectangle(Position, Size);
   Game1.sSpriteBatch.Draw(mImage, destRect, Color.White);
}
Build and run the project. The results should be the same as those shown previously in Figure 3-3, in pixel space. Now let’s take a look at user-defined space. Figure 3-9 shows the game world in the user-defined space.

Figure 3-9. User-defined coordinate system within the pixel space
Now try toggling buttons A and B to switch between windowed and full-screen modes. Notice how the relative sizes of the objects remain constant—an object that occupies half of the game window will continue to occupy the half in full-screen mode. As a game developer, you can now focus on designing the relative sizes and positions of your game objects without concerning yourself with the eventual pixel resolution of the game window.
It is important to recognize the difference in the camera’s width and position between coordinate spaces. The camera only covers 100 units in width in the user-defined coordinate space, while in pixel space it covers 1,000 pixels. Similarly, the camera’s origin is located in the bottom-left corner, at (10, 20), while the game window’s origin is located in the top-left corner, at (0, 0). This indicates that you have successfully decoupled the user-defined coordinate system from the game window’s pixel space.
Font Output
A valuable tool that many games use for a variety of tasks is text output. This is because text provides an efficient way to communicate information to the user as well as you, the developer. For example, it can be used to communicate the game’s story, the player’s score, or the debugging information during development. However, unlike in console programming, the game window that MonoGame provides does not include direct text output support. Fortunately, this can be easily remedied by using the SpriteFont class to create a custom class to produce output of text to the game window.
The SpriteFont class takes your desired font and converts the characters into a texture during build time. To use the SpriteFont class, a font file, such as Arial.spritefont, must be created, this file must then be conveted into the xnb format, and finally added to the project. Similar to images, fonts should be added to the content folder before they are used. This is because, like images, the font file is an external resource.
![]() Note SpriteFonts are XML files that can be generated from existing fonts on your PC. In order to create or customize your own SpriteFont, refer to http://msdn.microsoft.com/library/bb447673.aspx. For more information on the SpriteFont class and its properties, refer to http://msdn.microsoft.com/library/bb447759.aspx. It is also important to note that while you can create SpriteFonts from fonts that exist on your PC, you may need permission to use those fonts in your game.
Note SpriteFonts are XML files that can be generated from existing fonts on your PC. In order to create or customize your own SpriteFont, refer to http://msdn.microsoft.com/library/bb447673.aspx. For more information on the SpriteFont class and its properties, refer to http://msdn.microsoft.com/library/bb447759.aspx. It is also important to note that while you can create SpriteFonts from fonts that exist on your PC, you may need permission to use those fonts in your game.
Before you create a class to support fonts, you should first find the Arial.spritefont font description resource file in the Chapter03SourceCodeImagesAndFontUsed folder and convert this file into Arial.xnb. This conversion can be accomplished by invoking the XNAFormatter program from the XNB Builder utility you have downloaded and unzipped as part of the “Downloads and Installations” operations you performed in Chapter 1. Once converted, you can then include the Arial.xnb file into the MonoGame project in a similar fashion as image files we have worked with: either by right-clicking over the Content folder and navigating to Add ![]() Existing Item, or by dragging and dropping the file into the Content folder.
Existing Item, or by dragging and dropping the file into the Content folder.
![]() Note As with images, if you choose to drag and drop the Arial.xnb file into the Content folder, you must remember to bring up the Properties window and change the Build Action field to Content, and Copy to Output Directory to Copy if Newer.
Note As with images, if you choose to drag and drop the Arial.xnb file into the Content folder, you must remember to bring up the Properties window and change the Build Action field to Content, and Copy to Output Directory to Copy if Newer.
This project demonstrates how to draw text to the game screen by using a FontSprite asset. Two types of print function are supported. One prints to the top-left corner of the screen, and the other prints the message to any specified location in user-defined coordinate space. Printing to a location is useful when it is necessary to print text on an object; notice that the currently selected texture in Figure 3-10 is identified.
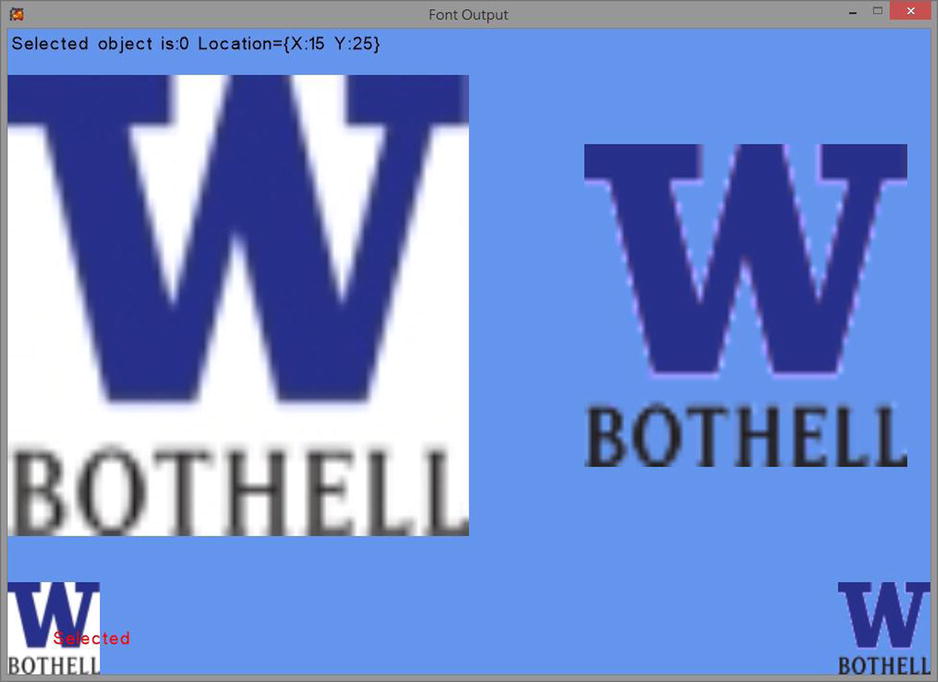
Figure 3-10. Running the Font Output project
The project’s controls are as follows:
- Back button (F1-key) Exits the program
- A button (K-key) Toggles to full-screen mode
- B button (L-key) Toggles to windowed mode
- Left thumbstick (WSAD-keys) Moves the currently selected texture
- Right thumbstick (arrow-keys) Changes the size of the currently selected texture
- X button (J-key) Switches the currently selected texture
The goals of the project are as follows:
- To understand how text can be output to the screen
- To understand how to use a FontSprite asset
- To create and use a FontSupport class
The steps for creating the project are as follows:
- Create a new FontSupport class for the project.
- Use and observe the FontSupport class.
Creating the FontSupport class
- Create a class named FontSupport in your GraphicsSupport folder and make the class static.
- Declare three static variables in the FontSupport.cs file—the sprite font, the color, and the location—as shown in the following code:
static private SpriteFont sTheFont = null;
static private Color sDefaultDrawColor = Color.Black;
static private Vector2 sStatusLocation = new Vector2(5, 5); - Now create a function called LoadFont(), which initializes the SpirteFont variable by loading it with the font resource that was added to the content project (in this case, Arial.spritefont).
static private void LoadFont()
{
    // For demo purposes, loads Arial.spritefont
    if (null == sTheFont)
        sTheFont = Game1.sContent.Load<SpriteFont>("Arial");
}
Note Notice that the Load() function does not specify the extension (.spritefont), only the font name (Arial). - Next, add a simple function called ColorToUse(), which allows the color to be changed from the default (black) to any specified color. In the following code, you can see that if the incoming color is null, the default color is returned; otherwise, the specified color is returned.
static private Color ColorToUse(Nullable<Color> c)
{
    return (null == c) ? sDefaultDrawColor : (Color)c;
} - To complete the class, add two functions to support printing to the game window.
- Name the first function PrintStatus and give it two parameters: one for the message that will be printed, and the other for the font color. This function will place the message in the top-left corner of the game window. You can see how this is achieved in the following code. Notice again that the static SpriteBatch variable is used to draw to the screen.
static public void PrintStatus(String msg, Nullable<Color> drawColor)
{
    LoadFont();
    Color useColor = ColorToUse(drawColor);

    // Compute top-left corner as the reference for output status
    Game1.sSpriteBatch.DrawString(sTheFont, msg, sStatusLocation, useColor);
} - Name the second function PrintStatusAt. This function is similar to the PrintStatus function; however, it supports printing to a specified location by accepting a position parameter and converting that position into user-defined coordinate space by using the ComputePixelPosition() function of the Camera class. You can see this reflected in the following code:
static public void PrintStatusAt(Vector2 pos, String msg, Nullable<Color> drawColor)
{
    LoadFont();

    Color useColor = ColorToUse(drawColor);

    int pixelX, pixelY;
    Camera.ComputePixelPosition(pos, out pixelX, out pixelY);
    Game1.sSpriteBatch.DrawString(sTheFont, msg,
                                        new Vector2(pixelX, pixelY), useColor);
}
- Name the first function PrintStatus and give it two parameters: one for the message that will be printed, and the other for the font color. This function will place the message in the top-left corner of the game window. You can see how this is achieved in the following code. Notice again that the static SpriteBatch variable is used to draw to the screen.
A full listing of the FontSupport class is shown in Listing 3-1.
Listing 3-1. The complete FontSupport class
static public class FontSupport
{
    static private SpriteFont sTheFont = null;
    static private Color sDefaultDrawColor = Color.Black;
    static private Vector2 sStatusLocation = new Vector2(5, 5);

    static private void LoadFont()
    {
        // for demo purposes, loads Arial.spritefont
        if (null == sTheFont)
            sTheFont = Game1.sContent.Load<SpriteFont>("Arial");
    }

    static private Color ColorToUse(Nullable<Color> c)
    {
        return (null == c) ? sDefaultDrawColor : (Color)c;
    }

    static public void PrintStatusAt(Vector2 pos, String msg, Nullable<Color> drawColor)
    {
        LoadFont();

        Color useColor = ColorToUse(drawColor);

        int pixelX, pixelY;
        Camera.ComputePixelPosition(pos, out pixelX, out pixelY);
        Game1.sSpriteBatch.DrawString(sTheFont, msg,
                                            new Vector2(pixelX, pixelY), useColor);
    }

    static public void PrintStatus(String msg, Nullable<Color> drawColor)
    {
        LoadFont();
        Color useColor = ColorToUse(drawColor);

        // compute top-left corner as the reference for output status
        Game1.sSpriteBatch.DrawString(sTheFont, msg, sStatusLocation, useColor);
    }

}
Using and observing the FontSupport class
To use the FontSupport class, all you need to do is call the PrintStatus and PrintStatusAt functions inside the Draw() function of Game1. PrintStatus will print the message to the top-left corner of the game window, and PrintStatusAt will print the message at your specified location. It’s that simple.
protected override void Draw(GameTime gameTime)
{
    // Clear to background color
    ...
    // Loop over and draw each primitive
    ...
    // Print out text message to echo status
    FontSupport.PrintStatus("Selected object is:" + mCurrentIndex +
                      " Location=" + mGraphicsObjects[mCurrentIndex].Position, null);

    FontSupport.PrintStatusAt(mGraphicsObjects[mCurrentIndex].Position, "Selected", Color.Red);
    ...
}
If you build and run the program, you can see it behave as expected (as shown previously in Figure 3-10). It is important to understand that the PrintStatus() function never converts the position of its message into the user-defined coordinate space. This means that it will remain at the top-left corner of the game window, even when the camera is repositioned.
A Simple Game Object
Now that you have an understanding of how the user-defined coordinate system functions via the Camera class and can now output text to the game window, it is time to create your first game object. Let’s start simple and create a ball with some basic functionality, such as multiple instantiation, movement control, and bounds-collision detection.
The Simple Game Object project
This project demonstrates how to create soccer balls that collide with the edge of the screen. Figure 3-11 shows the project running.

Figure 3-11. Running the Simple Game Object project
The project’s controls are as follows:
- Back button (F1-key) Exits the program
- A button (K-key) Spawns a new soccer ball
- Right thumbstick (arrow-keys) Moves the newly spawned soccer ball
The goals of the project are as follows:
- To understand how to create objects with simple behaviors and the reasons for doing so
- To work with the interaction of objects and the bounds of the camera window
- To experience working with an object’s bounds
The steps for creating the project are as follows:
- Modify existing classes to include bounds support.
- Add support for collision detection.
- Create a ball class called SoccerBall.
- Use the SoccerBall class.
Before you can implement bounds support, you need an understanding of what the bounds of an object entail. Take a look at Figure 3-12. It shows the bounds of a texture represented as MinBound and MaxBound. MinBound is in the bottom-left corner and MaxBound is in the top-right corner of the texture. This is a fairly common way to represent the bounds of a rectangular object, as it uses only two points. With the bounds of an object defined, you can add behavior such as collision.

Figure 3-12. The bounds and center position of the texture
You can calculate the values of these bounds by using the position and size of the texture, which are already known. Let’s try it.
Modifying the classes to include bounds support
- Add a MinBound and MaxBound variable to your TexturedPrimitive class. You can see this done in the following code. Using both the position and size of the texture allows the bounds to be calculated and returned. Notice that neither bound can be set. This is because the bounds of the texture only change if the position or size of the texture changes. Using both position and size in your calculation ensures that the bounds will be accurate.
public Vector2 MinBound { get { return mPosition - (0.5f * mSize); } }
public Vector2 MaxBound { get { return mPosition + (0.5f * mSize); } } - Now add similar bounds to the camera. Do this by using its position (sOrigin) and size (sWidth, sHeight). However, remember that sOrigin is located in the bottom-left corner of the camera, and thus is the MinBound of the camera. You can easily calculate the MaxBound by adding the sWidth and sHeight to the sOrigin. You can see this reflected in the following code:
/// Accessors to the camera window bounds
static public Vector2 CameraWindowLowerLeftPosition
    { get { return sOrigin; } }
static public Vector2 CameraWindowUpperRightPosition
    { get { return sOrigin + new Vector2(sWidth, sHeight); } }
Adding collision detection support
- Start by creating an enum (enumerated date type) in the Camera class called CameraWindowCollisionStatus to represent the five simple states that an object can have in colliding with the camera window: Top, Bottom, Left, Right
, and Inside.
Note For more information on enums, please refer to http://msdn.microsoft.com/library/sbbt4032.aspx.
// Support collision with the camera bounds
public enum CameraWindowCollisionStatus {
    CollideTop = 0,
    CollideBottom = 1,
    CollideLeft = 2,
    CollideRight = 3,
    InsideWindow = 4
}; - Next, you need to add a collision detection function for the camera. The following code shows the CollidedWithCameraWindow() function, which accepts a TexturedPrimitive object, tests its collision with the camera bounds, and returns the collision status:
static public CameraWindowCollisionStatus CollidedWithCameraWindow(TexturedPrimitive prim)
{
    Vector2 min = CameraWindowLowerLeftPosition;
    Vector2 max = CameraWindowUpperRightPosition;

    if (prim.MaxBound.Y > max.Y)
       return CameraWindowCollisionStatus.CollideTop;
    if (prim.MinBound.X < min.X)
       return CameraWindowCollisionStatus.CollideLeft;
    if (prim.MaxBound.X > max.X)
       return CameraWindowCollisionStatus.CollideRight;
    if (prim.MinBound.Y < min.Y)
       return CameraWindowCollisionStatus.CollideBottom;

    return CameraWindowCollisionStatus.InsideWindow;
} - Lastly, add a simple random number generator to the Game1 class by creating a Random type variable and initializing that within the constructor:
static public Random sRan; // For generating random numbers

public Game1()
{
    ...
    Game1.sRan = new Random();
}
Since all the necessary supporting code is now complete, it is time to create the SoccerBall class.
Creating the SoccerBall class
- Start by adding the image Soccer.png into your content project. The image can be found in the Chapter03SourceCodeImagesAndFontUsed folder.
- Create a new class, name it SoccerBall, and have it inherit from TexturedPrimitive. This will allow you to take advantage of all the TexturedPrimitive functionality within the SoccerBall class, as well as define specialized behaviors.
public class SoccerBall : TexturedPrimitive
{
    ...
} - Add a variable called mDeltaPosition to represent the change in the object’s position. This will be used to move the ball during updates.
private Vector2 mDeltaPosition; // Change current position by this amount
- Create the constructor according to the following code. Start by initializing the position and size of the SoccerBall and passing those values to the base class (TexturedPrimitive). Then define the amount of change for mDeltaPosition by using the random number support from the Game1 class.
public SoccerBall(Vector2 position, float diameter) :
        base("Soccer", position, new Vector2(diameter, diameter))
{
    mDeltaPosition.X = (float) (Game1.sRan.NextDouble()) * 2f - 1f;
    mDeltaPosition.Y = (float) (Game1.sRan.NextDouble()) * 2f - 1f;
} - Add a variable for modifying and retrieving the radius of the ball. Remember that the SoccerBall class is a rectangle; therefore, changing its radius means changing the size of the rectangle’s width and height. You can see an example of this in the following image:

public float Radius {
     get { return mSize.X * 0.5f; }
     set { mSize.X = 2f * value; mSize.Y = mSize.X;}
} - Next, define the behavior of the soccer ball upon a collision. You can do this in the Update() function of the SoccerBall class. Add the Update() function, as shown in the following code. Notice how the x or y direction of mDeltaPosition reverses based on where the ball collides with a camera bounds. The last line in the Update() function changes the ball’s position by the value of mDeltaPosition. Now the ball should bounce off the bounds of the camera. The following image shows an example of collision cases:

public void Update()
{
    Camera.CameraWindowCollisionStatus status = Camera.CollidedWithCameraWindow(this);
    switch (status) {
        case Camera.CameraWindowCollisionStatus.CollideBottom:
        case Camera.CameraWindowCollisionStatus.CollideTop:
            mDeltaPosition.Y *= -1;
        break;
        case Camera.CameraWindowCollisionStatus.CollideLeft:
        case Camera.CameraWindowCollisionStatus.CollideRight:
            mDeltaPosition.X *= -1;
        break;
    }
    Position += mDeltaPosition;
}
That is all that is currently needed for the SoccerBall class. It is now ready to be used. A full code listing of SoccerBall .cs is shown in Listing 3-2.
Listing 3-2. The complete SoccerBall class
public class SoccerBall : TexturedPrimitive
{
    private Vector2 mDeltaPosition; // Change current position by this amount

    /// <summary>
    /// Constructor of SoccerBall
    /// </summary>
    /// <param name="position">center position of the ball</param>
    /// <param name="diameter">diameter of the ball</param>
    public SoccerBall(Vector2 position, float diameter) :
            base("Soccer", position, new Vector2(diameter, diameter))
    {
        mDeltaPosition.X = (float) (Game1.sRan.NextDouble()) * 2f - 1f;
        mDeltaPosition.Y = (float) (Game1.sRan.NextDouble()) * 2f - 1f;
    }

    // Accessors
    public float Radius
        {
            get { return mSize.X * 0.5f; }
            set { mSize.X = 2f * value; mSize.Y = mSize.X;}
        }

    /// <summary>
    /// Compute the soccer ball's movement in the camera window
    /// </summary>
    public void Update()
    {
        Camera.CameraWindowCollisionStatus status =
                        Camera.CollidedWithCameraWindow(this);
        switch (status) {
            case Camera.CameraWindowCollisionStatus.CollideBottom:
            case Camera.CameraWindowCollisionStatus.CollideTop:
                mDeltaPosition.Y *= -1;
                break;
            case Camera.CameraWindowCollisionStatus.CollideLeft:
            case Camera.CameraWindowCollisionStatus.CollideRight:
                mDeltaPosition.X *= -1;
                break;
        }
        Position += mDeltaPosition;
    }
}
All that’s left is to use the SoccerBall in your game. You can do this in the Game1 class.
Using the SoccerBall class
- First, declare a SoccerBall variable named mBall and a TexturedPrimitive variable named mUWBLogo in the Game1 class:
TexturedPrimitive mUWBLogo;
SoccerBall mBall;
Vector2 mSoccerPosition = new Vector2(50, 50);
float mSoccerBallRadius = 3f; - Next, load the ball into the game by instantiating mBall and mUWBLogo within the LoadContent() function, as shown following:
protected override void LoadContent()
{
     ...
     // Create the primitives
     mUWBLogo = new TexturedPrimitive("UWB-PNG", new Vector2(30, 30), new Vector2(20, 20));
     mBall = new SoccerBall(mSoccerPosition, mSoccerBallRadius*2f);
} - Now update the ball in the Update() function by calling the ball’s Update() function; remember to pass in the controls (right thumbstick) as a parameter. In addition, add support for instantiating a new ball when the gamepad’s A button is pressed.
protected override void Update(GameTime gameTime)
{
     ...
     mUWBLogo.Update(InputWrapper.ThumbSticks.Left, Vector2.Zero);
     mBall.Update();
     mBall.Update(Vector2.Zero, InputWrapper.ThumbSticks.Right);

     if (InputWrapper.Buttons.A == ButtonState.Pressed)
          mBall = new SoccerBall(mSoccerPosition, mSoccerBallRadius*2f);
     ...
} - Lastly, remember to draw the ball by calling its Draw() function within the Draw() function of Game1.
protected override void Draw(GameTime gameTime)
{
     // Clear to background color
     ...
     mUWBLogo.Draw();
     mBall.Draw();

     // Print out text message to echo status
     FontSupport.PrintStatus("Ball Position:" + mBall.Position, null);
     FontSupport.PrintStatusAt(mUWBLogo.Position,
           mUWBLogo.Position.ToString(), Color.White);
     FontSupport.PrintStatusAt(mBall.Position, "Radius" + mBall.Radius, Color.Red);
     ...
}
Build and run the program. The output should look similar to Figure 3-11. Although the program should run, upon using it you’ll notice many unintended quirks. For example, if the size of the ball is changed when near the window’s boundary, the ball will get stuck on the boundary. Additionally, sometimes the ball will travel outside the window’s bounds and essentially disappear. You can circumvent this by creating a new ball when the A button is pressed; however, this is not ideal. To understand and solve these problems, you need to delve into some mathematics and physics (which we will discuss in the next chapter).
Simple Game State
Now that you have successfully added simple behaviors to the TexturedPrimitive class, it is time to explore how to support simple game-like interactions, or a game state. However, before digging into the details of creating a project with a game state, we’ll first help organize your thoughts.
Thus far, you have been modifying Game1.cs to handle the initializing, loading, updating, and drawing of your project. Ideally, it is a good practice to avoid using Game1.cs directly to prevent complexity in functions like initialization or draw functions, which can cause wasted debugging time further down the road. Additionally, a new class is needed to assist in the management of the game state.
You can isolate your interaction with Game1.cs and handle the management of the game state by creating a separate class that acts as an interface between you and Game1.cs. We will refer to this class as MyGame. The MyGame game state class will contain the Update() and Draw() functions that that will handle the updating and drawing of every object in your game. These two functions provide you with the functionality needed from Game1.cs for your game. Another aspect worth noting from the previous project (Simple Game Object) is the practice of subclassing. In that project, you subclassed the SoccerBall class from TexturedPrimitive to take advantage of the predefined behavior. Doing this afforded you the functionality of the TexturedPrimitive class and the ability to add new or specialized behaviors to SoccerBall. The subclassing not only avoided unnecessary code, but also reduced the potential of future bugs and the need to refactor your code. It is important to grasp this concept, because you will encounter it many times throughout the remainder of your time as a developer, as well as throughout the remainder of this book.
The Simple Game State project
This project demonstrates how to move a character or hero around the screen to collect (or net) basketballs. The basketballs will be generated randomly and continuously increase in size over time. Once the basketballs have reached a certain size, they will explode. Netting enough basketballs before they explode will give you the win, and allowing too many basketballs explode will make you lose. Figure 3-13 shows the project running.
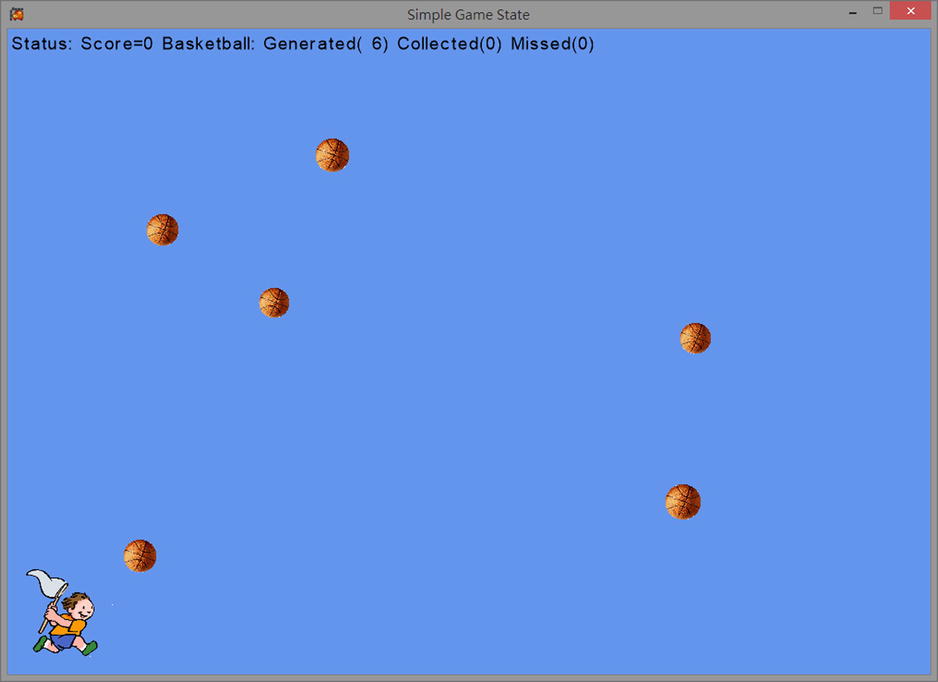
Figure 3-13. Running the Simple Game State project
The project’s controls are as follows:
- Back button (F1-key) Exits the program
- A button (K-key) Starts a new game
- Right thumbstick (arrow-keys) Controls the movement of the hero
The goals of the project are as follows:
- To understand the needs for game state organization
- To implement the GameState class to house the game logic and control
The steps for creating the project are as follows:
- Add TexturedPrimitive collision detection support.
- Create a BasketBall class.
- Create the GameState class.
- Modify Game1.cs to support the game state.
Add the following resources, which can be found in the Chapter03SourceCodeImagesAndFontsUsed folder, into your content project before you begin:
- BasketBall.png
- Loser.jpg
- Winner.jpg
- Me.png
Adding TexturedPrimitive collision detection support
Before creating new objects and defining a game state, open the TexturedPrimitive class and add the following code. The PrimitivesTouches() function detects whether two TexturedPrimitive objects overlap in space. This is accomplished by comparing the distance between the two objects’ positions against half of the combined width of both objects. A straightforward way of understanding this function is to notice that it is using a simple comparison of the distance between the objects, while accounting for their size, to see if the two objects overlap.
public bool PrimitivesTouches(TexturedPrimitive otherPrim)
{
    Vector2 v = mPosition - otherPrim.Position;
    float dist = v.Length();
    return (dist < ((mSize.X / 2f) + (otherPrim.mSize.X / 2f)));
}
- Start by creating a class named BasketBall that inherits from TexturedPrimitive. Next, add the three variables kIncreaseRate, kInitSize, and kFinalSize, as shown in the following code.
- • kIncreaseRate is the rate at which the basketball increases in size.
- • kInitSize is the initial size of the basketball.
- • kFinalSize is the size at which the basketball will explode.
private const float kIncreaseRate = 1.001f;
private Vector2 kInitSize = new Vector2(5, 5);
Private const float kFinalSize = 15f; - Now give the class a constructor that initializes the basketball’s position to a random spot and sets its initial size. Remember to use the base function provided by TexturedPrimitive.
public BasketBall() : base("BasketBall")
{
    mPosition = Camera.RandomPosition();
    mSize = kInitSize;
} - The last function needed for the BasketBall class provides the object with some specialized behavior. Create an UpdateAndExplode() function that will increase the ball size and check whether the ball should explode or expire if the final size is reached.
public bool UpdateAndExplode()
{
    mSize *= kIncreaseRate;
    return mSize.X > kFinalSize;
}
That is all that is needed for the BasketBall class. Listing 3-3 shows a full code listing of the BasketBall class.
Listing 3-3. The complete BasketBall class
public class BasketBall : TexturedPrimitive
{
    // Change current position by this amount
    private const float kIncreaseRate = 1.001f;
    private Vector2 kInitSize = new Vector2(5, 5);
    private const float kFinalSize = 15f;

    public BasketBall() : base("BasketBall")
    {
        mPosition = Camera.RandomPosition();
        mSize = kInitSize;
    }

    public bool UpdateAndExplode()
    {
        mSize *= kIncreaseRate;
        return mSize.X > kFinalSize;
    }
}
Creating the game state object
- Start by creating a new class named MyGame.
- Next, you need to declare the variables the game will need. This includes the variables required for the hero, the basketballs, and the game state.
- For the hero, declare a TexturedPrimitive, and declare two Vector2s—one for the hero size and one for the position:
// Hero stuff ...
TexturedPrimitive mHero;
Vector2 kHeroSize = new Vector2(15, 15);
Vector2 kHeroPosition = Vector2.Zero; - For the basketballs, you’ll need a list of BasketBall objects, because you will be creating many new basketballs throughout the course of the game. Additionally, you’ll need a timespan and integer for keeping track of when to spawn the next BasketBall object and add it to the list. Lastly, you’ll use another integer to store the total number of balls created.
// Basketballs ...
List<BasketBall> mBBallList;
TimeSpan mCreationTimeStamp;
int mTotalBBallCreated = 0;
// this is 0.5 seconds
const int kBballMSecInterval = 500; - The last variables you need to declare are relevant for the game state. The following code shows the variables needed to keep track of the game score, as well as the TexturedPrimitive object to display when a player wins or loses.
// Game state
int mScore = 0;
int mBBallMissed=0, mBBallHit=0;
const int kBballTouchScore = 1;
const int kBballMissedScore = -2;
const int kWinScore = 10;
const int kLossScore = -10;
TexturedPrimitive mFinal = null;
Now it’s time to add the constructor, update, and draw functions.
- For the hero, declare a TexturedPrimitive, and declare two Vector2s—one for the hero size and one for the position:
- Begin by initializing your hero object with the specified texture, position, and size. Also initialize the basketball list and the mCreationTimeStamp:
public MyGame()
{
    // Hero ...
    mHero = new TexturedPrimitive("Me", kHeroPosition, kHeroSize);

    // Basketballs
    mCreationTimeStamp = new TimeSpan(0);
    mBBallList = new List<BasketBall>();
} - Next, you need to create the update function. This is slightly more complicated; here are the steps:
- Check whether an update is necessary. The first thing you need to check here are the win-or-loss conditions. This is achieved by checking whether mFinal is equal to null. If mFinal is not equal to null, then a win-or-loss condition has been met, and the game no longer needs to be updated.
public void UpdateGame(GameTime gameTime)
{
    #region Step a.
    if (null != mFinal) // Done!!
    return;
    #endregion Step a.
    ...
} - Update all objects. Next, you update every game object by calling its update function. In the hero’s update function, the gamepad’s right thumbstick is passed in to allow control. In the list of BasketBall objects, the UpdateAndExplode() function is called, and if the return value is true (meaning the ball did explode), then the corresponding object is removed from the list and the score is updated.
public void UpdateGame(GameTime gameTime)
{
    ...
    #region Step b.
    // Hero movement: right thumb stick
    mHero.Update(InputWrapper.ThumbSticks.Right);

    // Basketball ...
    for (int b = mBBallList.Count-1; b >= 0; b--)
    {
        if (mBBallList[b].UpdateAndExplode())
        {
            mBBallList.RemoveAt(b);
            mBBallMissed++;
            mScore += kBballMissedScore;
        }
    }
    #endregion Step b.
          ...
} - Handle interactions among all objects. Now you need to handle any interaction between the game objects. Specifically, you want to loop through the list of basketballs to check whether the hero has collided with them using the PrimitivesTouches() function. If an object has collided, you remove that BasketBall object from the list and update the score.
public void UpdateGame(GameTime gameTime)
{
    ...
    #region Step c.
    for (int b = mBBallList.Count - 1; b >= 0; b--)
    {
        if (mHero.PrimitivesTouches(mBBallList[b]))
        {
            mBBallList.RemoveAt(b);
            mBBallHit++;
            mScore += kBballTouchScore;
        }
    }
    #endregion Step c.
          ...
} - Spawn new enemies. Next, you want to check to see whether a new BasketBall object needs to be created. You do this by recording the current time and the last time a ball was created, and then checking to determine whether the difference between those two times is greater than the time creation interval (kBballMSecInterval). If so, you create a new BasketBall object, add it to the list, and increment the ball total.
public void UpdateGame(GameTime gameTime)
{
    ...
    #region Step d.
    // Check for new basketball condition
    TimeSpan timePassed = gameTime.TotalGameTime;
    timePassed = timePassed.Subtract(mCreationTimeStamp);
    if (timePassed.TotalMilliseconds > kBballMSecInterval)
    {
        mCreationTimeStamp = gameTime.TotalGameTime;
        BasketBall b = new BasketBall();
        mTotalBBallCreated++;
        mBBallList.Add(b);
    }
    #endregion Step d.
    ...
} - Check for a win-or-loss condition. The last thing you need to check in the update function is whether the win-or-loss condition has been met. For this game, you can do this easily by determining whether the current score (mScore) is greater than the winning score or less than the losing score. If either of those conditions has been met, you can assign the appropriate corresponding texture to the mFinal TexturedPrimitive object.
public void UpdateGame(GameTime gameTime)
{
    ...
    #region Step e.
    // Check for winning condition ...
    if (mScore > kWinScore)
        mFinal = new TexturedPrimitive("Winner",
                                                new Vector2(75, 50), new Vector2(30, 20));
    else if (mScore < kLossScore)
        mFinal = new TexturedPrimitive("Looser",
                                                new Vector2(75, 50), new Vector2(30, 20));
    #endregion Step e.
}
Although it’s not trivial, you can usually divide the update function of the game state into distinct logical steps according to game rules. The five steps just described are (1) check whether an update is necessary, (2) update all game objects, (3) handle interactions among all game objects, (4) spawn new enemies, and (5) check for a win-or-loss condition. These steps can serve as a template for many simple games.
- Check whether an update is necessary. The first thing you need to check here are the win-or-loss conditions. This is achieved by checking whether mFinal is equal to null. If mFinal is not equal to null, then a win-or-loss condition has been met, and the game no longer needs to be updated.
- The last function required is the draw function. This function draws the hero, the basketball objects, and the win-or-loss picture by calling their corresponding draw function. Additionally, the status is printed out to show the score and stats of the game.
public void DrawGame()
{
    mHero.Draw();

    foreach (BasketBall b in mBBallList)
        b.Draw();

    if (null != mFinal)
        mFinal.Draw();

    // Drawn last to always show up on top
    FontSupport.PrintStatus("Status: " +
                                "Score=" + mScore +
                                " Basketball: Generated( " + mTotalBBallCreated +
                                ") Collected(" + mBBallHit + ") Missed(" + mBBallMissed + ")", null);
}
Modifying Game1 to support the game state
The last task you need to accomplish is to initialize and connect the game state (MyGame) in Game1.cs. As shown in the following code, you can easily achieve this by declaring a new MyGame object, initializing it in the LoadContent function, updating it in the update function of Game1, and drawing it in the draw function. In addition, notice that we added the ability to start a new game by instantiating a new MyGame object if the A button is pressed.
public class Game1 : Game
{
    ...
    MyGame
mTheGame;

    public Game1()
    {
        ...
    }

    protected override void LoadContent()
    {
        ...
        mTheGame = new MyGame();
    }

    protected override void Update(GameTime gameTime)
    {
        ...
        mTheGame.UpdateGame(gameTime);

        if (InputWrapper.Buttons.A == ButtonState.Pressed)
            mTheGame = new MyGame();
        ...
    }

    protected override void Draw(GameTime gameTime)
    {
        ...
        mTheGame.DrawGame();
        ...
    }
}
Your game state project is now complete. Try building and running the program. It should look similar to Figure 3-13, shown previously. Remember to test the program by winning, losing, and starting a new game to verify the behaviors of the game.
Summary
In this chapter, you have learned many of the basic graphics and effects principles needed to create your own customized game. This includes modifying the game window, creating textured primitives, and outputting text to the game window.
Another important concept that was touched on was the user-defined coordinate system. The user-defined coordinate system provides the flexibility and functionality needed to properly control what the user sees of the game world. It also provides the customization needed for a wide variety of games.
Lastly, you have seen what is required to provide an object with simple behavior and your game with a simple game state. Game state and object behavior are critical pieces needed to create a game from both technical and design standpoints. The way an object behaves in the game world and how it interacts with the user and game state is often referred to as gameplay. You will see how to create more advanced object behavior and game states in the upcoming chapters.
Quick Reference
To |
Do this |
|---|---|
| Change the game window size | Modify mGraphics.PreferredBackBufferWidth and mGraphics.PreferredBackBufferHeight. Remember to call the mGraphics.ApplyChanges() function to activate the window size change. |
| Change the window to a full-screen display | Set mGraphics.IsFullScreen to either true or false. Once again, remember to call the mGraphics.ApplyChanges() function to activate the change. |
| Draw and interact with multiple copies of the same graphical object | Define a class to abstract the desired behaviors—for example, the TexturedPrimitive class. Remember that it is convenient to define both Update() and Draw() functions for your class. These functions can be called from the Update() and Draw() functions for updating and drawing of your objects. |
| Work with your own game object class | 1. Define instance variables to represent your game objects. 2. Instantiate and initialize the game objects in LoadContent() . 3. Poll the user and change the game objects in Update() . 4. Draw the game objects in Draw() . |
| Work with the user-defined coordinate system | Allow the user to define the desired coordinate space by specifying the position for the lower-left corner and the width that the game window represents. Define functions to transform the user-defined coordinate space to pixel coordinate space by translating, scaling, and flipping the y-axis. In the case of this chapter, this functionality is defined in the Camera class. The SetCameraWindow() function allows the user to define the coordinate system. The ComputePixelPosition() and ComputePixelRectangle() functions implement the transform of positions and rectangles from user-defined to pixel coordinate space. |
| Draw in the user-defined coordinate system | 1. Define a coordinate space by calling the Camera.SetCameraWindow() function. 2. Define all game objects in the defined coordinate space. 3. Before drawing a game object, remember to call the Camera.ComputePixelRectangle() function to transform from user-defined to pixel coordinate space. |
| Load a font into the project | Follow the same steps as loading an image: right-click over the ContentProject and locate the font file. In general, these are the same steps to follow to load any external files or resources into your project. |
| Draw fonts in your game | You can work with the FontSupport class and call the PrintStatus() function to output text to the top-left corner of the game window, or call the PrintStatusAt() function to print text to a user-defined coordinate system position. |
| Define specific behavior for a game object | One convenient approach is to define a subclass from the TexturedPrimitive class: 1. Add a new file into the project. 2. Implement the behavior (for instance, by changing the Update() function). 3. Reuse the Draw() function if possible. 4. Work with your new class. |
| Avoid complex code in the Game1.cs file | Create a separate GameState object to create, maintain, and control your own game state. |
| Implement the Update() function of your GameState object | Follow these simple steps: 1. Check for the need to update (for example, for pausing or ending the game). 2. Call the Update() function for all game objects. 3. Handle interactions among all relevant game objects. 4. Spawn new enemies if necessary. 5. Check for a win-or-loss condition. |