
![]()
Getting Things Moving
After completing this chapter, you will be able to:
- Program with rotated texture objects effectively
- Understand the concept of rotation reference position
- Implement autonomous controlled gradual turning and target-locked chasing behaviors
As you saw at the end of Chapter 3, “2D Graphics, Coordinates and Game State,” the behavior of your game objects has become more complex. You may have noticed this in the Simple Game Object and Simple Game State projects, in which you created soccer ball and basketball game objects. The behavior given to those objects allows them to move around the game window, detecting and responding to collisions with the window’s edges.
This chapter covers the basic math you need to implement some common behaviors and concepts used across many games, including concepts for projectiles, velocity, and more advanced collision-based behaviors.
Rotating textures
Understanding how a texture rotates is a good place to start, because texture rotation can be useful for a variety of tasks, including orienting your objects in the game world, adding rolling support to an object, modifying the direction an object faces, and creating more natural collision reactions. However, before you can implement behaviors like this, it’s worth exploring the basics of rotation, which you’ll do in this next project.
The Rotate Textured Primitive project
This project demonstrates how to move an object around the game window and rotate it—either clockwise or counterclockwise. It also demonstrates how to select the Ball object (an instance of TexturedPrimitive) or Logo object (another instance of TexturedPrimitive) and scale it. You can see an example of this project running in Figure 4-1.

Figure 4-1. Running the Rotate Textured Primitive project
The project’s controls are as follows:
- Left thumbstick (WSAD-keys) Moves the selected image
- Right thumbstick (arrow-keys) Scales the selected image
- Button A (K-key) Selects the ball
- Button B (L-key) Selects the logo
- Button Y (I-key) Rotates the selected image clockwise
- Button X (J-key) Rotates the selected image counterclockwise
The goals of the project are as follows:
- To understand how to rotate a texture
- To understand the rotation reference position
The steps for creating the project are as follows:
- Modify the TexturedPrimitive class to support rotation.
- Modify the GameState class to rotate the textures.
- Observe and test the results.
Modifying the TexturedPrimitive class
- Modify the TexturedPrimitive class by adding the variable mRotateAngle. This variable holds the clockwise rotation angle of the texture in radians. Radians are an alternative unit for describing angles; for example, a circle circumscribes 360 degrees, or 2π radians. MonoGame and other games and graphics APIs use radians because of their relation to trigonometric functions. Because such functions are used throughout the APIs in many areas, they have naturally become the industry standard for describing angles.
 Note If you need to review or refresh the concept of radians, refer to http://reference.wolfram.com/legacy/teachersedition/Teacher/AlgebraTrigMathematica24.Radiansanddegrees.html. If the cognitive leap from degrees to radians is cumbersome, the library provides convenient helper methods called MathHelper.ToRadians() and MathHelper.ToDegrees().
public class TexturedPrimitive
{
    ...

    protected float mRotateAngle; // In radians, clockwise rotation

    ...
}
- Now that you have declared the rotation angle variable, it is important to remember to initialize it within the constructor. The TexturedPrimitive class contains two constructors; therefore, the rotation angle is initialized within both. Both constructors initialize the variable to zero, meaning the TexturedPrimitive object has no angle of rotation upon creation.
public TexturedPrimitive(String imageName, Vector2 position, Vector2 size)
{
    ...

    mRotateAngle = 0f;
}

public TexturedPrimitive(String imageName)
{
    ...

    mRotateAngle = 0f;
} - Next, because you’re going to want to modify the rotation angle, you should provide an accessor. The accessor simply needs to let you get or set the rotation variable, as shown here:
public float RotateAngleInRadian
{
    get { return mRotateAngle; }
    set { mRotateAngle = value; }
} - You also need to modify the update function of TexturedPrimitive to provide support for updating the rotation angle—something you can do easily by adding another parameter to specify the angle of rotation. In the following code, the change in angle gets added to the current angle of rotation:
public void Update(Vector2 deltaTranslate, Vector2 deltaScale, float deltaAngleInRadian)
{
    mPosition += deltaTranslate;
    mSize += deltaScale;
    mRotateAngle += deltaAngleInRadian;
}
Note As you may already know, the term delta is used as a synonym for change in mathematics. Therefore, when a parameter is named deltaAngleInRadian, you can think of it as the angle of change, in radians. - The last function that you need to modify is the Draw() function of TexturedPrimitive. This function includes three main steps: converting the position and size of TexturedPrimitive into pixel space for drawing; calculating the rotation origin or pivot; and drawing the texture to the screen using the SpriteBatch.
- To convert from user-defined coordinate space to pixel space, you can use the ComputePixelRectangle() function you created in the Camera class in Chapter 3. Simply pass in the texture’s position and size, and store the results in a local Rectangle variable called destRect, which you’ll use for drawing.
- Next, you can calculate the rotation origin, or org, by dividing both the image’s width and height by two. It’s handy to think of the rotation origin as the pivot point around which the texture rotates.

- Lastly, the SpriteBatch.Draw() function is where you use the converted pixel-space rectangle (destRect), the rotation angle (mRotationAngle), and the rotation origin or image reference position (org).
virtual public void Draw()
{
    // Define location and size of the texture
    Rectangle destRect = Camera.ComputePixelRectangle(Position, Size);

    // Define the rotation origin
    Vector2 org = new Vector2(mImage.Width / 2, mImage.Height / 2);

    // Draw the texture
    Game1.sSpriteBatch.Draw(
            mImage,
            destRect,           // Area to be drawn in pixel space
            null,
            Color.White,
            mRotateAngle,       // Angle to rotate (clockwise)
            org,                // Image reference position
            SpriteEffects.None, 0f);
}
- Now that the TexturedPrimitive class supports rotation, you can use it within the GameState class to demonstrate that it is functioning correctly. Start by adding the following TexturedPrimitive variables and initializing them within the constructor:
// Work with TexturedPrimitive
TexturedPrimitive mBall, mUWBLogo;
TexturedPrimitive mWorkPrim;

public GameState()
{
    // Create the primitives
    mBall = new TexturedPrimitive("Soccer",
                            new Vector2(30, 30), new Vector2(10, 15));
    mUWBLogo = new TexturedPrimitive("UWB-JPG",
                            new Vector2(60, 30), new Vector2(20, 20));
    mWorkPrim = mBall;
} - Next, change the update function to support the selection of the current primitive and also the rotation of that primitive if either the X or the Y button is pressed:
public void UpdateGame()
{
    #region Select which primitive to work on
    if (InputWrapper.Buttons.A == ButtonState.Pressed)
        mWorkPrim = mBall;
    else if (InputWrapper.Buttons.B == ButtonState.Pressed)
        mWorkPrim = mUWBLogo;
    #endregion

    #region Update the work primitive
    float rotation = 0;
    if (InputWrapper.Buttons.X == ButtonState.Pressed)
        rotation = MathHelper.ToRadians(1f);          // 1 degree pre-press
    else if (InputWrapper.Buttons.Y == ButtonState.Pressed)
        rotation = MathHelper.ToRadians(-1f);         // 1 degree pre-press
    mWorkPrim.Update(
        InputWrapper.ThumbSticks.Left,
        InputWrapper.ThumbSticks.Right,
        rotation);
    #endregion
} - Lastly, modify the DrawGame() function to draw both of the TexturedPrimitive objects and output their angles of rotation via the FontSupport class:
public void DrawGame()
{
    mBall.Draw();
    FontSupport.PrintStatusAt(
        mBall.Position,
        mBall.RoateAngleInRadian.ToString(),
        Color.Red);

    mUWBLogo.Draw();
    FontSupport.PrintStatusAt(
        mUWBLogo.Position,
        mUWBLogo.Position.ToString(),
        Color.Black);

    FontSupport.PrintStatus(
        "A-Soccer B-Logo LeftThumb:Move RightThumb:Scale X/Y:Rotate",
        null);
}
Observing and testing the results
Build and run the project. Does it behave as you expected? If so, try rotating the textures clockwise and counterclockwise. Notice that they rotate around the center of the image, because we defined the origin or reference position of the image. You’ll see more details about this important concept later in this book.
The next concept we’ll cover is vectors. Euclidean vectors are used across many fields of study, including mathematics, physics, computer science, and engineering. They are particularly important in games; nearly every game uses vectors in one way or another. Because they are used so extensively, this section is devoted to understanding and utilizing vectors in games.
One of the most common uses for vectors is to represent an object’s displacement and direction. This can be done easily, because a vector is defined by its size and direction. Using only this small amount of information, you can represent attributes such as an object’s velocity or acceleration. If you have the position of an object, its direction, and its velocity, then you have sufficient information to move it around the window without user input.
![]() Note A vector’s size is often referred to as its length, or magnitude.
Note A vector’s size is often referred to as its length, or magnitude.
Before going any further, it is important to review the concepts of a vector, starting with how you can define one. A vector can be specified using two points. For example, given the arbitrary position Pa = (Xa , Ya ) and the arbitrary position Pb = (Xb , Yb ), you can define the vector from Pa to Pb or (Vab) as Pb –Pa. You can see this represented in the following equations and Figure 4-2:


Figure 4-2. A vector being defined by two points
Now that you have a vector Vab, you can easily ascertain its length (or size) and its direction. A vector’s length is equal to the distance between the two points that created it. In this example, the length of Vab is equal to the distance between Pa and Pb, while the direction of Vab goes from Patoward Pb.
In MonoGame, the Vector2 class implements the functionality of a two-dimensional (2D) vector. Conveniently, you can also use the Vector2 class to represent positions in 2D space, such as a point. In the preceding example, Pa, Pb, and Vab can all be implemented as instances of the Vector2 class; however, Vab is the only mathematically defined vector. Pa and Pb represent positions, or points used to create a vector.
Recall that a vector can also be normalized. A normalized vector (also known as a unit vector) always has a size of 1. You can see a normalized vector represented in the following equation and Figure 4-3:
![]()

Figure 4-3. A vector being normalized
Vectors can also be rotated. If, for example, you have the vector Vr = (Xr , Yr ) and wish to rotate it by θ (radians), then you can use the equations shown following to derive Xr and Yr. Figure 4-4 shows the ro1tation of a vector being applied.
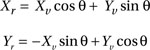

Figure 4-4. A vector being rotated by the angle theta (in radians)
Lastly, it is important to remember that vectors are defined by their direction and size; in other words, two vectors can be equal to each other independent of the locations of the vectors. Figure 4-5 shows two vectors (Va and Vbc) that are located at different positions but have the same direction and magnitude. Because their direction and magnitude are the same, these vectors are equal to each other. In contrast, the vector Vd is not the same because its direction and magnitude are different from the others.

Figure 4-5. Three valid vectors represented in 2D space with two vectors equal to each other
This project demonstrates how to represent and manipulate vectors within the game window. You can select and manipulate each of the vectors by changing its attributes, such as direction and size. The project shows vectors being represented in three different ways. Figure 4-6 shows an example of this project running.

Figure 4-6. Running the Show Vector project
The project’s controls are as follows:
- Left thumbstick’s x-axis (AD-keys) Rotates the vector at Py
- Left thumbstick’s y-axis (WS-keys) Increases and decrease the length of the vector at Py
- Right thumbstick (arrow-keys) Changes the currently selected locator position (Pa, Pb, Px, or Py)
- Button A (K-key) Selects Pa
- Button B (L-key) Selects Pb
- Button X (J-key) Selects Px
- Button Y (I-key) Selects Py
The goals of the project are as follows:
- To understand some of the utility of vectors
- To understand how to define a vector
- To be able to define a vector at a specified position
The steps for creating the project are as follows:
Add the following resource, which can be found in the Chapter04SourceCodeImagesAndFontsUsed folder, into your content project before you begin:
- Position.png
Creating the ShowVector class
- Start by creating a new class in the GraphicsSupport folder. Name the class ShowVector.cs.
- Add the following two static variables, which support drawing the ShowVector object. You can use a simple Texture2D type for the image and a float for the length-to-width ratio of the image.
protected static Texture2D sImage = null;    // Singleton for the class
private static float kLenToWidthRatio = 0.2f; - Now add a simple static function to load the image variable with the desire texture. Recall that the images used within this chapter can be found in Chapter04ImagesAndFontsUsed.
static private void LoadImage()
{
    if (null == sImage)
        ShowVector.sImage = Game1.sContent.Load<Texture2D>("RightArrow");
} - You need to add a function that can correctly draw the vector to the game window. To do this, add a DrawPointVector() function that accepts two arguments. The first is the starting position and the second is the direction. Both of these arguments should be Vector2s.
static public void DrawPointVector(Vector2 from, Vector2 dir)
{
    ...
}
Because this function is a bit lengthy, let’s look at each piece separately:
- The first thing to do is load the vector image to prepare it for drawing. You can do this by using the previously created LoadImage() function:
LoadImage(); - Next, you need to compute the correct angle of rotation for the image. This can be done by calculating the angle (theta) between the vector’s direction (Vector2 dir) and the x-axis, as shown in the image that follows.
Note The sign of the angle is positive when the rotation is counterclockwise.

To do this, you first normalize the given vector by dividing the vector with its length. With a normalized vector, the length is the size of the hypotenuse and has a value of 1, the value of the X component is the size of adjacent, and the value of the Y component is the size of the opposite. In this way, arc cosine on the normalized vector’s X value is the angle of rotation from the horizontal direction, as illustrated in the following image.

The sign of the Y value indicates if the rotation is counterclockwise (positive) or clockwise (negative). In the code that follows, you can see how the angle is found:
#region Step 4b. Compute the angle to rotate
float length = dir.Length();
float theta = 0f;
if (length > 0.001f)
{
dir /= length;
theta = (float)Math.Acos((double)dir.X);
if (dir.X < 0.0f)
{
if (dir.Y > 0.0f)
theta = -theta;
}
Else
{
if (dir.Y > 0.0f)
theta= -theta;
}
}
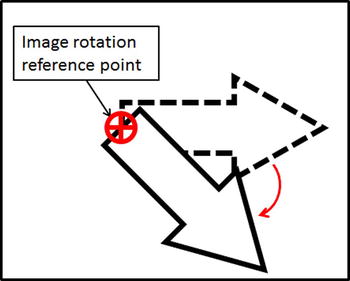
#endregion Note The x-axis is used because the direction of the image used needs to be taken into account. The image used for this project points horizontally. If the image were pointed vertically, then the preceding computation would need to use the y-axis as the reference. Alternatively, you can rotate a vertically pointing image by 90 degrees before including it in the project. - Now that you know the correct rotation for the image, you can draw it. You do this by calling the Game1.sSpriteBatch.Draw() function, passing in the correct rotation angle, image, and destination rectangle, which you can calculate from the vector’s position (from) and size (length). However, pay special attention to the reference point around which the image will rotate. To correctly reflect the vector’s position and size, you need to rotate the image around a middle-left position (the beginning of the arrow). This is reflected in the image that follows:
#region Step 4c. Draw Arrow
    // Define location and size of the texture to show
    Vector2 size = new Vector2(length, kLenToWidthRatio * length);
    Rectangle destRect = Camera.ComputePixelRectangle(from, size);

    // destRect is computed with respect to the "from" position
    // on the left side of the texture.
    // We only need to offset the reference
    // in the y from top left to middle left.
    Vector2 org = new Vector2(0f, ShowVector.sImage.Height/2f);

    Game1.sSpriteBatch.Draw(ShowVector.sImage, destRect, null, Color.White,
                    theta, org, SpriteEffects.None, 0f);
#endregion - The last portion of this function prints out the vector’s direction and size. You can achieve this using the previously created font support class’s PrintStatusAt() function:
#region Step 4d. Print status message
    String msg;
    msg = "Direction=" + dir + "
Size=" + length;
    FontSupport.PrintStatusAt(from + new Vector2(2, 5), msg, Color.Black);
#endregion
- The first thing to do is load the vector image to prepare it for drawing. You can do this by using the previously created LoadImage() function:
- Now that the DrawPointVector() function, which uses a position and direction, is complete, you need to add another function to draw a vector between two points. This is quite easy using the DrawPointVector() function you just created. The DrawFromTo() function draws a vector:
static public void DrawFromTo(Vector2 from, Vector2 to)
{
    DrawPointVector(from, to - from);
} - The last function you need for the ShowVector class is a rotation function. Add a function called RotateVectorByAngle(), which accepts a vector and the desired rotation. Using the rotation angle, you can rotate the vector by implementing the vector rotation equations defined previously. After calculating the rotation, the function should return the new vector. You can see an example of this in the following code:
static public Vector2 RotateVectorByAngle(Vector2 v, float angleInRadian)
{
    float sinTheta = (float)(Math.Sin((double)angleInRadian));
    float cosTheta = (float)(Math.Cos((double)angleInRadian));
    float x, y;
    x = cosTheta * v.X + sinTheta * v.Y;
    y = -sinTheta * v.X + cosTheta * v.Y;
    return new Vector2(x, y);
}
Now that you have implemented the ShowVector class, you can modify the GameState class to support the desired vectors.
Modifying the GameState class
- Add the following variables to the GameState class. These variables will be used to create your desired vectors by acting as points or locators. Remember that a vector can be defined by two points.
// Size of all the positions
Vector2 kPointSize = new Vector2(5f, 5f);

// Work with TexturedPrimitive
TexturedPrimitive mPa, mPb;               // The locators for showing Point A and Point B
TexturedPrimitive mPx;                    // to show same displacement can be applied to any position

TexturedPrimitive mPy;                    // To show we can rotate/manipulate vectors independently
Vector2 mVectorAtPy = new Vector2(10, 0); // Start with vector in the X direction;

TexturedPrimitive mCurrentLocator; - Modify the GameState class’s constructor to initialize the locators or points with an image, position, size, and name. Also set the current locator (currently selected) to the locator mPa. You can see this reflected in the following code:
public GameState()
{
    // Create the primitives
    mPa = new TexturedPrimitive("Position",
        new Vector2(30, 30), kPointSize, "Pa");
    mPb = new TexturedPrimitive("Position",
        new Vector2(60, 30), kPointSize, "Pb");
    mPx = new TexturedPrimitive("Position",
        new Vector2(20, 10), kPointSize, "Px");
    mPy = new TexturedPrimitive("Position",
        new Vector2(20, 50), kPointSize, "Py");
    mCurrentLocator = mPa;
} - With the required variables declared and initialized, you can now add code to change their states in the update function. Modify the UpdateGame() function to support the following:
- Allow the user to change the currently selected vector by polling the gamepad’s A, B, X, and Y buttons and changing mCurrentLocator to the corresponding locator:
#region Step 3a. Change current selected vector
    if (InputWrapper.Buttons.A == ButtonState.Pressed)
        mCurrentLocator = mPa;
    else if (InputWrapper.Buttons.B == ButtonState.Pressed)
        mCurrentLocator = mPb;
    else if (InputWrapper.Buttons.X == ButtonState.Pressed)
        mCurrentLocator = mPx;
    else if (InputWrapper.Buttons.Y == ButtonState.Pressed)
        mCurrentLocator = mPy;
#endregion - Support the movement of the currently selected vector with the gamepad’s right thumbstick by changing mCurrentLocator:
#region Step 3b. Move Vector
    // Change the current locator position
    mCurrentLocator.Position +=
        InputWrapper.ThumbSticks.Right;
#endregion - Give the user the ability to rotate the Py vector via the left thumbstick’s x-axis:
#region Step 3c. Rotate Vector
    // Left thumbstick-X rotates the vector at Py
    float rotateYByRadian = MathHelper.ToRadians(
        InputWrapper.ThumbSticks.Left.X);
#endregion - Give the user the ability to change the length of the Py vector via the left thumbstick’s y-axis:
#region Step 3d. Increase/Decrease the length of vector
    // Left thumbstick-Y increase/decrease the length of vector at Py
    float vecYLen = mVectorAtPy.Length();
    vecYLen += InputWrapper.ThumbSticks.Left.Y;
#endregion - Apply the computed changes to vector Py by utilizing the ShowVector class’s RotateVectorByAngle() function for the modified rotation angle, and then normalizing Py so that the new scale can be used:
#region Step 3e. Compute vector changes
    // Compute the rotated direction of vector at Py
    mVectorAtPy = ShowVector.RotateVectorByAngle(mVectorAtPy, rotateYByRadian);
    mVectorAtPy.Normalize(); // Normalize vectorAtPy to size of 1f
    mVectorAtPy *= vecYLen;  // Scale the vector to the new size
#endregion
- Allow the user to change the currently selected vector by polling the gamepad’s A, B, X, and Y buttons and changing mCurrentLocator to the corresponding locator:
- As you probably have guessed, the last function you need to modify within the GameState class is the DrawGame() function. You can do this via the code provided following. As you can see, the vectors are drawn via the ShowVector class and locators are drawn using the TexturedPrimitive Draw() function.
public void DrawGame()
{
    // Drawing the vectors
    Vector2 v = mPb.Position - mPa.Position;  // Vector V is from Pa to Pb

    // Draw Vector-V at Pa, and Px
    ShowVector.DrawFromTo(mPa.Position, mPb.Position);
    ShowVector.DrawPointVector(mPx.Position, v);

    // Draw vectorAtPy at Py
    ShowVector.DrawPointVector(mPy.Position, mVectorAtPy);

    mPa.Draw();
    mPb.Draw();
    mPx.Draw();
    mPy.Draw();

    // Print out text message to echo status
    FontSupport.PrintStatus(
        "Locator Positions: A=" + mPa.Position +
        " B=" + mPb.Position,
        null);
}
With the basics of vectors out of the way, we can now address more vector-based game-specific concepts, starting with the idea of front direction. This simple idea stems from the need to understand which direction a game object is facing. For example, in a platform-style game, front direction determines which direction the hero character or enemy characters faces.
Front direction can be used to affect the gameplay or simply flip to a character’s texture upon a directional change. Adding support for front direction provides you with a convenient tool for achieving many gamelike actions.
This project demonstrates how to use the concept of front direction by controlling a rocket, the direction it faces, and therefore the direction of its projectiles. The rocket can move, rotate, and fire. The user’s goal is to catch a bee by hitting it with a fired projectile. If the projectile touches the bee, it causes the bee to respawn at a random position. Figure 4-7 shows an example of this project in action.

Figure 4-7. Running the Front Direction project
The project’s controls are as follows:
- Left thumbstick (WSAD-keys) Changes the position of the rocket
- Right thumbstick’s x-axis (left/right-arrow-keys) Changes the front direction of rocket by rotating it
- Button A (K-key) Shoots the net
The goals of the project are as follows:
- To experience front direction
- To practice traveling along a predefined direction
The steps for creating the project are as follows:
Add the following resources, which can be found in the Chapter04SourceCodeImagesAndFontsUsed folder, into your content project before you begin:
- Insect.png
- Net.png
- Rocket.png
Modifying the GameState class
- Add the following variables needed to support the desired game state. For the rocket, a TexturedPrimitive and a vector for its initial direction are all that is needed. For the projectile (the net), a TexturedPrimitive, a bool for its flight state, a vector for its velocity, and a float for its speed are needed. The bee only requires a TexturedPrimitive and a bool for its status. Lastly, a couple of variables for the game statistics are needed.
// Rocket support
Vector2 mRocketInitDirection = Vector2.UnitY; // This does not change
TexturedPrimitive mRocket;

// Support the flying net
TexturedPrimitive mNet;
bool mNetInFlight = false;
Vector2 mNetVelocity = Vector2.Zero;
float mNetSpeed = 0.5f;

// Insect support
TexturedPrimitive mInsect;
bool mInsectPreset = true;

// Simple game status
int mNumInsectShot;
int mNumMissed; - Next, initialize the variables to the values shown in the code that follows. This represents the game state upon the initial loading of the project.
public GameState()
{
    // Create and set up the primitives
    mRocket = new TexturedPrimitive("Rocket", new Vector2(5, 5), new Vector2(3, 10));
    // Initially the rocket is pointing in the positive y direction
    mRocketInitDirection = Vector2.UnitY;

    mNet = new TexturedPrimitive("Net", new Vector2(0, 0), new Vector2(2, 5));
    mNetInFlight = false; // until user press "A", rocket is not in flight
    mNetVelocity = Vector2.Zero;
    mNetSpeed = 0.5f;

    // Initialize a new insect
    mInsect = new TexturedPrimitive("Insect", Vector2.Zero, new Vector2(5, 5));
    mInsectPreset = false;

    // Initialize game status
    mNumInsectShot = 0;
    mNumMissed = 0;
} - Now the update function needs to update each individual game object. This can be done by breaking down the objects and their behaviors into different steps.
- First, start by updating the rocket’s behavior. You can do this by rotating the rocket via the right thumbstick’s x-axis and moving the rocket via the left thumbstick. You can see this reflected in the code that follows:
mRocket.RotateAngleInRadian += MathHelper.ToRadians(InputWrapper.ThumbSticks.Right.X);
mRocket.Position += InputWrapper.ThumbSticks.Left; - Second, update the projectile’s (net’s) behavior by modifying its variables when the A button is pressed. You can see this achieved in the code that follows. Notice how the net uses the rocket’s rotation and position when launched.
/// Set net to flight
if (InputWrapper.Buttons.A == ButtonState.Pressed)
{
    mNetInFlight = true;
    mNet.RotateAngleInRadian = mRocket.RotateAngleInRadian;
    mNet.Position = mRocket.Position;
    mNetVelocity = ShowVector.RotateVectorByAngle(
        mRocketInitDirection,
        mNet.RotateAngleInRadian) * mNetSpeed;
} - The last piece that needs updating is the bee. You can easily do this by checking its alive state. If the bee does not currently exist, it should be re-created at a random position.
if (!mInsectPreset)
{
    float x = 15f + ((float)Game1.sRan.NextDouble() * 30f);
    float y = 15f + ((float)Game1.sRan.NextDouble() * 30f);
    mInsect.Position = new Vector2(x, y);
    mInsectPreset = true;
}
- First, start by updating the rocket’s behavior. You can do this by rotating the rocket via the right thumbstick’s x-axis and moving the rocket via the left thumbstick. You can see this reflected in the code that follows:
- The remaining portion of the update function needs to handle the interobject collision or interaction. For this project, the collisions that involve the net are what you care about. Because of this, you can check the net’s flight state and update its position (based on its velocity) and its collision detections if the net is in flight. If the net touches the insect, reset the states and modify the game stats. The net misses if it collides with the border of the game window.
if (mNetInFlight)
{
    mNet.Position += mNetVelocity;

    if (mNet.PrimitivesTouches(mInsect))
    {
        mInsectPreset = false;
        mNetInFlight = false;
        mNumInsectShot++;
    }

    if ((Camera.CollidedWithCameraWindow(mNet) !=
            Camera.CameraWindowCollisionStatus.InsideWindow))
    {
        mNetInFlight = false;
        mNumMissed++;
    }
} - The last function you need to modify in the GameState class is the draw function. You can do this very simply by calling the objects’ draw functions if their state is set to true. For example, the net should only be drawn if it is in flight. Also, remember to print the game status via the FontSupport class.
public void DrawGame()
{
    mRocket.Draw();
    if (mNetInFlight)
        mNet.Draw();

    if (mInsectPreset)
        mInsect.Draw();

    // Print out text message to echo status
    FontSupport.PrintStatus(
        "Num insects netted = " + mNumInsectShot +
        " Num missed = " + mNumMissed, null);
 }
Observing the results
Now that you have implemented the necessary code, build and run the program. Test the program to see if it behaves as you would expect. Notice that the rocket points in the intended direction when the user uses the right thumbstick. This is because the front direction is correctly oriented with the image.
As you might have noticed when coding this project, the GameState class contains a large number of variables that belong to other objects within the game state, such as the rocket object (the TexturedPrimitive) and its initial direction vector. This is fine for demonstrating the front direction concept; however, in a real game, organizing your objects’ variables within the game state is considered bad practice. You’ll address this issue by creating a GameObject class in the next project.
As you saw at the end of the last section, using the GameState class to prototype and learn new concepts can be a quick and effective way to get a project up and running. However, as a developer it is your job to design your game’s architecture, which you should generally strive to make as straightforward and clean as possible, yet still maintain the ability to modify and expand it. When you include groups of related variables in the GameState class, the game’s architecture can become complex and convoluted as your game grows in scale and diversity. In addition, creating similar objects becomes a tedious process, as properties for each object also need to be declared. The simplest way to solve these issues, as you may know, is to create a new class with the desired behaviors and properties.
This section combines the properties and behaviors declared in the previous project’s GameState class into a new class called GameObject. These properties include front direction, velocity, and speed, and provide you with improved control over the movement of a game object.
![]() Note Velocity can be thought of as the rate of change of the position of an object. Velocity is made up of both a direction and speed (size). If this is familiar, it is because velocity lends itself perfectly to a vector, which also has a direction and size.
Note Velocity can be thought of as the rate of change of the position of an object. Velocity is made up of both a direction and speed (size). If this is familiar, it is because velocity lends itself perfectly to a vector, which also has a direction and size.
This project demonstrates how to control a game object by moving it around the game window. You move the game object (the rocket) by adjusting its speed and front direction. Figure 4-8 shows an example of this project running.
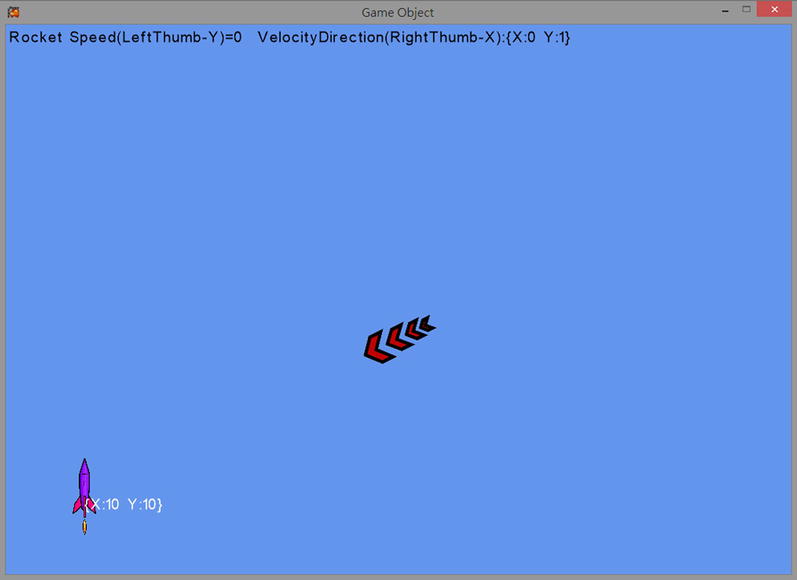
Figure 4-8. Running the Game Object project
The project’s controls are as follows:
- Left thumbstick's y-axis (AD-keys) Controls the rocket’s fly speed
- Right thumbstick's x-axis (left/right-arrow-keys) Changes the front direction of the rocket
The goal of the project is as follows:
- To abstract velocity and front direction into a new class
The steps for creating the project are as follows:
- Create and understand the GameObject class.
- Modify the game state to support the new GameObject class.
- Observe and test the results.
Add the following resources, which can be found in the Chapter04SourceCodeImagesAndFontsUsed folder, into your content project before you begin:
- Arrow.png
Creating the GameObject class
- Create a new class called GameObject. The GameObject class should derive from the TexturedPrimitive class so that you can take advantage of its previously defined behaviors and properties.
public class GameObject : TexturedPrimitive
{
    ...
} - Declare the following variables so you can support initial front direction, velocity direction, and speed:
// Initial front direction
(when RotateAngle is 0)
protected Vector2 mInitFrontDir = Vector2.UnitY;

// GameObject behavior: velocity
protected Vector2 mVelocityDir; // If not zero, always normalized
protected float mSpeed; - To support initialization of the GameObject class, create a constructor that accepts as arguments the object’s name, position, size, and label, and passes those parameters into the base class. Additionally, set the object’s speed and velocity variables to their initial values.
protected void InitGameObject()
{
    mVelocityDir = Vector2.Zero;
    mSpeed = 0f;
}

public GameObject(String imageName, Vector2 position,
    Vector2 size, String label = null)
        : base(imageName, position, size, label)
{
    InitGameObject();
} - Create a straightforward update function for the game object that modifies its position based on its speed and velocity direction values. Notice that this is a virtual function that subclasses can override.
virtual public void Update()
{
    mPosition += (mVelocityDir * mSpeed);
} - Add get and set accessors for the properties of the GameObject. These will allow you to change the direction and velocity of the game object from other classes, such as the GameState class. In total, you need five functions, as described following:
- The first accessor you should create is InitialFrontDirection. This function allows you to get the initial front direction, as well as set the initial front direction if the incoming vector is not of zero length.
public Vector2 InitialFrontDirection
{
    get { return mInitFrontDir; }
    set
    {
        float len = value.Length();
        // If the input vector is well defined
        if (len > float.Epsilon)
            mInitFrontDir = value / len;
        else
            mInitFrontDir = Vector2.UnitY;
    }
} - The next accessor is FrontDirection. This is similar to the previous accessor, except it returns a ShowVector and applies the incoming value to the rotation angle. You can see an example of the math needed to achieve this in the code and image that follow:
public Vector2 FrontDirection
{
    get
    {
        return ShowVector.RotateVectorByAngle(mInitFrontDir, RotateAngleInRadian);    }
    set
    {
        float len = value.Length();
        if (len > float.Epsilon)
        {
            value *= (1f / len);
            double theta = Math.Atan2(value.Y, value.X);
            mRotateAngle = -(float)(theta-Math.Atan2(mInitFrontDir.Y, mInitFrontDir.X));
        }
    }
}
- Now create an accessor for velocity. You can do this easily by using the code that follows. Notice how it obtains the velocity by multiplying the direction and speed together.
public Vector2 Velocity
{
    get { return mVelocityDir * Speed; }
    set
    {
        mSpeed = value.Length();
        if (mSpeed > float.Epsilon)
            mVelocityDir = value/mSpeed;
        else
            mVelocityDir = Vector2.Zero;
    }
} - Add a simple accessor to support Speed:
public float Speed
{
    get { return mSpeed; }
    set { mSpeed = value; }
} - Finally, create an accessor for VelocityDirection:
public Vector2 VelocityDirection
{
    get { return mVelocityDir; }
    set
    {
        float s = value.Length();
        if (s > float.Epsilon)
        {
            mVelocityDir = value / s;
        }
        else
            mVelocityDir = Vector2.Zero;
    }
}
- The first accessor you should create is InitialFrontDirection. This function allows you to get the initial front direction, as well as set the initial front direction if the incoming vector is not of zero length.
Now that the GameObject class is complete and provides the necessary properties and behaviors, you can modify the GameState class to use them within the game.
- Start by creating variables for the initial rocket position, the rocket game object, and the arrow game object:
Vector2 kInitRocketPosition = new Vector2(10, 10);
// Rocket support
GameObject mRocket;
// The arrow
GameObject mArrow; - Initialize the variables within the constructor with the default values shown following:
public GameState()
{
    mRocket = new GameObject("Rocket", kInitRocketPosition, new Vector2(3, 10));
    mArrow = new GameObject("RightArrow", new Vector2(50, 30), new Vector2(10, 4));
    // Initially pointing in the x direction
    mArrow.InitialFrontDirection = Vector2.UnitX;
} - Modify the UpdateGame() function so you can control and fly the rocket, as well as point the arrow in the rocket’s direction.
- To control the rocket, use the gamepad’s left and right thumbsticks. The right thumbstick controls the rocket’s angle or front direction, while the left thumbstick’s y-axis controls the rocket’s speed. In addition, check and reset the rocket’s position whenever it collides with the window border. Lastly, remember to call the rocket’s update function. Here’s the code to accomplish this:
#region Step 3a. Control and fly the rocket
mRocket.RotateAngleInRadian +=
    MathHelper.ToRadians(InputWrapper.ThumbSticks.Right.X);

mRocket.Speed += InputWrapper.ThumbSticks.Left.Y * 0.1f;

mRocket.VelocityDirection = mRocket.FrontDirection;

if (Camera.CollidedWithCameraWindow(mRocket) !=
    Camera.CameraWindowCollisionStatus.InsideWindow)
{
    mRocket.Speed = 0f;
    mRocket.Position = kInitRocketPosition;
}

mRocket.Update();
#endregion - Set the arrow’s front direction to face the rocket by finding the vector between the rocket’s position and the arrow’s position, and then apply that vector to the arrow’s front direction property:
#region Step 3b. Set the arrow to point toward the rocket
Vector2 toRocket = mRocket.Position - mArrow.Position;
mArrow.FrontDirection = toRocket;
#endregion
- To control the rocket, use the gamepad’s left and right thumbsticks. The right thumbstick controls the rocket’s angle or front direction, while the left thumbstick’s y-axis controls the rocket’s speed. In addition, check and reset the rocket’s position whenever it collides with the window border. Lastly, remember to call the rocket’s update function. Here’s the code to accomplish this:
- Finally, simply draw the rocket and arrow game objects by calling their draw functions within DrawGame. Also remember to update the status output with the necessary information.
public void DrawGame()
{
    mRocket.Draw();
    mArrow.Draw();

    // print out text message to echo status
    FontSupport.PrintStatus(
        "Rocket Speed(LeftThumb-Y)=" + mRocket.Speed +
        " VelocityDirection(RightThumb-X):" +
        mRocket.VelocityDirection, null);
    FontSupport.PrintStatusAt(mRocket.Position, mRocket.Position.ToString(), Color.White);
}
Observing the results
By grouping behaviors into a new class rather than declaring multiple variables within the game state, you have created a better-defined object and simplified your project by splitting it into more manageable pieces. You can now instantiate several of these objects without increasing the complexity of your code drastically. In upcoming examples, you’ll see that game objects can also become quite complex; however, by isolating them within a class, you can effectively hide much of the complexity. This makes it easier for you to use the object within the game and to modify the object’s overall behavior.
With game objects now moving around the screen, you can now look at the more specific behavior known as chasing. Chasing behavior is useful for many tasks within games. Some of the most common are projectile-based or bullet-based behaviors and simple enemy artificial intelligence (AI).
The goal of a chasing object is usually to catch the game object that it is targeting. This requires programmatic manipulation of the chaser’s front direction and velocity so it can home in on its target. However, it is generally important to avoid implementing a chaser that has perfect aim and always hits its target—because if the projectile always hits its target and characters are unable to avoid being hit, the challenge will essentially be removed from the game. However, this does not mean you should not implement a perfect chaser if your game design requires it. You’ll implement a chaser in the next project.
This project demonstrates how to control a rocket game object using both thumbsticks to control the rocket’s speed and direction. Pressing the A button shoots a snake that chases the rocket. You can then manipulate the rocket and attempt to avoid being hit. Figure 4-9 shows an example of this project running.

Figure 4-9. Running the Chaser Object project
The project’s controls are as follows:
- Left thumbstick's y-axis (WS-keys) Controls the rocket’s flying speed
- Right thumbstick's x-axis (left/right-arrow-keys) Changes the front direction of the rocket
- Button A (K-key) Shoots a snake that chases the rocket
The goals of the project are as follows:
The steps for creating the project are as follows:
- Review the concepts of dot product and cross product.
- Create and implement the ChaserGameObject class.
- Modify the GameState class support the new chaser class.
- Observe and test the results.
Before digging into the implementation of chasing behavior, you’ll review the mathematics required to correctly rotate or turn a game object during a chase. The two concepts you need to understand for this operation are the dot product and the cross product.
The dot product of two normalized vectors provides you with the means to find the angle between those vectors. For example, take a look at the following statements.
Given the following:
![]()
Then the following is true:
![]()
![]() Note If you need to review or refresh the concept of a dot product, refer to http://www.mathsisfun.com/algebra/vectors-dot-product.html.
Note If you need to review or refresh the concept of a dot product, refer to http://www.mathsisfun.com/algebra/vectors-dot-product.html.
Additionally, if both vectors V1 and V2 are normalized, then V1 ⋅ V2 = cos θ. You can see this concept reinforced in Figure 4-10.

Figure 4-10. The angle between two vectors, which can be found through the dot product
Lastly, it is also important to recognize that if V1 ⋅ V2 = 0 , then the two vectors are perpendicular.
The cross product of two vectors produces a vector that is orthogonal, or perpendicular, to both of the original vectors. In 2D games, where the 2D dimensions lie flat on the screen, the cross product results in a vector that either points inward (toward the screen) or outward (away from the screen). This may seem odd, because it’s not intuitive that crossing two vectors in 2D or XY space would result in a vector that lies in the third dimension, or the Z space. However, this vector is essential for the sole purpose of determining whether the game object needs to rotate in the clockwise or counterclockwise direction. Let’s take a detailed look at the following statements to clarify the mathematics involved.
Given the following:
![]()
Then the following is true:
(V1 × V2) is equal to a vector perpendicular to both V1 and V2.
![]() Note If you need to review or refresh the concept of a cross product, refer to http://www.mathsisfun.com/algebra/vectors-cross-product.html.
Note If you need to review or refresh the concept of a cross product, refer to http://www.mathsisfun.com/algebra/vectors-cross-product.html.
Additionally, you know that the cross product of two vectors in the XY space results in a vector in the Z direction. Lastly, when V1 crosses V2 > 0, you know that V1 is in the clockwise direction from V2 ; similarly, when V1 × V2 < 0, you know that V1 is in the counterclockwise direction. Figure 4-11 should help clarify this concept.

Figure 4-11. The cross product on two vectors
Creating the ChaserGameObject class
- Create a new class named ChaserGameObject. Subclass it from the GameObject class:
public class ChaserGameObject : GameObject
{
    ...
} - Add the following three variables for keeping track of the target. One of these variables is the target itself. Another keeps track of whether the target has been hit, and the last one holds a value that represents how rapidly the chaser homes in on its target.
// The target to go toward
protected TexturedPrimitive mTarget;
// Have we hit the target yet?
protected bool mHitTarget;
// How rapidly the chaser homes in on the target
protected float mHomeInRate; - Create a constructor to initialize the variables to the following default values. Remember to use the GameObject constructor or base constructor.
public ChaserGameObject(String imageName, Vector2 position, Vector2 size,
     TexturedPrimitive target) : base(imageName, position, size, null)
{
    Target = target;
    mHomeInRate = 0.05f;
    mHitTarget = false;
    mSpeed = 0.1f;
} - Now, an update function is needed to adjust the chaser’s direction. The following image shows an example of what you are trying to achieve. The function itself has been divided into two steps.

- The first step simply checks for a null target and calls the base update function:
#region Step 4a.
if (null == mTarget)
    return;
// Move the GameObject in the velocity direction
base.Update();
#endregion - Next, check for collision between the target object and the chaser. If the two objects have not yet collided, then the angle between the current front direction and the target direction needs to be calculated. This is done by using the dot product. After the angle between the two vectors has been computed, the cross product is used to determine if the target direction is in the clockwise or counterclockwise direction from the front direction vector.
#region Step 4b.
    mHitTarget = PrimitivesTouches(mTarget);

    if (!mHitTarget)
    {
        #region Calculate angle
        Vector2 targetDir = mTarget.Position - Position;
        float distToTargetSq = targetDir.LengthSquared();

        targetDir /= (float) Math.Sqrt(distToTargetSq);
        float cosTheta = Vector2.Dot(FrontDirection, targetDir);
        float theta = (float)
        Math.Acos(cosTheta);
        #endregion

        #region Calculate rotation direction
        if (theta > float.Epsilon)
        {
            // Not quite aligned ...
            Vector3 fIn3D = new Vector3(FrontDirection, 0f);
            Vector3 tIn3D = new Vector3(targetDir, 0f);
            Vector3 sign = Vector3.Cross(tIn3D, fIn3D);

            RotateAngleInRadian += Math.Sign(sign.Z) * theta * mHomeInRate;
            VelocityDirection = FrontDirection;
        }
        #endregion
    }
#endregion
- The first step simply checks for a null target and calls the base update function:
- Lastly, add the following accessors in order to allow modification or access to the instance variables of the ChaserGameObject from outside the class:
public float HomeInRate { get { return mHomeInRate; } set { mHomeInRate = value; } }
public bool HitTarget { get { return mHitTarget; } }
public bool HasValidTarget { get { return null != mTarget; } }
public TexturedPrimitive Target
{
    get { return mTarget; }
    set
    {
        mTarget = value;
        mHitTarget = false;
        if (null != mTarget)
        {
            FrontDirection = mTarget.Position - Position;
            VelocityDirection = FrontDirection;
        }
    }
}
With the ChaserGameObject now complete, all that is left is to update the GameState class to use its behavior.
- Start by adding the following variables. One for the ChaserGameObject object itself, and two others for keeping track of the number of times the chaser has hit or miss.
ChaserGameObject mChaser;
// Simple game status
int mChaserHit, mChaserMissed; - In the constructor, initialize the chaser with the following values and set the hit and missed stats to zero:
public GameState()
{
    ...

    mChaser = new ChaserGameObject("Chaser", Vector2.Zero, new Vector2(6f, 1.7f), null);
    // Initially facing in the negative x direction
    mChaser.InitialFrontDirection = -Vector2.UnitX;
    mChaser.Speed = 0.2f;
    mChaserHit = 0;
    mChaserMissed = 0;
} - Now modify the update function with the following behavior. First, check whether there is a valid target. Then, if the target is valid, apply the chase by calling mChaser.ChaseTarget();. Increment the hit or missed variables based on whether the chaser succeeds or fails. Failure is defined by colliding with the window’s edge. Also, remember to reinitialize a new chaser whenever the A button is pressed.
public void UpdateGame()
{
    ...

    #region 3. Check/launch the chaser!
    if (mChaser.HasValidTarget)
    {
        mChaser.ChaseTarget();

        if (mChaser.HitTarget)
        {
            mChaserHit++;
            mChaser.Target = null;
        }

        if (Camera.CollidedWithCameraWindow(mChaser) !=
                    Camera.CameraWindowCollisionStatus.InsideWindow)
        {
            mChaserMissed++;
            mChaser.Target = null;
        }
    }

    if (InputWrapper.Buttons.A == ButtonState.Pressed)
    {
        mChaser.Target = mRocket;
        mChaser.Position = mArrow.Position;
    }
    #endregion
} - Lastly, modify the draw function to draw the chaser and print out the hit and missed stats:
public void DrawGame()
{
    mRocket.Draw();
    mArrow.Draw();
    if (mChaser.HasValidTarget)
        mChaser.Draw();
    // Print out text message to echo status
    FontSupport.PrintStatus("Chaser Hit=" + mChaserHit + " Missed=" + mChaserMissed, null);
}
Observations
Now that the project is completed, build and run the program. Test to see whether the chasing object behaves as expected. Additionally, if everything is functioning as expected, try modifying the mHomeInRate variable within the chaser to a higher or lower value. Adjusting this variable should make the chaser itself more or less accurate.
Summary
This chapter has provided basic information about working with rotating textures. You should now be familiar with positive and negative rotation directions, working with the rotation reference position (the pivot), and accomplishing specific rotation goals by manipulating the pivot position.
You also reviewed vectors in 2D space. A vector is defined by its direction and magnitude. Vectors are convenient for describing defined displacements (velocities). You reviewed some foundational vector operations, including normalization of a vector, and how to calculate dot and cross products. You worked with these operators to implement the front-facing direction capability and create simple autonomous behaviors such as pointing toward a specific object and chasing.
Lastly, and as in previous chapters, you have seen that by properly abstracting common behaviors into game objects, you can greatly reduce the complexity of your game implementation. In the next chapter, you’ll continue investigating interesting game object behaviors in the form of more accurate collision determination and simple physics simulations.
Quick reference
To |
Do this |
|---|---|
| Rotate a TexturedPrimitive object | Ensure the rotation is represented as radians (by calling the MathHelper.ToRadians() function to convert from degrees to radians) and set the rotation by calling TexturedPrimitive.RotateAngleInRadian. |
| Draw a vector from position Pa to Pb | Call ShowVector.DrawFromTo(Pa, Pb). |
| Draw a vector V at position Pa | Call ShowVector.DrawPointVector(Pa, V). |
| Visualize the rotation of a vector V by rotation theta | Once again, make sure theta is in radians, and then call ShowVector.RotateVectorByAngle(V, theta). |
| Compute a vector from position Pa to Pb | Use Vector2 v = Pb - Pa;. |
| Compute the size of a given vector V | Use float VectorSize = V.Length();. |
| Normalize a given vector Va | Use Va.Normalize();. |
| Compute the angle between vectors Va and Vb | Use the following: Va.Normalize(); // Remember vectors must be normalized Vb.Normalize(); // For dot product to return cosine of angle float angle = (float) Math.Acos(Vector2.dot(Va, Vb)) |
| Compute the cross product between vectors Va and Vb | Use the following: Vector3 Vx = new Vector3(Va, 0f); // Cross product is in 3D space Vector3 Vy = new Vector3(Vb, 0f); Vector3 crossResult = Vector3.Cross(Vx, Vy); |
| Compute whether you should turn clockwise or counterclockwise to rotate from Va to Vb | Use the following (continue from the preceding code): if (Math.Sign(crossResult.Z) > 0) Counterclockwise rotation if (Math.Sign(crossResult.Z) < 0) Clockwise rotation |
| Set the initial front-facing direction of a GameObject | Set GameObject.InitialFrontDirection. |
| Set or get the current front-facing direction of a GameObject | Set or get GameObject.FrontDirection. |
| Set or get the velocity of a GameObject | Set or get GameObject.VelocityDirection and GameObject.Speed. |
| Implement home-in chasing | Instantiate ChaserGameObject and set ChaserGameObject.Target to the appropriate target. |