
![]()
Game object states and Semiautonomous Behaviors
After completing this chapter, you will be able to:
- Understand the uses of a finite state machine and how to implement one
- Create your own dynamic behaviors via a state machine
- Understand how to work with large groups of game objects within your game
So far, the behaviors you have added to game objects have been fairly straightforward, consisting mostly of a single state. Therefore, the game objects’ behaviors have not been malleable to conditions that would modify their initial behaviors. In this chapter, we will show you how to create more complex and dynamic behaviors for your game objects. These include common game behaviors that react autonomously to outside conditions or triggers, such as player input or timers. To implement these malleable behaviors, each game object will need to implement its own finite state machine.
Review of finite state machines
A finite state machine can be thought of as a model or functionality added to an object—or in your case, a game object. By definition, a finite state machine has a limited or finite number of states and can exist in only one state at a time. The transition between states is dependent upon the behavior desired for the state machine and is triggered by some condition.
For example, take a look at the generalized state machine in Figure 6-1. This finite state machine can be reduced to three primary states and their transitions. If you look closely at the figure, you can see that each state is outlined and exists as a separate entity. A condition generally must be met to cause a transition between states. This transition condition is often (but does not necessarily need to be) unique for each state within the finite state machine. It is also important to notice that this state machine contains several illegal transitions. For example, there’s no way to transition from state 2 back to state 1 in this example. If a state is not connected to the state machine via at least one transition condition, then it does not exist within the state machine and should be removed.
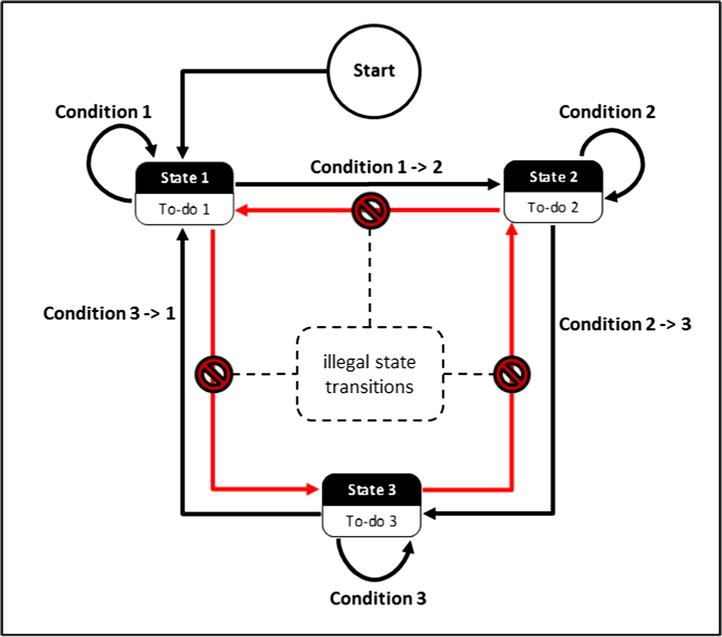
Figure 6-1. A basic finite state machine diagram with three states
Creating a spinning arrow
The first finite state machine you will implement centers around a simple spinning arrow. The arrow in this project demonstrates three distinct states, as well as the conditions required to transition from one state to the next. For the purposes of this project, each state can transition to only one other state. This means that a condition or trigger is associated with each of the three states. The transition between states can occur if and only if the condition has been met.
The Spinning Arrow project
This project lets you control a hero by moving it around the screen. The project contains an arrow that spins until the hero enters the arrow’s detection range; when that occurs, the arrow points toward the hero. The project also displays the arrow’s current state in the top-left corner of the window. You can see an example of this project running in Figure 6-2.
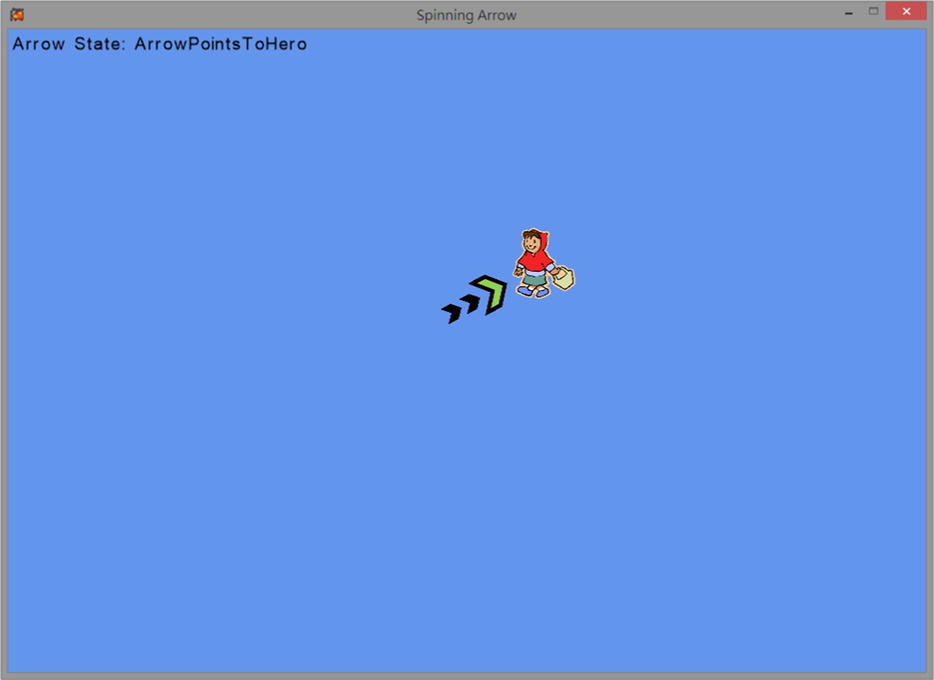
Figure 6-2. Running the Spinning Arrow project
The arrow’s finite state machine
The only new concept introduced in this project from the previous chapter’s projects is the arrow’s finite state machine; because of this, let’s take a closer look at the specifics involved. The arrow itself starts by spinning up to the maximum speed. It continues to spin at its maximum speed until it detects that the hero character is within range. When the hero character is detected, the arrow will stop spinning and point in the direction of the hero. After the hero leaves the arrow’s detection range, the arrow begins spinning again, thereby returning to its starting state. You can see this reflected in Figure 6-3. Notice that once the arrow’s state machine has started, it cannot break away from its state loop and must be within one of its three states.
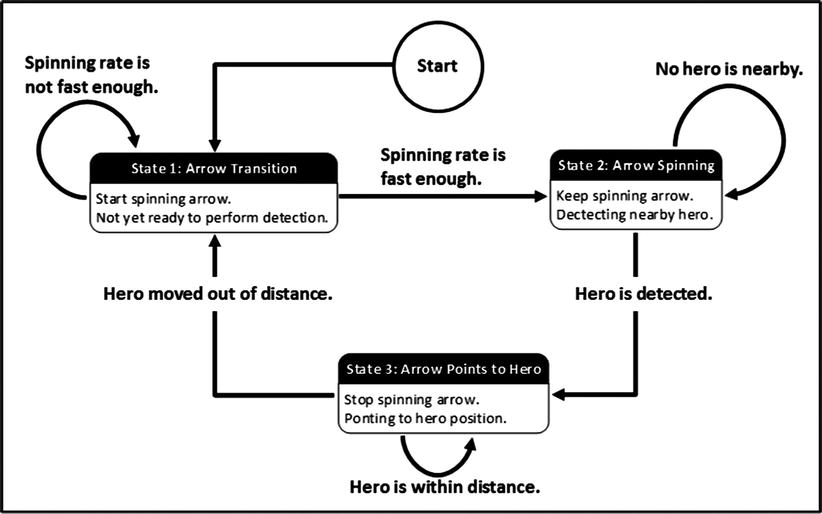
Figure 6-3. The Spinning Arrow project’s finite state machine
As shown in Figure 6-3, the arrow’s three states are as follows:
- State 1: Arrow transition Starts to spin the arrow. The spin rate continues to increase until it reaches its maximum, after which the arrow transitions to state 2.
- State 2: Arrow spinning Keeps the arrow spinning at its maximum rate until the hero is detected, at which point it then transitions to state 3.
- State 3: Arrow points to hero Stops the arrow from spinning and points it in the direction of the hero. When the hero has moved out of detection range, it transitions back to state 1.
This project has one control, as follows:
- Left thumbstick (WSAD-keys) Moves the hero
The goals of the project are as follows:
- To implement a simple finite state machine
- To dynamically reload textures
The steps for creating the project are as follows:
- Create a SpinningArrow class.
- Create a PlayerControlHero class.
- Modify the GameState class.
Add the following resources, which can be found in the Chapter06SourceCodeResources folder, into your content project before you begin:
- KidLeft.png
- KidRight.png
- RightArrow.png
The SpinningArrow class will contain all the behavior and functionality of the arrow. This includes the three possible states and the current state of the arrow, as well as the spinning behavior.
Creating the SpinningArrow class
- Create a new class called SpinningArrow that inherits from the GameObject class:
public class SpinningArrow : GameObject
{
    ...
} - Define an enum type that contains each possible state of the arrow. Because you know the three states already, this is straightforward.
public enum SpinningArrowState
{
    ArrowTransition,
    ArrowSpinning,
    ArrowPointsToHero
}; - Add the following variables for keeping track of the arrow’s current state and its current spin rate. Additionally, add the constants needed to define the arrow’s trigger distance from the hero, its maximum spin rate, and its rate of spin change:
private SpinningArrowState mArrowState = SpinningArrowState.ArrowTransition;
private float mSpinRate = 0f;

#region Constants
private const float kHeroTriggerDistance = 15f;
private const float kMaxSpinRate = (float) Math.PI / 10f;
private const float kDeltaSpin = kMaxSpinRate / 200f;
#endregion - Next, add the constructor to initialize the arrow by using the GameObject base class and the arrow’s initial front direction. In addition, add a simple public accessor that returns the arrow’s current state:
public SpinningArrow(Vector2 position) :
    base("RightArrow", position, new Vector2(10, 4))
{
    InitialFrontDirection = Vector2.UnitX;
}

public SpinningArrowState ArrowState
{
    get { return mArrowState; }
}
Note Vector2.UnitX is a default provided for a unit vector of (1, 0).
 - Create the function that spins the arrow. You can do this easily by increasing the arrow’s rotation angle incrementally during each update. Make sure to check whether the angle is greater than 2π. If so, subtract 2π from the arrow’s rotation angle. Doing this imposes a limit so the angle stays between zero and 2π.
private void SpinTheArrow()
{
    RotateAngleInRadian += mSpinRate;
    if (RotateAngleInRadian > (2 * Math.PI))
        RotateAngleInRadian -= (float)(2 * Math.PI);
} - Create a main update function that is responsible for calling the proper update method depending upon the arrow’s current state. A switch statement works perfectly for this. In the code that follows are three update functions, each called for one of the three states. To create these specific update functions, follow the subsequent steps:
public void UpdateSpinningArrow(TexturedPrimitive hero)
{
    switch (mArrowState)
    {
        case SpinningArrowState.ArrowTransition:
            UpdateTransitionState();
            break;
        case SpinningArrowState.ArrowSpinning:
            UpdateSpinningState(hero);
            break;
        case SpinningArrowState.ArrowPointsToHero:
            UpdatePointToHero(hero.Position - Position);
            break;
    }
}- Create the update function for the arrow-transition state. In this function, apply the arrow’s spin and then test whether the arrow has reached its maximum spin rate. If so, change the current state to ArrowSpinning; if not, increase the current spin rate.
private void UpdateTransitionState()
{
    SpinTheArrow();

    if (mSpinRate < kMaxSpinRate)
        mSpinRate += kDeltaSpin;
    else
        // Transition to Spin state
        mArrowState = SpinningArrowState.ArrowSpinning;
} - Next, create the update function for the spinning state. In this update, apply the arrow’s spin and then check whether the hero’s position has entered the arrow’s detection range. If so, reset the current spin rate and change the current state to ArrowPointsToHero. Note that this condition triggers a call to the update function for the ArrowPointsToHero state. This call provides an immediate reaction.
private void UpdateSpinningState(TexturedPrimitive hero)
{
    SpinTheArrow();

    Vector2 toHero = hero.Position - Position;
    if (toHero.Length() < kHeroTriggerDistance)
    {
        mSpinRate = 0f;
        mArrowState = SpinningArrowState.ArrowPointsToHero;
        UpdatePointToHero(toHero);
    }
} - You need one last update function for the ArrowPointsToHero state. In this function, you continue pointing the arrow toward the hero as long as the hero’s position is within kHeroTriggerDistance. If the hero moves out of the detection range, you change the state back to ArrowTransition.
private void UpdatePointToHero(Vector2 toHero)
{
    float dist = toHero.Length();
    if (dist < kHeroTriggerDistance)
    {
        FrontDirection = toHero;
    }
    else
        mArrowState = SpinningArrowState.ArrowTransition;
}
- Create the update function for the arrow-transition state. In this function, apply the arrow’s spin and then test whether the arrow has reached its maximum spin rate. If so, change the current state to ArrowSpinning; if not, increase the current spin rate.
Now you can create the class used to control the hero. The PlayerControlHero class will provide the simple behavior of moving the hero when the left thumbstick is used. Additionally, the hero’s image is swapped depending on which direction it moves.
Creating the PlayerControlHero class
- Create a new class named PlayerControlHero that inherits from the GameObject class:
public class PlayerControlHero : GameObject
{
    ...
} - Create a constructor to initialize the hero’s image, position, and size using the GameObject base class:
public PlayerControlHero(Vector2 position) :
        base("KidLeft", position, new Vector2(7f, 8f))
{
    ...
} - Lastly, add an update function. In this function, use the gamepad’s left thumbstick to modify the hero’s current position. Additionally, you can use this function to change the direction that the hero is facing by detecting whether the thumbstick’s x-axis is positive or negative. This is possible because MonoGame caches the textures the first time they are loaded.
public void UpdateHero()
{
    Vector2 delta = InputWrapper.ThumbSticks.Left;
    Position += delta;

    if (delta.X > 0)
        mImage = Game1.sContent.Load<Texture2D>("KidRight");
    else
        mImage = Game1.sContent.Load<Texture2D>("KidLeft");
}
All that remains is to use the new classes in the GameState class.
- Start by creating variables for the arrow and the hero and initializing them within the constructor with the values shown in the following code:
PlayerControlHero mHero;
SpinningArrow mArrow;

public GameState()
{
    mArrow = new SpinningArrow(new Vector2(50, 40));
    mHero = new PlayerControlHero(new Vector2(5, 5));
} - Now modify the update function so it calls the corresponding updates for the hero and the arrow:
public void UpdateGame()
{
    mHero.UpdateHero();
    mArrow.UpdateSpinningArrow(mHero);
} - Lastly, as usual, use the draw function to draw your game objects. Remember to print the project’s current status via the FontSupport class.
public void DrawGame()
{
    mHero.Draw();
    mArrow.Draw();
    FontSupport.PrintStatus("Arrow State: " + mArrow.ArrowState.ToString(), null);
}
Adding many spinning arrows
With your finite state machine for the SpinningArrow project complete, you will now increase the number of arrows within the project from 1 to 20. The state functionality for each arrow remains the same; however, you will add visual feedback for each of the arrow’s states. By increasing the number of arrows in the project, you increase the project’s complexity rather drastically. Adding many arrows should also serve to reinforce the benefits of taking an object-oriented approach when creating your game objects.
The Many Spinning Arrows project
As before, this project lets a user control a hero by moving it around the screen. The project contains a set of arrows that spin until the hero has entered an arrow’s detection range, at which time the arrows stop and point toward the hero. The project also reflects the arrow states by changing their color when the state changes. The colors for each state are as follows: gray for state 1 (arrow transition), green for state 2 (arrow spinning), and red for state 3 (arrow points to hero). In addition, each arrow has smaller black arrows equal to its current state number. You can see an example of this project running in Figure 6-4.
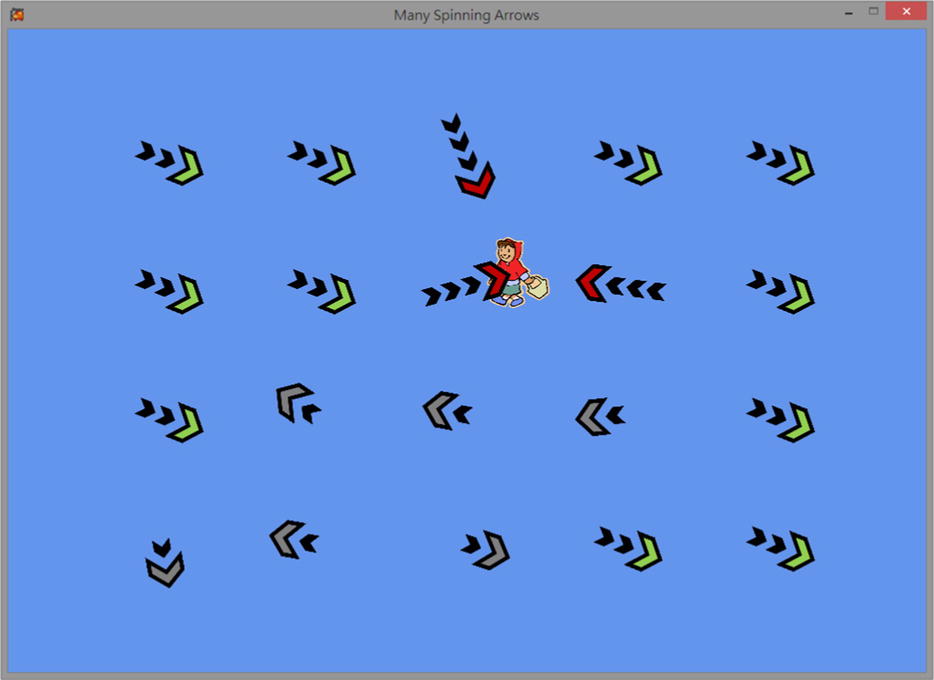
Figure 6-4. Running the Many Spinning Arrows project
The project has one control, as follows:
The goals of the project are as follows:
- To increase complexity by increasing the number of game objects
- To load textures at run time
The steps for creating the project are as follows:
- Modify the SpinningArrow class to reflect the changes in its state.
- Create a SpinningArrowSet class in order to properly handle the arrows.
- Modify the GameState class to use the new functionality.
Add the following resources, which can be found in the Chapter06SourceCodeResources folder, into your content project before you begin:
- TransientArrow.png
- PointingArrow.png
You first need to add the visual indicators for state changes by swapping to the appropriate image when the changes occur. You can achieve this by modifying the SpinningArrow class.
Modifying the SpinningArrow class
- If you recall the state diagram from the previous section, you will remember that the arrow starts within the ArrowTransition state. Support this by replacing the image in the constructor with TransientArrow.png:
public SpinningArrow(Vector2 position) :
        base("TransientArrow", position, new Vector2(10, 4))
{
    // Arrow initially facing postive x direction
    InitialFrontDirection = Vector2.UnitX;
} - The ArrowSpinning state is transitioned to from the ArrowTransition state. Therefore, modify the update of ArrowTransition to use the RightArrow.png image when changing states, as shown here:
private void UpdateTransitionState()
{
    ...

    // Transition to Spin state
    mArrowState = SpinningArrowState.ArrowSpinning;
    mImage = Game1.sContent.Load<Texture2D>("RightArrow");

    ...
} - The next state is ArrowPointsToHero, which is transitioned to from the ArrowSpinning state. Therefore, modify the ArrowSpinning update to use the PointingArrow.png image when changing states.
private void UpdateSpinningState(TexturedPrimitive hero)
{
    ...

    // Transition to ArrowPointsToHero state
    mSpinRate = 0f;
    mArrowState = SpinningArrowState.ArrowPointsToHero;
    mImage = Game1.sContent.Load<Texture2D>("PointingArrow");

    ...
} - Finally, because the state machine is a loop, the next state is ArrowTransition, which is transitioned to from the ArrowPointsToHero state. Therefore, modify the ArrowPointsToHero update to use the TransientArrow.png image when changing states.
private void UpdatePointToHero(Vector2 toHero)
{
    ...

    // Go back to TransitionState for spinning up the arrow
    mArrowState = SpinningArrowState.ArrowTransition;
    mImage = Game1.sContent.Load<Texture2D>("TransientArrow");

    ...
}
Now it is time to create the arrows. Rather than creating each arrow separately or creating an array, a better approach is to create a separate class for the array of arrows and instantiate it once within the GameState class. You can think of the SpinningArrowSet class as you would a deck of cards. To create a deck of cards, you would create a card class and a deck class that holds an array or set of 52 cards.
Creating the SpinningArrowSet class
- Create a new class called SpinningArrowSet. Add a constant variable for the number of rows and columns of arrows, as well as a list to hold the entire arrow set:
public class SpinningArrowSet
{
    private const int kNumRows = 4;
    private const int kNumColumns = 5;
    private List<SpinningArrow> mTheSet = new List<SpinningArrow>();

    ...
} - Next, add the constructor to initialize the arrows on the screen with a consistent spacing between them. To do this, create a nested loop that creates the arrows, incrementing the x and y positions and adding each arrow to the set for each iteration.
public SpinningArrowSet()
{
    Vector2 min = Camera.CameraWindowLowerLeftPosition;
    Vector2 max = Camera.CameraWindowUpperRightPosition;
    Vector2 size = max - min;
    float deltaX = size.X / (float)(kNumColumns + 1);
    float deltaY = size.Y / (float)(kNumRows + 1);

    for (int r = 0; r < kNumRows; r++)
    {
        min.Y += deltaY;
        float useDeltaX = deltaX;
        for (int c = 0; c < kNumColumns; c++)
        {
            Vector2 pos = new Vector2(min.X + useDeltaX, min.Y);
            SpinningArrow arrow = new SpinningArrow(pos);
            mTheSet.Add(arrow);
            useDeltaX += deltaX;
        }
    }
} - Lastly, you need to create the update and draw functions for the set of arrows. You can do this easily by using a simple foreach loop to call the corresponding update function and draw function for the set. Remember to include the hero parameter for the update function.
public void UpdateSpinningSet(TexturedPrimitive hero)
{
    foreach (var arrow in mTheSet)
        arrow.UpdateSpinningArrow(hero);
}

public void DrawSet()
{
    foreach (var arrow in mTheSet)
        arrow.Draw();
}
Now you can use the SpinningArrowSet class you just created within the GameState class instead of the SpinningArrow class.
- Start by creating variables for the set of arrows and the hero, and initializing them within the constructor with the values shown in the code that follows. Notice that the GameState class’s complexity remains the same.
PlayerControlHero mHero;
SpinningArrowSet mArrows;

public GameState()
{
    mArrows = new SpinningArrowSet();
    mHero = new PlayerControlHero(new Vector2(5, 5));
} - Now modify the UpdateGame() function to call the update function for the hero and the set of arrows:
public void UpdateGame()
{
    mHero.UpdateHero();
    mArrows.UpdateSpinningSet(mHero);
} - Lastly, use the DrawGame() function to draw your game objects by calling their corresponding draw methods:
public void DrawGame()
{
    mHero.Draw();
    mArrows.DrawSet();
}
Creating a patrol enemy
The Patrol Enemy project serves as another example of a finite state machine. As in the previous project, the patrol enemy loops through its states until a specific condition is met; however, the states themselves become more sophisticated in this project.
The Patrol Enemy project
In this project, the user again controls a hero by moving it around the screen. The game window contains a rocket that patrols different designated areas or regions. The hero does not affect the rocket’s state. You can see an example of this project running in Figure 6-5.
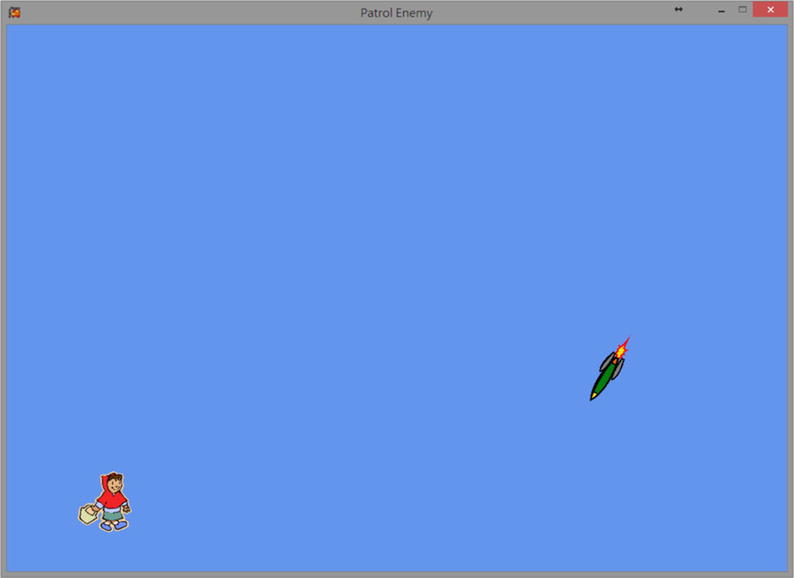
Figure 6-5. Running the Patrol Enemy project
The project has one control, as follows:
- Left thumbstick (WSAD-keys) Moves the hero
The goals of the project are as follows:
- To implement a more complex example of a finite state machine
- To work with randomness and understand its applications
- To understand how to define regions
The steps for creating the project are as follows:
- Gain an understanding of the finite state machine needed.
- Create the PatrolEnemy class, which contains the state machine.
- Modify the GameState class to use the PatrolEnemy class.
Add the following resource, which can be found in the Chapter06SourceCodeResources folder, into your content project before you begin:
- PatrolEnemy.png
The patrol enemy’s state machine
The patrol enemy starts by randomly selecting a location within a random region in which to spawn; after spawning, the enemy transitions to its next state. When it spawns at a random point of interest within a region, its state-change condition of being close enough to its target destination is immediately met, and it must therefore target a new random point of interest. You can see an example of this in Figure 6-6. The rocket spawns in the bottom-left region and then selects its new target within the top-left region.

Figure 6-6. The regions defined in the Patrol Enemy project and a random target position
After completing its spawning behavior, the rocket continues to move toward its new target until it is close enough that it must find a new target. In Figure 6-7, you can see an example of this behavior in the finite state machine that the patrol enemy uses. As you can see, the states themselves are quite similar: move toward your target until you reach it, and then find a new target within the next region to move toward.

Figure 6-7. The Patrol Enemy project’s finite state machine
Now that you have an understanding of the state machine, you can begin creating your patrolling enemy. The PatrolEnemy class is self-contained since includes its finite state machine as well as its random region and random target functionality.
Creating the PatrolEnemy class
- Create a new class called PatrolEnemy that inherits from the GameObject class. Additionally, create an enum that contains each possible PatrolEnemy state, a variable for its current state, and the other variables shown in the following code for the target position, patrol speed, and range from the target position for triggering a new state.
public class PatrolEnemy : GameObject
{
    protected enum PatrolState {
        TopLeftRegion,
        TopRightRegion,
        BottomLeftRegion,
        BottomRightRegion
    }

    // Target position we are moving toward
    private Vector2 mTargetPosition;
    // Current state
    private PatrolState mCurrentState;

    private const float kPatrolSpeed = 0.3f;
    private const float kCloseEnough = 1f;

    ...
} - Add a constructor that initializes the front direction, target position, and position for this PatrolEnemy. Remember to use the GameObject base class.
- In the constructor, randomly select a region, call its corresponding update function, and set the enemy’s position to the new randomly generated target position. You can see this in the following code. Notice that Game1.sRan.NextDouble(); is used to compute a random state. The function returns a number between 0 and 1; all you need to do is divide the states into fourths. This gives each state a 25 percent chance of being selected.
- Take note that the function lacks a randomly generated target position within a region. Instead, this is handled in the update function, which you will see later.
public PatrolEnemy() :
    base("PatrolEnemy", Vector2.Zero, new Vector2(5f, 10f))
{
    InitialFrontDirection = Vector2.UnitY;

    // Causes update state to always change to a new state
    mTargetPosition = Position = Vector2.Zero;

    #region Generate a random state to begin
    double initState = Game1.sRan.NextDouble();
    if (initState < 0.25)
    {
        UpdateBottomLeftState();
    }
    else if (initState < 0.5)
    {
        UpdateBottomRightState();
    }
    else if (initState < 0.75)
    {
        UpdateTopLeftState();
    }
    else
    {
        UpdateTopRightState();
    }
    Position = mTargetPosition;
    #endregion
}
- You can now create your main update function. This function is used to call the corresponding update depending upon the enemy’s current state. Remember to call base.Update() as well.
public void UpdatePatrol()
{
    // Operation common to all states ...
    base.Update(); // Moves game object by velocity

    switch (mCurrentState)
    {
        case PatrolState.BottomLeftRegion:
            UpdateBottomLeftState();
            break;

        case PatrolState.BottomRightRegion:
            UpdateBottomRightState();
            break;

        case PatrolState.TopRightRegion:
            UpdateTopRightState();
            break;

        case PatrolState.TopLeftRegion:
            UpdateTopLeftState();
            break;
    }
} - It is now time to create each state’s update function. Each update function is applied if the enemy’s position is close enough to the target position. This is simply done by using the Pythagorean theorem to find the distance between the two positions. In the code, the function LengthSquared() is used to accomplish this. You can see an example of this in the image that follows.

- If the target is close enough, you transition to the next state, generate the target’s new random position in the next state’s region, and compute the new position and velocity. Remember from the state diagram that the states transition in a clockwise direction.
private void UpdateBottomLeftState()
{
    if ((Position - mTargetPosition).LengthSquared() < kCloseEnough)
    {
        mCurrentState = PatrolState.TopLeftRegion;
        mTargetPosition = RandomBottomRightPosition();
        ComputePositionAndVelocity();
    }
}

private void UpdateBottomRightState()
{
    if ((Position - mTargetPosition).LengthSquared() < kCloseEnough)
    {
        mCurrentState = PatrolState.BottomLeftRegion;
        mTargetPosition = RandomTopRightPosition();
        ComputePositionAndVelocity();
    }
}

private void UpdateTopRightState()
{
    if ((Position - mTargetPosition).LengthSquared() < kCloseEnough)
    {
        mCurrentState = PatrolState.BottomRightRegion;
        mTargetPosition = RandomTopLeftPosition();
        ComputePositionAndVelocity();
    }
}

private void UpdateTopLeftState()
{
    if ((Position - mTargetPosition).LengthSquared() < kCloseEnough)
    {
        mCurrentState = PatrolState.TopRightRegion;
        mTargetPosition = RandomBottomLeftPosition();
        ComputePositionAndVelocity();
    }
} - Now add a function that computes the enemy’s position and velocity. First, the speed of the object is randomized to be between 80 and 120 percent of kPatrolSpeed. Then the vector to the next position is assigned to the velocity direction and front direction.
private void ComputePositionAndVelocity()
{
    Speed = kPatrolSpeed * (0.8f + (float)(0.4 * Game1.sRan.NextDouble()));
    Vector2 toNextPosition = mTargetPosition - Position;
    VelocityDirection = toNextPosition;
    FrontDirection = VelocityDirection;
} - Lastly, you need to add the functions that generate the random positions within each region. The image that follows shows where the top-left, top-right, bottom-right, and bottom-left regions are defined. The steps provided will guide you through the process of creating these regions.
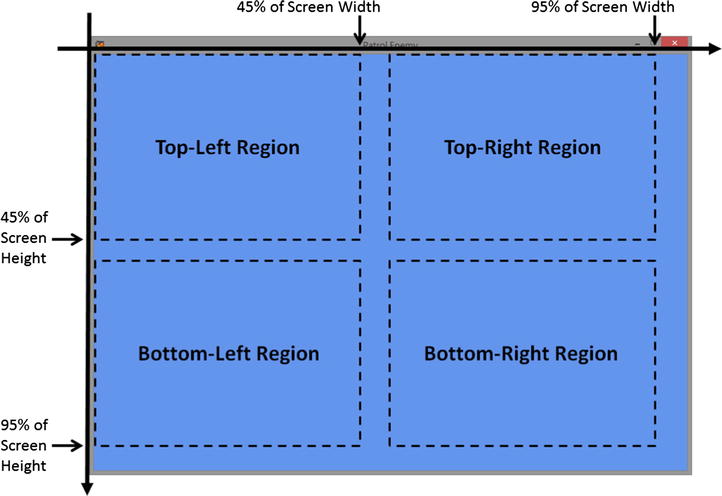
- Start by creating a ComputePoint() function that accepts a region and returns a position within it, as shown in the code that follows. Notice that each region is 45 percent of the window size, so you obtain a random position by getting a random position within that 45 percent and then adding the region’s offset.
private const float sBorderRange = 0.45f;

private Vector2 ComputePoint(double xOffset, double yOffset)
{
    Vector2 min = Camera.CameraWindowLowerLeftPosition;
    Vector2 max = Camera.CameraWindowUpperRightPosition;
    Vector2 size = max - min;
    float x = min.X + size.X * (float)(xOffset + (sBorderRange * Game1.sRan.NextDouble()));
    float y = min.Y + size.Y * (float)(yOffset + (sBorderRange * Game1.sRan.NextDouble()));
    return new Vector2(x, y);
} - Now add the randomness functions for the four regions by passing in the correct region offset:
private Vector2 RandomBottomRightPosition()
{
    return ComputePoint(0.5, 0.0);
}

private Vector2 RandomBottomLeftPosition()
{
    return ComputePoint(0.0, 0.0);
}

private Vector2 RandomTopRightPosition()
{
    return ComputePoint(0.5, 0.5);
}

private Vector2 RandomTopLeftPosition()
{
    return ComputePoint(0.0, 0.5);
}
- Start by creating a ComputePoint() function that accepts a region and returns a position within it, as shown in the code that follows. Notice that each region is 45 percent of the window size, so you obtain a random position by getting a random position within that 45 percent and then adding the region’s offset.
All that you need now is to modify the GameState class. Add a variable for the hero and the enemy, and instantiate them within the constructor. Call the hero and patrol’s update and draw functions correspondingly, as shown following:
public class GameState
{
    PlayerControlHero mHero;
    PatrolEnemy mEnemy;

    public GameState()
    {
        mEnemy = new PatrolEnemy();
        mHero = new PlayerControlHero(new Vector2(5, 5));
    }

    public void UpdateGame()
    {
        mHero.UpdateHero();
        mEnemy.UpdatePatrol();
    }

    public void DrawGame()
    {
        mHero.Draw();
        mEnemy.Draw();
    }
}
Implementing smooth turning
After running the previous project, you may have noticed that the rocket or patrolling enemy abruptly changes directions when transitioning between states. This can be a jarring effect—especially when it occurs in quick succession. This project is devoted to smoothing out the sudden change in front direction so that the patrolling enemy’s movement becomes more fluid.
The Smooth Turning Patrol project
As before, you control a hero by moving it around the screen. The game window contains a rocket that patrols different designated areas or regions. The hero character does not affect the rocket’s state. You can see an example of this project running in Figure 6-8.

Figure 6-8. Running the Smooth Turning Patrol project
The project has one control, as follows:
- Left Thumbstick (WSAD-keys) Moves the hero
The goal of this project is as follows:
- To integrate home-in functionality to gradually turn the patrol object toward the final destination.
The project will be completed in one step, as follows:
- Modify the PatrolEnemy class for smooth turning behavior.
When considering object-oriented programming, it is generally good practice to make the behaviors a game object has as self-contained as possible. This reduces the amount potential bugs and the complexity of your project, as well as increases its scalability. Due to the object-oriented structure you have implemented thus far, you need to modify only the PatrolEnemy class to add smooth turning behavior to your patrolling enemy.
Modifying the PatrolEnemy class
- Start by adding the following variables. Assuming that the update is being called 60 times per second, then kStateTimer is equal to 5 seconds. mStateTimer is used for counting down. Remember to initialize mStateTimer within the constructor.
public class PatrolEnemy : GameObject
{
    ...

    private const int kStateTimer = 60 * 5;
    private int mStateTimer;

    public PatrolEnemy() :
        base("PatrolEnemy", Vector2.Zero, new Vector2(5f, 10f))
    {
        mStateTimer = kStateTimer;

        ...
    }

    ...
} - Next, modify the UpdatePatrol() function so that it decreases the timer during each update in addition to computing the new front direction.
public void UpdatePatrol()
{
    base.Update();
    mStateTimer--;

    Vector2 toTarget = mTargetPosition - Position;
    float distToTarget = toTarget.Length();
    toTarget /= distToTarget;
    ComputeNewDirection(toTarget);

    switch (mCurrentState)
    {
        ...
    }
} - Now implement the ComputeNewDirection() function, which calculates the new front direction. You do this by first calculating the angle between the current front direction and the target direction, as shown in the image that follows. Recall that you use the dot product to find this angle. If the angle between the two directions is not zero (float.Epsilon), then you update the front direction by using the cross product to find which direction to rotate and then rotating by a percentage (in this case 3 percent) of the total angle needed to face the target direction.
Note Because these calculations work with floating-point numbers, it is often difficult or impossible to hit zero exactly. To account for this, you use float.Epsilon, because it is the smallest single value greater than zero.

private void ComputeNewDirection(Vector2 toTarget)
{
    double cosTheta = Vector2.Dot(toTarget, FrontDirection);
    float theta = (float)Math.Acos(cosTheta);
    if (theta > float.Epsilon)
    {
        Vector3 frontDir3 = new Vector3(FrontDirection, 0f);
        Vector3 toTarget3 = new Vector3(toTarget, 0f);
        Vector3 zDir = Vector3.Cross(frontDir3, toTarget3);
        RotateAngleInRadian -= Math.Sign(zDir.Z) * 0.03f * theta;
        VelocityDirection = FrontDirection;
    }
} - In each state’s corresponding update function, add a new condition to check for the expiration of the timer (it counts toward zero). If the timer expires (reaches zero), then you change the state.
private void UpdateBottomLeftState(float distToTarget)
{
    if ((mStateTimer < 0) || (distToTarget < kCloseEnough))
    {
        mCurrentState = PatrolState.BottomRightRegion;
        mTargetPosition = RandomBottomRightPosition();
        ComputeNewSpeedAndResetTimer();
    }
}

private void UpdateBottomRightState(float distToTarget)
{
    if ((mStateTimer < 0) || (distToTarget < kCloseEnough))
    {
        mCurrentState = PatrolState.TopRightRegion;
        mTargetPosition = RandomTopRightPosition();
        ComputeNewSpeedAndResetTimer();
    }
}

private void UpdateTopRightState(float distToTarget)
{
    if ((mStateTimer < 0) || (distToTarget < kCloseEnough))
    {
        mCurrentState = PatrolState.TopLeftRegion;
        mTargetPosition = RandomTopLeftPosition();
        ComputeNewSpeedAndResetTimer();
    }
}

private void UpdateTopLeftState(float distToTarget)
{
    if ((mStateTimer < 0) || (distToTarget < kCloseEnough))
    {
        mCurrentState = PatrolState.BottomLeftRegion;
        mTargetPosition = RandomBottomLeftPosition();
        ComputeNewSpeedAndResetTimer();
    }
} - Finally, add a new function to compute the patrol speed and reset the timer:
private void ComputeNewSpeedAndResetTimer()
{
    Speed = kPatrolSpeed * (0.8f + (float)(0.4 * Game1.sRan.NextDouble()));
    mStateTimer = (int) (kStateTimer * (0.8f + (float)(0.6 * Game1.sRan.NextDouble())));
}
Patrol that chases
The Patrol That Chases project is similar to the previous projects in that it contains a rocket that patrols around the game window. However, additional functionality has been added to the patrolling game object in the form of a new state. This additional state determines whether the rocket game object is patrolling or chasing.
The Patrol That Chases project
This project lets you control a hero character by moving it around the window. The game window also contains a patrolling rocket game object. The rocket will begin to chase the hero when the hero has entered its aggro range (the radius in which a monster will attack the player). After the chasing state has been activated, the patrolling object will continue to chase until it has touched the hero or until the chase timer expires. The game records the number of times the hero has been caught by the rocket in the upper-left corner. You can see an example of this project running in Figure 6-9.

Figure 6-9. Running the Patrol That Chases project
The project has one control, as follows:
- Left thumbstick (WSAD-keys) Moves the hero
The goal of the project is as follows:
- To integrate home-in functionality to gradually turn and move the patrol object toward the hero
The steps for creating the project are as follows:
- Add a new chase state in addition to the existing state.
- Modify the PatrolEnemy class to implement the new chase state.
- Modify the GameState class to use the new functionality.
Adding the chase state
In the previous projects, the patrol state contained several states that defined the behavior of the rocket. These states corresponded to different regions that the rocket could move to. In this project, in addition to the previous behavior, you will add a chase state. The chase state exists alongside the patrol states. This means that the rocket must be in one of these states. If it is in the patrol state, it behaves as in the previous projects, and if it is in the chase state, it chases the hero object until its conditions are met. For further clarification, refer to Figure 6-10.

Figure 6-10. The Patrol That Chases project’s finite state machine
It is now time to add the chasing functionality to the enemy patrol object.
Modifying the PatrolEnemy class
- Start by modifying the PatrolState enum to reflect the two states:
protected enum PatrolState
{
    PatrolState,
    ChaseHero
} - Add a new constant variable named kDistToBeginChase; this is the distance that will trigger patrol enemy to chase the hero.
private const float kDistToBeginChase = 15f; - Because you’re adding a new state alongside the patrol state, the generation of the next random target will be needed more than once; therefore, you should separate its logic into a new function. Name the function RandomNextTarget. In this function, you will set the current state to PatrolState, and then, as shown previously in the constructor, choose a random region in which to begin.
private void RandomNextTarget()
{
    mStateTimer = kStateTimer;
    mCurrentState = PatrolState.PatrolState;
    // Generate a random begin state
    double initState = Game1.sRan.NextDouble();
    if (initState < 0.25)
        mTargetPosition = RandomBottomRightPosition();
    else if (initState < 0.5)
        mTargetPosition = RandomTopRightPosition();
    else if (initState < 0.75)
        mTargetPosition = RandomTopLeftPosition();
    else
        mTargetPosition = RandomBottomLeftPosition();

    ComputeNewSpeedAndResetTimer();
} - In the constructor, remove the lines of code responsible for generating the next random target and replace them with a call to RandomNextTarget. This is done in the code that follows:
public PatrolEnemy() :
    base("PatrolEnemy", Vector2.Zero, new Vector2(5f, 10f))
{
    InitialFrontDirection = Vector2.UnitY;

    // Causes update state to always change into a new state
    mTargetPosition = Position = Vector2.Zero;

    RandomNextTarget();
    Position = mTargetPosition;
} - Modify the UpdatePatrol() function to include the two base states: patrolling and chasing. In addition, include a Boolean variable that becomes true when the hero has been caught:
public bool UpdatePatrol(GameObject hero)
{
    bool caught = false;

    base.Update();
    mStateTimer--;

    Vector2 toTarget = mTargetPosition - Position;
    float distToTarget = toTarget.Length();
    toTarget /= distToTarget;
    ComputeNewDirection(toTarget);

    switch (mCurrentState)
    {
        case PatrolState.PatrolState:
            UpdatePatrolState(hero, distToTarget);
            break;

        case PatrolState.ChaseHero:
            caught = UpdateChaseHeroState(hero, distToTarget);
            break;
    }
    return caught;
} - Create a new function called DectectHero that determines whether the hero has come within range of the rocket. Begin the function by finding the vector between the rocket’s position and the hero’s position. If that vector’s length is less than the distance that triggers the chase state, then you will set the timer to 120 percent of kStateTimer, increase the rocket’s moving speed, and change the current state to chasing. Additionally, you set the target position to the hero’s position and change the texture to reflect the change in state.
private void DetectHero(GameObject hero)
{
    Vector2 toHero = hero.Position - Position;
    if (toHero.Length() < kDistToBeginChase)
    {
        mStateTimer = (int)(kStateTimer * 1.2f); // 1.2 times as much time for chasing
        Speed *= 2.5f;  // 2.5 times the current speed!
        mCurrentState = PatrolState.ChaseHero;
        mTargetPosition = hero.Position;
        mImage = Game1.sContent.Load<Texture2D>("AlertEnemy");
    }
} - Now you can add the function responsible for updating when the patrol state is active. As before, first check whether the timer has expired or the object is close enough to its target position. If either of these conditions is met, generate a new random target using the function you created, and then recompute the speed and reset the timer via the ComputeNewSpeedAndResetTimer() function. Additionally, call the DetectHero() function during each update.
private void UpdatePatrolState(GameObject hero, float distToTarget)
{
    if ((mStateTimer < 0) || (distToTarget < kCloseEnough))
    {
        RandomNextTarget();
        ComputeNewSpeedAndResetTimer();
    }
    DetectHero(hero);
} - Now add a function to update the hero when the chasing state is active. The UpdateChaseHeroState() function uses pixel-accurate collision to detect whether the hero has been touched by the rocket. You can see this reflected in the code that follows. If the PixelTouches() function returns true or the timer has expired, then a new random target is chosen that changes the current state back to patrolling. Again, a new image is loaded to reflect the change in state.
private bool UpdateChaseHeroState(GameObject hero, float distToHero)
{
    bool caught = false;
    Vector2 pos;
    caught = PixelTouches(hero, out pos);
    mTargetPosition = hero.Position;

    if (caught || (mStateTimer < 0))
    {
        RandomNextTarget();
        mImage = Game1.sContent.Load<Texture2D>("PatrolEnemy");
    }
    return caught;
}
The only modification you need to make to the GameState class is to track the number of times the hero has been caught. In the code that follows, the variable mNumCaught has been added, incremented in the update function, and printed in the draw function:
public class GameState
{
    PlayerControlHero mHero;
    PatrolEnemy mEnemy;
    int mNumCaught = 0;

    public GameState()
    {
        mEnemy = new PatrolEnemy();
        mHero = new PlayerControlHero(new Vector2(5, 5));
    }

    public void UpdateGame()
    {
        mHero.UpdateHero();
        if (mEnemy.UpdatePatrol(mHero))
            mNumCaught++;
    }

    public void DrawGame()
    {
        mHero.Draw();
        mEnemy.Draw();
        FontSupport.PrintStatus("Caught=" + mNumCaught.ToString(), null);
    }
}
Creating many enemies
The project in this section is similar to the Many Spinning Arrows project in that it increases the number of objects that can chase the hero. As with the Many Spinning Arrows project, this increases the overall complexity; however, the functionality of the enemies remains the same as in the previous project.
The Many Enemies project
As before, in this project you control the hero character by moving it around the window. The game window contains many patrolling rocket game objects. The rockets will begin to chase the hero when the hero enters any rocket’s aggro range. Once the chasing state for a rocket has been activated, that rocket will continue to chase until it touches the hero or the chase timer expires. The game records the number of times the hero has been caught in the upper-left corner. You can see an example of this project running in Figure 6-11.
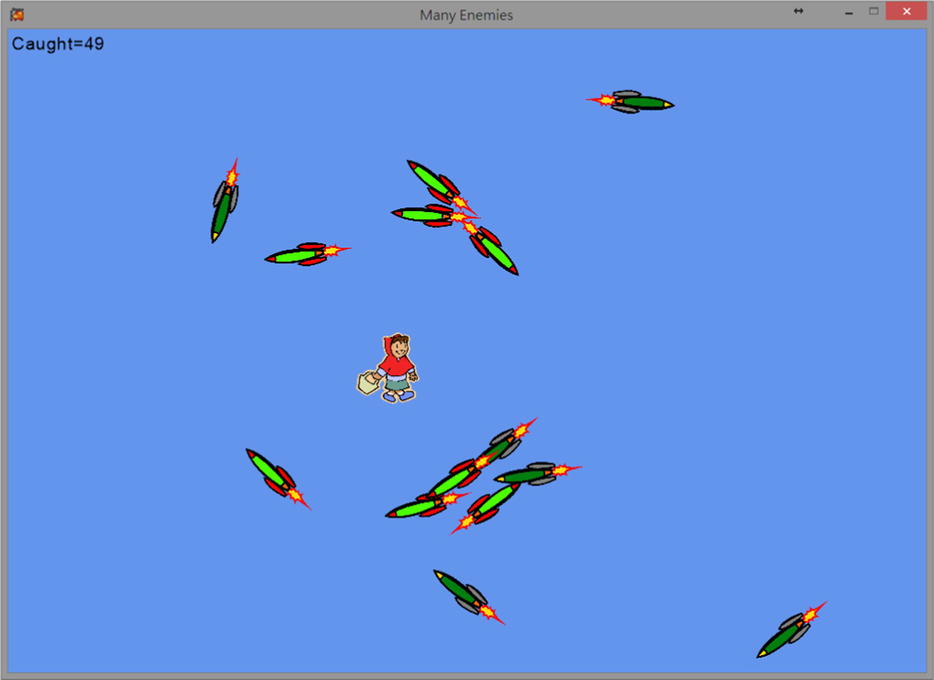
Figure 6-11. Running the Many Enemies project
The project has one control, as follows:
- Left thumbstick (WSAD-keys) Moves the hero
The goal of the project is as follows:
- To increase complexity by increasing the number of game objects.
The steps for creating the project are as follows:
- Create a PatrolEnemySet class in order to handle the group of enemies.
- Modify the GameState class to use the new set class.
Since this project is functionally identical to the previous project, all that you need to do is create a PatrolEnemySet class, which handles generating many enemies at once.
Creating the PatrolEnemySet class
- Create a new class named PatrolEnemySet. Include the variable mTheSet for the list of enemies and a constant variable named kDefaultNumEnemy.
public class PatrolEnemySet
{
    private List<PatrolEnemy> mTheSet = new List<PatrolEnemy>();
    const int kDefaultNumEnemy = 15;

    ...
} - Add two constructors that loop through and instantiate the enemies, adding them to the list. The first constructor creates a default number of enemies; the second creates the number of enemies specified in its parameter. Notice that the loop itself is extracted into a separate function called CreateEnemySet() to avoid code duplication.
public PatrolEnemySet()
{
    CreateEnemySet(kDefaultNumEnemy);
}

public PatrolEnemySet(int numEnemy)
{
    CreateEnemySet(numEnemy);
}

private void CreateEnemySet(int numEnemy)
{
    for (int i = 0; i < numEnemy; i++)
    {
        PatrolEnemy enemy = new PatrolEnemy();
        mTheSet.Add(enemy);
    }
} - Add the UpdateSet() function for updating all the enemy objects. Remember to return a count variable to keep track of the number of times the hero has been caught.
public int UpdateSet(GameObject hero)
{
    int count = 0;
    foreach (var enemy in mTheSet)
    {
        if (enemy.UpdatePatrol(hero))
            count++;
    }
    return count;
} - Finally, include a DrawSet() function to loop through each enemy and call its draw function.
public void DrawSet()
{
    foreach (var enemy in mTheSet)
        enemy.Draw();
}
The only change you need to implement in the GameState class is to use the new PatrolEnemySet class instead of the PatrolEnemy class. In the following code, mEnemies uses the PatrolEnemySet constructor, update, and draw functions in place of the PatrolEnemy functions.
public class GameState
{
    PlayerControlHero mHero;
    PatrolEnemySet mEnemies;
    int mNumCaught = 0;

    public GameState()
    {
        mEnemies = new PatrolEnemySet();
        mHero = new PlayerControlHero(new Vector2(5, 5));
    }

    public void UpdateGame()
    {
        mHero.UpdateHero();
        mNumCaught += mEnemies.UpdateSet(mHero);
    }

    public void DrawGame()
    {
        mHero.Draw();
        mEnemies.DrawSet();
        FontSupport.PrintStatus("Caught=" + mNumCaught.ToString(), null);
    }
}
Summary
In this chapter, you learned how to use a finite state machine to create autonomous behavior for your game objects. By breaking down the game objects’ behavior into a set of rules formulated as state and transition conditions, you can apply the techniques described here to implement any number of behaviors.
You also learned how to increase the complexity of the project by increasing the number of game objects within the GameState class. You achieved this by creating a set of objects that increase the project’s complexity while minimizing the additional code needed, letting you manage a group of objects in the GameState class as if they were a single entity.
Finally, you learned how to implement several gamelike behaviors, including distance triggers, patrolling, and chasing. By combining these concepts, you can create sophisticated and interesting games.
Quick reference
To |
Do this |
|---|---|
| Support semiautonomous behavior of game objects | Define a finite state machine, as follows: 1. Determine the behaviors of the machine. 2. Group distinct behaviors into separate states. 3. Define what triggers the transitions between states, as well as how and when they’re triggered. |
| Implement a finite state machine | 1. Define a new class to encapsulate the behavior. 2. Define an enum for each of the states. 3. Define an update function with a switch or case statement for each of the states. 4. Define a separate state service function for each state. |
| Introduce unpredictability to a finite state machine | Include randomness in, for example, positional computation or duration of states. |
| Support many instances of objects with finite state machine behavior | 1. Define a new class with a collection of the finite state machine object. 2. Implement Update() and Draw() functions in the new class to iterate through and call the corresponding Update() and Draw() functions of the finite state machine objects in the collection. For example, the SpinningArrowSet class has a collection of SpinningArrow objects, and the Update() and Draw() functions of the SpinningArrowSet class iterate through and call the corresponding Update() and Draw() functions of the SpinningArrow objects in the collection. |
| Patrol across regions or areas | 1. Identify regions of patrol as states. 2. Randomly generate a position in each region. 3. Move the patrol object toward a new region until sufficiently close to the border. 4. Transition to the new state or region. |
| Include unpredictability in patrolling | Include randomness when generating target positions for each region, and when computing the next state. |
| Smooth transitioning between patrol regions | Integrate home-in functionality to gradually turn patrol objects toward a destination position: 1. Compute the vector from the patrol object to the destination position. 2. Compute the dot product between the computed vector and the patrol’s front direction. 3. Turn the patrol clockwise or counterclockwise depending on the sign of the cross product between the two vectors. |
| Ensure a patrolling enemy does not orbit a target position | Include a countdown timer to force a transition to a new state. |
| Make a patrolling enemy chase a hero | Support a state that uses the hero’s location as the target position. In this case, it is important to remember to transition out of the hero-chasing state the when hero is sufficiently far away. |
| Create many patrolling enemies | Define an enemy patrol set to include a collection of patrolling enemies. |