
![]()
Managing Disk Layout and File Systems
On a Linux server, the way in which the hard disk is organized—and in which the file systems are created on that hard disk—is essential. There are many choices to be made, and there is no single solution that fits all needs. In this chapter, you’ll first assess if you have to work with partitions, or whether you’re better off working with logical volumes. You’ll also examine how partitions and volume behave differently on a master boot record (MBR) and on a globally unique identifier (GUID) partition table. Next, you’ll discover how to create partitions and logical volumes. Once the storage volume has been created, you have to put a file system on it. In this chapter, you’ll learn which file system best fits your needs and how to manage specific file-system features.
Creating a Storage Volume
When deciding on the design of hard disk layout, different options are available, depending on the hardware that is used. Options start with the type of disk that is used. On each disk, a boot loader is required. You’ll have to decide between the classical master boot record and the newer globally unique identifier–based partition table. After making that choice, you’ll have to decide whether to use partitions on logical volumes. This section explains your options.
The Partition Table: GUID vs. MBR
Since 1981, the MS-DOS-type boot sector has been used. With this type of boot sector, which is also known as a master boot record (MBR), a maximum disk size of 2TB is supported, and disk layout is based on partitions. As the amount of space in this type of boot sector is limited, a maximum amount of four partitions can be created. If more than four partitions are required, an extended partition is used, and within the extended partition, multiple logical partitions are created.
In current data centers, the maximum size of disks goes more and more frequently beyond 2TB. With the limited amount of address space that is available in MBR, this no longer can be addressed. That is why a new type of boot loader has been introduced. In this boot loader, the GUID Partition Table (GPT) is used. In this type of partition table, all partitions are primary partitions. Owing to the increased address space, the necessity to work with logical partitions has ceased.
A modern Linux distribution such as SUSE Linux Enterprise Server (SLES) can handle the difference between GPT and MBR. If partitions are created from YaST, the differences aren’t even visible. If, however, you’re using command-line utilities, you must be wary, because GPT partitions demand a different approach than MBR partitions. For the administrator, it’s often not a choice whether to use GPT.
Partitions or Logical Volumes?
The other choice that you’ll have to make as an administrator is between partitions and logical volumes. Partitions are the old way of organizing a disk, where every storage volume has a fixed size. Using partitions has a few disadvantages: you cannot easily resize them, and the maximum amount of partitions that can be created is limited.
Logical volumes, also referred to as LVM, have been introduced as an alternative. With LVM, it is relatively easy to resize the storage volume. Also, logical volumes aren’t bound to the physical device they are created on. In LVM, all storage devices are grouped in the volume group, and logical volumes are created from the volume group. The result is that if a logical volume grows out of disk space, it is easy to add a disk to the volume group, which allows for growth of the logical volume.
While LVM is very flexible and offers important benefits, compared to traditional partitions, with the rise of the Btrfs file system, the need to create logical volumes has decreased. Many features that were previously supported only on LVM are now also supported in the Btrfs file system. So, if Btrfs is used, you can do without LVM. But, if on your server multiple file systems are used side by side, it can still be interesting to use LVM. To allow you to use the disk layout that works best for your environment, this chapter discusses both solutions.
Creating Partitions
If you’re used to such tools as fdisk for managing partitions, you’re welcome to do so on SLES. If you want to make it a bit easier, while having full access to all of the advanced options that exist when working with storage, you can use YaST as a partitioning tool. When creating partitions or logical volumes from YaST, everything is integrated, and after creating the partition, you can easily put a file system on it.
Creating Partitions from YaST
To start the partitioning utility from YaST, select System ![]() Partitioner. This will elicit a warning, from which you can select Yes to continue. You’ll then see the Expert Partitioner screen, which is shown in Figure 3-1.
Partitioner. This will elicit a warning, from which you can select Yes to continue. You’ll then see the Expert Partitioner screen, which is shown in Figure 3-1.

Figure 3-1. The Expert Partitioner interface
![]() Note In this book, I prefer showing the ncurses interface of YaST, not because it is prettier, but because it is always available, no matter if you’re working from a text-only session or a complete graphical environment.
Note In this book, I prefer showing the ncurses interface of YaST, not because it is prettier, but because it is always available, no matter if you’re working from a text-only session or a complete graphical environment.
To add a partition, from the Expert Partitioner window, you’ll have to use the Tab key to navigate to the disk on which you want to create a partition. This gives access to the interface you see in Figure 3-2.

Figure 3-2. Options for creating new partitions
To add a new partition, select Add. This first opens a window, from which you can specify the size you want to use (see Figure 3-3). By default, all available disk space is selected, so if you don’t want to use it all, specify the size you want to assign in MiB, GiB, or TiB. Note that the notation MiB (Mebibyte), and so forth, refers to a multiple of 1024 bytes. This is in contrast to MB, which is a multiple of 1000 bytes.

Figure 3-3. Specifying partition size
After specifying the partition size you want to use, you can select the role for the partition. Depending on the role you’ve selected, a preselection of file system and mount point will be made. You can also choose the option Raw Volume, which allows you to format the partition at a later stage. This can be useful if, for example, you want to reserve disk space for use as a storage back end for an iSCSI LUN or a virtual machine.
In the next screen, you can select the file system type and mount options. These topics are explained in detail later in this chapter. When you’re back on the main screen of the Expert Partitioner, you’ll see the new partition. It hasn’t been committed to disk yet, however. To commit the changes to disk, select Next and Finish.
Creating Partitions from the Command Line
If you want to create partitions on an MBR disk, you have to use fdisk. To create partitions on a GUID disk, you’ll have to use gdisk. The utilities are pretty similar, but the information that is written is different, so make sure to use the right tool. As GUID partitions are rapidly becoming more common, in this chapter, I’ll explain gdisk and not fdisk.
To create a partition, type gdisk, followed by the name of the device you want to use. This gives you a message about the current disk partitioning and will next allow you to perform your manipulations on that disk. For an overview of available commands, type ? (see Listing 3-1).
Listing 3-1. Working from the gdisk Interface
linux-s0gc:/etc/sysconfig # gdisk /dev/sdb
GPT fdisk (gdisk) version 0.8.8

Partition table scan:
  MBR: protective
  BSD: not present
  APM: not present
  GPT: present

Found valid GPT with protective MBR; using GPT.

Command (? for help): ?
b       back up GPT data to a file
c       change a partition's name
d       delete a partition
i       show detailed information on a partition
l       list known partition types
n       add a new partition
o       create a new empty GUID partition table (GPT)
p       print the partition table
q       quit without saving changes
r       recovery and transformation options (experts only)
s       sort partitions
t       change a partition's type code
v       verify disk
w       write table to disk and exit
x       extra functionality (experts only)
?       print this menu

Command (? for help):
To create a new partition, type n. You can now select the partition number you want to create. The maximum amount of GUID partitions is 128, but you should number partitions in order, so normally, you can just press Enter to select the partition number that is proposed. Next, it asks for the first sector to use. A sector has a size of 512 bytes, and by default, the first sector that is used is 2048. You should not have your partition start anywhere else, unless you have a very good reason.
After selecting the starting point for the partition, you can specify the size. The easiest way to specify a size is by using a + sign, followed by an amount and the identifier K, M, G, T, or P, according to the amount of kilo-, mega-, giga-, tera-, or petabyte you want to assign. You next have to assign the partition type you want to use. For all normal Linux file systems, the default partition type 8300 works fine. Note that the partition type is not the same as the file system type. The partition type indicates the intended use of a partition, and in many cases, it’s not necessary to set a specific partition type. After creating the partition, type p, for an overview. The result should resemble Listing 3-2.
Listing 3-2. Verifying Partition Creation
Command (? for help): p
Disk /dev/sdb: 17179869184 sectors, 8.0 TiB
Logical sector size: 512 bytes
Disk identifier (GUID): DF090B7D-9509-4B13-95E2-BC8D7E98B4C1
Partition table holds up to 128 entries
First usable sector is 34, last usable sector is 17179869150
Partitions will be aligned on 2048-sector boundaries
Total free space is 17177771965 sectors (8.0 TiB)

Number  Start (sector)    End (sector)  Size        Code  Name
1       2048              2099199       1024.0 MiB  8300  Linux filesystem

Command (? for help):
If you’re happy with the results so far, press w to write the results to disk. If you’re not happy after all, press q to get out without changing any of the new partitions.
![]() Warning It is extremely important that you not use gdisk on a partition that is configured to use MBR, if you are booting from that disk. Gdisk will overwrite the MBR, which makes your disk unbootable.
Warning It is extremely important that you not use gdisk on a partition that is configured to use MBR, if you are booting from that disk. Gdisk will overwrite the MBR, which makes your disk unbootable.
Creating Logical Volumes
As for partitions, you can also create logical volumes from YaST or from the command line. In this section, you’ll learn how to do both.
Creating Logical Volumes from YaST
If you want to create logical volumes, YaST offers an easy-to-use interface. First, you should make sure that you have disk space available for creating logical volumes. That can be as a partition that you’ve created as partition type 0x8e. You’re also fine if you have unallocated disk space available.
To create logical volumes, start from YaST ![]() System
System ![]() Partitioner. Click Yes when the warning is displayed, which opens Expert Partitioner. Before you’re able to add new logical volumes, you need either a complete disk or a partition that has been set up with the partition type 0x8e. To create such a partition, from the YaST Expert Partitioner, select Hard Disks, and after selecting it, press the space bar. This will show you all available hard disks. Select the hard disk on which you want to work and press Enter. This opens the window that you can see in Figure 3-4.
Partitioner. Click Yes when the warning is displayed, which opens Expert Partitioner. Before you’re able to add new logical volumes, you need either a complete disk or a partition that has been set up with the partition type 0x8e. To create such a partition, from the YaST Expert Partitioner, select Hard Disks, and after selecting it, press the space bar. This will show you all available hard disks. Select the hard disk on which you want to work and press Enter. This opens the window that you can see in Figure 3-4.

Figure 3-4. The Expert Partitioner overview
From this window, use the Tab key to select Add and create a new partition. By default, the Custom Size option is selected, which allows you to specify the intended partition size manually. Enter the partition size you’d like to use and select Next. You’ll now see the screen on which you can select the partition role. From this screen, select Raw Volume (unformatted) and press Next. This will by default set the Linux LVM system ID. Click Finish to complete this part of the procedure.
After creating the LVM partition, you can move on to the Volume Management part in the Expert Partitioner. Select Volume Management and press Enter. This will open the Volume Management interface, which you can see in Figure 3-5.

Figure 3-5. Creating LVM logical volumes from YaST
From this interface, select Add. Depending on what has been created previously, you can now select between a volume group and a logical volume. In Figure 3-5, you can see an example of this window that was taken on a computer that was set up to use LVM. Before you can add a new logical volume, you must have a volume group. If no volume group exists yet, select Volume Group. If you already have an LVM set up on your computer, you can directly add a logical volume—if disk space is still available in the logical volume.
The volume group is the abstraction of all available disk space that can be assigned to LVM. You’ll have to put disks in it (the so-called physical volumes), and once disk space has been assigned to the volume group, on the other end, you can create logical volumes out of it.
To create the volume group, you’ll first have to specify a name. To make it easy to find the volume groups later, it’s a good idea to start volume group names with the letters vg, but you’re not required to do that. Next, you’ll have to specify the physical extent size. These are the minimal building blocks that you’re going to use in LVM. If you’re planning on creating huge logical volumes, set the physical extent size to the maximum of 64MiB. Every logical volume you’ll create will always have a size that is a multiple of 64MiB. For regular purposes, the default size of 4MiB does just fine.
After specifying the physical extent size, you must add physical volumes (disks or partitions) to the volume group. Make sure that you only select the intended disks or partitions, and after selecting them, click Add to add them to the set of selected physical volumes. At this point, you should see an interface that looks as in Figure 3-6.

Figure 3-6. Creating an LVM volume group
After creating the volume group, you’ll return to the Expert Partitioner main window. From this window, select the volume group that you’ve just created and use the Tab key on your keyboard to navigate to the Add option. From the drop-down list, select Logical Volume. This opens the screen that you see in Figure 3-7.

Figure 3-7. Adding a logical volume
To add a logical volume, you have to set the name of the logical volume and select the normal volume type. Then click Next and specify the size of the logical volume. By default, it wants to allocate the maximum size that is available in the volume group. That is not always a good idea, so you might be better off selecting a custom size. If there are multiple physical volumes in your volume group, you can also set the amount of stripes. By selecting an amount of stripes that is equal to the amount of physical volumes, you’ll load-balance read and write requests to the logical volumes, which allows you to create a Redundant Array of Inexpensive Disks (RAID) set on top of LVM. If you have just one disk, set the stripe size to 1.
From the next screen, you’ll have the opportunity to add a file system. As this will be discussed separately in a subsequent section, we’ll skip it here. To step out without creating a file system now, select Raw Volume (unformatted) and in the next screen, make sure that Do not format partition and Do not mount partition are selected (see Figure 3-8).
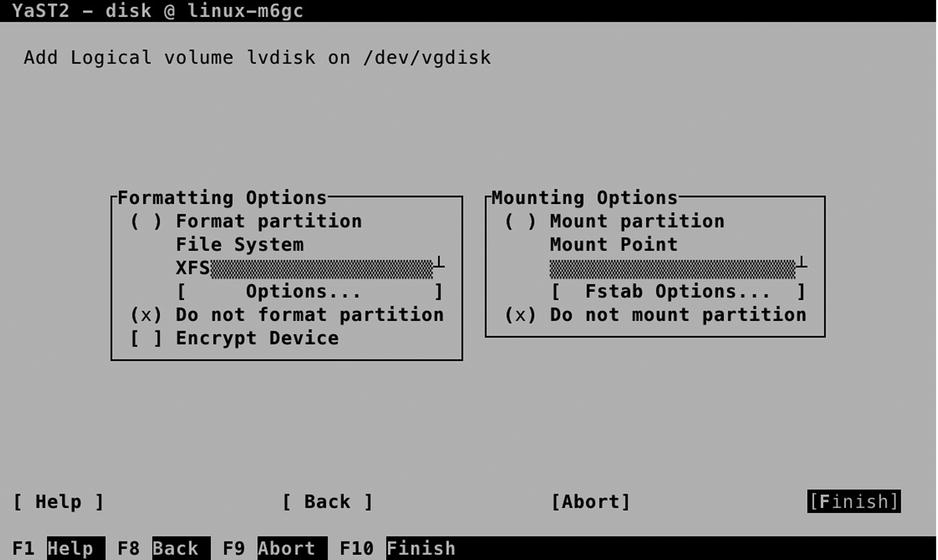
Figure 3-8. Skipping File System creation for now
Creating Logical Volumes from the Command Line
To create an LVM setup from the command line, you’ll start by creating a partition. To do this, you can follow the directions that were given in the section “Creating Partitions from the Command Line.” When gdisk asks which partition type to use, make sure to enter 8E00, which assigns the LVM partition type to the partition (see Listing 3-3).
Listing 3-3. Creating an LVM Partition Type
Command (? for help): n
Partition number (3-128, default 3): 3
First sector (34-17179869150, default = 4208640) or {+-}size{KMGTP}:
Last sector (4208640-17179869150, default = 17179869150) or {+-}size{KMGTP}: +1G
Current type is 'Linux filesystem'
Hex code or GUID (L to show codes, Enter = 8300): 8E00
Changed type of partition to 'Linux LVM'

Command (? for help):
Next, type w to write the partition to disk. If you’re using fdisk to create the partition, you must first define the partition and next type t to change the partition type. Set the partition type to 8e and type w to write the changes to disk. Next, run partprobe to make sure that the kernel is updated with the new changes to the partition table.
After creating the partition, you have to make it a physical volume. To do that, you’ll use the pvcreate command. The command is easy and straightforward to use: just type pvcreate, followed by the name of the partition you’ve just created, as in pvcreate /dev/sdb3. Next, type pvs to verify that you succeeded and the physical volume has been created (see Listing 3-4).
Listing 3-4. Verifying the Creation of Physical Volumes
linux-m6gc:~ # pvs
  PV         VG     Fmt  Attr PSize  PFree
  /dev/sda2  vgdata lvm2 a--  19.51g   3.51g
  /dev/sdb2  vgdisk lvm2 a--   1.00g 516.00m
  /dev/sdb3         lvm2 a--   1.00g   1.00g
In Listing 3-4, you can see that the physical volume has been added, but it’s not a part of any volume group yet. To put it in a volume group, you can now use the vgcreate command. This command has two mandatory options: you’ll have to specify the name of the volume group that you want to create, as well as the name of the device that you want to add to it, as in vgcreate vgsan /dev/sdb3. That would create the volume group for you, and you can verify that by using vgs or vgdisplay. Use vgs if you want to see a short summary of the volume groups on your system and their properties; use vgdisplay if you’re looking for more extended information. In Listing 3-5, you can see the output of both commands.
Listing 3-5. Showing Volume Group Properties
linux-m6gc:~ # vgs
  VG     #PV #LV #SN Attr   VSize  VFree
  vgdata   1   3   0 wz--n- 19.51g   3.51g
  vgdisk   1   1   0 wz--n-  1.00g 516.00m
linux-m6gc:~ # vgdisplay vgdisk
  --- Volume group ---
  VG Name               vgdisk
  System ID
  Format                lvm2
  Metadata Areas        1
  Metadata Sequence No  2
  VG Access             read/write
  VG Status             resizable
  MAX LV                0
  Cur LV                1
  Open LV               0
  Max PV                0
  Cur PV                1
  Act PV                1
  VG Size               1.00 GiB
  PE Size               4.00 MiB
  Total PE              257
  Alloc PE / Size       128 / 512.00 MiB
  Free  PE / Size       129 / 516.00 MiB
  VG UUID               c2l6y9-ibIo-Zdp0-tWeE-WxZl-jmW9-YHaC1Y
In both commands, you can see how many physical volumes are added to the volume groups. You can also see the amount of logical volumes currently existing in the volume group and a summary of the total size and available free space in the volume groups.
Now that you have created the volume group, you can add a logical volume to it. To do that, you’ll use the lvcreate command. This command requires at least two arguments: the size you want to use and the name of the volume group into which you want to put the logical volume. It is also a good idea to specify a name. If you don’t do that, a random name will be generated. If, for example, you wanted to create a logical volume with a size of 500MB, the name lvdb, and put that in the volume group that uses the name vgdisk, the command to use is lvcreate -L 500M -n lvdb vgdisk. You can next use the command lvs to get an overview of the logical volume properties, or lvdisplay, if you want to see more details about it.
Creating and Mounting File Systems
At this point, you should have either a partition or a logical volume, and you’re ready to create a file system on it. Before moving on and actually doing that, you’ll have to know about differences between Linux file systems. In the next section, you can read about these. Next, you’ll learn how to create a file system and how to make sure that the file system is automatically mounted on reboot.
Understanding File System Features
On Linux, many file systems are available, and recently some important changes have occurred, which leaves you with many choices for the file system that you want to use. Before moving on and teaching you how to actually create and manage a file system, we’ll first discuss the different options, so that you can select the file system that fits your needs best.
Ext File Systems
Shortly after the release of Linux in 1992, the System Extended File version 2 (Ext2) was released. This file system perfectly met the data needs of the early days of Linux. Ext2 has been the default Linux file system for some years, until the need for journaling became more manifest.
A file system journal is used to keep track of all ongoing transactions on the file system. That means that if at any time something goes wrong on a server and the server crashes, the file system can be easily recovered from the journal. If a journal is present, recovering the file system is a matter of seconds. If no journal is present, for file system recovery, an extensive file system check has to be performed, and the consistency of every single file has to be verified. On a small file system, that can take a long time; on a modern file system, that can take days. That is why file system journaling is an essential need for any new file system.
The biggest improvement in Ext3, the successor of Ext2, is that it has a file system journal by default. Also, some improvements have been made to make the kernel module, as well as the indexing that is used in the file system, more efficient. Ext3 was the default file system in SUSE Linux Enterprise Server 11.
The major disadvantage of Ext3 is the way it organizes access to files. Ext3 keeps track of its files by using linear indexes. This makes the file system slower when more files are used in the file system. Unfortunately, stepping away from the way an Ext3 file system is organized would mean a radical redesign of the whole file system. That is why on the day the Ext3 successor Ext4 was released, it was already clear that this file system wasn’t going to last, and something else would be needed to fit the needs of modern-day data centers.
Nevertheless, Ext4 has been, and still is, an important Linux file system. Compared to Ext3, the kernel module has been rewritten to make it faster and more efficient, and a new way of allocating blocks to the file system has been added: the use of extents.
An extent is a group of blocks that can be addressed and administered as one entity. The default size of an extent is 2MB. Compared to the often-used default file system block size of 4KB, using extents means an important reduction in the amount of blocks that has to be administered for a file. Imagine a file with a size of 2GB, for example. It would need 500,000 blocks for its administration, whereas only 1,000 extents are needed for its administration. Ext4 extents make the file system administration a lot more efficient, but it doesn’t take away the inefficiency in addressing files. For that reason, on modern generation Linux distributions, new solutions have been introduced.
Even if new file systems have been introduced, Ext4 is still commonly used. To its credit is that it is a very stable file system, as well as a very well-known file system. That means that there is excellent tooling available to repair problems occurring on Ext4 and that many options are available for its optimum use.
ReiserFS
The first serious attempt to offer an alternative to the Ext file systems was made with ReiserFS. This file system was introduced in the late 1990s as the default file system used by SUSE. It was a revolutionary file system in its approach, as it was organized around a database, to keep track of file system administration, instead of the slow and inefficient linear tables that are used in Ext file systems.
Unfortunately, the integration of ReiserFS with the kernel was not optimal, and that is why with the release of SLES 11, SUSE has dropped ReiserFS as the default file system. Nevertheless, ReiserFS is still available on SLES 12, and if you need a file system that can deal with many small files in an efficient way, it still is a valid choice. You should realize, however, that it is not the most popular file system, which means that it may be difficult to get support, should you ever encounter serious trouble using it.
Btrfs
Since 2008, developer Chris Mason has been working on the next generation Linux file system: Btrfs. This file system is developed as a Copy on Write (CoW) file system, which means that old versions of files can be maintained while working on them. When writing block, the old block is copied to a new location, so that two different versions of the data block exist, which helps to prevent problems on the file system. In 2009, Btrfs was accepted in the Linux kernel, and since then, it is available in several Linux distributions. Since the beginning, SUSE has been one of the leading distributions to show support for Btrfs.
Apart from being a CoW file system, Btrfs has many other useful features. Among these features are the subvolumes. A subvolume can be seen as something that sits between a volume or logical partition and a directory. It is not a different device, but subvolumes can be mounted with their own specific mount options. This makes working with file systems completely different. Whereas on old Linux file systems you needed a dedicated device if you had to mount a file system with specific options, in Btrfs you can just keep it all on the same subvolume.
Another important feature of Btrfs are snapshots. A snapshot freezes the state of the file system at a specific moment, which can be useful if you must be able to revert to an old state of the file system, or if you have to make a backup of the file system.
Because Btrfs is a CoW file system, snapshots are very easy to create. While modifying files, a copy is made of the old file. That means that the state of the old file is still available, and only new data blocks have to be added to that. From the metadata perspective, it is very easy to deal with both of these, which is why it is easy to create snapshots and revert files to an earlier version.
Snapshots are useful if you want to revert to a previous version of a file, but they also come in handy for making backups. Files in a snapshot will never have a status of open. That means that files in a snapshot always have a stable state that can be used to create a backup. Because it is easy to create snapshots from Btrfs subvolumes, SLES takes care of this automatically. These snapshots are used from the snapper utility, a front-end utility that makes it easier to revert to earlier versions of a file. You can even select from the Grub boot menu, to revert to an earlier state of your system.
XFS
Where Btrfs definitely is the choice of the future, it’s a relatively new file system, and not so long ago, it still had features that made many administrators question if it really was the best choice for their environment. That is why in SLES, the XFS file system is used as the default file system for operating system volumes.
XFS is a file system that was developed by SGI in the mid-1990s as a file system that organizes its metadata administration based on a database. It is a proven file system that has been around for a long time and is very flexible in the different options that can be used with it. XFS can be tuned for different environments. It is very usable for servers that have to deal with many small files but also for servers that have to be configured for streaming large files.
Creating and Mounting the File System
The easiest way to create a file system on SLES is from YaST. You can just follow the prompts that are provided when creating logical volumes or partitions. You can also add a new file system to a device that has been created previously, which you’ll read about in this section.
Creating File Systems from YaST
To create a file system on a device, you first have to select the device. In the YaST Partitioner, you’ll either open the Hard Disks view, or you’ll open the Volume Management view, to select the device on which you want to create the file system. Select the device and, next, select Edit, to modify its properties in the interface, which you can see in Figure 3-9.

Figure 3-9. Creating a file system on an existing device
You’ll now see the screen that you can see in Figure 3-10, on which you have to specify how you want to create the file system. In Formatting Options, select Format Partition. Next, use the down arrow key to select the file system you want to use, or accept the default selection of the Btrfs file system. You’ll next have to specify a mount point also. This is the directory that users will go to to work with this file system.
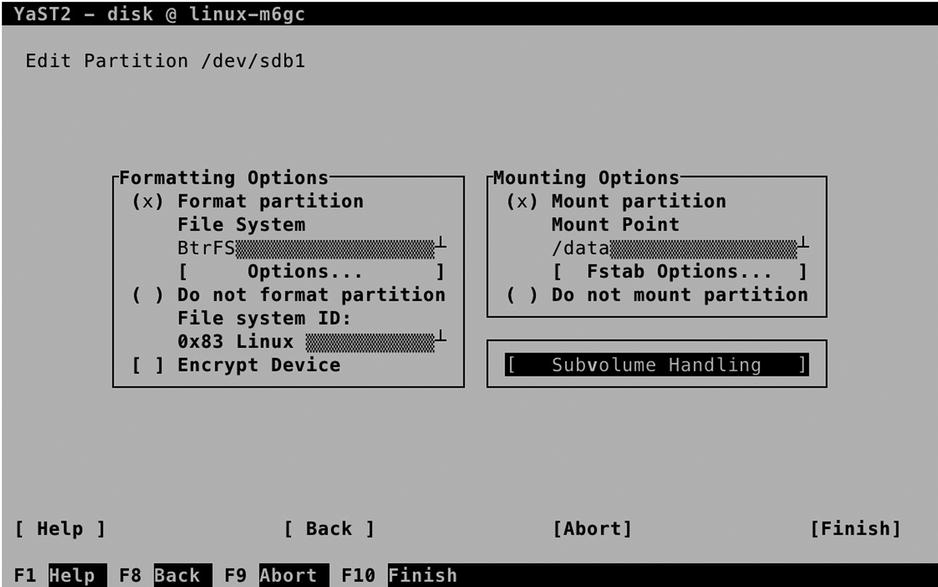
Figure 3-10. Making a file system
While creating a file system, you can specify specific fstab options. To make sure that the file system is automatically mounted on system boot, a reference to the file system is placed in the /etc/fstab file. YaST will take care of that automatically for you, but you can easily access different mount options, by selecting the fstab options, which you can see in Figure 3-11.

Figure 3-11. Specifying mount options
To start with, you can specify how you want the device to be mounted. By default, the device is mounted by its UUID. That is a universal unique ID that is written to the file system on the device and that will never change, not even if the disk topology is changed. Unfortunately, UUIDs are not very readable, which is why other options, such as the device ID and device path, are offered as well. You can also choose to use one of the more classical approaches, such as a mount that is based on device name (such as /dev/sdb1), or a mount that is based on a volume label that is written to the file system. From YaST, you can specify the volume label that you want to use (see Figure 3-11).
While mounting the file system, you can also select some mount options. The mount option No Access Time can be useful. This option makes it unnecessary for the file system metadata to be updated every time the file system is accessed, which is good for performance. There are many more mount options, however, that are not listed here, so if you have specific needs, you might want to edit the /etc/fstab file manually.
If you have elected to create a Btrfs file system, you can also create subvolumes from YaST. A subvolume is created as a subdirectory in the mount point that you’re working on. To add a subvolume, specify its name in the YaST interface, shown in Figure 3-12, and select Add new. This will add the subvolume to the list (but won’t do anything else with it). When done, select OK, to write the changes to disk. You have now added the file system to the /etc/fstab file, to ensure that it is mounted automatically on boot.

Figure 3-12. Adding subvolumes from YaST
Creating File Systems Manually
Instead of using YaST, you can also create file systems manually. This even adds some more flexibility, as from the command line, some tools are available that are not available from YaST. These allow you, for example, to create a ReiserFS file system, which you cannot do from YaST.
To add a file system from the command line, different utilities are available. To get an overview of these, type mkfs and hit the Tab key on your keyboard twice. This shows all commands that have a name beginning in mkfs. As each file system has different features and options, the options offered by these commands will be quite different from one another. If you want to create the file system the easy way, you can just type the name of the command, followed by the device name on which you want to create the file system, as in mkfs.ext4 /dev/sdb2. This will create a file system with default options for you, which, in most cases, will work just fine.
Making Manual Modifications to /etc/fstab
After creating the file system, you can put it in /etc/fstab for automatic mount after a reboot. In Listing 3-6, you can see an example of what the contents of /etc/fstab typically looks like.
Listing 3-6. Sample /etc/fstab Contents
linux-m6gc:~ # cat /etc/fstab
/dev/vgdata/swap                          swap                 swap       defaults              0 0
/dev/vgdata/lvroot                        /                    xfs        defaults              1 1
UUID=781ab8eb-b1eb-49b4-b44a-8bf309e5b99c /boot                ext4       acl,user_xattr        1 2
UUID=bab5beb7-02df-4697-809e-63d4a25d68bd /var                 btrfs      defaults              0 0
UUID=b0738048-2a89-4cd5-9d8e-dce32bc13f88 /data                btrfs      defaults              0 0
In /etc/fstab, six columns are used to mount the file system. In the first column, you’ll have to specify the name of the device. Read the next section, “Device Naming,” for more information on how to do that in a smart way. The second column tells the system on which directory to mount the device. If you make manual adjustments to /etc/fstab, make sure that you create the mount point before you try mounting it! In the third column, you’ll specify the type of file system you have used on this device.
In the fourth column, mount options can be specified. If you don’t know of any specific mount options you want to use, just type “default,” but if you need support for quota (see the section “Managing Quota,” later in this chapter), or if you need support for access control lists (see Chapter 4), you can enter the required mount option in this column.
In the fifth column, you’ll specify the backup option. This column needs to have a 1, if you want full backup support, and a 0, if you don’t. Just make sure that on any real file system, this column has a 1. If you’re using Btrfs, use a 0 in this column as well. In the last column, you’ll specify how the file system needs to be checked during mount. Use 0, if you don’t want an automatic check to occur or if you’re using Btrfs. Use a 1, if this is the root file system. Using a 1 ensures that it is checked before anything else. On all other file systems that are not using Btrfs and are not the root file system, use a 2.
Device Naming
When creating a partition, the name of the partition will be similar to /dev/sdc1, which indicates the first partition on the third hard disk that will be found on the SCSI bus. Using device names such as /dev/sdc1 works perfectly in a scenario in which servers are connected to physical disks, and the storage topology never changes.
Nowadays, many servers are connected to a Storage Area Network (SAN) to access storage. This means that storage has become much more flexible and that storage topology can change, with the result that the device that was previously known as /dev/sdc1 will now be known as /dev/sdf1, or any other device name that you did not expect. That is why a more flexible approach to file system naming is needed. On modern Linux systems, three different alternatives for file system naming exist:
- UUID
- File System Labels
- /dev/disk naming
When a file system is created, the file system is automatically assigned a universal unique ID (UUID). This UUID is long and difficult to read, but it does have one benefit: it is bound to the file system, and it will never change spontaneously. If you’re on a dynamic storage topology, it might be smart to use UUIDs. You can get a list of all UUIDs currently available on your system by typing the blkid command (see Listing 3-7).
Listing 3-7. Typing blkid for an Overview of UUIDs on Your System
linux-m6gc:~ # blkid
/dev/sda1: UUID="781ab8eb-b1eb-49b4-b44a-8bf309e5b99c" TYPE="ext4" PTTYPE="dos" PARTLABEL="primary" PARTUUID="e1695ed9-f2db-495b-9fdd-b970eb7569a7"
/dev/sda2: UUID="Pteo9u-cBKv-3PG7-Vt1n-Mv2H-Tm53-EbK50i" TYPE="LVM2_member" PARTLABEL="primary" PARTUUID="3ca331eb-c2fc-4d29-9dc7-ba3df66034f1"
/dev/sr0: UUID="2014-08-21-14-06-45-00" LABEL="SLE-12-Server-DVD-x86_6406991" TYPE="iso9660" PTUUID="2663792f" PTTYPE="dos"
/dev/mapper/vgdata-swap: UUID="7e6db5e9-69cf-4292-b75a-24f4c4871a27" TYPE="swap"
/dev/mapper/vgdata-lvroot: UUID="f029648c-2218-403b-8d86-b2ef9b684c48" TYPE="xfs"
/dev/mapper/vgdata-var: UUID="bab5beb7-02df-4697-809e-63d4a25d68bd" UUID_SUB="555f2b23-5d33-4ea6-8903-d66faf5b8a82" TYPE="btrfs"
/dev/sdb2: UUID="evADgP-Nb3w-X6cz-g9CD-fZrq-alPE-AjeERC" TYPE="LVM2_member" PARTLABEL="primary" PARTUUID="4757de6c-7688-49c8-9a84-0c251381f361"
/dev/sdb3: UUID="qfCHtq-dK2Q-JSMG-GM8s-BdNM-K265-ZndJ3T" TYPE="LVM2_member" PARTLABEL="Linux LVM" PARTUUID="dfe179c2-ed97-4cd2-829a-c619f8ee240c"
/dev/sdb1: UUID="b0738048-2a89-4cd5-9d8e-dce32bc13f88" UUID_SUB="a5618c9e-ca89-4a6d-bc97-570e54b55276" TYPE="btrfs" PARTLABEL="Linux filesystem" PARTUUID="927ec3f4-963f-41e1-a0e1-b34d69e1ff21"
Originally, UUIDs were assigned when creating the file system. If you’re using GUIDs, there is an alternative to the file system UUID, and that is the partition UUID, which is displayed as PARTUUID in the output of the blkid command. To mount a file system based on its UUID, you can include UUID= in /etc/fstab; to mount it on its partition UUID, you can use PARTUUID= in /etc/fstab.
While UUIDs do serve their purpose and offer worldwide unique naming, they are not very user-friendly. If a problem occurs while mounting a file system, you won’t be able to see at first sight that it is because of a wrong UUID. That is where file system labels may come in handy. Most mkfs utilities support the option -L to assign a human readable name to a file system. Using a label, you can specify a mount option such as LABEL=database in /etc/fstab. You can get an overview of labels currently defined by using the blkid command also.
Another option that ensures you have unique device naming is to use the names that are created in the /dev/disk directory. Depending on the specific configuration of the device, you’ll find the device name represented in different ways. In Listing 3-8, you can see what the contents of the /dev/disk/by-path directory looks like. Using these names can be a relatively readable way to refer to devices.
Listing 3-8. Device Naming in /dev/disk/by-path
linux-m6gc:/dev/disk/by-path # ls -l
total 0
lrwxrwxrwx 1 root root  9 Sep  9 12:52 pci-0000:00:10.0-scsi-0:0:0:0 -> ../../sda
lrwxrwxrwx 1 root root 10 Sep  8 16:57 pci-0000:00:10.0-scsi-0:0:0:0-part1 -> ../../sda1
lrwxrwxrwx 1 root root 10 Sep  8 16:57 pci-0000:00:10.0-scsi-0:0:0:0-part2 -> ../../sda2
lrwxrwxrwx 1 root root  9 Sep  9 13:39 pci-0000:00:10.0-scsi-0:0:1:0 -> ../../sdb
lrwxrwxrwx 1 root root 10 Sep  9 13:21 pci-0000:00:10.0-scsi-0:0:1:0-part1 -> ../../sdb1
lrwxrwxrwx 1 root root 10 Sep  9 12:18 pci-0000:00:10.0-scsi-0:0:1:0-part2 -> ../../sdb2
lrwxrwxrwx 1 root root 10 Sep  8 17:42 pci-0000:00:10.0-scsi-0:0:1:0-part3 -> ../../sdb3
lrwxrwxrwx 1 root root  9 Sep  8 16:57 pci-0000:02:05.0-ata-2.0 -> ../../sr0
EXERCISE 3-1. CREATING A FILE SYSTEM ON TOP OF LVM
Now that you’ve learned all about the file system creation basics, it’s time to practice your skills in an exercise. To perform this exercise, you need to have available storage. If you’re using a virtual machine, you can easily add a new disk to the machine. If you’re working on physical hardware, you can use a USB key to work through this exercise. I will assume that the device you’ll be working on is known to your computer as /dev/sdb. Make sure to change that, according to your specific hardware setup!
- To find out the name of the storage device that you can use, type cat /proc/partitions. In this file, you’ll get an overview of all disk devices that are attached to your computer.
- Type fdisk /dev/sdb to open fdisk and add a new partition. Before changing anything, let’s verify that there is nothing on the disk. Type p to show current partitioning. If any partitions do exist, and you are sure that you can use the entire disk in this exercise, type d to delete them.
- Now type n to create a new partition. The utility next asks which type of partition you want to create. Type p to create a primary partition, and enter the partition number 1, which is suggested as the default partition. Now press Enter to accept the default starting point of the partition, and type +500M to create the partition as a 500MiB partition.
- Verify that you have succeeded. Now type t to change the partition type, and set it to type 8e, which makes it usable for LVM. From the fdisk main menu, type w to write the changes to disk and quit fdisk.
- To make sure that the kernel is updated with the modifications you’ve just applied, type the partprobe command. If you see anything that looks like an error, reboot your system to make sure that the kernel has been updated properly before continuing. Verify that your partition is known as /dev/sdb1.
- Use pvcreate /dev/sdb1 to mark the partition as an LVM physical volume.
- Type vgcreate vgdata /dev/sdb1 to put the partition in a volume group that has the name vgdata.
- Type lvcreate -n lvdata -l 50%FREE vgdata. This command creates a volume with the name lvdata and allocates 50 percent of available disk space from vgdata to it.
- Type the commands pvs, vgs, and lvs to verify the creation of the LVM devices.
- If the LVM devices have been created properly, use mkfs.btrfs -L fsdata /dev/vgdata/lvdata to put a Btrfs file system on top of it, which uses the file system label fsdata.
- Type blkid to verify that the file system has been created and the label can be read from the file system.
- Use mkdir /data to create a mount point on which the file system can be mounted.
- Enter the following line in /etc/fstab, to ensure that the file system can be mounted automatically:
LABEL=fsdata /data btrfs defaults 0 0 - To test that all works well, type mount -a. This mounts all file systems that have an entry in /etc/fstab but haven’t been mounted yet.
- Type mount and df -h to verify that you can see the new mount.
Managing File Systems
As a Linux administrator, on occasion, you’ll have to perform some file-system-management tasks as well. The exact tasks depend on the type of file system that you’re using. In this section, we’ll cover some of the more common of these tasks.
Checking and Repairing File Systems
An important responsibility of the administrator is to guarantee the integrity of the file systems in use. That means that on occasion, you’ll have to check, and sometimes also repair, file systems on your systems. Fortunately, problems on file systems do not occur very frequently, but they do occur.
As the first line of defense, file systems are automatically checked while your system reboots—with the exception of the Btrfs file system, because the way it is organized makes a thorough check unnecessary. On occasion, the automated check may fail, and you’ll have to perform a manual check using the fsck command. This is especially the case if you’re using XFS or Ext4 file systems.
The Ext4 fsck utility has a few useful options. To start with, there is the option -p, which allows you to start an automatic repair where no questions are asked. If you add the option -y, you’ll automatically answer “yes” to all questions asked. This is a good idea, because if serious problems have occurred, you may be prompted many times to confirm a repair action.
Other useful options are -c, which checks for bad blocks and marks them as such, and -f, which forces a file system check. Normally, when fsck is started, it won’t do anything if the file system is considered clean, that is, free of problems. If there are problems, using the -f option is useful.
If serious problems have arisen on the file system, you can benefit from using an alternative superblock. On Ext4, the file system metadata is stored in the superblock, and the superblock is required to check and repair the file system. If the superblock is damaged, you cannot do anything to the file system anymore.
Fortunately, on any Ext file system, a backup superblock is stored. Typically, you’ll find it on block 8193. To use this backup superblock, type fsck -b 8193 /dev/sda1. This allows your file system to be restored to the original state (see Listing 3-9).
Listing 3-9. Using fsck on the Backup Superblock
linux-m6gc:/dev/disk/by-path # fsck.ext4 -b 8193 /dev/sda1
e2fsck 1.42.11 (09-Jul-2014)
/dev/sda1 was not cleanly unmounted, check forced.
Pass 1: Checking inodes, blocks, and sizes
Pass 2: Checking directory structure
Pass 3: Checking directory connectivity
Pass 4: Checking reference counts
Pass 5: Checking group summary information
Block bitmap differences:  +(73729--73987) +(204801--205059) +(221185--221443) +(401409--401667)
Fix<y>?
Note that in Listing 3-9, you can see that some errors were encountered, and the fsck utility began prompting for confirmation, to verify that errors can be fixed automatically. If you don’t want to press the y key many times, it’s a good idea to interrupt the fsck utility, using Ctrl+C, and to start it again, using the -y option.
XFS Tools
When working with the XFS file system, there are a lot of XFS-specific tools that you can use to perform management tasks on the file system. You can get an overview of these by typing xfs[tab][tab] as root on the command line. Some of these tools are pretty common, and you’ll use them on occasion. Some tools are not so common, and you will rarely use them.
To start with, there is the xfs_admin command. This command gives access to a few options, such as xfs_admin -l, which prints the file system label, or xfs_admin -L, which allows you to set a label on a file system. Note that when working with the XFS tools, some tools work on a device; other tools work on a mount point. So, on some occasions, you’ll have to enter a device name, and with other tools, you’ll have to use a directory name.
An interesting XFS tool is xfs_fsr, which will try to defragment an XFS file system. On some Linux distributions, you don’t really have to do any defragmentation. On XFS, you do, and this tool works on a mounted file system.
The XFS file system also has its specific repair utility, xfs_repair. This utility can be used on unmounted devices only; it does not run at boot time. The fsck option in /etc/fstab will only replay the XFS journal if that is necessary. For performing a repair on an XFS file system, you’ll have to make sure that the file system journal (which is referred to as the “log” in XFS) is clean. If you receive warnings about a dirty log, you can mount and unmount the file system, which, in general, will clean the log. If the journal is corrupt, just mounting and unmounting won’t be sufficient. You’ll have to use the command xfs_repair -L on your device to fix the problem.
In the section “Using LVM Snapshots,” later in this chapter, you’ll learn how to work with snapshots on LVM. If you don’t use snapshots on LVM, it is good to know that the XFS file system allows you to temporarily freeze a file system, so that you can take a snapshot without changes being made to the file system at the same time.
To freeze an XFS file system, use xfs_freeze -f /mountpoint (use the mount point, not the device name). This will temporarily stall all writes, so that you can take a snapshot. Once completed, use xfs_freeze -u /mountpoint to unfreeze the file system and commit all writes to the file system.
As mentioned before, the Btrfs file system introduces many new features. Some of the Btrfs features make working with LVM unnecessary, and some new features have also been introduced. The key new features in Btrfs are that it is a copy on write file system. Because of this, it supports snapshots by itself, allowing users and administrators an easy rollback to a previous situation.
Also, Btrfs has support for multiple volumes. This means that when running out of disk space on a particular Btrfs volume, another volume can be added. Also, after adding or removing a volume from a Btrfs file system, online shrinking and growth of the file system is supported. The Btrfs file system also supports metadata balancing. This means that depending on the amount of volumes used, the file system metadata can be spread in the most efficient way. Apart from that, there are Btrfs subvolumes.
Understanding Subvolumes
A Btrfs subvolume is a namespace that can be mounted independently with specific mount options. Multiple subvolumes can reside on the same file system and allow administrators to create different mount points for specific needs. By default, all file systems have at least one subvolume, which is the file system device root, but additional subvolumes can also be created. Apart from the support of per-subvolume mount options, snapshots are created on subvolumes. After unmounting a subvolume, a rollback of the snapshot can be effected.
After a default installation of SLES 12, Btrfs is used on the root file system, and subvolumes are created automatically. In Listing 3-10, you can see how they are created from different mounts in the /etc/fstab file.
Listing 3-10. Btrfs Default Subvolumes
UUID=c7997ed8-2568-49c3-bb84-3d231978707c /btrfs defaults 0 0
UUID=c7997ed8-2568-49c3-bb84-3d231978707c /boot/grub2/i386-pc btrfs subvol=@/boot/grub2/i386-pc 0 0
UUID=c7997ed8-2568-49c3-bb84-3d231978707c /boot/grub2/x86_64-efi btrfs subvol=@/boot/grub2/x86_64-efi 0 0
UUID=c7997ed8-2568-49c3-bb84-3d231978707c /home btrfs subvol=@/home 0 0
UUID=c7997ed8-2568-49c3-bb84-3d231978707c /opt btrfs subvol=@/opt 0 0
UUID=c7997ed8-2568-49c3-bb84-3d231978707c /srv btrfs subvol=@/srv 0 0
UUID=c7997ed8-2568-49c3-bb84-3d231978707c /tmp btrfs subvol=@/tmp 0 0
UUID=c7997ed8-2568-49c3-bb84-3d231978707c /usr/local btrfs subvol=@/usr/local 0 0
UUID=c7997ed8-2568-49c3-bb84-3d231978707c /var/crash btrfs subvol=@/var/crash 0 0
UUID=c7997ed8-2568-49c3-bb84-3d231978707c /var/lib/mailman btrfs subvol=@/var/lib/mailman 0 0
UUID=c7997ed8-2568-49c3-bb84-3d231978707c /var/lib/named btrfs subvol=@/var/lib/named 0 0
UUID=c7997ed8-2568-49c3-bb84-3d231978707c /var/lib/pgsql btrfs subvol=@/var/lib/pgsql 0 0
UUID=c7997ed8-2568-49c3-bb84-3d231978707c /var/log btrfs subvol=@/var/log 0 0
UUID=c7997ed8-2568-49c3-bb84-3d231978707c /var/opt btrfs subvol=@/var/opt 0 0
UUID=c7997ed8-2568-49c3-bb84-3d231978707c /var/spool btrfs subvol=@/var/spool 0 0
UUID=c7997ed8-2568-49c3-bb84-3d231978707c /var/tmp btrfs subvol=@/var/tmp 0 0
UUID=c7997ed8-2568-49c3-bb84-3d231978707c /.snapshots btrfs subvol=@/.snapshots
Using these default subvolumes allows administrators to treat the most common directories that have been created with their own mount options and create snapshots for them as well, if required. The subvolumes are created on mount by including the Btrfs specific subvol=@/some/name option. Subvolumes can only be created if the parent volume is mounted first. You can see that in the first list of output in Listing 3-10, where the /dev/sda2 device is mounted as a Btrfs device. For each subvolume after creation, specific mount options can be added to the mount options column in /etc/fstab.
From a shell prompt, you can request a list of subvolumes that are currently being used. Use the command btrfs subvolume list / to do so, which will give you a result like that in Listing 3-11.
Listing 3-11. Requesting a List of Current Subvolumes
linux-ia9r:~ # btrfs subvolume list /
ID 257 gen 48 top level 5 path @
ID 258 gen 39 top level 257 path boot/grub2/i386-pc
ID 259 gen 39 top level 257 path boot/grub2/x86_64-efi
ID 260 gen 42 top level 257 path home
ID 261 gen 28 top level 257 path opt
ID 262 gen 39 top level 257 path srv
ID 263 gen 45 top level 257 path tmp
ID 264 gen 39 top level 257 path usr/local
ID 265 gen 39 top level 257 path var/crash
ID 266 gen 39 top level 257 path var/lib/mailman
ID 267 gen 39 top level 257 path var/lib/named
ID 268 gen 39 top level 257 path var/lib/pgsql
ID 269 gen 48 top level 257 path var/log
ID 270 gen 39 top level 257 path var/opt
ID 271 gen 48 top level 257 path var/spool
ID 272 gen 41 top level 257 path var/tmp
ID 276 gen 39 top level 257 path .snapshots
Apart from the subvolumes that are created by default, an administrator can add new subvolumes manually. To do this, the command btrfs subvolume create is used, followed by the path of the desired subvolume. Use, for example, the command btrfs subvolume create /root to create a subvolume for the home directory of the user root.
After creating a subvolume, snapshots can be created. To do this, use the command btrfs subvolume snapshot, followed by the name of the subvolume and the name of the snapshot. Note that it is good practice, but not mandatory, to create snapshots within the same namespace as the subvolume. In Exercise 3-2, you’ll apply these commands to work with snapshots yourself.
EXERCISE 3-2. WORKING WITH BTRFS SUBVOLUMES
In this exercise, you’ll create a subvolume. You’ll next put some files in the subvolume and create a snapshot in it. After that, you’ll learn how to perform a rollback to the original state, using the snapshot you’ve just created.
- On an existing Btrfs file system, type btrfs subvolume create /test.
- Type btrfs subvolume list /. This will show all currently existing snapshots, including the snapshot you have just created.
- Copy some files to /test, using the command cp /etc/[abc]* /test.
- At this point, it’s time to create a snapshot, using btrfs subvolume snapshot /test /test/snap.
- Remove all files from /test.
- To get back to the original state of the /test subvolume, use mv /test/snap/* /test.
Working with Multiple Devices in Btrfs
Another benefit of the Btrfs file system is that it allows you to work with multiple devices. By doing this, Btrfs offers a new approach to creating RAID volumes. To create a Btrfs volume that consists of multiple devices, type a command such as mkfs.btrfs /dev/sda1 /dev/sda2 /dev/sda3. To mount a composed device through /etc/fstab, you’ll have to take a special approach. You’ll have to refer to the first device in the composed device and specify the names of the other devices as a Btrfs mount option, as in the following sample line:
/dev/sda1 /somewhere btrfs device=/dev/sda1,device=/dev/sda2,device=/dev/sda3 0 0
Btrfs also allows you to add devices to a file system that is already created. Use btrfs device add /dev/sda4 /somewhere to do so. Notice that the device add command works on the name of the mount point and not the name of the volume. After adding a device to a Btrfs file system, you should rebalance the device metadata, using btrfs filesystem balance /somewhere. You can request the current status of a multi-device Btrfs volume by using the btrfs device stats /somewhere command.
A multivolume device, as just described, is just a device that consists of multiple volumes. If one of the devices in the volume gets damaged, there’s no easy option to repair it. If you do want an easy option for repair, you should create a Btrfs RAID volume. The command mkfs.btrfs -m raid1 /dev/sdb /dev/sdc /dev/sdd /dev/sde will do that for you. If one of the devices in the RAID setup is missing, you’ll first have to mount it in degraded state. That’s for metadata consistency, and it allows you to remove the failing device. If, for example, /dev/sdb is showing errors, you would use the command mount -o degraded /dev/sdb /mnt. Notice that it must be mounted on a temporary mount and not on the mount point of the Btrfs RAID device. After mounting it, you can use btrfs device delete missing /mnt to remove it.
Managing Logical Volumes
You have previously learned how to create LVM logical volumes. Working with logical volumes adds some flexibility to your configuration, especially if no Btrfs file systems are used. Some important features that LVM was used for previously are now included in the Btrfs file system, however, which makes the need for LVM volumes less urgent. If you’re not using Btrfs, configuring LVM can add useful features. In this section, you’ll learn how to work with LVM snapshots and how to resize logical volumes.
Using LVM Snapshots
The purpose of LVM snapshots is to freeze the current state of a volume. That can be useful to make a backup. While creating a backup, open files cannot be backed up properly. It can also be useful, if you want to be able to easily revert to a previous configuration.
To create an LVM snapshot, you need available space in the volume group. The snapshot must be able to store the original blocks of all files that have changed during the lifetime of the snapshot. That means that if you’re creating a snapshot just to make sure that your backup procedure will run smoothly, the size of the snapshot can be limited. If, however, you want to create a snapshot before setting up a complex test environment, so that in case all goes wrong you can easily get back to the original configuration, the size requirements for the snapshot will be considerably higher. If you’re not sure, make certain that you have 10 percent of the size of the original volume. This will be sufficient in most cases.
While working with snapshots, you should be aware that a snapshot is not a replacement for a backup. Snapshots are linked to the original volume. If the original volume just dies, the snapshot will die with it. A snapshot is a tool to help you create a reliable backup.
To create a snapshot, you first have to make sure that you have a volume for which you want to create the snapshot and that you have available disk space in the volume group. Next, you have to make sure that no modifications are written to that volume at the moment that the snapshot is created. You can do this by stopping all services that are using the volume, or by using the XFS Freeze feature that was discussed earlier in this chapter. Next, use lvcreate -s -L 100M -n myvol-snap /dev/myvg/myvol. This creates a snapshot with a size of 100MiB for the volume myvol.
As discussed, LVM snapshots, in general, are created for two reasons: to create a backup or to revert to a previous situation. If you want to create a backup based on the snapshot volume you’ve just created, you should mount it somewhere. You can next take the backup of the mount point. Once the backup has been completed, the snapshot should be removed. This is important, because a snapshot that has not been removed will keep on claiming disk space until it is completely full and that will generate I/O errors on your system. To remove a snapshot, unmount it and, next, use lvremove /dev/yoursnapshot to remove it.
If you have created a snapshot to make it easier to revert to a previous state, you’ll have to use the lvconvert utility. To revert to the original state, apply the following steps:
- Unmount the volume that you want to revert.
- Use lvconvert --merge /dev/yoursnapshot.
- If the previous command complains that it cannot merge over an open origin volume, use lvchange -an /dev/yourvolume first.
- At this point, the original volume will be reverted, and you can mount it again.
Resizing Logical Volumes
Another common task when working with LVM is the resizing of a volume. The size of an LVM volume can be increased as well as decreased, but you should know that not all file systems offer the same options. Btrfs, for example, can easily be resized in both directions, but an XFS file system can be grown, not reduced. So, before starting a resize operation, make sure that your file system fully supports it.
In some manuals, in fact, you’ll read that you have to apply two different steps: the resizing of the file system and the resizing of the LVM volume. This is not the case. You can use the lvm commands to apply both steps in the same operation.
The most flexible utility for a resize operation is lvresize. Using this tool, you can grow as well as reduce a file system. Alternatively, you can use lvextend to grow an LVM volume or lvreduce to reduce its size. All of these commands honor the -r option, to resize the file system on the LVM volume at the same time, and the -L option, to specify the new size of the file system. The generic procedure for growing a file system is as follows:
- Make sure that disk space is available in the volume group. If this is not the case, use vgextend to add disk space to the volume group. If, for example, you want to add the disk /dev/sdc to the volume group vgsan, you would use vgextend vgsan /dev/sdc.
- At this point, you can grow the LVM volume. Use, for example, lvextend -L +1G -r /dev/vgsan/mylv, to add 1GiB of disk space to the volume mylv.
To reduce a file system, you’ll use lvreduce; for example, use lvreduce -L -1G -r /dev/vgsan/mylv to reduce the size of a logical volume with 1GB. You should note that the success of this command differs according to the file system that you’re using.
- To reduce the size of an Ext4 file system, the file system must be unmounted and checked before the actual reduce operation.
- XFS file systems cannot be reduced
- Btrfs file systems can be reduced while being online.
Instead of using the command line, you can also resize file systems easily from YaST. In YaST, select System ![]() Partitioner. Next, select the logical volume that you want to resize and navigate to the Resize option. This opens the window that you can see in Figure 3-13. From this window, specify the resulting size that you need. (Don’t specify how much you want to add; specify how big you want the file system to be.) Next, select OK, to perform the resize operation.
Partitioner. Next, select the logical volume that you want to resize and navigate to the Resize option. This opens the window that you can see in Figure 3-13. From this window, specify the resulting size that you need. (Don’t specify how much you want to add; specify how big you want the file system to be.) Next, select OK, to perform the resize operation.

Figure 3-13. Resizing file systems from YaST
Creating Swap Space
On Linux, swap space is used in a very efficient way. If a shortage of memory arises, the Linux kernel moves memory pages that are not actively being used to swap, to make more memory available for processes that do really need it. On some occasions, you may find that all available swap space has been consumed. If that happens, you can add swap space to your computer. This can be done from YaST, as well as from the command line.
The procedure to add swap space from YaST is easy and intuitive. First, you have to create the storage device (partition or logical volume), and after doing that, you can format it as swap, by selecting the swap file system from the drop-down list. The procedure from the command line involves a couple of commands and is outlined in the following exercise.
EXERCISE 3-3. CREATING A SWAP FILE
This exercise works only on a non-Btrfs file system. So, make sure that you put the swap file on a file system that does not use XFS.
- Create a partition or logical volume to be used as swap space. If you don’t have any disk space that can be dedicated to swap, you can consider creating an empty file using dd. This is not ideal but always better than having a server running out of memory. To create an empty file using dd, use dd if=/dev/zero of=/root/swapfile bs=1M count=1024. In this command, the swap file is filled with zeroes and consists of a total of 1,024 blocks with a size of 1MiB each.
- Type free -m to get an overview of current memory and swap usage.
- Type mkswap/root/swapfile to put a swap file system on your swap file.
- Set the permission mode to allow root access to the swap file only, by typing chmod 600/root/swapfile.
- Type swapon/root/swapfile to activate the swap file.
- Type free -m again. You’ll see that the amount of available swap space has increased by 1GiB!
Summary
In this chapter, you have learned how to work with storage in the SUSE Linux Enterprise Server (SLES). You have read how to set up partitions as well as local volumes, and you have learned how to do that from YaST and from the command line. You’ve also read about common file-system-management tasks. In the next chapter, you’ll learn how to work with users, groups, and permissions on SLES.