
![]()
Introduction and Installation
In this chapter, you’ll learn about SUSE Linux Enterprise 12 and how to install it. You’ll read how it relates to other versions of SUSE Linux and how modules are used to deliver functionality in a flexible way.
Understanding SUSE Linux Enterprise
Linux is an open source operating system. That means that the programs are available for free and that anyone can install Linux without having to pay for it. It also means that the source code for all software in Linux is freely available. There are no secrets in open source. Because of this freedom, Linux features can be used by anyone and implemented in a specific way by anyone, as long as the source code remains open.
To work with Linux, users can gather software themselves and install all programs for themselves. That is a lot of work and is why, since the earliest days of Linux, distributions have been offered. A distribution is a collection of Linux packages that is offered with an installation program, to make working with the distribution easy. One of these distributions is SUSE. Other distributions that currently are often used include Ubuntu and Red Hat.
SUSE (which stands for Software und System Entwicklung—Software and Systems Development) was founded in Germany in September 1992 and, as such, is one of the oldest Linux distributions available. When it was purchased by Novell in 2004, SUSE rapidly became one of the leading enterprise Linux distributions.
Versions of SUSE
Currently, there are two branches of SUSE Linux. openSUSE is the pure open source version of SUSE. It is available for free and is released on a regular basis. In openSUSE, new features and programs are tested before they find their way to SUSE Linux Enterprise.
openSUSE provides a very decent operating system, but it was never meant to be an enterprise operating system. One of the reasons is that a version of openSUSE is not maintained very long, meaning that openSUSE users have to upgrade to a newer version of the operating system after a relatively short period. openSUSE, however, is an excellent operating system for professionals who are working with Linux. It allows them to explore new features before they are brought to market in a new version of SUSE Linux Enterprise.
SUSE also provides a branch of the operating system for enterprise use. This branch is known as SUSE Linux Enterprise. Two main versions of SUSE Linux Enterprise are available: SUSE Linux Enterprise Server (SLES) and SUSE Linux Enterprise Desktop (SLED).
In the past, some serious attempts have been made to make Linux into a desktop operating system. That, however, never became a large-scale success. On the server, however, SUSE Linux has become an important player, being used by small and large companies all over the world.
About Supported Linux
An important difference between SUSE Linux Enterprise and openSUSE is that SUSE Linux Enterprise is supported. That is also why customers are paying for SUSE Linux Enterprise, even if it can be downloaded and installed for free.
The support of SUSE Linux Enterprise includes a few important features that are essential for corporate IT.
- SUSE is certified for specific hardware. That means that hardware vendors certify their platform for SUSE Linux Enterprise. So, if a customer gets in trouble on specific hardware, he or she will receive help, even if the hardware runs SUSE Linux Enterprise. Also, hardware vendors are knowledgeable about SUSE Linux Enterprise, so customers can get assistance from that side, in case of problems.
- Specific applications are certified for use on SUSE Linux Enterprise. If a company wants to run business applications on Linux, it is important that the business application is well integrated with Linux. That is what running a supported application means. More than 5,000 applications are certified for SUSE Linux Enterprise, which means that if a user has problems with the application, the application vendor will be able to offer support, because it is used on a known and supported platform.
- Updates are verified and guaranteed. On a new version of SUSE Linux Enterprise, updates will be provided for a period of seven years, after which an additional five years of extended support is available. That means that SUSE Linux Enterprise can be used for twelve years, thus guaranteeing that business customers don’t have to perform any upgrade of the software in the meantime.
- Support also means that SUSE offers direct help to customers who are having trouble. Different levels of support are available, from e-mail support, which is available for a relatively low price, up to premium support from engineers who will contact clients within a few hours.
Working with SUSE Linux Enterprise 12 Modules
In SLE 12, SUSE has introduced modules. Modules consist of specific software solutions, but with a custom life cycle. By working with modules, SUSE makes it easier to provide updates on specific software. A module is not a new way of selling solutions. Software that was included in earlier versions of SLE is still included in SLE 12. A module, however, is a collection of software packages with a common-use case, a common support status, and a common life cycle. This makes sense, because for some modules, a support life cycle of ten years is too much. Public cloud management software, for example, is developing very fast, as is the case for solutions such as web and scripting. By putting these in modules, SUSE makes it possible to provide updates on versions that are providing new functionality, without breaking the generic support status of SUSE Linux Enterprise.
Currently, SUSE is providing modules for different solutions, including the following:
- Scripting languages, such as PHP, Python, and Ruby on Rails
- UNIX legacy, such as sendmail, old IMAP, and old Java
- Public cloud integration tools
- Advanced systems management
While installing SLE, these modules can be selected in the Extension Selection option. At the time of writing, modules were provided not as an ISO image but via online repositories only, although this policy might change.
Aside from the modules that are provided as an integrated part, there are extensions as well. The most common extension is the High Availability Extension (see Chapter 18), but other extensions may be provided too.
Apart from these, SUSE is also selling different products. An example of these is SUSE Manager, which is discussed in Chapter 18.
Installing SUSE Linux Enterprise Server 12
To perform a basic installation of SUSE Linux Enterprise Server 12, you need an ISO or an installation disk. Advanced installation solutions are available also, such as an installation by using PXE boot and an installation server. These are discussed in Chapter 17. To install SLES, your server needs to meet some minimal system requirements. These depend on the kind of installation you want to perform. A text-only installation has requirements other than a full graphical installation. Table 1-1 provides an overview of recommended minimal specifications.
Table 1-1. Installation Requirements
text-based | graphical | |
|---|---|---|
CPU | i5 or better | i5 or better |
RAM | 512MB | 1GB |
Available disk space | 2GB | 4GB |
Network | 100Mbit | 100Mbit |
The SLES software is available on www.suse.com. Even if SLES is a paid product, you can download an ISO image for free. You will find it classed as “trial” on the web site. If you’re using a free version, you won’t be able to get support or updates, but you can install a fully functional version of SLES without paying anything. Don’t worry about the “trial” classification; the software is fully functional.
Performing a Basic Installation
After starting the installation from the installation media, you’ll see the welcome screen (see Figure 1-1). On this screen, you see different options, of which Boot from Hard Disk is selected by default. Select Installation to start the installation procedure. Other options are
- Upgrade: Use this to upgrade a previous version of SUSE Linux Enterprise Server.
- Rescue System: This option provides access to a rescue system that you can use to repair a server that doesn’t start normally anymore.
- Check Installation Media: Use this option to verify that your installation disk has no physical problems before starting the installation. Note that, in general, this option takes a lot of time.
- Firmware Test: This option verifies the compatibility of firmware that is used.
- Memory Test: This option checks the integrity of system RAM and can mark segments of a RAM chip as unusable, so that it will not be used upon installation.
In the lower part of the screen, you’ll also see several function keys that allow you to change settings, such as installation language, video mode, and installation source. Also, by using these options, you can specify additional drivers to be loaded. If you’re using a non-US keyboard, it makes sense to select the installation language and choose the correct keyboard settings before continuing. This option allows you to change the language as well as the keyboard. If you want to install in English but have to select a different keyboard, you’ll need the option that is presented in the next screen.

Figure 1-1. The Installation menu
After selecting the Installation option, a Linux kernel and the corresponding installation program is loaded. While this happens, the hardware in your server is detected. This can take some time. After hardware detection has occurred, you’ll see the screen shown in Figure 1-2, from which you can select the Language and Keyboard and agree to the License Agreement.
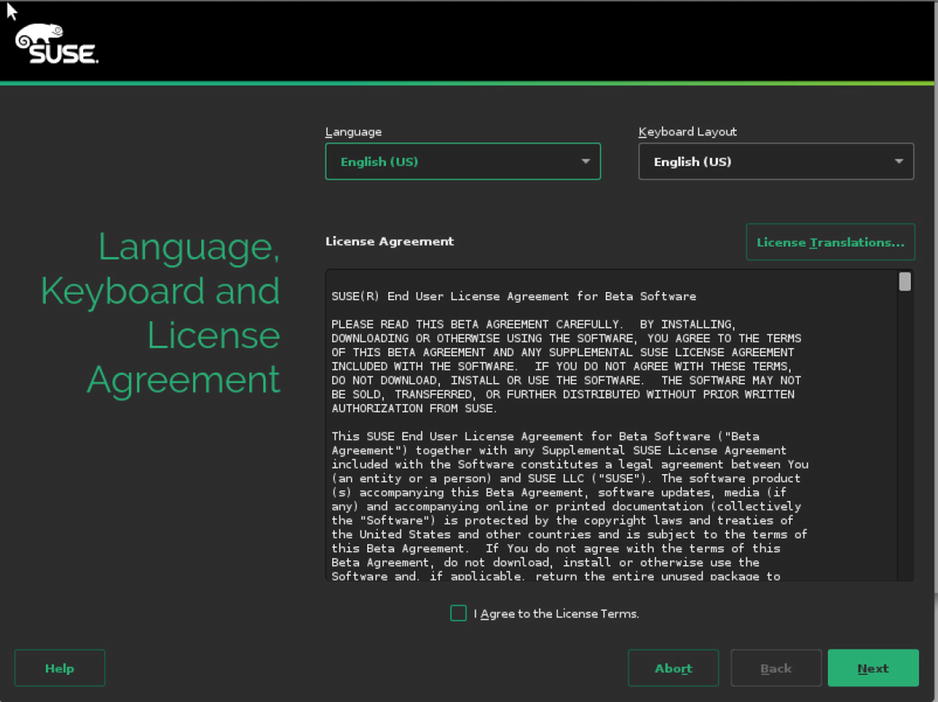
Figure 1-2. Selecting the installation language
To access patches and updates, you must provide an e-mail address and associated registration code at this point (see Figure 1-3). If you don’t, you can still continue the installation and continue this part later. So, if you have a valid e-mail address and registration code, enter it now. If you don’t, or if you want to perform an offline installation, click Skip Registration. If you’re using a local registration server, such as a SUSE Manager server or an SMT server, click Local Registration Server and enter the relevant credentials.
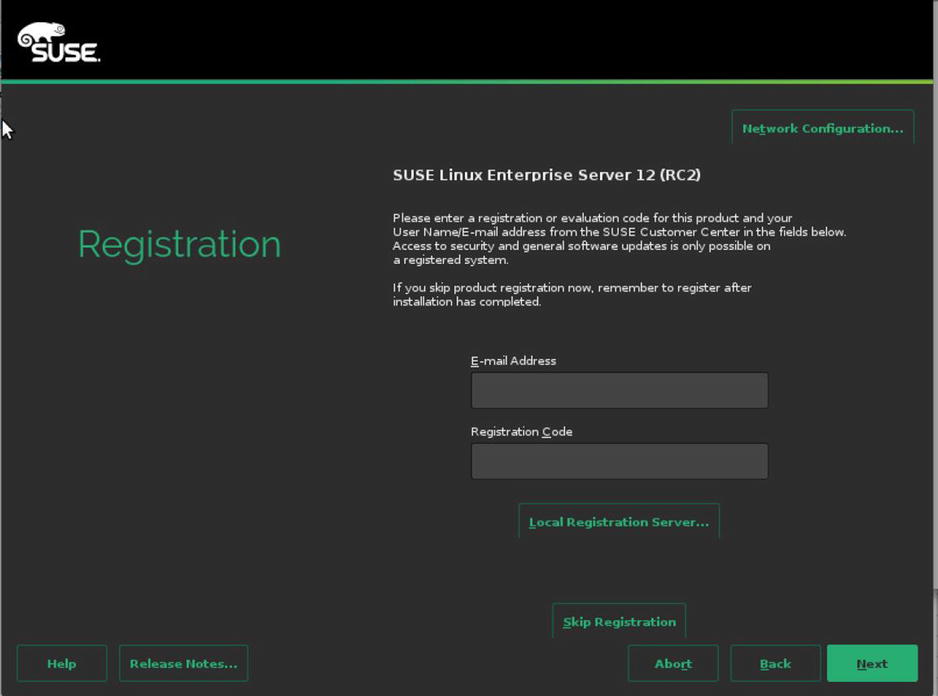
Figure 1-3. Entering your registration details
After entering your registration details, you can select optional Add On Products (see Figure 1-4). These are additional SUSE solutions, such as the High Availability Extension, which is not included in SUSE Linux Enterprise. To tell the installation program where to find the installation files, select the installation source from this screen. You can install add-on products from any installation source, including local directories, hard disks, or installation servers. If you don’t have any additional products to install, just select nothing and click Next.

Figure 1-4. Selecting an optional add-on product
On the screen that you see in Figure 1-5, you can select the partitioning for your server. By default, two partitions are created: one containing a swap volume, and the other containing a Btrfs file system. If you want to use Btrfs on SLES 12, it doesn’t make much sense to create several partitions, as every directory can be mounted as a subvolume, with its own mount properties (see Chapter 3 for more details on this). If you don’t want to use Btrfs, you can use the Expert Partitioner, to create your own partitioning. In the section “Installing with a Custom Partition Scheme,” later in this chapter, you can read how to do that.

Figure 1-5. Specifying hard disk layout
Many services such as databases rely on correct time configuration. In the Clock and Time Zone window that you see in Figure 1-6, you can specify your locale settings. Normally, you first click on the map, to set the right settings. Next, you specify if the hardware clock on your computer is set to Universal Time Coordinated (UTC). UTC more or less corresponds to Greenwich Mean Time (GMT), and it allows all of your servers to communicate at the same time. UTC is often used for Linux servers. If your server is using local time, you can set it here. If you’re not sure, just look at the current time that is shown. If it’s wrong, it is likely that you’re using the wrong setting here. You can also manually adjust the time settings, by clicking the Other Settings button. This allows you to manually set time and specify which NTP time servers you want to use. (Read Chapter 11 for more details about working with NTP.)
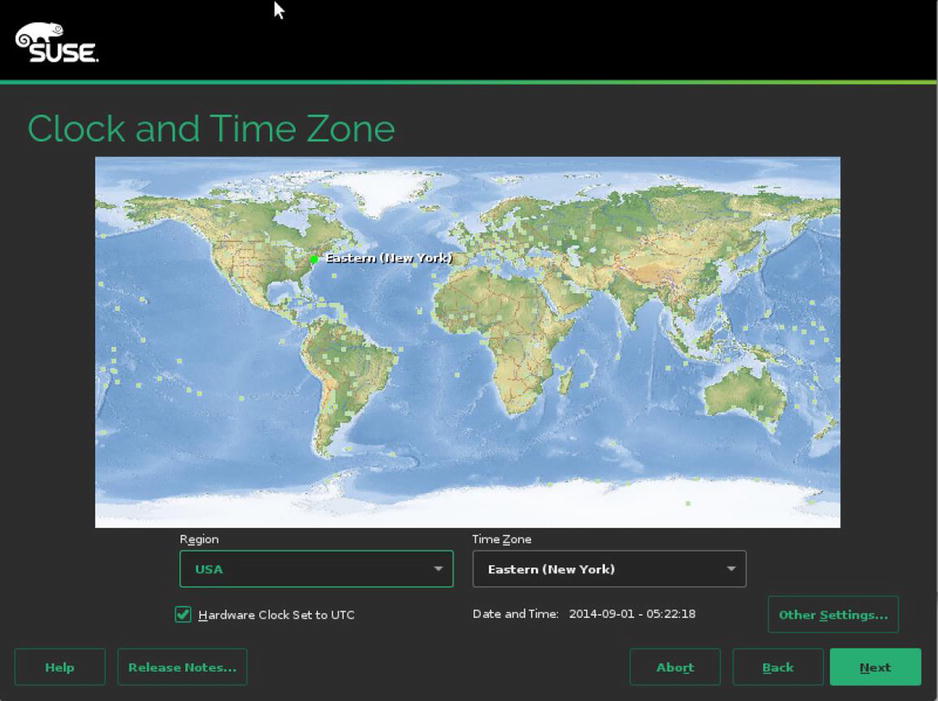
Figure 1-6. Specifying clock and time zone settings
On the screen shown in Figure 1-7, you can create a new user account and set properties for this user. It’s a good idea to create at least one local user account, so that you don’t have to work as root if that’s not necessary. If you don’t want to create a local user account, you can just click Next, to proceed to the next step.

Figure 1-7. Creating a local user account
At this point, you’ll have to enter a password for the user root (see Figure 1-8). Make sure to set a password that is complicated enough to be secure. To make sure that you don’t enter a wrong password because of keyboard incompatibility, you can use the Test Keyboard Layout option, to verify the current keyboard settings.
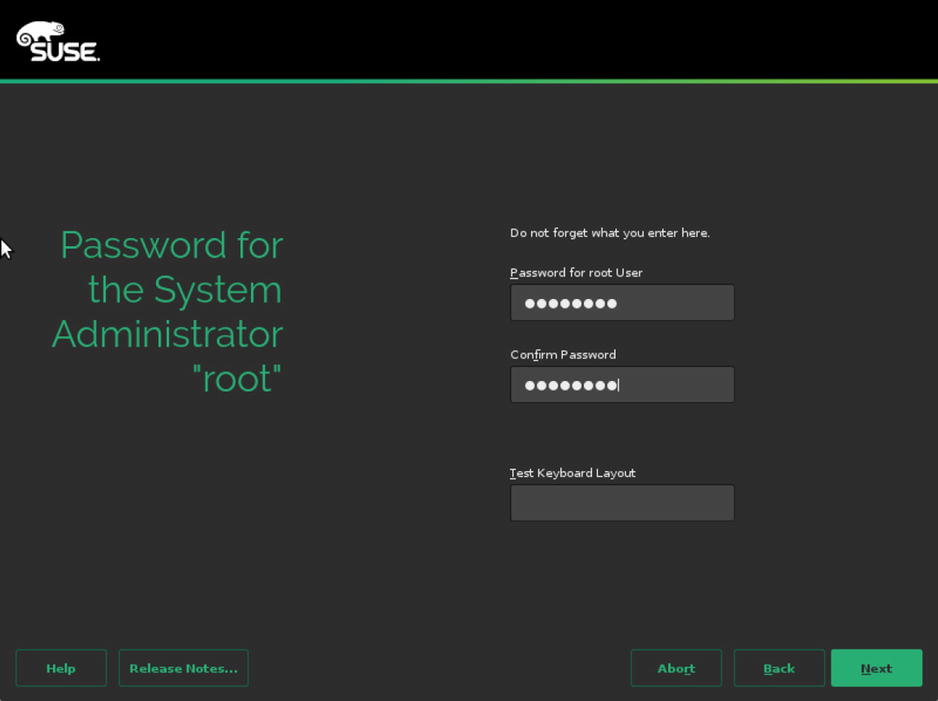
Figure 1-8. Setting the root password
You’ll now access the Installation Settings window, which you can see in Figure 1-9. In this window, you’ll find many options to further fine-tune your installation settings.
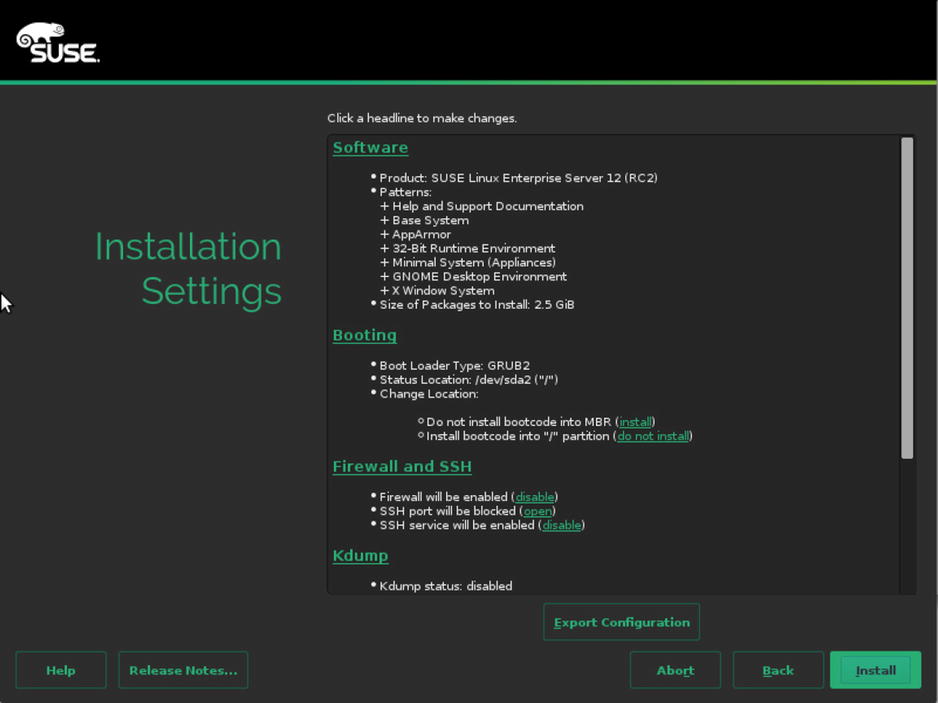
Figure 1-9. Fine-tuning installation settings
The Software option, allows you to choose from different package categories, to make an entire class of software and all of its dependencies available. If you require more detail, click the Details button, which still shows all of the different categories of software but also allows you to select or de-select individual packages (see Figure 1-10). After selecting this option, you can select one of the software patterns on the left, to show all the individual packages in that category. If you’re looking for specific packages, you can use the Search option (see Figure 1-11). Enter a keyword and click Search, to start your search operation. This shows a list of packages found to the left, from which you can select everything you need. From any of the four tabs in the Software Selection utility, click Accept, once you’re done. You may now see a window about dependencies, telling you that in order to install the packages you’ve selected, some other packages must be installed as well. Confirm, to get back to the main settings window, from which you can continue configuring the next part of your environment.
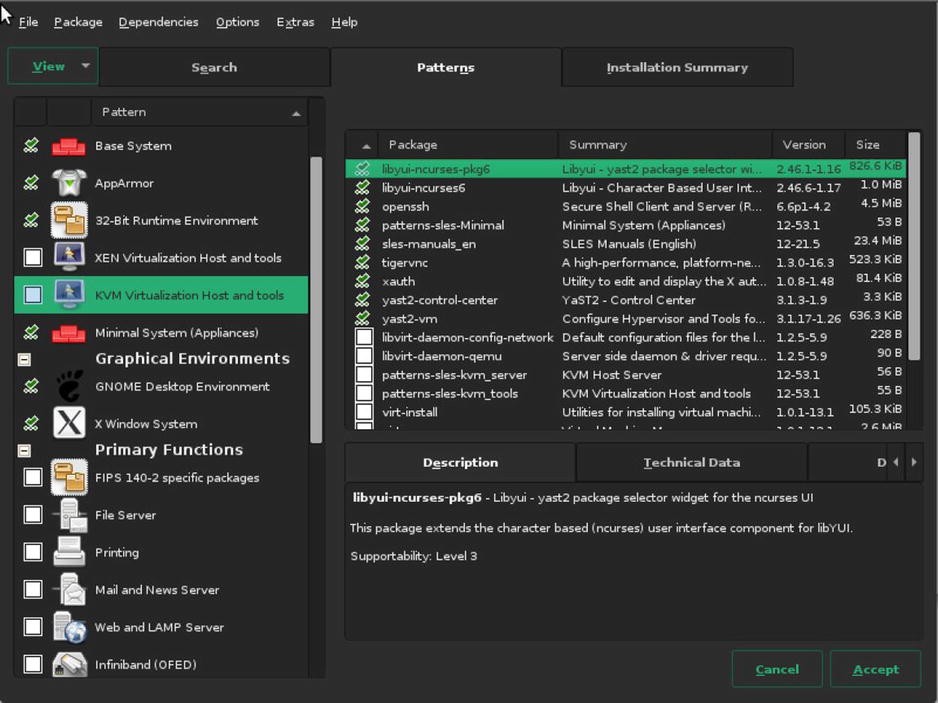
Figure 1-10. Getting more details on available software

Figure 1-11. Use the Search option, if you’re looking for something specific
The next part of the configuration settings is about the boot loader (see Figure 1-12). SLES 12 uses GRUB 2 as its default boot loader. The correct version is automatically selected, depending on the hardware you’re using, you might need either GRUB2 or GRUB2-EFI. You can also select where to install the boot loader. By default, SLES installs to the boot sector of the partition that contains the root file system (which is also set as the active partition in the partition table). In the MBR, some generic boot code is written, which allows the boot loader to find the code you’ve written to the active partition. If you prefer to write the boot code directly to the MBR, you can select Boot from Master Boot Record instead.

Figure 1-12. Selecting a boot loader
While booting, you can pass kernel parameters to the kernel from the boot loader (see Figure 1-13). This allows you to further fine-tune the behavior of the kernel and to include or exclude specific drivers, which is sometimes required for compatibility reasons. From this window, you can also specify which type of console you want to use (graphical or something else) and specify a console resolution.
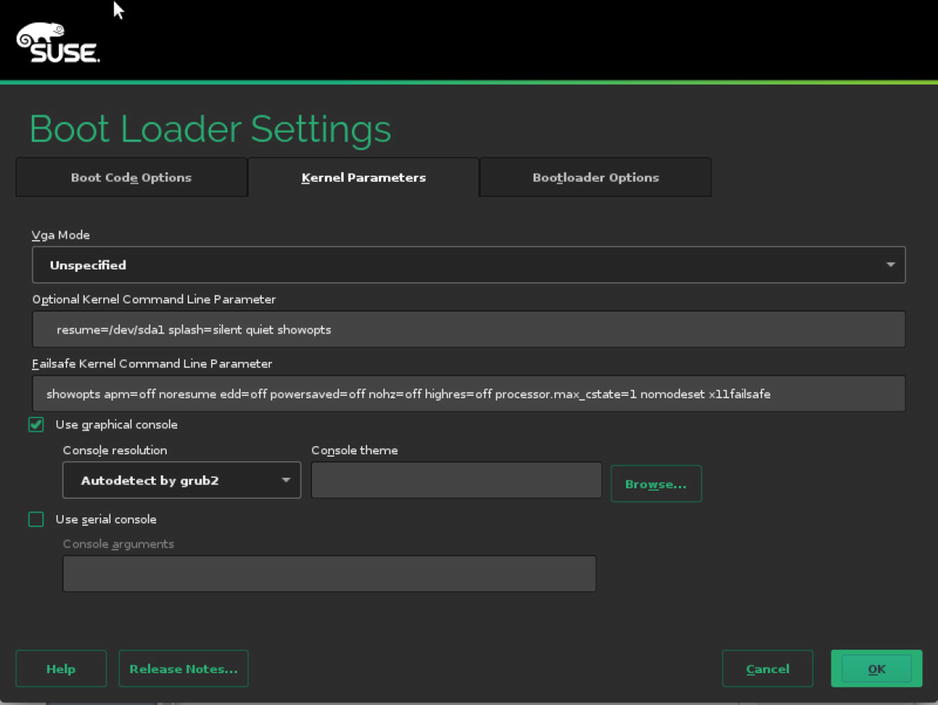
Figure 1-13. Specifying kernel boot parameters
The third tab of the boot loader configuration menu allows you to set a time out, the default section you want to boot, and a boot loader password. You should consider setting a boot loader password, as without such a password, anyone can access the GRUB boot menu and pass specific options to the boot loader. This is a security risk for environments in which the console can be physically accessed. If you protect the boot loader with a password, such options can only be entered after providing the correct password.
After indicating how you want the boot loader to work, you can configure the firewall and Secure Shell (SSH). By default, the firewall is enabled, as is the SSH service, but the SSH port is blocked. To change this configuration, select Firewall and SSH and make appropriate selections (see Figure 1-14). There is no advanced interface for firewall configuration available at this point, but you probably want to open at least the SSH port.
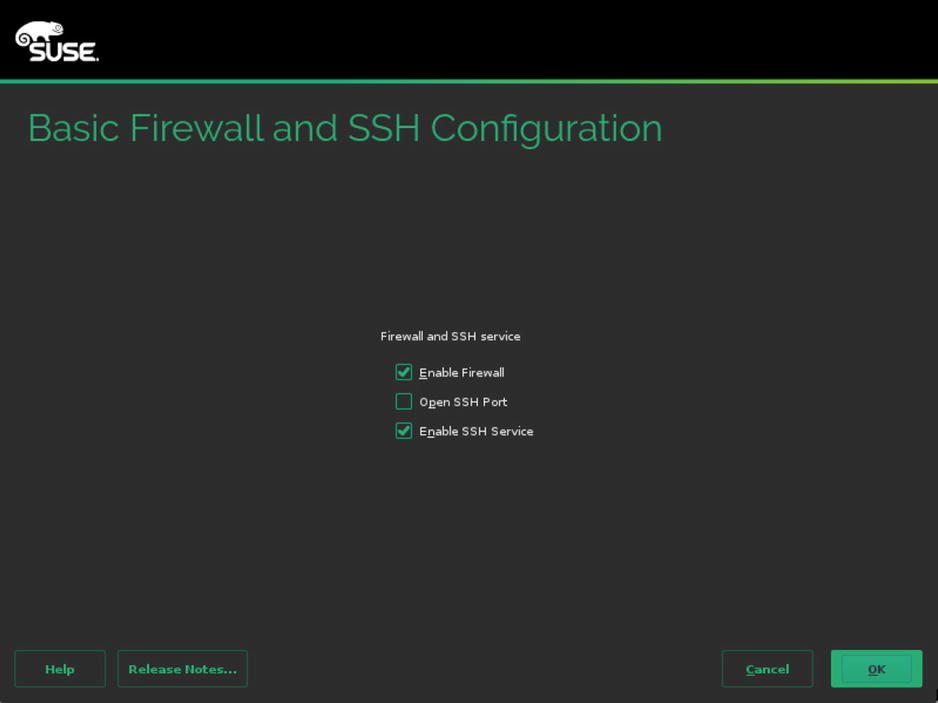
Figure 1-14. Opening the firewall for SSH
Next, you can specify if you want to use Kdump. Kdump is a core dump kernel that can be loaded with your default kernel. If the kernel crashes, the core dump kernel can write a memory core dump to a specified partition, to make it easier to analyze what was going wrong when your server crashed. If you want to enable Kdump, you must specify settings for available memory, as well as the Dump target, which is the default location to which the core dump will be written (see Figure 1-15).
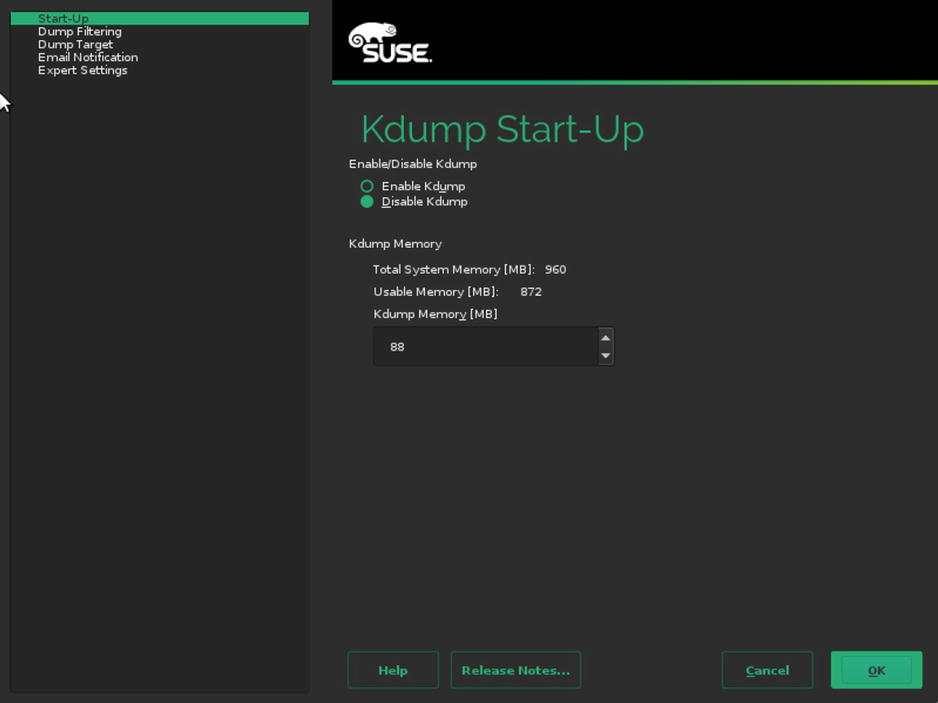
Figure 1-15. Specifying Kdump settings
After selecting Kdump settings, you can choose a default systemd target. This determines the mode your server is started in. By default, it will be started in a graphical mode, if graphical packages have been installed. From this menu interface, you can choose Text mode as an alternative start-up mode (see Figure 1-16).

Figure 1-16. Selecting the startup mode
Next, you’ll encounter the system option. This is a very interesting option that probes for available hardware in your server and allows you to easily change settings for that hardware. These are advanced hardware settings that change the performance profile of your server (see Figure 1-17). Don’t change them from here, if you don’t know what you’re doing, but read Chapter 15 instead. It explains the results of the modifications that you can apply here in detail.
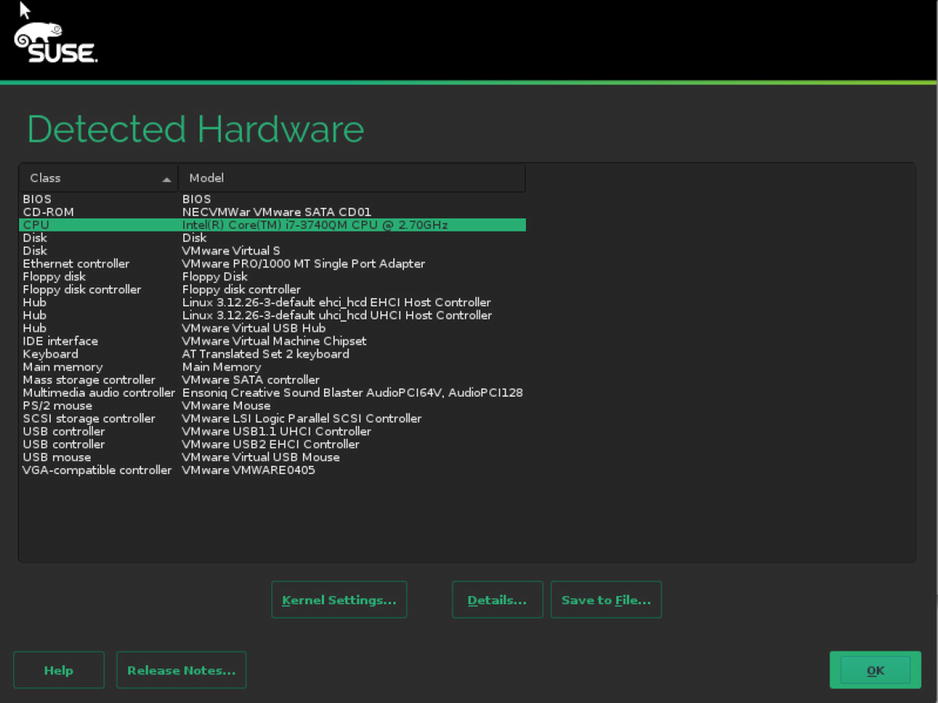
Figure 1-17. During installation, you can easily change advanced performance parameters
The last setting allows you to clone configuration setting to the file /root/autoinst.xml. This is default behavior that makes it easy to install another server using the same settings. If you don’t want to do that, click Do not write it. After selecting appropriate settings, click Install, to start the actual installation procedure. Once the file copy has completed, the system is started with the new settings, and you can start working.
Installing with a Custom Partition Scheme
By default, the SLES installer proposes a partition scheme in which two partitions are created. The first partition is configured as swap space, while the second partition is configured as the root file system, using a Btrfs file system. In some cases, you might want to select a different partitioning scheme, for example, if you’re using applications that haven’t been certified for Btrfs yet, or if you want to separate different data types. If that’s the case, you have to use the custom partitioning interface. In this section, you’ll learn how to use it.
When the installer prompts the Suggested partitioning window, click Expert Partitioner, to open the custom partitioning interface. This opens the window shown in Figure 1-18. On this window, you see a System View tree on the left, with, under the Linux item, an overview of the storage on your server. By default, the installer shows the detected hard disk(s), as well as the default partitioning that is proposed for the detected storage.
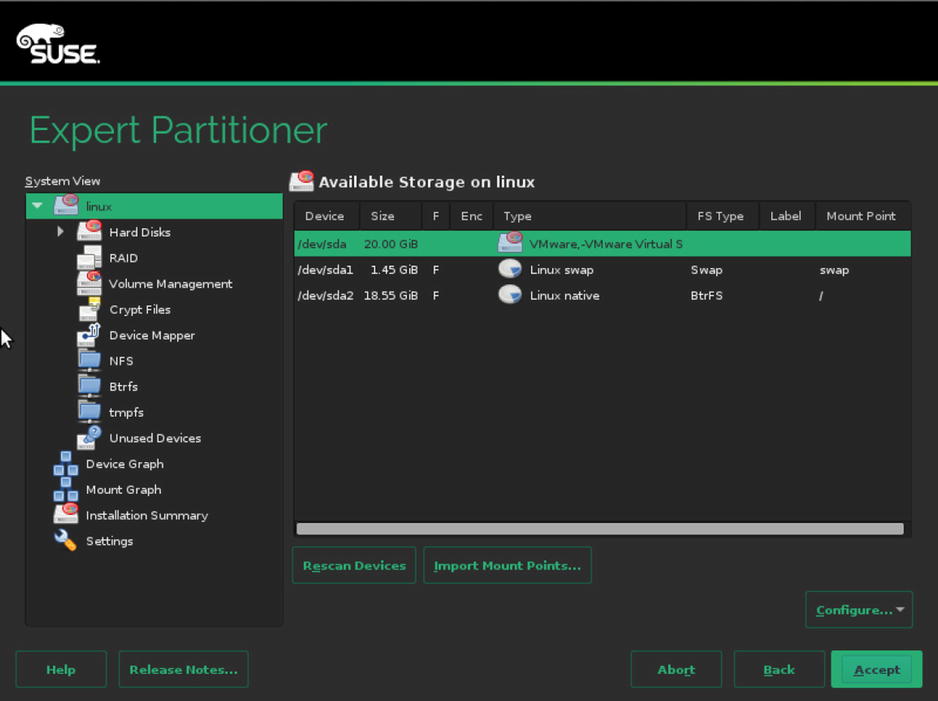
Figure 1-18. The Expert Partitioner interface
To make changes to a disk, you first have to active the Linux ![]() Hard Disks
Hard Disks ![]() sda item. This brings you to the Partitions window, which you can see in Figure 1-19. From this window, you can use different operations on the partitions. To start with, you probably want to delete the existing partitions, so that you can create new partitions. Select the partitions one by one, and next, click Delete, to remove them from your system. This gives you a starting point from which your hard disk is completely empty.
sda item. This brings you to the Partitions window, which you can see in Figure 1-19. From this window, you can use different operations on the partitions. To start with, you probably want to delete the existing partitions, so that you can create new partitions. Select the partitions one by one, and next, click Delete, to remove them from your system. This gives you a starting point from which your hard disk is completely empty.
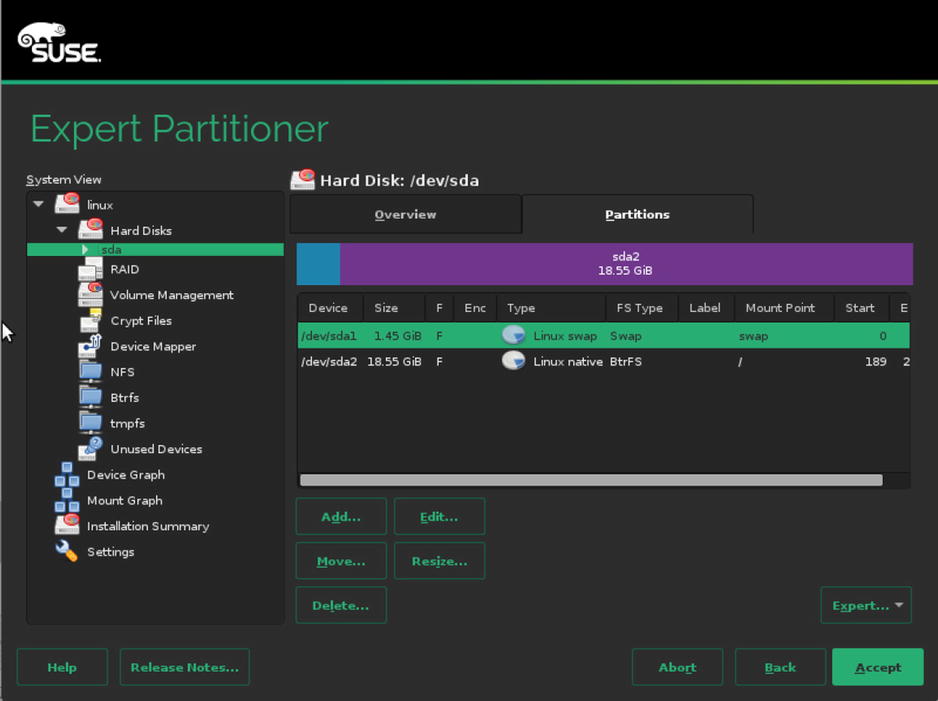
Figure 1-19. The Partitions interface
On modern configurations, you might want to start creating your custom disk layout by setting a partition table. Default partitioning is based on the MSDOS partition table, which allows you to address partitions with a maximum size of 2TiB. If you want to use the modern GPT (GUID Partition Table) disk layout, select Expert ![]() Create new partition table. After selecting the GPT partition table type, you’ll work in an environment that is a bit different. For example, there are no extended partitions in GPT. Read Chapter 3 for more details about these differences.
Create new partition table. After selecting the GPT partition table type, you’ll work in an environment that is a bit different. For example, there are no extended partitions in GPT. Read Chapter 3 for more details about these differences.
To create a new partition, from the Partitions menu on your selected hard disk, click Add. This opens the window shown in Figure 1-20. In this window, you can select the size of the partition you want to use. When specifying a custom size, enter a size in GiB (1,024 ´ 1,024 ´ 1,024) and not GB. You should note that many hardware vendors work with GB (1,000 ´ 1,000 ´ 1,000) as the default unit, so you may find that you don’t have as many GiB available as the amount of GB that was sold to you by your hardware vendor.

Figure 1-20. Creating a new partition
After specifying the size of the partition, in the next screen, you can select a role for the partition. That is the type of use you intend for the new partition. Based on the selection you make here, you’ll get a default selection for the file system to use as well. It doesn’t really matter much what you select here, as you can change the selection in the next screen anyway.
In the following step, you’ll have to specify formatting options. There are two important choices to be made here: which file system you are going to use and whether or not you are going to use Logical Volume Manager (LVM).
If you’re planning on using any file system other than Btrfs, it might be interesting to use LVM. When using LVM, disk devices can be joined in a volume group (VG), and from the VG, Logical Volumes can be created as the base allocation unit for all your storage. Using LVM allows you to easily resize your storage volumes and offers some other benefits as well, which is why this is a relatively frequently used solution for storage layout.
Next, you’ll have to decide on the file system you want to use. Basically, for a server, there are three choices. Some other file systems are listed, but they are not used very often anymore. The choices are between XFS, Btrfs, and Ext4. Use Btrfs, if you want the latest and greatest file system for Linux. In Chapter 3, you’ll learn about all the features Btrfs has to offer. If you want a very stable and reliable file system, you’re better off using XFS, a flexible, fast, and well-proven file system that has been around for a long time. If you need backward compatibility, you can select the Ext4 file system. This file system doesn’t offer the speed and scaling options that you might need on a modern server, which is why Ext4 should not be your first choice. But it’s still around, and it’s a very stable file system, so if your applications require you to use Ext4, it’s there for you.
To show you as many options as possible, in the following procedure, you’ll learn how to configure a server that uses the following disk layout:
- A small boot partition, using Ext4
- All remaining disk space in another partition that is configured for use of LVM
- A root logical volume, using XFS
- A swap logical volume
- A dedicated logical volume for /var, using Btrfs
To offer the best possible booting support, it’s a good idea to use a small boot partition. To do this, first create the partition with a size of 500MiB. Next, set the mount point to /boot, and select the Ext4 file system. As the boot partition contains only a small number of files, there’s no need to use an advanced file system, such as XFS or Btrfs, on this partition. After selecting these features, you can click Finish, to write the changes to disk and continue (see Figure 1-21).
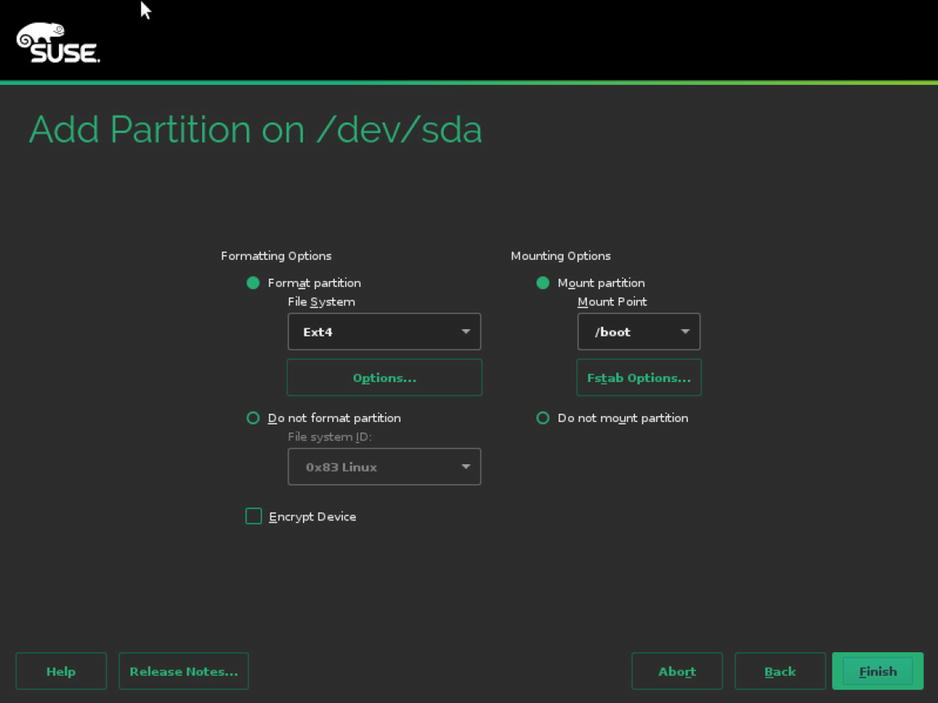
Figure 1-21. Creating a /boot partition
Back in the main Partitions overview, you can now add all remaining disk space in a partition that you’re going to use for LVM. To do this, when asked for the New Partition Size, you can select the option Maximum Size, which allocates all remaining disk space. Then click Next and select the Raw Volume Role. This will automatically select the Do not format partition option in the next screen and select the file system type 0x8E Linux LVM. You can now click Finish, to complete this part of the configuration.
After creating the partitions, from the Expert Partitioner main window, you’ll have to select the Volume Management option. From this interface, click Add and select Volume Group. This opens the Add Volume Group interface, which you can see in Figure 1-22. The Volume Group is the collection of all available storage. You’ll have to give it a name and assign storage devices to it. It’s a good idea to use a volume group name that is easy to recognize. For example, use vgdata as its name.

Figure 1-22. Creating a volume group
Next, you can set the Physical Extent Size. A physical extent is the base building block from creating logical volumes. All logical volumes will always have the size of a multiple of physical extents. For many cases, an extent of 4MiB works well, but if you want to use large logical volumes, you’re better off using bigger physical extents.
The last step to create volume groups is to assign physical volumes to the volume group. You’ll find all partitions that have been set up with the partition type 0x8E in the list of available physical volumes. Select them and click Add, to add to the volume group. Next, click Finish, to proceed to the next step.
After creating the volume group, the installer brings you back to the Expert Partitioner window. From here, click Add ![]() Logical Volume, to add a logical volume. This opens the window shown in Figure 1-23, from which you can specify a name and type for the logical volume. For normal use, you would use the Normal Volume type. Use Thin Pool / Thin Volume for environments in which you want to do thin provisioning, which makes sense, for example, in an environment in which desktop virtualization is used. In addition, all logical volumes require a unique name. You’re free in choosing whatever name you like, but it might make sense to select a name that makes it easy to identify the purpose of the volume.
Logical Volume, to add a logical volume. This opens the window shown in Figure 1-23, from which you can specify a name and type for the logical volume. For normal use, you would use the Normal Volume type. Use Thin Pool / Thin Volume for environments in which you want to do thin provisioning, which makes sense, for example, in an environment in which desktop virtualization is used. In addition, all logical volumes require a unique name. You’re free in choosing whatever name you like, but it might make sense to select a name that makes it easy to identify the purpose of the volume.
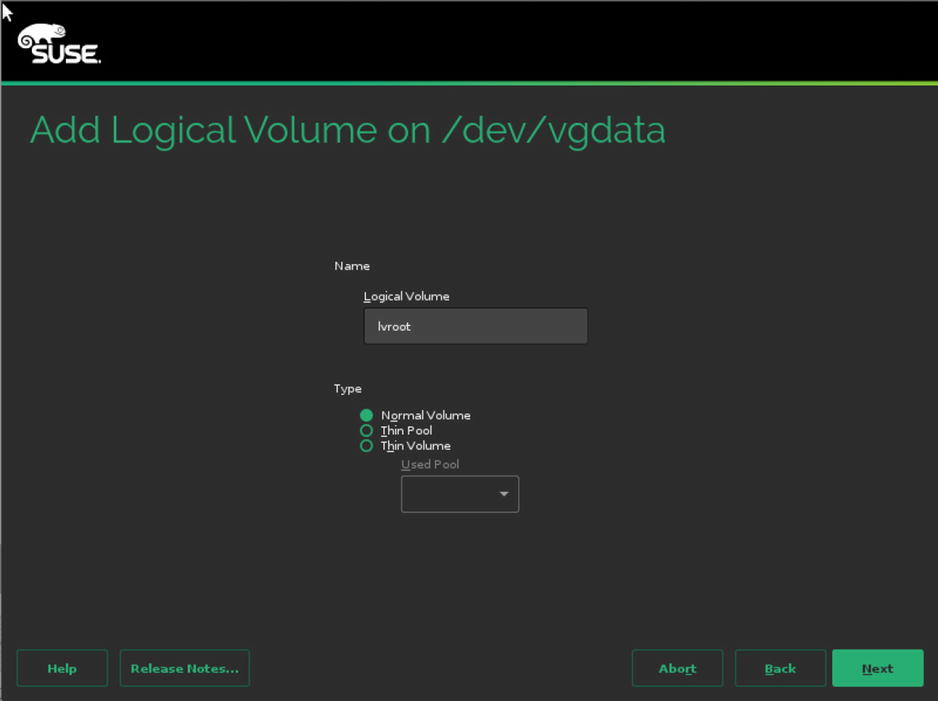
Figure 1-23. Creating logical volumes
After specifying the properties of the logical volumes, you must specify a size as well (see Figure 1-24). If you plan on using more than one logical volume, don’t leave the Maximum Size option selected. It will take all available disk space, and you cannot create any additional volumes anymore. Logical volumes support resizing. You can grow the size of any file system; you cannot shrink all file systems. As a volume is easy to grow, it’s a good idea to keep the volumes relatively small and some disk space unallocated, to accommodate for future growth. Once the volume has been created, you’ll get to the same interface that is used for creation of partitions. From this interface, you can select the file system to use, as well as the mount point. Note that when configuring an LVM volume for swap, you don’t have to set a directory as a mount point. The system interface swap is set as the mount point, and that cannot be changed.
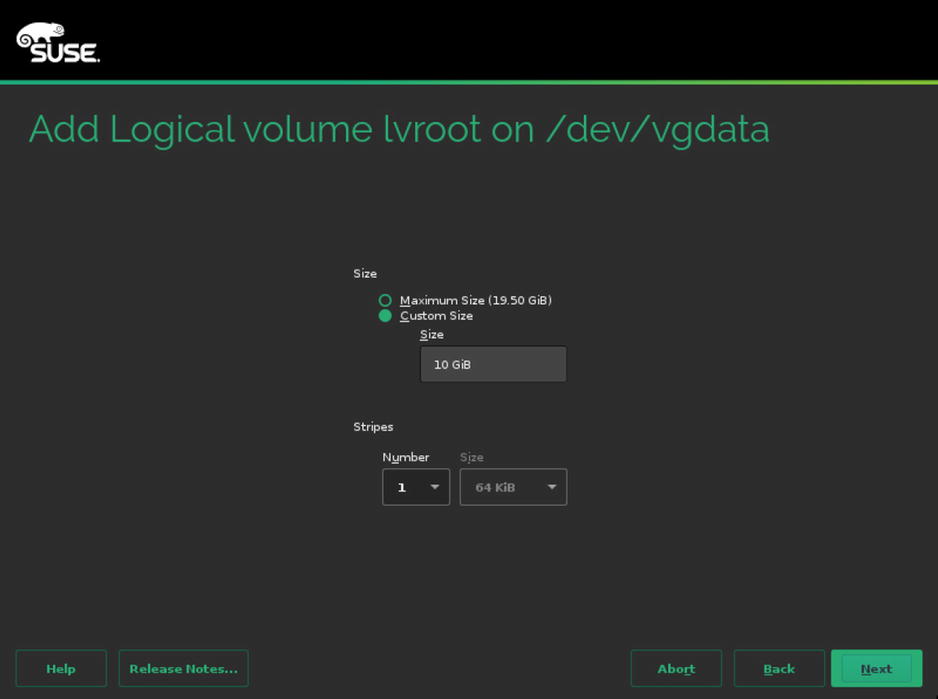
Figure 1-24. Specifying volume size
After finalizing your custom disk layout, you can write it to disk. The installer will now bring you back to the main installation procedure, which has been explained in the previous section.
Summary
In this chapter, you’ve learned about the SUSE product portfolio, focusing on SUSE Linux Enterprise Server, in particular. You have also learned about the different choices you have to make while performing an installation. A basic installation has been explained, as has the creation of an advanced disk layout. In the next chapter, you’ll learn about some of the essentials required to get you going with SUSE Linux Enterprise Server.