
![]()
File Sharing: NFS, FTP, and Samba
On SUSE Linux Enterprise Server, different solutions for file sharing are available. In this chapter you’ll learn how to configure the most significant of these services. You’ll learn how to share files with other Linux users using NFS, with anonymous Internet users using FTP and how to create a file server that can be used by Windows clients using Samba.
This chapter covers the following:
- Setting up NFS
- Using FTP for File Sharing
- Sharing Files with Samba
- Configuring Automount
Introducing the File Sharing Protocols
On Linux, there are different protocols available for file sharing. This can make it difficult for an administrator to select the most appropriate solution. Of the three solutions discussed in this chapter, Network File Services (NFS) is the classic UNIX way to share files. In recent Linux distributions, it is much enhanced and remains a very common solution for file sharing. It is especially useful for sharing files between servers or for mounting home directories.
The File Transfer Protocol (FTP)is a very common solution for use on the Internet. It allows not only authenticated users but also gives good options for making files available to anonymous users. It can even be used as a dropbox for anonymous users.
Samba file services, also known as Common Internet File Sharing (CIFS) services, are common in an environment in which interoperability with Windows is required. It offers many configuration options, which doesn’t always make it easy to configure, but for sharing files with endusers, Samba has become the defacto standard.
Also in this chapter, you’ll read about Automount, a service that can be used to mount network file systems automatically, when access is needed, which facilitates the work of the system administrator, as it is no longer necessary to set up every share in the /etc/fstab file.
NFS
For most tasks that a SUSE Linux administrator has to accomplish, YaST offers a good management utility for setting NFS servers as well as NFS clients. In this section, you’ll read how to start setting up an NFS server with YaST, after which we’ll have a look at the configuration files that are created during setup as well.
Setting Up an NFS Server with YaST
From YaST, select Network Services ![]() NFS Server. This shows the interface with which you can set up basic NFS server settings (see Figure 13-1).
NFS Server. This shows the interface with which you can set up basic NFS server settings (see Figure 13-1).
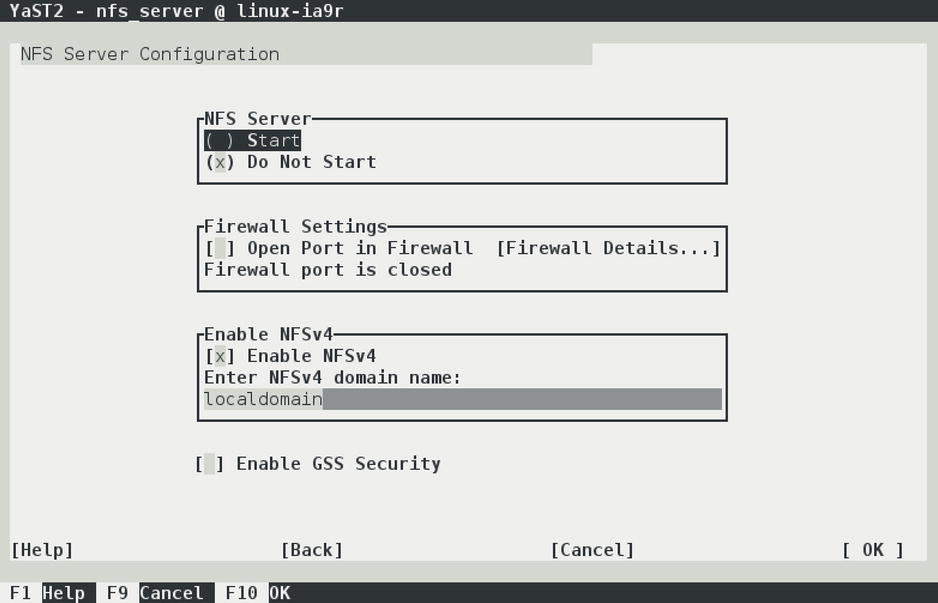
Figure 13-1. Setting up an NFS server from YaST
On the first screen of the YaST NFS server setup module, there are a couple of choices to make. First is whether you want to enable NFSv4. NFSv4 still has the reputation of being a new solution, as opposed to the older NFSv3 solution, but NFSv4 has been around since the mid-1990s. Still, however, some clients can make only much simpler NFSv3 mounts. If you want to set up an NFS server for such clients, you might consider not enabling NFSv4, but normally, you would want to use NFSv4.
Also on the NFS server configuration screen is the option to enable GSS Security. In old versions of NFS, security was dealt with in a very basic way, which is why a more advanced Kerberos-based security has been added. Using authentication tickets instead of sending over passwords in clear text makes an NFS server much more secure. However, many Linux administrators don’t need the complexity that is added with this option, which is why a vast majority of servers still come without GSS Security.
The last option you need to consider on the NFS server setup screen is the domain name. This domain name is used by the idmap daemon, an NFS helper process that tries to match usernames. Set it to the fully qualified domain name of this host, to make ID mapping work.
ID mapping is an important part of the NFS configuration, because it tries to match user IDs on an NFS client with user IDs on an NFS server. The default setting is that a user on the NFS client will connect with the same UID on the server. So, if on the client, user linda has UID 600, but on the NFS server, user bob has UID 600, the client user linda will be granted access to files on the server that are owned by bob. To prevent these kinds of mess-ups, an NFS server should either use a common authentication service, such as LDAP, or the idmap daemon. When setting up an NFS server from YaST, the idmap daemon is started automatically as well.
The second screen of the NFS server setup module in YaST allows you to specify which directories you want to export and which hosts are granted access to those directories (see Figure 13-2).

Figure 13-2. Setting up NFS shared directories
Managing the NFS Service
Setting up a basic NFS server isn’t very difficult. You basically need just two things: a file that defines what needs to be shared and the NFS services. To start the NFS server, you have to run the command systemctl start nfs, and to enable it, you add systemctl enable nfs afterward. In Chapter 17 of this book, you will learn that systemctl has become the default for NFS service management. The NFS service, however, is still managed by an in it script with the name /etc/init.d/nfs. From this in it script, different services can be started to make up the NFS service.
You can easily recognize the NFS-related services; all of their names begin with rpc. Use ps aux | greprpc to get an overview of all the services that are currently loaded, which should show a result as in Listing 13-1.
Listing 13-1. Showing NFS Services
suse:~ # ps aux | grep rpc | grep -v grep
rpc       4712  0.0  0.0  47092   660 ?        Ss   23:06   0:00 /sbin/rpcbind -w -f
root      4760  0.0  0.0      0     0 ?        S<   23:06   0:00 [rpciod]
root      8903  0.0  0.0  14928   152 ?        Ss   23:08   0:00 /usr/sbin/rpc.idmapd -p /var/lib/nfs/rpc_pipefs
root      8907  0.0  0.1  40476   780 ?        Ss   23:08   0:00 /usr/sbin/rpc.mountd
statd     8910  0.0  0.1  36004   988 ?        Ss   23:08   0:00 /usr/sbin/rpc.statd --no-notify
root      9615  0.0  0.0  31416   416 ?        Ss   23:13   0:00 /usr/sbin/rpc.gssd -D -p /var/lib/nfs/rpc_pipefs
The different RPC services make up the NFS process, and each takes care of a different part of the NFS functionality. By default, the following services are loaded:
- rpcbind: When NFS was first developed, the TCP/IP protocol suite hadn’t yet developed into the standard it is nowadays. That is why in those days, NFS used its own port addresses. To map these ports to UDP or TCP ports, the rpcbind service has to be started before any other of the RPC services.
- rpc.idmapd: This is the part of NFS that takes care of mapping usernames to UIDs and vice versa.
- rpc.mountd: This makes up the real heart of the NFS server.It takes care of exporting the local file systems that are accessible to NFS clients.
- rpc.statd: To prevent users from accessing files simultaneously, which is not supported, NFS has to take care of file locking. To accomplish this, rpc.statd is used. The rpc.statd process enables a client who has rebooted (on purpose or by accident) to inform the NFS server, which locks where it was held before the boot. By doing this, the locks can properly be released.
- rpc.gssd: The rpc.gssd process is a standard part of the NFSv4 server. It implements Kerberos security in NFSv4. It requires additional setup, but it isn’t used often, for which reason it’s not discussed further here.
Of the services discussed previously, there is one that has an additional configuration: the ID Mapper, which takes care of mapping user IDs between clients and server. The configuration of this service is in /etc/idmapd.conf. In this file, you can match usernames, as used by the NFS client, to local usernames on your server. This isparticularly useful in case the client uses other local usernames as the ones in use on the NFS server. In Listing 13-2, you can see the default contents of this configuration file.
Listing 13-2. The /etc/idmapd.conf File Can Be Used to Match Client Usernames to NFS Server Usernames
[General]

Verbosity = 0
Pipefs-Directory = /var/lib/nfs/rpc_pipefs
Domain = suse.example.com

[Mapping]

Nobody-User = nobody
Nobody-Group = nobody
Creating Shares in /etc/exports
To define the file systems that have to be exported, the /etc/exports file is used. In this file, lines are defined that contain the following three elements:
- The directory to export
- The nodes to which this export is available
- The options with which the share is exported
In Listing 13-3, you can see what the contents of this file may look like.
Listing 13-3. Defining Exported File Systems
/home *(ro,root_squash,sync,no_subtree_check)
When setting up an NFS share, you will have to define the options that are used for the export. Many options can be used, of which the man (5) exports give an overview. Some of the more common options are listed below.
- rw: Allow read/write access on the shared file system.
- ro: Allow read-only access on the shared file system (this is the default setting).
- sync: This makes the NFS server secure with regard to file modifications.A reply to a request will only be sent once the changes have been committed to storage.
- async: Opposite of the sync option described above. Using this option is faster but not as secure.
- no_subtree_check: This is a performance-related option, which defines that exact location of files in an exported NFS subtree does not have to be verified. Use this option on all exports that normally have many modifications. On a file system that is mostly read-only, it should be exported with the subtree_check option.
- root_squash: This option “squashes” root user access. This means that the user root on the NFS client will be mapped to user “nobody” on the NFS server. Use of this option on all shares is highly recommended.
Mounting NFS Shares
Getting access to an NFS share is easy: you can mount it from any client that supports the NFS protocol. If on server a directory /data is exported, a client can mount it on the /mnt directory with the following command:
mount server:/data /mnt
While mounting an NFS share, different mount options can be used to define how the share should be accessed. The following list shows the most important mount options in use:
- nfsvers=n: Specifies which version of the NFS protocol should be used when accessing an NFS mount. If this option is not specified, the client will negotiate the protocol, trying version 4 first and working down to versions 3 and 2, if that is unsuccessful.
- soft/hard: hard is the default NFS mount option. This option means that the NFS client will re-try indefinitely if a mount gets lost. This may mean that an application hangs forever, waiting for a response from the NFS server. To prevent this, use the soft mount option, which will generate a failure after trying three times.
- rsize/wsize: This can be used to specify the default block size employed in NFS communication.
When mounting an NFS share from a client, you can find out which shares are offered. To do this, use the showmount -e command, followed by the name of the NFS server.
EXERCISE 13-1. SETTING UP AN NFS SERVER
In this exercise, you’ll set up an NFS server. To allow you to perform this exercise using only one computer, you’ll use your host as the client also.
- Use the command mkdir /data to create a directory with the name /data.
- Copy some files to the /data directory, using cp /etc/a* /data.
- Open the file /etc/exports with an editor and add the following line:/data *(rw,root_squash).
- Type systemctl start nfs.service, followed by systemctl enable nfs.service.
- Type showmount -e localhost to get an overview of the exported mounts on your local computer.
- Use the command mount localhost:/data /mnt to mount the NFS export on the local directory /mnt.
FTP
You can use FTP to offer an easy way to share files over the Internet. Both authenticated local users are supported, as are anonymous users who use your server over the Internet. In this section, you’ll read how to set up an FTP server from YaST and how to further fine-tune it, using the configuration files.
Setting Up an FTP Server from YaST
To set up an FTP server, select Network Services ![]() FTP Server, from YaST. This asks if you want to use vsftpd or pure-ftpd as the FTP server. In this procedure, I’ll describe the use of vsftpd, so select vsftpd. This opens the generic FTP server setup screen that you can see in Figure 13-3. On this screen, five different configuration screens are accessible, all from the pane on the left side of the screen. By default, the Start-up page is active.
FTP Server, from YaST. This asks if you want to use vsftpd or pure-ftpd as the FTP server. In this procedure, I’ll describe the use of vsftpd, so select vsftpd. This opens the generic FTP server setup screen that you can see in Figure 13-3. On this screen, five different configuration screens are accessible, all from the pane on the left side of the screen. By default, the Start-up page is active.

Figure 13-3. The YaST FTP Server setup window
On the Start-up screen, you’ll first have to select how to start the FTP server. By default, it is not started automatically. If the FTP server is only going to be used occasionally, select Via xinetd, to have it managed by the xinetd service (read Chapter 11 for further details). To have it available on a permanent basis, select When booting. Also on this screen, you can select which FTP service you want to use. By default, the vsftpd service is used.
Next, there is the General Settings screen, on which you can specify some general settings for the server (see Figure 13-4). On this screen, you’ll set some important security-related settings. To start with, there is the Welcome message, which is often used to display a legal message, informing accidental users that unauthorized use is prohibited. The Chroot Everyone option ensures that all users come in a chrooted directory. This ensures that authenticated users cannot browse to the directories of other users and makes your FTP server more secure.

Figure 13-4. The FTP server General Settings screen
If you want detailed information on what is happening on the server, you can consider selecting Verbose Logging. In general, it’s not the best idea to set up verbose logging, because logs will be created for every individual file that is uploaded or downloaded. The last general settings determine the umask for Anonymous, as well as for authenticated users. By specifying this, you’ll tell the FTP server which default permissions should be used.
In the FTP Directories box, you specify where FTP users will go to work with their files. On SLES, anonymous users will access the directory /srv/ftp, which is also the home directory of the FTP user. Authenticated users, by default, will go to their home directory.
On the Performance Settings screen (see Figure 13-5), you can set performance-related settings. These settings ensure that not too many unused connections are staying open. By default, a maximum of 10 clients can exist. Make sure to change this parameter on a heavy-use FTP server, because it’s not enough if you’re running a popular server. The maximal idle time of 15 minutes, in general, is reasonable, because a user who hasn’t been downloading or uploading files for more than 15 minutes can be disconnected as well.
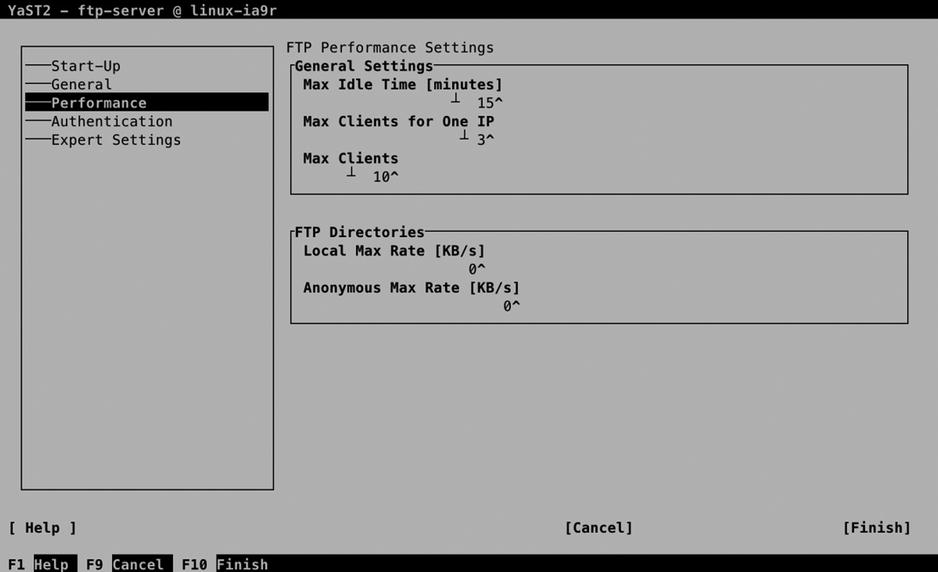
Figure 13-5. FTP server Performance Settings screen
Also interesting are the options to limit bandwidth use. You can set these in the amount of kilobytes per second, where a difference can be applied between local (authenticated) users and anonymous users.
On the Authentication tab (see Figure 13-6), you can specify which kinds of users are allowed. The default setting, which you can change if needed, allows anonymous users as well as authenticated users. By default, uploading files is not allowed. If you have to do this, make sure to switch on the Enable Upload option, to allow uploading for authenticated users. If you want to allow uploads for anonymous users as well, you have to select the Anonymous Can Upload option too.

Figure 13-6. FTP server Authentication options
When allowing anonymous uploads, you may wish to use some additional security settings, or else you may find that your server is very soon being abused as a platform to exchange illegal content between users. If you want to create an anonymous user dropbox server on which anonymous users can upload files but cannot see the files that are uploaded, you have to change the umask on uploaded files. Set this on the General tab, and make sure the upload umask is set to 600, which takes away from anonymous users all permissions on uploaded files.
On the Expert Settings (see Figure 13-7) tab, you’ll find some options that are rarely modified. It can be interesting to enable SSL and/or TLS for your FTP server. If you do this, make sure to select a DSA certificate for establishing encrypted connections. After specifying all settings for your FTP server, get back to the General tab and press the Finish button. This saves the configuration and starts the FTP server with the new settings.
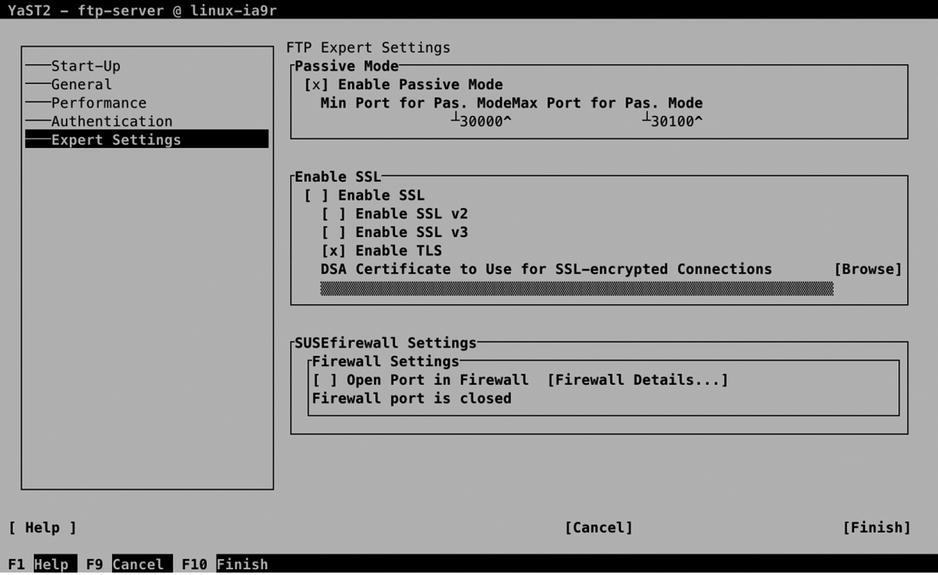
Figure 13-7. FTP server Expert Settings
Manually Configuring the vsftpd Server
To manage the vsftpd server, two parts are involved. First, there is the systemctl script /usr/lib/systemd/system/vsftpd.service, which runs the /usr/sbin/vsftpd process. This process gets its configuration from the /etc/vsftpd.conf file. By using the YaST interface, you’ll write modifications directly to this file, but you can also change it manually. In Listing 13-4, you can see the default contents of this file.
Listing 13-4. Default FTP Settings As Defined in /etc/vsftpd.conf
suse:~ # cat /etc/vsftpd.conf | grep -v ^#
write_enable=NO
dirmessage_enable=YES
nopriv_user=ftpsecure
local_enable=YES
anonymous_enable=YES
anon_world_readable_only=YES
syslog_enable=NO
connect_from_port_20=YES
ascii_upload_enable=YES
pam_service_name=vsftpd
listen=YES
ssl_enable=NO
pasv_min_port=29997
pasv_max_port=30100
anon_mkdir_write_enable=NO
anon_root=/srv/ftp
anon_upload_enable=NO
chroot_local_user=NO
ftpd_banner=Welcome message
idle_session_timeout=900
log_ftp_protocol=NO
max_clients=10
max_per_ip=3
pasv_enable=YES
ssl_sslv2=NO
ssl_sslv3=NO
ssl_tlsv1=YES
Using an FTP Client
To access the files that are offered by the FTP server, you need an FTP Client utility. Different solutions are available.
- Use a browser to navigate through the list of shared files on the FTP server and download files from the list.
- Use a client utility such as lftp to open an FTP shell from which you can use commands such as get and put to download and upload files.
- Use wget to download files directly from a URL.
About sftp
Apart from using the vsftpd server, alternatives are available. Among these is the sftp server, which offers FTP services through the SSH daemon. This service has been relatively popular in the past, but its need has been decreased with the rise of vsftpd, which offers security features as well. You should, however, be aware that a default FTP session is not secure, and neither data nor authentication tokens are protected with encryption.
EXERCISE 13-2. CONFIGURING A VSFTPD SERVER
In this exercise, you’ll configure the vsftpd service. After configuring the service, you’ll use the lftp client to connect to the FTP server and test the functionality.
- Use zypper in vsftpd to install the vsftpd server.
- Open the configuration file /etc/vsftpd.conf and use the following parameters to enable access to anonymous as well as authenticated users, but write access to authenticated users only:
write_enable=YES
local_enable=YES
chroot_local_user=YES
anonymous_enable=YES - Start and enable the FTP server, using systemctl start vsftpd.service and systemctl enable vsftpd.service.
- Install the lftp client utility, using zypper in lftp.
- Connect as the user user, using lftpuser@localhost.
- Type help to get an overview of commands that are available.
- Type bye to close the session to your FTP server.
Samba
Not so long ago, the file server was an important server in the corporate network. Windows file servers were the standard, and Linux offered an alternative by introducing Samba, also referred to as CIFS (Common Internet File Services). This service implements Windows file services.
The purpose of Samba and CIFS is to provide file sharing for Windows clients. Samba, however, has evolved to support more than only Windows clients. CIFS has become a standard for offering access to shared files, and other types of clients, such as Apple and Linux, are supported as well.
Whereas, at some point in time, lots of effort was put into developing Samba, the momentum has passed. This is due to the fact that file servers, as such, are not that important anymore. A large part of corporate data has moved away from the file server to the cloud or a dedicated application that manages data. Also, NAS appliances have become increasingly popular. In these, embedded Samba services are used to offer access to shared files. Even with these developments, Samba services can still be offered on Linux, and in this section, you’ll learn how to do it.
Configuring Samba with YaST
A quick and easy way to get started with Samba is by using YaST. In YaST, select Network Services ![]() Samba, to access the Samba configuration options. If no Samba configuration exists currently, you’ll have to provide a workgroup or domain name first. This is the simple method of providing access to shared files. Every Samba client is configured with a workgroup or domain name and will look for services that are offered in the same workgroup or domain.
Samba, to access the Samba configuration options. If no Samba configuration exists currently, you’ll have to provide a workgroup or domain name first. This is the simple method of providing access to shared files. Every Samba client is configured with a workgroup or domain name and will look for services that are offered in the same workgroup or domain.
Initial Setup
From a Samba perspective, there is no real difference between the workgroup and domain name, so when setting up a Samba server, you’ll just set up a workgroup. The security option (which is discussed later in this chapter) determines whether your Samba server functions in a workgroup mode (which basically is a peer-to-peer networking model) or in a domain mode, where a domain controller or an Active Directory controller is used. You should set the workgroup name to something different from Workgroup (see Figure 13-8). Workgroup is the default workgroup name on most Samba implementations, and by using it, you might unconsciously be sharing files with too many others.

Figure 13-8. To start with, change the workgroup name
In the next step of the Samba setup, you’ll specify which type of domain controller you’ll be using (see Figure 13-9). In a Windows environment, a domain controller is a central server that handles authentication requests. Samba domain controllers are based on the Windows NT4 Domain Controller model, which was released in the early 1990s. If many Samba servers are used, it makes sense to configure a domain controller, which makes it possible to manage user accounts on one central location. The Primary Domain Controller is the server on which user accounts are managed, and they are replicated to Backup Domain Controllers. Users can authenticate against Primary and Backup Domain Controllers.

Figure 13-9. Selecting the Domain Controller Type
If you just want to set up a single server environment in which shared files are offered to Samba clients, you don’t have to use a domain controller. Working with domain controllers is discussed in greater detail later in this chapter. In the remainder of this procedure, it is assumed that you have selected the option Not a Domain Controller.
![]() Note Setting up a domain controller is a Windows-oriented way of working. As a more flexible alternative, you can also use an LDAP server for centralized user management. In this setup, you’ll construct an LDAP server (see Chapter 12 for further details) and connect the Samba servers to the LDAP server.
Note Setting up a domain controller is a Windows-oriented way of working. As a more flexible alternative, you can also use an LDAP server for centralized user management. In this setup, you’ll construct an LDAP server (see Chapter 12 for further details) and connect the Samba servers to the LDAP server.
After specifying the basic settings, you’ll gain access to the Samba Configuration screen, on which many other Samba configuration options can be specified. From the Start Up screen, you select how to start the Samba service. Don’t forget to change to During Boot, if you want your Samba server to start automatically when your server starts up.
Creating Shares
The most important part of setting up a Samba server is the configuration of shares. A share provides a method with which to access resources such as printers and directories. Figure 13-10 gives an overview of the default shares that are offered.

Figure 13-10. Default sharesconfiguration
In every share, a few properties are set, as follows:
- Status: Use this to toggle share access on or off.
- Read-Only: Use this to set share level access to read-only or not.
- Name: This is the name of the share.
- Path: The path to the share. Some administrative shares, such as the netlogon share, which is needed for a domain controller setup, don’t require a path. Some other shares use variables, such as %H for home directories.
- Guest Access: This indicates whether or not to allow guest access to shares. A guest is a user who can access the share without authentication.
- Comment: An optional comment that makes it easier to identify a share.
To add access for a new share, you can select Add. This opens the screen that you can see in Figure 13-11.
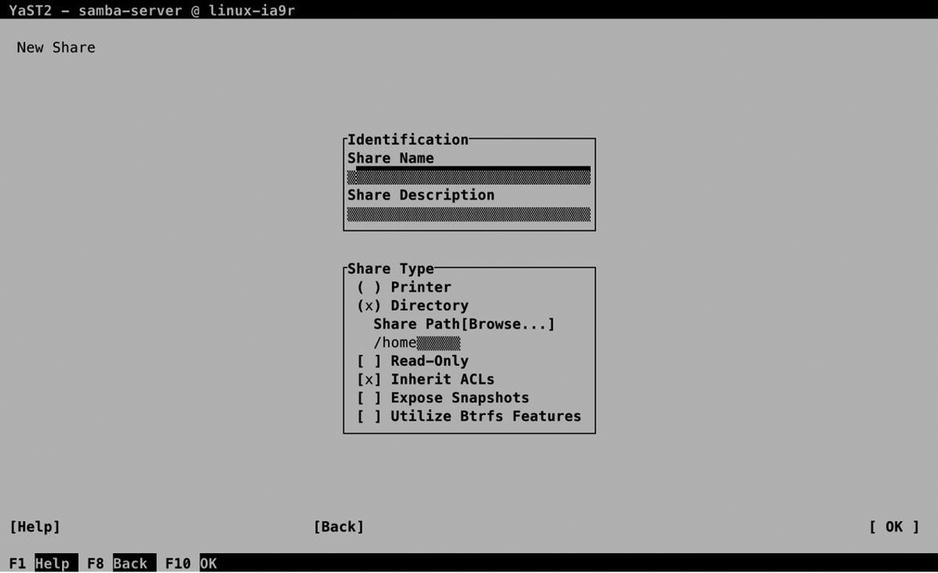
Figure 13-11. Creating a share
To start with, every share needs a name. From the Identification box, you can also enter an optional Share Description. In Share Type, you can enter the other share properties. The most important property is the Share Path, which specifies the name of the directory you want to share. Here, you can enter the name of the directory you want to share, or use the browser that is integrated in YaST. If you enter a directory name that doesn’t yet exist, YaST will show a prompt suggesting that you create the path now. Another important setting that you can select here is Inherit ACLs. This allows the share to inherit Linux file system ACLs, which allows you to set up security using Linux ACLs. After specifying all required options, select OK, to write the configuration.
On Samba shares, many different share options are available. The Create Share interface doesn’t show all of them. To gain access to additional share options, create the share, select it, and then click Edit. This opens the Selected Option box, from which you can use the down arrow key to select from among a long list of options the one you want to use. Select an option from this list, and then press Enter to add it to the list. Next, you can specify the value that you want to assign to this option.
On each share, many options can be selected. For more information, you can consult man 5 smb.conf. One option that is of use when setting up shares is the valid users option. This allows you to specify the names of users or groups that you want to give access to the share. As argument, you’ll specify the name of allowed users or groups. When specifying a group name, you have to start the group name with a @ sign, to make sure it is recognized as a group name.
Samba Server Options
On the Identity, Trusted Domains, and LDAP Settings tabs, you can specify further Samba configuration options. The Identity tab (see Figure 13-12) allows you to set the workgroup or domain name and change the current role as Domain Controller. The WINS and NetBIOS options are old and shouldn’t be used anymore. Pre–Windows 2000 clients needed NetBIOS and WINS to find Samba servers, but on current configurations, DNS is used for looking up hostnames.
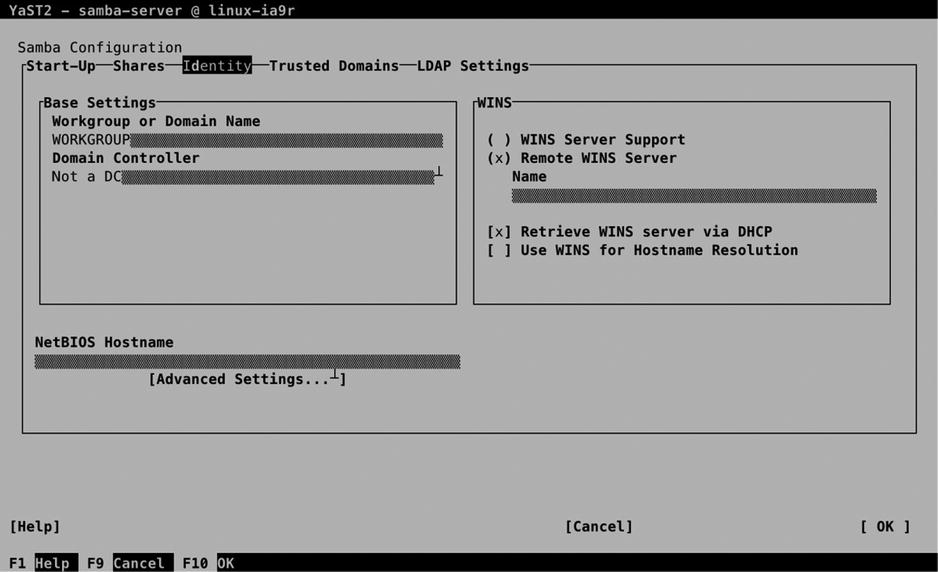
Figure 13-12. Specifying Identity options
The Trusted Domains interface allows you to set up trust relations between Windows domains. Make sure the Windows domain has been set up for trust relationships and, next, select Add to define a new trusted domain relationship. Enter the name of the Trusted Domain and the password to establish the trust.
Connecting Samba to LDAP
If an LDAP server is available in your environment, and if the LDAP client has been set up correctly, you can connect the Samba server to the LDAP server, using the LDAP Settings option (see Figure 13-13).
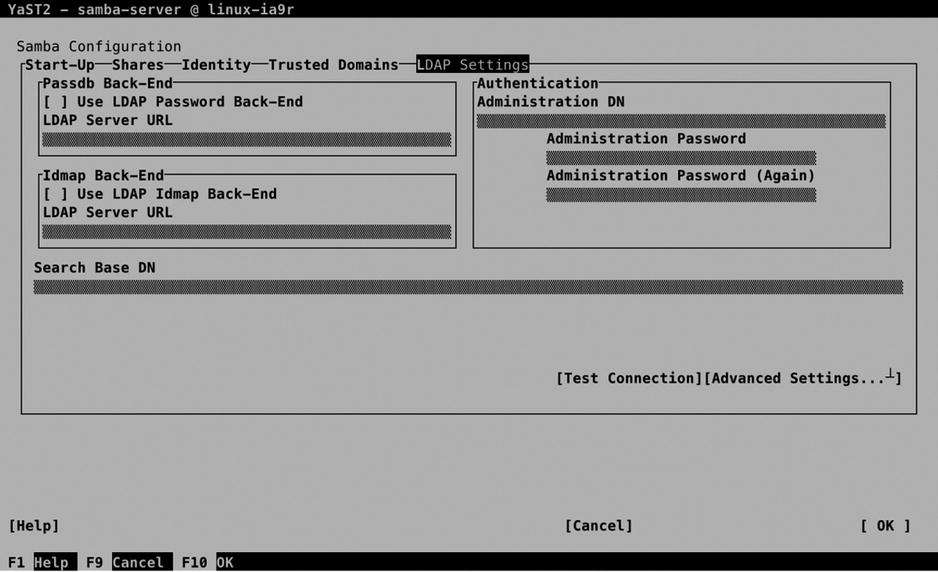
Figure 13-13. LDAP Settings
To start with, you have to enter all properties that are required to make the connection to the LDAP server. The Passdb backend allows you to store user passwords in LDAP. Enter the URL to the LDAP server, to configure the password back end. The Idmap back end is used for getting user IDs from LDAP as well. Next, you must specify the basic entry point in the LDAP server, by configuring the Search Base DN. Following that, you have to enter the Administrator account on LDAP, which allows the Samba module to log in to LDAP, to get and store Samba-related information in LDAP. Before going on, use Test Connection to make sure that the selected settings are operational and allow you to make connection.
Next, select the Expert LDAP options to define communications between Samba and the LDAP server. This gives you, within the LDAP Base DN, options to define the security setting (SSL or TLS) and suffixes that are used for storing users, groups, machines, and additional information (see Figure 13-14). Normally, the default settings will do fine here.
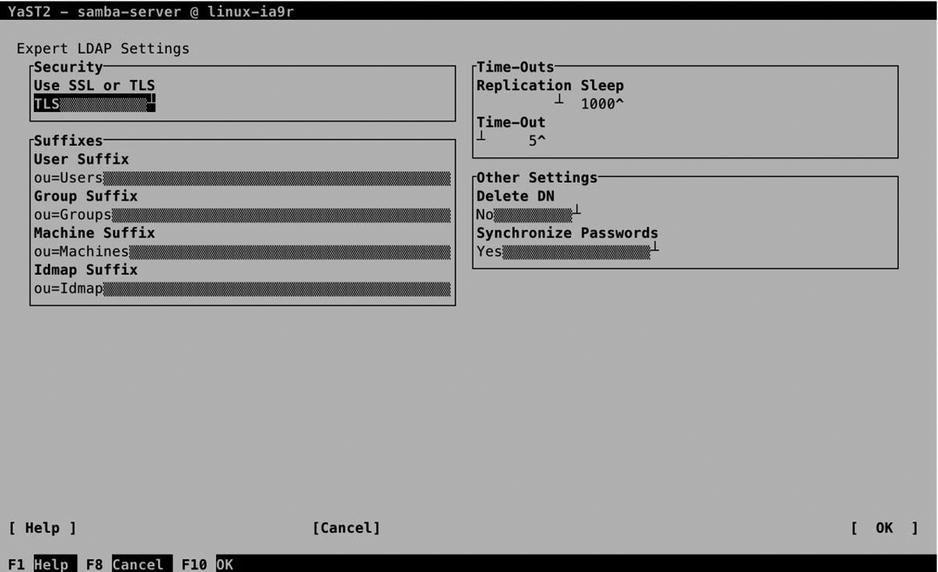
Figure 13-14. Advanced options for connecting to LDAP
Adding Samba Users to LDAP
By setting up the connection to the LDAP server, the Samba server will get authentication credentials from this server (see Figure 13-15). This assumes that users and groups have been added to the LDAP server also, using the YaST User and Group Administration module. In Exercise 13-3, you’ll learn how to create Samba users in LDAP from YaST.

Figure 13-15. Connecting to the LDAP server
EXERCISE 13-3. CREATING SAMBA LDAP USERS FROM YAST
In this exercise, you’ll create LDAP users that can be used in Samba. This advanced approach for dealing with authentication allows you to set up a Samba server that is ready for use in large corporate environments.
- Start YaST and select Security and Users
 User and Group Management.
 - By default, you’ll see local user administration. Select Set Filter LDAP Users. You’ll now be prompted to log in to the LDAP server. The name of the administrative user should already be filled in (if not, read the section about LDAP in Chapter 11), so you only have to enter the LDAP Server Password to connect.
- Click Add to add a new user. Make sure to enter at least a username and a password the user can use to connect with.
- Do not select OK yet, but activate the Plug-Ins tab. On this tab, you see the Manage Samba account parameters option. Select this option and launch it.
- From the next screen, you can enter the different Samba-related parameters and store them in LDAP. Don’t change anything; just select Next to continue.
- Select OK, OK, and Quit to write the Samba user account to LDAP. You have now successfully connected Samba to LDAP.
Understanding Samba Security Settings
By walking through the YaST module, you have created a share and specified which users can access the share. This alone is not sufficient, though. To access the directories that are shared with Samba, the user requires access to the underlying file system as well. For this, you have to make sure, too, that Linux permissions are set up properly. Exercise 13-4 shows what the problem is and provides a solution.
EXERCISE 13-4. CONFIGURING SAMBA ACCESS SECURITY
In the previous exercise, you created Samba users in LDAP. In this exercise, you’ll learn how to configure Samba to use them.
- From YaST, create a Samba share that provides access to the directory /data. Have the YaST module create the directory for you. Make sure that all members of the group users have access to this share, by adding @users to the valid users share option, which is done through the Add option in the edit share page.
- After quitting YaST, type systemctl status smb to verify the working of the Samba server. The result should look like Listing 13-5. (If this doesn’t work, use systemctl restart smb to restart the smb service.
Listing 13-5. Verifying the Functioning of the Samba Server
suse:/ # systemctl status smb
smb.service - Samba SMB Daemon
   Loaded: loaded (/usr/lib/systemd/system/smb.service; disabled)
   Active: active (running) since Sun 2014-06-08 16:09:35 CEST; 7s ago
  Process: 31256 ExecStart=/usr/sbin/smbd $SMBDOPTIONS (code=exited, status=0/SUCCESS)
  Process: 31246 ExecStartPre=/usr/share/samba/update-apparmor-samba-profile (code=exited, status=0/SUCCESS)
 Main PID: 31259 (smbd)
   CGroup: /system.slice/smb.service
├─31259 /usr/sbin/smbd -D
└─31261 /usr/sbin/smbd -D

Jun 08 16:09:35 suse systemd[1]: Starting Samba SMB Daemon...
Jun 08 16:09:35 suse systemd[1]: PID file /run/samba/smbd.pid not readable (yet?) aft...rt.
Jun 08 16:09:35 suse systemd[1]: Started Samba SMB Daemon. - Type smbclient -L //localhost to verify the availability of shares. It should look just as in Listing 13-6 and include the data share in the list.
Listing 13-6. Verifying the Availability of Shares
suse:/ # smbclient -L //localhost
Enter root's password:
Domain=[SUSE] OS=[Unix] Server=[Samba 4.1.7-5.1-3238-SUSE-SLE_12-x86_64]

        Sharename       Type      Comment
        ---------       ----      -------
        profiles        Disk      Network Profiles Service
        users           Disk      All users
        groups          Disk      All groups
        print$          Disk      Printer Drivers
        data            Disk      group data
        IPC$            IPC       IPC Service (Samba 4.1.7-5.1-3238-SUSE-SLE_12-x86_64)
Domain=[SUSE] OS=[Unix] Server=[Samba 4.1.7-5.1-3238-SUSE-SLE_12-x86_64]

        Server               Comment
        ------               -------

        Workgroup            Master
--------- ------ - Up to now, you haven’t set up the user accounts on your system for authentication on Samba. To do this, you have to use smbpasswd -a user for each user that has to be able to log in to the Samba server. You can only do this for valid Linux users, and this command creates a corresponding Samba user account with an associated password.
- Now, access the share you have created by mounting it in the local file system. The command mount -o username=user //localhost/data /mnt should do that for you. Make sure to replace the name of the user with a user account name that is valid on your system. Even if you still see a root prompt, at this point, you have connected the /mnt directory to the Samba share, and you’ll access the share as the user you’ve just configured.
suse:/ # mount -o username=user //localhost/data /mnt
Password for user@//localhost/data:  ********
suse:/ # cd /mnt - Try to write a file to the /mnt directory, by using the command touch hello. You’ll get a Permission denied error.
suse:/mnt # touch hello
touch: cannot touch 'hello': Permission denied - Type ls -ld /data. You’ll notice the directory is owned by user and group root, and the others entity has just read an execute permissions on this directory.
suse:/ # ls -ld /data
drwxr-xr-x 1 root root 0 Jun 8 12:22 /data - Type chmod 777 /data to set permissions on the Linux file system wide open. (This isn’t very elegant, but it proves the point, and that’s all we need now.)
- Get back in the /mnt directory and type touch myfile. You’ll notice that at this point, you can create the file without any problem.
In the preceding exercise, you have seen that additional setup is needed to allow users access to Samba shares. Let’s resume what you have to do to set up permissions correctly.
- Make sure you have a Samba user account for each Linux user that needs access to Samba shares. Use smbpasswd -a to set up these accounts and give them a password.
- For a Samba user to access a Linux share, a Linux user account that has permissions on the Linux file system is needed.
- Use Linux users, groups, and permissions to set the appropriate permissions to the Linux file system.
- Use Samba configuration to allow write access to Samba shares.
Manually Setting Up Samba
Until now, you have used YaST for setting up the Samba server. Like any other service on Linux, you can also configure the service manually. There are two main parts involved: the smb service provides access to Samba shares, and the /etc/samba/smb.conf file defines how access should be provided. To manage the service, you can use the systemctl command: use systemctl status smb to check the current status of the Samba service. You’ll notice that this command also gives detailed information about any existing error conditions. You can see this in Listing 13-7, in which the command is used with the -l option, to provide detailed information about the status of the Samba services.
Listing 13-7. Providing Information About the Samba Processes Using systemctl status -l
suse:/etc/samba # systemctl status smb -l
smb.service - Samba SMB Daemon
   Loaded: loaded (/usr/lib/systemd/system/smb.service; disabled)
   Active: active (running) since Sun 2014-06-08 16:09:35 CEST; 34min ago
  Process: 31256 ExecStart=/usr/sbin/smbd $SMBDOPTIONS (code=exited, status=0/SUCCESS)
  Process: 31246 ExecStartPre=/usr/share/samba/update-apparmor-samba-profile (code=exited, status=0/SUCCESS)
 Main PID: 31259 (smbd)
   CGroup: /system.slice/smb.service
├─31259 /usr/sbin/smbd -D
├─31261 /usr/sbin/smbd -D
└─31349 /usr/sbin/smbd -D

Jun 08 16:10:35 suse smbd[31261]: [2014/06/08 16:10:35.720507,  0] ../source3/printing/print_cups.c:528(cups_async_callback)
Jun 08 16:10:35 suse smbd[31261]: failed to retrieve printer list: NT_STATUS_UNSUCCESSFUL
Jun 08 16:23:36 suse smbd[31375]: [2014/06/08 16:23:36.381112,  0] ../source3/printing/print_cups.c:151(cups_connect)
Jun 08 16:23:36 suse smbd[31375]: Unable to connect to CUPS server localhost:631 - Bad file descriptor
Jun 08 16:23:36 suse smbd[31261]: [2014/06/08 16:23:36.383102,  0] ../source3/printing/print_cups.c:528(cups_async_callback)
Jun 08 16:23:36 suse smbd[31261]: failed to retrieve printer list: NT_STATUS_UNSUCCESSFUL
Jun 08 16:36:37 suse smbd[31435]: [2014/06/08 16:36:37.004921,  0] ../source3/printing/print_cups.c:151(cups_connect)
Jun 08 16:36:37 suse smbd[31435]: Unable to connect to CUPS server localhost:631 - Bad file descriptor
Jun 08 16:36:37 suse smbd[31261]: [2014/06/08 16:36:37.006867,  0] ../source3/printing/print_cups.c:528(cups_async_callback)
Jun 08 16:36:37 suse smbd[31261]: failed to retrieve printer list: NT_STATUS_UNSUCCESSFUL
suse:/etc/samba #
Use systemctl start smb to start it, followed by systemctl enable smb, which ensures that it is restarted when your computer restarts.
As an administrator, it is important to understand the contents of the /etc/samba/smb.conf file. Listing 13-8 shows the contents of this file as it has been created, based on the previous manipulations from YaST.
Listing 13-8. Sample smb.conf File
[global]
        workgroup = SUSE
        passdb backend = tdbsam
        printing = cups
        printcap name = cups
        printcap cache time = 750
        cups options = raw
        map to guest = Bad User
        include = /etc/samba/dhcp.conf
        logon path = \%Lprofiles.msprofile
        logon home = \%L\%U.9xprofile
        logon drive = P:
        usershare allow guests = No
        add machine script = /usr/sbin/useradd  -c Machine -d /var/lib/nobody -s /bin/false %m$
        domain logons = No
        domain master = No
        security = user
        wins support = No
        ldap admin dn = cn=Administrator,dc=example,dc=com
ldap group suffix = ou=Groups
        ldap idmap suffix = ou=Idmap
        ldap machine suffix = ou=Machines
        ldap passwd sync = Yes
        ldap suffix = dc=example,dc=com
        ldap user suffix = ou=Users
wins server =
[homes]
        comment = Home Directories
        valid users = %S, %D%w%S
        browseable = No
        read only = No
        inherit acls = Yes
[profiles]
        comment = Network Profiles Service
        path = %H
        read only = No
        store dos attributes = Yes
        create mask = 0600
        directory mask = 0700
[users]
        comment = All users
        path = /home
        read only = No
        inherit acls = Yes
        veto files = /aquota.user/groups/shares/
[groups]
        comment = All groups
        path = /home/groups
        read only = No
        inherit acls = Yes
[printers]
        comment = All Printers
        path = /var/tmp
        printable = Yes
        create mask = 0600
        browseable = No
[print$]
        comment = Printer Drivers
        path = /var/lib/samba/drivers
        write list = @ntadmin root
        force group = ntadmin
        create mask = 0664
        directory mask = 0775

[data]
        comment = group data
        inherit acls = Yes
        path = /data
        read only = No
        valid users = @users

## Share disabled by YaST
# [netlogon]
Let’s quickly review the configuration of the sample smb.conf file. The file starts with a [global] section. This defines the behavior of the Samba server in general. It deals with settings such as the name of the workgroup, Samba Printing, and connection to external authentication mechanisms such as LDAP, which is used in this example.
Following the [global] section are the individual shares. Many shares are existing by default, such as the [home] share, which gives users access to their home directories; the [profiles] share, which is used for logging in on domain controllers; some more generic shares; and shares that enable users to use printers on Samba. In these shares, you can use configuration settings that apply only to that share. Table 13-1 gives an overview of the most useful settings that haven’t been covered before.
Table 13-1. Samba share parameters
Setting | Use |
|---|---|
valid users | Specifies which user accounts get access |
browseable | Prevents users from navigating to directories outside of their own environment |
read-only | Set to No to give write access to shares. By default, users have read-only access only |
inherit acls | This setting has Samba respect ACLs that are configured on the Linux file system |
store dos attributes | Offers support for Windows attributes through Samba. Useful for offering the full file sharing experience to Windows users |
create mask | A umask that sets default permissions to new files |
directory mask | A umask that sets default permissions to new directories |
veto files | Names of files that will never be shown in the share |
printable | Used on printer shares to enable printing from the share |
path | The name of the directory or resource that is shared |
write list | If read-only is set to yes, this can be used to allow write access to specific users and/or groups |
force group | Makes sure new items are owned by the group that is specified here |
Samba Printing
Apart from giving access to directories, Samba can be used to give access to printers as well. Setting this up is easy to do: by default, Samba gives access to all printers that are available through CUPS. That means that Windows users will see the shared printers through Samba. This is useful in an environment in which users exist who don’t have access to CUPS printers by default. If your server is used in an environment where users can access printers directly or through CUPS, it doesn’t provide any additional value to set up CUPS as well.
Summary
In this chapter, you have learned how to configure your server for file sharing using NFS, FTP, or Samba. This was the last chapter in the section “Networking SUSE Linux Enterprise Server.” The following section is about “Advanced SUSE Linux Enterprise Server Administration,” and the first chapter in this section explains how to use shell scripting on Linux.