
![]()
Setting Up a LAMP Server
LAMP, which stands forLinux, Apache, MySQL, and PHP, is what has made Linux the most-used operating system in the data center. Even if the database and scripting solution may be different in your environment, LAMP still plays a significant role in Enterprise Linux. In this chapter, you’ll learn how to configure it.
Configuring Apache from YaST
From YaST, you can easily configure an Apache web server. YaST offers options to configure a web server with basic settings, as well as advanced configurations, such as virtual hosts or Secure Sockets Layer (SSL)–enabled web servers. In the next sections, you’ll read about the different configuration options.
Setting Up a Web Server with Basic Settings
As is the case for many services in the SUSE Linux Enterprise Server (SLES), YaST offers the most convenient way to get a server in an operational state. To start the Apache configuration from YaST, select Network Services ![]() HTTP Server. If the Apache software hasn’t been installed yet, you are now prompted to start the installation. Once installed, you will see the screen shown in Figure 12-1.
HTTP Server. If the Apache software hasn’t been installed yet, you are now prompted to start the installation. Once installed, you will see the screen shown in Figure 12-1.
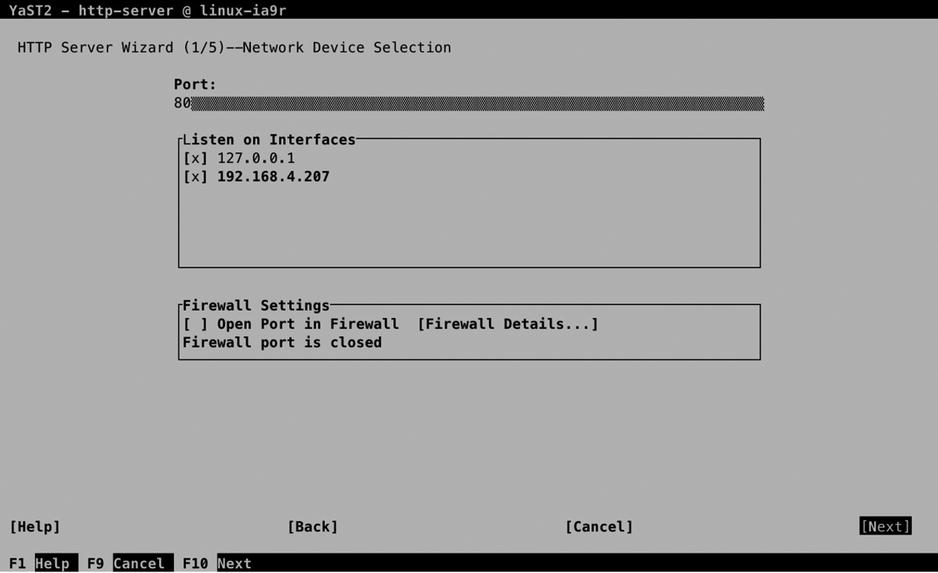
Figure 12-1. Configuring Apache interfaces
To start with, you have to specify how Apache should offer its services. By default, it will be configured to listen on port 80 and all available network interfaces, which you can change here, if so desired. You’ll also have to open Apache ports in the firewall. This does not happen by default.
In the next screen, you can specify whether Apache should have scripting enabled. You can choose between PHP5, Perl, and Python scripting. It is recommended that you select only the scripting type that you really intend to be using, as allowing unnecessary scripting types increases the security risks on your server. Most of the Apache security breaches that occur are in some way related to scripting, so you better disable scripting types that are not really needed (see Figure 12-2).

Figure 12-2. Make sure to allow only the scripting types you really need
In the next screen (see Figure 12-3), you’ll configure default host settings. The settings that are specified and explained in Table 12-1 relate directly to settings that you can find in the main Apache configuration file /etc/apache2/default-server.conf and related files (see the next section, “Manual Apache Configuration,” for more details about the configuration files that are used).

Figure 12-3. Specifying default configuration options
Table 12-1. Common Apache Configuration Options
Option | Use |
|---|---|
DocumentRoot | The default location where the Apache server is looking for web content files such as index.html. |
Directory | Directory settings are used to specify security settings that are specific to a particular directory. |
Alias | An alias defines a subdirectory that a user or Apache module can use when looking for specific items. The default alias /icons, for example, can be accessed as http://yourhost/icons. |
ScriptAlias | This default alias specifies the default location for scripts that the Apache server can start. |
IncludeOptional | This directive refers to additional configuration files that can be included. By default, included files are in /etc/apache2/conf.d. |
ServerName | The name of this server |
Server Administrator E-mail | The e-mail address of the administrator of this server |
Apart from the configuration options that are listed by default and discussed in Table 12-1, an administrator can add additional configuration settings. To do this, select Add. This opens a window in which you can select options from a drop-down list. Press the arrow key to see the contents of this list (see Figure 12-4).

Figure 12-4. Selecting additional configuration options
In the next window, the configuration utility prompts for the virtual hosts you want to create. Creating virtual hosts is discussed in the next subsection in this chapter. Next, you’ll see the overview of settings selected so far. From this overview, you can select Stat Apache2 Server When Booting to make sure it starts automatically on boot. Next, select Finish, to write the configuration. Depending on the selections that you’ve made, you can now be prompted to install some additional packages.
At this point, you have configured a basic Apache web server. It doesn’t have any content yet, though. To create content for your web server, you can produce a file with the name index.html and put it in the directory /srv/www/htdocs. The contents of this file (which may be plain ASCII text) will be displayed by users who are connecting to the web server.
Configuring Virtual Hosts
On a server, several Apache web sites can be hosted, each using a different domain name. You have to configure DNS so that requests to a particular web site will be received on your server, and the Apache process will next decide where to forward the request to. This decision is based on the configuration of virtual hosts on Apache. Virtual hosts are easily configured from YaST. The following procedure explains how to do it.
From YaST, select the module to configure Apache. From the main screen, select Hosts and select Add. This opens the window that you can see in Figure 12-5, from which you can put the identification of the virtual host you want to create. The server identification field defines the name and document root for the web server, as well as the administrator e-mail address. In the Server Resolution box, you’ll specify the name of the VirtualHost as it will be used by Apache. This ID is created automatically, based on the information you have entered in the Server Identification, but if required, you can select Change VirtualHost ID to change it here.

Figure 12-5. Specifying new host information
While creating virtual hosts, you can choose between two different approaches. Select Determine Request Server by HTTP Headers to configure a name-based virtual host or select Determine Request Server by Server IP Address to configure an IP-based virtual host. A name-based virtual host allows you to configure several hosts who are listening on the same IP address. To configure IP-based virtual hosts, you need a dedicated IP address for each virtual host. That is why name-based virtual hosts, in general, are more commonly used.
After specifying virtual host settings, you can configure advanced options on the screen shown in Figure 12-6. To start with, you can specify whether you want to enable CGI for this virtual host. By selecting this option, the virtual host will be available to start scripts. If you need this functionality, you’ll also have to specify the CGI Directory Path, which is the name of the directory on which the script files will be stored.
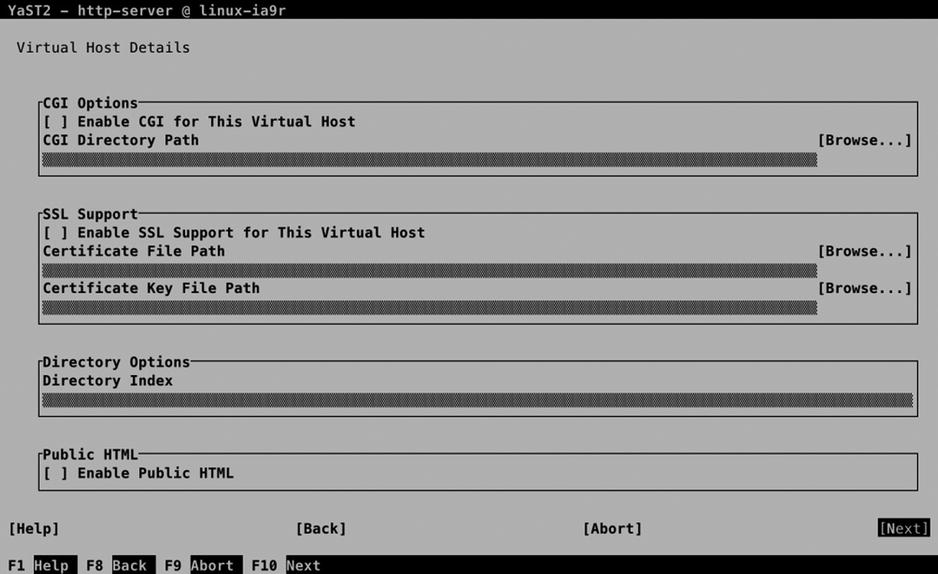
Figure 12-6. Specifying advanced virtual host options
If you need SSL Support on the virtual host as well, select Enable SSL Support for This Virtual Host. To offer SSL support, you have to specify access to the Certificate File and the Certificate Key File (read Chapter 10 for more information about SSL Certificates).
The Directory Index option that is under Directory Options is used to specify which files in the document root the Apache server should be looking for as HTML documents. By default, it will be looking for an index.html. If you need anything else, you can specify it here. Last, the Public HTML option is used to allow access to HTML documents in the home directories of users. If enabled, the user has to put the HTML documents in his or her home directory in a subdirectory with the name .public_html.
When working with virtual hosts, you should consider specifying a default virtual host. This default setting is important for packets that do reach your server but do not match a specific virtual host. That can happen if you have configured a virtual host for a site such as www.example.com. If you have configured your server in a way that packets addressed to example.com (without www) arrive at your server as well, but there is no matching virtual host configuration, then the packet will be delivered at the default virtual host.
Normally, the first host that is listed in alphabetical order is used as the default virtual host. If, instead, you want packets to be sent to a specific virtual host, you can use the Set as Default option to designate a specific host as default virtual host.
Apache Modules
Apache is a modular web server. That means that to offer specific functionality, modules have to be enabled. An example of such a module is mod_sssl. Without this module, no SSL support is available on your Apache web server. As with this module, many others are also available.
In some cases (like mod_ssl), configuration of a module is a transparent process. If you select SSL configuration from YaST, mod_ssl will automatically be loaded. For other modules, you have to specifically enable them. You can do this from the HTTP Server Configuration ![]() Server Modules screen (see Figure 12-7). From this screen, you can toggle the use of a module on or off, but no further configuration is possible from this screen. If you want to fine-tune an Apache module, you have to access the module-specific configuration file, which cannot be done from YaST.
Server Modules screen (see Figure 12-7). From this screen, you can toggle the use of a module on or off, but no further configuration is possible from this screen. If you want to fine-tune an Apache module, you have to access the module-specific configuration file, which cannot be done from YaST.

Figure 12-7. Enabling Apache modules from YaST
Although it seems tempting to enable many modules, there is a security risk. With every unnecessary module that is enabled, you increase chances that security issues will occur. For that reason, you should not enable modules that you don’t specifically need.
Manual Apache Configuration
Some Linux distributions put all of the Apache configuration in one file. This is not the case for SUSE Linux Enterprise (SLES). On SLES, you’ll have to work through multiple configuration files to configure Apache the way you want.
default-server.conf
The starting point of all the configuration files is /etc/apache2/default-server.conf, which you can see in the contents of Listing 12-1 (for legibility, all comment lines included in this file are removed).
Listing 12-1. Apache Configuration in /etc/apache2/default-server.conf
linux-ia9r:/etc/apache2 # cat default-server.conf | grep -v '#'

DocumentRoot "/srv/www/htdocs"

<Directory "/srv/www/htdocs">
Options None
AllowOverride None
Order allow,deny
 Allow from all
</Directory>

Alias /icons/ "/usr/share/apache2/icons/"

<Directory "/usr/share/apache2/icons">
 Options Indexes MultiViews
 AllowOverride None
 Order allow,deny
 Allow from all
</Directory>

ScriptAlias /cgi-bin/ "/srv/www/cgi-bin/"

<Directory "/srv/www/cgi-bin">
 AllowOverride None
 Options +ExecCGI -Includes
 Order allow,deny
 Allow from all
</Directory>

<IfModule mod_userdir.c>
UserDir public_html
Include /etc/apache2/mod_userdir.conf
</IfModule>

IncludeOptional /etc/apache2/conf.d/*.conf

IncludeOptional /etc/apache2/conf.d/apache2-manual?conf
ServerName linux-ia9r

ServerAdmin root@linux-ia9r
NameVirtualHost *
Table 12-2 provides an overview of the important configuration lines that you can find in this configuration file.
Table 12-2. Configuration Parameters Overview
Parameter | Explanation |
|---|---|
DocumentRoot | The location where the Apache server looks for its web content |
Directory | Specific settings for a directory |
Options | Options to consider for a specific directory |
AllowOverride | Set to None, if you don’t want security settings that are specified for this directory to be overwritten at a lower level |
Order allow,deny | Specifies that Allow directives should be read before Deny directives |
Alias | Defines an alias relative to the document root. The alias can be accessed as a subdirectory on the web server. |
ScriptAlias | An alias that is specific for web scripts |
IfModule | Configuration options that are for a specific module only |
IncludeOptional | Refers to names of directories of files that contain additional configuration. Contents of these will always be included while running the web server. |
ServerAdmin | The e-mail address of the web server administrator |
NameVirtualHost | Specifies that name-based virtual hosts should be used |
ServerName | The name of this web server |
httpd.conf
The default-server.conf file contains configuration for the default web server. It is not the starting point for all configuration, however. The first configuration file to be considered is /etc/apache2/httpd.conf. This file mainly contains includes to other files that should be read. The contents of this file is displayed in Listing 12-2.
Listing 12-2. httpd.conf Contents
linux-ia9r:/etc/apache2 # cat httpd.conf | grep -v '#'
Include /etc/apache2/uid.conf
Include /etc/apache2/server-tuning.conf
ErrorLog /var/log/apache2/error_log
Include /etc/apache2/sysconfig.d/loadmodule.conf
Include /etc/apache2/listen.conf
Include /etc/apache2/mod_log_config.conf
Include /etc/apache2/sysconfig.d/global.conf
Include /etc/apache2/mod_status.conf
Include /etc/apache2/mod_info.conf
Include /etc/apache2/mod_reqtimeout.conf
Include /etc/apache2/mod_usertrack.conf
Include /etc/apache2/mod_autoindex-defaults.conf
TypesConfig /etc/apache2/mime.types
Include /etc/apache2/mod_mime-defaults.conf
Include /etc/apache2/errors.conf
Include /etc/apache2/ssl-global.conf
<Directory />
    Options None
    AllowOverride None
    Order deny,allow
    Deny from all
</Directory>

AccessFileName .htaccess
<Files ~ "^.ht">
    Order allow,deny
    Deny from all
</Files>

DirectoryIndex index.html index.html.var

Include /etc/apache2/default-server.conf
Include /etc/apache2/sysconfig.d/include.conf
IncludeOptional /etc/apache2/vhosts.d/*.conf
As you can see, the httpd.conf mainly contains includes to read other files and contents of other directories. The most important configuration file that is included is default-server.conf, which was discussed in the previous section. Apart from this, there are configuration files that are specific to different modules (all of them start with mod). Another important include is on the last line, where all virtual host configuration files are included.
Virtual Host Configuration Files
On SUSE Linux Enterprise Server, virtual host configuration files are stored in separate configuration files, one for each virtual host that is defined. In Listing 12-3, you can see the contents of a sample virtual host configuration file.
Listing 12-3. Virtual Host Example
<VirtualHost *>
 DocumentRoot /srv/www/htdocs/account
 ServerName account.example.com
 ServerAdmin [email protected]
 <Directory /srv/www/htdocs/account>
  AllowOverride None
  Order allow,deny
  Allow from all
 </Directory>
</VirtualHost>
To allow administrators to configure virtual hosts easily, two template files are also provided. These are vhost-ssl.template and vhost.template. If an administrator wants to create a virtual host manually, it suffices to copy the contents of these template files and work from there.
SSL Configuration Files
To make configuration of SSL easy, a template file is provided to create an SSL-based virtual host. The contents of this file is in Listing 12-4.
Listing 12-4. Sample Template File for SSL Configuration
linux-ia9r:/etc/apache2/vhosts.d # cat vhost-ssl.template | grep -v '#'

<IfDefine SSL>
<IfDefine !NOSSL>

<VirtualHost _default_:443>
      DocumentRoot "/srv/www/htdocs"
      ErrorLog /var/log/apache2/error_log
      TransferLog /var/log/apache2/access_log
      SSLEngine on
      SSLProtocol all -SSLv2 -SSLv3
      SSLCertificateFile /etc/apache2/ssl.crt/server.crt
      SSLCertificateKeyFile /etc/apache2/ssl.key/server.key
<FilesMatch ".(cgi|shtml|phtml|php)$">
          SSLOptions +StdEnvVars
</FilesMatch>
<Directory "/srv/www/cgi-bin">
          SSLOptions +StdEnvVars
</Directory>
      BrowserMatch "MSIE [2-5]"
       nokeepalive ssl-unclean-shutdown
       downgrade-1.0 force-response-1.0
      CustomLog /var/log/apache2/ssl_request_log   ssl_combined
</VirtualHost>
Although there are more options in an SSL configuration file than in a regular Apache configuration file, it is not that hard to read. The most important lines in this file are the lines in which the location of the certificate file and the certificate key file are specified: SSLCertificateFile and SSLCertificateKeyFile. These by default point to /etc/apache2/ssl.crt for the certificate and /etc/apache2/ssl.key for the key file. Typically, after creating SSL certificates that match the name of your server, you should manually copy the files to this location.
Setting Up Authentication
On some occasions, it may be useful to set up authenticated web servers or to protect access to specific directories through authentication. To do this, you must set up a user authentication file, as well as a section that prompts for credentials when accessing a secured area.
To start with, you’ll need user accounts. The easiest way to set up these user accounts is by creating them with the htpasswd command. If you would want to add a user linda, the corresponding command would be htpasswd2 -c /etc/apache2/htpasswd linda. This will add user linda to the file /etc/apache2/htpasswd. Note that you’re free to select the file name from which the user accounts will be created. There’s no default or standard; the only thing that counts is that you refer to the same file name while setting up the protected environment. Instead of setting up a user file on each server, you could also use an LDAP server containing the usernames and passwords you’d like to use.
After creating the user account, you have to set up a protected environment. The sample code from Listing 12-5 shows how you can do this. Add this code to the appropriate vhost file:
Listing 12-5. Adding Security to a Directory
<Directory /srv/www/htdocs/secret>
      AuthType Basic
      AuthName "secret files"
      AuthUserFile /etc/apache2/htpasswd
      Require user linda
</Directory>
In this section, just four lines are used to make it a protected directory. To start with, the parameter AuthType Basic enables basic authentication. Next, AuthName defines a name that will be displayed to users accessing the protected environment. The most important line is AuthUserFile, which refers to the file that you’ve created for setting up authentication. The name of this file must match the name of the file you’ve created with the htpasswd command. In the last line, Require user linda specifies the name of the user account that has access. Instead of mentioning names of specific users, you can also use valid-user, which will only open the share to any user who exists in the password file.
If you want to set up your web server to authenticate against an LDAP server, that’s also possible. You’ll just need some more information in the Apache configuration. Listing 12-6 shows what the code to enable LDAP authentication would look like.
Listing 12-6. Setting Up LDAP Authentication
<Directory /srv/www/htdocs/private>
      AuthName Private Directory
      AuthType Basic
      AuthBasicProvider ldap
      AuthLDAPUrl "ldap://yourserver.example.com/dc=example,dc=com TLS"
      Require valid-user
</Directory>
As you can see, compared to Listing 12-5, only two parameters have changed. First, the AuthBasicProvider is now set to ldap, which tells Apache to expect an answer from an LDAP server. Next, the AuthLDAPUrl specifies the URL that can be used to get the credentials. This URL consists of two parts. The first part specifies the name for the LDAP server to use, which is followed by the LDAP context to use. The suffix TLS tells Apache that TLS security is required to get the credentials from LDAP.
Apache Logs
When things don’t work out the way they should, you can use the log files that are created by the Apache server. By default, Apache does not use syslog but writes directly to its own log files. On SLES, you can find these log files in /var/log/apache2. If you’re running only one web server, you’ll find a file with the name access_log containing information about users accessing your server and an error_log that shows details about errors that have occurred on your server. If virtual hosts are used, you have the option to configure each virtual host with its own log file (which is highly recommended).
If you want to centralize log handling on Apache, you can set up Apache to go through syslog. To do this, change the lines in /etc/apache2/httpd.log in which log handling is defined to look as follows:
ErrorLog       syslog:local1
AccessLog      syslog:local1
These lines ensure that log information is sent to syslog, using the local1 facility. Read Chapter 5 of this book for more information on how to configure this in syslog.
EXERCISE 12-1. SETTING UP AN AUTHENTICATED APACHE ENVIRONMENT
This exercise is a lab exercise that allows you to apply the skills that you’ve acquired so far.
Configure your server to host two virtual web servers: sales.example.com and account.example.com. Make these servers accessible through port 443 only. Use the YaST certificate module to obtain the certificates that are required for accessing the servers over TLS. Next, set up authentication for sales.example.com on the DocumentRoot of that server. Create at least one user with the name lisa and the password password. Allow access for all users who have been set up in the Apache password file.
Configuring the Database Part of the LAMP Server
Apache servers are commonly configured to work with databases. In previous releases of SLES, MySQL was the default database solution. MySQL, however, has been acquired by Oracle, and for licensing reasons, an open source fork of MySQL has been created with the name MariaDB. You’ll note from many things (including the name of the script file used to start the service) that MariaDB essentially is the same as MySQL, but in the future, both might develop in different directions.
To start with, you must install MariaDB and apply basic settings. In this section, you’ll learn how to do that, by installing the software, securing it, and making small changes to the database configuration file /etc/my.cnf. You will see that many of the components of MariaDB have names that refer to MySQL. That is normal, because MariaDB is a derivative of the MySQL database software.
To install MariaDB, apply the following steps:
- Use zypper in mariadb on the server on which you want to install the software.
- Type systemctl start mysql, followed by systemctl enable mysql, to start and enable the database service.
- Verify that MariaDB is running by using systemctl status mysql.
After installing MariaDB, it’s a good idea to secure it as well. To do this, run the mysql_secure_installation command. This will apply a few security settings. First, it removes root accounts that are accessible from outside, just keeping root access open from localhost. It will also set a password for the root user account, and it removes anonymous user accounts as well as the test database. The command will do this in an interactive command sequence, in which all of these steps are applied one by one.
MariaDB can be used locally only, or it can be accessed over the network. There are advantages to both. If MariaDB is accessible over the network, it is easy to set up a service stack on which the database is running on one server and related services are running somewhere else. This offers the maximum possible performance for the database, but it also increases the risk that things go wrong, because the database is accessible over the network. If you care to elevate the security to a maximum, you may want to consider switching off network access completely. That implies that all services that are using the database are available on the same server.
To determine if MariaDB is going to use networking, you’ll modify a few parameters in the /etc/my.cnf configuration file (which is the MariaDB main configuration file). In the [mysqld] section, you’ll find the following settings:
- bind-address: The address on which the database service will be listening. Set to : , if you want to enable access through all IP addresses (IPv4 as well as IPv6), or leave blank to enable access over IPv4 only. Alternatively, you can specify the IP addresses of specific interfaces to which the database should bind.
- skip-networking: Set to 1 to disable all networking. Communications with other local processes in that case will go through sockets, which by default are in /var/lib/mysql/mysql.sock. When using this approach, the client software also needs to access the database through sockets and cannot use localhost and IP for local database access.
- port: Specifies the port to listen on for TCP/IP connections
EXERCISE 12-2. INSTALLING MARIADB
In this exercise, you will perform a base installation of MariaDB. You’ll also disable network access and apply security settings. Next, you’ll verify that some default system databases are available.
- Type zypper in mariadb to install the database software.
- Use systemctl start mysql; systemctl enable mysql to start and enable the MariaDB software.
- Verify that MariaDB is listening, using netstat -tulpen | grep mysql. You should see a mysqld process listening on port 3306.
- Disable networking by adding the line skip_networking=1 to /etc/my.cnf and restart MariaDB using systemctl restart mysql.
- Start securing MariaDB, by using mysql_secure_installation. Set the password for the database root user to "password", disable remote root access, and remove the test database and any anonymous users.
- Type mysql -u root -p to log in to the database as root and have the database prompt for a password.
- From the MariaDB interactive shell prompt, type show databases; to display databases that are currently available.
- Type exit; to quit the MariaDB interactive shell interface.
Performing Simple Database Administration Tasks
Even if you’re a Linux administrator, it is useful to have basic knowledge of database administration commands. That doesn’t make you a database administrator, but it does help you perform basic configuration tasks.
To start working with databases, you must connect to the database first. To do this, you’ll use the mysql command, as in mysql -u root -h localhost -p. This command will log you in as user root to server "localhost" and will next prompt for a password. After logging in, you’ll enter the MySQL interactive shell, from which you will work with databases. You’ve already seen the command show databases;, which displays a list of available databases. Note that in the MySQL shell, commands are not case sensitive (but names of databases and tables are case sensitive!). In addition, note that all commands are terminated with a semicolon (;).
Working with databases looks a little like working with directories. The database administrator will create a database, start using the database, and then enter the contents of the database. The USE command is used like the cd command from a bash shell. Whereas cd allows you to switch between directories easily, the USE command allows you to switch between databases. Try, for example, the following commands (after logging in to the MySQL shell environment as root):
- Type CREATE DATABASE addressbook; to create a database with the name addressbook.
- Type USE addressbook; to start using the addressbook database.
- Type SHOW TABLES; to show its current tables. You should see none.
- Now type USE mysql; to switch to the mysql database.
- Type SHOW TABLES;, which will show many tables, including a table with the name user.
- Type DESCRIBE user; to get column names from the user table. This gives a detailed description, as you can see in Listing 12-7. It tells you which fields are available in a table, what type of data is expected in a field, and provides some more attributes on the table contents.
Listing 12-7. Showing Table Contents
MariaDB [mysql]> describe user;
+-----------------+-----------------------------------+------+-----+---------+-------+
| Field           | Type                              | Null | Key | Default | Extra |
+-----------------+-----------------------------------+------+-----+---------+-------+
| Host            | char(60)                          | NO   | PRI |         |       |
| User            | char(16)                          | NO   | PRI |         |       |
| Password        | char(41)                          | NO   |     |         |       |
...       |
| max_connections | int(11) unsigned                  | NO   |     | 0       |       |
| max_user_connect| int(11)                           | NO   |     | 0       |       |
| plugin          | char(64)                          | NO   |     |         |       |
| authent_string  | text                              | NO   |     | NULL    |       |
+-----------------+-----------------------------------+------+-----+---------+-------+
42 rows in set (0.00 sec)
In MariaDB, as well as in MySQL, you’ll be using Structured Query Language (SQL) to manipulate data in the database. The basic commands allow you to create, read, update, and delete. These commands are also referred to as the CRUD operations: create, select, update, and delete. Before inserting data in a database, you’ll have to find out which are the attributes of a table. Use DESCRIBE to do this, as in the DESCRIBE user; command that you’ve previously used.
Once you’ve found out which attributes are needed to create data in a table, you can use the INSERT command to add them: INSERT INTO user (Host,User,Password) VALUES ('localhost',linda,password);. In this command you’ll first refer to the name of the table in which data has to be added, list the specific attributes you want to fill, and, next, list the values that you want to enter in those specific attributes.
To delete data, you’ll use the DELETE command, as in DELETE FROM user WHERE User = rick;. Note that in this command, it is very important not to forget the WHERE part; if you omit it, all records in the table will be erased.
To change data, you’ll use the UPDATE command: UPDATA user SET password=secret WHERE User = linda;. Note that in this command, you have to use the WHERE statement to tell MariaDB which record to use and the SET command to specify the attribute you want to change, with its new value.
To read records, you’ll use the SELECT command: SELECT Host,User FROM user;. Alternatively, you can select to show all attributes, using *: SELECT * FROM user;, and using where, you can create simple queries, filtering by specific results: SELECT * FROM user WHERE name = johnson;.
When using where clauses, different operators can be used, as follows:
= | Equal |
<> | Not equal |
> | Greater than |
>= | Greater than or equal |
< | Less than |
>= | Less than or equal |
BETWEEN | Between a range |
LIKE | Search for a pattern |
IN | Specify multiple possible values in a column |
Managing Users
In MariaDB, you can create users and groups to restrict access to databases and tables. Alternatively, MariaDB can use PAM for authentication. By default, users are stored in the user table in the mysql database. To create new users, you’ll use CREATE USER. As the user who creates the new user, you’ll need the CREATE USER or INSERT privilege in the mysql database. While creating a user, you’ll typically include @hostname in the username. That allows you to distinguish between users who can log in from localhost only and those who can log in from other hosts.
If, for example, you want to create a user lisa, use CREATE USER lisa@localhost IDENTIFIED BY 'password';. This creates a user with the name lisa and the password 'password'. Passwords are stored encrypted in the MariaDB database. In the hostname specification, you have multiple options. You can use a hostname or IP address and the % sign as a wildcard. For example, lisa@% would refer to user lisa, who can log in from any host. When the user is no longer needed, use DROP USER user@host; to remove the user. Note that users who are currently active on the system won’t be deleted immediately.
When creating a user, the user, by default, is created with no privileges. That means that the user can connect but won’t be able to use any command. The privileges can be granted on specific tables but also on the entire database. As root, for example, use GRANT SELECT, UPDATE, DELETE, INSERT on addressbook.names to lisa@localhost; to grant user lisa the basic permissions to the names table in the addressbook database. Let’s look at some more examples where privileges are granted.
- GRANT SELECT ON database.table TO user@host;: Gives SELECT privilege to a specific table in a specific database
- GRANT SELECT ON database.* TO user@host;: Gives SELECT privilege to all tables in "database".
- GRANT SELECT ON *.* TO user@host;: Gives privileges to all tables in all databases
- GRANT CREATE, ALTER, DROP ON database.* to user@host;: Gives privilege to create, alter, and drop databases
- GRANT ALL PRIVILEGES ON *.* to user@host;: Creates a superuser
When working with privileges, it is important to reload all privileges after changing them. To do that, use the FLUSH PRIVILEGES; command. To show privileges that are assigned to a specific user, you can use SHOW GRANTS FOR user@host;.
In Exercise 12-3, you’ll create a simple database and work with user privileges on it.
EXERCISE 12-3. CREATING A DATABASE
- Type mysql -u root -p to log in as root.
- Type create database videos; to create a database with the name videos.
- Type USE videos; to switch to the videos database.
- Now let’s enter some columns: CREATE TABLE videos(title VARCHAR(40), actor VARCHAR(40), year INT, registration INT);.
- Let’s enter some data: INSERT INTO videos (registration,title,actor,year) VALUES(1,'Basic Instinct','Sharon Stone', 1992);.
- Repeat this to enter the following videos as well:
Pretty Woman, Julia Roberts, 1990
The Terminator, Arnold Schwarzenegger, 1984
Patriot Games, Harrison Ford, 1992
- Type SELECT * from videos; to show an overview of all database. You should see a result as in Listing 12-8.
Listing 12-8. SELECT * Result
MariaDB [videos]> INSERT INTO videos (registration, title, actor,year) VALUES (1,'Basic Instincts', 'Sharon Stone', 1992);
Query OK, 1 row affected (0.01 sec)

MariaDB [videos]> INSERT INTO videos (registration, title, actor,year) VALUES (2, 'Pretty Woman', 'Julia Roberts', 1990);
Query OK, 1 row affected (0.00 sec)

MariaDB [videos]> INSERT INTO videos (registration, title, actor,year) VALUES (3, 'The Terminator', 'Arnold Schwarzenegger', 1984);
Query OK, 1 row affected (0.01 sec)

MariaDB [videos]> INSERT INTO videos (registration, title, actor,year) VALUES (4, 'Patriot Games', 'Harrison Ford', 1992);
Query OK, 1 row affected (0.00 sec)

MariaDB [videos]> select * from videos;
+-----------------+-----------------------+------+--------------+
| title           | actor                 | year | registration |
+-----------------+-----------------------+------+--------------+
| Basic Instincts | Sharon Stone          | 1992 |            1 |
| Pretty Woman    | Julia Roberts         | 1990 |            2 |
| The Terminator  | Arnold Schwarzenegger | 1984 |            3 |
| Patriot Games   | Harrison Ford         | 1992 |            4 |
+-----------------+-----------------------+------+--------------+
4 rows in set (0.00 sec) - Create a user using CREATE USER julia@'%' IDENTIFIED BY 'secret';.
- Grant permissions to user julia using GRANT SELECT,INSERT,UPDATE,DELETE ON videos.* TO julia@'%';.
- Type FLUSH PRIVILEGES; to update the privileges.
- Type DESCRIBE videos; to show an overview of records in the videos database.
- Insert another new video: INSERT INTO videos(registration,title,actor,year) VALUES (5,'The Last Stand', 'Arnold Schwarzenegger', 2013);.
- Show a list of all records where the value of the 'actor' field is set to Arnold Schwarzenegger: SELECT * FROM videos WHERE actor = 'Arnold Schwarzenegger';.
- Type quit to close the MySQL shell interface.
MariaDB Backup and Restore
When making backups of MariaDB, there are two approaches to follow. You can create a physical backup, in which you’ll have a raw copy of the database directories and folders. This backup is fast and portable, but only to machines that are using similar hardware and software. To make a physical backup, the database service should be offline, or the tables in the database should be locked, to prevent data from changing during the backup.
As an alternative, you can make a logical backup. In a logical backup, the database structure is retrieved by querying the database. Such a backup is relatively slow, because the database must be accessed and converted into a logical format. It does have two huge benefits, however: (1) you can create a logical backup on an operational database; and (2) logical databases are portable to other database providers as well. In a logical backup, however, log and configuration files are not included.
To make a logical database backup, you can use the mysqldump (shell) command. If, for example, you want to create a backup of the videos database and write that to the file /root/videos-db.dump, you would use the following command: mysqldump -u root -p videos > /root/videos-db.dump. The mysqldump command can also be used to create a backup of all databases, using mysqldump -u root -p --all-databases > /root/all-db.dump.
To create physical backups, it’s a good idea to use LVM volumes. In LVM, you can create a snapshot, which contains the actual state of the LVM volume at the moment the snapshot was created. The physical backup itself will next be made from the snapshot and not from the actual open LVM volume. In Exercise 12-4, you can read how to create a physical database backup.
EXERCISE 12-4. CREATING A PHYSICAL MYSQL DATABASE BACKUP
- To start with, you have to make sure where the actual database is stored. To do this, use mysqladmin -u root -p variables | grep datadir. This command will show the directory in the file system where data is stored. Typically, the result would be the directory /var/lib/mysql.
- Use the df /var/lib/mysql command to find out which LVM volume is used to host this location. (This will, of course, only work if during installation an LVM volume was created to host the physical database.)
- Verify that within the volume group hosting the database volume unallocated disk space is still available, using vgs vgname.
- At this point, you must temporarily freeze the database, so that no modifications can be applied while the snapshot is created. To do this, connect to the database as root, using mysql -u root -p, and type FLUSH TABLES WITH READ LOCK;. Do NOT close this session, because it will remove the lock!
- In another terminal session, create the LVM snapshot. The following command assumes that the name of the volume group is vgdata and the name of the LVM volume hosting the database is lvmariadb: lvcreate -L 2G -s -n lvmariadb-snapshot /dev/vgdata/lvmariadb. Make sure that the snapshot size is large enough to hold the backup.
- Get back to the MariaDB session, and type UNLOCK TABLES; to remove the locks.
- Get back to the other session and mount the snapshot mkdir /mnt/snapshot; mount /dev/vgdata/lvmariadb-snapshot /mnt/snapshot.
- Use tar -cvf /root/mariadb.tar /mnt/snapshot to create the backup.
- Once the backup has been successfully created, you have to unmount and remove the snapshot: umount /mnt/snapshot; lvremove /dev/vgdata/lvmariadb-snapshot.
To restore a backup, it depends which kind of backup you have. To restore a logical backup, you would use a command such as mysql -u root -p videos < /root/videos-db.dump. To restore a physical backup, you must first stop the MariaDB service, after which you can use tar to restore the backup, as follows:
- systemctl stop mysql
- rm -rf /var/lib/mysql/*
- tar xvf /root/mariadb.tar -C /
Make sure that you verify the contents of the archive file before restoring the backup!
EXERCISE 12-5. WORKING WITH MARIADB DATABASES
Install MariaDB. Set the password of user root to 'secret'. Create a database with the name 'addressbook'. In this database, make sure you include the following fields:
- first name
- last name
- street
- number
- city
- zip
- telephone
Enter the following records:

Make a logical backup of the database and write it to /tmp/address-db.dump.
Summary
In this chapter, you’ve learned how to set up a LAMP server. You’ve read about the configuration of Apache and MariaDB for database services. You haven’t read much about setting up scripting, apart from how to enable the required modules in Apache for using PHP, Perl, or Python. Scripting itself is an art that requires a book dedicated exclusively to the subject; therefore, it has not been covered in this chapter.