
![]()
Securing Internet Services: Certificates and SUSE Firewall
Every server that is connected to the Internet needs security. Security is required at the point of entry; hence, you need a firewall. You’ll also have to secure services that are offered by your server, which is why you need certificates. In this chapter, you’ll learn how to set up a firewall, using SUSE Firewall, and how to use certificates, with the YaST integrated certificate authority.
Setting Up a Firewall
As with any other Linux distribution, SUSE uses Linux kernel security features, where netfilter is offering firewall services. The default interface to manage the SUSE firewall is by using the YaST firewall module, which you can find in Security and Users ![]() Firewall. This interface offers a clear and straight method for setting up firewall configurations, while still being compatible with the iptables command that administrators can use to configure firewalls from the command line.
Firewall. This interface offers a clear and straight method for setting up firewall configurations, while still being compatible with the iptables command that administrators can use to configure firewalls from the command line.
SUSE Firewall or iptables?
You have to make a choice when setting up firewalls. While iptables provides an excellent interface to manage firewalls that works the same on all Linux distributions, you don’t want to manage with iptables a firewall that was created from YaST. That is because in iptables, the firewall rules, which are easily set from the YaST module, are represented in a complicated way, in which many custom firewall chains are called. In Figure 10-1, you can see what the firewall configuration looks like from SUSE Firewall. In Listing 10-1, you can see the same, but from the iptables interface.

Figure 10-1. Firewall rules, as seen from SUSE Firewall
Listing 10-1. The Same Rules, As Seen with iptables
ldap:~ # iptables -L
Chain INPUT (policy DROP)
target     prot opt source               destination
ACCEPT     all  --  anywhere             anywhere
ACCEPT     all  --  anywhere             anywhere             ctstate ESTABLISHED
ACCEPT     icmp --  anywhere             anywhere             ctstate RELATED
input_ext  all  --  anywhere             anywhere
LOG        all  --  anywhere             anywhere             limit: avg 3/min burst 5 LOG level warning tcp-options ip-options prefix "SFW2-IN-ILL-TARGET "
DROP       all  --  anywhere             anywhere

Chain FORWARD (policy DROP)
target     prot opt source               destination
LOG        all  --  anywhere             anywhere             limit: avg 3/min burst 5 LOG level warning tcp-options ip-options prefix "SFW2-FWD-ILL-ROUTING "

Chain OUTPUT (policy ACCEPT)
target     prot opt source               destination
ACCEPT     all  --  anywhere             anywhere

Chain forward_ext (0 references)
target     prot opt source               destination

Chain input_ext (1 references)
target     prot opt source               destination
DROP       all  --  anywhere             anywhere             PKTTYPE = broadcast
ACCEPT     icmp --  anywhere             anywhere             icmp source-quench
ACCEPT     icmp --  anywhere             anywhere             icmp echo-request
LOG        tcp  --  anywhere             anywhere             limit: avg 3/min burst 5 tcp dpt:kerberos-adm flags:FIN,SYN,RST,ACK/SYN LOG level warning tcp-options ip-options prefix "SFW2-INext-ACC-TCP "
ACCEPT     tcp  --  anywhere             anywhere             tcp dpt:kerberos-adm
LOG        tcp  --  anywhere             anywhere             limit: avg 3/min burst 5 tcp dpt:ldap flags:FIN,SYN,RST,ACK/SYN LOG level warning tcp-options ip-options prefix "SFW2-INext-ACC-TCP "
ACCEPT     tcp  --  anywhere             anywhere             tcp dpt:ldap
LOG        tcp  --  anywhere             anywhere             limit: avg 3/min burst 5 tcp dpt:ldaps flags:FIN,SYN,RST,ACK/SYN LOG level warning tcp-options ip-options prefix "SFW2-INext-ACC-TCP "
ACCEPT     tcp  --  anywhere             anywhere             tcp dpt:ldaps
LOG        tcp  --  anywhere             anywhere             limit: avg 3/min burst 5 tcp dpt:ssh flags:FIN,SYN,RST,ACK/SYN LOG level warning tcp-options ip-options prefix "SFW2-INext-ACC-TCP "
ACCEPT     tcp  --  anywhere             anywhere             tcp dpt:ssh
ACCEPT     udp  --  anywhere             anywhere             udp dpt:kpasswd
ACCEPT     udp  --  anywhere             anywhere             udp dpt:kerberos
ACCEPT     udp  --  anywhere             anywhere             udp dpt:loadav
ACCEPT     udp  --  anywhere             anywhere             udp dpt:ldap
DROP       all  --  anywhere             anywhere             PKTTYPE = multicast
DROP       all  --  anywhere             anywhere             PKTTYPE = broadcast
LOG        tcp  --  anywhere             anywhere             limit: avg 3/min burst 5 tcp flags:FIN,SYN,RST,ACK/SYN LOG level warning tcp-options ip-options prefix "SFW2-INext-DROP-DEFLT "
LOG        icmp --  anywhere             anywhere             limit: avg 3/min burst 5 LOG level warning tcp-options ip-options prefix "SFW2-INext-DROP-DEFLT "
LOG        udp  --  anywhere             anywhere             limit: avg 3/min burst 5 ctstate NEW LOG level warning tcp-options ip-options prefix "SFW2-INext-DROP-DEFLT "
DROP       all  --  anywhere             anywhere

Chain reject_func (0 references)
target     prot opt source               destination
REJECT     tcp  --  anywhere             anywhere             reject-with tcp-reset
REJECT     udp  --  anywhere             anywhere             reject-with icmp-port-unreachable
REJECT     all  --  anywhere             anywhere             reject-with icmp-proto-unreachable
Setting Up a Firewall with SUSE Firewall
To keep things simple, in this book, you’ll learn how to configure a firewall, using SUSE Firewall.
Understanding SUSE Firewall Core Components
SUSE Firewall is based on a few core principles. If you want to set up a firewall successfully, you have to know how to handle each of the following:
- Interfaces: These are the network cards the firewall is using.
- Zones: Each interface is configured in a zone. The zone configuration allows users to make an easy distinction between secure environments, partially secured environments, and insecure environments.
- Services: Services are the basic entities that you want to add to firewall zones.
Before starting firewall configuration in the SUSE Firewall YaST module, let’s have a look at what is behind it. First, there is the file /etc/sysconfig/SuSEfirewall2. This file contains all settings that you’ll be making with YaST. The file behaves as a typical /etc/sysiconfig script: it is processed at the time the firewall starts, and all variables that are defined in the script are activated. Even if you can modify this script manually, you shouldn’t, because the YaST module provides an excellent method to do exactly the same.
Next, there are the service definition files in /etc/sysconfig/SuSEfirewall2.d/services. In these files, properties of specific services are defined. By default, a limited amount of services is defined, but it is relatively easy to add your own services. In Listing 10-2, you can see the contents of the sander service file I created:
Listing 10-2. Example of a Service File
ldap:/etc/sysconfig/SuSEfirewall2.d/services # cat sander
## Name: sander
## Description: Opens ports for the sander Server (sander).

# space separated list of allowed TCP ports
TCP="sander"

# space separated list of allowed UDP ports
UDP="sander"

# space separated list of allowed RPC services
RPC=""

# space separated list of allowed IP protocols
IP=""

# space separated list of allowed UDP broadcast ports
BROADCAST=""
As you can see, the service file is relatively simple. As a starting point, it contains only the TCP and UDP ports that have to be opened. In the example, file names are used. These names match the definitions in /etc/services, in which I have added TCP and UDP ports 778 as ports for the sander service. The service files also allow for additional configuration, such as a specification of RPC services (used in NFS environments) or very rarely used IP services that are allowed to the service. The services files created in /etc/sysconfig/SuSEfirewall2.d/services are all available in the YaST firewall module, which allows you to configure the firewall in an easy but consistent manner.
Using YaST to Set Up a Firewall
From YaST, you’ll select Security and Users ![]() Firewall to create a firewall configuration. This opens the interface that you see in Figure 10-2.
Firewall to create a firewall configuration. This opens the interface that you see in Figure 10-2.

Figure 10-2. Configuring a firewall from YaST
On the Start-Up tab, you’ll enable the firewall. If you haven’t disabled it during installation, it will be enabled by default. On the Interfaces tab, you can see the network interfaces that were found on your computer and the zone they are currently configured in. As services are allowed or denied in zones, you should make sure to configure a zone for each interface. Three zones are available:
- Internal: This is the trusted network, where no restrictions are required.
- External: This is the Internet zone, where security needs to be at the highest level.
- Demilitarized: This is the zone behind the internal and the external zone, where typically, web services and other services that have to be publicly available reside.
Figure 10-3 gives a schematic overview of the different zones.
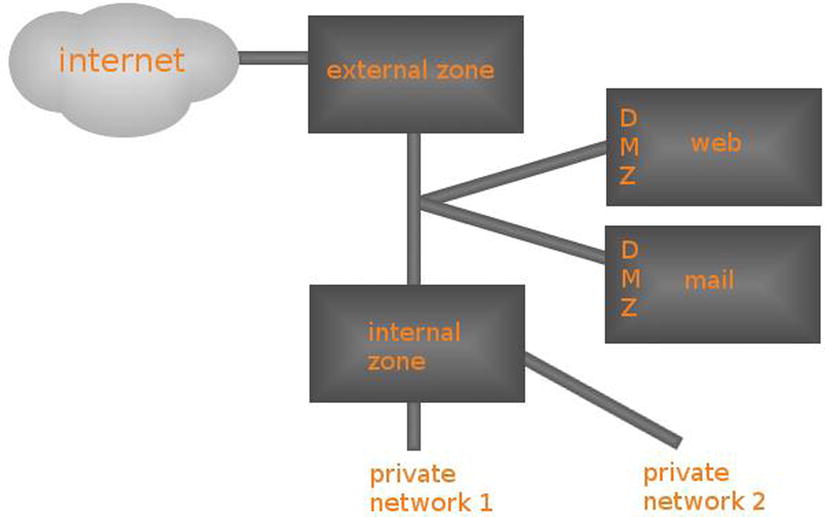
Figure 10-3. Schematic overview of zone configuration
Your first task as a firewall administrator is to assign each interface to a zone. To do this, select the Interface and navigate to the Change option. This option provides a drop-down list from which you can select the zone you want to use. Working with zones makes it easy to assign services to multiple network cards.
Allowed Services
The Allowed Services tab (see Figure 10-4) allows you to select services and add them to a zone. From this interface, you can also add your own services, as an alternative to modifying the configuration file directly, as described earlier in this chapter.
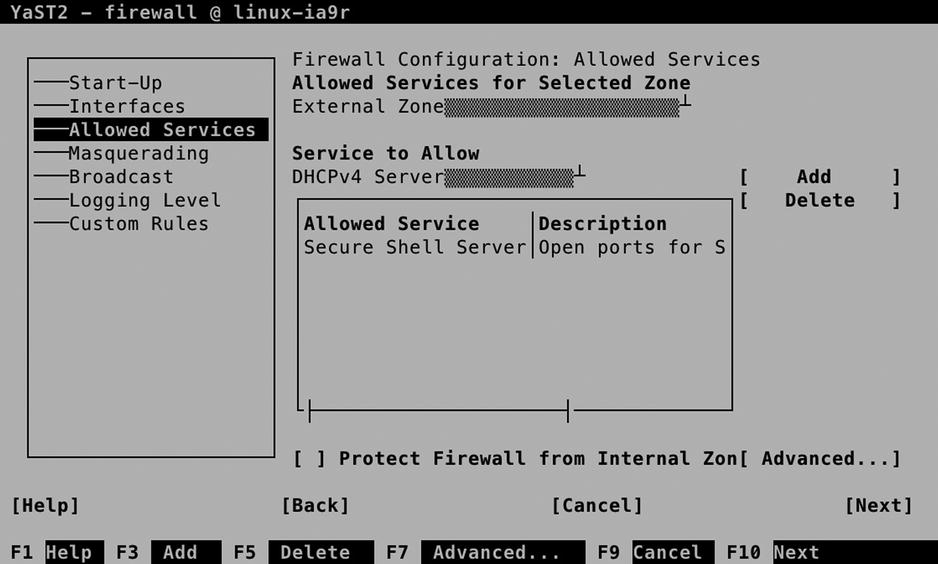
Figure 10-4. Managing services
To manage a service, you first select the zone you want to add the service to. Make sure it corresponds to the network interface you want the services to be allowed on. You will notice that in the Internal Zone, all services are allowed, and no restriction is applied by default. In the External Zone and the Demilitarized Zone, you will have to specify which services you want to allow yourself.
After selecting the zone you want to configure, you can select the service you want to allow. To do this, use the Service to Allow drop-down list and select Add, to add it. You will now see it in the list of allowed services.
The Advanced option on the Allowed Services tab makes it possible to define your own services (see Figure 10-5). This can be useful if you have to set up more complicated services that aren’t available by default. You can specify multiple ports and even IP protocols. (This is useful if you’re interested in such protocols as esp, smp, or chaos. If you have no clue what these are—as is the case for the majority of Linux admins on this planet—you don’t need them.)

Figure 10-5. Defining custom services
Before setting up Masquerading, you have to know what you’re dealing with. Figure 10-6 gives a schematic overview. In IP Masquerading, also known as Network Address Translation (NAT), you’ll always have an external and an internal network. On the external network, public IP addresses, which can be reached directly, are used. On the private network, IP addresses from the private IP address ranges can be reached. These addresses are not directly accessible from the Internet. The following IP address ranges can be used as private IP addresses. These addresses will never be routed on the Internet.
- 10.0.0.0/8
- 172.168.16.0/20
- 192.168.0.0/16
In Masquerading, two solutions are used.
- Internal clients can use the public IP address of the Masquerading router to go out on the Internet. This solution is referred to as dynamic NAT.
- Port forwarding can be used to define publicly accessible ports on the router, which are forwarded to private IP addresses on the internal network. This solution is referred to as port forwarding.

Figure 10-6. NAT schematic overview
In both solutions, the Linux kernel routes packets between networks and is configured to keep track of connections in the NAT table. In the schematic overview in Figure 10-6, you can see that on the NAT router, a public IP address, 214.112.116.13, is used. In this IP address, two ports are available: 2525 and 800. Behind these ports there must be a port-forwarding configuration that tells the NAT router that all traffic coming in on port 2525 is forwarded to 10.0.0.11:25 and all traffic addressed to port 800 is forwarded to 10.0.0.10:80.
In dynamic NAT, it is the end user who initiates the traffic. Have a look at Figure 10-7, for a schematic overview. In this overview, a user at IP address 10.0.0.60 issues a request to go to http://www.sander.fr. As this name resolves to IP address, in step 2, a packet is created with the destination address 217.70.184.38:80. The source address in this packet is 10.0.0.60:2345, in which the dynamic port 2345 is used as an identifier when the answering packet comes back from the target web server.
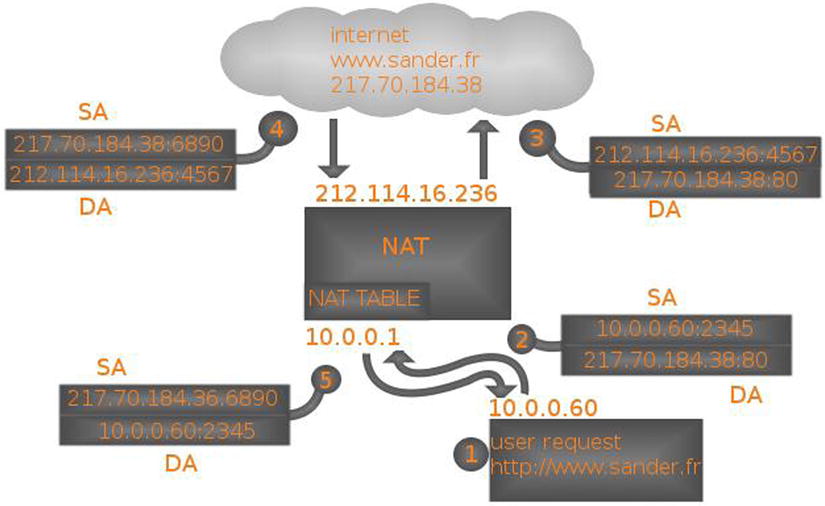
Figure 10-7. Dynamic NAT schematic overview
Before it can be further processed, the packet arrives at the NAT router. This router takes out the source address and stores it in an internal table, in which all outstanding NAT requests are stored. Next, the NAT router can re-create the packet, where, in step 3, the destination address is still the same, but the packet source address is now replaced with the IP address of the NAT router.
When the packet arrives at its destination, the destination server knows no better than that the packet comes from 212.114.16.236:4567, so the answer is sent back to that IP address in step 4. When the packet arrives on the NAT router, it uses port 4567 to identify the NAT request in the NAT table, which allows it to find the original request from the NAT client. This allows the NAT router in step 5 to send back a packet to the original client, who isn’t aware at all of everything that has happened to the packet.
Setting Up Masquerading
Setting up Masquerading from YaST is easy. In the Firewall module, select the Masquerading tab and select Masquerade Networks. This is all you have to do to set up dynamic NAT.
To configure port forwarding, you select Add, from the YaST Masquerading module. This opens the interface that you see in Figure 10-8. With this interface, the following options are available:
- Source Network: This option allows you to specify the allowed source network addresses. The address 0/0 opens the port-forwarding rule to any client.
- Protocol: Select TCP, UDP, or any other upper layer client protocol.
- Requested IP: This optional option allows you to make this rule available on one specific public IP address only.
- Requested Port: This is the port that must be available on the public IP address of your IP Masquerading router.
- Redirection: The private IP address that the request has to be forwarded to
- Redirect to Port: The port on the target IP address the request has to be forwarded to.

Figure 10-8. Setting up port forwarding
Notice that the option Redirect to Port is optional. Without this option, requests will be directed to the same port. This allows you, for example, to open port 80 on the Masquerading router and forward that to the same port on the IP address in the internal network.
Broadcast
A specific case that must be handled by a firewall is broadcast packets. Some services, such as CUPS printing, need broadcast to announce and discover the availability of services. If you have opened the firewall for a service that needs broadcast packets, it will automatically be added to the Broadcast overview screen that you see in Figure 10-9. Be careful setting up broadcast services yourself, because this is not typically what you want on an Internet connection.
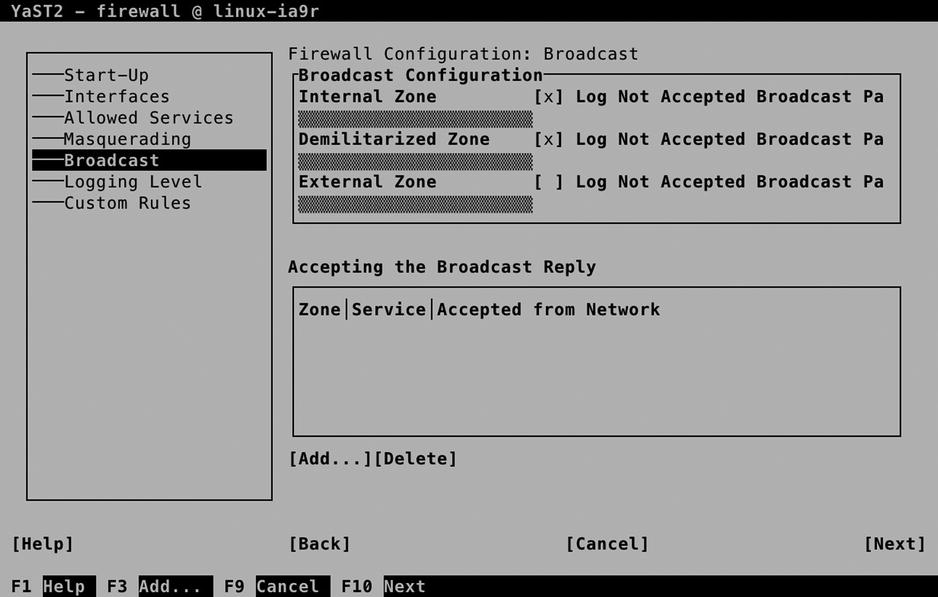
Figure 10-9. Firewall broadcast settings
Logging Level
In a firewall, it is possible to log all packets. Believe me, you don’t want that, because the log system will get overwhelmed with messages. You do, however, want to see entries occurring in the log files, if something critical happens. That is exactly what is configured in the Logging Level tab. If you need more information, you can use the drop-down lists to select another log level for logging of accepted packets, as well as logging of not accepted packets (see Figure 10-10).

Figure 10-10. Specifying the log level
Custom Rules
SUSE Firewall allows you to specify custom rules as well. In a custom rule, you can specify exactly what you want the firewall to allow or disallow. To start with, it permits you to open a source network, allowing or denying packets from that specific network only. Next, you can specify source and destination ports, as well as some of the advanced additional options that can be used with iptables.
Custom rules can be used, if you have specific needs. Imagine that you want to open the web service, but only for hosts coming from the network 10.0.0.0/24. You would define the source network 10.0.0.0/24, specify TCP as the protocol, and add the destination port 80 (see Figure 10-11).

Figure 10-11. Adding custom rules
Before writing the firewall configuration, you’ll see a summary of selected settings. This brings all you have configured so far together in one interface. If the summary doesn’t provide you with enough detail, make sure to select the Show Details option as well. This option provides valuable additional information, as you can see in Figure 10-12. After confirming that all is configured the way you want it to be, select Finish, to write the configuration to your system.

Figure 10-12. Before writing the configuration, make sure to check the summary
Checking SUSE Firewall Configuration
As an administrator, it is always good to know where you can find the configuration you have created. In the case of SUSE Firewall, most of the settings are stored in the file /etc/sysconfig/SuSEfirewall2. You can see that Listing 10-3 contains, in particular, many of the Masquerading options, which are easily recognized by the letters FW.
Listing 10-3. Checking Firewall Configuration
ldap:/etc/sysconfig # cat SuSEfirewall2 | grep -v ^# | grep -v '^$'
FW_DEV_EXT="eth0"
FW_DEV_INT="eth1"
FW_DEV_DMZ=""
FW_ROUTE="yes"
FW_MASQUERADE="yes"
FW_MASQ_DEV=""
FW_MASQ_NETS=""
FW_NOMASQ_NETS=""
FW_PROTECT_FROM_INT="no"
FW_SERVICES_EXT_TCP=""
FW_SERVICES_EXT_UDP=""
FW_SERVICES_EXT_IP=""
FW_SERVICES_EXT_RPC=""
FW_CONFIGURATIONS_EXT="kadmind kdc openldap sshd"
FW_SERVICES_DMZ_TCP=""
FW_SERVICES_DMZ_UDP=""
FW_SERVICES_DMZ_IP=""
FW_SERVICES_DMZ_RPC=""
FW_CONFIGURATIONS_DMZ="sshd"
FW_SERVICES_INT_TCP=""
FW_SERVICES_INT_UDP=""
FW_SERVICES_INT_IP=""
FW_SERVICES_INT_RPC=""
FW_CONFIGURATIONS_INT="sshd"
FW_SERVICES_DROP_EXT=""
FW_SERVICES_DROP_DMZ=""
FW_SERVICES_DROP_INT=""
FW_SERVICES_REJECT_EXT=""
FW_SERVICES_REJECT_DMZ=""
FW_SERVICES_REJECT_INT=""
FW_SERVICES_ACCEPT_EXT="10.0.0.0/24,tcp,80"
FW_SERVICES_ACCEPT_DMZ=""
FW_SERVICES_ACCEPT_INT=""
FW_SERVICES_ACCEPT_RELATED_EXT=""
FW_SERVICES_ACCEPT_RELATED_DMZ=""
FW_SERVICES_ACCEPT_RELATED_INT=""
FW_TRUSTED_NETS=""
FW_FORWARD=""
FW_FORWARD_REJECT=""
FW_FORWARD_DROP=""
FW_FORWARD_MASQ="0/0,10.0.0.20,tcp,2525,25"
FW_REDIRECT=""
FW_LOG_DROP_CRIT="yes"
FW_LOG_DROP_ALL="no"
FW_LOG_ACCEPT_CRIT="yes"
FW_LOG_ACCEPT_ALL="no"
FW_LOG_LIMIT=""
FW_LOG=""
FW_KERNEL_SECURITY=""
FW_STOP_KEEP_ROUTING_STATE=""
FW_ALLOW_PING_FW=""
FW_ALLOW_PING_DMZ=""
FW_ALLOW_PING_EXT=""
FW_ALLOW_FW_SOURCEQUENCH=""
FW_ALLOW_FW_BROADCAST_EXT="no"
FW_ALLOW_FW_BROADCAST_INT="no"
FW_ALLOW_FW_BROADCAST_DMZ="no"
FW_IGNORE_FW_BROADCAST_EXT="yes"
FW_IGNORE_FW_BROADCAST_INT="no"
FW_IGNORE_FW_BROADCAST_DMZ="no"
FW_ALLOW_CLASS_ROUTING=""
FW_CUSTOMRULES=""
FW_REJECT=""
FW_REJECT_INT=""
FW_HTB_TUNE_DEV=""
FW_IPv6=""
FW_IPv6_REJECT_OUTGOING=""
FW_IPSEC_TRUST="no"
FW_ZONES=""
FW_ZONE_DEFAULT=''
FW_USE_IPTABLES_BATCH=""
FW_LOAD_MODULES="nf_conntrack_netbios_ns"
FW_FORWARD_ALWAYS_INOUT_DEV=""
FW_FORWARD_ALLOW_BRIDGING=""
FW_WRITE_STATUS=""
FW_RUNTIME_OVERRIDE=""
FW_LO_NOTRACK=""
FW_BOOT_FULL_INIT=""
EXERCISE 10-1. CONFIGURING A FIREWALL
This exercise allows you to apply some firewall settings. It assumes nothing has been configured yet.
- From a root shell, type “yast firewall,” to start the YaST firewall module directly.
- On the Start-Up tab, select Enable Firewall Automatic Starting.
- Configure your network card in the external zone, using the options on the Interfaces tab.
- On the Allowed Services list, add at least the Secure Shell Server. There is no need to do anything else, because while configuring the individual modules, you’ll use the options on the Start-Up tab to open the firewall for the specific service.
For many services that are offered by a modern server, additional security is a requirement. By using this security, you can make sure that traffic to the server is encrypted and that the identity of the server is guaranteed. To realize this security, SSL is the standard. Before talking about setting up SSL certificates, you’ll now first read how the public/private key is used in common cryptography.
Understanding SSL
When thinking about SSL, many people think about web servers only. SSL certificates, however, are used by other servers as well. Without SSL, anyone can capture passwords that are sent between a POP or IMAP mail client and the mail server, and also, LDAP is commonly protected with SSL, to make sure that the passwords that are sent over cannot be captured when authenticating against an LDAP server. This makes creation and distribution of certificates an essential task for administrators.
If a user wants to establish a connection to a site, this connection must be protected. To ensure a protected connection, public and private keys are used. These keys can be used for the following three different reasons:
- To encrypt traffic from and to a server
- To prove the identity of another party
- To verify that a message has not been tampered with
Let’s take an example in which public/private keys are used to encrypt traffic that is sent to a server, something that is common during Internet use.
- When the connection to the server is first initialized, the server sends its public key infrastructure (PKI) certificate. This contains the public key of the server and is signed with the private key of the certificate authority (CA) that the owner of the server has used.
- To verify that the PKI certificate can be trusted, the signature of the CA that is in the certificate is checked. If the signature can be traced back to a public key that already is known to the client, the connection is considered to be trusted.
- Now that the connection is trusted, the client can send encrypted packets to the server. To encrypt the data traffic, the public key of the server is used.
- As public/private-key encryption is one-way encryption, only the server is capable of decrypting the traffic, by using its private key.
The essential part in working securely with SSL is the certificate. The certificate contains the public key of the server that users are going to employ to establish a secured connection, and it contains a “proof of identity,” which is normally provided by a CA. This CA can be a commonly trusted external server, or it can be an internal service that is used to create self-signed certificates.
The use of public/private keys is a great improvement in security on the Internet. But there is a challenge. How can the receiver be sure that the public key that is received really comes from the server that it is supposed to come from and not from a hacker who has hijacked the connection? This is where the CA comes in.
To guarantee the authenticity of a public key, a CA is used. The role of the CA is to sign certificates. A certificate can be generated by just any server, and it is the role of the CA to sign these certificates with its private key. This, however, only is useful if the public key of the CA is known to the client that receives the certificate. If this is not the case, the user will see a message indicating that he’s using an untrusted connection and will probably close the connection. So, for common use on the Internet, you better make sure that the CA is known to everyone. For private internal use, an in-house CA can be used as well.
If you want to create your own CA, you better make sure that the users that are going to use it will also trust it. You can accomplish this by having its certificates signed by a commonly known CA. Because the public keys of these commonly known CAs are available in most client applications, the CA that uses it will transparently be accepted. The only drawback is that, in general, you need to pay the CA that is going to sign your certificates. If you don’t want or don’t need to do that, you can use a self-signed certificate.
In case you are creating a certificate that is to be trusted, you need to have it signed. To do this, you’ll send a certificate signing request. You’ll learn in this chapter how you can do this.
In this section, you will learn how to run your own CA. If you do that, you can have its certificates signed by a trusted root. Alternatively, you can use self-signed certificates. This is the kind of certificate in which you mention “You can trust me, because I say so.” Not really the kind of security that you want to show your customers on the Internet, but for internal use it works well.
If you’re using self-signed certificates anywhere in the chain, the first time a user uses it, he or she will get a message indicating that there is a problem with the trustworthiness of the certificate. If your users are mainly internal users, you can deal with that, by importing the certificates on the users’ workstations. If they are external users, you have to convince them in some way that the certificate is to be trusted. If you’re offering an SSL-protected web server for your local hockey club, that’s not too hard to do, but you don’t really want to do this for the customers of your web shop on the Internet.
Configuring the YaST Certificate Authority
On the YaST Security and Users tab, the option CA Management is offered (see Figure 10-13). You may find an already existing certificate authority (CA), or you can create one for yourself. To allow for the management of certificates in your own environment, it’s a good idea to create your own CA. To do this, select Create Root CA.
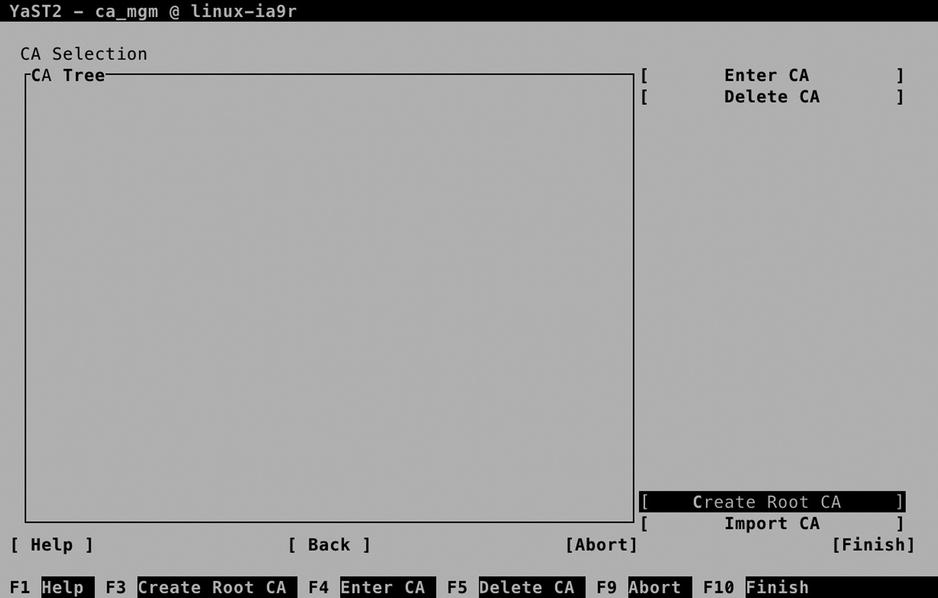
Figure 10-13. The CA Selection interface
On the Create New Root CA screen (see Figure 10-14), you have to enter the properties of the CA. The amount of completeness depends on what you’re going to use the CA for. If you’re using it for internal purposes only, it suffices to specify CA Name and Common Name. If you want to use it for signing external certificates as well, it’s a good idea to be as complete as possible, to make it easy for users to identify your CA.
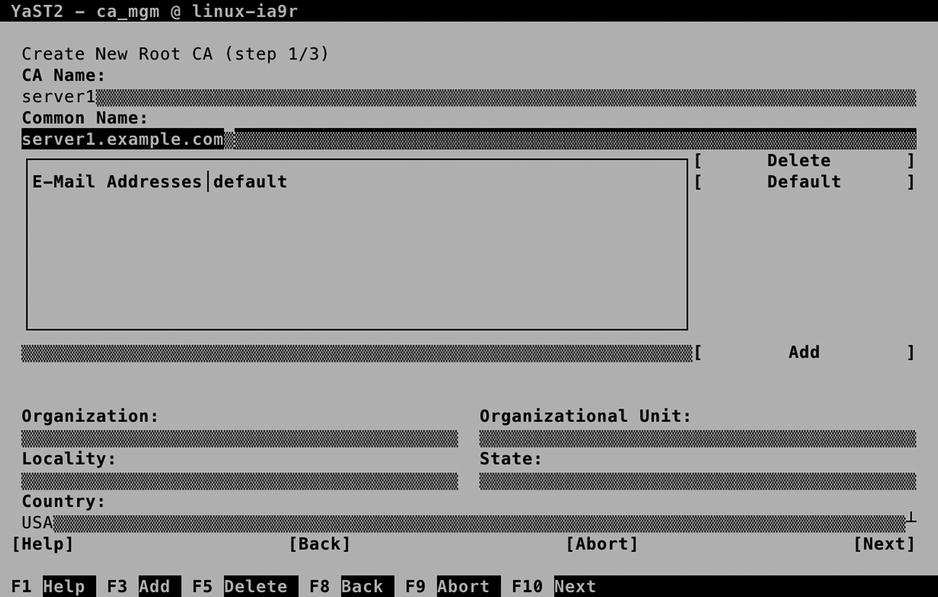
Figure 10-14. Creating a root CA
The CA Name is for internal purposes only. The Common Name is important, because it is used for identification of the certificate. It doesn’t have to match the name of the server the CA is running on, so make sure you pick something that makes sense and makes it easy to identify the CA from a certificate that it has signed. For these verification purposes, it’s also a good idea to include at least an e-mail address and, if possible, the name and local information about the organization that issued the CA.
On the second screen of the Create New Root CA procedure, you’ll enter a password that protects the CA, a key length, and a validity period. The password is mandatory, so choose wisely. The key length, by default, is set to 2048 bits, and the standard validity is 3650 days. In general, there is no reason to change these parameters.
If you have advanced requirements for setting up the properties of the CA, you can do so by selecting Advanced Options. This opens the screen shown in Figure 10-15, on which you can set a wide variety of usage options. In general, you don’t need them for setting up your own CA for internal usage.

Figure 10-15. Specifying advanced CA options
Before selecting Create on the last screen of the procedure, you can verify the summary of all options that have been selected. Once the CA is created, you go back to the CA Selection screen, from which you can enter the CA, to issue certificates. Remember that a CA by itself doesn’t serve any purpose other than to sign the certificates that your services are going to use.
Creating Certificates
Now that you have your own certificate authority (CA), you can go on and create certificates. To understand what you are doing, it’s good to remember the big picture and make sure you understand what the certificates are used for.
- Every service that requires security services needs access to a private key as well as a public key.
- When a client connects to that service, he or she needs access to the public key certificate of the CA that signed the service certificate.
- If the certificate is signed by a commonly known CA, often no additional work is required. If the certificate is self-signed, the client application needs access to the CA certificate as well.
To create certificates, from the YaST CA Management main screen, you first have to enter the CA. After supplying the CA password, you gain access to all CA Management options (see Figure 10-16).
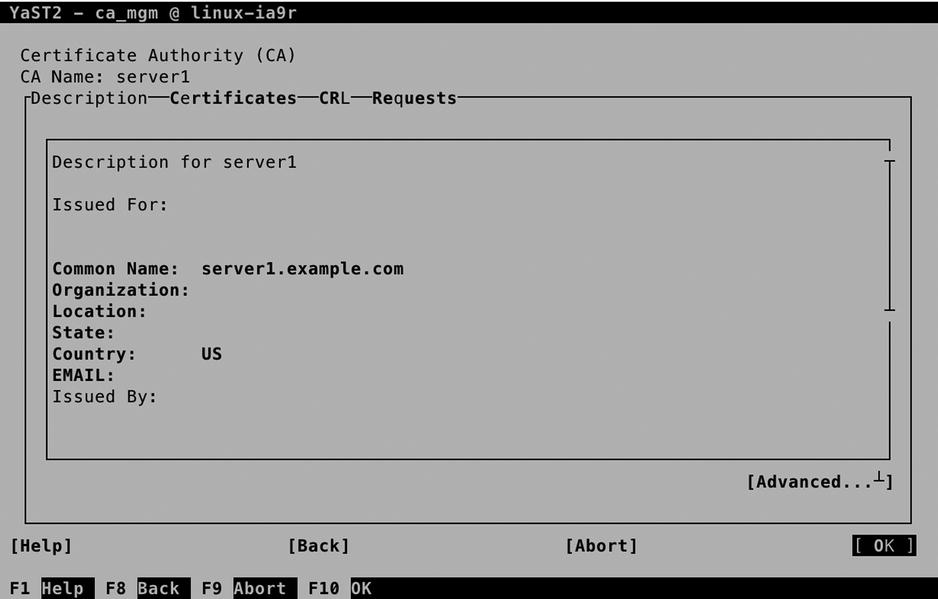
Figure 10-16. The CA Management screen
To create a certificate, activate the Certificates tab and select Add. This shows a small drop-down list from which you can specify whether to create a Server Certificate or a Client Certificate. From this drop-down list, select Add Server Certificate. This opens the screen shown in Figure 10-17.

Figure 10-17. Specifying certificate properties
The single most important option when creating a new certificate is the Common Name. This must match the name of the server that is going to use the certificate. If it doesn’t match, it will most likely be rejected by the client who is going to receive the certificate. In general, you have two options here.
- Use the name as returned by the uname -ncommand, to use the certificate as a common server certificate. If you’re not sure which option is best, select this option.
- Use the name that is similar to the service that is being configured to use it. So, if your server name is server.example.com, but you’re going to use the certificate on ldap.example.com, the common name should be ldap.example.com.
On the second screen (see Figure 10-18), you’ll have to set a password to protect the private key that you are going to generate. Consider this a mandatory activity: the password is going to protect the key from physical theft. To make it easy, you can also use the CA password as the certificate password. After specifying the password, you can select a Key Length and a Valid Period. A longer key length means better protection, but it’s more complex and, therefore, can make the services that are using it a bit slower. The default key length of 2048 bits works well for most uses.

Figure 10-18. Setting certificate encryption properties
An option to consider favorably is the Valid Period. By default, it is set to 365 days, which means that you’ll have to create and generate new certificates every 365 days. For security reasons, it is good to have a validity period of only 365 days, but that means you’ll have to be prepared to replace all keys after a year. So, you better put a notification in your agenda, if you don’t want to find out one year from now that your keys have expired, which makes authentication of all users on your LDAP server impossible.
As is the case for the CA, when creating a server certificate, you can specify many advanced options as well. For most uses, you don’t need them, and that’s why I’m not explaining them here either. After specifying all required properties, press Next, verify all settings in the overview screen, and click Create, to create the certificate.
Understanding Certificate Exports
Merely creating a certificate isn’t enough. You’ll have to do something with it, and that means that you have to export it. This is where certificate management often goes wrong. The reason is that there are many different kinds of exports that can be performed, and they are often mixed up. Let’s first line up the different scenarios.
- You want to use the certificate you’ve just created on the server where you’ve created it.
- You want to use the certificate you’ve just created on another server.
- You have to make sure that client applications can use the certificate you’ve just created.
The first scenario is the easiest. If you want to use the certificate you’ve just created on the same server, you can just export it as the default server certificate. This will at least allow your applications to access the certificate in an easy way. As the certificates we’ve just created are self-signed certificates, you will have a problem with client applications, however. Fix this by exporting the CA certificate as well, and make it available to client applications that have to use it.
If you’re using one CA in your network to create certificates for use on other servers, you’ll have to export the certificate to files and make these files available on the other server. In this case, you still have to make sure that the CA certificate is available for use by the clients.
In any case, as the certificates you’ve created here are self-signed certificates, you’ll have to make the CA certificate available to clients as well. This step is often skipped, which inevitably poses problems when using services that are set up to use your certificates.
Note that in all the preceding cases described, you’ll have to export the CA certificate for use on the client computers. That is because the certificates that have been created here are self-signed certificates, and the validity of the certificates cannot be traced back to the signing CA by the clients. That’s why you have to do it manually.
If you have your certificates signed by an external certificate authority, the signing CA can be traced back to a known CA by the client application. On the client, the applications that require certificates have access to the certificates of commonly known CAs. These certificates are installed locally on the client, and that means that the certificates you’ve issued can be verified without any further intervention. Later in this chapter, you can read how to set up your CA to use certificates that are externally signed.
Setting Up a Default Server Certificate
The easiest scenario is to set the certificates you’ve just created as the default server certificates. To do this, after entering the CA, select the Certificates tab and click Export. Then select Export as Common Server Certificate (see Figure 10-19) and enter the password that you’ve used when creating the certificate pair.

Figure 10-19. Setting common server certificates
As a result of this export action, two certificates have been created in the directory /etc/ssl/servercerts. The servercert.pem file contains the public key certificate. This is what services are going to offer to clients wanting to establish an SSL session. The serverkey.pem file contains the private key of the server. It needs the highest level of protection, and therefore, it is accessible by the root user only. Consider the location /etc/ssl/servercerts a temporary location, but you will further configure the certificate locations when setting up services to use the certificates.
Exporting Certificates for Use on Another Server
In a corporate environment, it makes sense to run one CA only. Preferably, this CA is not even network-connected and is used to generate public/private key pairs for all of the servers needing access to PKI certificates. If that is the case, from the CA server, you have to export the certificates. Here again, two options are available.
- Export the public key certificate as well as the private key of the certificate to files.
- Export both public key certificates as private key to an LDAP server, from which it can easily be accessed.
To export the certificates to a file, from the Certificate Authority management screen, select Certificates, then Export, and then Export to File (see Figure 10-20).

Figure 10-20. Exporting certificates to a file
You’ll now see the Export Certificate to File screen (see Figure 10-21), from which you can choose from multiple options. From among these options, you will have to make a few choices, which are described as follows:
- File format: Depending on the application that is going to use the certificates, you can choose between PEM, DER, and PKCS12 formats. As long as your application supports it, it doesn’t really matter what you select here. PEM is by far the most common format.
- Encryption level: If you want to add additional protection to the certificates while they are in transit, make sure to export them as encrypted certificates.
- If you want client users to have access to all certificates, select an option that includes the CA Chain. This copies over the certificate of the signing CA as well.
- Select if you want to export the key, the certificate, or both of them.

Figure 10-21. Exporting the certificate and key
Next, you can specify the password that was used when creating the private key (assuming that you have selected to export the private key as well). Make sure you also export the name of the destination file. For use of the certificates on another server, it’s a good idea to put them in a location where the other server can easily access them, like an FTP server. Be careful, though, when transferring private keys!
![]() Tip Even if it is convenient to export the key as well as the certificate in one run, it means you’ll have to extract them as well, which isn’t always obvious. To make it easy to use the certificates on the other server, I recommend that you first export the certificate to a file and then export the key to another file.
Tip Even if it is convenient to export the key as well as the certificate in one run, it means you’ll have to extract them as well, which isn’t always obvious. To make it easy to use the certificates on the other server, I recommend that you first export the certificate to a file and then export the key to another file.
Making Certificates Available for Use on Clients
Now that you’ve made the certificates available to use on other servers, you have to make the certificate authority (CA) certificate available to client applications using these certificates as well. To do this, from the YaST CA Selection screen, choose Enter CA. Once in the Certificate Authority screen, select Advanced ![]() Export CA to File (see Figure 10-22).
Export CA to File (see Figure 10-22).

Figure 10-22. Exporting the CA certificate
Next, in the Export Format box, select Only the Certificate in PEM Format and export it to a commonly accessible location.
Working with Externally Signed Certificates
Up to now, you have read how to create certificates for use within your own network environment. The certificates are self-signed, but that doesn’t matter, as you have control over the clients as well, and you can make the CA certificates easily available to the clients. In an Internet environment in which the client often is anonymous, you better work with certificates that are externally signed. To do this, from the YaST Certificate Authority screen, select Requests and add a new request. Export the request to files and send these over to the signing certificate authority. Next, you have to wait until you get them back.
Alternatively, you can often enter a management interface on the certificate authority and generate the certificate from there. Make sure to export both the key and the certificate into one file. To use them on your server, you have to make the certificate files physically available on the server. Next, from YaST, select Security and Users ![]() Common Server Certificate. This allows access to the screen shown in Figure 10-23. From this screen, select Import/Replace.
Common Server Certificate. This allows access to the screen shown in Figure 10-23. From this screen, select Import/Replace.

Figure 10-23. Importing externally signed certificates
From here, you can select the file you have received from the external CA. Enter the password and select Next, which allows you to specify the location where you want to put the certificate file and its associated private key.
EXERCISE 10-2. CONFIGURING A CERTIFICATE ENVIRONMENT
In this exercise, you’ll set up a certificate environment. You will first enter the default CA and create a certificate as well as a key. Next, you will export these to a file, to import them on another server. You will also make the certificate of the signing CA available, by putting it in an FTP server document root.
- On the server that you want to use as a CA, start the YaST CA Management utility and enter the CA.
- Select the Certificates tab and use Add to add a new certificate. Select Add Server Certificate.
- As the common name, use the fully qualified DNS name of the server that is going to use the certificate. Proceed to create the certificate.
- Still from the CA Management module, select the certificate you’ve just created and select Export to export it.
- Use Export to File and select Certificate and Key Unencrypted in PEM Format. Enter a password and use the file name /root/ldap.pem.
- From the YaST CA Management main screen, select Description. On this tab, select Advanced
 Export to File, to export the CA certificate to a file as well. Use the name /root/ca.pem.
 - Use zypper in vsftpd to install the vsftpd server. Copy the ca.pem file to the FTP server document root /srv/ftp.
- Use ssh to copy the ldap.pem file to the home directory of the user root on the target server. (This is the server on which services are going to use this certificate.)
- On the target server, you will use the certificates when configuring services. In Chapter 11, you’ll learn how to set up LDAP to use the certificates.
Summary
In this chapter, you have learned how to set up security for a server that is connected to the network. You have configured a firewall, and you have configured a certificate authority with related certificates. In the next chapter, you’ll learn how to configure the common network services NTP, DNS, DHCP, and LDAP.