
![]()
Basic Network Services: xinetd, NTP, DNS, DHCP, and LDAP
SUSE Linux Enterprise Server (SLES) can be used very effectively to provide different services on the network. In this chapter, you’ll learn how to work with such elementary services as NTP, DNS, DHCP, and LDAP. You’ll also learn how to set up different network services. We’ll begin with the xinetd service, also known as the Internet super service. This service can be used to listen on different ports and to start the related service as a request comes in on its port. Next, you’ll learn how to set up your server to synchronize time on the Internet. Following that, you’ll learn how to set up a DNS server, as well as a DHCP server, for automatic provision of IP-related settings to nodes. In the last section of this chapter, you’ll learn how to use LDAP as a centralized authentication service.
xinetd
In the days when servers had limited amounts of RAM, it was important not to waste the available resources. One way of doing this was by using the Internet super service inetd, which later was replaced with a more advanced version, known as xinetd.
The Internet super service is configured to listen on different ports, for a number of different protocols. At the moment that a request comes in on one of its ports, the associated service is started, and if the service hasn’t been used for an amount of time, the Internet super service can also shut it down.
To use xinetd, a few parts are involved. First there is the xinetd service; next, there is the generic configuration file /etc/xinetd.conf; and there are include files in the directory /etc/xinetd.d that are used to load specific services.
By default, no services are enabled for use with xinetd, which is why the xinetd service is also not started by default. To start and enable it, use systemctl start xinetd and systemctl enable xinetd. Once started, the systemctl status -l xinetd command gives detailed information about what it is doing. In its output (shown in Listing 11-1), you can see which service files have been processed and which services have been loaded.
Listing 11-1. Using systemctl status –l xinetd to Get Status Information
dbx:/etc/xinetd.d # systemctl status -l xinetd
xinetd.service - Xinetd A Powerful Replacement For Inetd
   Loaded: loaded (/usr/lib/systemd/system/xinetd.service; disabled)
   Active: active (running) since Sat 2014-07-05 07:06:43 EDT; 6s ago
 Main PID: 7345 (xinetd)
   CGroup: /system.slice/xinetd.service
           └─7345 /usr/sbin/xinetd -stayalive -dontfork
Jul 05 07:06:43 dbx systemd[1]: Starting Xinetd A Powerful Replacement For Inetd...
Jul 05 07:06:43 dbx systemd[1]: Started Xinetd A Powerful Replacement For Inetd.
Jul 05 07:06:44 dbx xinetd[7345]: Reading included configuration file: /etc/xinetd.d/chargen [file=/etc/xinetd.conf] [line=60]
Jul 05 07:06:44 dbx xinetd[7345]: Reading included configuration file: /etc/xinetd.d/chargen-udp [file=/etc/xinetd.d/chargen-udp] [line=14]
Jul 05 07:06:44 dbx xinetd[7345]: Reading included configuration file: /etc/xinetd.d/cups-lpd [file=/etc/xinetd.d/cups-lpd] [line=15]
Jul 05 07:06:44 dbx xinetd[7345]: Reading included configuration file: /etc/xinetd.d/daytime [file=/etc/xinetd.d/daytime] [line=11]
Jul 05 07:06:44 dbx xinetd[7345]: Reading included configuration file: /etc/xinetd.d/daytime-udp [file=/etc/xinetd.d/daytime-udp] [line=14]
Jul 05 07:06:44 dbx xinetd[7345]: Reading included configuration file: /etc/xinetd.d/discard [file=/etc/xinetd.d/discard] [line=15]
Jul 05 07:06:44 dbx xinetd[7345]: Reading included configuration file: /etc/xinetd.d/discard-udp [file=/etc/xinetd.d/discard-udp] [line=14]
Jul 05 07:06:44 dbx xinetd[7345]: Reading included configuration file: /etc/xinetd.d/echo [file=/etc/xinetd.d/echo] [line=15]
Jul 05 07:06:44 dbx xinetd[7345]: Reading included configuration file: /etc/xinetd.d/echo-udp [file=/etc/xinetd.d/echo-udp] [line=14]
Jul 05 07:06:44 dbx xinetd[7345]: Reading included configuration file: /etc/xinetd.d/netstat [file=/etc/xinetd.d/netstat] [line=15]
Jul 05 07:06:44 dbx xinetd[7345]: Reading included configuration file: /etc/xinetd.d/rsync [file=/etc/xinetd.d/rsync] [line=16]
Jul 05 07:06:44 dbx xinetd[7345]: Reading included configuration file: /etc/xinetd.d/servers [file=/etc/xinetd.d/servers] [line=12]
Jul 05 07:06:44 dbx xinetd[7345]: Reading included configuration file: /etc/xinetd.d/services [file=/etc/xinetd.d/services] [line=14]
Jul 05 07:06:44 dbx xinetd[7345]: Reading included configuration file: /etc/xinetd.d/systat [file=/etc/xinetd.d/systat] [line=14]
Jul 05 07:06:44 dbx xinetd[7345]: Reading included configuration file: /etc/xinetd.d/time [file=/etc/xinetd.d/time] [line=17]
Jul 05 07:06:44 dbx xinetd[7345]: Reading included configuration file: /etc/xinetd.d/time-udp [file=/etc/xinetd.d/time-udp] [line=15]
Jul 05 07:06:44 dbx xinetd[7345]: Reading included configuration file: /etc/xinetd.d/vnc [file=/etc/xinetd.d/vnc] [line=15]
Jul 05 07:06:44 dbx xinetd[7345]: Service discard will use IPv6 or fallback to IPv4
Jul 05 07:06:44 dbx xinetd[7345]: xinetd Version 2.3.15 started with libwrap loadavg options compiled in.
Jul 05 07:06:44 dbx xinetd[7345]: Started working: 1 available service
The xinetd.conf File
To set main xinetd parameters, you can modify the xinetd.conf file. This file contains generic settings that allow you to quickly enable or disable services, to specify logging, and to configure the default address that the xinetd service should be listening on. In Listing 11-2, you can see its default contents on SLES 12.
Listing 11-2. xinetd.conf Contents
defaults
{
# The next two items are intended to be a quick access place to
# temporarily enable or disable services.
#
#       enabled         =
#       disabled        =

# Previous default in SUSE - please don't forget to use the logrotate. The
# sample configuration is in /usr/share/packages/doc/xinetd/logrotate
#       log_type        = FILE /var/log/xinetd.log

# Define general logging characteristics.
        log_type        = SYSLOG daemon info
        log_on_failure  = HOST ATTEMPT
        log_on_success  = HOST EXIT DURATION

# Define access restriction defaults
#
#       no_access       =
#       only_from       = localhost
#       max_load        = 0
        cps             = 50 10
        instances       = 30
        per_source      = 10

#
# The specification of an interface is interesting, if we are on a firewall.
# For example, if you only want to provide services from an internal
# network interface, you may specify your internal interfaces IP-Address.
#
#       bind            = 127.0.0.1

# Address and networking defaults
#
#       bind            =
#       mdns            = yes
        v6only          = no

# setup environmental attributes
#
#       passenv         =
        groups          = yes
        umask           = 002

# Generally, banners are not used. This sets up their global defaults
#
#       banner          =
#       banner_fail     =
#       banner_success  =
}

includedir /etc/xinetd.d
The xinetd Include Files
To determine which services are enabled with xinetd, you will use the include files in /etc/xinetd.d. Some default include files have been copied there upon installation, and as administrator, you can add your own include files also. In Listing 11-3, you can see a sample include file for the systat service.
In each include file, you’ll find a couple of interesting parameters. First, there is disable, which specifies whether the service should be offered or not. Next, the user employed to run this service can be set, after which the server parameter tells xinetd which service process it should start. If the server uses arguments, these can be specified using the server_args parameter.
Listing 11-3. Sample xinetd Configuration File
service systat
{
        disable         = yes
        socket_type     = stream
        protocol        = tcp
        wait            = no
        user            = nobody
        server          = /bin/ps
        server_args     = -auwwx
}
EXERCISE 11-1. WORKING WITH XINETD
- Open the /etc/xinetd.d/netstat configuration file to enable the systat service in xinetd.
- Use systemctl start xinetd to start xinetd.
- Use systemctl status -l xinetd to give current usage information about the xinetd service.
NTP
On modern servers, many services can be used. Many of these services are very time-sensitive, which is why you must take care of time synchronization. A difference of just a few seconds may be enough for your database not to replicate or synchronize its data to other servers, which is why proper time synchronization is primordial. On SUSE Linux Enterprise Server (SLES), the Network Time Protocol is used to synchronize time between the local server and some time sources on the Internet.
Understanding Linux Time
In addition to the NTP server, the difference between the computer’s hardware clock and system clock also plays an important role. When a server boots, the hardware clock is read. Typically, this is the BIOS clock that is on the motherboard of the computer. Based on the current hardware clock setting, the system clock is set. Next, the ntpd process loads and seeks synchronization with an Internet time source. If there is a deviance, the system clock will synchronize with the Internet time. Changes that are made to the local clock are not synchronized back to the hardware clock. Such a synchronization can be forced, using the hwclock --systohc command (see Figure 11-1).
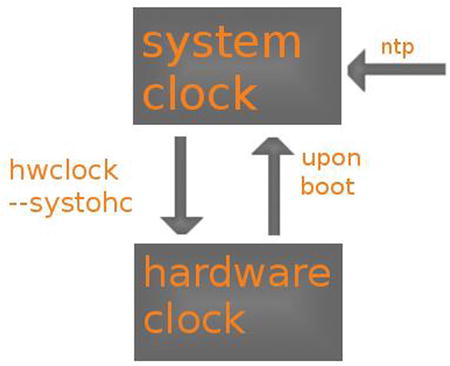
Figure 11-1. Linux time overview
To prevent changes from getting lost, this normally is a slow process. If, for instance, a ten-minute difference is found, the local system clock will increase or decrease its speed, to reach full synchronization after some time. This process can be sped up by using the iburst option in the NTP configuration file.
It is also important to know that the difference between a local clock and the time that is provided by an NTP server cannot be too great. If the difference is more than 15 minutes, the time source is considered to be insane and won’t be a candidate to synchronize with. For that reason, it is important to set local time to more or less the correct time, before starting synchronization.
Setting Time on SLES
To set time on SLES, YaST can be used. The YaST module for NTP configuration is available in Network Services ![]() NTP Configuration. This shows the screen in Figure 11-2.
NTP Configuration. This shows the screen in Figure 11-2.
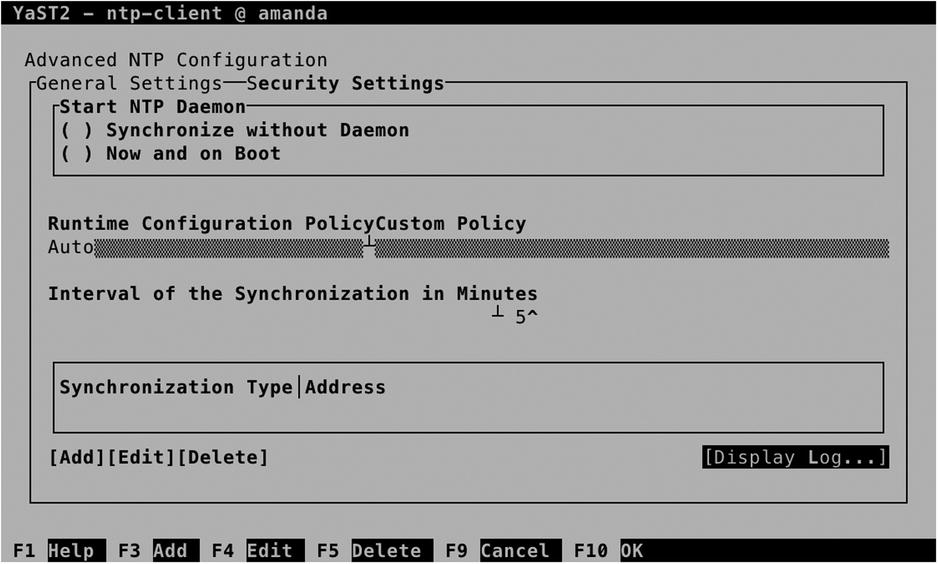
Figure 11-2. Configuring NTP settings in YaST
To start with, you should set the NTP daemon startup option. By default, it won’t be started. To have it started automatically, select Now and on Boot. Next, select Add, to add time servers to synchronize with. This offers the following five different synchronization types:
- Server is used to add an NTP server to synchronize with. Your server will just copy the time of the server to its local system clock.
- Peer is used to set another NTP node as peer. In a negotiation between peers, time is compared, and if there is a difference, both nodes will synchronize toward each other.
- Radio Clock is used to synchronize time with a local clock that is directly connected to your computer.
- Outgoing Broadcast is used to have your server broadcast time on the network.
- Incoming Broadcast is used to configure your server to accept time that is broadcast by other nodes on the network.
Between these options, the most common option is to configure an NTP server. Common NTP servers are available through pool.ntp.org. When selecting an NTP server in the screen that is shown in Figure 11-3, you can test that the server can be reached, before configuring access to it. Also, you can specify options that should be used in synchronization. The iburst option is common. It tells your server not to synchronize slowly but to synchronize local time as fast as possible with the time provided by the NTP server.

Figure 11-3. Specifying the server to synchronize with
When setting up NTP configuration, YaST also gives access to a limited amount of security settings (see Figure 11-4). By default, the option Run NTP Daemon in Chroot Jail is set. This means that the process is running in the w fake root directory. That means that if an intruder got shell access through a misconfiguration in the process, that intruder would only see configuration files related to the NTP server itself. Other security settings are best applied through the /etc/ntp.conf configuration file.

Figure 11-4. YaST provides limited access to a few NTP security settings
Managing NTP from the Command Line
After configuring NTP in YaST, it can be managed from the command line. As with any process that is running on SLES 12, systemd is used for its management. Use systemctl status ntpd to get an overview of its current status. As you can see in Listing 11-4, this command tells you if the process is active and, if it is, on which interfaces it is listening.
Listing 11-4. Checking ntpd Availability with systemctl status nptd
dbx:/etc # systemctl status -l ntpd
ntpd.service - NTP Server Daemon
   Loaded: loaded (/usr/lib/systemd/system/ntpd.service; enabled)
   Active: active (running) since Sat 2014-07-05 07:49:27 EDT; 1min 33s ago
     Docs: man:ntpd(1)
  Process: 8388 ExecStart=/usr/sbin/start-ntpd start (code=exited, status=0/SUCCESS)
 Main PID: 8401 (ntpd)
   CGroup: /system.slice/ntpd.service
           └─8401 /usr/sbin/ntpd -p /var/run/ntp/ntpd.pid -g -u ntp:ntp -i /var/lib/ntp -c /etc/ntp.conf

Jul 05 07:49:27 dbx systemd[1]: Started NTP Server Daemon.
Jul 05 07:49:27 dbx ntpd[8401]: ntp_io: estimated max descriptors: 1024, initial socket boundary: 16
Jul 05 07:49:27 dbx ntpd[8401]: Listen and drop on 0 v4wildcard 0.0.0.0 UDP 123
Jul 05 07:49:27 dbx ntpd[8401]: Listen and drop on 1 v6wildcard :: UDP 123
Jul 05 07:49:27 dbx ntpd[8401]: Listen normally on 2 lo 127.0.0.1 UDP 123
Jul 05 07:49:27 dbx ntpd[8401]: Listen normally on 3 eth0 192.168.4.175 UDP 123
Jul 05 07:49:27 dbx ntpd[8401]: Listen normally on 4 lo ::1 UDP 123
Jul 05 07:49:27 dbx ntpd[8401]: Listen normally on 5 eth0 fe80::20c:29ff:feff:f1fd UDP 123
Jul 05 07:49:27 dbx ntpd[8401]: peers refreshed
Jul 05 07:49:27 dbx ntpd[8401]: Listening on routing socket on fd #22 for interface updates
To start and enable the NTP service, you can use systemctl start ntpd, followed by systemctl enable ntpd.
While configuring the NTP server, configuration is written to /etc/npt.conf. Listing 11-5 shows what its contents looks like after applying the settings from YaST that were just discussed.
Listing 11-5. The ntp.conf Configuration File
# Clients from this (example!) subnet have unlimited access, but only if
# cryptographically authenticated.
# restrict 192.168.123.0 mask 255.255.255.0 notrust

##
## Miscellaneous stuff
##

driftfile /var/lib/ntp/drift/ntp.drift
# path for drift file

logfile /var/log/ntp
# alternate log file
# logconfig =syncstatus + sysevents
# logconfig =all

# statsdir /tmp/                # directory for statistics files
# filegen peerstats  file peerstats  type day enable
# filegen loopstats  file loopstats  type day enable
# filegen clockstats file clockstats type day enable

#
# Authentication stuff
#
keys /etc/ntp.keys
# path for keys file
trustedkey 1
# define trusted keys
requestkey 1
server pool.ntp.org iburst
# key (7) for accessing server variables
# controlkey 15                 # key (6) for accessing server variables
From the ntp.conf file, you can apply additional security settings, using the restrict parameter. Using this parameter, you can specify different synchronization parameters. Using this parameter, you can also specify specific options for an IP network address, including mask, which is followed by different flags. The following flags can be applied:
- ignore: All packets are denied.
- kod: If an access violation occurs, a “Kiss of Death” packet is sent back to the originator. A maximum of one kod packet is sent per second.
- nomodify: Access attempting to modify the current state of this server is denied.
- noquery: No ntpq and ntpdc queries are allowed.
- nopeer: This server cannot be configured as a peer.
- noserve: All packets are denied, with the exception of ntpq and ntpdc queries.
- notrust: Deny all packets, unless cryptographically authenticated.
- version: Only allow packets that were sent using the same NTP version as on this server.
Using ntpq and ntpdc for NTP Server Management
To manage NTP Server information, you can use ntpq and ntpdc. The ntpq command is useful for displaying NTP usage information on the current host. It offers many options to display information, of which the option -p is the most common. It shows status information about the server and peers the server is using for setting up time synchronization. In Listing 11-6, you can see what its output looks like.
Listing 11-6. Using ntp -p to Show Current Synchronization Information
dbx:/etc # ntpq -p
     remote           refid      st t when poll reach   delay   offset  jitter
==============================================================================
 server01.coloce 87.195.109.207   3 u    1   64    1   30.099  -137.74   0.409
 D57C702B.static .INIT.          16 u    -   64    0    0.000    0.000   0.000
In the preceding listing, you can see that this server is set up to synchronize with two different servers. For each server, an identification is given in the remote column. Once synchronization has been established, this is often the DNS name of the server that synchronization has been established with. This is followed by the refid, which contains either the IP address of that server or the current synchronization state. To establish synchronization, a server typically goes through a number of states: the state if INIT means that this server has just initialized; the state STEP means that it is looking to contact the other server, but first contact has not been established yet. If first contact with the other server has been established, you’ll see an IP address in the refid column.
In the third column of ntpq -p output, the stratum of the other NTP server is indicated. Stratum is a fundamental concept in NTP. It indicates the reliability of the NTP server. Servers with a low stratum number are more reliable than servers with a high stratum number. If multiple servers are available for synchronization, the local NTP process will always prefer the server with the lowest possible number. If a stratum of 16 is indicated, it means that the server has not been available for synchronization. The meanings of the other columns in ntpq -p output are provided in the following list:
- poll: The number of seconds between polls on the server
- when: The number of seconds since the last answer was received from the server
- reach: An octal bitmap indicating how successful communication with the server had been the last 8 polls. The value 377 means that the previous 8 attempts were successful; the number 0 means that none of them had been successful.
- delay: The amount of milliseconds it takes a round trip to the NTP server. Shorter delays are always better.
- offset: The difference in milliseconds between your clock and the clock of the server
- jitter: The dispersion of successive time values from the remote server. A lower value indicates a higher stability of the remote clock.
Whereas the ntpq -p command gives generic information, more detailed information can be obtained by using the ntpdc command. This command can be used as an interactive interface or as a command-line utility. You should note, however, that it only works on servers that haven’t been configured to deny ntpdc commands, using the noquery restriction. Unfortunately, many NTP servers won’t reveal much on ntpdc. You can also use ntpdc to get more information about the local time configuration. You can use, for example, the ntpdc -c loopinfo command, to display in seconds how far off the system time is, or ntpdc -c kerninfo, to display the current correction that still has to be applied to the local clock (see Listing 11-7).
Listing 11-7. Using ntpdc to Get Detailed Information About NTP Configuration
dbx:/etc # ntpdc -c loopinfo
offset:               0.000000 s
frequency:            -186.674 ppm
poll adjust:          0
watchdog timer:       35 s
dbx:/etc # ntpdc -c kerninfo
pll offset:           0 s
pll frequency:        -186.674 ppm
maximum error:        16 s
estimated error:      16 s
status:               0041  pll unsync
pll time constant:    7
precision:            1e-06 s
frequency tolerance:  500 ppm
EXERCISE 11-2. CONFIGURING NTP
- Type date to show the current time on your machine.
- Type hwclock to see the difference between system time and hardware time.
- Open the /etc/ntp.conf file with an editor and add the following line:
server pool.ntp.org iburst - Use systemctl restart ntpd.
- Show current information about the service, using systemctl status -l ntpd.
- Show current synchronization information, using ntpq –p.
- Use ntpdc -c loopinfo and ntpdc -c kerninfo to get more information about the current state of your clock.
- Once the local clock has been synchronized sufficiently, use hwclock --systohc to write the system time to the hardware clock.
DNS
Even if hosted DNS servers are becoming more and more common, SUSE offers great options to configure your own internal DNS server. All types of DNS are supported: DNS master servers, DNS slave servers, and Cache-only servers. As, in setting up DNS, many configuration files relate to one another, it makes sense to set up a base DNS configuration with YaST, after which you can manually modify the related configuration files.
Setting Up DNS with YaST
To set up DNS with YaST, select Network Services ![]() DNS Server. This will start the bind packages for you, after which the configuration of DNS can be started. Next, you’ll go through a wizard to complete all steps of the DNS configuration. In the first screen of this wizard (see Figure 11-5), you can configure a forwarder.
DNS Server. This will start the bind packages for you, after which the configuration of DNS can be started. Next, you’ll go through a wizard to complete all steps of the DNS configuration. In the first screen of this wizard (see Figure 11-5), you can configure a forwarder.
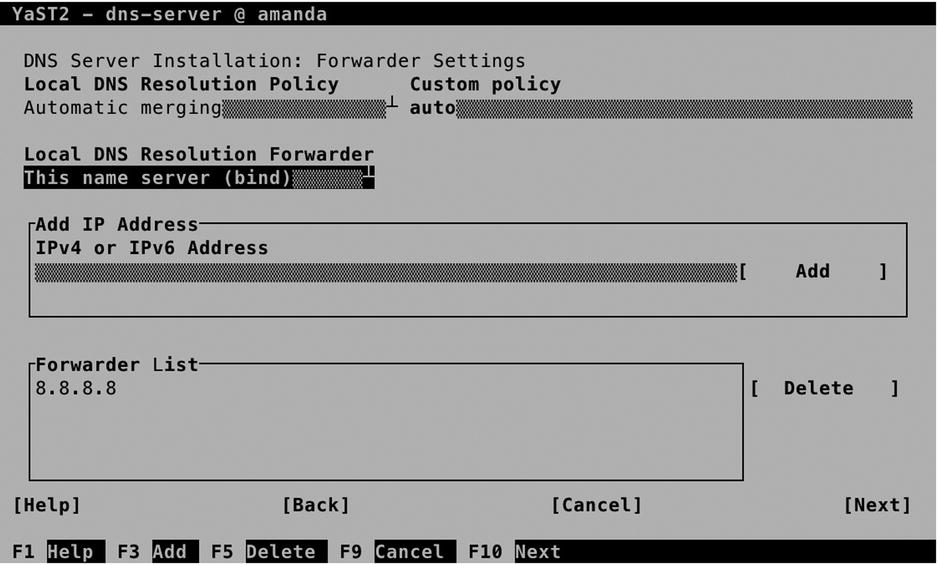
Figure 11-5. DNS forwarder configuration
Using a DNS forwarder is optional. By default, the named process that is running on your server will access a name server of the DNS root domain on the Internet, if it receives a request regarding a resource record that is not known. If you have access to a fast DNS server nearby, it makes sense to specify a forwarder. All unknown resource records will then be sent to the forwarder, which takes care of the further name-resolving process. Using a forwarder makes sense if you’re not on a fast Internet connection, or if you want to forward all requests to the main DNS server in your environment.
In the next screen of the DNS setup wizard (see Figure 11-6), you can add a new zone. That will be a zone that this DNS server is responsible for. Typically, that would be your local domain or other domains within your environment. Just add the name of the zone, specify the type, and select Add to add the zone. When starting to set up your own DNS zone, you’ll create a master zone. If it’s a master zone, your server is responsible for the resource records in the zone. For redundancy purposes, slave zones can be used also. A slave zone is typically a replicated database that can be used by DNS clients but cannot handle modifications by itself. You can also configure a forward zone, which directs a specific zone to a specific forwarder.

Figure 11-6. Creating your own zones
After adding your zones, you can add resource records to it. To do this, select the zone in the Configured DNS Zones pane and next select Edit. This brings you to the Zone Editor, which you can see in Figure 11-7. On this screen, there are different options available. The first screen you’ll get into contains the Basics settings. These include the following:
- Allow Dynamic Updates: Use this option if you want to use Dynamic DNS. This is the configuration in which updates are sent from a DHCP server to the DNS server. This means that after receiving new configuration from the DHCP server, a node can update its information in DNS.
- TSIG Key: To use Dynamic DNS, a security key must be used. This is the TSIG key. Make sure to select a TSIG key, if you want to use Dynamic DNS. You’ll learn how to create a TSIG key later in this chapter.
- Enable Zone Transport: In zone transport, the entire DNS database is downloaded to another host. As this has some implications for security, zone transport is not enabled by default. Check this option if you want to enable zone transport, and make sure to select an ACL next.
- ACLs: If zone transports are allowed, you have to specify which hosts are allowed to perform a zone transport. Select between any, localhost, or localnets.

Figure 11-7. Specifying zone properties
On the NS Records screen (see Figure 11-8), you’ll specify name servers for the zone you are configuring. You must at least include the name of this server, and if this zone is going to have Slave name servers also, specify their names here too. Note that you have to make sure that an address record for the name you’re using here is going to be created as well; otherwise, the name server cannot be reached. Also, you must be sure to use the correct naming, which has a dot at the end of the name. (So use dbx.example.com. and not dbx.example.com.) The dot at the end of the name ensures that this name is matched against the root of the DNS structure.

Figure 11-8. Configuring the name servers for a domain
On the MX Records screen (see Figure 11-9), you’ll include the Mail Exchange record. This is the address of the mail servers that are used by this DNS domain. Specifying these is important, if your domain has e-mail users employing that domain as well. When a remote mail server is looking up the mail server for a specific domain, this record is used to find out which server should be contacted.

Figure 11-9. Specifying mail servers
When specifying the mail server, you must use a valid DNS name. Also, each mail server can be configured with a priority. The mail server with the lowest priority is contacted first, other mail servers may be configured for redundancy purposes.
On the SOA screen, which you can see in Figure 11-10, you’ll specify default time-out settings. You don’t have to specify anything, as the default settings will work well, but if you want to, you can specify the following settings:
- Serial: A number that you can change on the master server to indicate to slave servers that the contents of the DNS database has been modified.
- TTL: The Time To Live (the validity time) of all records in the zone that don’t have specific TTL settings.
- Refresh: Specifies how often the zone should be synchronized from the master to the slave name servers.
- Expiration: Indicates how long it takes for a zone to expire on the slave server, if no successful synchronization has occurred. If a slave zone is expired, the slave server will stop servicing its records.
- Minimum: Specifies how long negative answers should be cached on a DNS server. Make sure not to set this too high!

Figure 11-10. Setting synchronization properties on the SOA tab
It is from the Records tab that you’ll do the real work and create the resource records. Numerous resource records can be set, of which the most common types (following) are available from YaST.
- A: This is the address field, used to get the IP address that belongs with a name in IPv4. Every DNS server must be configured with at least A records for its name servers.
- AAAA: The A record for IPv6 addresses.
- CNAME: A canonical name. This is an alias that can be specified for a hostname.
- NS: Name Server. These are the name servers that are configured in this zone.
- MX: The mail server responsible for this domain.
- SRV: An optional resource record that can be used to register services.
- TXT: An optional resource record that can be used to keep notes in DNS.
- SPF: The sender policy framework resource record contains a list of authorized mail servers for this zone. This resource record is used in spam protection. Mail from a mail server that is not listed in the SPF record for a domain will be refused.
Adding a resource record is not difficult. You first have to specify the resource record type you want to add. Next, specify the record key and the value. For an A record, for instance, the record key would be the hostname relative to this zone, and the value would be the IP address of the hostname (see Figure 11-11).

Figure 11-11. Adding resource records to DNS
After creating the base DNS configuration, YaST brings you to the last step of the wizard. On this screen, you can specify startup behavior and open firewall ports. Also, you can enable LDAP support, which makes DNS resource records to be replicated by an LDAP server. Also on this screen, which is shown in Figure 11-12, you get access to the DNS Server Expert Configuration.

Figure 11-12. The last screen in the DNS setup wizard
From the Expert Configuration screen, shown in Figure 11-13, you’ll have access to all the options you’ve just created. In addition, on a DNS server that has already been configured, this is the default management interface for all settings. It adds additional options, such as logging and ACL configuration, and the TSIG Keys tab.

Figure 11-13. Managing advanced configuration options
TSIG keys are used to set up trusted connections between DNS servers and between DNS servers and DHCP servers that are configured for Dynamic DNS. From the TSIG Keys tab, you can easily create these keys. On the tab, in the Create a New TSIG Key box, you must enter a key ID, which is used as an identifier for the key. Next, specify the name of the file the key should be written to and select Generate the key. This creates the TSIG key and automatically adds it to the list of current TSIG keys.
Manual DNS Server Management
Manual management of the DNS server on SUSE starts with the named process. DNS is implemented by the named process. Use systemctl start named to start it and systemctl enable named to make sure it is started automatically when your server reboots. Next, you can use systemctl status -l named to get information about its current status. This doesn’t just show you that it is running but also gives information about inconsistencies that appear in the zone configurations (see Listing 11-8).
Listing 11-8. Showing DNS Status Information
dbx:~ # systemctl status -l named
named.service - LSB: Domain Name System (DNS) server, named
   Loaded: loaded (/etc/init.d/named)
   Active: active (running) since Sat 2014-07-05 09:54:55 EDT; 2min 17s ago
  Process: 13670 ExecStart=/etc/init.d/named start (code=exited, status=0/SUCCESS)
   CGroup: /system.slice/named.service
           └─13736 /usr/sbin/named -t /var/lib/named -u named

Jul 05 09:54:55 dbx named[13736]: managed-keys-zone: loaded serial 0
Jul 05 09:54:55 dbx named[13736]: zone 0.0.127.in-addr.arpa/IN: loaded serial 42
Jul 05 09:54:55 dbx named[13736]: zone localhost/IN: loaded serial 42
Jul 05 09:54:55 dbx named[13736]: zone 0.0.0.0.0.0.0.0.0.0.0.0.0.0.0.0.0.0.0.0.0.0.0.0.0.0.0.0.0.0.0.ip6.arpa/IN: loaded serial 42
Jul 05 09:54:55 dbx named[13736]: zone example.com/IN: example.com/MX 'mail.example.com' has no address records (A or AAAA)
Jul 05 09:54:55 dbx named[13736]: zone example.com/IN: loaded serial 2014070500
Jul 05 09:54:55 dbx named[13736]: all zones loaded
Jul 05 09:54:55 dbx systemd[1]: Started LSB: Domain Name System (DNS) server, named.
Jul 05 09:54:55 dbx named[13670]: ..done
Jul 05 09:54:55 dbx named[13736]: running
The main configuration file of DNS is in /etc/named.conf. In Listing 11-9, following, you can see its configuration after a base DNS server has been configured from YaST.
Listing 11-9. /etc/named.conf Contents
dbx:~ # cat /etc/named.conf | grep -v '#'
options {
     directory "/var/lib/named";
     managed-keys-directory "/var/lib/named/dyn/";
     dump-file "/var/log/named_dump.db";
     statistics-file "/var/log/named.stats";
     listen-on-v6 { any; };
     notify no;
     disable-empty-zone "1.0.0.0.0.0.0.0.0.0.0.0.0.0.0.0.0.0.0.0.0.0.0.0.0.0.0.0.0.0.0.0.IP6.ARPA";
     include "/etc/named.d/forwarders.conf";
};

zone "." in {
     type hint;
     file "root.hint";
};

zone "localhost" in {
     type master;
     file "localhost.zone";
};

zone "0.0.127.in-addr.arpa" in {
     type master;
     file "127.0.0.zone";
};

zone "0.0.0.0.0.0.0.0.0.0.0.0.0.0.0.0.0.0.0.0.0.0.0.0.0.0.0.0.0.0.0.ip6.arpa" in {
     type master;
     file "127.0.0.zone";
};

include "/etc/named.conf.include";
zone "example.com" in {
    allow-transfer { any; };
     file "master/example.com";
     type master;
};
The configuration file consists of two main parts. First, there is the options section, which defines where all important DNS configuration can be found. For example, it specifies the directory setting, which indicates the default DNS root. All files that the configuration file refers to further on are related to this directory.
The second important part of the configuration is the definition of the zone files. All zone files that exist on this server are referred to from the /etc/named.conf file. Also note the use of the /etc/named.conf.include file, a configuration file that may contain additional configuration settings.
The second important part of the DNS configuration is in the directory /var/lib/named. In here, you’ll find all that the DNS server needs. This makes it easy to run the DNS server in a chroot jail. Typically, this directory contains a file with the name root.hint, which has a list of all root DNS servers that should be used. Also, it has the subdirectories master and slave, which are used for storage of configuration of master zones and slave zones that are hosted by this server.
In Listing 11-10, you can see what the contents of a zone configuration file may look like.
Listing 11-10. Sample Contents of a Zone Configuration File
dbx:/var/lib/named/master # cat example.com
$TTL 2d
@                     IN SOA             dbx.example.com.            root.dbx.example.com. (
                                         2014070501                   ; serial
                                         3h                           ; refresh
                                         1h                           ; retry
                                         1w                           ; expiry
                                         1d )                         ; minimum

example.com.          IN NS              dbx.example.com.
example.com.          IN MX              10 mail.example.com.
dbx                   IN A               192.168.4.175
lisa                  IN A               192.168.4.176
mail                  IN A               192.168.4.175
EXERCISE 11-3. CONFIGURING DNS
In this exercise, you’ll learn how to set up a DNS server and configure it with resource records for the zone example.org.
- Use systemctl status -l named to get the current status of the DNS name server. If it is currently running, stop it, using systemctl stop named.
- Make sure the named package is installed, using zypper in bind.
- Open the file /etc/named.conf and include the following lines:
zone "example.org" in {
        allow-transfer { any; } ;
        file "master/example.org";
        type master;
}; - Create a file with the name /var/lib/named/master/example.org and give it a contents like the following (make sure to modify settings to match the configuration you’re using, and make sure it contains at least an entry for “server.example.org”):
dbx:/var/lib/named/master # cat example.org
$TTL 2d
@              IN SOA          server.example.org.          root.server.example.org. (
                               2014070501                    ; serial
                               3h                            ; refresh
                               1h                            ; retry
                               1w                            ; expiry
                               1d )                          ; minimum

example.org.   IN NS           server.example.org.
example.org.   IN MX           10 mail.example.org.
server         IN A            192.168.4.175
lisa           IN A            192.168.4.176
mail IN A 192.168.4.175 - Use systemctl start named followed by systemctl enable named to start the DNS server, and make sure it is started automatically when your server reboots.
- Open the file /etc/sysconfig/network/config with an editor and modify the following lines to use your server as the DNS server.
NETCONFIG_DNS_FORWARDER="resolver"
NETCONFIG_DNS_STATIC_SERVERS="192.168.4.175" - Use the command netconfig update -v to update your network configuration.
- Type ping server.example.org to verify the working of your DNS server. It does not matter if you don’t get an answer, but you should see the name resolving in process and the ping command pinging the IP address of the server (see Listing 11-11).
Listing 11-11. Testing DNS Functionality with ping
dbx:~ # ping server.example.org
PING server.example.org (192.168.4.175) 56(84) bytes of data.
64 bytes from 192.168.4.175: icmp_seq=1 ttl=64 time=0.022 ms
64 bytes from 192.168.4.175: icmp_seq=2 ttl=64 time=0.044 ms
64 bytes from 192.168.4.175: icmp_seq=3 ttl=64 time=0.049 ms
^C
--- server.example.org ping statistics ---
3 packets transmitted, 3 received, 0% packet loss, time 2001ms
rtt min/avg/max/mdev = 0.022/0.038/0.049/0.012 ms
DHCP
Even if the Dynamic Host Configuration Protocol (DHCP) is provided by many network devices too, it can easily be configured on SUSE Linux Enterprise Server (SLES). In this section, you’ll learn how to set it up using YaST and how to manually tune the configuration from the command line.
Understanding DHCP
Some people think that DHCP is used only for handing out IP addresses and some related configuration. DHCP can do so much more! Using different DHCP types, more than 100 parameters can be handed out to DHCP clients! Before starting the configuration of these parameters, however, you should make sure that they are supported by the receiving IP stack. It is good that you can easily set a time server using DHCP, but you will find there’s a lack of support for many of the DHCP features by its clients.
DHCP is a broadcast-based protocol. A DHCP client will send a DHCP broadcast on its local network. That will be captured by any DHCP server that is listening. This means that there can be one DHCP server per network only. If (by accident) another DHCP server is also present, it will be unclear which server hands out the IP address configuration to clients. So, make sure that you don’t have two DHCP servers on the same network (this is especially true when setting up test environments).
If a network consists of multiple subnets that are connected by a router or a layer 3 switch, DHCP broadcasts that were issued on one network won’t be received on the other network. If you want to forward DHCP requests between networks, you have to run a DHCP agent on each network. Typically, this is something you would configure on the router. The DHCP agent captures DHCP requests and sends them through to the DHCP server that is configured for your network.
Configuring DHCP with YaST
The YaST module for DHCP server configuration is available in Network Services ![]() DHCP. After you have launched the module, it will start a short wizard for setting up the DHCP server. If it is not installed, then it prompts to install dhcp-server and installs the package. In the first screen of the wizard (see Figure 11-14), you have to select the network interface or interfaces that the DHCP server will be listening on.
DHCP. After you have launched the module, it will start a short wizard for setting up the DHCP server. If it is not installed, then it prompts to install dhcp-server and installs the package. In the first screen of the wizard (see Figure 11-14), you have to select the network interface or interfaces that the DHCP server will be listening on.

Figure 11-14. Selecting the interface on which the DHCP server will be listening
In the second screen (see Figure 11-15), you’ll set up the base configuration that will be handed out by the DHCP server. You will normally configure it at least with a (DNS) Domain Name, a Primary Name Server IP address, and a Default Gateway. Other options are the NTP Time Server, Print Server, and WINS Server. These settings are supported by most Linux clients, but you may have a hard time using them on other platforms. Also, you can specify the Default Lease Time. Notice that the default value of four hours is relatively short. If a node doesn’t succeed in renewing its lease within that period, it will lose its IP configuration.
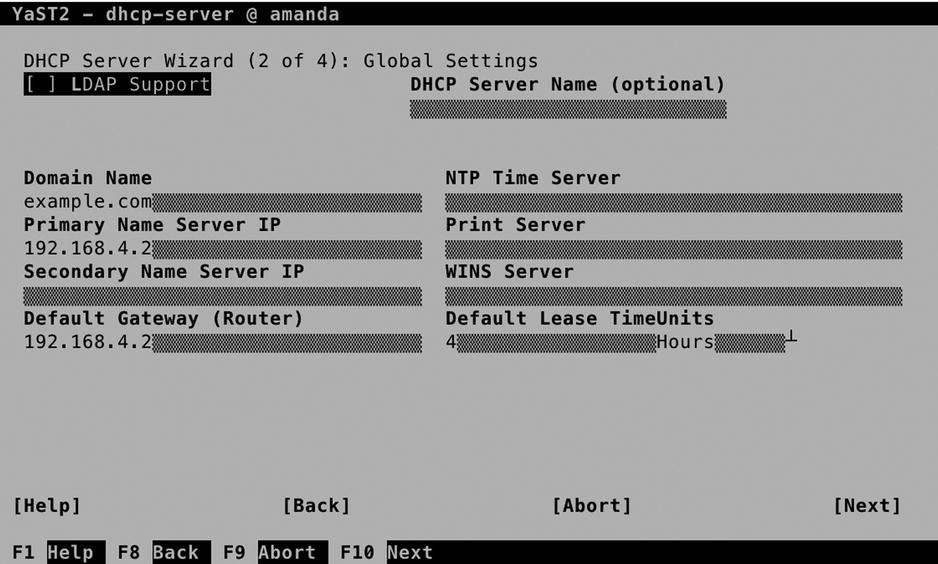
Figure 11-15. Configuring default DHCP server settings
In the next screen, shown in Figure 11-16, you’ll configure the IP addresses that are to be handed out. To start with, you need a subnet configuration. This is configured by default, because you have selected the interface on which you want to offer DHCP services. You cannot modify the subnet information, as it contains only the network properties of the subnet you are working on.

Figure 11-16. Configuring the IP address ranges and more
The most important part of the DHCP server configuration is the IP Address Range. You’ll enter the First IP Address that can be handed out, up to the Last IP Address. It is a good idea not to use all the available IP addresses within the subnet but only to specify a select range of IP addresses and leave some other IP addresses within the range available for fixed IP address assignments. You can also select if you want to allow Dynamic BOOTP. BOOTP is often required if you want to allow clients who perform a PXE boot, in which the client boots from the network card and listens to a DHCP server handing out the required configuration. If you want to enable your server for automatic installations, it’s a good idea to enable BOOTP.
Next, you’ll specify the Lease Time for this zone. Note that this will overwrite the server-wide DHCP lease time. The lease time consists of a default lease, which is four hours, and a maximum lease, which is set to two days. If within the period that is specified as the maximum lease a client isn’t able to renew his or her lease, it will expire, and the client will fall back to an address from the APIPA (Automatic Private IP Addresses Assignment) range, which starts with 169.254. (This normally means that the client cannot communicate on the network anymore).
Also on this screen is an option to synchronize the configuration with the DNS server. This is if you have set up your DNS server for Dynamic DNS, and it uploads all current IP address assignment information to the DNS server.
On the final screen of the wizard, you can specify how to start the server. Note that you do NOT want to start it automatically if there’s another DHCP server already active on this network! From this screen, you can also get access to the DHCP Server Expert Configuration, which you can see in Figure 11-17.
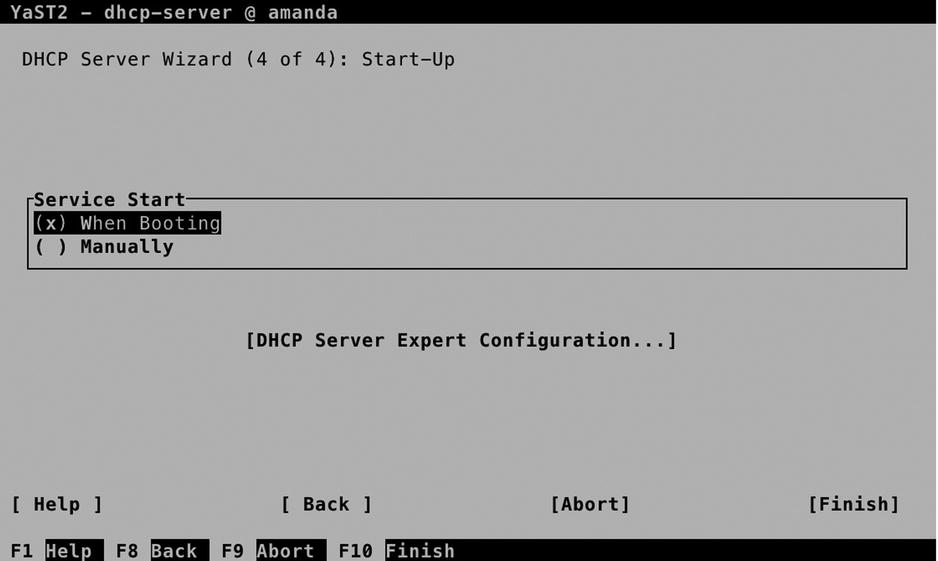
Figure 11-17. Finalizing DHCP server configuration
On the advanced DHCP Server Configuration screen, select DHCP Server Expert Configuration (see Figure 11-18), which gives access to some additional options. First, there is Run DHCP Server in Chroot Jail, which is enabled by default, and that is good. This means that if an intruder manages to break through the DHCP server and gets shell access, he or she will have gained entry to a very limited environment only.

Figure 11-18. DHCP expert options
Also from this screen, you can enable LDAP support. This only works if the DHCP server has been able to find the current hostname it is running on. If that’s not the case, you cannot configure LDAP support. The advantage of having LDAP support is that the DHCP configuration is stored in an LDAP directory. That is not just the settings but also the information about current leases, and that allows for more redundancy. The LDAP server can replicate information between servers, which makes the configuration more available.
From the Advanced Configuration screen, you can select each subnet the DHCP server is currently servicing and add new subnets, if that is needed. After selecting a subnet, you get access to the subnet options. From here, you can add many more configuration parameters to be handed out to DHCP clients, including some parameters that are not supported by many clients. So, find out if your client supports it before adding it!
Also from the subnet options, you’ll get access to the Dynamic DNS Setup. This is because setup of dynamic DNS is per subnet. To connect your DHCP server to a DNS server, you have to select a TSIG key. If this key has been created while setting up the DNS server, you can select it from here; otherwise, you can create a new key (which must be configured for use on the DNS server also).
Manual DHCP Configuration
To manage the DHCP server, you must start and enable the dhcpd process, using systemctl start dhcpd, followed by systemctl enable dhcpd. After a successful start, you can verify the operations of the DHCP server, using systemctl status -l dhcpd (see Listing 11-12).
Listing 11-12. Verifying DHCP Server Operation
dbx:/etc # systemctl status -l dhcpd
dhcpd.service - ISC DHCPv4 Server
   Loaded: loaded (/usr/lib/systemd/system/dhcpd.service; enabled)
   Active: active (running) since Sat 2014-07-05 11:05:33 EDT; 5s ago
  Process: 21925 ExecStart=/usr/lib/dhcp/dhcpd -4 start (code=exited, status=0/SUCCESS)
 Main PID: 22053 (dhcpd)
   CGroup: /system.slice/dhcpd.service
           └─22053 /usr/sbin/dhcpd -4 -cf /etc/dhcpd.conf -pf /var/run/dhcpd.pid -chroot /var/lib/dhcp -lf /db/dhcpd.leases eth0

Jul 05 11:05:33 dbx dhcpd[22052]: Copyright 2004-2014 Internet Systems Consortium.
Jul 05 11:05:33 dbx dhcpd[22052]: All rights reserved.
Jul 05 11:05:33 dbx dhcpd[22052]: For info, please visit https://www.isc.org/software/dhcp/
Jul 05 11:05:33 dbx dhcpd[22052]: Not searching LDAP since ldap-server, ldap-port and ldap-base-dn were not specified in the config file
Jul 05 11:05:33 dbx dhcpd[22052]: Wrote 0 leases to leases file.
Jul 05 11:05:33 dbx dhcpd[22052]: Listening on LPF/eth0/00:0c:29:ff:f1:fd/192.168.4.0/24
Jul 05 11:05:33 dbx dhcpd[22052]: Sending on   LPF/eth0/00:0c:29:ff:f1:fd/192.168.4.0/24
Jul 05 11:05:33 dbx dhcpd[22052]: Sending on   Socket/fallback/fallback-net
Jul 05 11:05:33 dbx dhcpd[21925]: Starting ISC DHCPv4 Server [chroot]..done
Jul 05 11:05:33 dbx systemd[1]: Started ISC DHCPv4 Server.
The configuration of the DHCP server is written to the file /etc/dhcpd.conf, which is relatively easy to read. Listing 11-13 shows what it looks like after applying the settings previously discussed in YaST. From this file, you can change all settings that have to be adjusted.
Listing 11-13. Contents of the dhcpd.conf Configuration File
option domain-name "example.com";
option domain-name-servers 192.168.4.175;
option routers 192.168.4.2;
default-lease-time 14400;
ldap-dhcp-server-cn "dhcpserver";
ddns-update-style none;
subnet 192.168.4.0 netmask 255.255.255.0 {
  option pop-server 192.168.4.2;
  range dynamic-bootp 192.168.4.50 192.168.4.75;
  default-lease-time 14400;
  max-lease-time 172800;
}
Monitoring and Testing DHCP Functionality
Testing DHCP functionality is not difficult. Messages about DHCP requests are sent to rsyslog, so you can easily access information about the working of the DHCP server by opening a trace to /var/log/messages, using tail -f /var/log/messages. In Listing 11-14, you can see what occurs in the /var/log/messages file on the DHCP server when a machine boots.
Listing 11-14. Analyzing DHCP Log Information
2014-07-05T11:14:36.797964-04:00 dbx dhcpd: DHCPREQUEST for 192.168.4.175 (192.168.4.254) from 00:0c:29:ff:f1:fd via eth0: unknown lease 192.168.4.175.
2014-07-05T11:14:51.782009-04:00 dbx dhcpd: DHCPDISCOVER from 00:0c:29:b9:8b:55 via eth0
2014-07-05T11:14:52.781707-04:00 dbx dhcpd: DHCPREQUEST for 192.168.4.191 (192.168.4.254) from 00:0c:29:b9:8b:55 via eth0: unknown lease 192.168.4.191.
2014-07-05T11:14:52.782687-04:00 dbx dhcpd: DHCPOFFER on 192.168.4.50 to 00:0c:29:b9:8b:55 via eth0
2014-07-05T11:14:57.792148-04:00 dbx dhcpd: DHCPREQUEST for 192.168.4.142 from 00:0c:29:b9:8b:55 via eth0: unknown lease 192.168.4.142.
A normal DHCP request will always start with a DHCPREQUEST. This is the broadcast that is issued by the DHCP client when it starts up. If the client has used an IP address before, it will ask to use that specific IP address again. In the preceding listing you can see two clients requesting information for specific IP addresses.
The DHCPREQUEST is normally followed by a DHCPOFFER. This is your DHCP server offering a specific IP address. Next, it is up to the client to confirm that he or she wants to use that address. If that occurs, a DHCPACK follows as the confirmation that the client does want to use the address that was offered.
What is interesting in the preceding configuration sample is that the DHCPACK did never follow. The logical explanation is that the listening DHCP server was not able to offer the requested IP address. If this would have been the only address that is offered to the client, it would have accepted it anyway. As the client in this case didn’t get back with an acknowledgment that he or she wanted to use the IP address offered, that can only mean that there is another DHCP server on this network that did offer the requested IP address!
Configuring the DHCP Relay Service
As mentioned previously, you can have only one DHCP server per network, and a DHCP server is required on each network. On networks that don’t have their own DHCP server, you can configure the DHCP Relay Agent. Setting it up is easy.
- Use zypper in dhcp-relay to install the dhcp-relay package.
- Edit the contents of the /etc/sysconfig/dhcrelay configuration file and make sure it contains a DHCRELAY_INTERFACES parameter listing the network interfaces the DHCP Relay Agent should listen on. Also, it should have a DHCRELAY_SERVERS parameter, configured with the IP address of the DHCP server.
- Use systemctl start dhcrelay, followed by zypper enable dhcrelay, to start and enable the DHCP Relay Agent.
EXERCISE 11-4. SETTING UP A DHCP SERVER
It is highly recommended that this exercise be performed only in an isolated network! If not, you may mess up the working of a currently functional DHCP server!
- Use zypper in dhcp-server dhcp to install the packages that are required for setting up a DHCP server.
- Open the configuration file /etc/dhcpd.conf with an editor, and give it the following contents, making sure that the address you’re employing is used on a local connected interface;if not, the DHCP server will refuse to start:
INTERFACES=ëth0"
option domain-name "example.org";
option domain-name-servers 192.168.4.175;
option routers 192.168.4.2;
default-lease-time 14400;
ldap-dhcp-server-cn "dhcpserver";
ddns-update-style none;
subnet 192.168.4.0 netmask 255.255.255.0 {
  option pop-server 192.168.4.2;
  range dynamic-bootp 192.168.4.50 192.168.4.75;
  default-lease-time 14400;
  max-lease-time 172800;
} - Use systemctl start dhcpd to start the DHCP server. Don’t enable it to make sure that it is not started automatically. (This is to avoid having conflicts with other DHCP servers on your network).
- Start a client that is configured to use DHCP. Verify that the logs are appearing in /var/log/messages.
LDAP
If you’ve got only one server to administer, it’s easy to keep track of the user accounts in your environment. Just create your users as local users, and all will be fine. If you have dozens of servers, that approach doesn’t work well. In such cases, you can benefit from a centralized directory server, such as an LDAP directory server. In this section, you will learn how to set up LDAP for this purpose.
Understanding LDAP
The Lightweight Directory Access Protocol (LDAP) was initially developed as an access protocol, allowing users to request information from a directory server that was based on the X.500 protocol. Over the years, LDAP has evolved into a protocol to structure such directory servers as well. In SUSE Linux, OpenLDAP is well integrated and allows you to set up a centralized service that can be used for authentication and much more.
An LDAP setup is hierarchical, in the way that DNS is hierarchical. That means that in LDAP, different domains are used, too, which makes it easy to differentiate between objects in different locations or that serve different purposes. As in DNS, in LDAP databases also can be created for each domain that is in use. The relation between domains is established by using referrals, which are pointers to the next child or parent domain. This approach allows a huge directory service to be set up, which can include the entire planet, if necessary.
For redundancy purposes, the databases in LDAP can be set up as replicated databases, in which a master-slave model is used. The databases are writable on the master copy, and changes are replicated to the slave database, which makes it easy to make the setup available at different sites, while offering redundancy at the same time.
When setting up an LDAP server, there are a few things to be aware of. First, in LDAP, you have to specify a base domain. This is the entry point from which clients should start searching for information in the LDAP directory. This domain name is written with a type indication. As a result, a domain that in DNS would be known as example.com is known in LDAP as dc=example,dc=com.
When setting up LDAP clients, it is also necessary to specify the LDAP server that the client should connect to. This is typically only one server. If redundancy is required, it can be offered by using techniques such as high-availability (HA) clusters, as described in Chapter 14.
When establishing contact with the LDAP servers, TLS certificates are also mandatory. So, before setting up an LDAP server with certificates, administrators should make sure they have configured certificates for use on the LDAP server.
Setting Up an LDAP Server with YaST
To set up an LDAP server from YaST, select Network Services ![]() Authentication Server. This will install openldap2 as well as the Kerberos packages krb5-server and krb5-client. (Kerberos is not really required, but as LDAP can use Kerberos as an authentication service, there is a dependency anyway).
Authentication Server. This will install openldap2 as well as the Kerberos packages krb5-server and krb5-client. (Kerberos is not really required, but as LDAP can use Kerberos as an authentication service, there is a dependency anyway).
After installation of the packages, a setup wizard will guide you through some of the most important settings. To start with, set Start LDAP Server to Yes, to make sure it automatically starts up while booting. You can also indicate that it should register at an SLP daemon, which makes it easier to relocate the LDAP server on the network. SLP clients can query the SLP server on which the LDAP service is registered, and thus have an easy method of locating an available LDAP server.
When setting up an LDAP server, you can choose different roles. In this chapter, you’ll read how to set up LDAP as a stand-alone server. Alternatively, you can set it up as a master server or as a slave server in a network environment (see Figure 11-19). Setting up a master/slave configuration provides redundancy but is more complicated, and for that reason, this is not covered in this chapter.

Figure 11-19. Selecting the server role
Specifying Security Settings
When working with LDAP, security is important. In Figure 11-20 you can see the screen from which you take care of setting security options. By default, only the option Enable LDAP over SSL (ldaps) interface is selected. This allows LDAP clients to connect to port 636 to establish a secure connection. With the option Enable TLS, the client also can connect to port 389 and open a TLS-secured session from there. This is the recommended option, so make sure to select Enable TLS.

Figure 11-20. Setting security options
When working with TLS, you need TLS certificates as well. These are taken care of from the CA Management Module. So, before you specify anything, select Launch CA Management Module to create certificates. In Chapter 10, you can read in detail about using certificates. In this section, I’ll only explain what you need to do to set up TLS certificates for use with LDAP on a server that doesn’t have any certificates configured yet. If your server already has TLS certificates, you can select them there.
From the CA Selection screen, you can enter the Root CA, or Create a Root CA, if it doesn’t exist yet. On the screen shown in Figure 11-21, no root certificate currently exists, so select Create Root CA to create one. (In Chapter 10, you can find more detailed instructions on setting up a Certificate Authority [CA] and working with certificates.)
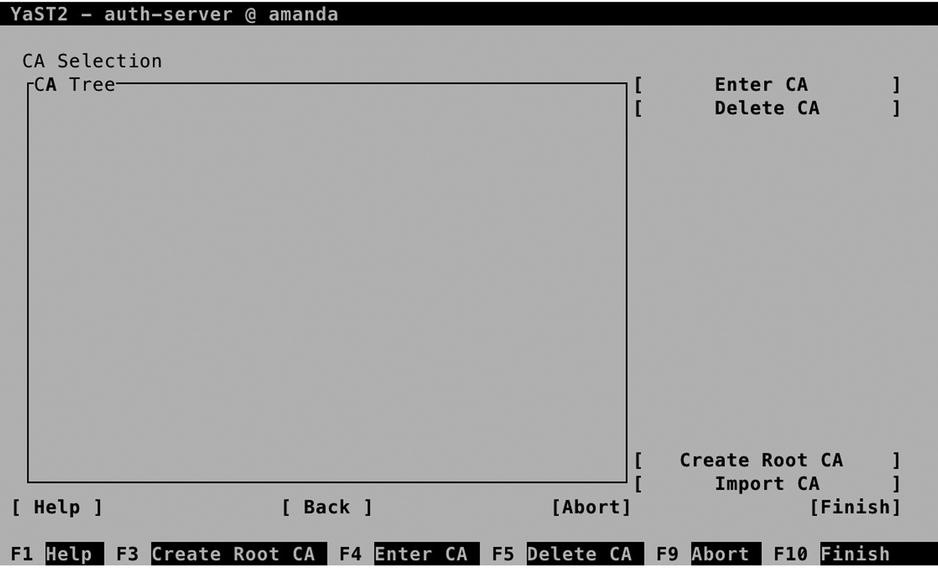
Figure 11-21. CA properties
From the Create New Root CA screen, you have to enter at least a CA name and a common name. The CA Name is the name that will be used in the certificate files, so make sure to choose a name that is easy to recognize later. The Common Name is the name of this server. All other options are discretionary, so you can skip them (see Figure 11-22).
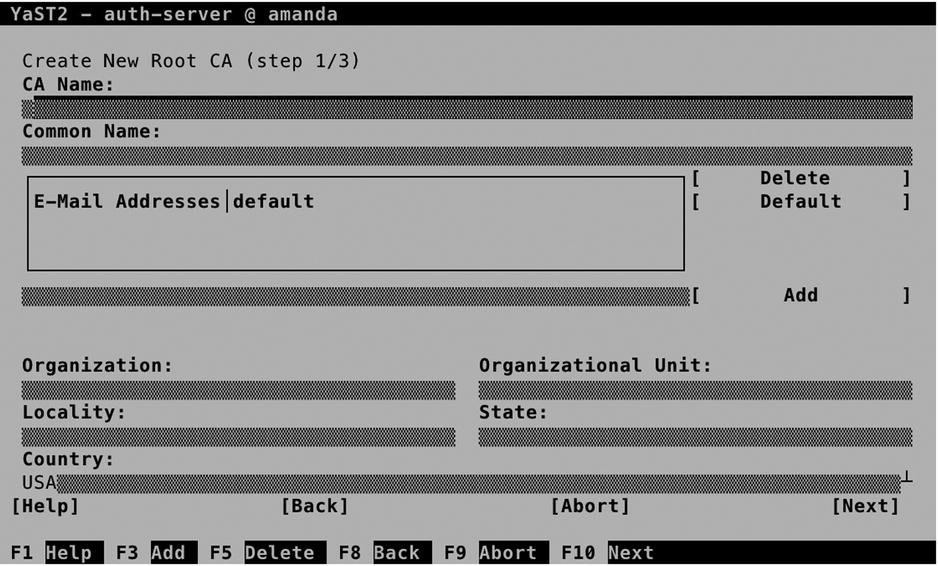
Figure 11-22. Creating the root CA
In the next screen (Figure 11-23), you set the properties for the root CA. These are a password that has to be entered when starting the root CA, a key length, and a validity period. For the purpose of creating certificates for an LDAP server, you must enter a password, and for the rest, you can select all default options and Next, to proceed to the following screen. You’ll now see an overview of the selected settings. Review them and click Create to proceed.

Figure 11-23. Setting the root CA password and certificate validity
Back on the CA Selection screen, you can now select Enter CA to enter the CA and create the certificates that the LDAP server is going to use.
You are now on the Certificate Authority (CA) screen (see Figure 11-24). From here, select Certificates ![]() Add to add a new certificate. From the drop-down list, select Add Server Certificate.
Add to add a new certificate. From the drop-down list, select Add Server Certificate.

Figure 11-24. Adding a server certificate to the CA
The most important parameter when adding a new certificate is the Common Name. You can set this on the screen shown in Figure 11-25. This name is used to identify the host that the client is connecting to, and for that reason, it should be similar to the hostname. All other parameters are optional.

Figure 11-25. Specifying the certificate common name
In the next step, you have to set a password and enter the certificate validity period. By default, certificates are valid for 365 days only. This is secure, but inconvenient, as you will have to create new certificates every year. You, therefore, might want to increase the validity period (see Figure 11-26).

Figure 11-26. Specifying certificate properties
Once created, you’ll get back to the Certificate Authority screen. From here, you have to export it. There are three different kinds of exports that must be performed.
- The LDAP server needs access to the private key of the server certificate you’ve just created.
- The LDAP server needs access to hand out to clients the public key of the server certificate you’ve just created.
- LDAP clients need access to the public key of the Certificate Authority.
From the Export option, you can select to export to File, to LDAP, or to export as a common server certificate. A common server certificate can be used by different services and provides an easy way of securing multiple services. Therefore, export as a common server certificate and close down the CA Management utility.
![]() Note If the common server certificate didn’t exist when you first started YaST to configure the LDAP server, you won’t be able to select it directly after creation. Stop YaST and start it again, and you will see the common server certificate selected.
Note If the common server certificate didn’t exist when you first started YaST to configure the LDAP server, you won’t be able to select it directly after creation. Stop YaST and start it again, and you will see the common server certificate selected.
Setting Up the LDAP Database
After exporting the certificates, you can proceed to set up the LDAP database. Figure 11-27 shows the options that are available. Of these options, you must specify the following:
- Base DN: This is the default context LDAP clients get into. By default, it is based on the DNS FQDN and noted in the LDAP format.
- Administrator DN: This is the name of the administrator. By default, the administrator will be cn=Administrator, with the base DN appended to make the full name.
- LDAP Administrator Password: In here, you’ll set the password the administrator is going to use to configure the LDAP database.
- Database Directory: The location in which the physical database will be stored.
- OpenLDAP clients: Sets up the local LDAP client configuration to use this database.
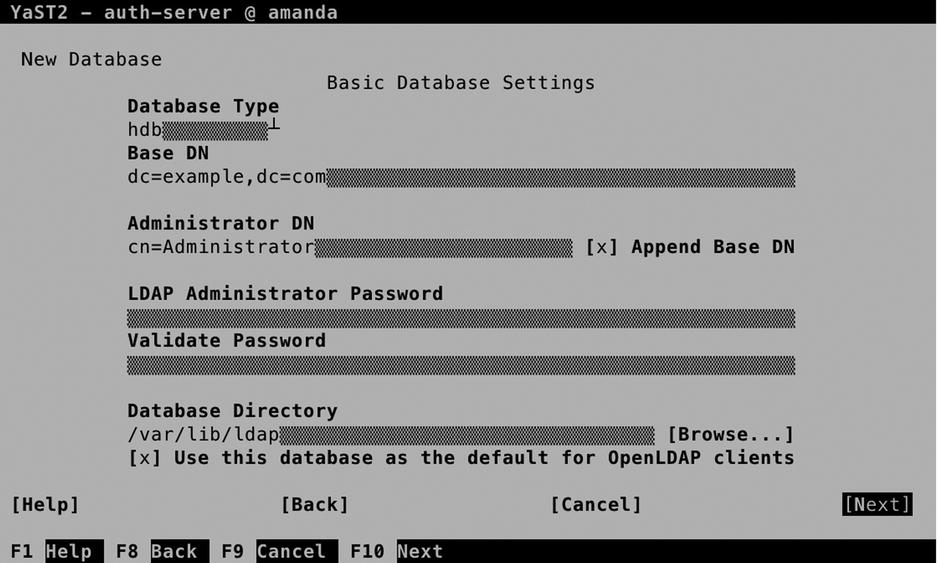
Figure 11-27. Setting up the LDAP database
On the next screen, you’ll specify whether you want to use Kerberos Authentication. For increased security where Kerberos tickets are used instead of LDAP Password, select Yes. For setting up a basic LDAP server, leave this setting to No and select Next to proceed. You’ll now see the LDAP server overview window. Click Finish to create the LDAP database and start it.
At this point, it’s a good idea to verify the working of the LDAP server. The ldapsearch utility provides a solution to do that. Use ldapsearch -D "cn=Administrator,dc=example,dc=com" -W -x -b "dc=example,dc=com". It should, at this point, give you a result, as you can see in Listing 11-15.
Listing 11-15. Using ldapsearch to Verify LDAP Accessibility
suse:~ # ldapsearch -D "cn=Administrator,dc=example,dc=com" -b "dc=example,dc=com" -W -x
Enter LDAP Password:
# extended LDIF
#
# LDAPv3
# base <dc=example,dc=com> with scope subtree
# filter: (objectclass=*)
# requesting: ALL
#

# search result
search: 2
result: 32 No such object

# numResponses: 1
Populating the LDAP Database
The classic way of adding users to an LDAP server is by using LDIF files. These are files in which user accounts have to be specified, with all of the properties that the users require to do whatever they need to do on the server. Before doing that, however, you have to create a base structure. This is also accomplished by using an LDIF file, such as the one shown in Listing 11-16.
Listing 11-16. LDIF to Create the Base LDAP Structure
dn: ou=users,dc=example,dc=com
objectClass: organizationalUnit
objectClass: top
ou: users

dn: ou=groups,dc=example,dc=com
objectClass: organizationalUnit
objectClass: top
ou: groups
To add the contents of this file to the LDAP directory, you can use the ldapadd command, as in ldapadd -x -D "cn=Administrator,dc=example,dc=com" -W -f ~/base.ldif.
Once the base structure has been added to the LDAP database, LDIF files containing users can be added to the service. The contents of such an LDIF file may resemble Listing 11-17.
Listing 11-17. Sample LDIF Configuration File
dn: uid=lisa,ou=users,dc=example,dc=com
objectClass: top
objectClass: account
objectClass: posixAccount
objectClass: shadowAccount
cn: lisa
uid: lisa
uidNumber: 5001
gidNumber: 5001
homeDirectory: /home/lisa
loginShell: /bin/bash
gecos: lisa
userPassword: {crypt}x
shadowLastChange: 0
shadowMax: 0
shadowWarning: 0
After creating the LDIF file, it must be imported to the LDAP directory, using a command such as ldapadd -x -D "cn=Administrator,dc=example,dc=com" -W -f ~/users.ldif. To verify that the import has been successful, you can use the ldapsearch command, as in ldapsearch -x -D "cn=Administrator,dc=example,dc=com" -W -b "dc=example,dc=com" "(objectclass=*)".
Because setting up users in this way can hardly be called intuitive, YaST provides an alternative approach. The steps below describe how to set up a newly installed LDAP Directory Server for adding user accounts.
- Start YaST and select Security and Users
 User and Group Management.
 - First, select Expert Options LDAP User and Group Configuration. From the screen that you see now (see Figure 11-28), make sure that Home Directories on This Machine is selected and, next, select Configure User Management Settings. The last option doesn’t show you anything, but it does create the required information in the LDAP directory. Next, press OK to return to the User and Group Management main screen.
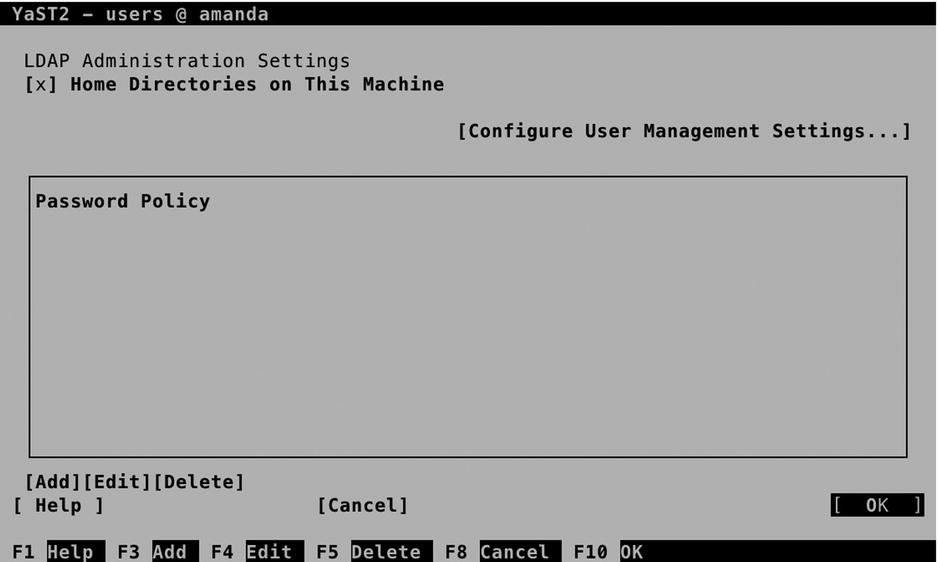
Figure 11-28. Enabling YaST for managing LDAP users
- From the User and Group Administration interface, select Set Filter. From the drop-down list, select LDAP Users and enter the BindDN and password, to connect to the LDAP Server (see Figure 11-28).
- At this point, continue and create the users as normal. This will add the users to the database with all the required properties. To verify, you can use ldapsearch -x -D "cn=Administrator,dc=example,dc=com" -W -b "dc=example,dc=com" "(objectclass=*)". This does not guarantee that you can log in as the LDAP user (you have to set up the LDAP client to do that), but at least it shows that the user has been added to the directory, including some additional configuration.
LDAP Client Configuration
To use an LDAP server, you have to notify your server or the LDAP client that you want to configure. An Authentication Client is available in YaST. Select Network Services ![]() Authentication Client to configure it. The first thing you have to configure is an authentication domain. Consider the domain a collection of settings that tells the authentication process where to go to do its work. From the screen that you see in Figure 11-29, select Add to configure the authentication domain.
Authentication Client to configure it. The first thing you have to configure is an authentication domain. Consider the domain a collection of settings that tells the authentication process where to go to do its work. From the screen that you see in Figure 11-29, select Add to configure the authentication domain.

Figure 11-29. Configuring the authentication domain
From the screen that opens now (see Figure 11-30), enter a name for the domain. It doesn’t really matter which name you use, so enter something like “ldap,” for example. Next, make sure that the identification provider as well as the authentication provider are set to ldap and press OK.

Figure 11-30. Configuring the authentication domain
At this point, you’ll have to provide an LDAP URI and an LDAP Search Base. The URI is the name of the LDAP server (make sure that you use a name, not an IP address, and that this name can be resolved in DNS). The LDAP search base is the entry point in the LDAP hierarchy. If the LDAP server is at ldap.example.com, use that as the URI, and if the search_base is dc=example,dc=com, enter that here (see Figure 11-31).
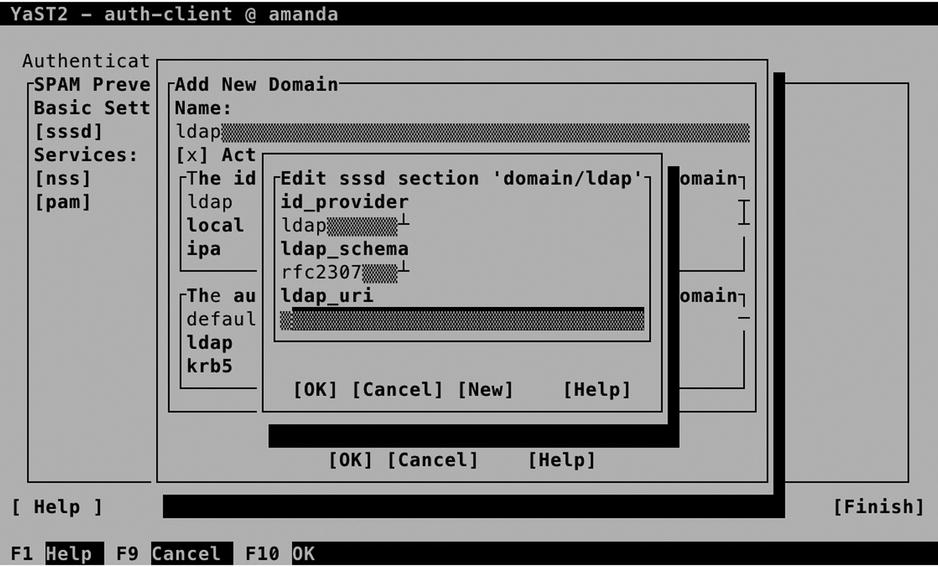
Figure 11-31. Entering the LDAP URI and search base
Back in the main screen of the Authentication Client Configuration, select Finish to finish and write the configuration. At this point, you’re ready to test the configuration, for example, by using the command su - linda (assuming that linda is your LDAP user). You will be authenticated as that user now.
While setting up the LDAP Client with YaST, the sssd service has been configured. Use systemctl status -l sssd to check that it is running. This service reads a configuration file, which is in /etc/sssd/sssd/conf. In Listing 11-18, you can see what its contents should look like, based on the settings that were entered from YaST.
Listing 11-18. Checking the Contents of the /etc/sssd/sssd.conf File
ldap:/etc/sssd # cat sssd.conf
[sssd]
config_file_version = 2
services = nss, pam
domains = ldap
# SSSD will not start if you do not configure any domains.
# Add new domain configurations as [domain/<NAME>] sections, and
# then add the list of domains (in the order you want them to be
# queried) to the "domains" attribute below and uncomment it.
; domains = LDAP

[nss]
filter_users = root
filter_groups = root

[pam]
[domain/ldap]
id_provider = ldap
auth_provider = ldap
ldap_schema = rfc2307
ldap_uri = ldap://ldap.example.com
ldap_search_base = dc=example,dc=com
The preceding configuration has shown how to set up the LDAP client on the server that also runs the LDAP server. The same procedure can be applied to other clients. Just make sure to enter the same parameters, and if problems occur, verify the following:
- You are able to ping the LDAP server by its name.
- The certificate of the CA that has signed the LDAP server certificate is available on the client. Read Chapter 10 for more information on how to organize this.
EXERCISE 11-5. SETTING UP AN LDAP SERVER AND CLIENT FOR USER AUTHENTICATION
- Open /etc/hosts and make sure that hostname resolving is set up for your server.
- Create a Certificate Authority and create default server certificates from it. Make sure the server certificates are installed in their default locations.
- In YaST, select Network Services Authentication Server. Press Enter to install the required packages.
- On the General Settings screen, press Enter to accept the default settings. Next, select Stand-alone server as the default Server Type.
- On the TLS Settings screen, accept all basic settings. Make sure that the three certificate files are present at the locations where they are mentioned. By default, the YaST-CA.pem file is not present at the location that is mentioned. Export it from the root CA to a PEM file that contains only the certificate and copy the file you have exported to the directory /etc/ssl/certs/YaST-CA.pem.
- On the Basic Database Settings screen, enter a password for the LDAP administrator user.
- On the Kerberos Authentication screen, accept the default settings.
- Press Finish to close the Authentication Server module.
- Still from YaST, select Security and Users User and Group Management.
- Select Expert Options LDAP User and Group Configuration. From the screen that appears now, select Configure User Management Settings and then press OK.
- Back on the main User and Group Administration screen, select Set Filter; select LDAP Users; and log in to the LDAP server. Now add a user account to the LDAP database.
- Use ldapsearch to check that the user account and related information have been created successfully.
- Select Network Services Authentication Client and then Add to add a new authentication domain.
- Set the id_provider, and auth_provider to ldap; set the LDAP URI to the name of your LDAP server (make sure the URI starts with ldap://); and specify the LDAP Search Base.
- Close the Authentication Client Configuration window and log in as your LDAP user. If this does not work, open the /etc/sssd/sssd.conf file and split the URI into ldap_uri and ldap_search_base entries.
Summary
In this chapter, you have learned how to configure core network services. You have learned how to configure xinetd, NTP, DNS, and DHCP. In the last part of the chapter, you have learned how to set up an LDAP server for centralized user authentication. In the next chapter, you’ll learn how to configure core Internet services on your server.