
![]()
Creating a SLES 12 Installation Server
If you have to install only a few SUSE servers, there’s nothing wrong with inserting the installation disk in the machine and performing a manual installation. If you have multiple installations to perform, a more automated method is preferable. In this chapter, you’ll learn how to configure SLES 12 as an installation server, to perform fully or partially automated installations over the network.
Understanding the Components
In an installation server, different parts are used. The first part is an online repository. The online repository provides access to the files that have to be installed. To get access to these files, the server that has to be installed must start an installation image. This installation image can be on a DVD, but it can also be a small boot image that is provided through a PXE boot server. In that scenario, the PXE boot server delivers the boot image, and from the boot image, the installation server to be used is specified. To automate this process even further, AutoYaST can play a role. In AutoYaST, installation profiles containing all settings that have to be configured on the installable server are provided.
When setting up an installation environment, you can configure a complete environment, in which all these elements are used and working together. It is also possible to take elements of the complete environment and combine these, to facilitate an installation process that can be performed more smoothly.
Configuring an Online Repository
To configure an online repository, the YaST Installation Server module, which is in the miscellaneous section, is used. This module allows administrators to set up an installation server as an HTTP, FTP, or NFS repository (see Figure 17-1).
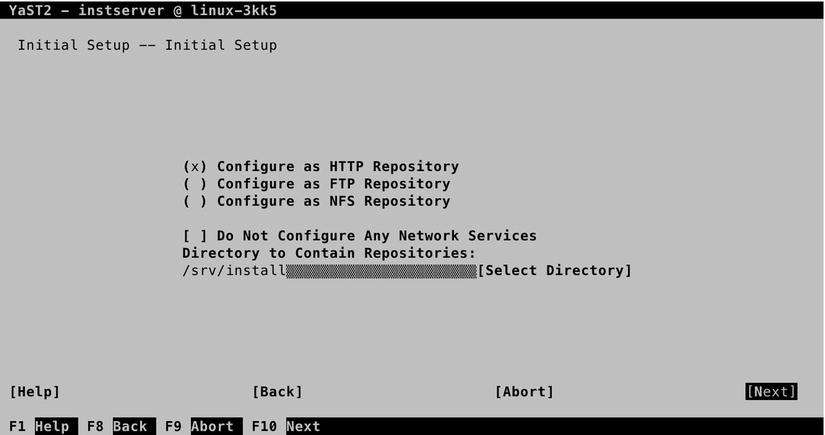
Figure 17-1. The YaST Installation Server module provides different options
While setting up an installation server, different protocols can be used. For optimal speed, HTTP is probably the best option, so if you don’t have a specific reason to use one of the other protocols, select Configure as HTTP Repository, to set up the online repository. (In fact, what YaST calls an installation server isn’t much more than an online repository).
In the screen shown in Figure 17-1, there’s also a Do Not Configure Any Network Services option. Select this if the service that you want to use for the installation server is already operational on your server. You’ll also have to specify the directory in which you want to put the installable files. By default, this is the /srv/install directory.
You’ll now see a screen from which you can define a Directory Alias and Firewall settings. After selecting what you want to do, you’ll see the screen that is shown in Figure 17-2. From this screen, you must install the installation sources.

Figure 17-2. Adding files to the repository
After pressing Add from the screen depicted in Figure 17-2, you’ll gain access to the Repository Configuration screen (see Figure 17-3). Here, you must specify the name of the repository that you want to create. It’s a good idea to use the name of the SLES version that you want to install as the repository. Optionally, you can select to announce the repository as an installation service with the Service Location Protocol (SLP). When this option is selected, clients can search the network for available installation servers, which makes installing these servers a lot easier.
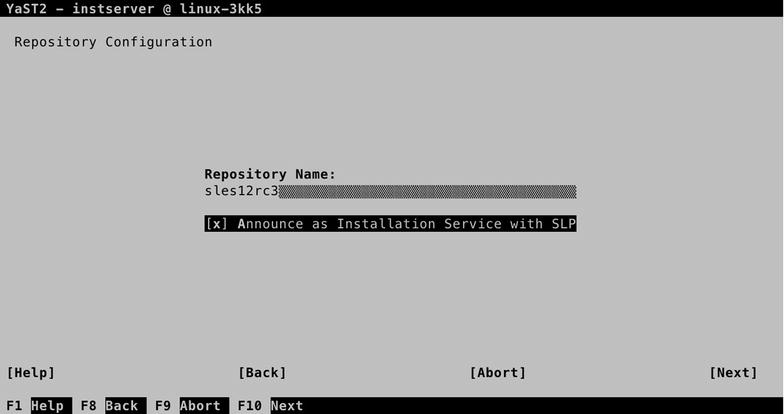
Figure 17-3. Configuring the repository
After specifying the repository name, you’ll have to copy files to the repository. To do this, the installation medium is required. You can copy files from either the physical installation disk or an ISO image. In either case, you must make sure that the installation files are available. From the screen shown in Figure 17-4, select the installation medium that you want to use and click Next to proceed.

Figure 17-4. Copying files to the repository
Once the files are copied to the repository, you’re asked for the next CD. In general, it’s safe to skip this. (Don’t use Cancel, as it will cancel everything you’ve done so far!) At this point, the installation server is complete, and you’ll see the screen shown in Figure 17-5. You can now press F10 to finalize the procedure.

Figure 17-5. The repository has now been added to the installation server
Before proceeding and creating the PXE boot server, it’s a good idea to test whether what you’ve done so far is really working. To do this, boot a server from the installation disk. In the boot menu, select Installation and press F4 to select the installation source (see Figure 17-6). If you’ve set up the installation server with SLP, you can use the SLP option to find it automatically. If this is not the case, you’ll have to provide the URL to the files on the server. If you haven’t changed any of the details, and you have configured an Apache-based installation server, the files are available at http://your-installation-server/install.
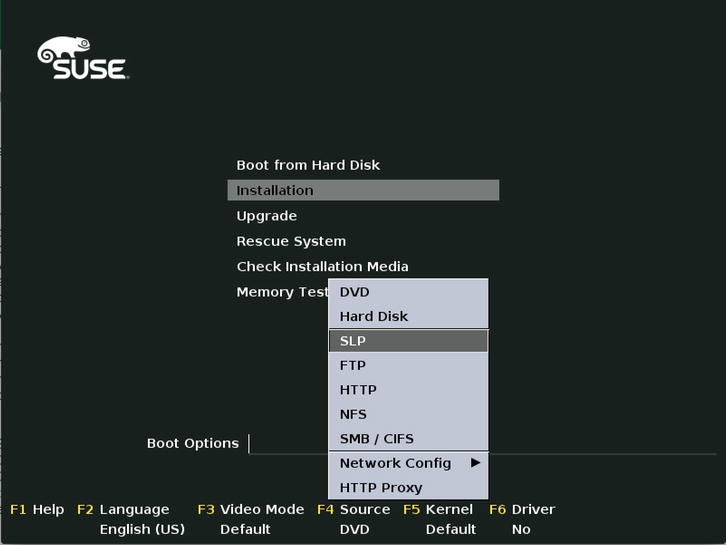
Figure 17-6. Testing the installation server
Creating the PXE Boot Configuration
Most modern network cards have an option that allows users to boot from the network card. This is known as a PXE boot, in which PXE stands for Preboot eXecution Environment. In this scenario, a boot image is delivered over the network. For this to work, you’ll have to provide two elements: a DHCP server that is configured to hand out IP addresses to the servers you want to install and a TFTP server that is configured to hand out the boot image. In this section, you’ll learn how to set up such an environment. This section focuses on the PXE-specific parts of the DHCP server. Read Chapter 11 for more details on setting up a DHCP server.
After configuring the DHCP server, you must include the following three additional elements in the subnet declaration:
- next-server: This is the server that the DHCP client should contact to get the PXE boot image.
- server-name: This optional parameter informs the client of the name of the server from which it is booting.
- filename: This specifies the name of the file that the TFTP server has to offer to the client.
With these parameters, the dhcpd.conf file should now look as in Listing 17-1.
Listing 17-1. dhcpd.conf with PXE Boot Parameters
amanda:~ # cat /etc/dhcpd.conf
option domain-name "example.com";
option domain-name-servers 192.168.4.2;
option routers 192.168.4.2;
default-lease-time 14400;
ddns-update-style none;
subnet 192.168.4.0 netmask 255.255.255.0 {
  range 192.168.4.100 192.168.4.110;
  default-lease-time 14400;
  max-lease-time 172800;
  next-server 192.168.4.210;
  server-name "amanda.example.com";
  filename "pxelinux.0";
}
After configuring the DHCP server, you have to make sure that the tftp and syslinux packages are installed. Use zypper in tftp syslinux to install them. This creates the file /etc/xinetd.d/tftp, which has the content that you can see in Listing 17-2.
Listing 17-2. The /etc/xinetd.d/tftp Configuration File
amanda:/etc/xinetd.d # cat tftp
# default: off
# description: tftp service is provided primarily for booting or when a
#      router need an upgrade. Most sites run this only on machines acting as
#     "boot servers".
#     The tftp protocol is often used to boot diskless
#     workstations, download configuration files to network-aware printers,
#     and to start the installation process for some operating systems.
service tftp
{
    socket_type  = dgram
    protocol     = udp
    wait         = yes
    flags        = IPv6 IPv4
    user         = root
    server       = /usr/sbin/in.tftpd
    server_args  = -u tftp -s /srv/tftpboot
#   per_source   = 11
#   cps          = 100 2
    disable      = no
}
Make sure that in this file, the parameter disable is set to no, which enables the tftp service the next time the xinetd service is restarted. Also, type systemctl enable xinetd, to make sure the xinetd service is started at next reboot.
You can now create the pxelinux configuration directory. To do this, type mkdir -p /srv/tftpboot/pxelinux.cfg. Next, use the following command: cp /usr/share/syslinux/pxelinux.0 /srv/tftpboot.
In the TFTP server document root, you need some additional files as well: at least, the kernel and installation image of the distribution that you want to install using the PXE boot server. You’ll find them in the repository you’ve just created. If the name of the repository is sles12, and you are using an HTTP installation server, the directory to copy the linux and initrd files from is /srv/install/sles12/CD1/boot/x86_64/loader. From that directory, use cp linux initrd /srv/tftpboot to copy these files.
As a next step, you must create the file /srv/tftpboot/pxelinux.cfg/default. This file is used as a boot menu for PXE boot clients, and it makes sure that the PXE client knows what to install. Give this file a contents that looks like the following:
default SLES12
label SLES12
        kernel linux
      append initrd=initrd ramdisk_size=65536    install=http://yourinstallserver/install
After creating these configurations, use systemctl start xinetd; systemctl start dhcpd; systemctl enable xinetd; systemctl enable dhcpd to start everything. You can now try to PXE-boot a server you want to install, and you should receive a boot image that automatically starts the installation.
Using AutoYaST
After setting up an online repository and a PXE server, you’ll still have to provide input as to how you want the server to be installed. This can be automated as well, by using AutoYaST. With AutoYaST, you can provide an answer file, containing all the answers that are needed for successful installation. Such an answer file is created on every server that has been installed, and you can find it under the name autoinst.xml, in the home directory of user root. To use the AutoYaST file, it suffices to add the following line to the PXE default file: autoyast=http://your-server/install/autoyast.xml. You can also pass this line as an argument on the boot prompt, while performing an installation.
The autoinst.xml file is an XML file, and it can be manually changed. This, however, is not the easiest approach, as the file is long, and it’s hard to get an overview of everything it offers. As an alternative, you can use the autoyast module that is available in YaST. Using this interface allows you to specify everything that should be happening while installing. Figure 17-7 shows the interface that can be used to create an AutoYaST file.
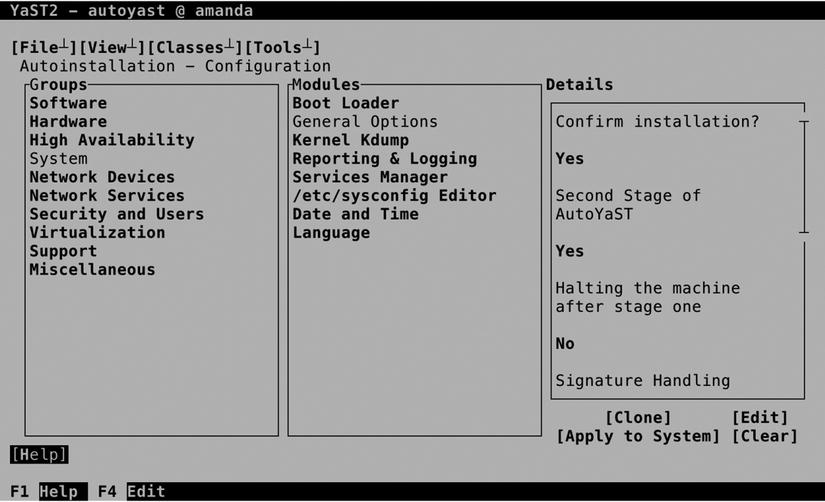
Figure 17-7. Creating an AutoYaST file from YaST
From the YaST AutoYaST module, you’ll just walk through the different installation settings and provide the answers you want to use while installing. It’s also possible to leave answers open, in which case, the installation procedure will still prompt you for input while installing.
Summary
In this chapter, you’ve learned how to set up an installation server. You’ve read how to create the repository containing the RPMs you want to use on installation, as well as a PXE boot environment. You’ve also read how to use AutoYaST to provide all installation parameters automatically.