
![]()
Managing Virtualization on SLES
Even if SUSE Linux Enterprise Server (SLES) is not developed as a specific virtualization platform, it’s a Linux distribution, and the Linux kernel includes embedded virtualization options. This chapter provides an overview of the available options and goes into further detail about setting up a Kernel-based Virtual Machine (KVM) host platform.
Understanding Linux Virtualization Solutions
In Linux, no less than three approaches are available to create virtual machines. Before going into detail about the most significant virtualization approach, let’s have a look at available techniques.
The first virtualization hype on Linux started with the introduction of Xen in the early 2000s. The Xen virtualization platform used a modified Linux kernel that offered virtualization extensions. Because Xen allowed virtual machines to address hardware directly, by using an approach that was known as paravirtualization, it took a long time before the Xen virtualization extension really got integrated into the Linux kernel, which has stimulated the rise of an alternative virtualization solution: KVM.
KVM is the Linux Kernel-based Virtual Machine, a kernel module that offers support for creating virtual machines. Because KVM is so simple in its design and approach, it has been a huge success since the moment it was launched. At present, KVM is the de facto virtualization solution on Linux.
Apart from Xen and KVM, which both are tightly integrated into the Linux kernel, there is also container virtualization. In container virtualization, one kernel is used, and on top of that kernel, different isolated environments are created. Each of these environments behaves as an independent machine, but it isn’t. They all depend on the same kernel, and that also means that it’s not possible to run different operating systems in such an environment. In Linux, LXC (Linux Containers) is the default solution for offering container-based virtualization.
Understanding the KVM Environment
To set up a KVM environment, a few elements are needed. To start with, you’ll need hardware support for virtualization. That means that the CPU that is needed on the hypervisor platform requires virtualization extensions. In general, this is the case for mid- to high-end CPUs. It can be verified by checking the contents of the /proc/cpuinfo file; in the CPU, flags vmx (intel) or svm (AMD) should be listed. If they are not, your CPU does not offer support for virtualization, and KVM cannot be used. Listing 7-1 shows sample contents of the /proc/cpuinfo file for a CPU that does offer virtualization support.
Listing 7-1. The Availability of Virtualization Support in the CPU Is Shown in /proc/cpuinfo
processor         : 1
vendor_id         : GenuineIntel
cpu family        : 6
model             : 58
model name        : Intel(R) Core(TM) i7-3740QM CPU @ 2.70GHz
stepping          : 9
microcode         : 0x15
cpu MHz           : 2693.694
cache size        : 6144 KB
fpu               : yes
fpu_exception     : yes
cpuid level       : 13
wp                : yes
flags             : fpu vme de pse tsc msr pae mce cx8 apic sep mtrr pge mca cmov pat pse36 clflush dts mmx fxsr sse sse2 ss syscall nx rdtscp lm constant_tsc arch_perfmon pebs bts nopl xtopology tsc_reliable nonstop_tsc aperfmperf eagerfpu pni pclmulqdq vmx ssse3 cx16 pcid sse4_1 sse4_2 x2apic popcnt aes xsave avx f16c rdrand hypervisor lahf_lm ida arat epb xsaveopt pln pts dtherm tpr_shadow vnmi ept vpid fsgsbase smep
bogomips          : 5387.38
clflush size      : 64
cache_alignment   : 64
address sizes     : 40 bits physical, 48 bits virtual
power management  :
If the CPU extensions for virtualization are available, the required kernel modules can be loaded. These are kvm and kvm_intel or kvm_amd, depending on the hardware platform that is used.
To manage a virtual machine, libvirt is used. libvirtd is a daemon that is started on the hypervisor platform and offers management support for different virtualization platforms. Using libvirtd, KVM can be managed, but other virtualization platforms can be used as well, such as Xen or LXC. libvirtd is also the interface that is used by different management utilities. Common management utilities that can work on top of libvirt are the graphical utility virt-manager and the command-line utility virsh.
Creating KVM Virtual Machines
Using SLES 12 as a KVM host is not difficult. It is started by selecting the software pattern from the Software option in YaST. There’s a pattern for Xen as well as for KVM, as SUSE believes it is important to continue supporting customers who have a current infrastructure on top of Xen and, at the same time, wants to offer full KVM support.
After installing the KVM software pattern, YaST will show a Virtualization option (see Figure 7-1). From this virtualization menu, the following three options are available:
- Create Virtual Machines for Xen and KVM: This option helps you to configure virtual machines from YaST.
- Install Hypervisor and Tools: This is the option you’ll have to use first, as it ensures that all of the required components are available.
- Relocation Server Configuration: Use this option if you have multiple KVM host platforms and you want to be able to use live migration, whereby a running virtual machine can be migrated from one platform to the other hardware platform.
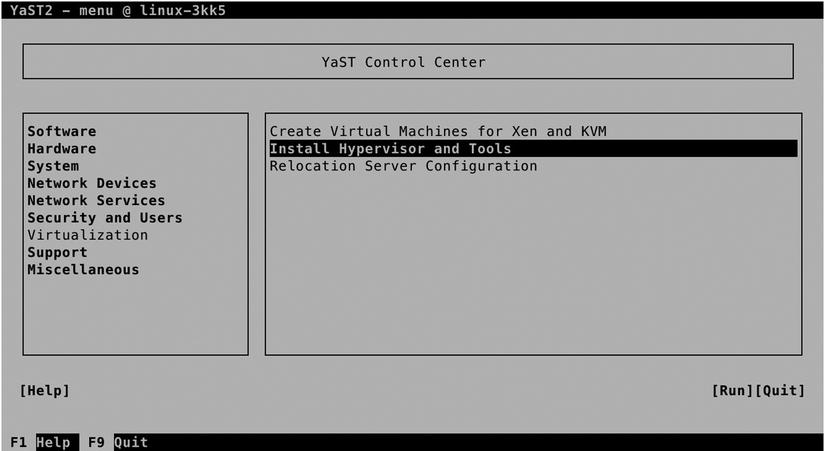
Figure 7-1. YaST virtualization options
Configuring the KVM Host
When selecting the Install Hypervisor and Tools option, you can select between the three different virtualization platforms (see Figure 7-2). For using KVM, select the KVM server, as well as the KVM tools to be installed, and select Accept, to proceed.

Figure 7-2. Selecting your hypervisor of choice
While installing the KVM environment, multiple things will occur. An important element is the creation of a software bridge. This software bridge will be used as the intermediate layer between the physical network card(s) in your server and networking in the virtual machines. When using KVM, multiple virtual machines need access to one physical network card, and that traffic has to be managed. To ensure that no conflicts arise, a virtual bridge is created. In the section “Managing KVM Networking,” later in this chapter, you’ll learn how to manage this network environment.
The installer may prompt a few times, depending on the exact configuration you’re using. First, it will ask if you want to install graphical components as well. If you’re installing from a text-only environment, it normally doesn’t make much sense to install graphical management software, but KVM virtual machines are best managed from the graphical tools, so better make sure that these are installed. The next prompt is about setting up a network bridge. You must do this for easy access to the network.
Once the installation of the required components is complete, there are a few things to verify. First, type ip link show, for an overview of available network devices. You’ll note that a device with the name br0 has been added. Next, type brctl show. This will show that the bridge br0 is using the physical network card in your server as its interface. (See Listing 7-2). That is a good point from which to proceed (although you might consider creating more complex network configurations, such as a bridge that uses a teamed network interface for redundancy).
Listing 7-2. Verifying KVM Host Network Configuration
linux-3kk5:~ # ip link show
1: lo: <LOOPBACK,UP,LOWER_UP> mtu 65536 qdisc noqueue state UNKNOWN mode DEFAULT group default
    link/loopback 00:00:00:00:00:00 brd 00:00:00:00:00:00
2: eth0: <BROADCAST,MULTICAST,UP,LOWER_UP> mtu 1500 qdisc pfifo_fast master br0 state UP mode DEFAULT group default qlen 1000
    link/ether 00:0c:29:aa:91:f2 brd ff:ff:ff:ff:ff:ff
3: br0: <BROADCAST,MULTICAST,UP,LOWER_UP> mtu 1500 qdisc noqueue state UP mode DEFAULT group default
    link/ether 00:0c:29:aa:91:f2 brd ff:ff:ff:ff:ff:ff
linux-3kk5:~ # brctl show
bridge name        bridge id                 STP enabled          interfaces
br0                8000.000c29aa91f2         no                   eth0
Creating Virtual Machines
Once the KVM host has been configured and at least the network bridging is in place, you can proceed and create some virtual machines. To do this, you need a graphical interface, and from the graphical interface, you can start the Create Virtual Machines for Xen and KVM option in YaST. This starts the virt-install utility, which will now prompt you about how you would like to install the operating system (see Figure 7-3).
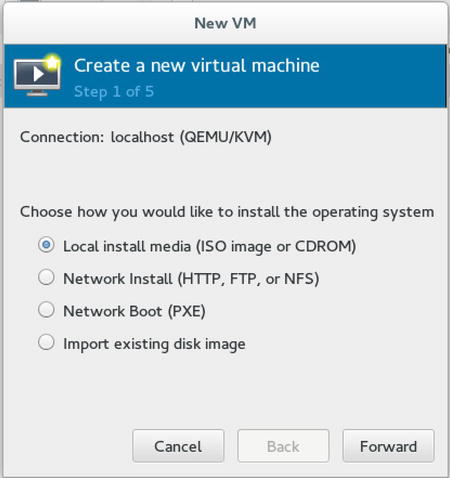
Figure 7-3. Starting virtual machine installation
To make installation of virtual machines easy, it’s a good idea to use network installation. You might want to set up an installation server through HTTP, FTP, or NFS, that offers the repositories required for installation of the virtual machine and configure PXE as well, to ensure that the machines can boot from the network and get an installation image delivered automatically. Read Chapter 17 for more details on setting up such an environment.
If no installation server is available, select Local install media. This allows you to install the virtual machine from a physical DVD or an ISO image that is available on the KVM host.
After selecting the installation source you want to use, you can provide more details on where exactly the installation files can be found. If you have selected to install from a DVD or ISO, you’ll select the disk you want to use (see Figure 7-4), or if you have selected to install from an installation server, you have to provide a URL to make sure that the files installation packages can be located (see Figure 7-5).

Figure 7-4. Providing the path to access an installation disk or ISO

Figure 7-5. Providing details about the installation server
After specifying details about the installation source you want to use, you’ll have to provide information about the amount of RAM and CPUs you want to assign to the virtual machine (see Figure 7-6). You’ll understand that it’s not possible to go beyond the physical limits of available RAM and CPUs on your computer, but the total of all RAM that is used by your virtual machines doesn’t have to be less than the total amount of RAM in the host.
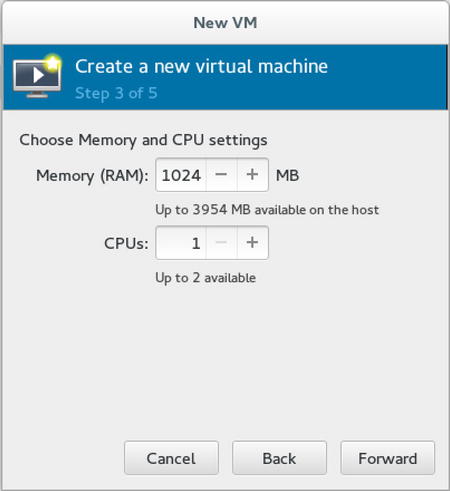
Figure 7-6. Allocating virtual machine RAM and CPUs
In KVM, a smart feature that is known as Kernel Shared Memory (KSM) is used. Using KSM makes it possible to load memory pages that are addressed multiple times once only, as shared memory. That means that if you have four virtual machines that are all using the same Linux kernel, you don’t physically have to load that kernel four times as well, which means that the total amount of RAM that is configured on your virtual machines can go beyond the total amount of RAM in the host.
After allocating RAM and CPUs to the virtual machine, you’ll have to configure storage (see Figure 7-7). The easy solution is to create a disk image on the computer’s hard drive. That option will create a disk file for each virtual machine. This is an easy option, if you don’t want to take additional measures at the storage level. If you want a more advanced setup for storage, it makes sense to create an LVM logical volume for each virtual machine and configure that as storage, using Select managed or other existing storage options.
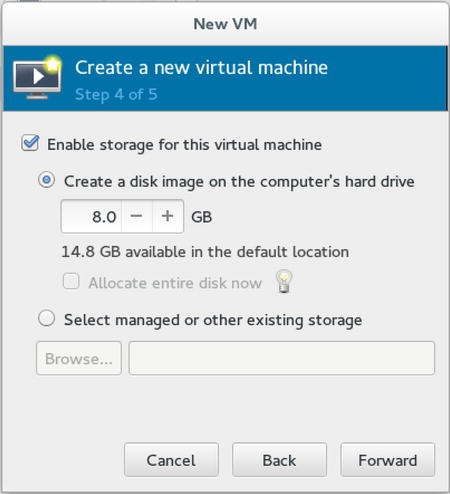
Figure 7-7. Selecting storage
After selecting which storage to use, you’ll see a summary screen. From this screen, you can start the installation of your virtual machine.
Managing KVM Virtual Machines
Once the virtual machine has been installed, you can start using it. On operational virtual machines, there are a few parameters that can be managed as well. Many of these can be managed from the graphical interfaces that are offered through the virt-managerb utility. These include networking and virtual machine properties. Alternatively, the virsh command-line utility can be used for performing basic management tasks.
Managing KVM Networking
Networking is an important part of virtual machine management. The network properties can be accessed through Virtual Machine Manager, by selecting the local hypervisor, which is indicated as localhost (qemu). After selecting this, you’ll see the window shown in Figure 7-8, from which the network interfaces and the virtual networks can be managed.
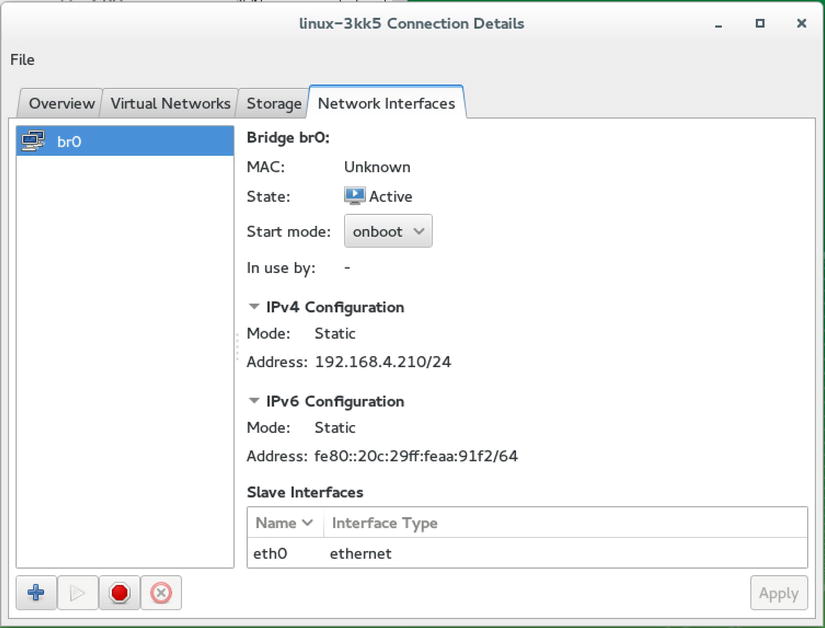
Figure 7-8. Managing virtual network interfaces
By default, the virtual bridge that is active on the KVM host offers networking through NAT. On the virtual network, a private IP address is ranged, and users in the same network can access other hosts in that network. External users, however, cannot access hosts in the NATted network directly. The default IP address for the internal NATted network is 192.168.4.0/24.
In many cases, the default NATted network works well, but in some cases, it does not, and you might require something else. To create an alternative network configuration, select the Virtual Networks tab (see Figure 7-9). On this tab, you can create different virtual network configurations that can be connected to the network interfaces seen on the Network Interfaces tab.
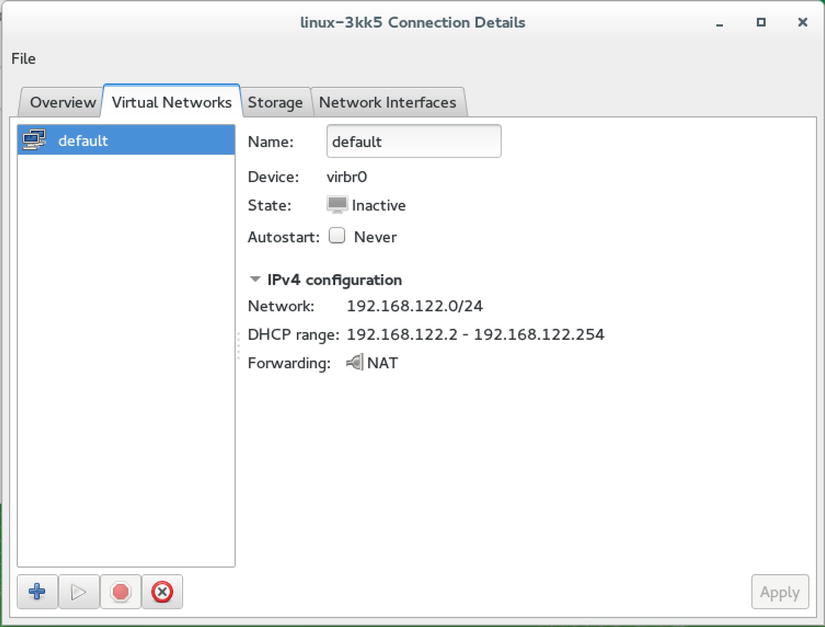
Figure 7-9. Configuring virtual networks
When adding new virtual networks, you’ll walk through a small wizard. The last screen in the window asks how you want to be connected to the physical network. On this screen, you can select between an Isolated virtual network and Forwarding to physical network. The Isolated virtual network is what it says it is: a network that is connected to nothing else. If you want to connect the network to the outside world, you’ll have to select the Forwarding to physical network option. This option first lets you select the physical network to connect to and, next, has you select a mode. You can choose between NAT and routed modes. In NAT mode, the network configuration of virtual machines is set up automatically, which ensures an easy connection to external computers. If selecting Routed networking, you’ll have to manually configure routing between the internal virtual network and external networks (see Figure 7-10).
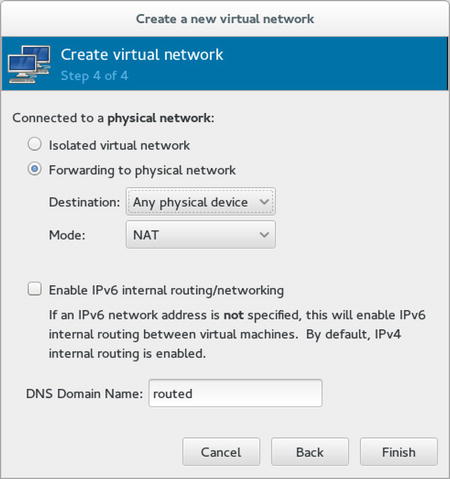
Figure 7-10. Setting up virtual networking
Managing Virtual Machine Properties
On a virtual machine, much virtual hardware is available. This hardware can be managed and changed by opening the virtual machine in virt-manager and clicking the lightbulb. This gives the interface that can be seen in Figure 7-11.

Figure 7-11. Managing virtual machine properties
As you can see in Figure 7-11, an interface is available for all elements of the hardware that is configured in the virtual machine, and many properties of the devices can be managed. This includes advanced settings, such as properties of hardware devices, but also more basic settings, such as the amount of RAM or hard disks allocated to a virtual machine. Note that for many changes in the virtual hardware configuration, the virtual machine must be rebooted. There are also hardware settings that can only be changed while the virtual machine is powered off.
Managing Virtual Machines from the Command Line
In addition to the options that are offered from the graphical interface, virtual machines can be managed from the command line as well, using the virsh utility. virsh offers a shell interface with a huge amount of options that allow advanced administrators to perform any possible manipulation on virtual machines. To start with, there is virsh list, which shows a list of all virtual machines that are currently running. It doesn’t show virtual machines that are not operational, however. Use virsh list --all to see them too.
From the command line, the state of a virtual machine can be managed also. Type virsh shutdown vmname to shut down a virtual machine gracefully. If that doesn’t work, you can use virsh destroy vmname, which halts it immediately, as if you have pulled the power plug.
The virtual machine itself is stored in a configuration file, which is in /etc/libvirt/qemu. All settings of the virtual machine are stored in that configuration file. You can see an example of it in Listing 7-3.
Listing 7-3. Sample Virtual Machine Configuration File
linux-3kk5:/etc/libvirt/qemu # cat sles12.xml
<!--
WARNING: THIS IS AN AUTO-GENERATED FILE. CHANGES TO IT ARE LIKELY TO BE
OVERWRITTEN AND LOST. Changes to this xml configuration should be made using:
  virsh edit sles12
or other application using the libvirt API.
-->

<domain type='kvm'>
  <name>sles12</name>
  <uuid>c0352e07-795d-404c-86a6-bf045f7aa729</uuid>
  <memory unit='KiB'>1048576</memory>
  <currentMemory unit='KiB'>1048576</currentMemory>
  <vcpu placement='static'>1</vcpu>
  <os>
    <type arch='x86_64' machine='pc-i440fx-2.0'>hvm</type>
    <boot dev='hd'/>
  </os>
  <features>
    <acpi/>
    <apic/>
    <pae/>
  </features>
  <cpu mode='custom' match='exact'>
    <model fallback='allow'>Westmere</model>
  </cpu>
  <clock offset='utc'>
    <timer name='rtc' tickpolicy='catchup'/>
    <timer name='pit' tickpolicy='delay'/>
    <timer name='hpet' present='no'/>
  </clock>
  <on_poweroff>destroy</on_poweroff>
  <on_reboot>restart</on_reboot>
  <on_crash>restart</on_crash>
  <pm>
    <suspend-to-mem enabled='no'/>
    <suspend-to-disk enabled='no'/>
  </pm>
  <devices>
    <emulator>/usr/bin/qemu-system-x86_64</emulator>
    <disk type='file' device='disk'>
      <driver name='qemu' type='qcow2'/>
      <source file='/var/lib/libvirt/images/sles12.qcow2'/>
      <target dev='vda' bus='virtio'/>
      <address type='pci' domain='0x0000' bus='0x00' slot='0x07' function='0x0'/>
    </disk>
    <disk type='block' device='cdrom'>
      <driver name='qemu' type='raw'/>
      <target dev='hda' bus='ide'/>
      <readonly/>
      <address type='drive' controller='0' bus='0' target='0' unit='0'/>
    </disk>
    <controller type='usb' index='0' model='ich9-ehci1'>
      <address type='pci' domain='0x0000' bus='0x00' slot='0x05' function='0x7'/>
    </controller>
    <controller type='usb' index='0' model='ich9-uhci1'>
      <master startport='0'/>
      <address type='pci' domain='0x0000' bus='0x00' slot='0x05' function='0x0' multifunction='on'/>
    </controller>
    <controller type='usb' index='0' model='ich9-uhci2'>
      <master startport='2'/>
      <address type='pci' domain='0x0000' bus='0x00' slot='0x05' function='0x1'/>
    </controller>
    <controller type='usb' index='0' model='ich9-uhci3'>
      <master startport='4'/>
      <address type='pci' domain='0x0000' bus='0x00' slot='0x05' function='0x2'/>
    </controller>
    <controller type='pci' index='0' model='pci-root'/>
    <controller type='ide' index='0'>
      <address type='pci' domain='0x0000' bus='0x00' slot='0x01' function='0x1'/>
    </controller>
    <controller type='virtio-serial' index='0'>
      <address type='pci' domain='0x0000' bus='0x00' slot='0x06' function='0x0'/>
    </controller>
    <interface type='bridge'>
      <mac address='52:54:00:c4:b0:31'/>
      <source bridge='br0'/>
      <model type='virtio'/>
      <address type='pci' domain='0x0000' bus='0x00' slot='0x03' function='0x0'/>
    </interface>
    <serial type='pty'>
      <target port='0'/>
    </serial>
    <console type='pty'>
      <target type='serial' port='0'/>
    </console>
    <channel type='spicevmc'>
      <target type='virtio' name='com.redhat.spice.0'/>
      <address type='virtio-serial' controller='0' bus='0' port='1'/>
    </channel>
    <input type='tablet' bus='usb'/>
    <input type='mouse' bus='ps2'/>
    <input type='keyboard' bus='ps2'/>
    <graphics type='spice' autoport='yes'/>
    <sound model='ich6'>
      <address type='pci' domain='0x0000' bus='0x00' slot='0x04' function='0x0'/>
    </sound>
    <video>
      <model type='qxl' ram='65536' vram='65536' heads='1'/>
      <address type='pci' domain='0x0000' bus='0x00' slot='0x02' function='0x0'/>
    </video>
    <redirdev bus='usb' type='spicevmc'>
    </redirdev>
    <redirdev bus='usb' type='spicevmc'>
    </redirdev>
    <redirdev bus='usb' type='spicevmc'>
    </redirdev>
    <redirdev bus='usb' type='spicevmc'>
    </redirdev>
    <memballoon model='virtio'>
      <address type='pci' domain='0x0000' bus='0x00' slot='0x08' function='0x0'/>
    </memballoon>
    <rng model='virtio'>
      <backend model='random'>/dev/random</backend>
      <address type='pci' domain='0x0000' bus='0x00' slot='0x09' function='0x0'/>
    </rng>
  </devices>
</domain>
As is mentioned in the configuration file, its contents should not be edited directly, but by using the virsh edit vmname command, which ensures that all modifications are applied correctly. From the XML file, new virtual machines can be created easily as well: use virsh create vmname.xml to generate a new virtual machine from the XML code.
Summary
In this chapter, you’ve read how SUSE uses virtualization to make it easy to run multiple virtual hosts on one hardware box. You’ve read about the different virtualization technologies that exist and how KVM can be used to configure SUSE as a versatile hypervisor environment.