This chapter examines various video and image sources in more detail. This is an important prerequisite to image processing. Obviously having a source of images is helpful before processing any images. The SimpleCV framework can capture images from a variety of image sources, ranging from a standard webcam to the Microsoft Kinect. In particular, this chapter covers:
A review of working with webcams
How to use a Kinect to capture depth information for basic 3D processing
Using an IP camera as a digital video source
Working with virtual devices to process images from video feeds or pre-captured sets of images
How to handle a single image and a set of images
The SimpleCV framework supports most cameras that connect to a computer through a variety of interfaces such as USB, FireWire, or a built-in webcam. It can access networked IP cameras that are connected via a wire or a wireless connection. It can even interact with many video capture boards, which work with a variety of analog video inputs (such as Composite, Component, and S-Video).
Outside of connecting to the camera, there are options such as whether to use a monochrome or a color camera, or whether to use a camera with a CCD or a CMOS image sensor. Some cameras record different portions of the light spectrum, such as visible, infrared, or ultraviolet. Then there’s always the choice of how much to invest, as cameras these days range from the very inexpensive to the very expensive. With all of these options, it is easiest just to start with a basic webcam or even just a local image file. For those who would like more help on how to select a camera that aligns with project requirements, see Appendix B.
This chapter revisits how to work with a locally connected camera, which was first introduced in Chapter 2. It then delves into more advanced topics such as using a Kinect to collect 3D depth information, working with remote cameras on the Internet, and using virtual video devices to do things like accessing streams of data previously saved to disk.
The SimpleCV framework does not need a camera to process images. Instead, it makes it easy to load and save images that were previously captured and saved to disk. This is useful both for working with pre-existing image sources, and for saving images captured from a camera so they can be processed at a later time. The following demonstrates the three ways to load image files:
from SimpleCV import Image

builtInImg = Image("logo")

webImg = Image("http://simplecv.s3.amazonaws.com/simplecv_lg.png")

localImg = Image("image.jpg")
-
Loading one of the built-in images that are distributed with the SimpleCV framework.
-
Loading an image directly from the Internet by specifying the URL of the image.
-
Loading an image available on the hard drive by specifying the filename of the image.
The first approach in the above example loads the SimpleCV logo, which is bundled with the SimpleCV software. Additional bundled images include:
simplecvThe SimpleCV logo
logoAlso the SimpleCV logo
logo_invertedAn inverted version of the logo
logo_transparentA version of the logo with a transparent background
lennaThe “Lenna” image found in many common image processing texts
Examples of these are demonstrated in Figure 3-1.

Saving an image is just as easy as loading one. In general, saving
is done by passing the filename to the save() function. As a shortcut, if the image was
already loaded from the disk, simply calling the save() function with no parameters will
overwrite the original image. Alternatively, passing a new filename will
save a new copy of the image to the disk. To demonstrate some of the
options:
from SimpleCV import Image

img = Image("chicago.png")
img.save()

# Now save as .jpg
img.save("chicago.jpg")

# Re-saves as .jpg
img.save() 
-
Load the file
chicago.png.-
This saves the file using the original filename,
chicago.png.-
This now saves the image as a new file called
chicago.jpg. Notice the change in the file extension. It is automatically converted and saved in the JPEG format.-
Because the last file touched was
chicago.jpg, this will savechicago.jpg, and notchicago.png.
Note
When saving a file loaded from the built-in images or fetched directly from the Internet, a filename must be provided.
The SimpleCV image library actually looks at the file extension
provided to determine the image format. Hence a file with a .jpg extension will be saved as a JPEG and a
.png extension will be saved as a PNG.
This is done independently of the file’s original format. For example, the
following code is an easy way to convert an image from a JPEG to a PNG.
The file extension is not case-sensitive for determining the file format,
but it does affect the filename. Using img.save("myfile.PNG") and img.save("myfile.png") will both create a PNG
file, but the filenames will preserve the caps.
from SimpleCV import Image

img = Image("my_file.jpg")
img.save("my_file.png")In addition to working with a single image file, it is also a
common task to work with a large number of image files. Rather than
loading them individually, the ImageSet() library manages sets of images. The
following example demonstrates how to use an ImageSet to manage the saving of a set of
files from a security camera. The ImageSet() command takes one optional
parameter: the path to the directory containing the images to be loaded.
If a directory argument is not provided, ImageSet will create an empty list to which
images can be added.
from SimpleCV import Camera, ImageSet import time cam = Camera() camImages = ImageSet()
-
Initialize an empty
ImageSetobject. Images will be added to this object later in the code.-
Append the image to the
ImageSetnamed camImages.-
Save the images to disk. Because the images did not previously have a filename, one is randomly assigned. It will be a string of random letters followed by
.png. By passingverbose=Trueto thesave()function, it will show the names of the files.
As a final note on ImageSets; like an Image, an ImageSet also has a
show() function. Where the show() function displays a single image when called on an Image object, it will show a slideshow when called on an
ImageSet object. In the case of ImageSets, the show function
takes one argument that sets the number of seconds to pause between images. For example,
ImageSet().show(5) will display a slide show with a
five=-second delay between showing each image in the set.
We first looked at working with a locally connected camera in the “Hello World” program in Chapter 2. For reference, here is that program again:
from SimpleCV import Camera, Display, Image

# Initialize the camera
cam = Camera()

# Initialize the display
display = Display()

# Snap a picture using the camera
img = cam.getImage()

# Show the picture on the screen
img.save(display)
The salient points to remember here are:
To work with a locally connected camera, first import the
CameraclassThen use the
Camera()constructor to initialize a camera object
Historically, the computer vision market has been dominated by 2D vision systems. 3D cameras were often expensive, relegating them to niche market applications. More recently, however, basic 3D cameras have become available on the consumer market, most notably with the XBox Kinect. The Kinect is built with two different cameras. The first camera acts like a traditional 2D 640×480 webcam. The second camera generates a 640×480 depth map, which maps the distance between the camera and the object. This obviously will not provide a Hollywood style 3D movie, but it does provide an additional degree of information that is useful for things like feature detection, 3D modeling, and so on.
Tip
Want to play with Kinect code without owning a Kinect? The Freenect project has a set of drivers called fakenect which fake the installation of a Kinect. For more information, see http://openkinect.org.
The Open Kinect project provides provides free drivers that are required to use the Kinect. The standard installation on both Mac and Linux includes the Freenect drivers, so no additional installation should be required. For Windows users, however, additional drivers must be installed. Because the the installation requirements from Open Kinect may change, please see their website for installation requirements at http://openkinect.org.
As mentioned above, the Kinect is a combination of a standard 2D camera with a second depth sensor to capture 3D information. The overall structure of working with the 2D camera is similar to a local camera. However, initializing the camera is slightly different:
from SimpleCV import Kinect # Initialize the Kinect kin = Kinect()
-
Unlike local cameras, which are initialized by calling the
Camera()constructor, the Kinect is initialized with theKinect()constructor. If the drivers were not correctly installed, this line of code will print a warning and future operations will fail. Note that unlikeCamera(), theKinect()constructor does not take any arguments.-
Although the initialization is different, the basic steps for capturing an image are the same. Simply call
getImage()from the Kinect object to snap a picture with the Kinect’s 2D camera.
Using the Kinect simply as a standard 2D camera is a pretty big waste of money. The Kinect is a great tool for capturing basic depth information about an object. Underneath the hood, it measures depth as a number between 0 and 1023, with 0 being the closest to the camera and 1023 being the farthest away. Although the Kinect captures values in a range from 0 to 1023, the SimpleCV framework automatically scales that range down to a 0 to 255 range. Why? Instead of treating the depth map as an array of numbers, it is often desirable to display it as a grayscale image. In this visualization, nearby objects will appear as dark grays, whereas objects in the distance will be light gray or white. To better understand this, the following example demonstrates how to extract depth information:
from SimpleCV import Kinect

# Initialize the Kinect
kin = Kinect()

# This works like getImage, but returns depth information
depth = kin.getDepth()

depth.show()
The example output, shown in Figure 3-2, shows some hints of a person in the foreground, as indicated by the darker person-shaped spot. Other, more distant objects are also somewhat discernible further in the background. The image is not a traditional picture, but the relative distance of the objects still provides some indication or outline of the actual objects.

The Kinect’s depth map is scaled so that it can fit into a 0 to
255 grayscale image. This reduces the granularity of the depth map. If
needed, however, it is possible to get the original 0 to 1023 range
depth map. The function getDepthMatrix() returns a NumPy matrix with
the original full range of depth values. This matrix represents the
2×2 grid of each pixels depth. More
information about the link between matrices and images is covered in
Chapter 4.
from SimpleCV import Kinect

# Initialize the Kinect
kin = Kinect()

# This returns the 0 to 1023 range depth map
depthMatrix = kin.getDepthMatrix()

print depthMatrix
Putting the pieces together, it is possible to create a real-time depth camera video feed using the Kinect. These examples are best run as a separate Python script, rather than in the SimpleCV shell. The three examples are:
A video feed of the Kinect depth map
Using the Kinect to identify and extract just the part of an image in the foreground
Using the Kinect to measure an object that passes into its field of view
The first example is a basic streaming feed from the Kinect. Like the examples in Chapter 2 that used the webcam to create a video feed, this provides a real-time stream of images. Unlike the previous examples, however, it shows the depth map instead of the actual image.
from SimpleCV import Kinect

# Initialize the Kinect
kin = Kinect()

# Initialize the display
display = kin.getDepth().show()

# Run in a continuous loop forever
while (True):
     # Snaps a picture, and returns the grayscale depth map
     depth = kin.getDepth()

     # Show the actual image on the screen
depth.save(display)The previous examples in this book have assumed that the camera is directly connected to the computer. However, the SimpleCV framework can also control Internet Protocol (IP) Cameras. Popular for security applications, IP cameras contain a small web server and a camera sensor. They then stream the images from the camera over a web feed. As of the writing of this book, these cameras have recently dropped substantially in price. Low end cameras can be purchased for as little as $30 for a wired camera and $60 for a wireless camera.
Most IP cameras support a standard HTTP transport mode, and stream
video via the Motion JPEG (MJPG) format. To access a MJPG stream, use the
JpegStreamCamera library. The basic
setup is the same as before, except that now the constructor must provide
the address of the camera and the name of the MJPG file. This is
represented by mycamera and
video.mjpg, respectively, in the example
below:
from SimpleCV import JpegStreamCamera

# Initialize the webcam by providing URL to the camera
cam = JpegStreamCamera("http://mycamera/video.mjpg")

cam.getImage().show()
In general, initializing an IP camera requires the following information:
The IP address or hostname of the camera, represented by mycamera in the example above.
The path to the Motion JPEG feed, represented by video.mjpg in the example above.
The username and password, if required. This configuration option is demonstrated below.
Note
Having difficulty accessing an IP camera? Try loading the URL in a web browser. It should show the video stream. If the video stream does not appear, it may be that the URL is incorrect or that there are other configuration issues. One possible issue is that the URL requires a login to access it, which is covered in more detail below.
Tip
Many phones and mobile devices today include a built-in camera. Tablet computers and both the iOS and Android smart phones can be used as network cameras with apps that stream the camera output to an MJPG server. To install one of these apps, search for “IP Camera” in the app marketplace on an iPhone/iPad or search for “IPCAM” on Android devices. Some of these apps are for viewing feeds from other IP cameras, so make sure that the app is designed as a server and not a viewer.
The first configuration parameter needed is the IP or hostname of the network camera, which varies from model to model. The camera manual should list this, though the exact configuration is based on both the camera’s default configuration and the local network’s configuration. The IP or hostname used is exactly the same as the IP or hostname used when accessing the camera via a web browser.
The next step is to find the name of the video stream file, which
should end in .mjpg. Once the camera is
online, log in to the camera from a web browser. Popular username-password
pairs are admin/admin or admin/1234, although this information should be
provided in the camera documentation. After logging in, the web page will
most likely display the video stream. If it does not, navigate to the page
that does show the video stream. Then right click on the streaming video
and copy the URL. If the stream’s URL is not available by right-clicking,
it may require a little detective work to find the MJPG stream URL for the
camera. To see an initial database for some popular cameras, go to: https://github.com/ingenuitas/SimpleCV/wiki/List-of-IP-Camera-Stream-URLs.
If the video stream requires a username and password to access it,
then provide that authentication information in the URL as shown below. In
the example URL, the text string admin
should be replaced with the actual username; the string 1234 should be replaced with the actual
password; the string 192.168.1.10
should be replaced with the hostname for the camera; and the string
video.mjpg should be replaced with the
name of the video stream file.
from SimpleCV import JpegStreamCamera

# Initialize the camera with login info in the URL
cam = JpegStreamCamera("http://admin:[email protected]/video.mjpg")

cam.getImage().show()
Caution
This puts the username and password in plain text in the Python script. Make sure that the Python script is only readable by authorized users.
Notice the formatting of the URL. It takes the form: http://username:password@hostname/MJPG_feed. For
those who have done basic HTTP authentication in the past, this is the
same formatting. Once connected, the network camera will work exactly like
a local camera.
The classic real world application for an IP camera is a security camera. A WiFi connected web camera can easily stream a live video feed to a central location for monitoring. These examples are focused on basic image capture. Later chapters of the book will talk about how to detect motion and other ideas for creating a more robust application. The two versions of the security camera application are demonstrated:
Streaming a single live feed
Capturing multiple streams and displaying them in a single panel
As with the previous examples, these are best run as Python scripts—and not in the SimpleCV shell.
The first example is basic single IP camera. Once configured, it works like a locally connected camera. As a demonstration, the following example shows a feed captured from the IP camera:
from SimpleCV import JpegStreamCamera, Display
import time

#initialize the IP camera
cam = JpegStreamCamera("http://35.13.176.227/video.mjpg")

display = Display()

img = cam.getImage()
img.save(display)

while not display.isDone():

     img = cam.getImage()
     img.drawText(time.ctime())
     img.save(display)

     # This might be a good spot to also save to disk
     # But watch out for filling up the hard drive

time.sleep(1)-
Initialize the IP camera, as described above.
-
From this point on, the IP camera will work just like other example code described in the previous chapter.
The SimpleCV framework does not actually require a physical camera to do image processing. In addition to IP cameras and physically connected cameras, the SimpleCV framework can also process image data previously saved to disk. In other words, a pre-existing video or image can serve as a frame source. This is useful for processing video captured from non-compatible devices or for providing post-processing of previously captured video.
One approach to using existing images is to use a virtual camera. Instead of capturing data fed through a camera, the virtual camera loads a video file that is accessed as though it is a stream of video coming through a camera. By this point in the book, the overall access and use should appear familiar to most readers:
from SimpleCV import VirtualCamera

# Load an existing video into the virtual camera
vir = VirtualCamera("chicago.mp4", "video")

vir.getImage().show()
The previous example looks for a video named chicago.mp4 as the frame source. The first
parameter to VirtualCamera() is the
filename of the video to load. The second is simply the word “video,”
indicating that the first parameter points to a video as opposed to a
static image. When working with a virtual camera, each call to getImage() will advance the video by a single
frame. Figure 3-3 shows one frame from the example video. Once the last frame of the video is reached, calling getImage() again will loop back to the first
frame of the video.

Note
The ability to use videos as a frame source is based on the codecs installed. The installed codecs will vary from system to system. Under Windows, the video files are decoded with Video for Windows. Linux uses ffmpeg. Mac OS uses QuickTime to decode video files. If in doubt, try to open the file first in another application to see if the video is readable.
Because virtual cameras are based on the Camera class, other camera functionality also
works. For example, the Camera.live()
function introduced in the previous chapter will work with virtual
devices too. Just like with a regular webcam, simply click with the left
mouse button on any point on the screen to get information about the
pixel coordinates and color. Notice that at the end of the video, it
automatically loops back to the beginning and plays it again.
from SimpleCV import VirtualCamera

vir = VirtualCamera("chicago.mp4", "video")

# This plays the video
vir.live()
Figure 3-4 shows an example frame from what you would see using this code.

Instead of a video file, a single image can also be used as a virtual camera:
from SimpleCV import VirtualCamera

# Notice: the second parameter is now: image
vir = VirtualCamera("chicago.png", "image")

vir.getImage().show()
This time, the VirtualCamera
function is passed the path to an image file and then the word “image,”
indicating that the first parameter is a single image. Because this is
only a single image and not a video, getImage() always returns the same image. A
lot of the same functionality could be achieved by simply loading the
image. In fact, the following two lines of code create identical output
to the end user:
from SimpleCV import Image, VirtualCamera

# These two lines of code do the same thing
VirtualCamera("chicago.png", "image").getImage().show()
Image("chicago.png").show()
Notice that the overall functionality of the virtual camera with
single images looks a lot like working with the Image library. Because the Image library also includes additional
features to handle drawing and the extraction of features, it is usually
the preferred method of working with images.
The examples provided in this chapter cover a range of applications of image sources. They are designed to demonstrate the range of potential sources and their practical application. The examples cover the following topics:
Converting a directory of images to the JPEG format
Using the Kinect to segment an image to extract the nearest object
Using the Kinect to measure the height of an object
Combining multiple IP camera feeds into a single feed for easy viewing
This example uses the ImageSet
library to convert an entire directory of images to the .jpg format. It first uses the ImageSet to load the directory of images. It
then iterates through the set, changing the name of the file to have a
.jpg extension. Then it saves the
file again with the new file extension and automatically converts it to
the new file format during the save process.
from SimpleCV import ImageSet

set = ImageSet(".")

for img in set:

     oldname = img.filename

     newname = oldname[0:-3] + 'jpg'

     print "Converting " + oldname + " to " + newname

img.save(newname) 
-
The first step is to get an
ImageSetof all the files. This example assumes that the code is run from the same directory that contains the images, the Chapter 3 folder. Note that although the chicago.mp4 file is also in the Chapter 3 folder, it is not an image file, soImageSetwill skip it.-
Next, loop over all image files. The
imgvalue represents each individual image while looping through the set.-
This line extracts the original filename of the image.
-
This creates the new filename by first finding the name of the original file without the extension (
oldname[0:-3]) and then appending thejpgextension.-
Finally, save a new copy of the file with the
.jpgextension. The.jpgextension will automatically convert the file and save it in the JPEG format.
For the next application, the depth information from the Kinect can be used to extract objects from the foreground and then erase the background. In computer vision, this is known as segmentation, which is the process of dividing an image into groups of related content in order to make the image easier to analyze. Segmentation is covered in greater depth in later chapters, but this example shows how the Kinect can also be used to perform basic segmentation on the image.
Tip
Don’t have a Kinect? Example images are provided in the
electronic supplement. The 2D image is kinect-image.png and the depth information
is stored in kinect-depth.png.
Modify the code below to load the images instead of capturing them via
the Kinect.
from SimpleCV import Kinect import time # Initialize the Kinect kin = Kinect() # Get the image and depth information dep = kin.getDepth()
-
This gets the depth information from the Kinect. The depth information will be used to detect the parts of the image that are in the foreground and the parts that are in the background.
-
Next, capture an image. This should be done with a still or very slow moving object so that the depth image captured in the previous step matches the picture captured in this step.
-
This binarizes the depth image, which converts it into a pure black and white image only (no shades of gray). In other words, rather than have many different depths, it will just have foreground and background. The binarization threshold,
190, may need to be adjusted based on the environment. It is then inverted, changing the black to white, and the white to black. By the end of this step, objects in the foreground are black and objects in the background are white.-
Subtract the black-and-white image from the main image. This has the effect of removing the background.
-
Finally, show the resulting image.
The resulting segmentation is not perfect, as you can see in Figure 3-5. It includes a little stuff from right and above the object and misses some material from left and below the object. This is an artifact of the distance between the normal image camera and the depth sensor. Objects farther away from the camera will have less of a problem with this.
This is the first of several tricks for extracting important features from an image. It demonstrates how the depth information can be used to reduce the image to only its key components. As the book progresses, we cover these concepts in greater detail, and introduce a variety of different tips and tricks.
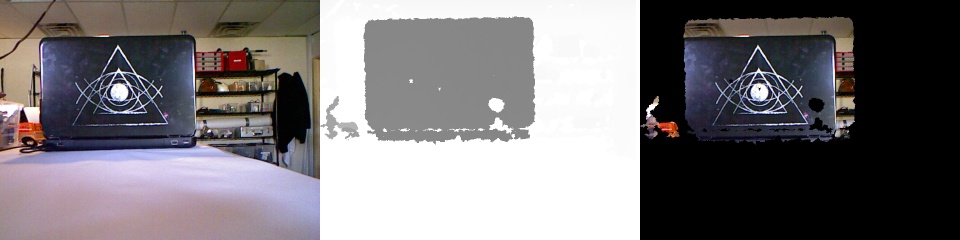
The final Kinect example goes a little further. As demonstrated in the previous example, the 3D depth information is useful for identifying an object of interest because the object of interest is likely closer to the camera than the background objects. This example detects the largest object in the field of view and then tries to measure its height.
from SimpleCV import Kinect, Display import time # Initialize the Kinect kin = Kinect() # Initialize the display disp = Display((640, 480))
-
This initializes the display with a specific resolution of 640×480, which matches the output from the Kinect.
-
This is a calibration value that will need to be adjusted based on the environment in which the code is used. The code will measure how many pixels high an object is, but it needs a way to translate pixels into inches.
-
Next binarize the image and find blobs. The previous example showed that binarizing the image will help pick out the nearest object. Finding blobs will then look for a big contiguous object, which is assumed to be the object to be measured.
-
The
drawText()function should be familiar from Chapter 2. Howeverblobs[-1].height()is new. By usingblobs[-1], it retrieves the largest blob found. Then it callsheight()on that blob to get the height in pixels of that object. That measurement is displayed on the screen.
This example requires some calibration. To make it work, start
with an object of a known height and place it in front of the camera.
Adjust the pixelsToInches value until
the output shows the correct height in inches. After this calibration is
done, the Kinect can be used to measure other objects, such as the laptop in Figure 3-6. The measurements
will not be perfect because of limitations in the Kinect sensor, but
they should provide a decent estimate of height.

Note, however, that the objects must be put in the same spot as the original object used for calibration. As an extra credit assignment, the depth values could also be calibrated and used to measure physical distance from the camera. This could then be used to measure an object at a more arbitrary distance from the camera—though this is getting more complicated than is appropriate for this early in the book.
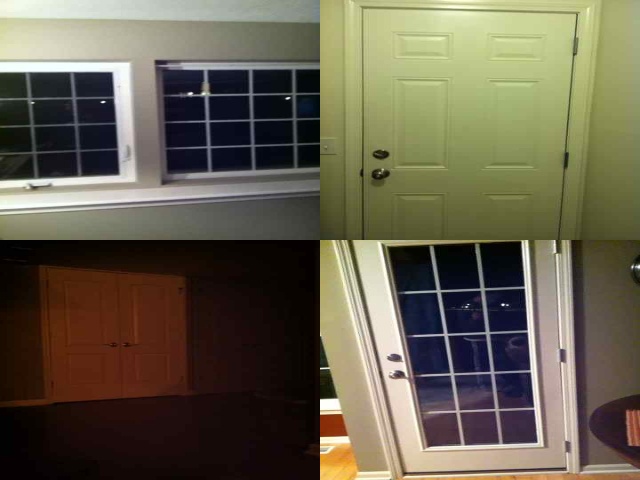
So far, the security camera examples use only one camera. However,
it is common to have multiple security cameras, all of which should be
monitored at the same time. The following block of example code shows
how to do this by combining the output of four cameras into one display
window. This code introduces the sideBySide() function, which combines two
images together. The options for the sideBySide() function include the name of the
image to add to the original image, the side on which place the image
(left, right, top, or bottom), and whether or the images should be
scaled.
from SimpleCV import Camera, Display
import time

#initialize the IP cameras
cam1 = JpegStreamCamera("http://admin:[email protected]/video.mjpg")
cam2 = JpegStreamCamera("http://admin:[email protected]/video.mjpg")
cam3 = JpegStreamCamera("http://admin:[email protected]/video.mjpg")
cam4 = JpegStreamCamera("http://admin:[email protected]/video.mjpg")

display = Display((640,480))

while not display.isDone():
     img1 = cam1.getImage().resize(320, 240)
     img2 = cam2.getImage().resize(320, 240)
     img3 = cam3.getImage().resize(320, 240)
     img4 = cam4.getImage().resize(320, 240)

     top = img1.sideBySide(img2)
     bottom = img3.sideBySide(img4)

     combined = top.sideBySide(bottom, side="bottom")

     combined.save(display)
     time.sleep(5)
-
Initialize the four IP cameras. Note that each camera has a unique hostname.
-
Initialize the display at 640×480. This area will support four images, each of size 320×240 to be stacked in a two by two grid.
-
Capture the image, and then resize to 320×240, so they will all fit into the display.
-
The
sideBySide()function takes two images, and pastes them together side by side into one. First, assemble the top and bottom rows of the grid.-
Then take the top and bottom rows of the grid and paste them together into the full grid.
-
Finally, display the results to the screen, and then sleep for 5 seconds.
An example of what this might look like is shown in Figure 3-7.