
![]()
Integration of FI with Other SAP ERP Modules
In this chapter, you learn how to integrate FI with other SAP modules as well as how to customize and integrate the Material Management (MM) and Sales & Distribution (SD) modules.
At the end of this chapter, you will be able to:
- Integrate the FI module with other SAP modules
- Explain the Material Management (MM) module
- Configure automatic postings
- Explain the Sales & Distribution (SD) module
- Prepare revenue account determination
Integrate FI with Other SAP Modules
Most, if not all, transactions that take place in other modules in the SAP system trigger postings to the FI module. The idea behind assigning other modules to the FI module is to allow the system to automatically post financial transactions from other modules to FI. This process is referred to as integration in SAP ERP. The modules in Figure 13-1 are available for integration within FI.

Figure 13-1. Integrating other SAP modules into FI
As a result, you need to perform some assignments between these modules in order to allow the system to perform automatic postings between them. For example, when you integrate the Payroll module into the FI module, postings made in the Payroll module are automatically posted to G/L accounts in real-time based on defined criteria.
In Figure 13-1, the Material Management (MM), Asset Accounting (FI-AA), Sales & Distribution (SD), Payroll, and Local General Ledger modules are integrated into FI. Therefore, postings to these modules are automatically posted to FI based on the integration procedures you define.
In this chapter, you learn how to integrate the Material Management (MM) and Sales & Distribution (SD) modules only. In Chapter 18 you integrate the Asset Accounting (FI-AA) module into FI.
![]() Note Before you begin integrating other modules into FI, you should create the appropriate G/L accounts that you will need. Go to “Appendix A, Chapter 13” (Integration of FI with other modules) to create the appropriate G/L accounts for this exercise.
Note Before you begin integrating other modules into FI, you should create the appropriate G/L accounts that you will need. Go to “Appendix A, Chapter 13” (Integration of FI with other modules) to create the appropriate G/L accounts for this exercise.
Material Management (MM)
Moving materials (such as goods issued and received) from one stage to another takes place in the MM module and those actions need to be posted to the FI. To represent the movement of these items in FI, they have to be assigned to G/L accounts in the FI module in the Valuation class. The Valuation class integrates the MM actions to FI and determines the G/L accounts where material movements (such as raw materials, semi-finished products, and finished products) are posted (Figure 13-2). In order for the system to automatically post MM transactions, you need to set its specifications in the Valuation class.
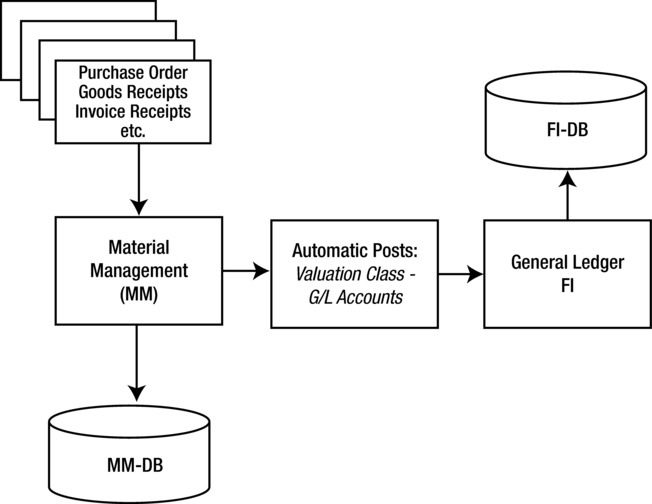
Figure 13-2. How movement of material in MM is posted in FI-DB (the database)
To properly classify your materials, you have to define the Valuation class for every material in the Valuation class’ fields. SAP supplies standard Valuation classes for this purpose.
You need to configure three settings in order to perform automatic postings from the MM module to FI:
- Valuation class: The Valuation class determines the G/L account group materials with the same account characteristics even when they are posted at different stages during material movement. For example, it allows goods receipt of raw materials to be posted to one G/L account and finished products to another. This is achieved by assigning different Valuation classes to materials at different stages. For example, the Valuation class number for Raw Materials is 3000, for Semi-Finished Products is 7900, and for Finished Products it’s 7920.
When creating a material, you must specify a Valuation class in the accounting data for the material. A material is entered in the accounting data view of the material master data. As part of your configuration you must also assign a material type to the Valuation class. This will allow the system to determine whether the Valuation class you defined can be used for the material type. A Valuation class can be assigned to one or more material types. Likewise, a material type can be assigned to one or more Valuation classes. The link between Valuation classes and material types is maintained by the account category reference. A combination of Valuation classes is often referred to as an account category reference.
- Transaction key or code:Transaction codes differentiate between transactions and determine the G/L account where the transaction is posted. SAP includes standard transaction keys that you can use to customize your settings.
- Accounts:This is where you assign the G/L accounts. You assign G/L accounts to posting transactions for every valuation class, and the postings in MM will automatically generate corresponding postings in FI.
In order for the system to post MM transactions automatically to the G/L accounts in FI, you need to perform the automatic posting configurations.
Configure Automatic Postings
When you customize the automatic postings, the system can then automatically post the MM actions to the appropriate G/L accounts. That means you don’t have to manually input material movements; the system will do it for you.
Let’s look at an example to see how customizing MM integration into the G/L accounts works in principle. Assume a goods receipt (GR) of £200K is posted to the Purchase Order account in the MM module. The double entry record for this transaction is to:
- Debit the inventory account.
- Credit the GR/IR clearing account (Figure 13-3).

Figure 13-3. Accounting double entry of goods receipt (GR)
There are two ways to access the screen where you customize these types of automatic postings:
- IMG: Financial Accounting (New)
 General Ledger Accounting (New) Periodic Processing Integration Material Management Define Accounts for Material Management
 - IMG: Material Management Valuation and Account Assignment Account Determination Account Determination Without Wizard Configure Automatic Postings
The Configuration Accounting Maintain: Automatic Posts - Procedures screen is displayed. This screen contains a list of procedures you can choose from. Choose Inventory Posting BSX from the Procedures list by clicking on it. Then click the Details ![]() button on the top-left side of the screen. The Enter Chart of Accounts dialog box pops up. Enter your chart of accounts code in the Chart of Accounts field. Click the Enter
button on the top-left side of the screen. The Enter Chart of Accounts dialog box pops up. Enter your chart of accounts code in the Chart of Accounts field. Click the Enter ![]() button at the bottom of the dialog box or press Enter on your keyboard. The Configuration Accounting Maintain: Automatic Posts – Rules screen is displayed. Notice that the system has automatically entered your chart of accounts CA90 and the transaction code BSX for inventory posting. This is where you determine the valuation class for your account assignment.
button at the bottom of the dialog box or press Enter on your keyboard. The Configuration Accounting Maintain: Automatic Posts – Rules screen is displayed. Notice that the system has automatically entered your chart of accounts CA90 and the transaction code BSX for inventory posting. This is where you determine the valuation class for your account assignment.
In the Accounts Are Determined Based On section of the screen, specify the basis on which you want your material valuation accounts to be determined. You do this by setting the posting rules for the Valuation modification, Valuation class, and G/L accounts. Select the Valuation Modif and Valuation Class checkboxes. Click Save ![]() at the top of the screen for the system to accept your valuation class specification. The Configuration Accounting Maintain: Automatic Posts - Accounts screen is displayed (Figure 13-4). This is where you specify the settings for automatic postings of MM transactions to FI.
at the top of the screen for the system to accept your valuation class specification. The Configuration Accounting Maintain: Automatic Posts - Accounts screen is displayed (Figure 13-4). This is where you specify the settings for automatic postings of MM transactions to FI.

Figure 13-4. Maintaining the automatic posting of inventory
Update the following fields:
- Valuation Modification: Enter 0001 in this field for each material (Raw Material, Semi-Finished Products, and Finished Products). This determines accounts posted based on the valuation area or plant (if your valuation area is based on plants). A plant is an organizational unit that distinguishes activities based on business operations. For example, production units.
- Valuation Class: Select the appropriate valuation class from the ones supplied by SAP by clicking the Search button. In this instance, select the Validation Class for Raw Material 3000, Semi-Finished Products 7900, and Finished Products 7920.
- Account: Enter the G/L Account for Raw Material 300000, Semi-Finished Products 790000, and Finished Products 792000 in the Account field.
Click the Enter ![]() button to confirm your entries and save
button to confirm your entries and save ![]() your efforts.
your efforts.
In the double entry example earlier in Figure 13-3, you had two accounts: Inventory and GR/IR. Since you have created an inventory account using the BSX transaction key, the next step is to create a corresponding credit account for the GR/IR clearing account. To do this, you should use the GR/IR clearing account WRX transaction key from the list of procedures on the Configuration Accounting Maintain: Automatic Posts - Procedures screen (see Figure 13-4).
Click the Back ![]() button on the top of the screen to return to the previous screen (Configuration Accounting Maintain: Automatic Posts - Procedures). Search for GR/IR clearing account WRX from the Procedures list by clicking the scroll
button on the top of the screen to return to the previous screen (Configuration Accounting Maintain: Automatic Posts - Procedures). Search for GR/IR clearing account WRX from the Procedures list by clicking the scroll ![]() buttons. Click the Details
buttons. Click the Details ![]() button at the top of the screen to go to the Configuration Accounting Maintain: Automatic Posts – Accounts screen, where you will assign an account to the GR/IR clearing account. Notice that the system will automatically use your chart of accounts CA90 and the transaction code WRX GR/IR clearing account (Figure 13-5).
button at the top of the screen to go to the Configuration Accounting Maintain: Automatic Posts – Accounts screen, where you will assign an account to the GR/IR clearing account. Notice that the system will automatically use your chart of accounts CA90 and the transaction code WRX GR/IR clearing account (Figure 13-5).
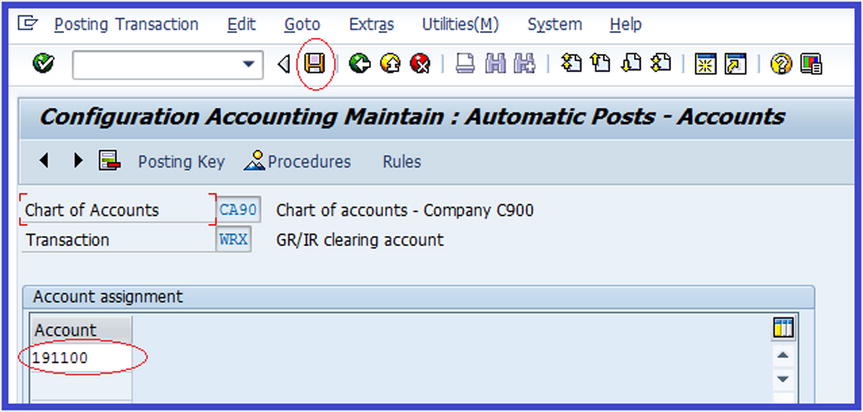
Figure 13-5. Maintaining the automatic posting for the GR/IR clearing account
Enter the GR/IR clearing account G/L account 191100 in the Account field and save ![]() your account assignment.
your account assignment.
In an automatic posting procedure, there are several transactions and transaction keys that are not covered in this book that you may want to explore on your own. The following transaction keys are important:
- GBB: Offsetting entry for inventory posting
- PRD: Cost (price) differences
- KON: Consignment payables
In this activity you will only be looking at the offsetting entry for inventory posting (GBB), which is a predefined transaction code. Basically, the procedure for assigning a transaction key is the same. GBB has several account groupings that you can choose from based on the relevant movement types. The following list contains the accounting groupings for materials or goods movement types in GBB:
- AUF – Goods receipt for production orders with account assignment
- BSA – Initial entries of stock balances
- INV – Expenses/revenue for inventory differences
- VAX – Goods issues for sales orders without account assignment
- VAY – Goods issues for sales orders with account assignment
- VBO – Consumption for stock of material provided to vendor
- VBR – Internal goods issues to production/cost center
- VKA – Consumptions for sales order SD
- VNG – Scrapping/destruction
- VQP – Sampling
- ZOB – Goods receipt without purchase orders
- ZOP – Goods receipt without production orders
In this activity, you will only be updating general modification VBR (a predefined transaction key supplied by SAP for internal inventory posting to G/L accounts) with the Material Consumption account. After you configure the GBB-offsetting entry for inventory posting, the system will automatically post materials or goods issued to production or cost center to offsetting accounts in FI by debiting the Material Consumption account and crediting the Inventory account for materials.
Let’s configure the offsetting entry for inventory GBB now. Follow this menu path: IMG: Financial Accounting (New) ![]() General Ledger Accounting (New)
General Ledger Accounting (New) ![]() Periodic Processing
Periodic Processing ![]() Integration
Integration ![]() Material Management
Material Management ![]() Define Accounts for Material Management. The Configuration Accounting Maintain: Automatic Posts - Procedures screen is displayed. Click the scroll
Define Accounts for Material Management. The Configuration Accounting Maintain: Automatic Posts - Procedures screen is displayed. Click the scroll ![]() buttons to find the Offsetting entry for Inventory GBB in the procedure list. Select it and click the Details
buttons to find the Offsetting entry for Inventory GBB in the procedure list. Select it and click the Details ![]() button at the top of the screen. The Enter Chart of Accounts dialog pops up. Enter your chart of accounts CA90 into the Chart of Accounts field.
button at the top of the screen. The Enter Chart of Accounts dialog pops up. Enter your chart of accounts CA90 into the Chart of Accounts field.
Click the Enter ![]() button at the bottom of the pop-up screen to confirm your entry. You will be presented with the Configuration Accounting Maintain: Automatic Posts – Rules screen (Figure 13-6).
button at the bottom of the pop-up screen to confirm your entry. You will be presented with the Configuration Accounting Maintain: Automatic Posts – Rules screen (Figure 13-6).

Figure 13-6. Maintaining the posting rules for automatic posting
In the Accounts Are Determined Based On section, check the following checkboxes:
- Debit/Credit
- General Modification
- Valuation Modification
- Valuation Class
These items are then made available for input on the next screen. Click Save ![]() . The Configuration Accounting Maintain: Automatic Posts – Accounts screen appears (Figure 13-7). Update the screen using the information in Table 13-1.
. The Configuration Accounting Maintain: Automatic Posts – Accounts screen appears (Figure 13-7). Update the screen using the information in Table 13-1.
Table 13-1. Information Needed to Customize the Automatic Offsetting Entry for Inventory Posting
|
Field |
Value |
Description |
|---|---|---|
|
Valuation Modif. |
0001 |
Determines accounts posted based on valuation area or plant (if your valuation area is based on plants). |
|
General Modification |
VBR |
Transaction type used to differentiate account determination. VBR represents internal goods issues to production/cost center. |
|
Valuation Class |
3000 |
An important key that determines the G/L account material that should be posted to at different stages. |
|
Debit |
400000 |
G/L account debit items are posted. |
|
Credit |
400000 |
G/L account credit items are posted. |
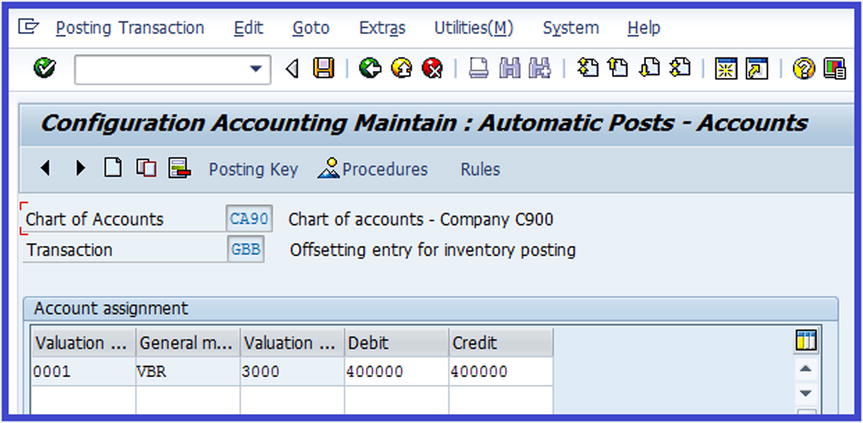
Figure 13-7. Maintaining automatic posting for the offsetting entry for inventory posting
Click the Enter ![]() button at the top of the screen to confirm your entries and save
button at the top of the screen to confirm your entries and save ![]() your efforts.
your efforts.
The next step is to integrate FI to Sales & Distribution (SD) to allow the system to automatically post transactions in SD to FI.
Sales & Distribution (SD)
Sales & Distribution (SD) is part of the SAP module and handles business processes from the sales order to the delivery. This module manages customer sales orders, shipping, billing of products, services, and risk management, and more. Billing is a part of the SD function, and all billing transactions that take place in the SD module also form part of the FI transactions, which result in postings in the FI - general ledger.
This section uses the double entry principle to illustrate how an SD billing transaction is recorded in accounting. Assume that a bill is raised in SD for £200K. This will look like the double entry accounting transaction in Figure 13-8.

Figure 13-8. Accounting double entry when an SD document is posted to FI
The next section explains the customizing steps involved in integrating FI G/L accounts to SD in SAP ERP.
Prepare Revenue Account Determination
Account determination is an important integration process in SAP ERP. It enables the system to post transactions in SD (sales, sales deductions, and freights) to appropriate G/L accounts in FI via account keys (Figure 13-9).

Figure 13-9. How SD transactions are posted to FI
SAP comes with standard account keys that you can use to integrate FI and SD. The following list contains the available account keys that you can use when customizing:
- ERB – Rebate Sales
- ERL – Sales Revenue
- ERS – Sales Deductions
- ERU – Rebate Accruals
- EVV – Cash Clearing
When integrating G/L accounts in FI to SD, you first need to specify the items in Table 13-2.
Table 13-2. Items Needing Specification When Integrating SD to G/L Accounts in FI
|
Field |
Description |
|---|---|
|
Application |
This is where you specify the key for the Sales & Distribution application. The standard application key for SD is V. You can access this key using the matchcode next to the application field. |
|
Condition Type for Account Determination |
SAP comes with standard condition types KOFI and KOFK. If your company code is making SD (Sales & Distribution) transactions posting to FI and not to (CO) controlling, use condition type KOFI for the account determination. On the other hand, if you want the system to post SD transactions to FI and CO, you use condition type KOFK. |
|
Chart of Accounts |
Here you specify the chart of accounts for your G/L account structure. In this activity, the chart of accounts key is CA90. |
|
Sales Organization |
Here you specify the sales organization you want to apply to your account determination. For example, sales organization 0001, 0002, and so on. Sales organizations are distinguished with an identification number in SAP ERP. |
|
Account Key |
The account key you specify here will determine the appropriate G/L account transactions relating to sales that are posted. For example, ERL for Sales Revenue, ERS for Sales Deduction, and so on. |
|
G/L Account |
The G/L account in FI that transactions from SD are posted to for accounting purposes. |
When assigning G/L accounts to SD, you must also determine the sequence to use. In SAP you have five access sequences:
- Cust. Grp/Material Grp/Acct Key
- Cust. Grp/ Acct Key
- Material Grp/Acct Key
- General
- Account Key
Access sequences allow you to specify different G/L accounts for different sales organizations. Based on your settings, the system will go through your settings to determine if a G/L account is assigned to an account key. The system will check the first item in the access sequence, for example, the Cust.GrpMaterialGrpAccKey. If a G/L account is assigned, the system will use the G/L account for revenue posting. If a G/L account is not assigned, the system will go to the next item in the sequence and so on, until the system finds an account key that a G/L account is assigned to. It will use it for posting SD transactions to G/L accounts in FI.
![]() Note You should determine the access sequence that you want to maintain for your G/L account.
Note You should determine the access sequence that you want to maintain for your G/L account.
Let’s integrate G/L accounts in FI to SD now. This activity illustrates the steps involved in configuring revenue account determination.
Problem: Using an account key (Acct Key), assign a G/L account to the Sales Revenue (ERL) and Sales Deductions (ERS) modules.
You can access the menu path for revenue account determination either in FI or SD:
- IMG: Financial Accounting (New) General Ledger Accounting (New) Periodic Processing Integration Sales & Distribution Prepare Revenue Account Determination
- IMG: Sales & Distribution Basic Functions Account Assignment/Costing Revenue Account Determination Assign G/L Accounts
The Assign G/L Accounts screen is displayed. It contains a list of five access sequences to choose from. Choose Account Key (this is the last item on the list) and then click Details ![]() at the top of the screen to go to the Change View Acct Key Overview screen. This is the initial screen where you will prepare revenue account determination for the integration of G/L accounts in FI to SD. Click the
at the top of the screen to go to the Change View Acct Key Overview screen. This is the initial screen where you will prepare revenue account determination for the integration of G/L accounts in FI to SD. Click the ![]() button on the top-left side of the screen to go to the New Entries: Overview screen (Figure 13-10).
button on the top-left side of the screen to go to the New Entries: Overview screen (Figure 13-10).

Figure 13-10. Assigning G/L accounts to an account key
- Application: Enter application key V. This is the standard key for SD.
- CndTy.: Enter condition type KOFI. This condition type is used for account determination without posting CO (controlling). If you want to be able to post to FI and CO, use the condition type KOFK.
- ChAc: Enter the chart of accounts you defined in Chapter 2. This will allow you to use the G/L accounts in your chart of accounts.
- SOrg: Enter sales organization 0001. We used 0001 for illustration purposes.
- ActKy: Enter account key ERL (sales revenue) and ERS (sales deductions). The account key will allow the system to distinguish between transactions.
- G/L Account: Enter the G/L account you want sales revenue to be posted in the G/L account in FI. This activity uses 800000 as the G/L account for illustration purposes.
- Provision Acc.: Enter the G/L account you want to post sales deductions to in this field.
Click the Enter button on the top-left side of the screen and save ![]() your work to complete your configuration.
your work to complete your configuration.
Summary
This chapter explained the processes involved in integrating FI with other modules in SAP ERP. It briefly discussed material movements that take place in the Material Management (MM) module that need to be posted to FI. This included material issues and receipts. It went on to explore the steps involved in customizing the integration of MM with FI. In customizing MM, we defined the Valuation class for Raw Material, Semi-Finished Products, and Finished Products using the standard valuation keys supplied by SAP and assigning them to appropriate G/L accounts. You also looked at the relationship between Sales & Distribution (SD) and FI. You learned about this through a flow diagram, which explained the concepts involved in configuring SD with FI.
Finally, you also learned how to customize SD in order for the system to determine the appropriate G/L accounts that SD transactions are posted to. In doing so, you specified various condition types and assigned them to G/L accounts. This is necessary so that the system can determine the G/L accounts that SD transactions are posted to.
The next chapter explains how to customize the Accounts Payable (AP) and Accounts Receivable (AR) modules. It explains how to create number ranges for customers/vendors and covers the problems associated with creating number ranges. It defines account groups with screen layouts, explains the use of payment terms and various installment plans, and covers how to configure manual and automatic outgoing payments in SAP ERP. It also looks at how to define adjustment accounts for receivables and payables by maturity, and adjustment posting/reversal of documents using negative postings methods.