Dragons are not unique to Western culture, of course—Japan and China are rife with tales and paintings of dragons, usually depicted as benevolent and wise beings, often respected and revered as guardian spirits. Perhaps the most striking difference between dragons of the East and dragons of the West is their appearance. Eastern dragons have long, serpentine bodies, and they do not have wings; however, they achieve flight by floating and undulating through the air. Eastern dragons are often depicted with beards, thick manes, two elk- or deerlike horns, and long whiskers, like a catfish or carp. This lesson will demonstrate drawing the general characteristics of Eastern dragons so you can capture their essence in your own drawings.
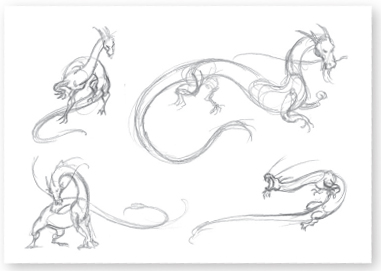
Rough Sketches Eastern dragons present a range of drawing possibilities. Because they do not have wings, there is more freedom—and perhaps a greater challenge—in using their unique body type in the composition of the drawing. Spend some time creating rough sketches, and try not to get caught up in a repetition of S curves. Overlapping the dragon’s coils can help create a sense of depth.

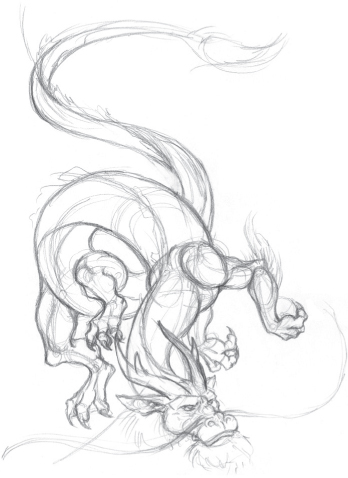
Step 1 I begin by drawing the line of action with an HB pencil. I sketch separate lines to indicate the coil shape of the dragon’s body; then I rough in lines for the legs. I sketch some rough forms to develop more areas of the body as this helps me find a pleasing composition. Without wings to fill up the frame, there is more freedom to play around with the coil-shaped body, neck, and tail.
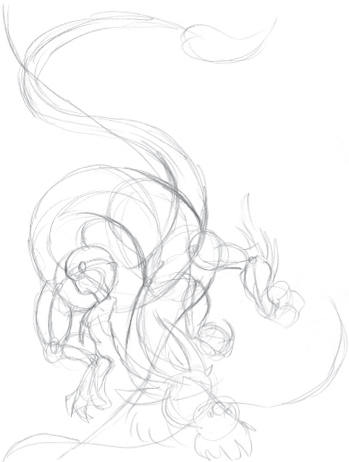
Step 2 Now I develop the dragon’s overall form, and I sketch the whiskers, toes, horns, and fur. Notice how I lightly sketch the limbs and the rear body through the front body. This helps me position the limbs and continue to draw them correctly. To emphasize the twisting motion, I indicate the backbone and the belly with separate lines so I can see how the body is turning. If you get overwhelmed by this pose, don’t worry. Practice drawing simpler poses until you feel more comfortable with this type of dragon, and then work your way up to more challenging poses.
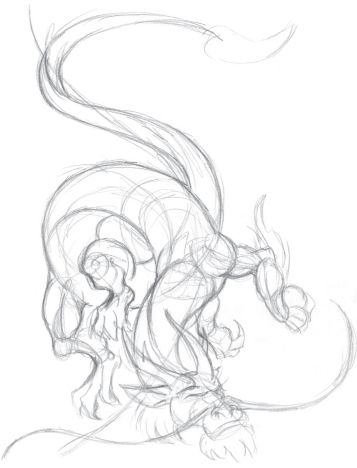
Step 3 I’m happy with this composition, so I continue using the HB pencil to develop the form by outlining specific muscle masses. I add more detail to the toes and fur, as well as a few facial features, such as brow ridges and nostrils. I also more clearly define the shape of the visible ear.
Step 4 Using the HB pencil, I clean up extra sketch lines I don’t need and darken the lines I want to keep. I further outline the muscle masses and start defining more specific details, including the claws, eyes, horns, and other facial features. Notice the faint outline of the sphere this dragon is holding. Some legends mention Eastern dragons possessing a giant “pearl of wisdom.” Details like this are up to you, but I like the idea of this dragon carrying its favorite bauble.

Step 5 I transfer my sketch to a sheet of heavier drawing paper so my lines are as clean as possible. I also completely erase the remaining sketch lines I don’t want. I further define details, such as claws, horns, and hair, including the mane that travels down the ridge of the spine. By far the most dramatic jump between this step and the previous step is the addition of scales, which I sketch lightly with my trusty HB pencil. Because I’ve transferred my drawing to a fresh sheet of paper, I don’t add the scales until the lines are as clean as possible. If you find it easier to add the scales sooner, by all means do so!
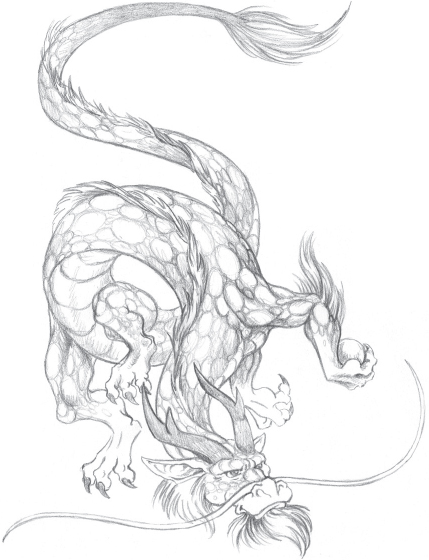
Step 6 Now that I’ve added the scales, I start laying down some basic shading using short strokes and hatching with the lighter H pencil; this helps add volume to the dragon’s limbs and muscle masses. I work the whole image before developing the shading any further. This way I’ll have a better idea of how the shading will work throughout the image, and I can see which areas need deeper shadows or additional highlights.

Step 7 To develop more shading throughout the drawing, I lay down midtones and establish where some of the darker shadows will be by layering shorter, soft strokes using B and 2B pencils. I gradually reduce the detail along the dragon’s tail using atmospheric perspective to make it seem farther away.
Scales have the potential to be the most challenging aspect of drawing dragons; however, the process can also be the most rewarding when you find a method that works for you. For this project, I’ve chosen an irregular pattern of scales that look somewhat “pebbly.” I’m fond of the unusual look it produces when combined with smooth belly scales, like those on a snake. Experiment until you find a style that works best for you!


Step 8 Once I establish where I want the deep shadows to be, I build them up using a combination of long and short strokes and some hatching with softer 3B and 4B pencils. Then, using soft strokes with the HB pencil, I blend the shadows into the midtones. Next I lift out highlights with a kneaded eraser. Shading the edges of the scales with a soft pencil and lightening the opposite edges with a kneaded eraser adds volume to the scales and helps shape the muscles underneath them. I also use the kneaded eraser to lift out highlights on the dragon’s horns, as well as in the beard and mane.