
Chapter 14. Building a CMIS server
- Generating a CMIS server stub with the OpenCMIS Server Framework
- Testing a CMIS server for compliance
- Using the OpenCMIS query parser
- Changing the authentication mechanism
In the previous chapters, we looked at CMIS mainly from a client perspective. In this chapter, we’re changing sides and explaining how to build a CMIS server. You’ll learn how to build a CMIS frontend on top of an existing content repository (or similar data source) with the OpenCMIS Server Framework. For this chapter, you should know how to work with servlets and understand the general concepts relating to building web applications.
14.1. Introduction to the OpenCMIS Server Framework
It’s hardly surprising that a CMIS server is an upside-down version of a CMIS client. All the principles we’ve discussed in this book apply here, too. Similar to a CMIS client, you can either implement the CMIS bindings yourself or use a library or framework. Using a framework obviously saves you time and effort.
In this chapter, we’ll discuss the OpenCMIS Server Framework, which is a Java server implementation of CMIS. It runs on top of a servlet engine such as Tomcat or Jetty (see figure 14.1). It implements all CMIS bindings, which means it covers all XML and JSON handling. To connect the framework to the content repository, you have to implement two Java interfaces: CmisService and CmisServiceFactory. Take a wild guess what we’ll be talking about next.
Figure 14.1. The OpenCMIS Server Framework in a servlet engine

14.1.1. CmisService interface
The main interface is CmisService. If you’ve played with the OpenCMIS client low-level API, this interface should look familiar. The CmisService interface is an aggregation of all nine low-level interfaces plus a few extra methods that we’ll explain a bit later. This interface covers all CMIS 1.0 and 1.1 operations and has over 50 methods. The methods and parameters are named after the CMIS operations. Implementations of this interface are supposed to behave as described in the specification; that includes throwing the exceptions documented in the specification. The “Services” section of the CMIS specification will become your best friend when you’re implementing this interface.
14.1.2. CmisServiceFactory interface
The second interface is CmisServiceFactory. As the name suggests, it provides instances of CmisService implementations. Apart from the getService method that returns such an object, there are some methods that are called at initialization and destruction time of the web application as well as methods that return configuration data.
14.1.3. The framework
The framework consists of five servlets (shown in figure 14.2) and two context listeners. One context listener initializes the CmisServiceFactory implementation. The other one sets up the Web Services binding. There are two servlets for the Web Services binding (one for CMIS 1.0, the other for CMIS 1.1), two servlets for the AtomPub binding (again one for CMIS 1.0 and one for CMIS 1.1), and one servlet for the Browser binding (CMIS 1.1 only).
Figure 14.2. Servlets that are parts of the framework and their associated protocols

When a servlet receives a CMIS request, it parses the requests, checks if the request is syntactically correct, and turns the input parameters into Java objects. It then asks the CmisServiceFactory implementation for an instance of the CmisService implementation and calls the appropriate method with the input Java objects. The response of the called method is then translated into XML or JSON and sent back to the client.
That is the general mode of operation. The rest of this chapter describes how to implement the two interfaces, set up a CMIS web application, and deploy that application.
14.2. Generating a server stub
You’ll use a Maven archetype to generate a Maven project, which in turn creates a server stub. Don’t worry if you aren’t familiar with Maven; this chapter provides step-by-step instructions. Once the stub has been generated, you can keep the Maven project for further development or move the stub to a different build environment of your choice.
To generate the stub, you need Java 5 (or higher) and Maven 3 installed on your computer. The stub generation is done via command line. First change to the stub’s target directory. Then execute the following command:
mvn archetype:generate
-DgroupId=org.example.cmis
-DartifactId=my-cmis-server
-Dversion=1.0-SNAPSHOT
-Dpackage=org.example.cmis.server
-DprojectPrefix=Example
-DarchetypeGroupId=org.apache.chemistry.opencmis
-DarchetypeArtifactId=chemistry-opencmis-server-archetype
-DarchetypeVersion=0.9.0
-DinteractiveMode=false
This call accepts the following parameters:
- groupId, artifactId, and version—Maven coordinates for the project you’re creating.
- package—Java package for your project.
- projectPrefix—Prefix for the classes that will be generated. For example, the prefix Example generates the classes ExampleCmisService and ExampleCmisServiceFactory.
- archetypeGroupId, archetypeArtifactId, and archetypeVersion—OpenCMIS archetype and OpenCMIS version that should be used. The archetype was introduced with OpenCMIS 0.9.0. You may choose this version or a later version to generate the stub. This version also defines the runtime OpenCMIS Server Framework version.
- interactiveMode—If false, Maven won’t prompt you to confirm any of the previous parameters passed in.
Next we’ll explore the results generated by this process. As you’ll see, this is a real time saver:
|--my-cmis-server
|----pom.xml
|----src
  |----main
    |----java
    | |----org
    |   |----example
    |     |----cmis
    |       |----server
    |         |----ExampleCmisService.java
    |         |----ExampleCmisServiceFactory.java
    |----webapp
      |----index.jsp
      |----WEB-INF
        |----classes
          |----repository.properties
- pom.xml— The pom.xml file for your web project. It contains the configuration you need to build the CMIS server. You can adapt this file if necessary.
- ExampleCmisService.java— Stub implementation of the CmisService interface. Note that it resides in the package you provided and has the prefix defined previously.
- ExampleCmisServiceFactory.java— Stub implementation of the CmisServiceFactory interface.
- index.jsp— Start page of the web application. It provides the URLs for the three CMIS bindings. You can change or remove this file; it’s not required in order to run the server.
- repository.properties— Connects the framework with your implementation. It’s a Java properties file, which must at least contain the key class. The value for this key is the fully qualified class name of the CmisServiceFactory implementation. If you rename or move your factory class, you have to adapt this file accordingly.
Now that all the introductions are over, let’s build a WAR file for this new project.
14.2.1. Building the CMIS server WAR file
Change to the my-cmis-server directory, and run the following command to build the web application:
mvn clean install
When the build is done, there should be a subdirectory called target. It contains a ready-to-run WAR file called my-cmis-server-1.0-SNAPSHOT.war. The name is a combination of the artifactId and project version. Rename it to something shorter, such as myserver.war, and deploy it to a servlet engine.
For your first tests, use a plain servlet engine like Tomcat or Jetty. Some application servers need a special classloader configuration, which we don’t cover here. Once the deployment has finished, open the URL http://localhost:8080/myserver (adjust host and port) in a web browser. You should see the CMIS server start page shown in figure 14.3.
Figure 14.3. The CMIS server start page

The start page contains links to the three bindings. Copy the URLs, and try them with the CMIS Workbench. You should be able to load the (short) list of repositories, but further requests will fail. Nevertheless, you’ve just deployed a CMIS server. Congratulations!
Let’s look under the hood of the WAR file next.
14.2.2. Dissecting the CMIS server WAR file
When you unpack the WAR file, you should see something like this:
|----index.jsp
|----WEB-INF
  |----classes
  | |----org
  | | |----example
  | |   |----cmis
  | |     |----server
  | |       |----ExampleCmisService.class
  | |       |----ExampleCmisServiceFactory.class
  | |----repository.properties
  |----lib
  | |----...
  |----cmis10
  | |----...
  |----cmis11
  | |----...
  |----sun-jaxws.xml
  |----web.xml
Here are the high points of what you see here:
- The index.jsp file and the contents of the WEB-INF/classes directory should look familiar. These are the generated project files.
- The WEB-INF/lib directory contains all libraries that are required to run the CMIS server.
- The WEB-INF/sun-jaxws.xml file and the cmis10 and cmis11 directories are required for the Web Services binding. The WSDL and XSD files are fixed by the specification and shouldn’t be modified. We’ll come back to the sun-jaxws.xml file a bit later when we talk about authentication.
- The WEB-INF/web.xml file defines all servlets and context listeners.
You can override these files and add new files by putting them in the right place under the src directory. You can also add dependencies to other Maven projects to pom.xml. You’ll probably want to embed a library that helps you connect to your underlying content repository.
At this point you have a choice of continuing to use this Maven project or taking the contents of the WAR file plus the source files and moving to a different build environment. The project setup is done now. Next we’ll dive into the implementation details.
14.3. Implementing the CmisServiceFactory interface
The main task of a CmisServiceFactory implementation is to serve CmisService instances. Before we look into this, open the generated class ExampleCmisServiceFactory and skim through it. You may notice that it doesn’t implement the interface directly but extends the AbstractServiceFactory class instead. This abstract class implements all the methods of the CmisServiceFactory interface except getService, which provides the CmisService objects. It’s recommended that you use this abstract class because it provides sensible default return values for the interface’s other methods.
How the getService method creates or manages a CmisService object is up to the implementation. The factory can create an object for each request, can pool objects, or can keep an object per thread in a ThreadLocal. In the end it depends on how expensive it is to create and maintain such an object.
CmisService objects aren’t shared across threads by the framework and don’t need to be thread-safe. But if they’re reused, they must not keep any data from a previous request. That could lead to unpredictable side effects and memory leaks.
14.3.1. CmisServiceWrapper
OpenCMIS provides an optional wrapper for CmisService objects. The CmisServiceWrapper class checks every request before it’s forwarded to the CmisService object. If a request obviously violates the CMIS specification, the wrapper throws the appropriate exception. For example, if a client calls the getObject operation without an object ID, the wrapper automatically throws a CmisInvalidArgumentException, and the actual CmisService object isn’t bothered with this request.
Additionally, the wrapper sets operation parameters that the client didn’t provide if the specification defines a default values for these parameters. For example, if a client calls the checkIn operation and doesn’t provide the major flag, which defines whether the new version should become a major version, the wrapper sets the major flag to TRUE, because that’s the default value defined in the specification. That is, your CmisService implementation always gets a value for such a parameter, even if the client didn’t supply one.
Clients don’t need to set the maxItems parameter for operations that return lists, and they also don’t need to set the depth parameter for operations that return trees. The specification says the default values for these parameters are repository-specific. The wrapper lets you define these values and fills them in if the client didn’t provide the parameters.
In summary, the wrapper helps you build a specification-compliant and more robust server, and it’s recommended that you take advantage of it. The generated ExampleCmisServiceFactory class demonstrates how to apply this wrapper. But the wrapper is optional—if you want or need to catch all invalid requests yourself, remove it from the code.
14.3.2. CallContext
You may also have noticed that the getService method gets a parameter of type CallContext. This CallContext object contains a lot of details about the current call. Just to name a few, it provides the repository ID, the binding the client used, the CMIS version of this call, and the username and password if the standard authentication mechanisms were used. It also provides the call’s HttpServletRequest and HttpServletResponse objects, if you need low-level access.
The getService method is also a good place for checking user credentials. The CallContext object should provide all the necessary data. We’ll cover authentication in detail later in this chapter; but as a rule of thumb, if the credentials are incorrect, throw a CmisPermissionDeniedException right here.
14.3.3. Other CmisServiceFactory methods
The other methods of the CmisServiceFactory interface can be divided into two groups. First are the two lifecycle methods init and destroy. The names suggest when they’re called. The init method retrieves a Map of values, which represents the content of the repository.properties file. This file can be used to provide repository connection details.
The second group provides several configuration details for the framework. To handle big documents, the framework sometimes has to create temporary files in which to park content for a very short period of time. The following methods control the temporary files:
- getTempDirectory—Defines the directory for the temporary files. The default is the system’s temp directory.
- encryptTempFiles—Documents can contain confidential content, so the temporary files can be encrypted. If this is turned on, plain document content will never touch a hard disk. It’s turned off by default for performance reasons. (At the time of writing, the Web Services binding ignores this parameter, but that may change with later OpenCMIS releases.)
- getMemoryThreshold—Document content is written to temporary files only if they’re bigger than the threshold value returned by this method. Documents smaller than that are buffered in main memory. The default value is 4,194,304 bytes (4 MB).
- getMaxContentSize—Temporary space isn’t infinite. This method defines the size at which the framework should reject the document. The default value is 4,294,967,296 bytes (4 GB). If you’re daring, you can return -1, which lifts this restriction entirely. (At the time of writing, the Web Services binding ignores this parameter, but that may change with later OpenCMIS releases.)
The factory is now set up, but the real work happens in the service implementation. Let’s look into that next.
14.4. Implementing the CmisService interface
The CmisService interface is huge. We already said it has more than 50 methods. It’s probably a good idea to split up the implementation into logical chunks, but how you divide it is up to you. The next few subsections will suggest some logical divisions.
14.4.1. AbstractCmisService
When you look at the generated ExampleCmisService class, you may wonder where all these methods are. The answer is that they’re in the AbstractCmisService class, which the ExampleCmisService class extends. The abstract class provides convenience implementations for almost all CMIS operations. Most of them throw a CmisNotSupportedException. A few methods try deriving meaningful responses from other methods. For example, the getAllowableActions method calls the getObject method and extracts the allowable action from the response. That’s good enough for a start, but probably not a sustainable solution for a productive system. For the most efficient implementation, you should eventually override all methods with your own code.
There are a few methods that the AbstractCmisService class doesn’t implement and that are empty in the ExampleCmisService class. These methods are the bare minimum for a read-only CMIS server. Once those are implemented, you can browse your repository with the CMIS Workbench. The server isn’t a fully compliant repository yet, but it’s fairly close.
14.4.2. Best practices for implementing the CmisService
The best practices for implementing the CmisService interface work as follows:
1. Pick the next CMIS operation you want to implement, going for the read-only operations first.
2. Read the operation description in the CMIS specification and everything related to it.
3. Check the Javadoc of the AbstractCmisService class for implementation hints. A few CMIS operations map to more than one method because of binding differences. A bit later, you’ll learn that the AtomPub binding sometimes needs special treatment. Whenever you read something about “object info” objects, refer to “AtomPub differences,” section 14.6, later in this chapter.
4. Implement the method(s). Note that all input and output parameters are interfaces. You can either implement them yourself or use the implementations provided by OpenCMIS. If you want to use the OpenCMIS implementations, add the suffix Impl to the interface names to get the implementation class names. These classes are basic data containers with getter and setter methods. Some parameters are wrapped in a Holder<> class; these are input and output parameters at the same time. Make sure you don’t forget to set the values of these holders before your method returns.
5. Once in a while, compile and deploy your server and run the OpenCMIS Test Compatibility Kit (TCK), which is discussed in the next section.
The Local binding
A fourth, nonstandard binding is mentioned in the AbstractCmisService Javadoc: the Local binding. This binding allows OpenCMIS clients to talk to OpenCMIS servers that reside in the same JVM. Instead of making calls over the network, the client directly invokes the server’s Java methods.
There are all kinds of use cases for this binding. You’ll know them when you see them, but it’s particularly handy for tests. It lets you run automated tests outside a servlet engine, which can make testing much easier.
The process of implementing over 50 methods isn’t as tedious as it seems. There’s a lot of code you’ll use over and over. For example, one of the first methods you have to implement is getObject. It takes a moment to build this method’s bells and whistles, but it pays off when you tackle all the other methods that return ObjectData objects—getChildren, for example. Depending on the underlying content repository and how well its concepts fit with CMIS, it’s possible to build a pretty solid and almost complete proof of concept in about a week.
You may also want to check out the source code of the OpenCMIS FileShare repository. This repository implementation turns a local filesystem directory on your computer into a CMIS repository. The code is straightforward and simple, and you may find some code snippets that you want to borrow—especially the type- and property type–definition code, which should be reusable.
Developing a proof of concept and developing a production server are two different things. The latter needs a lot more testing, and the OpenCMIS TCK should be part of it. We’ll cover that in the next section.
14.5. Testing the CMIS server with the OpenCMIS TCK
The CMIS Technical Committee didn’t define test cases or provide a certification program. There’s no official test that can validate your CMIS server.
OpenCMIS tries to fill this gap with the Test Compatibility Kit (TCK). The TCK is a set of tests that makes a few hundred calls to a repository and checks whether the responses comply with the CMIS specification. It covers almost all aspects of the specification and is an essential tool for the early development stages.
14.5.1. Running the TCK with the CMIS Workbench
The easiest way to run the TCK is with the CMIS Workbench. There’s a TCK button on the Workbench toolbar; it opens a dialog box that allows you to choose the tests you would like to execute (see figure 14.4). The TCK session inherits the login details from the Workbench session. When you’re doing serious testing, you should run the tests for each binding.
Figure 14.4. Dialog for TCK run options

All TCK tests are also JUnit tests, and the OpenCMIS TCK includes an Ant task for automated testing. The OpenCMIS Full Integration Test (FIT) runs the TCK with every OpenCMIS Maven build. If you want to do something similar, you may want to look at the OpenCMIS FIT package.
14.5.2. TCK results breakdown
The TCK can report the results as XML, HTML, or plain text. There are six different message types:
- INFO—This type provides additional information about a test or a test result.
- SKIPPED—The test was skipped because the repository doesn’t support the feature that should be tested.
- OK—The repository behaved as expected.
- WARNING—The repository didn’t behave as expected, but it didn’t violate the specification. When you see a warning for the first time, make sure you understand what’s going on. Some warnings can be tolerable; others should be fixed to improve interoperability.
- FAILURE—The repository violated the specification. This needs to be fixed. There shouldn’t be any failures in the final implementation.
- UNEXPECTED EXCEPTION—The repository threw an exception that the test didn’t expect. It’s very likely that there’s a bug in the repository implementation.
The TCK tries to point out the exact cause of a problem wherever possible. But in some cases it’s helpful to look at the TCK test code and understand exactly what’s going on. Each result contains the name of the Java test class and a line number, which should help you track down the issue. Figure 14.5 shows the TCK results screen after a test run in the CMIS Workbench.
Figure 14.5. TCK results dialog box after a test run, showing first few results

14.5.3. Deeper testing
Although the TCK covers a lot, it can’t replace repository-specific tests. Some TCK tests are complete, whereas others are shallow. An example of a more complete test is this: the TCK creates documents, checks that the documents are there, verifies that they’re complete and correct, and then deletes the documents and checks that they’re gone. Queries, on the other hand, can only be tested superficially. The TCK can perform a query and check whether the response is syntactically correct, but it generally can’t verify whether the result set is complete.
The TCK is constantly growing and improving. New tests are added and existing tests are refined with every OpenCMIS release. You may want to follow OpenCMIS development and revalidate your server once in a while. If you have any suggestions for TCK tests, please let the Apache Chemistry development team know (see appendix E).
When you test, test all three bindings. That’s because the AtomPub binding is a bit different compared to its two siblings. We’ll look into that in the next section.
14.6. AtomPub differences
The Web Services binding and Browser binding are almost one-to-one mappings of the CMIS domain model to the wire protocol. The AtomPub binding is different, though. It also has to comply with the AtomPub specification, and serving these two masters makes life more difficult in some areas. In this section, we’ll explain the extra methods in the CmisService interface that don’t directly map to the CMIS specification.
14.6.1. Providing ObjectInfo
Chapter 11 gave you some insight into the CMIS bindings. One of the main elements of the AtomPub binding is the use of links. A CMIS client has to hop from one link to another to access certain pieces of information about an object or trigger an action. To make that possible, the repository must provide all these links, even if the client hasn’t explicitly asked for them. For example, if a client calls getObject for a document with a property filter that only contains the document’s name, the Web Services binding and the Browser binding can return just that. But the AtomPub binding must also provide a link to the content (if the document has content), a link for the version history (if the document is versioned), links for each rendition (if it has any), a link for the ACLs (if the repository supports ACLs), links to one or more parents (if the document is filed), and so on.
The OpenCMIS framework, which eventually has to compile and send these links, can’t know all these details about an object. You have to tell it. The tool to do this is called ObjectInfo. For each object the framework delivers to the client, it needs an accompanying ObjectInfo object that carries these extra bits of information.
If you’ve already started building your server and you’re wondering why your AtomPub binding magically works when you’ve never touched any ObjectInfo objects, you probably derived your implementation from the AbstractCmisService class. This abstract class has convenience code that automatically creates ObjectInfo objects on the fly if they’re missing. It does that by making several calls to your CmisService implementation and extracting the information it needs. It gets the object and its version history, parents, and relationships, and it looks into the repository info to check the capabilities and more. This implementation isn’t very efficient, but it’s so generic that it works with all repositories. It’s good enough to get off the ground, but eventually you should provide your own code optimized for your repository.
The framework asks the CmisService object for ObjectInfo objects by calling the getObjectInfo method. You can either implement this method or let the abstract class manage the ObjectInfo objects for you. The abstract class keeps a Map in the background that stores all ObjectInfo objects for one request and clears this Map after each request. You can add your own ObjectInfo objects by calling the addObjectInfo method. If you don’t provide an ObjectInfo object for a CMIS object, it will generate one as explained earlier. The framework may ask for the same object multiple times during the XML response generation, so caching these objects per request is advised. Eventually, the framework calls the close method to indicate that the request processing is finished and the CmisService object isn’t needed any more.
The AbstractCmisService class Javadoc reveals whether and which ObjectInfo objects should be provided for each method. The CallContext method isObjectInfoRequired specifies whether ObjectInfo objects are required at all for the request (it could be a Web Services binding or Browser binding request).
14.6.2. Handling create and delete requests
Create and delete requests can be ambiguous with the AtomPub binding. If a create request comes in, all the framework knows is that an object should be created. It doesn’t know if it’s a document, a folder, a policy, or an item. (Relationships are slightly different.)
Therefore, the CmisService interface has an unspecific create method that’s only called with the AtomPub binding. The AbstractCmisService class provides a convenience implementation of this method that dissects the request and forwards it to the createDocument, createFolder, createPolicy, or createItem method. This code might or might not be efficient for your repository. If it isn’t, you override the create method. For example, your server may have an internal way of determining the type of object by its ID format in some static manner.
Delete requests have a similar issue. They’re indistinguishable from cancelCheckOut requests. Therefore, the framework calls the deleteObjectOrCancelCheckOut method, and the server implementation has to figure out how to deal with it. If the object is a private working copy, then this is definitely a cancelCheckOut request. If the object is a document that isn’t checked out or any other nondocument object, then this is definitely a delete request. The behavior of the repository is undefined if the document is checked out but the referenced object isn’t the Private Working Copy. Many repositories don’t allow a document to be deleted if it’s checked out. In this case, the server should throw an exception.
14.6.3. Dealing with version series
The CMIS domain model defines three operations that receive the version series ID as a parameter:
- getAllVersions
- getObjectOfLatestVersion
- getPropertiesOfLatestVersion
You may have noticed that the AtomPub binding and Browser binding server code don’t receive the version series ID when these operations are called. Instead, an object ID of an object that’s part of the version series is provided. To deal with that, the corresponding methods in the CmisService interface have an extra object ID parameter. This parameter is set if the AtomPub binding or the Browser binding is used. The version series ID isn’t set in this case. For the Web Services binding, it’s the other way around.
14.6.4. Managing ACLs
In chapter 12, we pointed out that changing ACLs is slightly different with the AtomPub binding. This is reflected in the CmisService interface. There’s an extra applyAcl method, which takes the complete ACL instead of a list of ACEs to add and a list of ACEs to remove. This method is called only for the AtomPub binding, whereas the other applyAcl method is called for the other bindings.
These binding differences are annoying but don’t make the implementation much more complex. What is truly complex is parsing the CMIS Query language. Luckily, OpenCMIS provides a CMIS query parser, which we discuss next.
14.7. Parsing a CMIS query
At some point you’ll reach the query method of the CmisService interface and want to implement it. It hands you the query statement that the client sent as a string. You now have to parse this string to understand what the client wants. You’re free to do whatever you want with the string. The idea of having to implement a parser can be a bit intimidating, but fear not. If you like, OpenCMIS can support you with its own CMIS query parser.
The OpenCMIS query parser uses ANTLR (www.antlr.org/) to do the actual parsing. If you’re familiar with ANTLR, you can take the CMIS Query language grammar file and build your own parser; that would be the lowest level of integration. There are a few more layers of convenience on top of that. We’ll explore just one here, which should work for most servers.
14.7.1. An example of initialization and use
Listing 14.1 demonstrates how to initialize and use the parser. After we’ve discussed this code, we’ll show you how to work with the individual parsed query parts.
Listing 14.1. Initialization and use of the parser


The traverseStatement method ![]() is provided by the QueryUtil class, which hides the complexity that is required to set up the ANTLR parser. The traverseStatement method needs at least two parameters: the query statement that the client sent and a QueryObject object. This object is responsible for interpreting the query statement and managing the parsing result. It needs a TypeManager object in order to work
is provided by the QueryUtil class, which hides the complexity that is required to set up the ANTLR parser. The traverseStatement method needs at least two parameters: the query statement that the client sent and a QueryObject object. This object is responsible for interpreting the query statement and managing the parsing result. It needs a TypeManager object in order to work ![]() . The TypeManager interface is a small interface that you have to implement first. It gives the QueryObject access to the type system of your repository. It lets you fetch type and property type definitions by their query names and
navigate the type hierarchy.
. The TypeManager interface is a small interface that you have to implement first. It gives the QueryObject access to the type system of your repository. It lets you fetch type and property type definitions by their query names and
navigate the type hierarchy.
The traverseStatement method returns a CmisQueryWalker object. It contains the abstract syntax tree (AST) of the WHERE clause, which we’ll discuss in a second.
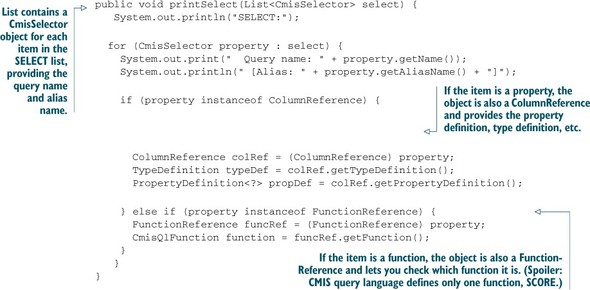
14.7.2. Parsing SELECT
First let’s look at the SELECT part of the query. As you can see from the previous code, you get the list of selected properties from the QueryObject. Let’s iterate through the following code:
14.7.3. Parsing FROM
Now let’s check out the FROM part. The QueryObject provides a Map that maps the alias name to the query name:
public void printFrom(Map<String, String> from) {
  System.out.println("FROM:");

  for (Map.Entry<String, String> type : from.entrySet()) {
    System.out.print("  Query name: " + type.getValue());
    System.out.println(" [Alias: " + type.getKey() + "]");
  }
}
If you need the type definition, you can call the getTypeDefinitionFromQueryName method on the QueryObject, which in turn asks for your TypeManager object.
14.7.4. Parsing WHERE
The WHERE clause is translated into an abstract syntax tree, which you get from the CmisQueryWalker object. Here’s one way to walk through it:

Your task is now to traverse that tree and turn it into a query that your repository understands. Each tree node has a type and may have children. The CmisQueryWalker class provides descriptive constants for node types. You may want to look at the source code of the AbstractPredicateWalker class that’s part of OpenCMIS; it connects the right dots and could serve as a good starting point for your tree-traversal code.
14.7.5. Parsing ORDER BY
Finally we’ve arrived at the ORDER BY part. The following code gets the list of properties and indicates for each one whether the sort order should be ascending or descending:
public void printOrderBy(List<SortSpec> orderBy) {
  System.out.println("ORDER BY:");

    if (orderBy == null) {
      return;
    }

    for (SortSpec property : orderBy) {
      System.out.print("  " + property.getSelector().getName() + " ");
      System.out.println(property.isAscending() ? "ASC" : "DESC");
    }
}
14.7.6. Query wrap-up
These are the basics of the OpenCMIS query parser. Implementing the CMIS query is one of the difficult parts of server development and requires a lot of testing. Especially challenging is making sure the current user sees only what they’re allowed to see. The permissions for each object have to be checked before the object is added to the result set. But to get to this point, the server must first know who the current user is. The next section explains how authentication works with the OpenCMIS Server Framework.
14.8. Extracting authentication information
The OpenCMIS Server Framework implements the authentication mechanisms that are recommended by the CMIS specification. That is, it supports HTTP Basic Authentication for the AtomPub binding and the Browser binding and UsernameTokens for the Web Services binding. These were discussed in chapter 12.
14.8.1. CallContext
The CallContext object delivers the username and password to the server implementation. It’s the responsibility of the server to verify the credentials. The framework only provides the values as shown here:
String username = context.getUsername();
String password = context.getPassword();
Other authentication mechanisms can replace the default implementation. The interface for the Web Services binding is different from the interfaces for the other bindings, though. It’s important to replace both.
The implementations of both interfaces are supposed to extract authentication information from the request and enrich the CallContext object with this data. Usually, authentication information is transported in a request’s HTTP headers or in an SSL client certificate. In case of the Web Services binding, there are also SOAP headers that can contain credentials, keys, signatures, or whatever is used to identify the user.
The CallContext object stores key-value pairs. You can add as many entries as you want and use any key you like as long as there’s no collision with the predefined keys. Everything you add here is accessible from the CallContext object that the framework hands over to the CmisServiceFactory object.
14.8.2. CallContextHandler
Let’s focus on the AtomPub binding and the Browser binding first. The interface to implement is called CallContextHandler. The method to implement it is called getCallContextMap. The following listing shows a code example.
Listing 14.2. A sample CallContextHandler implementation
public class MyCallContextHandler implements CallContextHandler {

  @Override
  public Map<String, String>
    getCallContextMap(HttpServletRequest request) {

    String user = ...
    String password = ...

    Map<String, String> callContextMap =
      new HashMap<String, String>();

    callContextMap.put(CallContext.USERNAME, user);
    callContextMap.put(CallContext.PASSWORD, password);
    return callContextMap;
  }
}
This code tries to extract a username and a password. But again, it could be anything else. The key-value pairs that this method returns are later added to the CallContext object.
To activate your call-context handler, you have to change the web.xml file. Find all servlets that have a callContextHandlerinit parameter, and set the value to the fully qualified class name of your implementation:
<servlet>
  <servlet-name>cmisbrowser</servlet-name>
  <servlet-class>org.apache.chemistry.opencmis.server.
     impl.browser.CmisBrowserBindingServlet</servlet-class>
  <init-param>
    <param-name>callContextHandler</param-name>
    <param-value>org.example.MyCallContextHandler</param-value>
  </init-param>
</servlet>
14.8.3. Web services
On the web services end, you use JAX-WS handlers. A lot of documentation and examples are available on the internet, so we don’t dive deep here.
Important advice about MessageHandler
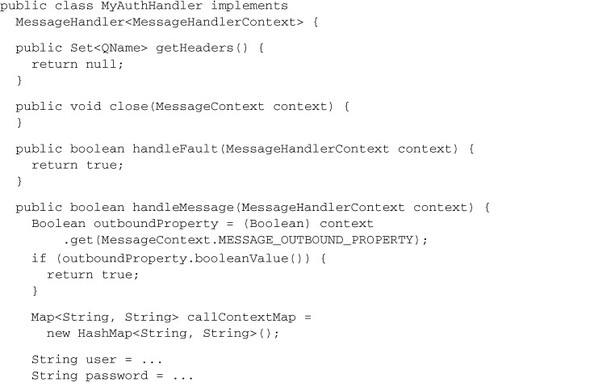
We have one important piece of advice at this point. If you have to access the SOAP headers, extend the nonstandard MessageHandler interface and not the standard SOAPHandler and LogicHandler interfaces. The latter two load the entire SOAP message, including the document content, into main memory when you touch the headers. That can be fatal if the content is bigger than the main memory.
The next listing shows a simple example of a handler that processes user credentials.
Listing 14.3. A sample MessageHandler implementation

To activate your handler, you have to change the sun-jaxws.xml file. Find all handler chain entries, and set the fully qualified class name of your handler, as shown here:
<handler-chains xmlns="http://java.sun.com/xml/ns/javaee">
  <handler-chain>
    <handler>
      <handler-class>org.examplpe.MyAuthHandler</handler-class>
    </handler>
  </handler-chain>
</handler-chains>
14.8.4. Authentication wrap-up
That’s how you read and forward authentication information to the server implementation. If you make sure both implementations send the authentication information with the same keys and in the same format, you don’t have to distinguish later between the bindings.
14.9. CMIS extensions
We covered CMIS extensions in chapter 12 and explained what they’re good for and when to use them. We won’t repeat that, but we want to show you how to add extensions with the OpenCMIS Server Framework.
A CMIS extension is a tree of nodes. Each node has a name, a namespace, and attributes. Leaf nodes have a string value, and all other nodes have one or more child nodes. Extensions are eventually converted into XML fragments or JSON objects. When an extension is converted to JSON, the namespaces and attributes of the nodes are ignored, because such concepts don’t exist in JSON. To be compatible across all bindings, you shouldn’t rely on namespaces and attributes.
All objects that implement the ExtensionsData interface can carry extensions. The following example adds an extension to an object:

So far, all of this is compliant with CMIS 1.0; but with CMIS 1.1, you can also announce your extension in the repositoryInfo. Doing so means clients no longer have to dig around manually in the types and properties to figure out if this particular extension feature is supported. The following code shows how to add this extra 1.1 extension information to your repositoryInfo:
ExtensionFeatureImpl extensionFeature = new ExtensionFeatureImpl();
extensionFeature.setId("http://example.org/cmis/current-datetime");
extensionFeature.setCommonName("CurrentDateTime");
extensionFeature.setVersionLabel("1.0");
extensionFeature.setDescription(
  "Adds the current date and time to each object.");

List<ExtensionFeature> extensionFeatures =
  new ArrayList<ExtensionFeature>();
extensionFeatures.add(extensionFeature);

repositoryInfo.setExtensionFeature(extensionFeatures);
Speaking of CMIS 1.1, the next section explains what you should take into consideration if you want to support CMIS 1.0 and CMIS 1.1 with the same server code.
14.10. Supporting CMIS 1.0 and CMIS 1.1
Because CMIS 1.1 only adds functionality to CMIS 1.0, it makes sense to have one code base for both specifications. To make that work, you must make sure you serve CMIS 1.0 clients only data that is defined in the CMIS 1.0 specification. For example, if your repository supports cmis:item objects, you need to suppress them in getChildren calls. The cmis:item type definition also shouldn’t appear in getTypeChildren and getTypeDescendants responses. Similarly, properties of secondary types must not be included in the property set of an object. You get the idea. The TCK checks quite a bit of that, but don’t rely on it.
The CallContext provides the information about which CMIS version the client understands:
if (context.getCmisVersion() != CmisVersion.CMIS_1_0) {
  // add CMIS 1.1 stuff here
}
14.11. Summary
OpenCMIS provides a server framework to build CMIS servers on top of existing content repositories and data stores. In this chapter, we’ve outlined how to generate a CMIS server stub and build a web application for the server. We discussed the two Java interfaces that must be implemented and how to test the server for compliance with the CMIS specification.
We focused your attention on the AtomPub binding, which requires some extra coding. We also looked into the OpenCMIS query parser and how to hook nonstandard authentication mechanisms into the server. Finally, we demonstrated how to add CMIS extensions and discussed CMIS 1.0 and CMIS 1.1 support with the same code base.
Many small details and best practices about building a CMIS server didn’t made it into this chapter. The subject could probably fill a separate book of its own. If you have any questions, please email the Apache Chemistry mailing list; the community is very active and an ever-evolving source of information on this subject.
This has been a long ride, if you made it all the way to this point. As you can see, the subject of CMIS development is both broad and extremely deep in places. Whether you’re building a client or your own server, we (the authors and contributors) hope we’ve exposed enough of the layers for you to confidently start planning and building your application.
Happy coding!