
Chapter 5. User interaction
- Responding to simple touch events
- Responding to complicated touch gestures
- Using controls for user interaction
Apps would be static, linear, and boring if the user couldn’t interact with them. In this chapter, we’ll look at three different ways an app can respond to user interaction:
- Controls are special types of views that are built to receive user interaction. You’ve already seen one type of control in the distance converter app: the text field. In this chapter, you’ll extend the distance converter app to convert kilometers or miles that the user enters in the text fields, by adding buttons and responding to changes in the text fields. Finally, we’ll look at other available controls for receiving user interaction.
- Next, we’ll look at receiving user interaction in a view via touches. Custom views can respond to touches by overriding relevant view methods. To explore this concept, you’ll build an app with a custom view that changes color when you tap it.
- We’ll then look at receiving user interaction via gestures. Using gesture recognizers, your app can detect much more complicated movements from touches such as pinching, rotating, long press, or swiping. In this chapter, you’ll build a simple image viewer app that will respond to gestures.
5.1. Controls
A control is a special type of view that’s designed for user interaction. Because controls come with UIKit and are available for everyone to use in their apps, they have a consistent and familiar look across different apps, making controls in your interface more intuitive for your users.
As with gestures, control events can trigger actions in your code. Let’s look at several different types of controls, and how to receive notification of different control events.
5.1.1. Buttons
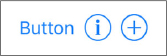
One of the most common controls in UIKit is the button. See figure 5.1 for default looks for several different button types.
Figure 5.1. Button types
You’ll use system buttons to make your distance converter app interactive. The user can convert the number of miles they’ve entered to kilometers or vice versa (see figure 5.2). Okay, we’re not going to win any design awards, but we’re focused on functionality for the moment.
Checkpoint
Open the distance converter app where you left it at the end of the last chapter, or check it out at https://github.com/iOSAppDevelopmentwithSwiftinAction/DistanceConverter.git.
Figure 5.2. Distance converter interface

Adding a button
Let’s add the two convert buttons to the interface.
- Open the main storyboard and drag on a Button from the Object Library beside the miles label.
- Open the Attributes Inspector and take a moment to inspect the attributes available for buttons. Notice the State Config attribute.
Buttons can have four different states, shown in table 5.1.
Table 5.1. Button states
State
Description
Default The default state for the button Highlighted Active while the user is touching the button Selected Active if the button’s selected property is set to true Disabled Active if the button’s enabled property is set to false
One important thing to understand with buttons is that attributes below the State Config attribute only apply to the currently selected state. If you don’t set specific attributes for a state, appropriate defaults for that state will be implemented.
For the default state, change the text of the button (called its title) to “Convert to km.” While you’re here, drag on a second button beside the kilometers label, and give it the title “Convert to miles.”
Run it on the iPhone 6s Plus simulator. The interface should look something like figure 5.2.
Creating control actions
Nothing happens yet when you tap the buttons. You’re going to connect the convert buttons with methods in the view controller code that will perform the conversion and display the result.
To connect a method to a control event in Interface Builder, you’ll need to define the method as an action. An action in simple terms is a method that will be triggered when something happens. In this case, you’ll create an action method in your view controller code that will be triggered when a convert button is touched using the following steps:
- As you did when creating an outlet in the previous chapter, open the Assistant Editor. Holding down the Control key, drag from a Convert-to-km button in Interface Builder to your view controller source code,
below the viewDidLoad method.
Tip
If you don’t see the view controller source code, double-check you have the Automatic mode selected in the Assistant Editor jump bar.
- This time, instead of creating an outlet, you’ll create an action. Change the Connection type to Action. Give your action a Name—let’s call it “convertToKm.”
- Notice the many event options available to you. Touch Down refers to a touch being detected on the button, while Touch Up
Inside refers to a finger lifting off the button. The rest of the settings are fine left at their defaults. Select Connect,
and an @IBAction will be generated in the view controller source. See figure 5.3 to clarify the steps.
Figure 5.3. Create control action
Now that you’re receiving notification of the user tapping a convert button, you can perform the conversion. Like outlets, action methods are tagged with a keyword that begins with @IB, which stands for Interface Builder. The @IBAction keyword indicates that this method can be connected to something in the storyboard and the filled-in circle next to the line number indicates that this action is indeed connected. Connecting an event to a method (known as the action) in an object (known as the target) in this way is called the target-action pattern. Later, we’ll explore setting up this connection in code.
- First, you need to cast the String contents of the miles text field to a Double in the convertToKm method. As the result of this conversion is an optional, use optional binding:
if let miles = Double(milesTextField.text!) { } - Reset the distance object’s miles property, and the distance object will automatically convert the kilometers. Convert the km Double to an Int to remove the unnecessary decimal value, and display it in the kilometers text field:
distance.miles = miles
kmTextField.text = "(Int(distance.km))"
Challenge
Follow the same process to create a convertToMiles() method, triggered by the Convert to Miles button, that converts the value in the kilometers text field to miles, and displays the result in the miles text field.
- Run the app, and your distance converter app has become truly interactive, converting distances when you tap the conversion
buttons.
Checkpoint
Compare your solution with mine at https://github.com/iOSAppDevelopmentwithSwiftinAction/DistanceConverter.git (3.ConvertDistanceWithButtons).
But wait—are the conversion buttons necessary? Maybe the conversion could happen automatically as the user types the distance into the text field.
As it happens, text fields are types of controls too, and can also trigger actions in your code. Let’s take a look.
5.1.2. Text field
Text fields display one line of text that the user can edit using the pop-up software keyboard.
Select a text field now, and examine the attributes available in the Attributes Inspector.
- You can adjust how autocorrection works in Capitalization, Correction, and Spell Checking.
- With the return key attribute, you can change the look or text of the return key to a variety of predefined options.
- You can request that text entered be hidden (that is, Password field) by selecting Secure Text Entry.
- Under Keyboard Type, you can choose which type of keyboard you want to appear. Different types are relevant for different text field purposes.
Keyboard types
There are three main categories of keyboards, with different variations, as explained in table 5.2.
Table 5.2. Keyboard categories
|
Category |
Use |
|---|---|
| ASCII | Text, emails, URLs, and so on. The Numbers and Punctuation keyboard can be accessed if necessary. |
| Numbers and Punctuation | Numbers and punctuation, where the ASCII keyboard can be accessed if necessary. |
| Number Pad | For when numbers and relevant symbols are required, and the ASCII keyboard isn’t required. |
To make the different variations of keyboards, the bottom layer of keys in the ASCII keyboard is swapped out, and one of the Number Pad keys is swapped out. See figure 5.4 for all keyboard type variations.
Figure 5.4. The three keyboard types

That’s not all the different keyboard types! Keyboard keys and layout vary depending on the language, the orientation of the device, and the device type itself!
Which type of keyboard is most appropriate for your miles and kilometers text fields? Choose an appropriate type and make the adjustment in the Attributes Inspector.
Connecting actions from Interface Builder
You’ll modify your distance converter app to automatically calculate the distance conversion as the user types it into the text field.
- Open the Assistant Editor. Unlike earlier, where you created a new method, you’ll connect an existing method, convertToKm(), to a text field event.
- Holding down Control, drag from the miles text field to the convertToKm() method. The Connect Action text should appear (see figure 5.5).
Figure 5.5. Connect Action from Interface Builder

- Run the app, and make changes to the miles text field. Notice that the kilometers text doesn’t change.
- Inside your running app, tap in the kilometers text field. Notice that now the kilometers value changes! What’s going on?
- Back in Interface Builder, select the miles text field, and open the Connections Inspector to get a better idea of what’s going on. You should see that the “Editing Did End” event is connected to the convertToKm method.
You may have noticed when you connected the action to the text field that you didn’t have a choice of event. Connecting actions in this way assumes a control’s default event. The Editing Did End event is the text field’s default, which only triggers after a user stops editing a text field, for instance, by tapping on another text field.
Deleting connections
This isn’t the event we’re looking for, so delete the Editing Did End connection by selecting the X in the Connections Inspector (see figure 5.6).
Figure 5.6. Delete the connection.

Connecting actions from the Connections Inspector
The Editing Changed event triggers whenever the text in a text field is modified. This sounds more like it! Connect the Editing Changed event to the convertToKm method.
- Drag from the Editing Changed circle in the Connections Inspector to the convertToKm method (see figure 5.7).
Figure 5.7. Connect Action from Connections Inspector

- Run the app again. This time, as you make changes to the miles text field, you should see the kilometers text field converting automatically. Success!
Connecting actions from code
You could connect the Editing Changed event for the kilometers text field to the convertToMiles() method in the same way, but this time let’s connect the action in code.
Use the UIControl’s addTarget() method to specify the target and the action. You’ll also need to need to specify the control event itself that you’re listening for (editingChanged). These steps show you how:
- Add the following line to the view controller’s viewDidLoad method:
kmTextField.addTarget(self, action: #selector(convertToMiles),
    for: .editingChanged)
In English, this line says, “When the editingChanged event is triggered, call the convertToMiles() action on self (that is, instance method of the view controller). And that’s all that’s necessary to connect the action in code! Now that you’ve made the conversion happen automatically, you’ve made the buttons redundant! - Select and delete the buttons.
- You could also remove the @IBAction keyword from the convertTo-Miles() method because this is called from code now, and isn’t connected to an event in Interface Builder. If you forget to do this, don’t worry; it’s not strictly necessary.
- Run the app again, and admire your work. You have completed a fully interactive distance conversion app!
Checkpoint
If you want to check out my version of the app at this point, you can do that at https://github.com/iOSAppDevelopment-with-Swift-inAction/DistanceConverter.git (4.ConvertDistanceWhenText-Changes).
5.1.3. Other controls
UIKit provides several controls for different purposes. We’re not going to discuss all of them in detail now, but table 5.3 has a summary of what’s available and what they’re useful for.
Table 5.3. UIKit controls
|
Control |
Default interface |
Use |
Example usage |
|---|---|---|---|
| Switch | Modify a Boolean value between an on or off state. Similar to a toggle button or checkbox. | Turn sound off or on. | |
| Slider | Modify a numeric value between a continuous range of values, such as between 0 and 1. | Adjust the sound volume. | |
| Stepper | Modify a numeric value by increasing or decreasing by a defined amount. | Select the quantity of a product in a shopping cart. | |
| Picker |  |
Select a value from a set of values. Similar to a drop-down or combo box, but allows for multiple selectors. | Select a language from a set of languages. |
| Date Picker |  |
Select a date and/or time. | Select a departure date in a travel app. |
| Segmented Control | Select one value from a small set of values. | Select a travel class (Economy, Business) in a travel app. |
Note
If we’re being pedantic, Picker isn’t a control, although Date Picker is! How could this be possible? While the UIDatePicker class subclasses UIControl, the UIPickerView class subclasses UIView directly, bypassing UIControl. Therefore, UIPickerView doesn’t have access to connect events to action methods. Rather, it uses what’s called the delegation pattern to be customized and receive user interaction (we’ll look at the delegation pattern shortly). The user has no idea of the internal implementation of a view, so if it looks like a control and works like a control, it’s a control! I’ve therefore included the Picker in this list of controls.
Controls are a useful high-level way to implement user interaction. But sometimes you don’t need all the bells and whistles of controls—you might have a simple view, and you need to receive information on touch events.
5.2. Touching views
In this section, you’ll create an app called Touch Views that displays simple views that change color when the user touches them. See figure 5.8 for the interface on the left, and the view hierarchy of the app on the right.
Figure 5.8. Touch Views app view hierarchy

Checkpoint
To spare you the headache of setting up this interface, check out the TouchViews project repository at https://github.com/iOSAppDevelopmentwithSwiftinAction/TouchViews.git (1.Initial Setup).
When you have the project open in Xcode, open the ViewController.swift file and examine how the views are constructed in code, passing in a CGRect structure to the UIView initializer, the way you did in the ViewsInCode project in the previous chapter.
To distinguish the views from each other, they each have a different random background color. The random property is already set up for you in a UIColor extension that you can find in the UIColorExtension.swift file.
Notice that while views A, B, and C are being added to the subviews of the root view, view D is added to the subviews of view C. Have another look at this view hierarchy in figure 5.8. Note that a view that is added after another view appears in front. This is why view B appears to be in front of view A.
5.2.1. Hit testing
Whenever an app receives a touch event, it first follows a path down the view hierarchy performing what is called hit-testing to determine the lowest-level view that was touched.
For example, if the user touches within the bounds of view D (see figure 5.9), iOS first checks the root views’ subviews from front to back (that is, views C, B, and then A) until it finds a view that contains the touch. When it finds the touch in view C, it doesn’t need to continue looking in views B and A. It then looks inside the subviews of view C and finds that view D contains the touch. As view D doesn’t have any subviews, it determines view D is the lowest-level view that was touched.
Figure 5.9. Hit testing

5.2.2. Overriding touch methods
After drilling down to view D, iOS will then call this view’s touchesBegan() method, passing in a Set of touches. If you create a custom subclass of UIView and override this method, you can provide custom implementation for this view when it’s touched.
- Create a custom view class to receive and respond to this method. Select File > New > File > iOS > Source > Cocoa Touch Class. Subclass UIView, and name your custom view ColoredView.
- Override the touchesBegan() method.
- Call its super method.
- Reset the background color of the view to another random color.
override func touchesBegan(_ touches: Set<UITouch>, with event: UIEvent?) {
    super.touchesBegan(touches, with: event)
    self.backgroundColor = UIColor.random
}
Now, back in the ViewController class, instead of creating instances of UIView, create instances of your new view subclass, ColoredView. - Go through the ViewController class replacing all mentions of UIView with ColoredView.
- Run the app again, touch the different views, and watch them change color.
Notice that when you touch view B where it overlaps view A, only view B changes color. iOS checks a view’s subviews in the order that they’re displayed, from front to back. When a view returns a successful hit test, iOS stops checking other views at this level. In the example, view B is closer to the front than view A because it was added last. Because it’s the front view, when it returns a successful hit test, iOS stops there, and doesn’t perform a hit test on view A.
Notice that when you touch view D, its superview, view C, also changes color. Why?
5.2.3. The responder chain
When a view receives an event such as a touch event, it passes this event up to its superclass, and so on. When the event arrives at the root view of a scene, it’s passed to the scene’s view controller. The view controller in turn passes the event on to the superview of its root view. In this example, the superview of the root view of the scene is the window of the app. The dotted line in figure 5.10 illustrates the path of the event in our app, called the responder chain.
Figure 5.10. The responder chain

Every object that can receive these events is called a responder and every responder (that is, UIView and UIViewController) subclasses the UIResponder class. The UIResponder class is where you’ll find the touchesBegan() method.
Let’s demonstrate that the view controller is on the responder chain.
- Add the same touchesBegan() method to the ViewController class. This time, change the background color of its root view.
override func touchesBegan(_ touches: Set<UITouch>, with event: UIEvent?) { super.touchesBegan(touches, with: event) self.view.backgroundColor = UIColor.random } - Run the app, and you should notice the background color of the root view changes on all touches.
Other UIResponder methods can be overridden to receive other touch events, as explained in table 5.4.
Table 5.4. UIResponder touch methods
|
Touch method |
Trigger |
|---|---|
| touchesBegan() | One or more fingers touched down on a view. |
| touchesMoved() | One or more fingers moved within a view. |
| touchesEnded() | One or more fingers lifted off a view. |
| touchesCancelled() | A touch is interrupted by a system event. |
| touchesEstimatedPropertiesUpdated() | To ensure touch events are presented in a timely manner, sometimes touch attributes are estimated. These estimated values are later updated in this method. |
Challenge
Make the views also change color when the user lifts their finger off the view. You can check out the completed app at https://github.com/iOSAppDevelopmentwithSwiftinAction/TouchViews.git (2.ColoredView).
With all these triggers for touches, you could easily respond to taps—but what if you want your view to also respond to double taps? Should you wait a short period before responding to the tap, in case it was going to be a double tap? How long would that short period of time be?
What if you want your app to pinch to zoom in and out on an image? Are you brushed up on your Pythagoras theorem?
Not to worry, Apple has you covered with another type of user interaction called gesture recognizers.
5.3. Gesture recognizers
Gesture recognizers go one step further than merely reporting touch information. Gesture recognizers interpret the touches and recognize the intention of the movement the way humans would. They can tell the difference between a swipe and a pan, a double tap and two single taps, or a pinch and a rotation.
Without needing to program or understand the complicated underlying code defining the gesture recognition algorithms, your app can detect and respond to all sorts of complex predefined gestures.
Having standardized gesture recognizers has the added benefit of consistency with other apps in the App Store, which should make your interface more intuitive for your users. Apple provides several gesture recognizers, each of which detects different types of gestures. See table 5.5 for different gestures, the relevant recognizer, and how this gesture can be used in your app.
Table 5.5. Gestures
|
Gesture |
Recognizer |
Example usage |
|---|---|---|
| Tap | UITapGestureRecognizer | Selecting a control or item. |
| Double tap | UITapGestureRecognizer | Zooming in (or out if already zoomed in). |
| Pinch | UIPinchGestureRecognizer | Zooming in/out. |
| Pan | UIPanGestureRecognizer | Dragging or panning content in any direction. |
| Flick | UIPanGestureRecognizer | Scrolling or panning content in any direction quickly. |
| Drag from edge of display | UIScreenEdgePanGestureRecognizer | Drag in additional content from off-screen. |
| Swipe (left, right, up, or down) | UISwipeGestureRecognizer | Returning to previous screen, revealing hidden view or button. |
| Two fingers circular movement | UIRotationGestureRecognizer | Rotating content. |
| Touch and hold | UILongPressGestureRecognizer | Positioning cursor in text fields. |
You’ll explore the possibilities with gestures by creating a simple image viewer app. In this app, you’ll pan, zoom, and rotate an image, or tap to view the next image. The starter project is bare bones, with only an image view in the main scene ready for viewing.
Checkpoint
Check out a starter project for your image viewer app at https://github.com/iOSAppDevelopmentwithSwiftinAction/Image-Viewer.git (1.InitialSetup).
Image views are straightforward—they’re a special type of view that can display an image stored in your project.
If you open the project folder in Finder, you’ll also find a folder called Images with three photos. Feel free to use these images or replace them with your own photos. Now let’s add these files to your project!
- Drag the Images folder into your ImageViewer project in the Project Navigator. A popup will appear with options when adding files.
- Select Copy items, if needed, Create groups, and Add to ImageViewer target, and select Finish. A yellow group called Images
should appear in the Project Navigator.
Options when adding files to your project
When you add files to your project, you have a few options to consider:
Destination: Copy items if needed. If you check this option, any files or folders you drag into your project will physically be copied into your project folder. You can theoretically include references in your project to files that aren’t in your project folder. This could make sense, for example, if you’re sharing resources with another project, though it’s recommended to keep all relevant files within your project folder—it helps organize your resources into one place. The image folder is already in the project folder, so in this case checked or unchecked is irrelevant.
Added folders: Create groups/Create folder references. When you add a folder, you have the choice to add it as a reference to the folder, or a reference to each individual file bundled into a group. If you have a reference to a folder (blue icon), whenever you update the contents of the physical folder on disk, Xcode will automatically update its contents in the Project Navigator. A group, on the other hand (yellow icon), is no longer connected to the folder itself after being added to the project. Any files you add to the folder will not be reflected in the group, and any files you remove from the folder will be highlighted as missing files. Generally, it makes sense to go with groups, but cases exist where folder references can come in handy. For example, perhaps you’re sharing a folder with a graphic designer and want the resources to update automatically.
Add to targets: Choose which target you would like to add the files to. Every resource and source file is explicitly included in the appropriate target. You can check this by selecting a file in the Project Navigator and noting the Target Membership section in the File Inspector. Generally, files are divided into their target groups in the Project Navigator, but files can also be shared between targets.
File categories
Xcode determines what to do with each file when building your app by categorizing files into Compile Sources, Bundle Resources, and Frameworks and Libraries.
Compile Sources—This category refers to all source files, such as Swift or Objective-C code. Source files are compiled into your app executable, called the binary.
Bundle Resources—This category refers to all sorts of resources and media you may want to include. Certain resource files such as images, audio files, or even PDF files are copied directly into your app bundle. Other resource files, such as the asset catalog or storyboards, are converted in different ways when copied into the app bundle.
Frameworks and Libraries—This category refers to frameworks that your app will link to. Distinct from third-party frameworks, frameworks from Apple are automatically linked with your project, and they don’t need to be physically added. We’ll look more at third-party frameworks and libraries in chapter 11.
You can examine the categories of the files in your app in the Build Phases tab of your project target settings. For more details about project settings, check appendix A.
- Open the settings for the project target, select the Build Phases tab, and verify that the images have been added to the Copy Bundle Resources section.
- Open the main storyboard, select the image view, and in the Attributes Inspector in the Image attribute, select one of the photos you’ve dragged into the project.
For a view to respond to a gesture, you need to add a gesture recognizer to the view. You can do this in code, or in Interface Builder. Let’s start by adding a pan gesture recognizer to the image view in Interface Builder.
5.3.1. Pan gesture
Add a pan gesture recognizer to your image view to be able to pan the image around.
- Find the Pan Gesture Recognizer in the Object Library, and drag it onto the image view.
You’ll notice that the pan gesture recognizer appears in the document outline for the view controller and in the scene dock
in the Interface Builder canvas. If you select the image view, you’ll also find the pan gesture recognizer connected to the
image view in the Connections Inspector (see figure 5.11).
Figure 5.11. Pan gesture recognizer
Certain gesture recognizers can be customized. If you open the Attributes Inspector, you’ll find attributes that you can use to customize the pan gesture recognizer. If you want your pan to only respond to only one- or two-finger pans, for example, you do that here.
- In the Attributes Inspector for the pan gesture recognizer, adjust the maximum touches to 2. You’re going to create an action to respond to the pan gesture.
- Open the Assistant Editor.
- Holding down the Control key, drag from the pan gesture recognizer in Interface Builder to your view controller source code below the viewDidLoad method.
- Change the type of the connection to Action and name the action “handlePan.”
- Change the Type to “UIPanGestureRecognizer” so your method will explicitly receive the recognizer, correctly typed as a UIPanGestureRecognizer, in the function parameters. An action method should appear in your code.
See figure 5.12 for clarification on the steps to create an action for a gesture recognizer.
Figure 5.12. Create gesture recognizer action

- While you have the Assistant Editor open, the way you did in the last chapter, create an outlet for the image view and call it “imageView.” Now you have a method that’s called whenever a pan gesture event is recognized. As gestures take place over a period of time, events could represent, for example, that a gesture began, changed, ended, or failed. The current state of the gesture is stored in the state property of the gesture recognizer that’s passed into the method. The state property stores its current state as a UIGestureRecognizerState enumeration. Enumeration types store related values, such as states. We’ll take a closer look at enumerations as well as create our own enumeration type in chapter 10. The gesture recognizer also reports back important information about the gesture itself, measured from the moment the gesture began. The pan gesture recognizer reports a coordinate representing where the user has panned to, from the moment the gesture began. This information is perfect to use for moving the image. You’ll need to convert the pan movement to a coordinate value relative to the image view’s superview. This type of conversion is called translation.
- Translate the coordinate by calling the pan gesture recognizer’s translation method, passing in the root view:
let translation = sender.translation(in: self.view)
- You can add this x,y coordinate to the image view’s current position to move the image. Use the UIView’s center property to set the image view’s current position:
imageView.center = CGPoint(
    x: imageView.center.x + translation.x,
    y: imageView.center.y + translation.y)
Because gesture recognizers report on movement since the moment a gesture began, and the center property reports on the current location of the image view, if we continue adding the gesture movement to the image view location every time the gesture recognizer reports a movement, the image view will move exponentially. To illustrate this, consider if the image view begins at (x:0, y:0). The first time the gesture recognizer is called, the translation may be a movement of (x:1, y:1), so the image view is moved to (x:1, y:1). The second time the gesture recognizer is called, the translation may have moved another 1 point in the x direction and 1 point in the y direction, so the translation (representing the movement from the moment the gesture began) will be (x:2, y:2). The new location of the image view should be (x:2, y:2) but following the code above, instead it will be (x:3, y:3). What can be done about this? There are two possible solutions:- You could use the gesture recognizer’s state property to detect when the gesture begins, and at this point record the initial location of the view. You could then base all view movement calculations from this initial location rather than the view’s current location.
- You could reset the gesture recognizer every time you respond to a gesture event, so that the gesture recognizer now reports on movement since the last pan gesture event.
- Reset the recognizer to zero:
sender.setTranslation(CGPoint.zero, in: self.view)
Your handlePan method should now look like the following code.@IBAction func handlePan(_ sender:UIPanGestureRecognizer) { let translation = sender.translation(in: self.view) 1 imageView.center = CGPoint( 2 x: imageView.center.x + translation.x, 2 y: imageView.center.y + translation.y) 2 sender.setTranslation(CGPoint.zero, in: self.view) 3 }- 1 Translates coordinate
- 2 Moves the image view
- 3 Resets the gesture recognizer
- Run the app and drag the image around.
5.3.2. Pinch gesture
A good image viewer can zoom in on the image as well.
Follow the same steps that you followed for the pan gesture recognizer, but with the pinch gesture recognizer:
- Drag the pinch gesture recognizer from the Object Library onto the image view.
- Open the Assistant Editor.
- Control-drag the new pinch gesture recognizer to the view controller.
- Set the Connection to Action, Name it “handlePinch,” and make the Type explicitly UIPinchGestureRecognizer.
The pinch gesture recognizer has a property, scale, that estimates the degree that the user has pinched the view. You’ll use this property to set the scale of the image view
with a view transformation.
Transformations of a view, such as scale, are performed on a view’s transform property. This property is a transformation matrix that can be manipulated to scale, rotate, translate, or skew an object
(see figure 5.13).
Figure 5.13. View transformations
Several helper methods exist that can take a transformation matrix and perform the calculations to generate a new transformation matrix based on the type of transformation you’re looking for. For example, to adjust the scale of a view, you’d use the scaledBy method.
- Scale the image view using the transformation matrix, passing in the recognizer’s scale property:
imageView.transform = imageView.transform.scaledBy( x: sender.scale, y: sender.scale) - The way you did with the pan gesture recognizer, and to avoid the image view scaling up exponentially, you want to reset the
recognizer’s scale property. The default for scale is 1:
sender.scale = 1
In the end, your handlePinch method should look like the following:
@IBAction func handlePinch(_ sender: UIPinchGestureRecognizer) {
    imageView.transform =                                            1
        imageView.transform.scaledBy(                                2
            x: sender.scale, y: sender.scale)                        2
    sender.scale = 1                                                 3
}
- 1 Sets the transformation matrix
- 2 Converts scale
- 3 Resets the gesture recognizer
Run the app and confirm you can pinch the image to zoom.
Note
If you’re running the app in the simulator, you can simulate two fingers if you hold down the Alt key.
Your image viewer app is coming along!
5.3.3. Rotate gesture
To round out your image viewer app, how about adding rotation to the mix?
Challenge
After going through the process twice already, you should be familiar enough to try it yourself without following instructions. Add a rotate gesture recognizer to the image view. When you’re done, compare your results with the code in listing 5.1 for the handleRotate method.
Tip
Use the rotated method to transform the rotation of the transformation matrix.
Listing 5.1. Rotate gesture action
@IBAction func handleRotation(_ sender: UIRotationGestureRecognizer) {
    imageView.transform =                                                  1
        imageView.transform.rotated(by:sender.rotation)                    2
    sender.rotation = 0                                                    3
}
- 1 Sets the transformation matrix
- 2 Converts rotation
- 3 Resets the gesture recognizer
Run your app again, and you can rotate your view as well!
5.3.4. Simultaneous gesture recognizers
You may have noticed a limitation of the recognizers. By default, only one gesture can be performed at a time. If the system recognizes that you’re pinching to zoom, for example, you can’t rotate the image until you stop zooming by taking your fingers off the screen.
You can change this default behavior, however. You could be zooming and rotating and panning all at the same time! But to change this default behavior, you’ll need to use the delegation pattern.
Using the delegation pattern
We’ve looked at the target-action pattern, where one object can call a method on another object. The delegation pattern is like the target-action pattern on steroids—in the delegation pattern, an object contains a property called the delegate, which contains a list of methods that the object can call. You can then implement this delegate object, providing custom responses to the methods the object calls.
An object can call methods on its delegate for various purposes:
- Notify the delegate that something is about to happen (usually prefixed with “will”).
- Notify the delegate that something happened (usually prefixed with “did”).
- Request permission from the delegate to do something (usually prefixed with “should”).
- Request data. (In this case, the delegate is often called a data source. We’ll explore data sources further in chapter 9.)
The list of methods in a delegate is defined by a protocol—in fact, all an object knows or cares about its delegate is that it can handle the methods in the delegate protocol. By convention, the delegate protocol has the suffix “Delegate.”
You can create a delegate object that adopts the delegate protocol, and then set your object as the delegate property. Often, for simplicity, a view controller is used as a delegate object.
You’ll find the delegation pattern is used frequently in the iOS SDK, including gesture recognizers!
All gesture recognizers have a property delegate with a list of methods defined by the UIGestureRecognizerDelegate protocol. This protocol contains methods such as
- gestureRecognizerShouldBegin—Requests permission from the delegate to begin recognizing gestures
- gestureRecognizer(shouldRecognizeSimultaneouslyWith)—Requests permission to recognize this gesture simultaneously with another gesture recognizer
Oh! That method sounds like exactly what you need to be able to zoom, rotate, and pan at the same time! How about using it?
To define your view controller as the delegate for a gesture recognizer, your view controller would need to
- Set itself as the gesture recognizer’s delegate.
- Adopt the UIGestureRecognizerDelegate protocol.
- Implement any required methods in the UIGestureRecognizerDelegate protocol.
See figure 5.14 for a visual representation of the relationships when a gesture recognizer uses a view controller as its delegate.
Figure 5.14. Gesture recognizer with a view controller as a delegate

Implement the delegation pattern here by doing the following:
- Set the view controller as the delegate of the three gesture recognizers. The gesture recognizers then know who to ask (the delegate, that is, the view controller) to find out if they should permit simultaneous recognition. This time, you’ll set the delegate in Interface Builder.
- Open Interface Builder, and from the Document Outline, Control-drag from the pan gesture recognizer to the view controller.
Select Delegate (see figure 5.15).
Figure 5.15. Set recognizer delegate
Do the same for each of the three gesture recognizers. When you’re done, select the view controller and open the Connections Inspector. In the Referencing Outlets section, you should see that each of the three gesture recognizers is connected to the view controller as a delegate.
- Adopt the UIGestureRecognizerDelegate protocol. You could directly adopt the protocol on the view controller class, but a useful convention is to adopt the protocol
on an extension to the view controller. This helps keeps related code together.
Next, you need to implement any required methods on the protocol. The protocol contains the list of methods that a gesture
recognizer can call on its delegate so that the recognizer knows how to behave. One of the methods determines whether it should
allow other gesture recognizers to be recognized at the same time—and that’s what you need!
Add the following to your view controller class.
extension ViewController:UIGestureRecognizerDelegate { 1 func gestureRecognizer(_ gestureRecognizer: UIGestureRecognizer, shouldRecognizeSimultaneouslyWith otherGestureRecognizer: UIGestureRecognizer) -> Bool { 2 return true 3 } }- 1 Adopts delegate protocol
- 2 Implements appropriate delegate method
- 3 Allows simultaneous gesture recognizers
- Run the app. You should be able to zoom, rotate, and pan at the same time!
5.3.5. Tap gesture in code
After implementing three gesture recognizers using Interface Builder, you could probably implement another gesture recognizer blindfolded! Let’s explore an alternative approach to setting up a gesture recognizer: implementing it purely with code.
You’re going to implement a single-finger double-tap gesture that will navigate to the next image.
- Set up an array of the available images and a variable that keeps track of the current image number. If you’ve used your own
images, make the necessary changes to this array:
let images = ["CradleMountain.JPG", "Laguna69.JPG", "PatagoniaSky.JPG"]
var imageNo = 0
- Add a handleTap() action method that will be triggered when the user taps the image. The method increments the image number by 1 and returns
it to 0 if it reaches the upper limit of elements in the images array. It then replaces the image in the image view with the next image in the array, as shown in the following code. (You could add a fancy transition
here, but let’s not complicate things too soon—all in good time!)
@objc func handleTap(_ sender: UITapGestureRecognizer) {
    imageNo += 1
    if imageNo == images.count {imageNo = 0}
    imageView.image = UIImage(named: images[imageNo])
}
Note
Unlike the other action methods, this action method doesn’t begin with @IBAction. Because you’re not going to trigger this method from Interface Builder, this attribute isn’t necessary. Instead, this method will need to begin with the @objc keyword to make it available to Objective-C—more on that in a moment.
Now, to create the gesture recognizer itself. Every gesture recognizer is instantiated with two parameters, as shown in table 5.6.Table 5.6. Gesture recognizer parameters
Parameter
Description
target Specifies the object to receive any gesture events, which in this case will be self—the view controller. action Specifies the method to receive notification of the gesture event. You set up the handleTap() method to receive these notifications. The action is specified using a special expression called #selector. Use #selector to pass in the name of the method. Because the #selector expression uses the Objective-C runtime to connect to the associated method, the method will need to be exposed with the @objc keyword. - Add the instantiation of the tap gesture recognizer to your viewDidLoad method:
let tapGestureRecognizer =
    UITapGestureRecognizer(target: self, action: #selector(handleTap))
You can now customize the recognizer. - Holding down Command, click on UITapGestureRecognizer to explore the generated interface for the file. You’ll find that this gesture recognizer has two forms of customization: numberOfTapsRequired and numberOfTouches-Required.
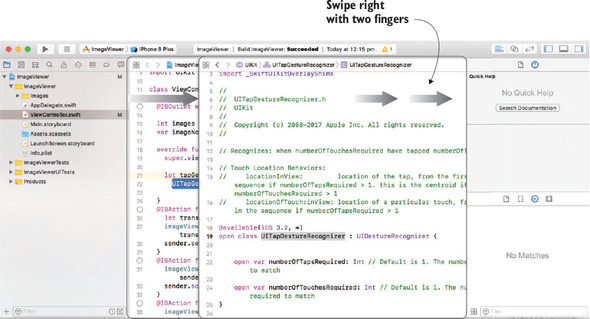
- Return to your view controller code by pointing your mouse cursor at the editor area and swiping right with two fingers (see
figure 5.16).
Figure 5.16. Shortcut to go back in the editor area
- Use what you’ve learned about the tap gesture recognizer and customize yours to require a single-finger double-tap:
tapGestureRecognizer.numberOfTouchesRequired = 1             1
tapGestureRecognizer.numberOfTapsRequired = 2                2
- 1 One finger
- 2 Double tap
- All that’s left is to add this gesture recognizer to the image view:
imageView.addGestureRecognizer(tapGestureRecognizer)
- Run your app again, and you should now be able to navigate to the next image!
Well, you added double tapping to go to the next image, but how about double tapping with two fingers to go to the previous image? Because each tap recognizer only recognizes taps of a specific number of fingers and taps, you’ll have to set up another tap gesture recognizer.
Challenge
Add a double-tap-with-two-fingers gesture recognizer to go to the previous image. If you want to peek at the answer, you can download the completed image viewer from https://github.com/iOSAppDevelopmentwithSwift-inAction/ImageViewer.git (2.ImageViewerComplete).
5.4. Summary
In this chapter, you learned the following:
- Use UIKit controls such as buttons, text fields, switches, and sliders to add an extra level of interaction to your app.
- When a view is touched, a touch event travels up the responder chain.
- Views or view controllers can respond to simple touches by overriding UIResponder touch methods.
- Use gesture recognizers to interpret touches as more-complex gestures such as pan, pinch, tap, and rotate.
- Controls and gesture recognizers can trigger actions that connect to methods in your code.
- Connect control events or gestures to methods via Interface Builder or in code.