
Chapter 9. Tables and navigation
- Displaying data in single-column tables
- Adding, editing, and deleting rows
- Adding navigation to other scenes
- Passing data between scenes
Most useful apps display dynamic information in one form or another. If you have a list of items to display, Apple provides a convenient object for you to use called a table view.
In this chapter, you’ll create the first scene of the Bookcase app you’ve been working on. This scene will show a list of all the books the user enters into the app. When the user adds or edits a book record, they’ll navigate to the bookcase form you’ve worked on in previous chapters.
In this chapter, you’ll explore
- Table views and table view controllers—Table views manage a list of data and display it in a simple one-column table. Table view controllers are view controllers that contain a table and handle part of the boilerplate setup for you.
- Navigation controllers and navigation bars—You’ll use navigation controllers to navigate between scenes. By default, navigation controllers provide a navigation bar that indicates where you are in the app, gives you a back button for returning to the previous scene, and can be used for additional controls.
- Segues— The transition between two scenes is also known as a segue. You’ll use different kinds of segues to display view controllers in different ways.
9.1. Displaying data in table views
When you think of tables, you probably think of multicolumn spreadsheets or perhaps HTML tables. Well, table views in the world of iOS display a list of data in one column. Each row or item in the list is displayed in what’s called a cell.
You probably see tables in apps more than you realize. See figure 9.1 for types of tables you could encounter in standard Apple apps.
Figure 9.1. Tables in Apple apps

Tables are mighty useful for presenting a scrollable list of information. They’re also useful for allowing the user to select items in the list. Selections can toggle a checkmark in the cell or enable navigating to another scene.
Notice the variations available in table views. Table views can be grouped into sections (such as the Settings and Calendar apps in figure 9.1) or can display an index such as letters on the right of the table (such as the Contacts app in figure 9.1). We’ll focus on a plain table view (such as the Reminders app in figure 9.1) in this chapter.
Apple provides several different styles of default table view cells, which we’ll look at shortly. You could also create your own completely customized look for table view cells. We’ll look at customized cells in the next chapter.
You’re going to add a table view to the Bookcase app, which will display a list of books in your bookcase. Then you’ll add tapping on a book in the list to edit the book in the form you’ve been working on. Let’s not get ahead of ourselves, though! For now, let’s focus on adding the table view to the app (see figure 9.2).
Figure 9.2. Books table

You have two main ways to set up a table view using Interface Builder:
- You could drag a table view object onto your scene’s root view. You’d then need to connect the view controller to the table view—you’d make your scene’s view controller the delegate and data source for the table view and implement any required delegate methods. More on the delegate and data source of the table view shortly.
- You can drag a special type of view controller called a table view controller onto the storyboard. The table view controller comes with a table view ready to go and connected to the table view. All you need to focus on is customizing the table view to display your data.
9.1.1. Setting up a table view controller in the storyboard
You’re going to use the table view controller to display a list of books in your app.
Checkpoint
Open the Bookcase app where you left off in the previous chapter. Alternatively, you can check out my project at the same point at https://github.com/iOSAppDevelopmentwithSwiftinAction/Bookcase.git (Chapter8.3.ScrollView).
- Open the main storyboard. Move the book detail view controller scene you’ve been working on to the right for the moment. We’ll come back to this later in the chapter, but for now, you’ll set up a table view controller.
- Find the Table view controller in the Object Library and drag it onto the storyboard. A table view controller will appear
in the storyboard with a table view already loaded as the root view of the scene (see figure 9.3).
Figure 9.3. Add Table view controller to canvas

- Drag the arrow indicating the initial view controller from the book detail view controller to the new table view controller
(see figure 9.4).
Figure 9.4. Move initial view controller arrow.

- Select the table view in the Document Outline. Notice in the Attributes Inspector that the content of the table view is using
Dynamic Prototypes by default (see figure 9.5).
Figure 9.5. Dynamic prototypes table view
Table views can use one of two types of cells:
- Static cells— Use table views with static cells to build up a static design using a table. The number of rows in a table with static cells is set at design time, and each cell has its own unique design. A list of customizable settings in an app could be a good candidate for a table using static cells.
- Dynamic prototypes— Use table views with dynamic prototypes to build a table with content that can change at runtime and/or where cells have the same layout. A table view set to dynamic prototypes will automatically give you a prototype cell to customize the look of the cells in the table.
- Select the white rectangle at the top of the table view, underneath the title Prototype Cells. This special table view cell is like a template that cells in your table will emulate.
- Find Style in the Attributes Inspector for the cell and select Subtitle.
Table view cell styles
Apple gives you four simple table view cell styles to work with.

Each style uses different combinations of three main elements:
- imageView for displaying an image
- textLabel for displaying a primary text label
- detailTextLabel for displaying a secondary text label
Not all styles contain every element—the basic style doesn’t contain a detail text label, and the left detail style doesn’t provide for an image view. If you don’t use an element such as the image view, for example, the other elements will grow to fill the space.
If none of these cell styles suits your data, you can create your own custom table view cell by subclassing the UITableViewCell class. We’ll look at custom cells in the next chapter, but for now, the subtitle style looks great for displaying books, so let’s go with that!
- Find Identifier in the Attributes Inspector for the cell. Give the table view cell a reuse identifier—let’s call it bookCell. You’ll use this to identify the cell template when you generate cells.
- Notice the Accessory attribute in the Attributes Inspector—you’re going to leave this set to None.
Table view cell accessory views
Table view cells can contain an optional accessory view as well, for helping to indicate what will happen when the user selects a cell.

Checkmark can be used to indicate when a cell is selected.
Disclosure can be used to indicate that selecting a cell goes to another table view, such as in Apple’s Settings app.
Detail displays additional information about the selected cell when the user selects the accessory view itself.
Detail disclosure displays additional information about the selected cell in another view when the user selects the accessory view itself.
9.1.2. Displaying data in the table view
Now that you have the table view controller set up in the storyboard, you’ll need to customize the table view in code. Select the table view controller and open the Identity Inspector. Note that the view controller’s base class is UITableViewController (see figure 9.6).
Figure 9.6. Table view controller identity

You’re going to subclass UITableViewController to manage its table view.
- Select File > New > File. A selection of templates will appear. In the iOS > Source category, select Cocoa Touch Class (see
figure 9.7).
Figure 9.7. Select Cocoa Touch Class template

- Give your class a name, and specify which class you want it to subclass. You want to subclass UITableViewController, and you could call your class Books-TableViewController.
Tip
A common convention when defining the name of your class is to suffix it with the name of the iOS class you’re subclassing. You can type the word Books in the Class field, and when you specify the subclass, Xcode will automatically fill in the rest for you.
- Leave XIB file unchecked.
- Choose the language as Swift and select Next (see figure 9.8).
Figure 9.8. Create file options

- Save your file in the default folder for your project. Xcode will automatically open your new UITableViewController subclass generated from a template, with additional methods ready to use. You need to connect the table view controller in the storyboard with the subclass you created.
- Open the main storyboard again, and select your table view controller.
- Under Custom Class, replace the base class with your subclass (see figure 9.9).
Figure 9.9. Connect table view controller to subclass

Data source and delegate
In certain UIKit views, your view controller can directly request a view to display data. For example, you could tell a UILabel to display “Hello World” by the following:
label.text = "Hello world"
Table views work a little differently. Instead of passing the table’s data directly into the table and letting the table view manage its data, table views use the delegation pattern, and request information on demand. This way ensures separation of the view (table view in this case) and the model (the table view’s data), and maintains a good MVC structure.
Table views divide their delegation responsibilities in two:
- The data source provides the table view with all the information necessary to display the data in the table. For example, when a table view needs to know how many rows it should display in the table, it asks its data source. When it needs to display a cell for a specific row, it asks the data source for it.
- The delegate handles additional responsibilities such as selecting and deleting rows or specifying the height of a specific row. The table view will also notify the delegate of certain events, such as when the user selects or edits a row.
If you drag a table view object into a regular view controller in the storyboard, you have to configure the data source and delegate yourself. However, because you’re using a table view controller, the UITableViewController class comes automatically preconfigured to be both the table view’s delegate and data source (see figure 9.10).
Figure 9.10. Table view controller relationships

Stubs for delegate and data source methods are also already implemented in the UITable-View-Controller class. To customize your subclass, you’ll need to override any delegate or data source methods you wish to implement. In fact, if you’re subclassing UITableView-Controller, it doesn’t really matter whether you override a method from the data source or the delegate—the main takeaway here is that you have several methods to override to manage your table view.
The suggested methods in the template will get you off to a great start. Before you implement the Bookcase table, let’s create a basic implementation of a table to get an idea of how this is going to work (see figure 9.11).
Figure 9.11. Basic table

You’ll implement three methods in Books-TableViewController that will answer three important data source questions that the table view needs to know to display the table. Here are the three questions and your answers in plain English:
- How many sections are there in the table? Just the one.
- How many rows are there in this section of the table? I’ll say ten!
- What cell goes in this row? I’d like cells based on the bookCell reuse identifier I set up earlier, and I want to display the text “Row #” with the row number.
Now, let’s see how this looks in code.
- Replace the following methods in your BooksTableViewController class:
override func numberOfSections(                       1
       in tableView: UITableView) -> Int {            1
   return 1                                           12
}                                                     1
override func tableView(_ tableView: UITableView,     3
       numberOfRowsInSection section: Int) -> Int {   3
   return 10                                          34
}                                                     3
override func tableView(_ tableView: UITableView,     5
       cellForRowAt indexPath: IndexPath              5
       ) -> UITableViewCell {                         5
   let cell = tableView.dequeueReusableCell(          56
       withIdentifier: "bookCell", for: indexPath)    56
   cell.textLabel?.text = "Row # (indexPath.row)"    57
   return cell                                        58
}                                                     5
The first two methods are straightforward. The number of sections in the table or rows in each section is returned from the methods. If multiple sections exist, you can check the section number the table view was asking about before returning the number of rows. (Because your table only has one section, it’s unnecessary to check the section number.) The third method is interesting. It receives an IndexPath parameter, which contains the number of the section and the row of the cell it’s interested in. It then gets a table view cell for this index path, based on the reuse identifier you defined earlier in Interface Builder. You can then customize the table view cell how you like. The index path is generally useful here to know what data to inject into the cell. The interesting thing about this method is where it gets its cell from. Imagine if you had a million rows in your table. It would start to be a major memory issue if the table view kept a million cells in memory. On the flip side, imagine if the app removed cells from memory as soon as they were scrolled offscreen and created new cells every time they scrolled onscreen. This strategy could be a performance issue, especially if the cells were graphically intensive. Apple’s shrewd solution is to keep a cache or queue of table view cells. When you call the dequeueReusableCell method, it first checks for any cells with the requested reuse identifier in the cache, and if none are found, it creates a new cell. When a cell is scrolled offscreen, rather than removing the cell from memory, it’s sent to the cache to be reused. - Run the app, and you should see 10 cells appear in the simulator.
Now that you know the basics of table views, you’ll set up the table view controller to display books for the Bookcase app. But first, you’ll need to set up a model class to hold the properties of a book.
Set up the model
To display books in the table view controller for the Bookcase app, you’ll first need a way to store data for each book. You’ll set up a simple Book structure based on the data the user can enter for each book. Remind yourself of the book properties with another look at the bookcase form in figure 9.12.
Figure 9.12. Bookcase form

- Select File > New File > Swift File.
- This time, in the iOS > Source category, select Swift File.
- Call it Book and select Create.
- In this Book.swift file, create a Book type that stores the book properties with an initializer that sets their initial values:
import UIKit                                             1
struct Book {
   static let defaultCover = UIImage(named: "book.jpg")!
   var title: String
   var author: String
   var rating: Double
   var isbn: String
   var notes: String
   var cover: UIImage {                                  2
       get {                                             2
           return image ?? Book.defaultCover             2
       }                                                 2
       set {                                             2
           image = newValue                              2
       }                                                 2
   }
   private var image: UIImage?                           3

   init(title: String, author: String,
           rating: Double, isbn: String,
           notes: String,
           cover: UIImage? = nil) {                      4
       self.title = title
       self.author = author
       self.rating = rating
       self.isbn = isbn
       self.notes = notes
       self.image = cover
   }
}
- 1 UIKit necessary for UIImage
- 2 Computed property
- 3 Optional UIImage property
- 4 Cover defaults to nil
A few notes about the code listing:
- Because UIImage comes in the UIKit framework, you need to import the UIKit framework!
- As this type does not need to subclass, and the value of the properties defines a book’s identity, define the Book type as a structure rather than a class.
- Later in the book, we’ll look at allowing the user to add an image for the book cover; you can store this image in a UIImage object. Because entering a cover image for the book isn’t required, leave the image variable as an optional defaulting to nil, and set up a default cover image. Set up a computed property cover that returns the image if it exists, and the default cover otherwise.
Observant readers will notice the private keyword defining the image property. Other classes should access the cover property, which provides a default image if the image property is nil. To prevent other classes from accessing the image property by mistake, you define it as private, restricting access to this property from other files.
There are five access levels in Swift. Here they are, from most to least restrictive:
Private—Access is restricted to the entity (for example, structure or class) it’s declared in.
File-private—Access is restricted to the file it’s declared in.
Internal—Access is restricted to the module it’s declared in. A module is a unit of code distribution, such as an application, framework, or build target. The default access level is internal.
Public—Access is unrestricted, but classes marked as public can’t be subclassed from another module.
Open—Access is unrestricted. (The open keyword only applies to classes.)
Great, you can now use this Book class to create an array of Book objects that eventually will be used to fill the table.
Creating a books manager
You could create this array directly in your BooksTableViewController class, but to keep responsibilities of the controller and the model separate, maintaining a good MVC structure, it’s a good idea to manage the books data in a model class. In our Bookcase app, this model class is basically going to be your friendly librarian! It will store books; give books to the user; manage adding, updating, and removing books; and eventually it will handle sorting and searching the books.
Call your friendly librarian class the BooksManager. The BooksManager will lazily load an array of books that’s preloaded with sample data.
- Create a BooksManager Swift file preconfigured with a computed property for returning the number of books (bookCount), a method returning a specific book (getBook), and a lazy property (the books array) that preloads with sample data.
import Foundation class BooksManager { private lazy var books: [Book] = self.loadBooks() 1 var bookCount: Int {return books.count} 2 func getBook(at index: Int) -> Book { 3 return books[index] 3 } 3 private func loadBooks() -> [Book] { 4 return sampleBooks() 4 } 4 private func sampleBooks() -> [Book] { 5 let books = [ 5 Book(title: "Great Expectations", 5 author: "Charles Dickens", 5 rating: 5, 5 isbn: "9780140817997", 5 notes: "from Papa"), 5 // Enter more sample books here 5 ] 5 return books 6 } }- 1 Lazy load books array
- 2 Calculates number of books
- 3 Returns a book
- 4 Loads books
- 5 Creates sample books array
- 6 Returns array
- You can now define an instance variable of the books manager in your Books-TableViewController class:
var booksManager: BooksManager = BooksManager()
Now that your books table view controller has an array of books, you can update your answers to the three important data source questions. There’s still going to be only one section, so the answer to the number of sections won’t need updating from before. The number of rows has changed though, so it should reflect the number of books in the array. - Update your code:
override func tableView(_ tableView: UITableView, numberOfRowsInSection section: Int) -> Int { return booksManager.bookCount 1 }- 1 Returns number of books
- First, get a reference to the relevant book from the books array for this row. Then, you can update the elements of the cell with the data from the book object.
override func tableView(_ tableView: UITableView, cellForRowAt indexPath: IndexPath) -> UITableViewCell { let cell = tableView.dequeueReusableCell( withIdentifier: "bookCell", for: indexPath) let book = booksManager.getBook(at: indexPath.row) 1 cell.textLabel?.text = book.title 2 cell.detailTextLabel?.text = book.author 3 cell.imageView?.image = book.cover 4 return cell }- 1 Gets book object for a row
- 2 Sets text label from book title
- 3 Sets detail text label from book author
- 4 Sets image view with the book cover image
- Run the app, and you should find that your sample books appear in the table. Success!
9.2. Adding a row
It’s time for your users to add a book to the books table.
To add the data for a book, you want your users to tap an add button (plus), and then navigate from the books table to the bookcase form to fill in the details for the new book (see figure 9.13).
Figure 9.13. Tap + to add a book.

One useful approach for managing navigation between view controllers is to embed your view controller in a navigation controller.
Until now, we’ve only looked at content view controllers with limited navigation, but another category of view controllers exists called container view controllers. Container view controllers manage the content from multiple view controllers, and each have their own approach to view hierarchies. Certain container view controllers that you may encounter include
Tab bar controllers—Adds a tab bar at the bottom of the interface to navigate between view controllers
Split view controllers—Shows two content view controllers simultaneously in certain devices and orientations and navigates between the two in other devices or orientations
Navigation controllers—Manages navigation between content view controllers
9.2.1. Embedding a navigation controller
A navigation controller manages navigation going forward and back through a hierarchy of content view controllers. The navigation controller is usually used in conjunction with a navigation bar. The navigation bar can be helpful to orient the user with a title for the scene and a back button to return to the previous scene. The navigation bar can also be a useful location for additional buttons—a great place for the add button!
The navigation controller manages its view controllers in a navigation stack, which is an array of view controllers. The navigation controller’s root view controller will be the first view controller in the navigation stack. When the navigation controller navigates to a new scene, the new view controller is added to the stack. When the user selects the back button, the current view controller is removed from the stack.
The iPhone Settings app is an example of a navigation controller. The Settings scene is the navigation controller’s root view controller. After navigating down to the Speak Selection scene, it becomes the fourth view controller in the navigation stack (see figure 9.14 to see the current state of the navigation stack in each scene in the navigation hierarchy).
Figure 9.14. Navigation controller

You’re going to set up a navigation controller for navigating to the book detail view controller, to add a book to the books table.
- With the books table view controller selected, select Editor > Embed In > Navigation Controller.
The navigation controller will appear to the left of the books table view controller, with a symbol and arrow between, indicating
the relationship. The initial view controller indicator arrow moves to the navigation controller, and a navigation bar appears
at the top of your books table view controller (see figure 9.15).
Figure 9.15. Navigation controller

- Add a title for the scene in the navigation bar. Double-click in the middle of the navigation bar to open the edit title field and give it the title Books. Navigation bars accept special kinds of buttons called bar button items. When you use the navigation controller to navigate to another view controller, a special back button automatically appears in the left of the navigation bar with the name of the previous view controller.
- You can add your own bar button item to the navigation bar, too. Find Navigation Bar Item in the Object Library and drag it to the right side of the navigation bar. The bar button item will say Item by default, but you want an add button.
- Select the bar button item and open the Attributes Inspector. Examine the options in the System Item attribute. Apple has several different preconfigured button styles.
- Select Add, and a + symbol will appear.
9.2.2. Creating a segue
When the user taps the add button, you’ll transition to the book detail view controller. A transition from one scene to another is called a segue.
- Create a segue for when the user taps the add button, by Control-dragging from the add button to the book detail view controller.
- We’ll explore different types of segues shortly, but for now select Show. A symbol appears between the two scenes representing the type of segue you created (see figure 9.16).
Figure 9.16. Create Show segue

- Run the app to see your show segue in operation!
- Tap the plus button in the navigation bar. The book detail view controller should slide in from the right, with a back button
on the left of the navigation bar (see figure 9.17).
Figure 9.17. Show segue in action
The show segue is most appropriate for content that provides more details about the user’s selection. When adding content, a modal segue is more appropriate. Rather than adding the new view controller to the navigation stack, a modal segue replaces the current view controller, displaying the new view controller over the top.
- Select the segue, open the Attribute Inspector, and change the kind of segue to Present Modally.
There are four main kinds of segues, each with its own unique approach and attributes, and which act differently depending on the size class they’re in, or whether they’re embedded in a navigation controller or a split view controller.
![]() Show Detail—This segue is most useful for split view controllers. Split view controllers support dividing an interface into a master view and a detail view when in landscape orientation
in a regular size class environment. If a detail view is available, the show detail segue will replace the current detail view.
Show Detail—This segue is most useful for split view controllers. Split view controllers support dividing an interface into a master view and a detail view when in landscape orientation
in a regular size class environment. If a detail view is available, the show detail segue will replace the current detail view.
![]() Show—This segue really shines if the presenting view controller is in a navigation controller or a split view controller. The
presented view controller is added or pushed onto the navigation stack of view controllers (in the split view controller’s detail view if available), and a back button
automatically appears in the navigation bar. If no navigation controller is available, it acts the same as a modal segue.
Show—This segue really shines if the presenting view controller is in a navigation controller or a split view controller. The
presented view controller is added or pushed onto the navigation stack of view controllers (in the split view controller’s detail view if available), and a back button
automatically appears in the navigation bar. If no navigation controller is available, it acts the same as a modal segue.
![]() Modal—A modal window presents over the top of the presenting view controller and must be closed before returning to the presenting
view controller. Modal segues can be customized using two attributes:
Modal—A modal window presents over the top of the presenting view controller and must be closed before returning to the presenting
view controller. Modal segues can be customized using two attributes:
- Presentation— Modal windows are always full-screen in a compact-width size class environment, but in regular-width size class environments, the presented view controller can appear in different presentation styles, such as form sheet, which displays as a centered window. The default presentation is full-screen.
- Transition— By default, the modal window transitions from below (cover vertical), but you can also use fancy flips, dissolves, and curls.
![]() Popover—Popovers appear as a bubble with an arrow pointing to an anchor view in your presenting view. Popovers only look like bubbles
in regular-width size class environments—in compact-width, popover segues appear as full-screen modal segues.
Popover—Popovers appear as a bubble with an arrow pointing to an anchor view in your presenting view. Popovers only look like bubbles
in regular-width size class environments—in compact-width, popover segues appear as full-screen modal segues.
Here’s what the four kinds of segues look like in landscape orientation on an iPad.

Notice that when you change the navigation to a modal segue, the second view controller loses its navigation bar because it’s no longer added to the navigation controller’s stack. The user has no way of exiting this scene!
9.2.3. Embedding second navigation controller
A Cancel button and a Save button would be perfect for exiting the book detail view controller, and the best place for these buttons is on a navigation bar (see figure 9.18).
Figure 9.18. Modal segue in action.
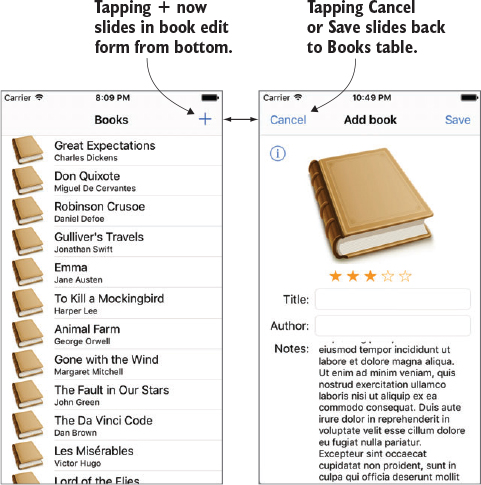
To give the book detail view controller a navigation bar for the Save and Cancel buttons, embed it in its own navigation controller.
- Select the book detail view controller and select Editor > Embed In > Navigation Controller.
- Select the navigation bar in the book detail view controller, and in the attributes inspector give it the title Add book.
- Drag in a bar button item on the left of the navigation bar. In the Attributes Inspector and under System Item select Cancel.
- Drag in another bar button item on the right of the navigation bar, and select a System Item of Save.
- Run the app again to see your changes. Notice that the default transition for modal transition slides up rather than across. The Save and Cancel buttons don’t do anything yet. You need to hook them up to return to the books table. If the user taps the Save button, you need to pass the book data back to add to the books array.
- With the Assistant Editor open, Control-drag from the Cancel button to the BookViewController class, to create an IBAction. Call the method touchCancel.
- Do the same with the Save button, creating a touchSave method.
- From both methods, you can now call a dismissMe method where you can dismiss the view controller. A view controller can request itself to be dismissed with the dismiss method.
@IBAction func touchCancel(_ sender: AnyObject) { dismissMe() } @IBAction func touchSave(_ sender: AnyObject) { //need to save data here dismissMe() } func dismissMe() { dismiss(animated: true, completion: nil) } - Run the app, and you should find that tapping the Cancel or Save button now closes the book detail view controller. But if you select Save, your book is still not being added to the books table!
When the user selects Save, your book detail view controller needs to pass the new book data back to the books scene for it to then add the data to the books array and display the new book in the table. You’ll facilitate this communication with the delegation pattern that we looked at in chapter 5.
9.2.4. Communicating with the books scene using your own delegate
To use the delegation pattern, you’ll need to set up a delegate protocol that defines a list of all the methods that the delegate should implement. In this case, the protocol will only need one method that will pass a book object to the delegate ready for saving. The table view controller would then adopt the protocol and define itself as the book detail view controller’s delegate. See figure 9.19 for a visual representation of the relationships.
Figure 9.19. Delegate to save book

- Create the delegate protocol. The naming convention for the delegate of a class is to use the same name of the class with
the suffix Delegate. Add the BookViewControllerDelegate protocol to the BookViewController.swift file.
protocol BookViewControllerDelegate { func saveBook(_ book: Book) } - Add a reference to the delegate in BookViewController, and make it an optional.
var delegate: BookViewControllerDelegate?
Now, to extract the data that the user has entered for the book, you’ll need to create outlets for each of the elements in the form. - In the Assistant Editor, Control-drag from each text field and text view in the form to the BookViewController class. (You probably already have a reference to the book cover.)
@IBOutlet weak var titleTextField: UITextField!
@IBOutlet weak var authorTextField: UITextField!
@IBOutlet weak var isbnTextField: UITextField!
@IBOutlet weak var notesTextView: UITextView!
- In the touchSave method before calling the dismissMe method, create a book object from the fields in the book edit form, and pass it into the delegate method:
let bookToSave = Book(
   title: titleTextField.text!,             1
   author: authorTextField.text!,
   rating: 3,                               2
   isbn: isbnTextField.text!,
   notes: notesTextView.text!
)
delegate?.saveBook(bookToSave)              3
- 1 Creates book object from form fields
- 2 We’ll come back to ratings in chapter 13
- 3 Passes book object to delegate
Using your delegate protocol
As you saw in chapter 5, for a class to use a delegate protocol, it needs to follow three steps:
- Set itself as the delegate.
- Adopt the delegate protocol.
- Implement any required methods in the protocol.
Let’s follow these steps to set up the BooksTableViewController class to implement the BookViewControllerDelegate protocol you created.
First, during the segue, the BooksTableViewController class needs to tell the BookViewController that it is the BookViewController’s delegate. The problem is that because the segue was created in Interface Builder, the instantiation of the new view controller is managed automatically.
Fortunately, view controllers contain a prepareForSegue method that’s called after any new view controllers are instantiated but before the segue is performed.
- Override this method so that you can get a reference to the destination view controller using the segue parameter’s destinationViewController property, ready to perform any additional customization.
override func prepare(for segue: UIStoryboardSegue, sender: Any?) {Because the BookViewController is embedded in a navigation controller, the segue’s destinationViewController will be a navigation controller. The destinationViewController property is a UIViewController type, so you’ll need to downcast it to a UINavigationController. - Use optional binding to get a reference to the destinationViewController as a navigation controller.
if let navController = segue.destination as? UINavigationController { - Now that you have a reference to the navigation controller, you can get a reference to its root view controller. You can get
a navigation controller’s root view controller with the topViewController property. Because this returns a UI-ViewController object, you’ll need to downcast it to a BookView-Controller.
if let bookViewController = navController.topViewController as? BookViewController { - Now you have a reference to the bookViewController, and the Books-TableViewController can set itself as its delegate.
The following code shows the whole prepareForSegue method.
override func prepare(for segue: UIStoryboardSegue,                 1
   sender: Any?) {                                                  1
   if let navController = segue.destination                         2
           as? UINavigationController {                             2
       if let bookViewController = navController.topViewController  3
               as? BookViewController {                             3
           bookViewController.delegate = self                       4
       }
   }
}
You’ll notice that an error appears on the delegate line, indicating that the BooksTableViewController class isn’t the correct type to be the BookViewController's delegate. To resolve this, the BooksTableView-Controller class needs to adopt the protocol. - Adopt the BookViewControllerDelegate protocol in an extension to Books-TableViewController:
extension BooksTableViewController: BookViewControllerDelegate {

}
While this resolves the type error, another error will appear indicating that the BooksTableViewController doesn’t conform to the BookView-Controller Delegate protocol. - Ensure that BooksTableViewController conforms to the protocol by implementing any required methods in the BookViewControllerDelegate protocol:
extension BooksTableViewController: BookViewControllerDelegate {
   func saveBook(_ book: Book) {
       // save book here
   }
}
9.2.5. Adding data to the table
Let’s recap where we are—the user has tapped the + symbol to add a book and then entered details for the book (such as a title and author) into the book edit form. They then selected Save or Cancel to dismiss the form. If they selected Save, the book detail view controller passed the data back to the books table view controller via a delegate, and requested it to be saved.
Now that the books table view controller has received a book object representing the data entered into the book edit form, it’s ready to add the data to the data source.
- First, add a method to the BooksManager to handle adding a book to the books array:
func addBook(_ book: Book) { books.append(book) } - Now, you can request BooksManager to add a book from the saveBook method in the BooksTableViewController extension:
booksManager.addBook(book)
In general, when updating a table’s data, you have two choices:- Perform a requested operation (for example insert, delete, or move rows) on the table.
- Reload the table data. This will rebuild the table with the updated data.
- Add a call to reload data in the saveBook method:
func saveBook(_ book: Book) { booksManager.addBook(book) 1 tableView.reloadData() 2 }- 1 Adds book to data source
- 2 Reloads table data
- Run the app to see your hard work in action!
Tap the + symbol to add a book to the table. Add a title for the book, and tap Save. You should see your new book appear in the table. Tap the + symbol again, and this time tap Cancel. There should be no change in the table.
Challenge
You may notice that it’s possible to save an empty book at this stage. Because a book without a title doesn’t make sense, you should probably require at least the title for each book. Check that the title field contains text when the text in the title text field changes (the way you did in chapter 5), and adjust the Save button’s isEnabled property appropriately. While you’re tidying up loose ends, open the main storyboard and remove the placeholder text that text views add by default from the notes text view.
Checkpoint
If you’d like to compare your project with mine at this point, you can check mine out at https://github.com/iOSAppDevelopmentwithSwiftinAction/Bookcase.git (Chapter9.1.TableViewController).
There are often many ways to achieve the same goal in iOS development, and the same goes with how data entry view controllers (also called detail view controllers) return and pass data back to their presenting view controller. We’ve looked at one solution for doing this using the delegation pattern, but alternative approaches are often used. Let’s look at a couple—perhaps you might find one or another more attractive than the delegate protocol approach you used.
This alternative has similarities to the delegation pattern, but focuses on one closure rather than a list of methods in a protocol. The presenting view controller simply passes in a closure to the detail view controller that the detail view controller can then call before resigning itself.
Closures can be stored as variables to be called later. The following sets up an optional closure declaration in the detail view controller class that could receive a Book object and doesn’t return anything:
var saveBook: ((Book) -> Void)?
In the prepareForSegue method, the presenting view controller would then pass the complete saveBook method into the detail view controller as a closure:
bookViewController.saveBook = { (_ book: Book) in
   self.booksManager.addBook(book)
      //etc
}
Alternatively, the saveBook method itself could be passed in:
bookViewController.saveBook = saveBook
The detail view controller can now directly call the saveBook method. Because closures capture variables from their original scope, when the detail view controller calls the saveBook method, it will automatically have access to variables it refers to in the presenting view controller’s scope. Because the closure is declared as an optional, it must be unwrapped when called:
saveBook?(bookToSave)
Now, when the user taps the Save button in the detail view controller, before resigning itself, it will call a closure scoped to the presenting view controller that performs any necessary operations, such as saving data.
Unwind segue
Similar to the way a transition from a presenting view controller to another view controller is called a segue, transitioning back to the presenting view controller is called an unwind segue. You can trigger an unwind segue from a button in a detail view controller by following two magical and mysterious steps.
- Create a function in the presenting view controller with an @IBAction keyword that accepts a UIStoryboardSegue object. You can name this function whatever you like!
@IBAction func unwind(_ sender: UIStoryboardSegue) { //will be called after unwinding } - Now comes the magical part! From the button in the presented view controller from which you want to trigger the unwind segue,
control-drag to the Exit button in the scene dock, and select the unwind function you created.
When the user selects the button in the presented view controller, the unwind method you set up will be called and an unwind segue will trigger back to the presenting view controller. If your detail view controller needs to do something before the unwind segue, such as store data, you can use the prepareForSegue method, the way you did with normal segues.
9.3. Editing a row
Now that you’ve implemented adding a row, editing the data for a book when the user taps on one of the rows in the table won’t be too difficult (see figure 9.20).
Figure 9.20. Tap a cell to edit the book.

- Create a segue from the prototype cell to the book detail view controller.
- Pass in the book object to edit to update the book edit form’s initial state.
- Remove the view controller correctly when the user selects Save or Cancel.
- Update the appropriate book object in the table when the user selects Save.
Let’s start by creating a segue for editing a row.
9.3.1. Creating a segue from a row
You want the app to navigate to the book detail view controller when the user selects a row in the books table. Because the book detail view controller will present more information about the user’s selection, a show segue will be most appropriate. The show segue maintains the navigation bar from the presenting navigation controller, so the additional navigation controller that you needed with the Modal segue for adding a book won’t be necessary.
- Control-drag directly from the prototype cell in the table view controller to the book view controller, and select Show.
- Move the navigation controller out of the way to see the show segue you created (see figure 9.21).
Figure 9.21. Creating a segue

9.3.2. Passing in the book object to edit
If the user selects a book from the table, they’ll expect the book form to automatically fill with the current contents of that book. The presenting view controller should pass in the book object to edit to the book edit view controller.
- Define an optional book object in the BookViewController class:
var book: Book?
- In the viewDidLoad method, the BookViewController should check if the book object exists, and if it does, prefill the fields. If a book object exists, you know that you’re editing rather than creating a book. Take the opportunity to adjust the navigation bar’s title accordingly. Be sure to fill the fields before checking
if the Save button should be enabled.
if let book = book { 1 bookCover.image = book.cover 2 titleTextField.text = book.title 2 authorTextField.text = book.author 2 isbnTextField.text = book.isbn 2 notesTextView.text = book.notes 2 navigationItem.title = "Edit book" 3 } saveButton.isEnabled = !titleTextField.text!.isEmpty 4- 1 Unwraps book object
- 2 Prefills form fields with book
- 3 Changes navigation bar title
- 4 Disables Save button if no title
- Now, the book view controller is ready to receive a book object and the books table view controller needs to pass it in when
the user is editing a book. If the user has selected a row, you know the user is editing a book. In the prepareForSegue method of the BooksTableViewController class, check that there is a value in the table view’s indexPathForSelectedRow property:
if let selectedIndexPath = tableView.indexPathForSelectedRow { //Editing - You need to unwrap a reference to the destination view controller. Because you’ve created the segue directly to the book view
controller, it will be the destination view controller:
if let bookViewController = segue.destination as? BookViewController { - This time, as well as setting itself as the delegate, the table view controller will pass in the book to edit:
bookViewController.book = booksManager.getBook(at: selectedIndexPath.row)
bookViewController.delegate = self
After merging the if statements together, the full prepareForSegue method to pass the delegate and book data to the detail view controller will now look like this:override func prepare(for segue: UIStoryboardSegue, sender: Any?) { if let selectedIndexPath = tableView.indexPathForSelectedRow, let bookViewController = segue.destination as? BookViewController { //Editing bookViewController.book = booksManager.getBook(at: selectedIndexPath.row) bookViewController.delegate = self } else if let navController = segue.destination as? UINavigationController, let bookViewController = navController.topViewController as? BookViewController { //Adding bookViewController.delegate = self } }
9.3.3. Removing the view controller
If you run the app now, you’ll find that the Cancel and Save buttons no longer dismiss the view controller. The dismiss method is appropriate for when a view controller has been presented, such as via a modal segue. The show segue pushes the view controller onto the navigation stack. When a view controller in a navigation stack wants to be removed, it needs to request this from the navigation controller, using the popViewController method.
You need to update the dismissMe method to check how the view controller was displayed to determine the appropriate method it should use to dismiss itself.
If the view controller was presented via a modal segue, the view controller’s presentingViewController property will contain a value. If the view controller was pushed via a show segue, presentingViewController will be nil.
- Check the presentingViewController property and dismiss the view controller appropriately:
func dismissMe() { if presentingViewController != nil { 1 // was presented via modal segue dismiss(animated: true, completion: nil) 2 } else { 3 // was pushed onto navigation stack navigationController!.popViewController(animated: true) 4 } }- 1 If presented
- 2 Dismisses view controller
- 3 If pushed
- 4 Pops view controller
Table 9.1. Displaying and removing a view controller
Equivalent segue
Method to display
Method to remove
Navigation controller Show pushViewController popViewController View controller Modal/Popover present dismiss - Run the app, tap a row, and then tap Save or Cancel.
The detail view controller should close. However, the Save button will add the book you’re editing to the books array—not exactly what you’re after!
9.3.4. Updating the book object
If the user is editing a book, you want to update the data for the book in the data source and the table, rather than add it.
- Add a method to update a book to the BooksManager class:
func updateBook(at index: Int, with book: Book) {
    books[index] = book
}
Next, in the saveBook method in the BooksTableViewController extension, you want to check if the user is editing or adding a book before performing the relevant operation. You know if a row of the table is selected, the user is editing a book. - Unwrap this index path to determine which book in the array needs updating, and then reload the appropriate row in the table.
Here’s the updated saveBook method:
func saveBook(_ book: Book) { if let selectedIndexPath = tableView.indexPathForSelectedRow { // Update book booksManager.updateBook(at: selectedIndexPath.row, with: book) } else { // Add book booksManager.addBook(book) } tableView.reloadData() } - Run the app, and you should now be able to edit a book!
9.4. Using large titles
The observant amongst you may have noticed that the title first navigation controller in the settings app back in figure 9.14 was in a large font. Since iOS 11, Apple has introduced large titles in navigation bars, and recommends that you use them, especially in the first scene in a navigation stack.
Add a large title to your Books Table View Controller.
- Select the navigation bar of the Books Table View Controller’s navigation controller, and select Prefers Large Titles in the attributes inspector. This will set up large titles for this navigation controller’s root view controller, and for each subsequent view controller in the navigation stack. As you’re using a show segue to push the book detail view controller onto the navigation stack when the user edits a book, it will also by default use a large font. For a detail view controller however, the smaller title font is more appropriate.
- Select the navigation bar and look for the Large Title attribute in the attributes inspector. By default, it’s set to Automatic, inheriting its font style.
- Select Never to display the title of the book detail view controller in a smaller font.
9.5. Deleting a row
You can’t let the user add rows without letting them delete! It’s surprisingly straightforward to implement row deletion in tables with a fancy swipe mechanism (see figure 9.22).
Figure 9.22. Swipe to delete row

The user swipes left to request a delete, and then continues swiping left or taps the Delete button to confirm (or taps the cell again to cancel).
- First, add a removeBook method to the BooksManager to handle removing a book from the books array:
func removeBook(at index: Int) {
   books.remove(at: index)
}
Swiping left to delete is already built into table views in UIKit—when the user confirms they’d like to delete a row, a data source method will be called. All you need to do is override this method in BooksTableViewController and double-check that the user is requesting to delete a row. - You can now make the appropriate change to update both the data and the table, identifying the row to delete with the index
path parameter. Request the booksManager to remove the book from the books array, and the tableView to delete the row:
override func tableView(_ tableView: UITableView, 1 commit editingStyle: UITableViewCellEditingStyle, 1 forRowAt indexPath: IndexPath) { 1 if editingStyle == .delete { 2 booksManager.removeBook(at: indexPath.row) 3 tableView.deleteRows(at: [indexPath], with: .fade) 4 } }- 1 Overrides table view method
- 2 Checks user requested deletion
- 3 Removes book from array
- 4 Removes book from table
Note
Surprisingly, overriding this method is all that’s required for swiping to delete functionality to be enabled. This method will also be called if the user tries to move a row, if reordering of rows is enabled via the data source method canMoveRowAt.
- Run the app and swipe left on a row.
- Tap the Delete button that appears, and the row should disappear from the table.
Swiping rows isn’t limited to just delete actions, nor just swiping to the left. Since iOS 11, you can implement all sorts of custom actions, swiping left or right, and with one or more actions available per swipe.
To implement custom actions on swipe, instantiate one or more UIContextualAction objects, use these to instantiate a UISwipeActionsConfiguration object, and then return this object from data source methods for trailing and/or leading swipe actions. Swipe action buttons can be customized with images and different colors.
Our delete action, for example, could be rewritten as a custom swipe action:
override func tableView(_ tableView: UITableView,                     1
   trailingSwipeActionsConfigurationForRowAt indexPath: IndexPath)    1
   -> UISwipeActionsConfiguration? {                                  1
  let deleteAction = UIContextualAction(style: .destructive,          2
   title: "Delete") {                                                 2
     (contextAction: UIContextualAction,                              2
     sourceView: UIView,                                              2
     completionHandler: (Bool) -> Void) in                            2
    self.booksManager.removeBook(at: indexPath.row)                   3
    self.tableView.deleteRows(at: [indexPath], with: .left)           4
    completionHandler(true)                                           5
  }
  return UISwipeActionsConfiguration(actions: [deleteAction])         6
}
Checkpoint
If you’d like to compare your project with mine at this point, you can check mine out at https://github.com/iOSApp-Developmentwith-SwiftinAction/Bookcase.git (Chapter9.2.EditDeleteBook).
9.6. Summary
In this chapter, you learned the following:
- To display data in a table view. At a minimum you need to answer three data source questions: how many sections are in the table, how many rows are in each section, and what cell goes in each row?
- Embed a view controller in a navigation controller to push a view controller onto the navigation stack. A navigation controller has the additional advantage of a navigation bar, where you can display a back button, additional controls, and information about the current view controller.
- Use show (push) segues to navigate to a scene that presents more information about the user’s selection. Use a present (modal) segue to perform a self--contained operation.
- Use access control keywords private (restricted to file) and public (unrestricted) to change the access control from the default internal (restricted to module).
- Use prepareForSegue to pass data to a presented view controller. Pass data back to the presenting view controller with a delegate, via a closure, or with an unwind segue.