
Chapter 13. Graphics and media
This chapter covers
- Adding images and app icons to your app bundle
- Drawing in your app and creating a reusable custom view
- Taking or selecting photos from the photo library
- Detecting barcodes
- Playing sounds
In this chapter, we’ll look at making your apps more visual! Though you want your app to follow Apple standards for app consistency, you also want your app to stand out in the crowd. We’ll explore changing the look of your app, from adding images and app icons to custom drawing. We’ll also look at allowing the user to add their own images from the camera and photo library and even turn their device into a barcode scanner!
Along the way, you’ll encounter additional concepts:
13.1. Adding images to your app with an asset catalog
You’ve probably noticed the Assets.xcassets file in your Project Navigator. This is the default asset catalog for your app and a convenient place to store assets. Though it’s possible to drag images directly to your Project Navigator to include them in your project bundle, an asset catalog is generally preferable. Why?
The asset catalog makes it easy for you to categorize your images into image sets, variations of the same image optimized for different environments. With different size classes, resolutions, and devices, you could potentially provide many variations of each image, but Apple makes it simpler for you with the distinction of scale factor. Variations of an image in an image set can be divided into three scale factor categories, as explained in table 13.1.
Table 13.1. Scale factor
|
Scale factor |
Device types |
|---|---|
| 1x | Non-Retina devices (for example: iPhone 3, iPad mini 1, iPad 2, and earlier) |
| 2x | Retina devices (for example: iPhone 4–8, iPad mini, and iPad Pro) |
| 3x | iPhone X, iPhone Plus range (for example: iPhone 8 Plus) |
By providing variations for each scale factor, the appropriate variation for each image is automatically displayed for a device. iPhones in the Plus range, such as iPhone 7 Plus, automatically use 3x images, while most other iPhones and iPads on the market today use 2x images.
Tip
1x scaled images for non-Retina devices apply to a small percentage of iOS devices in use today. (The last non-Retina device to be sold in stores, the 16GB iPad Mini 1, was discontinued in mid-2015.) In fact, if your deployment target is iOS 9 or later, your app won’t even support non-Retina iPhones!
All that said, you don’t even need to know which scale factor goes with each device type. You provide scale factor alternatives, and the correct image is used automatically—sorry for the cliché, but it just works!
Note
Asset catalogs are capable of holding other types of assets as well, such as textures or data. Similar to images, adding other types of assets to the asset catalog can prove useful in providing variations for different environments.
13.1.1. Adding image sets
Next, you’ll add image sets to the asset catalog of the Bookcase app to display in the tab bar (see figure 13.1).
Figure 13.1. Tab bar icons

Checkpoint
Open the Bookcase app where you left it after implementing the archiving data storage option, or check it out at https://github.com/iOSAppDevelopmentwithSwiftinAction/Bookcase.git (Chapter11.5.StoreDataArchiving).
- Select Assets.xcassets in the Project Navigator. This opens the asset catalog editor. On the left, you’ll find the asset set list, with the set viewer on its right. You’ll find the project already has an asset set defined for the app icon. We’ll look at this shortly.
- Select the + button at the bottom of the set list to add a new image set, and select New Image Set (see figure 13.2).
Figure 13.2. Asset catalog editor

- Double-click on the name of the image set to rename it to “literature.”
With the literature image set selected, you’ll see the variations defined for the set in the set viewer. If you want additional variations (for
device types, for example) you can add those in the Attributes Inspector for the image set. We’ll stick with the three default
scale factor variations.
Now, to add the actual images to the image set. Your designer has sent you a nice crisp design for both tabs, but the question
is, what size should a tab bar image be? You’ll find the answer in the iOS Human Interface Guidelines.
iOS Human Interface Guidelines
Apple provides a helpful site called the Human Interface Guidelines (https://developer.apple.com/ios/human-interface-guidelines) that provides recommendations and advice direct from Apple to improve the interface of your apps, with an aim to make them more consistent and simple to use. I recommend you browse these guidelines (also known as the HIG), especially any areas with relevance to an app you hope to build.
According to the HIG (https://developer.apple.com/ios/human-interface-guidelines/icons-and-images/custom-icons/), tab bar icons should be 75 x 75 pixels for 3x images and 50 x 50 pixels for 2x images. The HIG doesn’t mention the older 1x images, but through simple mathematics, 1x images should be 25 x 25 pixels. - Download the icons. You can find a package of media you’ll use in this chapter at https://github.com/iOSAppDevelopmentwithSwiftinAction/Bookcase-Media.
- In the literature and cover folders, you’ll find the icons already exported into the three scale factor sizes. The 2x and 3x files have suffixes @2x
and @3x to distinguish them from the 1x file.
Note
To avoid compression artifacts, PNG files are usually recommended in iOS development, especially for smaller images such as icons. In fact, app icons (which we’ll explore shortly) accept only PNG files.
- Drag the three literature icons from the Finder into their appropriate wells in the set viewer for the literature set list
(see figure 13.3).
Figure 13.3. Add images to image set from Finder
The suffixes of the image files can also help to automate this process.
- Create the image set for the second icon by selecting all three files in the Finder and dragging them directly to the asset
set list. A new image set will be created with the name cover, and, like magic, the files will automatically drop into the appropriate wells in the image set (see figure 13.4).
Figure 13.4. Add image set

Note
It would probably be more consistent to give the cover 1x image the suffix @1x, but unfortunately Xcode doesn’t work that way—leave the 1x file without a suffix if you want Xcode to automatically detect its scale factor.
Now that you’ve added both image sets, it’s straightforward to add these images to the tab bar items of the tab bar. - Select the Books tab bar item.
Tip
There’s a trick to selecting a tab bar item that can drive you crazy until you know what the problem is! Your instinct may be to select and configure tab bar items in the tab bar controller; but tab bar items can only be selected in the first view controller for each tab. In this example, because both tabs take you to navigation controllers, you’ll need to select the tab bar items in each navigation controller.
- In the Image item in the Attributes Inspector, select the literature image set (see figure 13.5).
Figure 13.5. Add image to tab bar item

- Do the same for the Covers tab bar item, selecting the cover image set. Optionally, you can include an image to display when the tab is selected, in the Selected Image item. If you don’t include a separate image, the distinction is still clear, because selected tab bar items are automatically tinted blue. You can adjust the tint color in the attributes of the tab bar itself in the tab bar controller.
- That’s it! If you run your app now, you should find your tab bar has two icons representing each tab.
Once you define variations for each asset, your app will automatically use this information to produce a variation of your app bundle appropriate for each device. This process is called app slicing. Only assets that are appropriate for a user’s device will be included in the app’s bundle when it’s distributed to the user, reducing app size and download time.
13.1.2. Adding app icons
As you’ve seen, the asset catalog also contains an image set for the icon for your app. Unlike regular image sets, iOS app icons accept a range of sizes for different devices and purposes. In addition to the app icon displayed in the home screen, versions of the icon are needed for when your app turns up in a Spotlight search, when push notifications appear, or for adjusting settings for your app in the Settings app. You’ll also need a large version of your app icon for the App Store (although this icon doesn’t need to be included in your app bundle). Apple provides a template for app icons in the resources section of the HIG.
Apple also provides several guidelines in the HIG for app icons, such as these:
- Keep it simple.
- Avoid transparency.
- Don’t include photos.
- Keep icon corners square. iOS will automatically provide rounded corners for your icon.
You may have noticed that your app already has a default icon consisting of grid lines and circles (see figure 13.6). This curious symbol is the grid system that Apple designers use to design icons for their apps and can be a great guide to consider in composing your own app icons.
Figure 13.6. Apple icon grid

You’re going to update the app icon for the Bookcase app. Fortunately, your friendly designer has already prepared an icon and output it in a variety of image sizes. You can find a folder of app icon image files in the app icon folder of the same package you downloaded for image sets. All you need to do now is play “Match that file”!
- As you did earlier, drag each file to the appropriate well. (Unfortunately, automating this process isn’t as straightforward
as simple image sets.) When you’re finished, your app icon should look like figure 13.7 in the asset catalog.
Figure 13.7. App icon in the asset catalog and device home screen

- Run the app and close it again; you should now see your brand-new app icon in your device’s home screen.
13.2. Displaying a launch screen
You may have noticed a moment of white screen after launching your app, before your app loads and the interface of your app appears. To indicate to the user that your app is loading, Apple recommends you prepare a launch screen to replace that moment of white screen that resembles the initial scene of your app. Let’s look at how Apple has implemented the launch screen in two of their own apps to get a better idea of what they mean (see figure 13.8).
Figure 13.8. Launch screens in Apple apps

You can build your launch screen using the LaunchScreen storyboard that’s generated automatically for you when you create your project. As with regular storyboards, you can add standard UIKit components from the Object Library to the launch screen storyboard and position views with auto layout and size classes.
As you’d expect, launch screen storyboards do have their limitations. To load up quickly, launch screens are static and noninteractive, don’t animate, and are disconnected from the rest of your app. Launch screen storyboards don’t permit you to subclass views or view controllers or perform segues or actions.
You can read more about Apple’s recommendations for launch screens in the HIG at https://developer.apple.com/ios/human-interface-guidelines/icons-and-images/launch-screen/. For example, Apple suggests that text, in general, should be avoided, because launch screen text can’t be localized.
Tip
Though storyboards are the recommended approach for building up a launch screen, sometimes it can be difficult to build up an appropriate launch screen storyboard for your app using standard UIKit components, especially for games or other graphically intensive apps. If you prefer, you can create a launch screen with an image set of PNG files. Add a launch screen image set to the asset catalog, providing variations for all possible device types, orientations, and environments. To direct Xcode to the correct launch screen, you should then specify the image set you created in the launch screen file attribute in the General settings for your project target.
You’ll modify the launch screen storyboard of the Bookcase app so that it resembles the app’s initial screen. Following Apple’s lead, let’s implement a plain navigation bar, search bar, and tab bar, ready to create the illusion that these elements are completed when the first scene appears (see figure 13.9).
Figure 13.9. Bookcase launch screen

- Select LaunchScreen.storyboard in the Project Navigator.
- Drag a tab bar to the bottom of the launch screen. Remove any default tab bar items.
- Drag a navigation bar to the top of the main scene of the launch screen. The navigation controller in the main storyboard increases the height of its navigation bar to 118 points.
- Give your navigation bar a height constraint of 118 points to match, and while you’re there, pin the navigation bar to the left, top, and right edges.
- Drag a search bar below the navigation bar.
That’s it! If you run your app now, you should catch a glimpse of your launch screen handiwork for a second before it’s replaced by the real thing. Well done!
Checkpoint
If you’d like to compare your project with mine at this point, you can check mine out at https://github.com/iOSApp-DevelopmentwithSwiftinAction/Bookcase.git (Chapter13.1.AssetCatalog LaunchScreen).
13.3. Drawing with Core Graphics
Up to now, all the visuals you’ve used in apps have been standard UIKit components or PNG images from the asset catalog. What if you want to go a little further and draw your own 2D shapes in code? Perhaps you want to draw a simple shape such as a rectangle or circle or a more complicated path such as a star or even a custom button. One way to achieve drawing in Swift is with the Core Graphics framework.
You’re going to explore Core Graphics by building a view in the Bookcase app that displays star-ratings for each book that the user can interact with to edit the rating (see figure 13.10).
Figure 13.10. Star-ratings

First, let’s build a view that will draw a yellow star.
13.3.1. Overriding the draw method
The most common place to draw using Core Graphics is in the draw method of UI-View. This method is called when a view is first laid out and any time that the view needs to be redrawn.
- Create a subclass of UIView called Star. The draw method shows up in the UIView template, but it’s commented out.
- Uncomment the draw method:
class Star: UIView {
    override func draw(_ rect: CGRect) {
        // Drawing code
    }
}
Note that the draw method is passed a rect parameter containing the dimensions available to you to draw in.
13.3.2. Describing a path
To draw both simple and complex shapes in Core Graphics, you first need to describe their paths. Paths are described with a CGPath object, but UIKit class UIBezierPath is often used, because it has additional functionality and can provide you with a CGPath object anyway, via its cgPath property.
Simple shapes are easy to define in UIBezierPath—it has initializers that define ovals, rectangles, rounded rectangles, and arcs. For example, the following will create a circle path that fits inside a rectangle:
UIBezierPath(rect: CGRect(x: 0, y: 0, width: 100, height: 100))
Complex shapes are easy, too. To create a complex path, after instantiating an empty UIBezierPath object, you’d move to the initial point of the path with the move method, draw lines to each point in the path with the addLine method, and finally close the path with the close method.
You’ll use the UIBezierPath method to draw a star. Add the following method to your Star class that returns a UIBezierPath object that describes the path to draw a star:
func getStarPath() -> UIBezierPath {
    let path = UIBezierPath()
    path.move(to: CGPoint(x: 12, y: 1.2))
    path.addLine(to: CGPoint(x: 15.4, y: 8.4))
    path.addLine(to: CGPoint(x: 23, y: 9.6))
    path.addLine(to: CGPoint(x: 17.5, y: 15.2))
    path.addLine(to: CGPoint(x: 18.8, y: 23.2))
    path.addLine(to: CGPoint(x: 12, y: 19.4))
    path.addLine(to: CGPoint(x: 5.2, y: 23.2))
    path.addLine(to: CGPoint(x: 6.5, y: 15.2))
    path.addLine(to: CGPoint(x: 1, y: 9.6))
    path.addLine(to: CGPoint(x: 8.6, y: 8.4))
    path.close()
    return path
}
Several paid programs out there, such as PaintCode, will automatically convert vector images to Swift code. Alternatively, if you already have a program that can export an XML-based vector format such as SVG, you can extract the points from the SVG file in a text editor and copy-paste away!
To draw the shape you defined with Core Graphics, you need a graphics context.
13.3.3. Drawing into the graphics context
The graphics context is where all your Core Graphics drawing is performed. You can get a reference to the current graphics context with the global UIGraphicsGet-CurrentContext method.
- Add a reference to the current graphics context in the draw method:
let context = UIGraphicsGetCurrentContext()
Now that you have a graphics context, you can set the stroke or fill color, add the path you defined earlier, and then draw the path using either a fill, a stroke, or both. - Draw the star path into the current graphics context using an orange fill. Use the cgColor property of UIColor to pass in a CGColor object.
context?.setFillColor(UIColor.orange.cgColor)              1
context?.addPath(getStarPath().cgPath)                     2
context?.drawPath(using: .fill)                            3
- 1 Sets fill color
- 2 Adds path to context
- 3 Draws path using fill
Core Graphics isn’t limited to drawing paths. It also offers additional features that we don’t have time to delve into here, such as these:
- Drawing images
- Displaying text
- Adding shadows
- Transforms (We looked at view transforms in chapter 5.)
- Creating PDFs
13.3.4. Saving and restoring graphics state
Every time you make a change to an attribute in the graphics context (such as setting the fill color, font name, line width, anti-aliasing, or transforms—the list goes on) you’re adjusting the graphics state, and any future graphics calls will be affected by these changes. If you only want to adjust the graphics state temporarily for the current operation you’re performing, it’s a good idea to save the graphics state to the stack first and then restore the graphics state from the stack when you’re finished, to leave the graphics state as you found it.
Surround the drawing of the star path with saving and restoring the graphics state:
context?.saveGState()
//change graphics state
//draw operation (e.g. draw star)
context?.restoreGState()
13.3.5. Drawing paths with UIBezierPath drawing methods
An additional feature of the UIBezierPath wrapper for CGPath is the ability to stroke or fill a path into the current graphics context directly from the path object. Using the UIBezierPath drawing methods not only avoids the need for a reference to the graphics context, but will automatically perform the administrative detail of saving and restoring graphics state for you.
Note
Drawing paths with UIBezierPath methods will only work within the draw method of UIView, where drawing automatically updates the view’s graphics context.
- Replace the graphics context–focused code from earlier with the UIBezierPath drawing methods. You can set the fill on the UIColor class itself, and then fill the path by calling the fill method on the UIBezierPath object.
override func draw(_ rect: CGRect) {
   UIColor.orange.setFill()
   getStarPath().fill()
}
Notice the relative brevity of the UIBezierPath drawing methods. When you use these stars in the star-rating view, you need to display both filled and unfilled stars. - Add a fill property to the Star class, which determines whether the star should be filled or given a stroke.
var fill = false 1 override func draw(_ rect: CGRect) { if fill { UIColor.orange.setFill() getStarPath().fill() } else { UIColor.orange.setStroke() getStarPath().stroke() } }- 1 Should star be filled?
- Add a didSet property observer to the fill property, which calls setNeedsDisplay.
var fill: Bool = false {
    didSet {
        setNeedsDisplay()
    }
}
13.3.6. Rendering views in Interface Builder
It would be great to see the star you’ve drawn. Let’s look at what you have so far in Interface Builder.
- With the main storyboard open, drag in a temporary view controller and then drag a view into its root view.
- In the Identity Inspector, give the view the custom class of Star, and you should see ... nothing change! Xcode needs to be notified that it should render your custom code for a view in Interface Builder. You can do this with the @IB-Designable attribute.
- Add the @IBDesignable attribute before the class declaration for Star.
@IBDesignable class Star: UIView {Return to the main storyboard, and the star view should now render nicely. But it’s defaulting to not filled. It would be great if you could specify from the storyboard that you want to see the star filled (see figure 13.11).Figure 13.11. Inspectable custom attribute
You can specify that a property be adjustable directly from Interface Builder by adding the @IBInspectable attribute before declaring the property.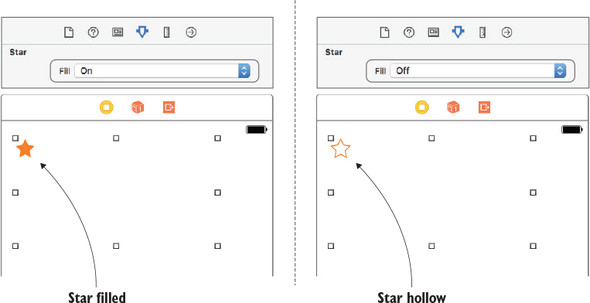
- Add the @IBInspectable attribute before the fill property in the Star class.
@IBInspectable var fill: Bool = false { - Return to the main storyboard and select the Attributes Inspector for the star view. You should find a new attribute, called “Fill.”
- Select On, and your star view should appear filled in the canvas!
Challenge
Add inspectable properties for both the fill color and stroke color of the star view and check that they update in the storyboard.
13.3.7. Creating a star-rating view
Now that the star view is ready, you can set up your star-rating view. Similar to the star view, the star-rating view will render in Interface Builder, and will have inspectable properties to customize its appearance (see figure 13.12).
Figure 13.12. Star-rating view in Interface Builder

- Create a Rating class that subclasses UIView, and make it render in the storyboard with the @IBDesignable attribute.
@IBDesignable class Rating: UIView { - Set up a property to define how many stars the rating view should fill. Make the property inspectable, and include a property
observer that registers that the view requires layout when it is set.
@IBInspectable var rating: Double = 3 { didSet {setNeedsLayout()} } - Add the star subviews in the layoutSubviews method of the star-rating view. Check that the stars array is empty. If it is, you need to create the star views, adding them to the view and the stars array. You need to clear the background color of each star view because it will default to black otherwise when generated
from the draw method. Finally, use the rating property to determine how many stars should be filled.
var stars: [Star] = [] 1 let numberOfStars = 5 2 override func layoutSubviews() { if stars.count == 0 { 3 // add stars for i in 0..<numberOfStars { 4 let star = Star(frame: 5 CGRect(x: CGFloat(30 * i), y: 0, 5 width: 25, height: 25)) 5 star.backgroundColor = UIColor.clear 6 self.addSubview(star) 7 stars.append(star) 8 } } for (i,star) in stars.enumerated() { 9 star.fill = Double(i) < rating 10 } } - Open the main storyboard, and in the Identity Inspector, change the subclass of your temporary view to your new Rating class. Your rating view should now render nicely in the storyboard.
- Play with the number of stars and rating properties in the Attributes Inspector, and change the look of the rating view in the canvas. Now you want to make your ratings view interactive in your Bookcase app, so that the user can select ratings.
- Override the touchesBegan method in the Rating class. Determine the index of the star view the user touched from the stars array, and use this index to set the rating property.
override func touchesBegan(_ touches: Set<UITouch>,
 with event: UIEvent?) {
    guard let touch = touches.first else {return}                1
    guard let star = touch.view as? Star else {return}           2
    guard let starIndex = stars.index(of: star) else {return}    3
    rating = Double(starIndex) + 1                               4
}
with event: UIEvent?) {
guard let touch = touches.first else {return} 1
guard let star = touch.view as? Star else {return} 2
guard let starIndex = stars.index(of: star) else {return} 3
rating = Double(starIndex) + 1 4
}- 1 Gets touch object
- 2 Gets star view touched
- 3 Gets index of star
- 4 Sets rating
- Override the intrinsicContentSize property in the Rating class.
override var intrinsicContentSize: CGSize {
    return CGSize(width: 30 * numberOfStars, height: 25)
}
Congratulations—you’ve completed a custom star-rating view, which you could reuse in other projects! Now that your star-rating view is interactive and operational, you can move it to the book edit form. - Delete the temporary view controller where you’ve been experimenting, and replace the placeholder ratings image in the book edit form with the star--rating view.
- Connect the star-rating view up to an outlet in the BookViewController class. Give it the name starRatings.
- After unwrapping the book object in the viewDidLoad method, set the rating in the star-rating view in viewDidLoad to the current book rating.
starRatings.rating = book.rating
- When saving a new book in the touchSave method, instead of hardcoding the rating to 3, use the current rating in the star-rating view.
let bookToSave = Book(title: titleTextField.text!, ...
   rating: starRatings.rating, ...)
- Run the app, select a book, and you should find your new star-rating view appear below the book cover.
- Select a different rating, select Save, and then return to the book. You should see the rating appear as you left it.
Checkpoint
If you’d like to compare your project with mine at this point, you can check mine out at https://github.com/iOSApp-DevelopmentwithSwiftinAction/Bookcase.git (Chapter13.2.StarRatingsView).
13.4. Drawing with Core Animation
It’s also possible to draw in a view in iOS using the Core Animation framework. All UIKit views and subclasses are backed by a Core Animation layer, represented by the CALayer class from the Core Animation framework. The CALayer describes everything visual about a view that needs rendering and can be used to animate these visuals.
You can access a view’s layer with its layer property. With the reference to the layer, you can then modify its appearance. For instance, properties are available to adjust background color, border, corner radius, shadow, mask, transform, and anti-aliasing.
Certain CALayer properties are available in UIView already, while others aren’t. If you want to give a UIView a background color of yellow, you could set this directly on the view in Interface Builder without needing to reference its layer. But if you want to give your UIView a black border of 1 pixel and a gray shadow (see figure 13.13), you need to manipulate its layer properties, as shown in the following listing.
Figure 13.13. View layer with border and shadow

Listing 13.1. Add border and shadow to view layer
layer.borderColor = UIColor.black.cgColor
layer.borderWidth = 1
layer.shadowColor = UIColor.gray.cgColor
layer.shadowOffset = CGSize(width: 2, height: 2)
layer.shadowOpacity = 1
layer.shadowRadius = 2.0
If you find that you need to adjust a layer property frequently, you could add it to the inspectable attributes for all views by creating an extension for UIView and adding it as an inspectable computed property. The following extension for UIView adds a corner radius inspectable property (see figure 13.14).
Figure 13.14. Corner radius

Listing 13.2. Add inspectable layer property in UIView extension
extension UIView {
   @IBInspectable var cornerRadius: CGFloat {
       get {return layer.cornerRadius}
       set {layer.cornerRadius = newValue}
   }
}
Note
If you want your Attributes Inspector adjustments to show up in Interface Builder, views still need to be attached to a subclass of UIView that contains the @IBDesignable attribute.
Core Animation layers not only provide customizable properties, they’re ready and primed for animation; and though it’s true you can customize animations explicitly using CATransaction objects, the exciting thing about Core Animation layers is that adjusting layer properties will implicitly trigger an animation of the transition between the properties, and you don’t have to do a thing!
You’ll update the star object in your star-rating view to use the CALayer and take advantage of this fancy built-in animation. Rather than an immediate change when the star’s fillColor is set, there will be a smooth transition from white to orange.
Similar to the way you can add subviews to views to create a hierarchy of views, you can also add sublayers to layers. Every view and subview of a view has its own layer property that, in turn, can contain a hierarchy of layers.

The Core Animation framework contains many CALayer subclasses that offer additional functionality beyond the basic CALayer. You’ll find layer subclasses that help you to display gradients, text, tiles, video; you’ll even find an emitter layer that displays particle systems, which you could use to simulate fire or smoke.
A subclass of CALayer specializes in drawing paths; it’s called CAShapeLayer. You’ll use shape layers to draw star shapes, and then add them to each star view’s layer (see figure 13.15).
Figure 13.15. View and layer hierarchy of rating view

- Refactor the draw method of the Star class in the Bookcase app to create a CAShapeLayer object and build up the star shape. Then add the shape layer as a sublayer to the main layer for the view.
let star = CAShapeLayer() 1 override func draw(_ rect: CGRect) { star.path = getStarPath().cgPath 2 if fill { star.fillColor = UIColor.orange.cgColor 3 } else { star.fillColor = UIColor.clear.cgColor 4 star.strokeColor = UIColor.orange.cgColor 5 } self.layer.addSublayer(star) 6 }- 1 Creates shape layer
- 2 Sets path of shape layer
- 3 Fill path
- 4 Fill path with clear
- 5 Stroke path
- 6 Adds shape layer to view layer
- Run the app again, select a book, and change the rating. You should find, this time, that the change causes an animation between the filled and unfilled states of the star. Fancy!
Checkpoint
If you’d like to compare your project with mine at this point, you can check mine out at https://github.com/iOSApp-DevelopmentwithSwiftinAction/Bookcase.git (Chapter13.3.StarRatingsViewCoreAnimation).
13.5. Using the camera
In addition to including images in your app catalog or drawing them with Core Graphics or Core Animation, an app can also use images from external sources, such as the device’s camera or the user’s photo library.
Here are two main ways of allowing the user to access the device’s camera from your app:
- The UIImagePickerController from the Cocoa Touch Layer is the simplest approach. It provides a default interface for taking photos and videos, or selecting photos from the photo library that you can “drop in” to your app. You don’t need to concern yourself with too many details, though customization of the image picker interface is possible.
- If you need to go beyond the default possibilities of UIImagePickerController, use the AVFoundation framework from the iOS SDK’s Media layer.
13.5.1. Taking photos with the image picker controller
We’ll come back to the AVFoundation framework shortly, but for now you’ll use the simpler UIImagePickerController in the Bookcase app to allow users to add cover images to their books.
The user will select a camera button in the book edit scene, which will open the default image picker controller. After taking and accepting the photo, the image will appear instead of the default cover image (see figure 13.16).
Figure 13.16. Using UIImagePickerController to photograph a book cover

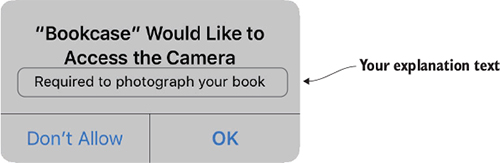
Requesting permission to use the camera
Before you can use the camera, you need user permission, and to get permission you must explain why you need it! This explanation will be included in a dialog that requests authorization from the user when you first access the camera (see figure 13.17).
Figure 13.17. Camera permission dialog
You can provide the explanation text by adding a value to the Info.plist file:
- Select the Info.plist file in the Project Navigator.
- Right-click anywhere on the Property List Editor, and select Add Row.
- Select Privacy - Camera Usage Description from the key drop-down.
- Add a value describing why you need access. I went with Required to Photograph Your Book (see figure 13.18).
Figure 13.18. Add row to property list

Note
Be careful not to forget to add this value to the Info.plist file—without it, your app will crash in iOS 10 when it attempts to access the camera!
Adding a camera button
For the user to take a photo, you need to add a camera button to the interface. Let’s add a bar button item to the navigation bar of the book edit scene (see figure 13.19).
Figure 13.19. Camera button item added to the navigation bar

- Find the book edit view controller in the main storyboard.
- Drag a bar button item from the Object Library to the left of the Save button.
- Conveniently, bar button items already have a camera symbol available. In the System Item attribute for the bar button item, select Camera.
Ensuring the camera is available
It’s good practice to make sure the camera is available before using it.
You’ll disable the camera button when the device doesn’t have access to a camera.
- Open the main storyboard in the Assistant Editor, and create an IBOutlet for the camera button and call it cameraButton. You can use the isSource-TypeAvailable method of the UIImagePickerController class to check a source type’s availability.
- Add the following to the viewDidLoad method of the BookViewController class:
if !UIImagePickerController.isSourceTypeAvailable(.camera) 1 cameraButton.isEnabled = false 2 }- 1 Checks camera is unavailable
- 2 Disables camera button
Taking a photo
Finally, you’re set to take a photo! The UIImagePickerController class handles the interface for taking pictures, but you need to instantiate it and present it. Because the UIImagePickerController can also be used to record video or choose from images already saved on the device, you’ll need to specify that you want the camera to be the source.
- With the storyboard open in the Assistant Editor, create an IBAction for the camera button in the BookViewController class, and call it takePhoto.
- Inside the takePhoto method, instantiate a UIImagePickerController with a camera source and present it.
let imagePicker = UIImagePickerController()                  1
imagePicker.sourceType = .camera                             2
present(imagePicker, animated: true, completion: nil)        3
- 1 Creates image picker controller
- 2 Sets source to camera
- 3 Presents full screen
- Set the BookViewController as the delegate of the imagePicker.
imagePicker.delegate = self
The delegate of UIImagePickerController must adopt two protocols, UIImagePickerControllerDelegate and UINavigationController-Delegate. - Adopt these protocols in an extension of BookViewController.
extension BookViewController: UIImagePickerControllerDelegate,
       UINavigationControllerDelegate {
   // Implement protocol methods here
}
When the user has taken a picture, the delegate’s didFinishPickingMediaWithInfo method is called and passed a reference to the image. Be sure to dismiss the image picker controller from this method. - Implement the didFinishPickingMediaWithInfo delegate method:
func imagePickerController( 1 _ picker: UIImagePickerController, 1 didFinishPickingMediaWithInfo info: [String: Any]) { 1 dismiss(animated: true, completion: nil) 2 // Store image }- 1 Delegate method
- 2 Dismisses image picker controller
- Define an optional property to store the image in the BookViewController class.
var coverToSave: UIImage?
The image the user takes is passed into the delegate method as an element in the info dictionary and stored against the UIImagePickerControllerOriginalImage key. - In the didFinishPickingMediaWithInfo method, extract the image from the info dictionary, store it in the coverToSave property, and use it to replace the default image in the book edit form.
if let image = info[UIImagePickerControllerOriginalImage] 1 as? UIImage { 1 coverToSave = image 2 bookCover.image = image 3 }- 1 Unwraps picked image from the dictionary
- 2 Stores image in the book object
- 3 Displays image in form
- Add in the cover property when saving a book.
let bookToSave = Book(title: titleTextField.text!,
   author: authorTextField.text!,
   rating: starRatings.rating,
   isbn: isbnTextField.text!,
   notes: notesTextView.text!,
   cover: coverToSave
)
Next, you’ll set up the Book structure to store cover images to disk. Unfortunately, the UIImage class does not adopt the Codable protocol. Fortunately, the Data structure does adopt the Codable protocol, and it’s fairly straightforward to convert a UIImage to the Data format and vice versa. Instead of using the init and encode methods that the Codable protocol automatically generates, you’re going to implement your own version. It will be mostly identical to the synthesized version, but yours will also manage converting your image to image data and back. (If you need reminding about the Codable protocol, revisit section 11.2.3, “Archiving objects.”) - Implement your own init method in the Book struct that works with the decoder to generate a Book object. Use the NSKeyedUnarchiver class to unarchive image data to a UIImage object.
init(from decoder: Decoder) throws { 1 let container = try decoder.container(keyedBy: CodingKeys.self) 1 title = try container.decode(String.self, forKey: .title) 1 author = try container.decode(String.self, forKey: .author) 1 rating = try container.decode(Double.self, forKey: .rating) 1 isbn = try container.decode(String.self, forKey: .isbn) 1 notes = try container.decode(String.self, forKey: .notes) 1 if let imageData = 2 try container.decodeIfPresent(Data.self, forKey: .imageData) { 2 image = NSKeyedUnarchiver.unarchiveObject(with: imageData) 3 as? UIImage 3 } else { 4 image = nil 4 } } - Implement your own encode method in the Book structure that works with the encoder to encode Book data. Use the NSKeyedArchiver class to archive the image to the Data format.
func encode(to encoder: Encoder) throws { 1 var container = encoder.container(keyedBy: CodingKeys.self) 1 try container.encode(title, forKey: .title) 1 try container.encode(author, forKey: .author) 1 try container.encode(rating, forKey: .rating) 1 try container.encode(isbn, forKey: .isbn) 1 try container.encode(notes, forKey: .notes) 1 if let image = image { 2 let imageData = NSKeyedArchiver.archivedData(withRootObject: image)3 try container.encode(imageData, forKey: .imageData) 4 } }- 1 Identical to synthesized encode
- 2 Unwraps image
- 3 Archives image to Data
- 4 Encodes image data
- Add an imageData constant to the CodingKeys structure in Book.swift to use as a key when encoding your data for archiving.
enum CodingKeys: String, CodingKey {
   case title
   case author
   ...
   case imageData
}
That’s it! Now, if you run your app on a device, select the camera button, select the camera shutter button, and select Use Photo, you should see the photo appear as a cover for the book. If you select Save, the book cover should appear in the table or collection views and persist for the next launch of your app.
Note
The simulator doesn’t have access to your Mac’s camera, so you need to test taking photos with an actual device. The simulator will come in handy, however, for testing that your camera button is disabled if the camera is unavailable!
13.5.2. Selecting photos from photo library with the image picker controller
The UIImagePickerController can handle selecting images from a user’s photo library too! Although the interface is vastly different from the interface for taking photos, the code you need to implement is quite similar, with three main differences:
- Access to the photo library requires a different permission, and so a different explanation. You need to set the explanation in your app’s Info.plist file under Privacy - Photo Library Usage Description.
- You need to adjust the sourceType of the image picker controller to photoLibrary.
imagePicker.sourceType = .photoLibrary
Alternatively, you can use savedPhotosAlbum, which only shows the device’s camera roll. - Apple recommends in the documentation for UIImagePickerController that you present your image picker as a popover when picking from a photo library or saved photos album. As you saw in chapter 9, popovers appear as a bubble with an arrow pointing to an anchor point.
You need to present your image picker as a popover simply by updating its modal presentation style, and specifying the popover’s anchor point:
imagePicker.modalPresentationStyle = .popover 1 imagePicker.popoverPresentationController?.barButtonItem 2 = galleryButton 2- 1 Sets popover presentation style
- 2 Sets popover anchor point
Challenge
Add a custom bar button item to the navigation bar next to the camera button, using the gallery image from the media package. If the user selects the Gallery button, the device’s photo library should open. The selected photo should replace the current book’s cover image (see figure 13.20).
Figure 13.20. Using UIImagePickerController to select a photo from the photo library

Checkpoint
If you’d like to compare your project with mine at this point, you can check mine out at https://github.com/iOSApp-DevelopmentwithSwiftinAction/Bookcase.git (Chapter13.4.UIImagePickerController).
13.5.3. Taking photos with AVFoundation
The UIImagePickerController is the simplest approach for taking photos and videos, and selecting photos from the device, and is appropriate for many circumstances, but sometimes you might need to dig a little deeper with the AVFoundation framework.
The AVFoundation framework is useful for recording, editing, and playing back audio and video. With AVFoundation, you can get lower-level access to the device’s camera to do things such as adjust white balance, focus, and exposure; add effects; access raw picture data; or detect patterns such as faces, barcodes, or QR codes.
You’ll use the AVFoundation framework in your Bookcase app to use the camera to automatically detect barcodes for the book and fill in the ISBN field. (Book barcodes are derived from their ISBN.) Your users will thank you for not making them laboriously type in the ISBN for each book! See figure 13.21.
Figure 13.21. Using AVFoundation to detect barcodes

Setting up the barcode detection view controller
Because you’ll use AVFoundation to access the camera, you need to build your own interface. None of this will be too new to you, so if you prefer, you can skip to the next checkpoint where you’ll begin using AVFoundation. Alternatively, following the steps to set up the barcode detection view controller could be an interesting revision.
First, you’ll need a scene to display the video preview for barcode detection.
- In the main storyboard, drag another view controller into the right of the book edit form. Next, you need a button in the book edit form that opens the barcode detection scene.
- Add the barcode icon from the media package to the asset catalog.
- Drag in another bar button item to the top right of the book edit form’s navigation bar. Give it the barcode image.
- Add a popover segue from the barcode button to the barcode detection scene. To implement the barcode detector scene, you’ll need to create a view controller subclass.
- Create a new Cocoa Touch class called BarcodeViewController that subclasses UIViewController. The BarcodeViewController will display the preview of the camera and handle detection of barcodes. We’ll look at how to do this shortly, but first, the BarcodeViewController will also need a way for the user to cancel this operation.
- In the main storyboard, embed the barcode detection scene in a navigation controller. Give the barcode scene the title “Detect barcode” and add a Cancel bar button item to the right of the navigation bar. The Cancel button should dismiss the barcode view controller.
- Link the Cancel button to an @IBAction in the BarcodeViewController class.
@IBAction func touchCancel(_ sender: AnyObject) {
    dismiss(animated: true, completion: nil)
}
If the barcode detection scene detects a barcode, it will need to communicate the ISBN back to the book edit form. You’ll implement a delegation pattern to handle this communication. - Add a delegation protocol to the BarcodeViewController.swift file that contains a foundBarcode method. The BarcodeViewController class can use this method to notify its delegate that it has found a barcode.
protocol BarcodeViewControllerDelegate { func foundBarcode(barcode: String) } class BarcodeViewController var delegate: BarcodeViewControllerDelegate? ... - The BookViewController can set itself as the delegate of the BarcodeViewController, to be notified when a barcode is detected and then update the ISBN field in the book edit form.
extension BookViewController: BarcodeViewControllerDelegate { func foundBarcode(barcode: String) { isbnTextField.text = barcode } } - In the BookViewController class, set up a prepareForSegue method, dig down through the barcode detection scene’s navigation controller to get a reference to the barcodeViewController, and set the BookView-Controller as the delegate of the barcodeViewController.
override func prepare(for segue: UIStoryboardSegue, sender: Any?) { if let navController = segue.destination as? UINavigationController, let barcodeViewController = navController.topViewController as? BarcodeViewController { barcodeViewController.delegate = self } } - If you run your app now, you can open the barcode detection scene and cancel it, but you haven’t implemented any barcode detection yet! Let’s do that now.
Checkpoint
If you’d like to compare your project with mine at this point, you can check mine out at https://github.com/iOSApp-Development-withSwiftinAction/Bookcase.git (Chapter13.5.PreAVFoundation)
Detecting a barcode
As is often the case in iOS, there isn’t just one way to solve a problem. To detect barcodes you could use
- The Vision framework, a powerful new framework introduced in iOS 11 that performs object detection, taking advantage of the new machine learning framework, CoreML.
- The AVFoundation framework itself provides object detection. Some object detection such as faces can be more accurate with the Vision framework and machine learning, but on the other hand, AVFoundation has a faster processing time.
We’ll explore barcode detection using the AVFoundation framework.
The AVFoundation framework contains several classes that work together to capture, play, edit, and write video and audio. To detect book barcodes, we’ll look specifically at using AVFoundation to capture metadata from the device’s camera.
At the center of capturing media with AVFoundation is an instance of an AV-CaptureSession. You can imagine your AVCaptureSession as a sort of black box where you can make connections between inputs and outputs. First, you hook up a device (such as a camera or microphone) to its own input that captures data from the device. You then connect this input to the capture session, which then directs this data to appropriate outputs (such as writing to file, still images, or metadata). See figure 13.22 for more detail on this process and the classes involved.
Figure 13.22. AVCaptureSession with inputs and outputs

Notice the boxes with broken lines—these are the objects you’re going to need to use to capture input data from the camera, output it to metadata, and detect barcodes.
- In the BarcodeViewController class, define a capture session instance property ready to accept inputs and dispatch appropriate data to outputs.
var captureSession: AVCaptureSession = AVCaptureSession()
- In viewDidLoad, get a reference to the default capture device for the camera.
let cameraDevice = AVCaptureDevice.default(for: AVMediaType.video)
Note
The default device for video happens to be on the back camera, which is perfect for barcode detection. If you wanted the front camera (aka selfie camera) instead—perhaps for face detection—you’d use the devices method, which you could use to return an array of all available cameras. You could then use the position property on the AVCaptureDevice objects to find the front camera.
- Instantiate an input object, passing it the camera. This operation can throw an error, so you’ll need to implement error handling.
Use an optional try to trap any errors, call a failed method if you need to notify the user of the error with an alert (see chapter 11 if you need a reminder on alerts), and exit the method.
guard let videoInput = 1 try? AVCaptureDeviceInput(device: cameraDevice) 2 else { failed() 3 return 4 }- 1 Unwraps input object
- 2 Tries to instantiate input object
- 3 Notifies user if error
- 4 Exits method if error
Error handling with an optional tryEarlier we looked at the do-catch block with try, to handle places in your code where an error can be thrown. A more succinct alternative can be the optional try, represented by try?. An optional try will return an optional for the value that a throwable operation returns. It’s then up to you to unwrap the optional. If you’re confident that an error will never be thrown, you also have the option to use an implicitly unwrapped optional try, represented by try!.
- Now, you can plug the camera’s video input into the capture session black box, but first, you need to check that the capture
session can accept this type of input. Again, if there’s a problem, you should notify the user and exit the method.
guard (captureSession.canAddInput(videoInput)) 1 else { failed() 2 return 2 } captureSession.addInput(videoInput) 3- 1 Checks capture session can add input
- 2 Notifies the user if problem and returns
- 3 Adds input to capture session
let metadataOutput = AVCaptureMetadataOutput()           1
guard (captureSession.canAddOutput(metadataOutput))      2
 else {
   failed()                                              3
   return                                                3
}
captureSession.addOutput(metadataOutput)                 4
// Customize metadata output
Not only are there several types of metadata, there are several barcode formats. Fortunately, a standard 13-character barcode format exists that books implement these days. - Let the output object know what sort of metadata to look for.
metadataOutput.metadataObjectTypes = [AVMetadataObject.ObjectType.ean13]
When the output object discovers a barcode, it will notify its delegate. To receive callbacks from the metadata output, your BarcodeViewController class will need to specify itself as the delegate. You also need to specify which queue to receive callbacks on. Because you’ll be updating the user interface, it makes sense to receive callbacks on the main queue. - Specify the delegate and the queue with the setMetadataObjectsDelegate method.
metadataOutput.setMetadataObjectsDelegate(self,
Great—your black box is all set up with inputs and outputs, ready to start detecting barcodes, but there’s one thing left to do—you need to turn it on! queue: DispatchQueue.main) - Turn on the capture session:
captureSession.startRunning()
Because the BarcodeViewController is the delegate of the metadata output object, it will need to adopt the delegation protocol. The captureOutput delegate method will be notified whenever the metadata output object finds a barcode, and any information on barcodes found will be passed into the metadataObjects array. For simplicity, you’ll use the first object in the array, and cast it as a special class for barcodes called AVMetadataMachineReadableCodeObject, which stores the barcode value in its stringValue property. Now that you’ve detected a barcode, you can stop the capture session, report the barcode back to the BookViewController using the delegate you created earlier, and dismiss the BarcodeViewController. - Create an extension of BarcodeViewController that adopts the output object’s delegate, implements the captureOutput method, and deals with barcodes detected.
extension BarcodeViewController: 1 AVCaptureMetadataOutputObjectsDelegate { 1 func metadataOutput(_ captureOutput: AVCaptureMetadataOutput, 2 didOutput metadataObjects: [AVMetadataObject], 2 from connection: AVCaptureConnection) { 2 if let metadataObject = metadataObjects.first as? 3 AVMetadataMachineReadableCodeObject { 3 captureSession.stopRunning() 4 delegate?.foundBarcode(barcode: 5 metadataObject.stringValue!) dismiss(animated: true, completion: nil) 6 } } }- 1 Adopts the metadata output delegate
- 2 Receives detected barcodes
- 3 Casts first object as barcode
- 4 Turns off capture session
- 5 Notifies BookViewController of barcode
- 6 Dismisses BarcodeViewControlle
- Add a preview layer instance property to the BarcodeViewController.
var previewLayer: AVCaptureVideoPreviewLayer!
- Back in the viewDidLoad method, instantiate the preview layer, passing in the capture session.
previewLayer = AVCaptureVideoPreviewLayer(session: captureSession)
- Set the frame of the preview layer to the frame of the root view’s layer. Then, set the preview layer’s scaling to maintain
its aspect ratio but fill the frame, with the strangely named videoGravity property.
previewLayer.frame = view.layer.frame
previewLayer.videoGravity = AVLayerVideoGravity.resizeAspectFill
- Finally, add the preview layer to the layer of the BarcodeViewController’s root view.
view.layer.addSublayer(previewLayer)
- That’s it! Run your app, open a book, and select the Barcode button. The barcode detector scene should appear, previewing the camera.
- Point the camera at a book barcode; the barcode scene should disappear, and the ISBN field should fill with the book’s ISBN, like magic!
Checkpoint
If you’d like to compare your project with mine at this point, you can check mine out at https://github.com/iOSAppDevelopmentwithSwiftinAction/Bookcase.git (Chapter13.6.AVFoundation).
13.6. Playing sounds
The AVFoundation framework contains an area dedicated to audio. If you’re interested in audio features, such as managing audio interruptions or playing audio in the background, look into the AVAudioSession. If you’re interested in mixing audio and applying different audio effects, you should check out the AVAudioEngine. If, on the other hand, you only need the basic features of recording and playing audio, you can use the AVAudioRecorder and AVAudioPlayer classes.
We’ll keep it simple here and play a sound in the Bookcase app, using an AVAudio-Player instance.
You may have noticed that a default camera shutter sound already plays when you take a photo, as part of the image picker controller. Let’s play a short sound as well to indicate that a barcode has been detected.
- Grab the barcode scanning sound (scanner.aiff) out of the media package, and drag it into your Project Navigator.
- To keep your project organized, you might want to create a group in the Project Navigator called “Media” and move in the sound file and asset catalog. You’ll play the barcode sound when the book edit form scene is notified by the barcode detection scene that it has found a barcode.
- In the foundBarcode method for the BookViewController class, call the playBarcodeSound method.
- Create the playBarcodeSound method. Get a URL reference to the sound file via the main bundle.
func playBarcodeSound() { guard let url = Bundle.main.url( forResource: "scanner", withExtension: "aiff") else {return} // Play sound } - Add an AVAudioPlayer instance property to the BookViewController class to play the sound. This property mustn’t only be defined locally within the method, or the property could be released
while the sound is playing.
var barcodeAudio: AVAudioPlayer!
- Back in the playBarcodeSound method, instantiate the barcodeAudio property with the URL you generated. Trap any errors with an optional try.
barcodeAudio = try? AVAudioPlayer(contentsOf: url)
- Now that you have a sound file generated, you can go ahead and play it.
barcodeAudio?.play()
- Run the app again, and this time the app should indicate when it detects a barcode with a simple barcode sound.
Checkpoint
If you’d like to compare your project with mine at this point, you can check mine out at https://github.com/iOSApp-DevelopmentwithSwiftinAction/Bookcase.git (Chapter13.7.AVAudioPlayer).
13.7. Summary
In this chapter, you learned the following:
- Including variations for your assets in the asset catalog helps streamline your app bundle through app slicing.
- App icons you add to your asset catalog should be square—Apple will round the corners for you.
- Include a launch screen that resembles the first screen of your app to give the illusion that your app’s interface is loading.
- When subclassing UIView, perform your drawing in the draw method.
- Consider Core Animation layers for drawing if a hierarchy of layers makes sense for your drawing or if you want to use animation features.
- UIImagePickerController is the simplest approach to giving the user access to the camera in your app. For a more advanced feature set, use AVFoundation.