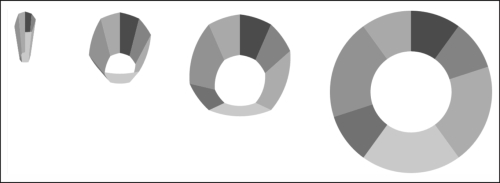
One area where arc differs significantly from other shapes, such as line and area, is its transition. For most of the shapes we covered so far, including simple SVG built-in shapes, you can rely on D3 transition and interpolation to handle their animation. However, this is not the case when dealing with arc. We will explore the arc transition technique in this recipe.
Open your local copy of the following file in your web browser:
https://github.com/NickQiZhu/d3-cookbook/blob/master/src/chapter7/arc-transition.html
In this recipe, we will animate a multi-slice annulus transitioning each slice starting from angle 0 to its final desired angle and eventually reaching a full annulus:
<script type="text/javascript">
var width = 400,
        height = 400,
        endAngle = 2 * Math.PI,
        colors = d3.scale.category20c();

var svg = d3.select("body").append("svg")
        .attr("class", "pie")
        .attr("height", height)
        .attr("width", width);

function render(innerRadius) {

    var data = [
        {startAngle: 0, endAngle: 0.1 * endAngle},
        {startAngle: 0.1 * endAngle, endAngle: 0.2 * endAngle},
        {startAngle: 0.2 * endAngle, endAngle: 0.4 * endAngle},
        {startAngle: 0.4 * endAngle, endAngle: 0.6 * endAngle},
        {startAngle: 0.6 * endAngle, endAngle: 0.7 * endAngle},
        {startAngle: 0.7 * endAngle, endAngle: 0.9 * endAngle},
        {startAngle: 0.9 * endAngle, endAngle: endAngle}
    ];

    var arc = d3.svg.arc().outerRadius(200).innerRadius(innerRadius);

    svg.select("g").remove();

    svg.append("g")
        .attr("transform", "translate(200,200)")
        .selectAll("path.arc")
            .data(data)
        .enter()
            .append("path")
            .attr("class", "arc")
            .attr("fill", function (d, i) {
                return colors(i);
            })
            .transition().duration(1000)
            .attrTween("d", function (d) { // <-A
                var start = {startAngle: 0, endAngle: 0}; // <-B
                var interpolate = d3.interpolate(start, d); // <-C
                return function (t) {
                    return arc(interpolate(t)); // <-D
                };
            });
}

render(100);
</script>
The preceding code generates an arc which starts rotating and eventually becomes a complete annulus:

Arc transition with tweening
]
When confronted with the requirement of such transition, your first thought might be using the vanilla D3 transition while relying on built-in interpolations to generate the animation. Here is the code snippet which will do just that:
svg.append("g")
        .attr("transform", "translate(200,200)")
        .selectAll("path.arc")
            .data(data)
        .enter()
            .append("path")
            .attr("class", "arc")
            .attr("fill", function (d, i) {
                return colors(i);
            })
            .attr("d", function(d){
               return arc({startAngle: 0, endAngle: 0});
             })
            .transition().duration(1000).ease("linear")
            .attr("d", function(d){return arc(d);});
As shown with highlighted lines in the preceding code snippet, with this approach we initially created slice path with both startAngle and endAngle set to zero. Then, through transition we interpolated the path "d" attribute to its final angle using the arc generator function arc(d). This approach seems to make sense, however, what it generates is the transition shown in the following:

Arc transition without tweening
This is obviously not the animation we want. The reason for this strange transition is that by directly creating a transition on the svg:path attribute "d", we are instructing D3 to interpolate this string:
d="M1.2246063538223773e-14,-200A200,200 0 0,1 1.2246063538223773e-14,-200L6.123031769111886e-15,-100A100,100 0 0,0 6.123031769111886e-15,-100Z"
To this string linearly:
d="M1.2246063538223773e-14,-200A200,200 0 0,1 117.55705045849463,-161.80339887498948L58.778525229247315,-80.90169943749474A100,100 0 0,0 6.123031769111886e-15,-100Z"
Hence, this particular transition effect.
In order to achieve the transition effect we want, we need to leverage the D3 attribute tweening (for detailed description on tweening, see the Using tweening recipe of Chapter 6, Transition with Style):
svg.append("g")
        .attr("transform", "translate(200,200)")
        .selectAll("path.arc")
            .data(data)
        .enter()
            .append("path")
            .attr("class", "arc")
            .attr("fill", function (d, i) {
                return colors(i);
            })
            .transition().duration(1000)
            .attrTween("d", function (d) { // <-A
                var start = {startAngle: 0, endAngle: 0}; // <-B
                var interpolate = d3.interpolate(start, d); // <-C
                return function (t) {
                    return arc(interpolate(t)); // <-D
                };
            });
Here, instead of transitioning the svg:path attribute "d" directly, we created a tweening function on line A. As you can recall, D3 attrTween expects a factory function for a tween function. In this case, we start our tweening from angle zero (see line B). Then we create a compound object interpolator on line C, which will interpolate both start and end angles for each slice. Finally on line D, the arc generator is used to generate a proper svg:path formula using already interpolated angles. This is how a smooth transition of properly-angled arcs can be created through custom attribute tweening.
D3 also provides support for other shape generators, for example, symbol, chord, and diagonal. However, due to their simplicity and the limited scope in this book we will not cover them individually here, although we will cover them as parts of other more complex visual constructs in the following chapters. More importantly, with well-grounded understanding of these shape generators that we introduced in this chapter, you should be able to pick up other D3 shape generators without much trouble.
- For more information on transition and tweening, refer to the Using tweening recipe in Chapter 6, Transition with Style
