
With test environment ready, we can move on and develop a simple bar chart very similar to what we have done in the Creating a bar chart recipe in Chapter 8, Chart Them Up, though this time in a test-driven fashion. You can see how the bar chart looks if you open the tdd-bar-chart.html page:
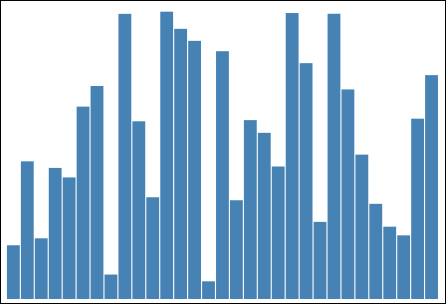
Test Driven Bar Chart
By now we all know very well how to implement a bar chart using D3; however, building a bar chart is not the focus of this recipe. Instead, we want to show how we can build test cases every step of the way and verify automatically that our bar chart implementation is doing what it is supposed to do. The source code of this recipe was built using test driven development method; however, we will not show you every step in the TDD process due to limited scope in this book. Instead, we have grouped multiple steps into three larger sections with different focuses in this chapter and this recipe is the first step we take.
First step we need to take is to make sure our bar chart implementation exists and can receive the data. The starting point of our development could be arbitrary and we decide to drive from this simplest function to set up the skeleton for our object. Here is what the test case looks like:
describe('BarChart', function () {
    var div,
        chart,
        data = [
            {x: 0, y: 0},
            {x: 1, y: 3},
            {x: 2, y: 6}
        ];

    beforeEach(function () {
        div = d3.select('body').append('div'),
        chart = BarChart(div);
    });

    afterEach(function () {
        div.remove();
    });

    describe('.data', function () {
        it('should allow setting and retrieve chart data', function () {
            expect(chart.data(data).data()).toBe(data);
        });
});
});In this first test case we used a few Jasmine constructs:
describe: This function defines a suite of test cases; within describe a sub-suite can be nested and test cases can be definedit: This function defines a test casebeforeEach: This function defines a pre-execution hook which will execute the given function before the execution of each test caseafterEach: This function defines a post-execution hook which will execute the given function after the execution of each test caseexpect: This function defines an expectation in your test case which can then be chained with matchers (for example,toBeandtoBeEmpty) to perform assertion in your test case
In our example we use the beforeEach hook to set up a div container for each test case and then remove div after execution in afterEach hook to improve the isolation between different test cases. The test case itself is almost trivial; it checks if the bar chart can take data and also return data attribute correctly. At this point if we run our SpecRunner, it will display a red message complaining there is no BarChart object, so let's create our object and function:
function BarChart(p) {
var that = {};
var _parent = p, data;
that.data = function (d) {
        if (!arguments.length) return _data;
        _data = d;
        return that;
};

return that;
}
Now, if you run SpecRunner.html again it will give you a happy green message showing our only test case is passing.