
In this section, we will show you a basic approach to detect faces in an image. We will use the cascade classifier in OpenCV to detect the face location. This approach may have alignment errors. In order to obtain a precise location, we will also provide another advanced approach to find the face region using facial landmarks. In our implementation, we will only use the face region. However, many researchers use facial landmarks to extract facial components, such as eyes and mouths, and operate on these components separately.
In our implementation, we will use the Haar Feature-based cascade classifier in the objdetect module. In OpenCV, you can also extract the the face region with LBP-based cascade. LBP-based cascade is faster than Haar-based cascade. With the pre-trained model, the performance of LBP-based is lower than Haar-based cascade. However, it is possible to train an LBP-based cascade to attain the same performance as the Haar-based cascade.
Note
If you want to understand object detection in detail, you should check Chapter 5, Generic Object Detection for Industrial Applications.
The code for detecting faces is very simple. First, you need to load the pre-trained cascade classifier for faces into your OpenCV installation folder:
CascadeClassifier face_cascade;
face_cascade.load("haarcascade_frontalface_default.xml");
Then, load the input image in color mode, convert the image to grayscale, and apply histogram equalization to enhance the contrast:
Mat img, img_gray;
img = imread(imgPath[i], CV_LOAD_IMAGE_COLOR);
cvtColor(img, img_gray, CV_RGB2GRAY);
equalizeHist(img_gray, img_gray);
Now, we can find faces in the image. The detectMultiScale function stores all the detected faces in the vector as Rect(x, y, w, h):
vector<Rect> faces;
face_cascade.detectMultiScale( img_gray, faces, 1.1, 3 );
In this code, the third parameter 1.1 is the scale factor, which specifies how much the image size will be resized at each scale. The following figure shows the scale pyramid using the scale factor. In our case, the scale factor is 1.1. This means that the image size is reduced by 10%. The lower this factor is, the better chance we have of finding the faces. The scaling process starts with the original image and ends when the image resolution reaches the model dimension in the X or Y direction. However, the computation cost is high if we have too many scales. Therefore, if you want to reduce the number of scales, increase the scale factor to 1.2 (20%), 1.3 (30%) ,or more. If you want to increase the number of scales, reduce the scale factor to 1.05 (5%) or more. The fourth parameter 3 is the minimum number of neighbors that each candidate position should have to become a face position.
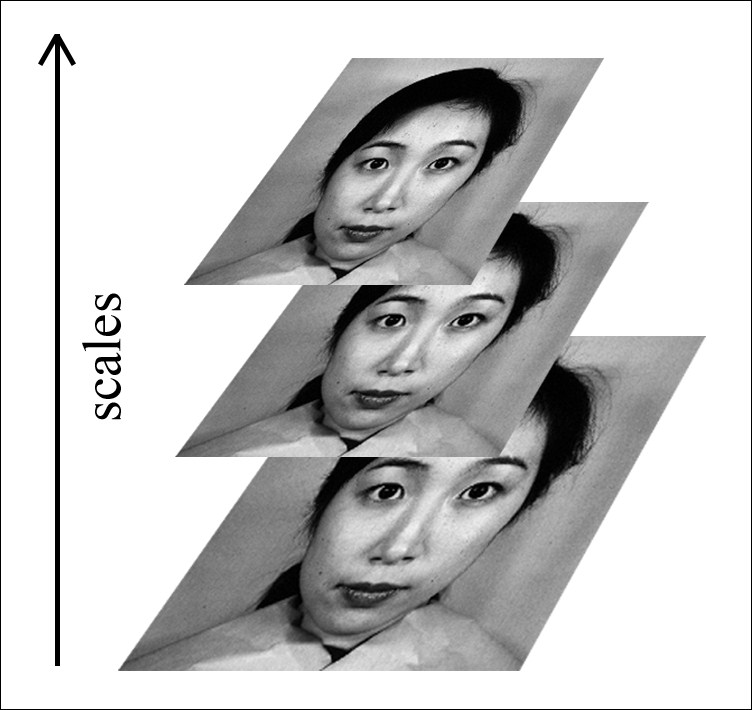
Pyramid of image scales
The following figure is the result of face detection if we set the number of neighbors to zero:
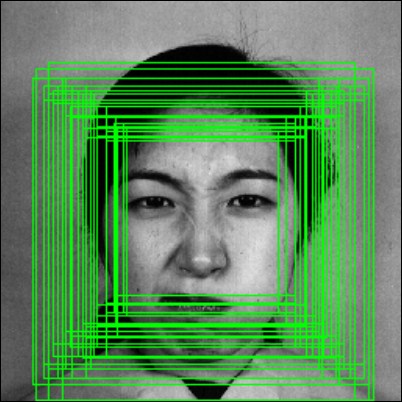
All the candidates for face regions
Finally, the position of the face region can be obtained as follows:
int bbox[4] = { faces[i].x, faces[i].y, faces[i].x + faces[i].width, faces[i].y + faces[i].height };Each element of the faces vector is a Rect object. Therefore, we can get the position of the top-left corner with faces[i].x and faces[i].y. The position of the bottom-right corner is faces[i].x + faces[i].width and faces[i].y + faces[i].height. This information will be used as the initial position for the facial landmarks process, as described in the following section.
One disadvantage of the face detector is that the results may have misalignment. The misalignment may happen in scaling or translation. Therefore, the extracted face regions in all images will not align with each other. This misalignment can lead to poor recognition performance, especially with DENSE features. With the help of facial landmarks, we can align all the extracted faces so that each facial component is in the same area over the datasets.
Many researchers make use of facial landmarks for classification with other emotion recognition approaches.
We will use the flandmark library to find the location of the eyes, nose and mouth. Then, we will use these facial landmarks to extract the precise facial bounding box.
Flandmark is an open source C library implementing a facial landmark detector.
Note
You can access the flandmark library main page at: http://cmp.felk.cvut.cz/~uricamic/flandmark/.
Given a face image, the goal of the flandmark library is to estimate an S shape that represents the location of the facial component. A facial shape in an S is an array of (x, y) positions shown as: S = [x0y0x1y1....xnyn].
The pre-trained model in flandmark contains eight points, as shown in the following figure:

The 8 landmarks model and the corresponding index for each landmark.
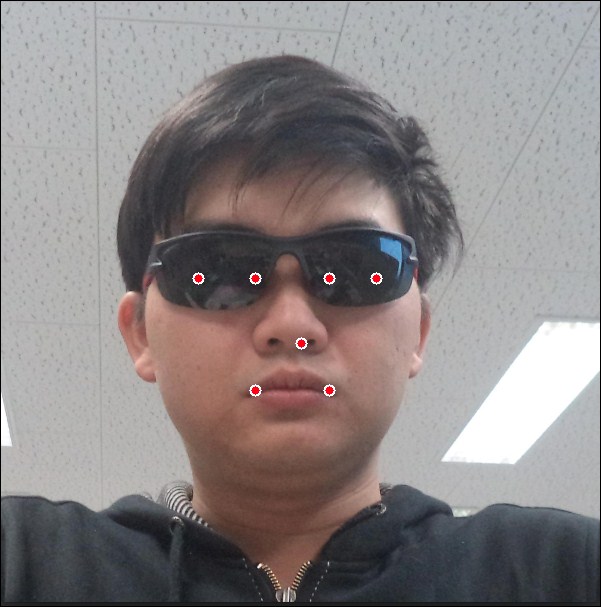
In our implementation, we use flandmark because it is easy to integrate it into an OpenCV project. Besides, the flandmark library is really robust in many scenarios, even when the person is wearing glasses. In the following figure, we show the result of using the flandmark library on an image where the person is wearing dark glasses. The red dots indicate the facial landmarks.
In the next section, we will show you the steps to download and use flandmark in our project.
Flandmark is implemented in C and can be integrated into our project easily. However, we need to modify some headers in the library source to use it with OpenCV 3. The following are the steps to download and compile the library:
- Go to the main page of the flandmark library and follow the GitHub link: http://github.com/uricamic/flandmark
- Clone the library to your local machine with the following command:
git clone http://github.com/uricamic/flandmark - Copy the
libflandmarkfolder to your project folder. - Copy
flandmark_model.dat,which isin the data folder, to your project folder. - Edit the
liblbp.hfile inlibflandmarkand change:#include "msvc-compat.h"
to
#include <stdint.h>
- Edit the
flandmark_detector.hfile inlibflandmarkand change:#include "msvc-compat.h" #include <cv.h> #include <cvaux.h>
to
#include <stdint.h>
#include "opencv2/opencv.hpp"
#include "opencv2/objdetect/objdetect.hpp"
#include "opencv2/highgui/highgui.hpp"
#include "opencv2/imgproc/imgproc.hpp"
#include <iostream>
#include <stdio.h>
using namespace std;
using namespace cv;
- Edit
CMakeLists.txtin your project folder to add the flandmark library:add_subdirectory(libflandmark) include_directories("${PROJECT_SOURCE_DIR}/libflandmark") - Link the executable file with the flandmark static library.
- Add the flandmark header to your source code:
#include "flandmark_detector.h"
Once you have finished the above steps, the process to extract facial components is very straightforward.
First, we create a FLANDMARK_Model variable to load the pre-trained model:
FLANDMARK_Model * model = flandmark_init("flandmark_model.dat");Then, we save the number of landmarks into the num_of_landmark variable and create an array to store the output result:
int num_of_landmark = model->data.options.M;
double *points = new double[2 * num_of_landmark];
Finally, for each face region, we create an integer array to store the face location and use the flandmark_detect function to obtain the final result in the points array:
int bbox[4] = { faces[i].x, faces[i].y, faces[i].x + faces[i].width, faces[i].y + faces[i].height };
flandmark_detect(new IplImage(img_gray), bbox, model, points);
The first parameter in the flandmark_detect function is IplImage so we need to pass our gray image into the IplImage constructor.
This step is optional. You don't need to implement the code in this section. However, we recommend that you try and understand the results. The following code draws a circle on the image at the location of the landmarks:
for(int j = 0 ; j < num_of_landmark; j++){
  Point landmark = Point((int)points[2 * j], (int)points[2* j + 1]);
  circle(img, landmark, 4, Scalar(255, 255, 255), -1);
}
The following figure shows multiple examples of the results using the above code:

Some examples of flandmark results on JAFFE images
We now have the location of the eyes, nose, and mouth. It is very easy to extract the face region.
First, we compute the center of the left eye as the middle of point 2 and point 6:
Point centerLeft = Point( (int) (points[2 * 6] + points[2 * 2]) / 2, (int) (points[2 * 6 + 1] + points[2 * 2 + 1]) / 2 );
Second, the width of the eye region is the difference between x coordinates of point 2 and point 6:
int widthLeft = abs(points[2 * 6] - points[2 * 2]);
Then, we find the center and the width of the right eye:
Point centerRight = Point( (int) (points[2 * 1] + points[2 * 5]) / 2, (int) (points[2 * 1 + 1] + points[2 * 5 + 1]) / 2 );
int widthRight = abs(points[2 * 1] - points[2 * 5]);
We can assume that the width of the face is a bit larger than the distance between the eyes, and the height of the face is larger than the width of the face, so we can get the eyebrows. We can obtain a good face position with the following code:
int widthFace = (centerLeft.x + widthLeft) - (centerRight.x - widthRight);
int heightFace = widthFace * 1.2;
Finally, the face region can be extracted with the following code:
Mat face = img(Rect( centerRight.x - widthFace/4 , centerRight.y - heightFace/4, widthFace, heightFace ));
The following figure shows some extracted images from our implementation:
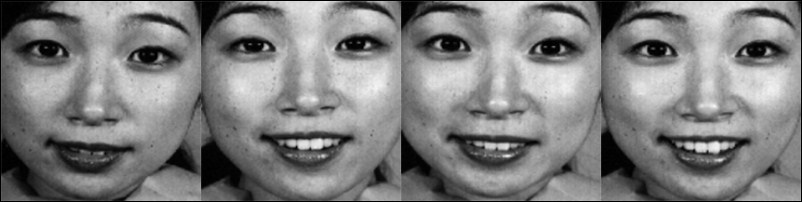
Some examples of extracted face regions from JAFFE images
We have implemented the software to extract facial components from the JAFFE dataset. You can use the code as follows:
- Download the source code. Open the terminal and change directory to the source code folder.
- Build the software with
cmakeusing the following command:mkdir build && cd build && cmake .. && make - You can use the facial_components tool, as follows:
./facial_components -src <input_folder> -dest <out_folder>
Note
The software for this chapter based on OpenCV 3 can be found at: https://github.com/OpenCVBlueprints/OpenCVBlueprints/
In order to simplify the process, we save the image paths in a .yaml file, list.yml. The structure of this .yaml file is simple. First, we save the number of images in the num_of_image variable. After that, we save the paths of all the images, as shown in the following screenshot:

An image of the list.yml file