
We have set up the hardware that will be used along this chapter. Now, let's develop our application to give it some life.
Assuming that you retrieved the whole project in your local directory, simply go to the server_1
directory and open matrixServer.py.
Looking at the code parts, some prerequisites must be followed for both the server and client sides.
For the server, you can use the following command:
sudo pip install twisted
Alternatively, you can use the following line:
Install python-twisted
For the client part, you'll need to install the Python environment according to your operating system from https://www.python.org/downloads/.
The code that we'll use here is compatible with both the 2.7 and 3 versions.
Additionally, you'll need a twisted matrix, which you can retrieve with this command:
pip install twisted
Alternatively, you can obtain the one for your operating system from https://twistedmatrix.com/trac/wiki/Downloads.
The hardware is set up and the requirements are in place; you are ready to run the example.
Server_3/matrixServer.py Client/client3/

Connect to the BeagleBone Black board with PuTTY or any SSH client and enter in the directory, as indicated:
debian@arm:~/BeagleboneBlack-Server-Book/Server/Server_1$ ./matrixServer.py

The message shown in the preceding screenshot indicates that the server is running correctly and is now waiting to accept a client connection. However, if you don't run the server before the client, you'll end up with the following message:
>>>
Connection failed - goodbye!
As soon as you start the client after the server, the client immediately loops over the data and you can see that the matrix gets its LEDs in green, according to that loop:
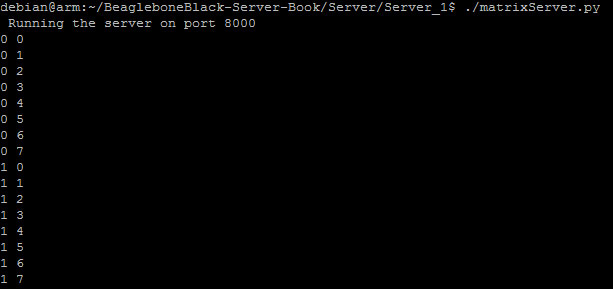
On the server display (the SSH connection), you can also check the coordinates for the LED that is currently set.
When it is running on BeagleBone, the unique purpose of a server is to wait for the incoming data. If you intend to modify the server's code—and I hope you will—be warned that in order to keep the example simple, the code doesn't check the viability of the data sent from the client.
Each time the server receives data, it will look for the following three values:
- The X position
- The Y position
- Color
If you want to expand this format, you'll need to apply modifications on both the server and client sides.
As soon as the server receives a data packet, it will transcode it into I2C, then be able to address each LED individually.
So, functionally speaking, the server can be seen as a "remote and translator" between the client application and each LED.
Now, let's dive into the main parts of the source:

The preceding lines of code state that the required libraries (that is, Adafruit) are not in the standard path, but they can be found in the directory upwards. That way, if a new version is available, you just have to retrieve it (git pull), and you won't have to copy/paste into directories, as it's made transparent to you.
grid = ColorEightByEight(address=0x70)
The grid-based object needs to be instantiated in the program with an identified address, 0x70.
Tip
Here's a tip about I2C-tools: If you want to know where this address comes from, watch the video at http://derekmolloy.ie/beaglebone/beaglebone-an-i2c-tutorial-interfacing-to-a-bma180-accelerometer/.
The remaining code is taken from the twisted matrix examples, which are handy to manage network applications. Finally, the following screenshot shows the main part of the server code:

The client part is also based on the Twisted Matrix example with a modification in the EchoClient class. The client will do the following:
- Establish a connection to the server.
- Check whether the server is alive.
- With a successful connection, some frames are generated to fill the matrix line by line. This is the purpose of the two
forloops.
When the client has finished, the matrix appears with all its LEDs lit, as shown here:
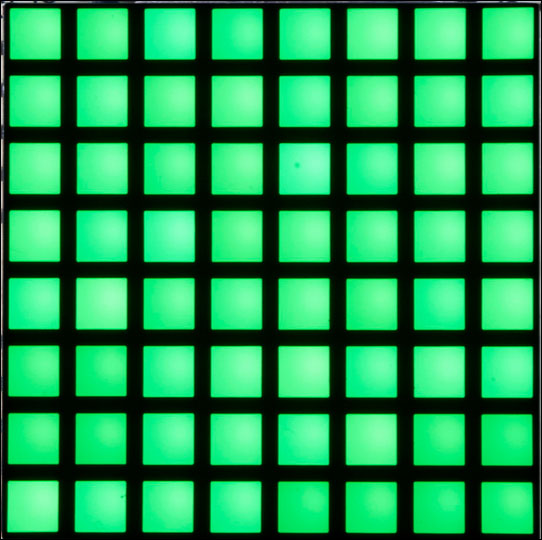
What we have done so far is connecting our client application to a specific server in order to provide a service—remember the translation we talked about before—dedicated to a device, which is our LED matrix.
From a larger point of view, we have seen a project that aims to implement some customized hardware.
You can easily adapt this project to use any hardware of your choice or any off-the-shelf modules available, as described in the cape paragraph from Chapter 5, Building Your Media Player.
The following are the questions and suggestions related to this example:
- Have you noticed that with the provided library the loop evolves in a particular sense?
- I've left a
clear_matrixfunction that is yet to be used: what needs to be implemented on the client side in order to request the matrix to be cleared? - You can imagine action words to create your own protocol, such as executing a predefined pattern, animation, and so on.
- Instead of using a hardcoded configuration, a cool improvement will be to parse an external file. For example, you can use
configparser(https://wiki.python.org/moin/ConfigParserExamples), or if you don't like INI files, the PyYAML syntax (http://pyyaml.org/wiki/PyYAML) is a good alternative.
As you have quickly acquired confidence with the previous example, I'm sure you want to improve your project, and different ideas might come to mind. We are going to implement some of them.
Based on the previous client-server scenario, it will be handy to add a graphical interface to the client in order to visually control the matrix. The GUI must be able to run on most known platforms, smartphones included.
We also want to control each LED color from the client side. Obviously, using all the available LED colors is now required, so we will add a dedicated control to the interface for this purpose.
In the previous example, our focus was on the basic concepts to validate the project; we now intend to improve it. On the other side, the main evolution of the server is to find a way to allow each LED to evolve one after the other in a "traditional" direction, that is, from the top-left to bottom-right.
Actually, this is not exactly true. If you take a look at the provided code, you can see that some more functionality has already been implemented, but we will see this at the end of this second part:

Using the Python language, Kivy is an open source library that can be used to code graphical interfaces easily. With Kivy, you can run your project's executable on many targets, such as Windows, Linux, OS X, Android, and iOS. Multitouch is something that is also possible.
You can obtain Kivy for different platforms from http://kivy.org/#download.
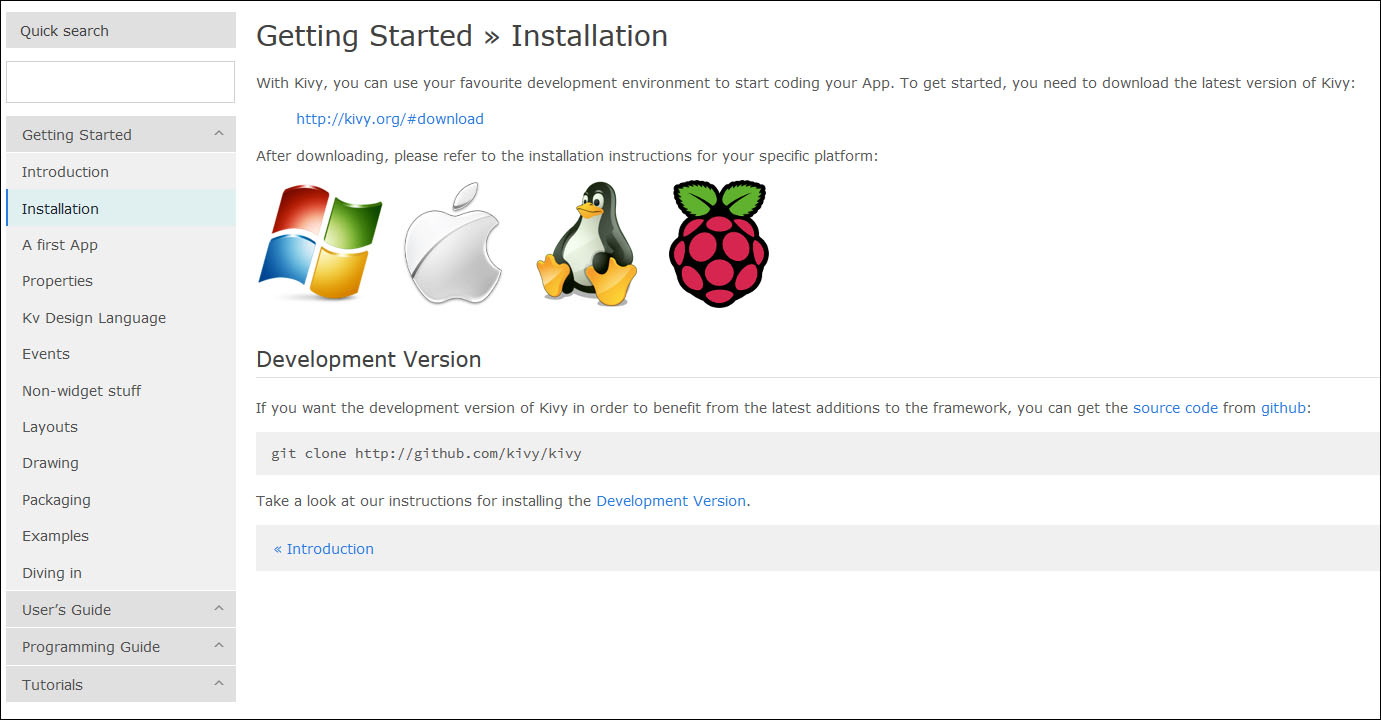
Please follow the installation guidelines (http://kivy.org/docs/installation/installation-windows.html for Windows users) in order to be able to use the following example.
The following screenshot shows how this second version is organized:
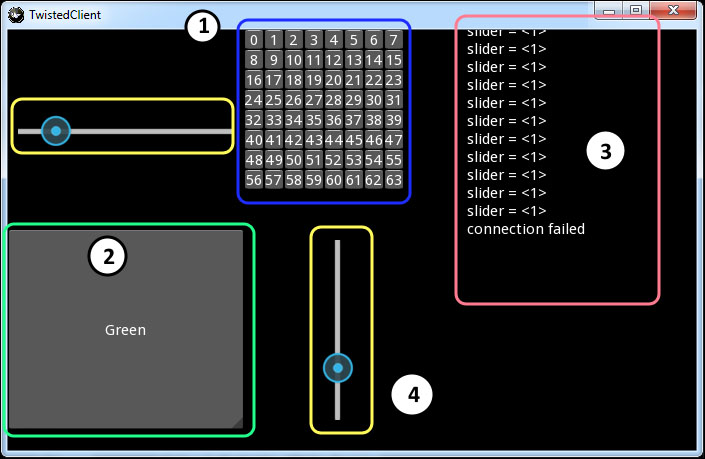
This application aims to be seen as a laboratory where you can have different experiments; therefore, no effort is put into the presentation, in order to focus on code simplicity for better understanding. Our laboratory is composed of the controls we spoke about in the improvements. Those controls can be split into four main groups, as follows:
- 64 buttons organized in a matrix, representing each LED individually. Each time you click on any button, you will see the corresponding LED lit on the matrix.
- A list of choices to select the color before you click on the matrix button.
- A log where you can see events, such as the current connection status of the board, some values, debugging information, and so on.
- Some additional splitters, which are kept for the last part of this example.
Sharing the same code as the previous example, this client comes with additional functionality anyway. Let's take a look at the code; it is shown in the following screenshot:

The build method from TwistedClientApp is called to execute setup_gui and connect_to_server.
Thus, the
Setup_gui method is the main method used to set up the interface, as shown here:
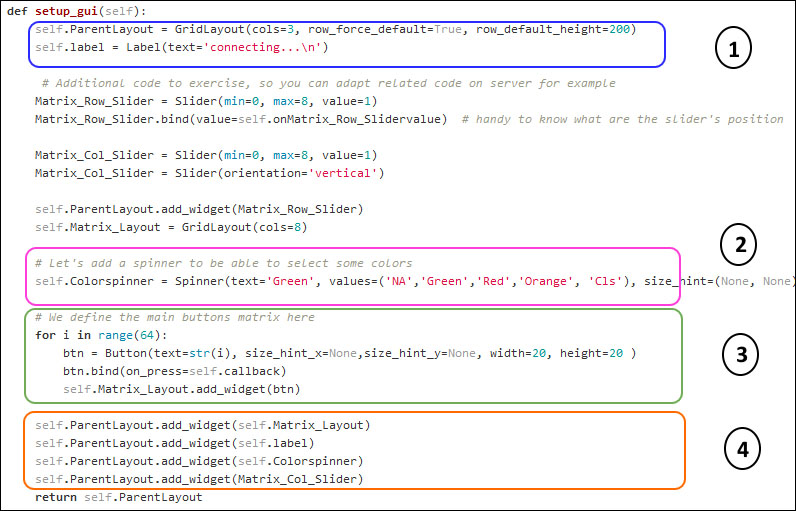
This is where you define which controls will be inserted and their arrangement, and more precisely their layout:
- Label: As we want to define our GUI on three different parts of the screen, the program relies on a grid layout. The method also defines a text zone dedicated to the communications with the board, debugging details, and so on.
- Spinner: This is a color selector when clicked on so that you can choose a color.
- A matrix made up of 64 buttons: Instead of defining all of them individually, a
forloop is in charge of instantiating all the buttons. We then associate (bind) each new button click event to a dedicated handler (callback). Let's take a look at this callback method; it is shown in the following screenshot:
- Layout management: We insert different controls in our grid layout, knowing that the order is important.
Each time a button is clicked, the related callback will be called. Then, in the callback, we can handle the event by doing some computations and eventually print out some text about which button has been pressed to the log window next to it.
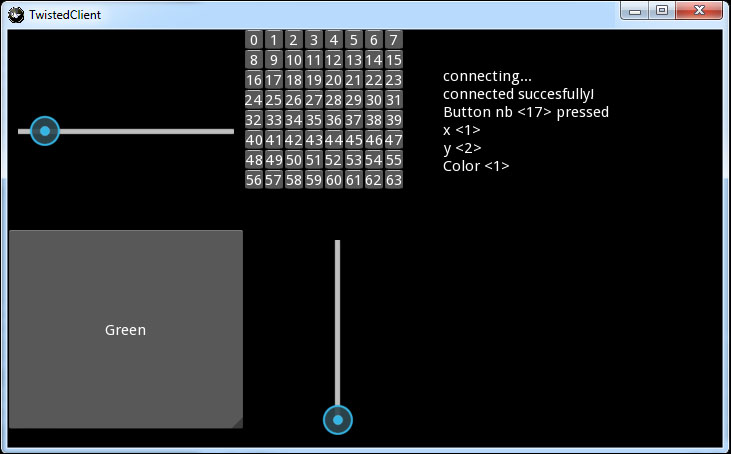
After playing along with the client, you can see your requests executed on the matrix and then some LEDS set with different colors, as shown in the following screenshot:

The Setup_Gui method is somewhat long; can you try to modify the implementation in order to follow the recommended object concepts?
It won't take much time to change the callback so that it can handle colors without selecting them from the list. Here's a hint: you can get inspired from the next example.
If you have taken a closer look at the client code, you might see that some elements are waiting to be used and some others are left for improvement. For example, while two sliders are present, only one slider is able to display values. Both are left for improvement, so you can use them for whatever you want.
The same applies to the server code; we didn't use the Bargraph code at all.
The previous two examples focused on experimentation, hardware understanding, and communication above others. That having been acquired, with the third example we will keep the same client/server basis, while we will leave the laboratory concept to set up a more realistic project. By doing this, we will be coding an application that will have a better ergonomy with a finest aspect.
To achieve this goal, we are going to change the client programing language to use C++ with the Qt framework. Even though the example is quite simple, you'll need some C++ and object-oriented programming (OOP) knowledge. Qt is a framework that will allow you to keep the code universality, as in the previous example with Kivy, with a wider range of targets. As there are many similarities, you can then legitimately ask yourself why you need to change all the code? In this case, Qt benefits from many years of research and community efforts. Moreover and mostly, Qt provides more than GUI programming capabilities. Indeed, this vast and polyvalent framework gives access to various mechanisms for networks, threads, state machines, process communication, and so much more.
For installation purposes, you need to retrieve the proper installer from the download URL at http://qt-project.org/downloads.
Along with this installer, an editor is also provided, so you can start coding/compiling right away.
Tip
After installation, to check your environment you can open QtCreator and start an empty Qt Widgets Application project. Compile it with the green triangle button on the left-hand side. As soon as you see a new empty application window popping up, this means that the compiler, the Qt Framework, and your settings are valid.
From now on, we will rely on QtCreator as the development environment. For the sake of everybody's spirit, everything is available from this environment. No external tools will be needed.
If you intend to develop projects but are afraid of C++ or Qt, then the Voidrealms website (http://www.voidrealms.com) is the solution for you.
There, the author has covered the most important subjects. From the very basic hello world to some advanced ones such as mutable, Model-View-Delegate, or QtConcurrent, you'll never waste a minute you spend there.
Indeed, behind the subjects that Voidrealms can explain, the concept is really attractive. Each topic is accompanied by a short video that allows you to get all the explanations, to finish each time with a single executable to understand and reproduce. The advantage of the video is that it has detailed explanations, and what is interesting is the mistakes that one can commit.
With most of the tutorials, you will also have a ZIP file of all the project sources of the video.
For those who already have some C++ skills and want to jump directly to Qt without an introduction, I've provided here the main topics that you'll find in our project:
- C++ Qt 04 - Signals and Slots
- C++ Qt 09 - QGridLayout
- C++ Qt 12 - QFile
- C++ Qt 13 - Resource Files
- C++ Qt 15 - QPushButton
- C++ Qt 36 - Introducing containers and the QList
- C++ Qt 63 - Introduction to Network Programming Concepts
- C++ Qt 65 - QTcpSocket basics
The previous example not only relies on the object programming paradigm but also on the way the information is represented. Indeed, while we will talk with the BeagleBone Black server in the same way, we'll configure the matrix on the computer with a totally different point of view by defining a more ergonomic GUI.

As we did in the previous chapters, let's list what is done in this third example, knowing that a pattern represents the status of all the LEDs in the matrix:
- The graphical interface reuses the matrix representation as shown previously but in a way that can be adapted to different square matrices. This is handy for anyone who needs to implement a matrix with a different size and a few modifications.
- The client is completely rewritten in C++ and uses Qt.
- Each LED's status and color is set directly by a single click of the button. This allows you to define a pattern with different colors quickly.
- When you think that your pattern is complete, you have the possibility of saving it into a file or sending it directly.
- You can remove a pattern from the list.
- There is, of course, the possibility of loading some patterns from a file.
From the previous paragraph, you might want to know how these new functionalities will interact together. The following schema should represent the main idea:

- Begin by editing your new pattern and validate it by saving it
- This allows you to keep it in the list of all the patterns at the same time
- Then you can send it to the BeagleBone server with the server code running
- Alternatively, you can also save the pattern to a file
- You can start the application by directly loading some previously saved patterns as well
As you have previously cloned the repository, the related Qt code is already in your hands and you simply need to change the directory from Client2 to Client/Qt. Then perform the following steps:
- In the new directory, you should see a bunch of CPP and HPP files.
- Now, launch QtCreator and, from the File menu, select the Open File or Project submenu.
- From the file's dialog box, select the
Led_Matrix.profile from the directory you found in step 1.
In the opened project, you can have a look at the code, compile it, and eventually modify it as well.
For now, we just compile it by clicking on the green triangle on the bottom-left.
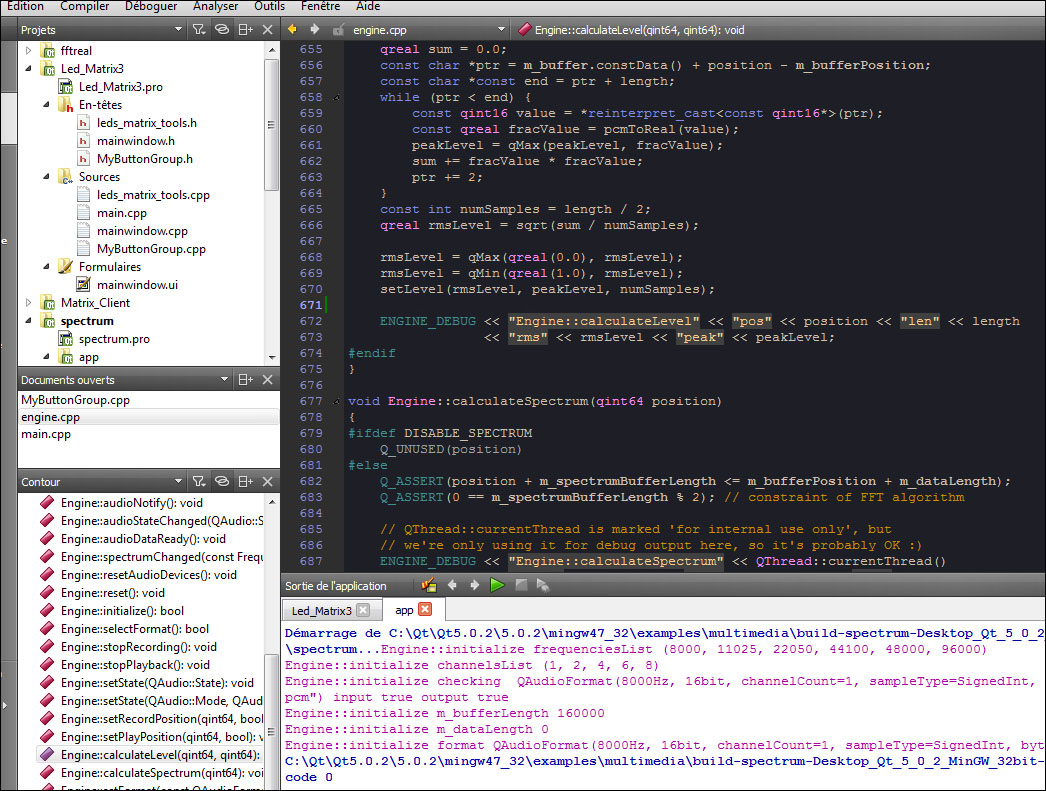
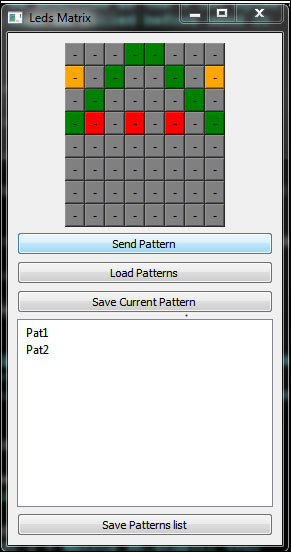
During the compilation, the output window displays some hints about eventual errors and warnings. On a successful build, the leds_matrix executable is displayed here:
Of course, you won't have a drawing like this one at the start. You need to load your Load patterns file to start sending your patterns.
You can now see how the
Led_Matrix Qt application differs from the Kivy version.
The same matrix representation is used to let you design your pattern in the same way as before. However, an improvement has been made, as you don't have to select the color each time you click on a cell.
Indeed, the click follows a color cycle, as shown here:
Off -> Green -> Orange -> Red
This circular cycle ensures that the button is in the Off state again after the color Red. As soon as you are happy with your pattern, save it.
This adds your creation to the patterns list. Let's just use this single pattern for the moment.
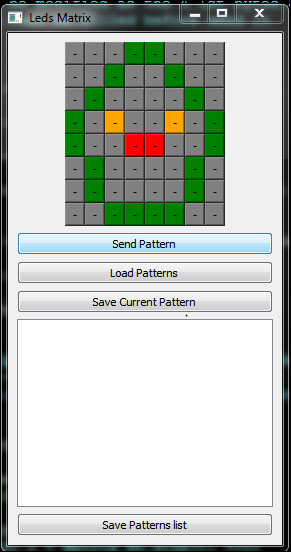
Now, click on Send pattern, which will read your pattern from the list and send it to the server. You should now see your matrix from the server cloning the pattern defined in the client, as shown in the following screenshot:
Obviously, the fun lies in defining different patterns to send to the matrix in order to end up with a cool animation. Don't hesitate to share your patterns by proposing them in the repository.
With this third example, I'd like to introduce you to a different approach for coding. The starting point is the main where an instance is created. The project is coded along two different classes:
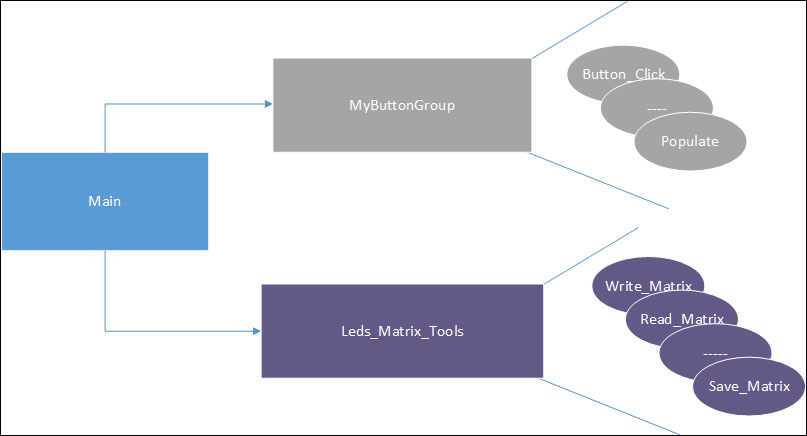
Adding code for 64 items individually is not viable; the object paradigm is done to avoid it. Thus, we don't have to create, instantiate, and code an event for each LED one by one in the graphical matrix. This is why MyButtonGroup was derived from the original QButtonGroup class.
Then, each item in the matrix has a SIGNAL/SLOT connection:
connect(this,SIGNAL(buttonClicked(QAbstractButton*)),
this, SLOT(buttonClick(QAbstractButton*)));
This helps us to create a dedicated event, as shown in the following screenshot:

We are now free to add anything we want in the ButtonClick event handler. Therefore, this is the place to compute a button's position according to the *button pointer that is given as a call parameter.
However, this is not enough. The graphical buttons matrix has been separated from its logical representation. This is the role of the following command:
QStringList Leds_Matrix ;
This aims to define a list of matrices. In addition, the idea is to use the functions provided with this container class—reverting, searching, removing, finding the first, last, and so on—so that you can create your own graphical algorithms in an easier way.
Some transformations within switch are done because even though we know which button has been clicked, we still ignore its position in the matrix. After this small calculation, it's easy to affect the buttons due to the color-changing cycle. By the way, we also update the logical matrix data.
Here is an overview of the other main functions:
Clear(): This aims to empty the current pattern in the patterns list. This is used whenLeds_Matrixneeds to be reset from the constructor mainly.Savefile_click(): This is an event handler relied to theSave_To_Filemethod, which will parse all the patterns and save them to the local file.Save_To_File(QString Filename): This parsespatterns_listto save all the patterns in the list into a local file.Loadfile_click(): This is an event handler relied to theLoad_From_Filemethod.Load_From_File(QString Filename): This parses the local file to retrieve all the saved patterns in order to restore the patterns list.Populate(QGridLayout *layout, MyButtonGroup* group ): This is called only once, at the beginning of the application in order to initiate the graphical matrix.Read_Matrix(unsigned short x): This a low-level function that takes a row/column and returns the color value found at these coordinates.Write_Matrix(unsigned short x, unsigned short y, unsigned short value): This a low-level function that takes a row/column to write the color value at these coordinates.Save_Pattern_click(): This will walk through all the patterns loaded in memory and send them to the server. A small conversion is needed here to transform an array-like data into our three-data protocol (x, y, and color).
The questions and thoughts related to this example are given as follows:
- Did you notice that while the server is developed in Python, the C++ client can communicate with it. How is this possible?
- Try to find the limitations of this approach.
- What will you do if you intend to modify the time delay of the animation? Try to identify the part of the code related to this functionality.
- Will you apply this change in the client or from the server code?
- It's legitimate to question yourself when you intend to develop a new functionality in your project. Take a moment to compare both the client and server sides, as they each have their pros and cons.