
Now that we have the energy matrix, we are ready to compute the seams. We need to find the path through the image with the least energy. Computing all the possible paths is prohibitively expensive, so we need to find a smarter way to do this. This is where dynamic programming comes into the picture. In fact, seam carving is a direct application of dynamic programming. We need to start with each pixel in the first row and find our way to the last row. In order to find the path of least energy, we compute and store the best paths to each pixel in a table. Once we've construct this table, the path to a particular pixel can be found by backtracking through the rows in that table.
For each pixel in the current row, we calculate the energy of three possible pixel locations in the next row that we can move to, that is, bottom left, bottom, and bottom right. We keep repeating this process until we reach the bottom. Once we reach the bottom, we take the one with the least cumulative value and backtrack our way to the top. This will give us the path of least energy. Every time we remove a seam, the width of the image decreases by 1. So we need to keep removing these seams until we arrive at the required image size.
Let's consider our ducks image again. If you compute the first 30 seams, it will look something like this:
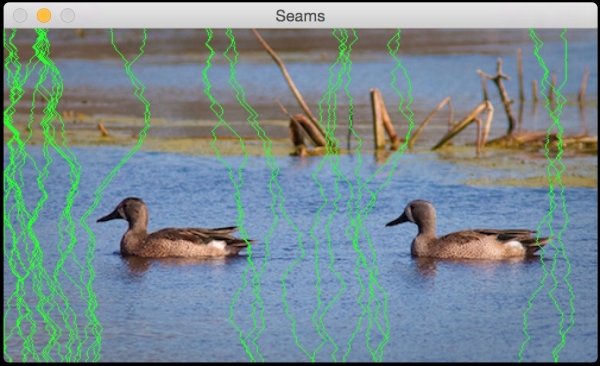
These green lines indicate the paths of least importance. As we can see here, they carefully go around the ducks to make sure that the interesting regions are not touched. In the upper half of the image, the seams go around the twigs so that the quality is preserved. Technically speaking, the twigs are also "interesting". If you continue and remove the first 100 seams, it will look something like this:

Now, compare this with the naively resized image. Doesn't it look much better? The ducks look nice in this image.
Let's take a look at the code and see how to do it:
import sys

import cv2
import numpy as np

# Draw vertical seam on top of the image
def overlay_vertical_seam(img, seam):
    img_seam_overlay = np.copy(img) x

    # Extract the list of points from the seam
    x_coords, y_coords = np.transpose([(i,int(j)) for i,j in enumerate(seam)])

    # Draw a green line on the image using the list of points
    img_seam_overlay[x_coords, y_coords] = (0,255,0)
    return img_seam_overlay

# Compute the energy matrix from the input image
def compute_energy_matrix(img):
    gray = cv2.cvtColor(img, cv2.COLOR_BGR2GRAY)

    # Compute X derivative of the image
    sobel_x = cv2.Sobel(gray,cv2.CV_64F,1,0,ksize=3)

    # Compute Y derivative of the image
    sobel_y = cv2.Sobel(gray,cv2.CV_64F,0,1,ksize=3)

    abs_sobel_x = cv2.convertScaleAbs(sobel_x)
    abs_sobel_y = cv2.convertScaleAbs(sobel_y)

    # Return weighted summation of the two images i.e. 0.5*X + 0.5*Y
    return cv2.addWeighted(abs_sobel_x, 0.5, abs_sobel_y, 0.5, 0)

# Find vertical seam in the input image
def find_vertical_seam(img, energy):
    rows, cols = img.shape[:2]

    # Initialize the seam vector with 0 for each element
    seam = np.zeros(img.shape[0])

    # Initialize distance and edge matrices
    dist_to = np.zeros(img.shape[:2]) + sys.maxint
    dist_to[0,:] = np.zeros(img.shape[1])
    edge_to = np.zeros(img.shape[:2])

    # Dynamic programming; iterate using double loop and compute the paths efficiently
    for row in xrange(rows-1):
        for col in xrange(cols):
            if col != 0:
                if dist_to[row+1, col-1] > dist_to[row, col] + energy[row+1, col-1]:
                    dist_to[row+1, col-1] = dist_to[row, col] + energy[row+1, col-1]
                    edge_to[row+1, col-1] = 1

            if dist_to[row+1, col] > dist_to[row, col] + energy[row+1, col]:
                dist_to[row+1, col] = dist_to[row, col] + energy[row+1, col]
                edge_to[row+1, col] = 0

            if col != cols-1:
                if dist_to[row+1, col+1] > dist_to[row, col] + energy[row+1, col+1]:
                    dist_to[row+1, col+1] = dist_to[row, col] + energy[row+1, col+1]
                    edge_to[row+1, col+1] = -1

    # Retracing the path
    seam[rows-1] = np.argmin(dist_to[rows-1, :])
    for i in (x for x in reversed(xrange(rows)) if x > 0):
        seam[i-1] = seam[i] + edge_to[i, int(seam[i])]

    return seam

# Remove the input vertical seam from the image
def remove_vertical_seam(img, seam):
    rows, cols = img.shape[:2]

    # To delete a point, move every point after it one step towards the left
    for row in xrange(rows):
        for col in xrange(int(seam[row]), cols-1):
            img[row, col] = img[row, col+1]

    # Discard the last column to create the final output image
    img = img[:, 0:cols-1]
    return img

if __name__=='__main__':
    # Make sure the size of the input image is reasonable.
    # Large images take a lot of time to be processed.
    # Recommended size is 640x480.
    img_input = cv2.imread(sys.argv[1])

    # Use a small number to get started. Once you get an
    # idea of the processing time, you can use a bigger number.
    # To get started, you can set it to 20.
    num_seams = int(sys.argv[2])

    img = np.copy(img_input)
    img_overlay_seam = np.copy(img_input)
    energy = compute_energy_matrix(img)

    for i in xrange(num_seams):
        seam = find_vertical_seam(img, energy)
        img_overlay_seam = overlay_vertical_seam(img_overlay_seam, seam)
        img = remove_vertical_seam(img, seam)
        energy = compute_energy_matrix(img)
        print 'Number of seams removed =', i+1

    cv2.imshow('Input', img_input)
    cv2.imshow('Seams', img_overlay_seam)
    cv2.imshow('Output', img)
    cv2.waitKey()