
OpenCV comes preinstalled with a range of sophisticated classifiers for general-purpose object detection. Perhaps, the most commonly known detector is the cascade of Haar-based feature detectors for face detection, which was invented by Paul Viola and Michael Jones.
Every book on OpenCV should at least mention the Viola–Jones face detector. Invented in 2001, this cascade classifier disrupted the field of computer vision, as it finally allowed real-time face detection and face recognition.
The classifier is based on Haar-like features (similar to Haar basis functions), which sum up the pixel intensities in small regions of an image, as well as capture the difference between adjacent image regions. Some example rectangle features are shown in the following figure, relative to the enclosing (light gray) detection window:

Here, the top row shows two examples of an edge feature, either vertically oriented (left) or oriented at a 45 degree angle (right). The bottom row shows a line feature (left) and a center-surround feature (right). The feature value for each of these is then calculated by summing up all pixel values in the dark gray rectangle and subtracting this value from the sum of all pixel values in the white rectangle. This procedure allowed the algorithm to capture certain qualities of human faces, such as the fact that eye regions are usually darker than the region surrounding the cheeks.
Thus, a common Haar feature would have a dark rectangle (representing the eye region) atop a bright rectangle (representing the cheek region). Combining this feature with a bank of rotated and slightly more complicated wavelets, Viola and Jones arrived at a powerful feature descriptor for human faces. In an additional act of genius, these guys came up with an efficient way to calculate these features, making it possible for the first time to detect faces in real-time.
Even better, this approach does not only work for faces but also for eyes, mouths, full bodies, company logos, you name it. A number of pre-trained classifiers can be found under the OpenCV install path in the data folder:
|
Cascade classifier type |
XML file name |
|---|---|
|
Face detector (default) |
|
|
Face detector (fast Haar) |
|
|
Eye detector |
|
|
Mouth detector |
|
|
Nose detector |
|
|
Full body detector |
|
In this chapter, we will use haarcascade_frontalface_default.xml, haarcascade_lefteye_2splits.xml, and haarcascade_righteye_2splits.xml.
A cascade classifier can be loaded and applied to a (grayscale!) image frame with the following code:
import cv2

frame = cv2.imread('example_grayscale.jpg', cv2.CV_8UC1)face_casc = cv2.CascadeClassifier('haarcascade_frontalface_default.xml')
faces = face_casc.detectMultiScale(frame, scaleFactor=1.1,
    minNeighbors=3)
The detectMultiScale function comes with a number of options:
minFeatureSize: The minimum face size to consider (for example, 20 × 20 pixels).searchScaleFactor: Amount by which to rescale the image (scale pyramid). For example, a value of 1.1 will gradually reduce the size of the input image by 10 percent, making it more likely for a face to be found than a larger value.minNeighbors: The number of neighbors each candidate rectangle should have to retain it. Typically, choose 3 or 5.flags: Options for old cascades (will be ignored by newer ones). For example, whether to look for all faces or just the largest (cv2.cv.CASCADE_FIND_BIGGEST_OBJECT).
If detection is successful, the function will return a list of bounding boxes (faces) that contain the coordinates of the detected face regions:
for (x, y, w, h) in faces:
    # draw bounding box on frame
    cv2.rectangle(frame, (x, y), (x + w, y + h), (100, 255, 0), 2)
Note
If your pre-trained face cascade does not detect anything, a common reason is usually that the path to the pre-trained cascade file could not be found. In this case, CascadeClassifier will fail silently. Thus, it is always a good idea to check whether the returned classifier casc = cv2.CascadeClassifier(filename) is empty, by checking casc.empty().
All relevant face detection code for this chapter can be found as part of the FaceDetector class in the detectors module. Upon instantiation, this class loads three different cascade classifiers that are needed for preprocessing: a face cascade and two eye cascades.
import cv2
import numpy as np


class FaceDetector:
    def __init__(
        self, face_casc='params/haarcascade_frontalface_default.xml',left_eye_casc='params/haarcascade_lefteye_2splits.xml',right_eye_casc='params/haarcascade_righteye_2splits.xml',scale_factor=4):
Because our preprocessing requires a valid face cascade, we make sure that the file can be loaded. If not, we print an error message and exit the program:
        self.face_casc = cv2.CascadeClassifier(face_casc)
        if self.face_casc.empty():
            print 'Warning: Could not load face cascade:',
                face_casc
            raise SystemExit
For reasons that will become clear in just a moment, we also need two eye cascades, for which we proceed analogously:
        self.left_eye_casc = cv2.CascadeClassifier(left_eye_casc)
        if self.left_eye_casc.empty():
            print 'Warning: Could not load left eye cascade:', left_eye_casc
            raise SystemExit
        self.right_eye_casc =
            cv2.CascadeClassifier(right_eye_casc)
        if self.right_eye_casc.empty():
            print 'Warning: Could not load right eye cascade:', right_eye_casc
            raise SystemExit
Face detection works best on low-resolution grayscale images. This is why we also store a scaling factor (scale_factor) so that we can operate on downscaled versions of the input image if necessary:
self.scale_factor = scale_factor
Faces can then be detected using the detect method. Here, we ensure that we operate on a downscaled grayscale image:
def detect(self, frame):
    frameCasc = cv2.cvtColor(cv2.resize(frame, (0, 0), fx=1.0 / self.scale_factor, fy=1.0 / self.scale_factor), cv2.COLOR_RGB2GRAY)
    faces = self.face_casc.detectMultiScale(frameCasc,
        scaleFactor=1.1, minNeighbors=3,
        flags=cv2.cv.CV_HAAR_FIND_BIGGEST_OBJECT) * self.scale_factor
If a face is found, we continue to extract the head region from the bounding box information and store the result in head:
for (x, y, w, h) in faces:
    head = cv2.cvtColor(frame[y:y + h, x:x + w], cv2.COLOR_RGB2GRAY)
We also draw the bounding box onto the input image:
cv2.rectangle(frame, (x, y), (x + w, y + h), (100, 255, 0), 2)
In case of success, the method should return a Boolean indicating success (True), the annotated input image (frame), and the extracted head region (head):
return True, frame, head
Otherwise, if no faces were detected, the method indicates failure with a Boolean (False) and returns the unchanged input image (frame) and None for the head region:
return False, frame, None
After a face has been detected, we might want to preprocess the extracted head region before applying classification on it. Although the face cascade is fairly accurate, for recognition, it is important that all the faces are upright and centered on the image. This idea is best illustrated with an image. Consider a sad programmer under a tree:
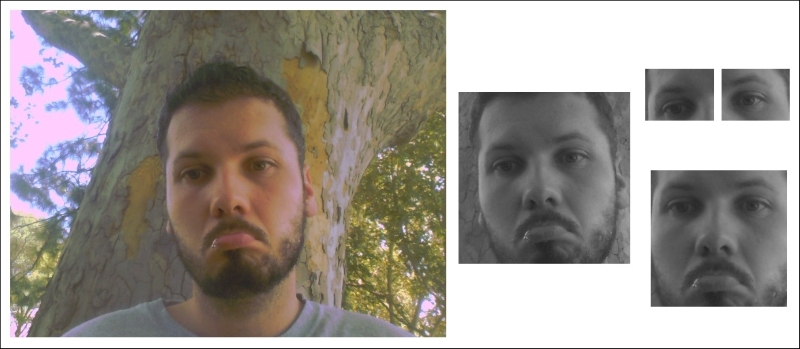
Because of his emotional state, the programmer tends to keep his head slightly tilted to the side while looking down. The facial region as extracted by the face cascade is shown as the leftmost grayscale thumbnail on the right. In order to compensate for the head orientation, we aim to rotate and scale the face so that all data samples will be perfectly aligned. This is the job of the align_head method in the FaceDetector class:
def align_head(self, head):
    height, width = head.shape[:2]
Fortunately, OpenCV comes with a few eye cascades that can detect both open and closed eyes, such as haarcascade_lefteye_2splits.xml and haarcascade_righteye_2splits.xml. This allows us to calculate the angle between the line that connects the center of the two eyes and the horizon so that we can rotate the face accordingly. In addition, adding eye detectors will reduce the risk of having false positives in our dataset, allowing us to add a data sample only if both the head and the eyes have been successfully detected.
After loading these eye cascades from file in the FaceDetector constructor, they are applied to the input image (head):
    left_eye_region = head[0.2*height:0.5*height, 0.1*width:0.5*width]
    left_eye = self.left_eye_casc.detectMultiScale(left_eye_region, scaleFactor=1.1, minNeighbors=3, flags=cv2.cv.CV_HAAR_FIND_BIGGEST_OBJECT)
Here, it is important that we pass only a small, relevant region (left_eye_region; compare small thumbnails in the top-right corner of the preceding figure) to the eye cascades. For simplicity, we use hardcoded values that focus on the top half of the facial region and assume the left eye to be in the left half.
If an eye is detected, we extract the coordinates of its center point:
left_eye_center = None
for (xl, yl, wl, hl) in left_eye:
    # find the center of the detected eye region
    left_eye_center = np.array([0.1 * width + xl + wl / 2, 0.2 * height + yl + hl / 2])
    break # need only look at first, largest eye
Then, we proceed to do the same for the right eye:
right_eye_region = head[0.2*height:0.5*height, 0.5*width:0.9*width]
right_eye = self.right_eye_casc.detectMultiScale(right_eye_region, scaleFactor=1.1, minNeighbors=3,flags=cv2.cv.CV_HAAR_FIND_BIGGEST_OBJECT)
right_eye_center = None
for (xr, yr, wr, hr) in right_eye:
    # find the center of the detected eye region
    right_eye_center = np.array([0.5 * width + xr + wr / 2, 0.2 * height + yr + hr / 2])
    break  # need only look at first, largest eye
As mentioned earlier, if we do not detect both the eyes, we discard the sample as a false positive:
if left_eye_center is None or right_eye_center is None:
    return False, head
Now, this is where the magic happens. No matter how crooked the face that we detected is, before we add it to the training set, we want the eyes to be exactly at 25 percent and 75 percent of the image width (so that the face is in the center) and at 20 percent of the image height:
desired_eye_x = 0.25
desired_eye_y = 0.2
desired_img_width = 200
desired_img_height = desired_img_width
This can be achieved by warping the image using cv2.warpAffine (remember Chapter 3, Finding Objects via Feature Matching and Perspective Transforms?). First, we calculate the angle (in degrees) between the line that connects the two eyes and a horizontal line:
eye_center = (left_eye_center + right_eye_center) / 2
eye_angle_deg = np.arctan2(
    right_eye_center[1] – left_eye_center[1],
    right_eye_center[0] – left_eye_center[0]) *
    180.0 / cv2.cv.CV_PI
Then, we derive a scaling factor that will scale the distance between the two eyes to be exactly 50 percent of the image width:
eye_size_scale = (1.0 - desired_eye_x * 2) * desired_img_width / np.linalg.norm(right_eye_center – left_eye_center)
With these two parameters (eye_angle_deg and eye_size_scale) in hand, we can now come up with a suitable rotation matrix that will transform our image:
rot_mat = cv2.getRotationMatrix2D(tuple(eye_center), eye_angle_deg, eye_size_scale)
We make sure that the center of the eyes will be centered in the image:
rot_mat[0,2] += desired_img_width*0.5 – eye_center[0]
rot_mat[1,2] += desired_eye_y*desired_img_height – eye_center[1]
Finally, we arrive at an upright scaled version of the facial region that looks like the lower-right thumbnail of the preceding image:
res = cv2.warpAffine(head, rot_mat, (desired_img_width, desired_img_height))
return True, res