2
How to Manage Content
In the previous chapter, we had a look at the backend application of Joomla, introduced the dashboard, and checked the components included in the standard setup of the CMS.
We’ll now look at the central functionalities of the application; the features dedicated to content management. We’ll see how to structure and manage content within Joomla, comparing the content handling features to other major CMSes.
We’ll also have a look at Categories, Featured Articles, blog functionalities, and the Media Manager.
After reading this chapter, you will be able to do the following:
- Understand how to create a new article in Joomla
- Understand how to define a structure and hierarchy for your content through categories
- Explore publishing options
- Explore article options
- Be familiar with the Media Manager, which is integrated into Joomla, and its functionalities
- Understand the difference between Joomla and WordPress in content management
Exploring articles in Joomla
Articles are the basic units of content in Joomla. An article is a piece of content that might include text, HTML code, images, or media that links to other content. Think about a news website: every news story is an article in Joomla, or if you think about a blog, every blog post is an article in Joomla.
Articles have a title, content, and should be assigned to a category. If you do not define any custom categories, there is always a default category called Uncategorized.
In the upcoming sections, we will see how to create an article and the features offered by the integrated editor.
Creating a new article
Articles can be inserted into a website either through the backend or the frontend of Joomla.
Both provide an editor that simplifies the content creation process, supplying a What You See Is What You Get (WYSIWYG) visual experience. This allows website authors and administrators to create HTML content without having to directly type HTML code.
- To create a new article, click on the + symbol next to the Articles button on the backend dashboard of Joomla, as highlighted in Figure 2.1.
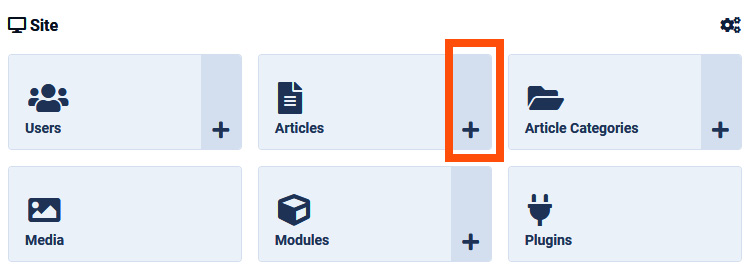
Figure 2.1 – New article button
Note
There are multiple ways to create new articles. You can also create a new article by clicking the + symbol near Articles from the Content Dashboard menu item or the Content menu item in the left sidebar menu.

Figure 2.2 – Creating a new article
At the top of the screen, we have the toolbar that hosts the action buttons. These buttons will allow you to save your article, cancel and go back to the previous screen, open the inline help, or check the support pages.
The first field is Title, which allows you to specify the title of the article. This can be any short sentence that describes the content of your article.
The second field is Alias. The content of this field is used to build the URL of the article page, once published. This field should be filled with an SEO-oriented slug that should not include white spaces or special characters (for example, if your article is named Title of my article, Alias should be something such as title-of-my-article).
After these fields there are some tabs, the first and most important one is the Content tab.
Content
The Content tab, as the name suggests, is dedicated to the content of the article. The central part of this screen shows a text editor box in which you can insert the content of your article. The editor grants an MS Word-like experience, with a simplified user interface and classic text-editing controls and buttons.
The editor offers more controls and functionalities that can be enabled by clicking on the … button.

Figure 2.3 – Full editor toolbar
Here, you have all the commonly used features to insert and style rich text: bold, italics, underlined, font size, font style, paragraph style, tables, and much more.
It’s also possible to disable the WYSISYG editor and directly type the HTML code in to the article editing window. To disable the editor, just click on the Toggle Editor button placed under the editing window.
As you can see in Figure 2.2, the right sidebar includes the following fields:
- Status: Allows you to define whether an article should be Published, Unpublished, Archived, or Trashed.
- Category: Allows you to choose the category the article should be tied to. Through this field, you can also create a new category on the fly. We will learn more about categories later in this chapter.
- Featured: Allows you to choose whether an article is featured or not. We’ll see what this means later in this chapter.
- Access: Allows you to select which user group should be granted access to the article.
- Tags: Allows you to add tags to the article. There can be one or more tags. Through this field, you can also create new tags on the fly.
- Note: Allows you to create an internal note regarding the article. This can be useful for administrative purposes and is not visible on the published website.
- Version Note: Allows you to add an internal note related to the specific version of the article. In fact, Joomla includes a versioning system that keeps track of the changes to articles, saving a version of it at each saving action.
One of these fields, Featured, has some significance on how and where the article appears. Let’s look into this in detail.
Featured Articles
As seen in Figure 2.2, one of the options that could be actioned for the article is the Featured status. This option allows you to highlight the article and include it in a specific list of articles that are featured.
There is a specific menu item that is called Featured Articles, which shows all the articles that are featured and is generally used to build the home page of a website.
Joomla also allows you to define a period for which the article should be featured. This is useful when you want to highlight a specific article for a limited time. This, and other settings, can be configured in the Publishing tab of the article creation/editing view, which we will explore in the next section.
Let’s move on to the second tab of the editing screen, Images and Links.
Images and Links
On this screen, you can enrich your article by adding images and links to it. There are two types of images that can be added to an article: Intro Image and Full Article image.
Intro Image is the image that is shown with the introduction of the article (the part before Read More). It is generally visible when you have a blog layout or a category layout.
The Full Article image is shown when you open the article page, that is, on the page where the full content of the article is visible.

Figure 2.4 – Intro Image options
For each of the images, you can specify several options as you can see in Figure 2.4. This includes Image Description, which is the alternative text in the HTML markup, a Caption box to add a caption that is visible below the image, and Image Class, which is the CSS class that should be used to display the image on a public website.
Images can be selected from the image folders of the website or easily uploaded from your computer.
On the same screen, you have also the opportunity to add links to your article. They should be used to add some references to online resources and, depending on your frontend templates, they are displayed on the public website as links to the article. For each of the links, you can specify the target URL, the anchor text, and the browser target window.
Once the article is ready to be saved, you can click on one of the following buttons in the toolbar (as seen earlier, in Figure 2.2):
- Save: Save the article and continue to work on it. Useful while working on long articles or materials that take a long time to edit.
- Save & Close: Save the article and go back to the Articles list.
- Save To Menu: Save the article and open the new menu item screen to create a menu item that points to the article.
- Save as Copy: Create a copy of the article.
With this, we’ve seen how to create and save our articles. Let’s now explore all the options to publish and optimize an article.
Exploring Publishing and SEO settings
The Publishing tab is divided into two main parts. The left one is related to the Publishing settings, and the right one is dedicated to Metadata and SEO options.

Figure 2.5 – The Publishing settings
Let’s analyze the options available on the Publishing screen (Figure 2.5):
- Start Publishing: Allows you to set the date/time that the article should be published. It’s automatically set to the current date/time. You can set a date and time in the future, allowing you to schedule the automatic publication of an article.
- Finish Publishing: Allows you to set the date/time that the article should be suspended from publication. Generally, this field is empty when the article should not be unpublished automatically.
- Start Featured: Allows you to set the date/time that the article should be set as featured. This field is optional and is related to the feature presented in the earlier paragraph.
- Finish Featured: Allows you to set the date/time that the article’s featured status should end. This field is optional and should be left empty if you don’t want to remove the featured status.
- Created Date: This field is automatically set with the date and time that the article is created in the system. It can be edited through the calendar button next to the field.
- Created By: Shows the name of the user who authored the article. The author of the article can be changed at your convenience, by selecting one of the other users of the system.
- Created by Alias: Allows you to set a custom name for the author, even if the author does not have an account on the website.
- Modified Date: Displays the date and time that the article has last been changed. This field is not changeable and is filled automatically.
- Modified By: Shows the user who last changed the article.
- Revision: Displays the number of the current revision of the article.
- Hits: Shows the number of hits received by the article. A hit is recorded each time the article is viewed in the frontend of the website.
- ID: Displays the unique ID of the article within the system.
The right side of the screen, as mentioned earlier, shows options oriented to the SEO of the website, as seen in Figure 2.6.

Figure 2.6 – Article SEO options
These settings will allow you to set some important options that affect the SEO of the article:
- Meta Description: Allows you to specify a meta description for the article. The field is limited to 160 characters and will produce the respective HTML metatag in the markup of the page.
- Keywords: Allows you to specify the keywords of the article. Keywords should be separated by commas. It’s recommended that you put a limited number of keywords for each article.
- Robots: Allows you to define the rule for the robots.txt file for the specific page. You can choose from the most common options or leave the default Use Global value that is set in the Global Configuration of the website.
- Author: Allows you to set the meta tag Author for the article.
- Content Rights: Allows you to specify the content rights and rules for the article, for example, indicating the license for the article.
Thanks to all the settings seen in this paragraph, you can enrich the HTML markup of your article, optimize the article for search engines, and automate the publication of your content. In the following section, we’ll explore the Options tab.
Article Options
The next tab on the article editing screen is the Options tab, which supplies many settings to customize the appearance and layout of an article.
Options are shown in separate groups: Layout, Category, Author, Date, and Options. Let’s explore each of them.
The Layout group
The settings in this group allow you to customize the layout of the article and offer a few options to select from, as shown in Figure 2.7.

Figure 2.7 – Article options – Layout
These options enable you to choose a specific layout for the article. This is useful if you have overrides (which will be covered in Chapter 13) for your template and to decide whether or not to show the title of the article, the title with a link, the tags associated with the article, and the introduction text. You can also choose whether or not to show the box with the article details (including author, publishing date, category, and so on) and in which position.
Note
Intro Text is the content of the article that is placed before Read More. Read More is an interruption of the content of the article that can be placed in the article to separate the introductory part of the article from the rest of the article. It’s generally used on news websites and in blog layouts to show the summary of the article in a multiple-article view.
Next, let’s take a look at the Category group.
The Category group
The settings in this group allow administrators to choose whether or not to show information about the category next to the article.

Figure 2.8 – Article options – Category
If you enable the Link Category option, there will be a link to the Category view directly in the article details box, allowing your website visitors to navigate to the list of articles in the same category.
The Author group
There are only a couple of options to choose from in this group, as you can see in the following figure:

Figure 2.9 – Article options – Author
The Author group holds controls that allow the administrator to choose whether to show the author’s name next to the article and whether to link the name of the author to a contact page.
The Date group
The controls included in the Date group allow the administrator to choose whether to show the dates of the article or not.

Figure 2.10 - Article options – Date
These dates are the Creation date, Modification date, and Publishing date. They are shown in the article details box and the appearance is controlled by the template in use.
The Options group
The last group of options, as shown in Figure 2.11, allows the administrator to show some extra details of the article.

Figure 2.11 – Article options – Options
These include Navigation, which shows the previous and next buttons used to navigate between articles of the same category, the hits received by the article, and Unauthorised Links. You can also customize Read More Text and Browser Page Title, shown in the browser tab.
As you might have noticed, for many of the options available, the field is populated with the Use Global value. That is because you can set these settings globally for your articles directly in the configuration of the Articles component. This way, you do not have to set the configuration specifically for each article.
You can access the configuration of the Articles component by clicking on the Options button in the toolbar when the list of articles is opened.
With this, we have a full understanding of the article creation options and settings, and we can successfully publish our articles. We will not cover the Permissions tab as we will explore the Access Control List (ACL) and permissions in Chapter 6. The settings in the Configure Edit Screen tab allow you to change the appearance of the page in which you edit the article.
When creating articles, there is a frequent need to add supporting images and media content (videos, animations, and more). This can be easily done from the Media section in the article editing screen, which allows you to upload your media files. In addition, sometimes you need to check the media files that you uploaded to your site and perform certain basic operations on them. To do so, Joomla offers the Media Manager, which we will explore in the next section.
Exploring the Media Manager
The Media Manager is one of the features rebuilt for Joomla 4 and includes many functionalities to load multimedia files and edit them directly online. This has simplified the publishing workflow for website administrators and editors.
The Media Manager is accessible from the Media button on Home Dashboard or from the Media menu item under the Content menu in the sidebar.
By default, the component shows a preview of images loaded in the main images folder (generally it’s the folder named images placed under public_html), as shown in Figure 2.12.

Figure 2.12 – The Media Manager
From this page, you can also navigate through the subfolders holding media files (images, videos, and animations), create new subfolders, and upload media files.
The Media Manager also allows you to perform several operations on the uploaded files. When you select media, you can see the available commands.

Figure 2.13 – Media Manager commands
In Figure 2.13, we can see a number of icons that help perform specific actions. Let us see what each one of them does:
- Magnifier icon: Show the preview of the image in real size
- Download icon: Download the file onto your device
- Text icon: Rename the file loaded on the website
- Pencil icon: Edit the media file
- Link icon: Copy the link to the media file
- Trash icon: Delete the media file
In the next section, we will explore the tools to edit media files online.
Media editing features
The new Media Manager includes some tools to perform basic editing operations directly online, without having to download the file and use graphics software such as Photoshop or GIMP. Let us take a look at the various features offered by Media Manager.
Crop
The first of the features included allows you to crop an image, set up the quality of the resulting image as a percentage, and define certain parameters to crop the image:
- X-Axis
- Y-Axis
- Width
- Height
- Aspect ratio
This feature is useful when you want to crop an image or keep just a part of it, helping you avoid loading huge images and increasing the weight of your web page.
Resize
The second editing feature included in the Media Manager allows you to resize an image, scaling it to the desired size. Again, you can configure some parameters to perform the action:
- Quality (in percentage)
- Width (in pixel)
- Height (in pixel)
The resize feature is very useful to ensure images have the proper size for your website.
Rotate
The last tool included in the Media Manager allows you to rotate images. You can set the quality of the resulting image and the angle of rotation. The tool provides some default angles: 0°, 90°, 180°, and 270°.
With these basic tools, you can prepare and optimize your images directly on your websites, without the need for any external software.
Let’s now understand how to organize articles through categories.
Getting to know categories
It’s important to know more about categories. Categories can be considered as the folders in which articles are classified and stored.
Each category can have an unlimited number of nested categories, allowing website administrators to create a structure that best fits their needs and accommodates complex website nesting levels.
Each article, as mentioned earlier in this chapter, must be assigned to a category. By default, Joomla supplies an Uncategorised category to hold articles. Website administrators can rename it or create any desired category.
It’s recommended to plan the structure of the website, prior to adding content, so that you can create all the needed categories and nest them, as it’s more convenient for the site structure. Categories are also used to build SEO-oriented navigation paths within the website, thanks to the category aliases included in the URLs of the generated pages.
Categories can be also used to handle different sections of the website, with access to resources differentiated by user groups, thanks to the permission management features included in Joomla. We will discuss more about permissions in Chapter 6 of this book.
Let us consider a sample scenario where you are building a website to hold your family recipes. A simple category structure could be as follows:
- Main Courses
- Beef
- Pork
- Seafood
- Vegetables
- Appetizers
- Salads
- Desserts
- Vegetarian
A structure like the one mentioned in the scenario would allow you to categorize your content in a meaningful way and let your users find the recipes easily.
Categories are a common pattern in Joomla. In fact, other components – either built-in or third-party – integrate the category management system.
With this, we’re done looking at the basics of content management in Joomla. Let’s quickly explore the differences between Joomla and WordPress.
Page, post, or article? That is the dilemma!
Now that we have a clear understanding of how to create and edit an article on our Joomla website, let’s spend some time clarifying some key concepts related to the content management features, and do a comparison with WordPress.
At the beginning of this chapter, we mentioned that articles in Joomla are the basic unit of content management. An article could be some news, a blog post, a recipe, a static page, or an announcement. The role of specific content within the website structure is not important while creating it.
This is the first key difference that WordPress users would notice while using Joomla. In WordPress, you should define the role of specific content prior to creating it, choosing, for example, whether you would like to create a blog post (using the Post feature) or whether you would like to create a static page (using the Page feature).
In Joomla, a unit of content can be created as an article, independent of its role within the website. Furthermore, the role of specific content might be changed at any time, simply because in Joomla you will use the menu items to decide how and where to show specific content.
An article might at the same time be a static page of the website – thanks to a Single Article menu item pointing to it – and part of a list of articles or a blog section – thanks to a Category view menu item pointing to the category that includes such an article. We’ll understand more about Joomla menus and their configuration in Chapter 5 of this book.
With this parallel between Joomla and WordPress content management features, we have completed the basics of articles. Let’s move on to exercises to start trying Joomla in action.
Exercises
It’s time to apply the knowledge acquired in the first chapters of the book and start using the Joomla backend.
To complete the exercises proposed in this chapter, you will need to have a Joomla 4.x installation either on your local machine or on a remote server.
Exercise 1 – categories
Open the backend of your Joomla installation, simply typing <yourwebsite.tld>/administrator – where yourwebsite.tld should be replaced with the URL of your installation – and type the administrator password chosen during the installation of Joomla.
Once logged in to the backend of Joomla, go to Article Categories and create a new category called MyCategory. You can set a personal description for the category and leave all the other options as their default values. MyCategory should be a top-level category. Save and go back to the Article Categories view.
Now create a new category named SubCategory1 and set it as a subcategory of MyCategory. Specify a personal description for the subcategory and save it. Then move back to the Home Dashboard screen of your backend.
Exercise 2 – articles
From the Home Dashboard screen, click on the button to create a new article (Figure 2.1). Add content at your convenience or simply two lines of text. Use the text-formatting features to highlight some text with bold and italic styles. Name the article My Article and let the system automatically apply the alias for the title. Put the article in the MyCategory category that you created in the previous exercise. Save and close the article. Congratulations, you created the first article on your website! You can also preview the article, after saving it, by clicking on the Preview button.
Summary
In this chapter, we explored the basic content management features of Joomla and understood how to create an article and configure the settings to customize the appearance of the article on a website, as well as how to use the Media Manager and handle images loaded on the website.
In the next chapter, we’ll go deeper into the content management features, introducing Custom Fields, Workflows, and built-in accessibility functionalities.