
10
Tailored Communication with Mail Templates
In the previous chapter, we explored the brand-new Scheduled Tasks feature, which allows you to configure your website so that it automatically executes actions regularly.
Now, we’ll look at Mail Templates, a feature that allows you to completely customize the communication style of your website.
After reading this chapter, you will be able to do the following:
- Use notifications as a branding item
- Understand how Mail Templates works
- Customize the look and feel of your website’s automated notifications
Let’s understand why customizing emails matters for a website.
Notifications as a branding item
Every company has a brand style guide that is used among all types of communication: newsletters, press releases, documents, and much more. Websites, especially those with advanced features such as e-commerce sites, generally send a lot of automated emails as a result of user actions (think about user registration, account activation, order confirmation, subscription expiration, and similar notifications).
Even for large corporate sites, some of those communications differ from the usual corporate style, especially automated emails for processes such as account creation/activation, where those emails are generally sent as simple text without graphics or style. This is in contrast to newsletters, which are well-styled and prepared with specific graphics.
Furthermore, in some countries, a company may be obliged by the law to include some company details, such as the company’s name, VAT ID, registration number, or address in the footer of each communication. So, there could be multiple needs to customize and harmonize all website’s emails.
Joomla 4 allows us to implement our corporate style in any communication sent through the website. This can be done through the Mail Templates feature, which allows us to customize every automated email style and its appearance, creating a uniform way to communicate with the same look and feel.
Let’s see how it works.
The Mail Templates feature
The Mail Templates feature can be found in the System Dashboard area. Once opened, it looks like what’s shown in Figure 10.1:

Figure 10.1 – Mail Templates
The main screen of Mail Templates shows a list of all the notification messages that are sent by Joomla, each one connected to a specific Extension and with a Description that specifies when a message is sent.
Search and filtering functionalities allow us to look for a specific email or filter emails by extension. It’s useful when you want to customize emails sent by a specific extension (for example, e-commerce, newsletter, contacts, and so on).
For each of the emails, in the Edit Templates column, flags of the available languages are visible. Here, we can edit the email in the desired language, granting us a high degree of flexibility.
Now, let’s see the feature in action by customizing our first email template.
Customizing an email template
To explore the functionalities of the Mail Templates feature, we are going to customize the first template shown in Figure 10.1, called User Action Log: Notification Mail. Let’s click on the English flag in correspondence to the email we want to edit.
The Edit Template screen looks like what’s shown in Figure 10.2:

Figure 10.2 – Mail Templates | Edit Template
In the preceding figure, we can observe several details: the email’s title and language, the label with an internal name, and a description of the email template. Such a description generally includes the purpose of the communication and the recipient.
Then, we have the Subject field, which corresponds to the email subject that the users will receive in their mailbox, and the Body text area, in which you can see the actual text of the email and customize it.
On the right-hand side of the screen, two buttons allow you to reset either the Subject or Body properties of the email to the respective default value, canceling any eventual variation you made.
The Insert Tags section lists all the variables – called Tags – that you can add to this email. In Figure 10.2, we can see that the message, date, extension, and username tags are listed. Tags are automatically converted into their values when the email is generated and sent to the recipients.
Email tags
Do not forget to add tags to your email when they need to show variable values. Tags are used to display the username or the email address of the user, or – as shown in Figure 10.2 – some messages and data from extensions.
If we look at the Body section of the message, as shown in Figure 10.2, we can see that the text of the email is shown in plain text format and includes some of the tags we’ve seen.
Customizing the message is very easy – we just need to type some text in addition to the default content of the message. For example, if we want to add a footer, we can add one, as shown in Figure 10.3:
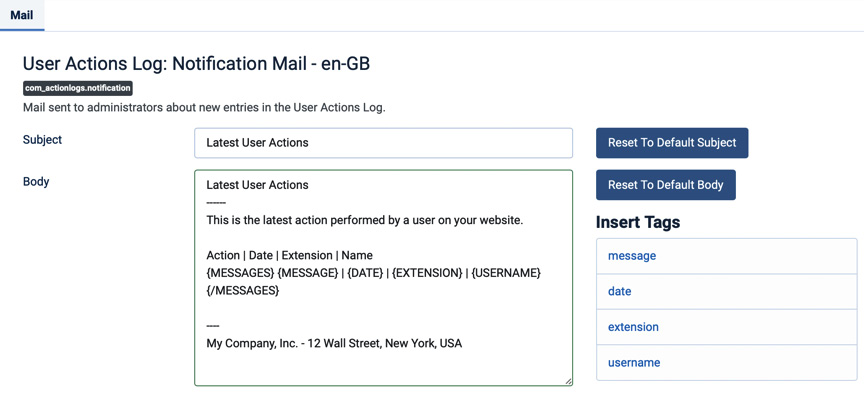
Figure 10.3 – Mail Templates | Edit Template – modified
Once the text has been changed, we can simply click on Save & Close.
Plain text versus HTML
You may have noticed that, by default, all system notifications are sent in plain text mode, without any HTML tags and styles. If you want to customize the look and feel of your website’s email, you should enable HTML mode so that you can add images, headers, footers, and much more. You can enable HTML from the Mail Templates feature’s Options screen by selecting HTML under the Mail Format option. Bear in mind that not all email clients support HTML emails, so ensure that you can test your messages to ensure they can also be read when opened in a simple text format.
When HTML mode is enabled, editing mail templates is more user-friendly. For example, if we look at the same mail template, named User Action Log: Notification Mail - en-GB, we will see something similar to the following:
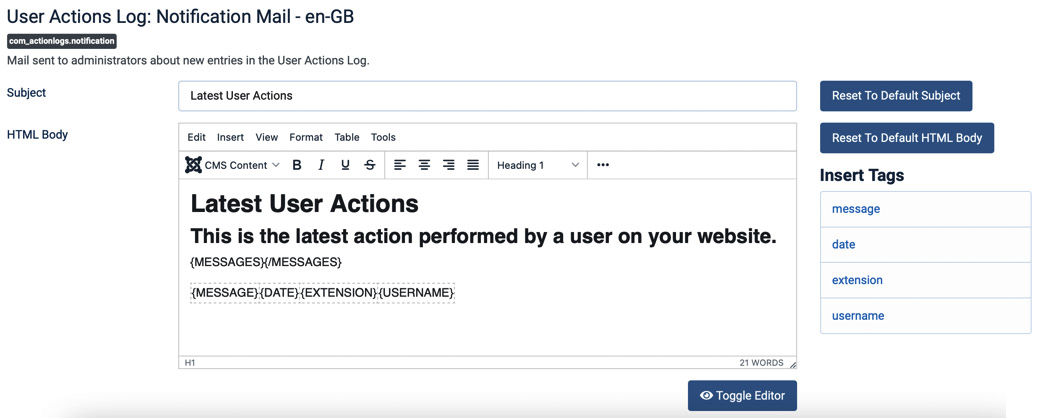
Figure 10.4 – Mail Templates | Edit Template | HTML mode
As shown in Figure 10.4, the email’s content looks more structured, thanks to the use of headers and the table in which we can find tags.
With the standard content editor integrated into Joomla, it’s much easier to input your content and format it, adding images and other items to the message.
Earlier in this chapter, we mentioned that you could edit each email template for each of the languages available on the website. This is useful for a multinational company website, for example, where there could be different corporate addresses or contact details based on the country. With Mail Templates, you can have a custom footer that’s different for each language so that you can put the regional office for Italy in emails to Italian users, the global office for those who receive emails in English, and so on.
In the next section, we will customize the user registration email by completing a case study.
Case study – customizing the user registration email
In this case study, we are going to customize the email message that the user receives after registering to our website. This scenario is one in which users register by themselves to the website without the need for account approval either by administrators or users.
In the Mail Templates feature, filter by Extensions and select Users, as shown in Figure 10.5:
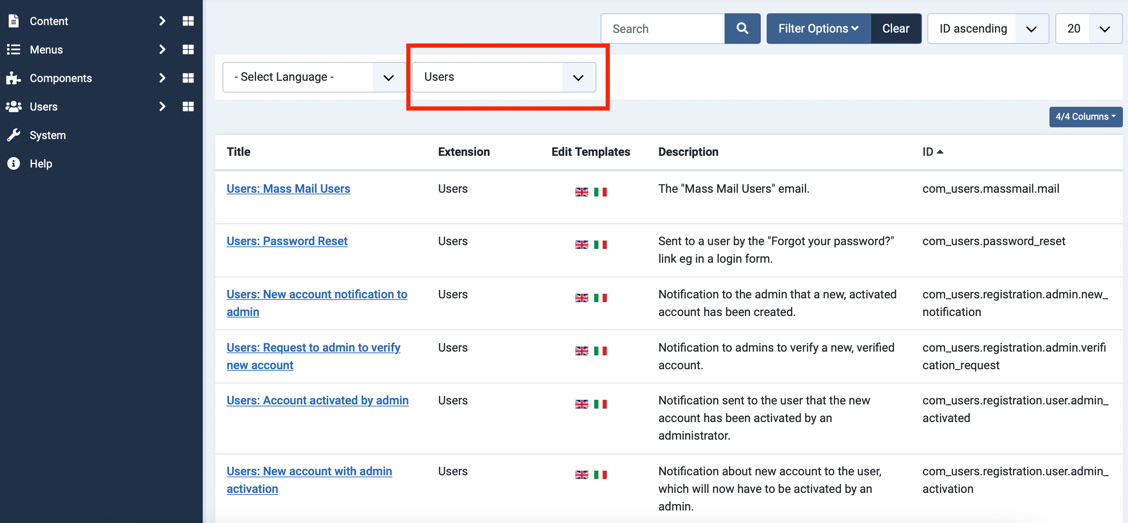
Figure 10.5 – Mail Templates | Extensions – Users
In the list of emails, find the one named Users: New account without activation, as highlighted in Figure 10.6:
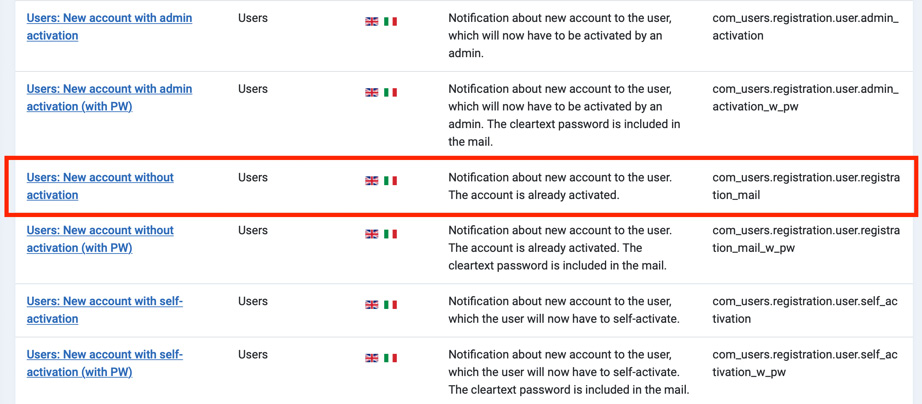
Figure 10.6 – Mail Templates | Detail
To start editing it, click on the English flag. The edit screen will look as follows:

Figure 10.7 – Mail Templates | Edit new account without activation email
Now, we can customize the email template. Let’s start by changing the email’s Subject to something more attractive, such as {NAME}, welcome to {SITENAME}!.
This string would look like Paul, welcome to MyCorp!.
Here, Paul is the name of the user and MyCorp is the name of the website. This subject is more personal and friendly for the user.
Now, we can work on the email’s content. First, we will add our logo as the heading of the email; then, we can add a footer for the message. Figure 10.8 shows what the message will look like after making these additions:

Figure 10.8 – Modified mail template
Here, we have added a logo to the header of the email, then instructions on how to get support. The email was completed with a footer that shows the address of the company.
Once the email is ready, we just click on Save & Close to complete the operation. Remember that it’s opportune to update emails in other languages so that your users across the world can have a consistent experience.
Standardize your style
To give your users a consistent experience throughout their relationship with your website, it’s opportune to adopt a standardized design and layout for your email templates. This will also make your users immediately recognize your emails as legitimate, as they will all have the same look and feel.
With this case study, we have finished exploring the Mail Templates feature. Try it by yourself in the proposed exercises.
Exercises
It’s time to apply the knowledge you’ve acquired in this chapter regarding Mail Templates.
Exercise 1 – customizing the courtesy Contact Form Mail Copy
You have been asked to customize the email that a user receives after submitting a contact form on your website. The mail template we want to edit is called Contacts: Contact Form Mail Copy.
Check the email’s format
Before editing the mail template, ensure you enable HTML as Mail Format in the Options area of the Mail Templates component.
The email template will look as follows:

Figure 10.9 – Mail Templates | Edit template – Contact Form Mail Copy
- Change the Subject property to Thank you for contacting {SITENAME}.
- Update the text, adding the following lines before the actual content:
Hello {NAME}, thank you for contacting us.Your message {SUBJECT} has been received. - At the end of the message, add the following text as a footer, after two blank lines:
MyCorp, Inc. – 01, Wall Street – New York, USA
- Remember to center the content of the footer using the proper button in the toolbar.
- Once done, Save & Close the mail template.
We customized the email message received by the users who contacted us through the website. Proceed to the next exercise to add a custom logo to your messages.
Exercise 2 – modifying your emails with your logo
Open the template you edited in the previous exercise (Contacts: Contact Form Mail Copy) and modify it by adding your logo.
You can either upload a custom image file from your device or pick one of the default images shipped with Joomla. Place the logo at the top of the email template, before the text. Once done, click Save & Close for your email template.
Now, your website’s users will receive a nicer confirmation email when they contact you.
Summary
In this chapter, we explored the Mail Templates feature, understood how to edit the messages and confirmation emails sent by the system, and learned how to give all the website’s emails a uniform look and feel. The reported case study and exercises helped us learn how to customize emails.
In the next chapter, we will learn how to use Joomla through its Command-Line Interface (CLI) and how to perform basic operations via the CLI.