5
Building Your Site Structure: the Menu System
In the previous chapter, we explored Joomla modules, the most flexible content unit of the CMS.
We’ll now look at one of the most important features of Joomla, the Menu Manager.
The menu management features allow you to create menus and menu items to build your personalized navigation system for the website. Menus decide what will be visible on the website, who can see a specific page, what the URL structure of a specific page will be, and much more.
After reading this chapter, you will be able to do the following:
- Understand how the menu system works in Joomla
- Understand how to define a navigation structure for your website
- Handle associations between modules and menu items
- Create a custom menu for your website
So, let’s begin!
The menu system
In a website, a menu represents its navigation system, the mechanism that allows users to navigate through the different pages. A menu is a collection of menu items; each menu item points to a page, a resource that is displayed when users click on the menu item. Each website might have multiple menus, for example, the main menu shown at the top of the website and an additional menu with some specific items and links displayed in a sidebar. The number of menus and menu items may vary per website since each website has a different structure and complexity.
Also, in Joomla, a menu is a collection of menu items. You can create the number of menus and menu items you need without limits, nest menu items to create submenus, and design a navigation structure that completely fits your needs, as shown in Figure 5.1.

Figure 5.1 – A sample top menu in Joomla
Menu items control many aspects in Joomla – from permissions to the language, and from templates to the URL path, so it’s crucial to learn how to structure the menus of your website, to get the most out of it.
Furthermore, the menu items define what type of content should be displayed: a single article, a list of articles, a preview of articles in a category, the main page of a component, a specific component page, and much more, based on the type of menu item selected.
Menus are shown within modules, which control their position, layout, and style within the website.
Let’s dig into the Joomla menu-building system, starting from the creation of a new menu for the website’s frontend.
Creating a menu
As mentioned in the previous section, a website might have multiple menus, but let’s discover how to create a new menu:
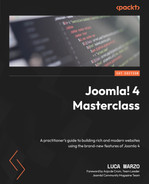
- From Menu Dashboard (displayed in Figure 5.2), let’s click on the Manage link shown in the Menus module.
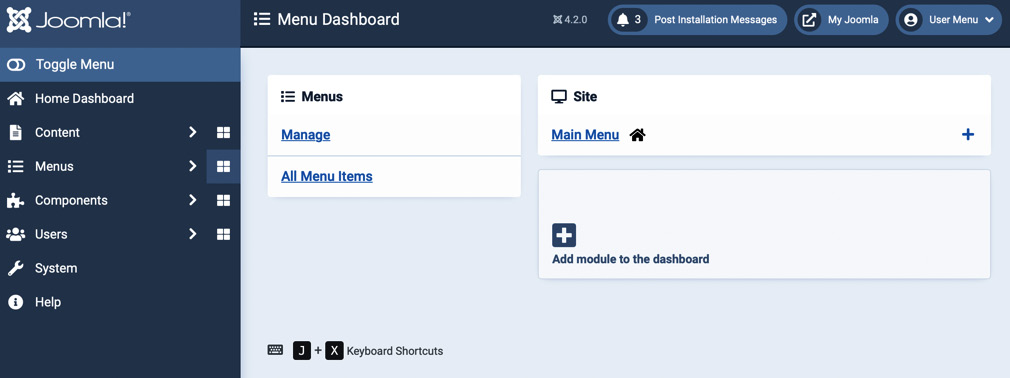
Figure 5.2 – Menu Dashboard

Figure 5.3 – Menus screen
- Click on the + New button, and let’s start creating our menu.
- The new menu screen has just a few fields, as displayed in Figure 5.4.

Figure 5.4 – Create a new menu
Let’s now explore the fields:
- Title: This is the title of the menu. The menu title should be useful to understand which type of menu it is, for example, a horizontal menu, a top menu, or sidebar navigation.
- Unique Name: Specifies a unique name for the menu within the site. This field should not contain spaces or special characters. You should only use numbers, letters, hyphens, and underscore symbols. A sample unique name might be 01_sidebar_menu.
- Description: This is an internal description of the menu. This text should help the administrator to remember the scope of the menu while selecting a menu to be shown on the website or when deciding where to put a specific menu item.
The options in the Permissions tab allow you to handle permissions and access levels for the menu. We will explore permissions and ACLs (Access Control Lists) in Chapter 6, User Management and ACL.
To complete the creation of our custom menu, let’s just click on Save & Close so that we move back to the list of available menus.
After completing these steps, we have created a new menu; now it’s time to start creating menu items to be added to the menu we have just created. In the following section, we will explore the available menu item types and how to create a new menu item.
Creating a new menu item
In the previous section, we created a new menu, and it’s ready to contain our menu items. As mentioned earlier in this chapter, each menu can host unlimited menu items, even nested in multiple levels. Let’s create a menu item and check the available menu item types.
To check the available menu item types in your installation, let’s just create a new menu item. To do so, in the list of website menus (Menus | Manage), click on the list icon displayed next to the Sample menu menu that we created, as displayed in Figure 5.5.

Figure 5.5 – List of available menus and button to open menu items
Clicking on the icon highlighted in red in the previous screenshot allows us to see the list of menu items tied to the Sample menu menu. As we can also see from the numbers shown in the columns Published, Unpublished, and Trashed, the menu does not have any menu items.
To create a new menu item, just click on the + New button in the toolbar. This action opens the New Menu Item screen, as displayed in Figure 5.6.

Figure 5.6 – New Menu Item screen
Let’s explore the fields and available options to create a menu item:
- Title: Specifies a title for the menu item. This is displayed on the menu bar on the public website (for instance, Home or Contacts).
- Alias: Specifies an alias for the menu item. This field is used to build the URL structure.
- Menu Item Type: By clicking on Select, you can pick the desired type of menu item. We will explore the available menu types in the next section.
- Link: This field is automatically populated and shows the deep URL of the page.
- Target Window: You can choose whether the link should be opened in a Parent window or in a new browser window with or without navigation.
- Template Style: Choose the template to be assigned to this menu item. By default, all the menu items will be opened using the template style set as default for the whole website.
- Menu: Choose which menus the menu item should belong to. In our example, the menu item will be added to Sample menu.
- Parent Item: Choose whether the menu item should be a first-level item or nested under another menu item. The drop-down list will show all the menu items in the menu.
- Ordering: Choose the position in the list of menu items. This option can be actioned only after the menu item is saved.
- Status: Choose whether the menu item should be Published/Unpublished/Trashed.
- Default Page: Choose whether the menu item should be set as the home page (default page) of the website. This means that if your visitors open mywebsite.com, they will be directed to this page.
- Start Publishing: Select the date and time at which the menu item should be published. This is useful if you want to publish a menu item at a specific time, allowing you to schedule the activity. The field is optional, and by default, it’s empty.
- Finish Publishing: Select the date and time at which the menu item should be unpublished. This is useful to hide a menu item from your website at a specific time. The field is optional, and by default, it’s empty.
- Access: Specify the access level for this menu item by selecting the user group that can see the item and access it. We will explore user groups and ACL in Chapter 6, User Management and ACL.
- Note: This is an internal note for website administrators.
Note: the importance of menu item aliases
In Joomla, menu item aliases are fundamental in building the URL structure of the website. Through aliases, you can create a custom URL structure to improve the Search Engine Optimization (SEO) of your website.
Example: If your website is mywebsite.com and you want to have a friendly URL for your contact page, such as contact-us string, you should specify as an alias for the menu item of the contact page the contact-us. This would result in the following URL for the page: mywebsite.com/contact-us. As you can see, it’s a friendly URL that is easy to remember and write.
Aliases are important while building the URL structure for the whole website, including blogs and category views.
Please note that the alias should be a string that includes only letters, numbers, dashes, and underscores; special characters are not allowed in this field. Remember that if empty, the alias will be automatically generated based on the content of the Title field.
Prior to checking the options offered by Joomla while configuring a menu item, let’s explore the different menu types available.
Exploring available menu item types
Available menu item types may vary based on the third-party extensions installed in your Joomla instance. Most components offer one or more menu item types to display their output. Let’s explore the menu item types offered in a standard Joomla installation.
After clicking on the + New button to create a menu item, we saw in the previous section that you are prompted to input several details and options for the menu item to be created. The most important choice is Menu Item Type, which allows you to define what the menu item should have as the target. Click on the Select button to see the list of available menu item types in your installation, as shown in Figure 5.7.

Figure 5.7 – List of the available menu item types
The list shows the installed components and features that offer a specific menu item type. Each of them may offer one or more menu item types.
Let’s click on Articles to see the menu item types provided by the Articles component, as displayed in Figure 5.8.
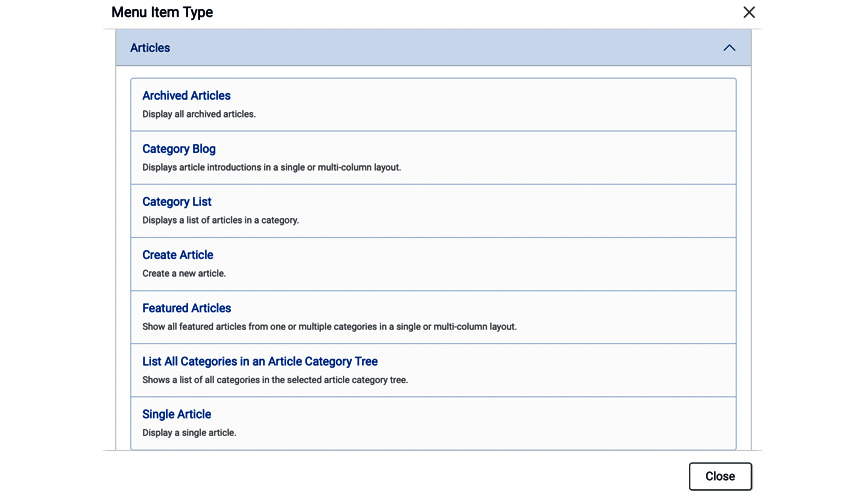
Figure 5.8 – Available menu item types in the Articles component
Let’s explore the different types of menu items offered by the Articles component:
- Archived Articles: Displays all the articles with an Archived status.
- Category Blog: Displays a list of articles from a category, showing titles and introductory text for each of them. The layout is completely configurable through the menu item options, which allow you to select the number of columns and how articles are displayed.
- Category List: Displays a list of articles from a category, showing a minimal table or list with titles and other information. The layout is configurable through the menu item options.
- Create Article: Opens the page where users with appropriate permissions can submit a new article to the website.
- Featured Articles: Displays featured articles from one or more categories in a customizable layout.
- List All Categories in an Article Category Tree: This shows a list of categories nested in the category selected in the menu item. It’s useful if you want to build a navigable sitemap or create a section map, given a specific category.
- Single Article: Displays a single article. This is one of the most used menu item types since it allows you to create a page. If you only want to show a specific article on a page, this is the right menu item.
Joomla and WordPress: articles, posts, and pages
One of the main differences between Joomla and WordPress is the way the menu is built and managed. This is also reflected in the content. In WordPress, you should decide beforehand whether the content is a blog post (type: post) or it is meant to be a static page (type: page). In Joomla, you don’t have to choose. You simply create an article, and thanks to menu items, you can have the article as part of a blog (for example, using the Category Blog menu item) or a single page (using the Single Article menu item type).
With Single Article, we’ve completed the menu item types offered by the Articles component. But as seen in Figure 5.7, there are many other components that offer menu item types.
For example, the Users component offers menu item types that allow you to create a login/logout page, a user profile page, and a registration form. The Contacts component provides menu item types to display a single contact or a category of contacts, to create a new contact, or to show the whole list of contacts.
Third-party components may add specific menu item types. For example, an e-commerce extension will add menu item types to show the shopping cart, the list of orders, the list of products by category, a single product, or the list of invoices.
There are also some menu item types that are provided by the system and are not tied to a specific component.

Figure 5.9 – System Links menu item types
Let’s explore the menu items type available under the System Links group, as displayed in Figure 5.9:
- Menu Heading: Displays a header in the menu. This is a special type of menu item, not linked to anything, but used when you want to group submenu items.
- Menu Item Alias: Creates an alias for another existing menu item. This is useful when you want to have the same menu item in different menus or to link to the same target page using two different anchor texts in menus.
- Separator: This is a special item type that creates a placeholder text in a menu without any link.
- URL: Allows you to create a link to an external resource, such as a third-party URL.
After the System Links menu items, let’s explore the unique item type in the Wrapper group. Iframe Wrapper is a special menu item type that allows you to embed a URL in to a website page, through an iframe.
Having seen the most common menu item types in this section, let’s move back to the creation of a menu item process, continuing to analyze the available options.
Menu item options
The options to configure a menu item vary depending on the menu item type. Each menu item type, like those discovered in the previous section, provides a specific set of options in addition to the standard configuration options provided by Joomla itself.
To explore the available options, let’s start by selecting a specific menu item type: Single Article. Based on this selection, the menu item creation screen changed, immediately showing additional fields, tabs, and buttons, as shown in Figure 5.10.

Figure 5.10 – Single Article menu item creation screen
The additional field that appeared is Select Article, which shows two buttons:
- Select: Allows you to choose an article from existing ones. The article selection screen provides search and filter functionality to find the desired article.
- Create: Opens the new article creation screen so that you can write a new article and connect the menu item to it.
The Options tab collects a series of options to customize the appearance of the Single Article page. For example, you can choose whether or not to display the article Title, Author, Category, the introductory text, Publishing Date, and much more.
As mentioned earlier in this section, different menu item types offer different setup options based on the specific item type.
Let’s continue to explore the available options, moving to the Link Type tab.

Figure 5.11 – Menu item options: Link Type
As shown in Figure 5.11, the Link Type tab includes options to customize the menu item with some attributes and styles. All these are optional:
- Link Title Attribute: Allows you to specify an additional description to the menu item title.
- Link Class: Adds a specific CSS class to the link in the menu.
- Link Icon Class: Allows you to specify a CSS class for the menu item icon if any.
- Link Image: Adds an image to the menu item. Useful when you want to display a small icon near the anchor text in the menu.
- Image Class: Allows you to specify a CSS class for the menu item image.
- Display Menu Item Title: Yes/No. By default, the title of the menu item is shown. You can disable this option when you want to show only the image or icon instead of the title in the menu.
- Display in Menu: Yes/No. By default, the menu item is displayed in the menu. Choose No if you want to hide the menu item from the menu.
Let’s now move on to the Page Display tab, which collects some options related to the page's appearance.
Figure 5.12 – Menu item options: Page Display
As shown in Figure 5.12, the options on this page allow you to operate on the appearance of the page linked by the menu item:
- Browser Page Title: Defines the title of the page displayed in the browser tab and the <title> HTML metatag that impacts your website’s SEO.
- Show Page Heading: Allows you to decide whether or not to show the page title on the website page. The Use Global (Hide) option inherits the setting specified in the component options in Global Configuration.
- Page Heading: Allows you to specify custom text for the page heading.
- Page Class: Allows you to specify a CSS class to be used to render the page.
Let’s now move on to the Module Assignment tab, displayed in Figure 5.13.
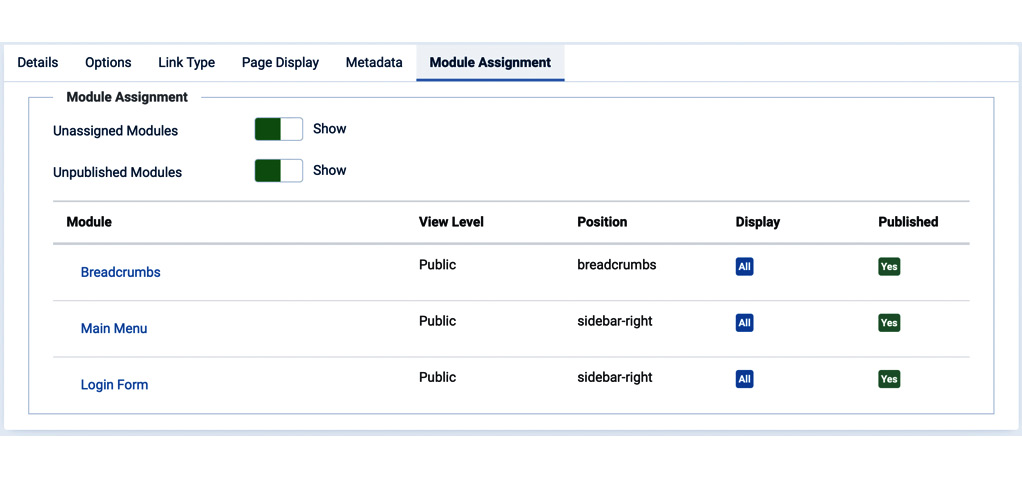
Figure 5.13 – Menu item options: Module Assignment
The Module Assignment tab displays the list of modules that are assigned to the specific menu item. It represents a fast method to check which modules are displayed on the page of the website. For each module, you can see the access level, the position, whether it’s displayed, and whether or not it’s published.
The options above the list of modules allow you to choose whether or not modules unassigned to menu items or unpublished modules should be displayed.
In the next section, we’ll explore the Metadata tab and other SEO-oriented options.
Menu and SEO configuration
We mentioned earlier in this chapter that menus are important to improve the SEO of your website.
One of the most useful fields is Alias, which is used in the formation of the URL structure of the website.
Let’s now discover the options offered by the Metadata tab, displayed in Figure 5.14:
- Meta Description: Allows you to specify the description meta tag for the page. You can write up to 160 characters in the field.
- Robots: Allows you to specify the rules for the search engine indexing bots (index, follow / noindex, follow / index, nofollow / noindex, nofollow).
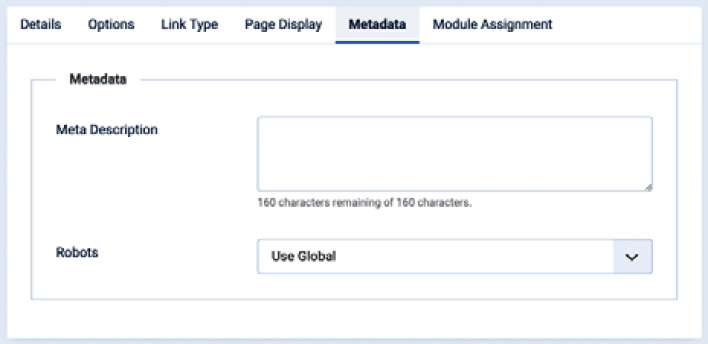
Figure 5.14 – Menu item options: Metadata
We will explore all the features related to SEO in Chapter 7, SEO at Its Best.
Let’s now discover some of the aspects related to menus on multilingual websites.
Menu and languages
Joomla offers a set of powerful features to manage multilingual websites in a single installation. We will explore multilanguage websites in depth in Chapter 8, One Website, Multiple Languages.
We need to know that menus are crucial in the creation and configuration of a multilanguage website. When multilanguage features are enabled, for each menu item, you can choose to which of the languages you want to tie the menu item. A menu item can be tied to a single language or to All. When All is selected, the menu item is shown in all the languages available.
With this section, we have completed the options to create a menu item. Let’s now move on to exercises.
Summary
In this chapter, we have explored the menu management features of Joomla and understood how to create a custom menu for our website, create new menu items, and the different types of menu items available. We have also discovered the settings available for each menu item and their effects on the produced page.
In the next chapter, we’ll go deeper into the user management features, introducing Users, Privacy Features, Access Levels, and User Groups.
Exercises
It’s time to apply the knowledge acquired in this chapter and start building our menus.
Exercise 1 – create a menu and a menu item
In your sample Joomla installation, go to Menu Manager and create a new menu called Sample menu. You can set a personal description for the menu. Save and go back to the Menus view.
Now create a menu item of the Single Article type, selecting the article MyArticle that we created in Exercise 2 of Chapter 2. The menu item should have MyArticle for Title and an autogenerated Alias.
You can choose the options at your convenience, but ensure that the article’s title, category, and author are displayed on the page.
Exercise 2 – a category list
Let’s now create a new menu item in Sample menu. The new menu item should have as its title MyList, as its type Category List, and select the MyCategory category that we created in Chapter 2. The result should be a page on which the list of articles belonging to the MyCategory category is displayed.