
12
Styling Your Website – Templates
In the previous chapter, we explored Joomla’s command-Line interface, a different way to perform actions on a website without accessing its backend.
We’ll now learn how to customize the appearance of our website through templates. Templates define how the website will look – the style, colors, fonts, module positions, and much more.
After reading this chapter, you will be able to do the following:
- Understand what a template is
- Understand the difference between templates and styles
- Understand how to customize a template through the website’s backend
What is a template?
A template is a special type of Joomla extension that is used to style a website. It is a package that includes all the files needed to provide a different look to the website: images, CSS files, JavaScript files, and PHP files.
A template may incorporate styling libraries, such as Bootstrap, Tailwind, or other technologies, to provide some common graphic patterns. For example, the Joomla 4 frontend template, Cassiopeia, is based on Bootstrap 5.
Incorporating popular libraries, such as Bootstrap, simplifies the process of building a template, as it can use all the components and assets from the library.
In Joomla, a template has full control of the appearance of a website, defining its layouts, colors, font type, and size, the available module positions and style variations, and the opportunity to customize the template through the backend.
Templates can be installed as a regular Joomla extension and are provided as a .zip file package. Sometimes, template designers also provide a Quickstart package for their templates. You can install a template at any time, and it allows you to change the look of your website without the need to build it again from scratch.
What is a Quickstart package?
A Quickstart package is a Joomla installation with a specific template installed and set as the default and comes with some placeholder images. These packages are used to allow users to replicate the look and feel of the demo installation of a specific template, as shown on their designer’s website. Quickstart packages can’t be installed on live sites, as they include a whole Joomla installation, but they should be used to start a new site.
The following are the two types of templates in Joomla:
- Frontend templates
- Backend templates
Backend templates are very rare, and they customize how the website’s backend looks. Frontend templates are the most common type of templates. In this chapter, we’ll talk about frontend templates, as they allow us to customize the style of our website.
Joomla offers several features to manage templates. Let’s start exploring them.
Template management – templates
Template management functionality is accessible through System Dashboard and is collated into a module named Templates, as shown in Figure 12.1.
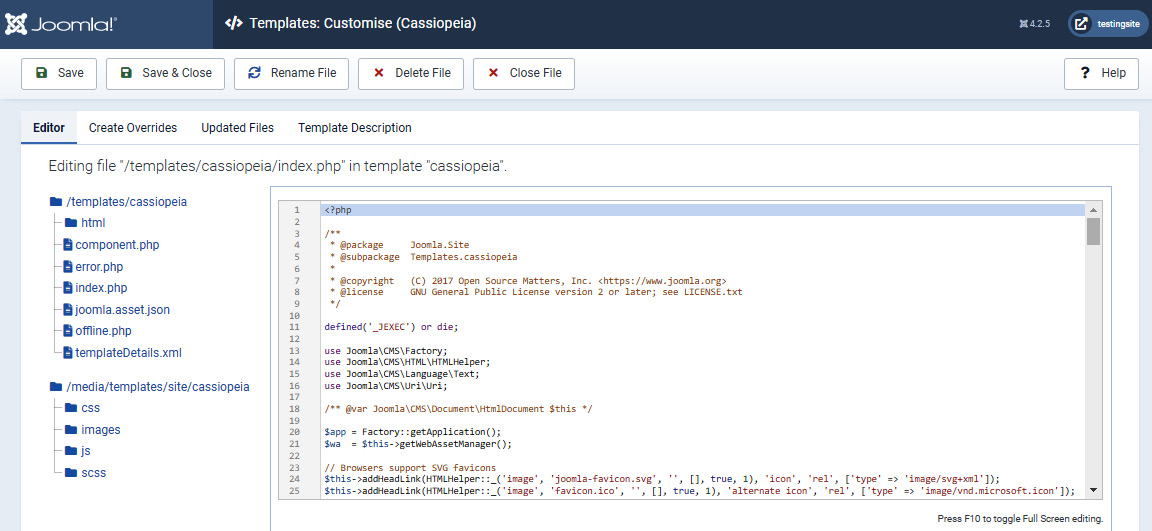
Figure 12.1 – Templates module in System Dashboard
The module displays links to access the various functionalities regarding both frontend and backend templates. Let’s start by clicking on Site Templates to start going through the available features.
By clicking on Site Templates, we can access the list of installed frontend templates, as shown in Figure 12.2.

Figure 12.2 – Templates | Site Templates
Each installed template has an entry in the table where we can see its name, a preview/demo image, its version, the release date, information about its author, and whether or not overrides are up to date.
To enter the details and use a template, just click on the name of the template.
We will then see a screen with the list of the template’s files and folders, as shown in Figure 12.3.
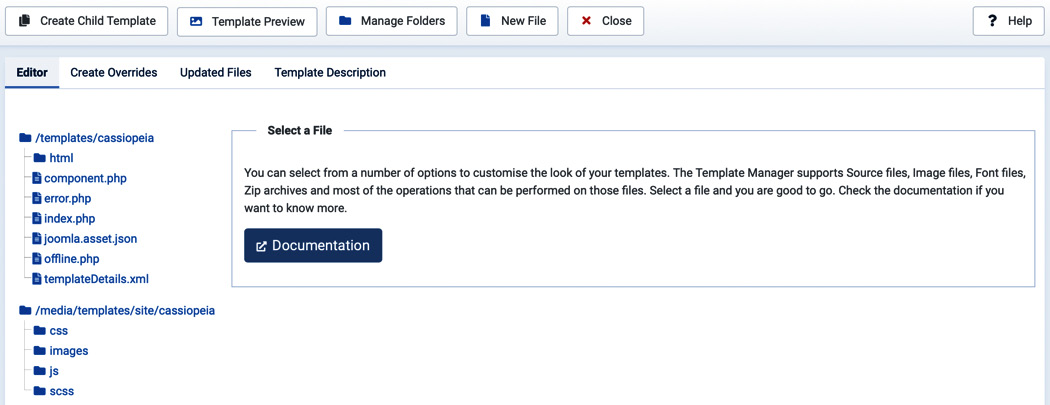
Figure 12.3 – Templates | Site Templates | Cassiopeia Details and Files
By clicking on any of the files from the tree displayed on the left part of the screen, we can see the content of the file and edit it through the integrated editor offered by Joomla. By clicking on the name of the file, it’s possible to edit PHP, CSS, JavaScript, HTML, and other types of files online, without the need to download and update them on your computer. In Figure 12.4, you can see how to edit a file directly within the template manager.

Figure 12.4 – Templates | Site Templates – online file editing
File and folder structure of a template
It’s opportune to dedicate a few moments to understanding how template files and folders are structured. Each installed template has a dedicated folder under the /templates folder of your website; for example, Cassiopeia’s folder is /templates/cassiopeia. This folder holds the files needed by the template in order to function properly, such as index.php, error.php, offline.php, and components.php. Those files define how the site is structured in certain cases, for example, when displaying a component, when the website is offline, or when there is an error, as the filenames suggest. The /html folder within the /templates folder holds the overrides – the views that the template implements differently from the standard Joomla layout. For example, it includes the PHP files to provide a specific layout for blog pages or category views. We’ll get to know overrides in Chapter 13, Customize Everything with Overrides. Each template may have its own overrides for standard layouts. In the folder structure, we can also see the folder with the /media/templates/site/cassiopeia path that is outside of the /templates folder. This folder is meant to hold media files such as image, CSS, JavaScript, and SCSS files.
The template manager also allows you to create and manage folders, as well as to create and manage files, thanks to the Manage Folders and New File buttons in the toolbar. The toolbar also hosts the Create a Child Template button, which we’ll explore in Chapter 14, Child Templates.
These features allow you to customize your template, edit the template files, and add your custom files directly from the backend without the need to download files, edit them offline, and re-upload them via FTP. Be careful of updates, as changes applied to files may be lost. But in most cases, it’s not required to operate directly on the source code of your template files, as most templates offer several options to customize them through a configuration panel. This can be done by switching to the Site Templates Styles view in the backend of the website. You can access this feature by clicking the Styles button in the toolbar, as seen in Figure 12.5.
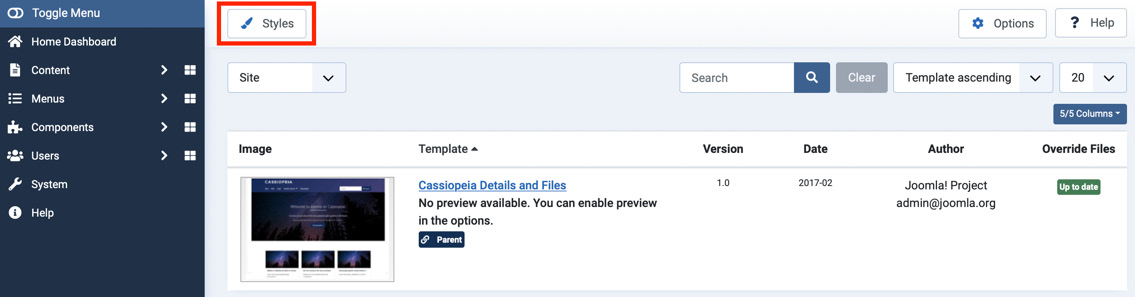
Figure 12.5 – Templates | Site Templates – switch to Styles
In the next section, we’ll go through template styles and the options provided.
Template management – styles
Each template installed may have one or more styles. Furthermore, you can create additional template styles for any of the installed templates. Styles allow you to have different configurations for a single template. This feature is useful when you want to differentiate the appearance of your website across different pages or languages by assigning a certain template style to a specific menu item.
A template style should be assigned as Default for the website, and it will govern the look and feel of all the website pages that don’t have a different template style assigned.
When opening the Site Templates Styles view from System Dashboard, or by clicking on Styles on the Site Templates page, we can see the list of available styles, as shown in Figure 12.6.

Figure 12.6 – Templates | Site Templates | Styles
In Figure 12.6, we can see that there is just one template style installed, called Cassiopeia – Default. We can also observe that this style is set to Default for all pages. For each style, we can also see which templates they are derived from.
By clicking on the name of the style, we can open the template configuration and customization page. The options available for each template may vary depending on the template itself.
Most templates offer options to change the font and background colors, choose the type of layout, implement a specific footer, link to social networks, and much more.
For each style, you can also specify to which menu item the style should be assigned; this way, you can customize the way the website looks based on the active page. This can be done through the Menu Assignment tab on the style management page, as shown in Figure 12.7.

Figure 12.7 – Templates | Template Style | Menu Assignment
The Menu Assignment tab shows all the menu items of the website, grouped by menu. From this page, we can select to which menu items the template style should be assigned. Furthermore, template styles can be assigned directly from each menu item configuration in the menu management.
You can duplicate styles as needed and assign them to specific menu items so that every part of the website looks different. In the next section, we will explore the customization option offered by the Joomla default frontend template, Cassiopeia.
Example – a powerful frontend template, Cassiopeia
As an example, we will explore the options offered by Cassiopeia, the default template of Joomla 4. To access them, from Site Templates Styles, click on Cassiopeia – Default, then click on Advanced, and the screen will look like Figure 12.8.

Figure 12.8 – Templates | Site Templates Styles | Cassiopeia – Default | Advanced
The first option is called Brand, and it allows us to decide whether to include branding elements on our website. In fact, if allowed, additional fields are displayed, as shown in Figure 12.9.
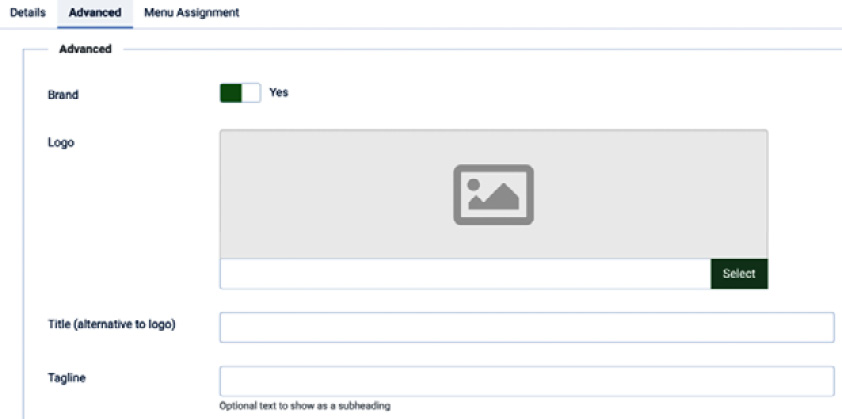
Figure 12.9 – Details of the Brand options of the Cassiopeia template
These additional fields, as displayed in Figure 12.9, allow us to select an image as a logo of the website, specify a title to be shown as an alternative to the logo – when the image is not present – and a tagline, a short line of text to be shown after the logo or the title.
Continuing with the options displayed in Figure 12.8, the Fonts Scheme field allows us to select the font family to be used on the website, selecting from locally installed fonts (included in Joomla) or remote fonts, such as from Google Fonts.
Other options are defined in the following list:
- Colour Theme: Allows you to choose between the default or an alternative color palette.
- Layout: Choose whether to use a Static or Fluid layout. The Fluid layout is generally fullscreen.
- Sticky Header: Allows you to enable or disable the sticky header. This blocks the header part of the template – where the logo and the menu are displayed – while scrolling.
- Back-to-top Link: Allows you to choose whether or not to show a link to go back to the top of the page. This is useful when it is a long page.
In Figure 12.10, you can see what the original version of the Cassiopeia template looked like.
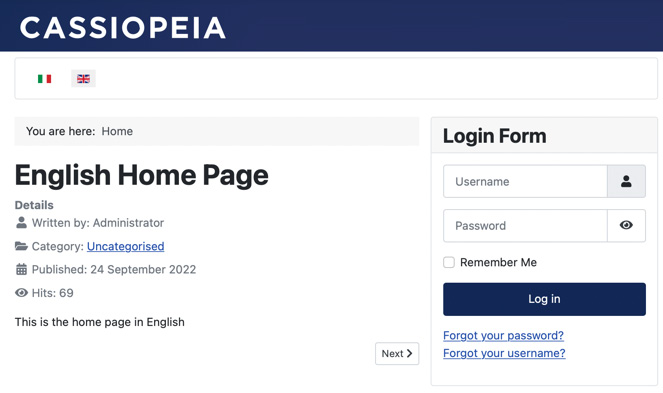
Figure 12.10 – Cassiopeia template, standard configuration
We then uploaded a custom logo, specified a tagline, selected a different remote font, and applied an alternative color scheme. In Figure 12.11, you can see the results of the changes to the template.
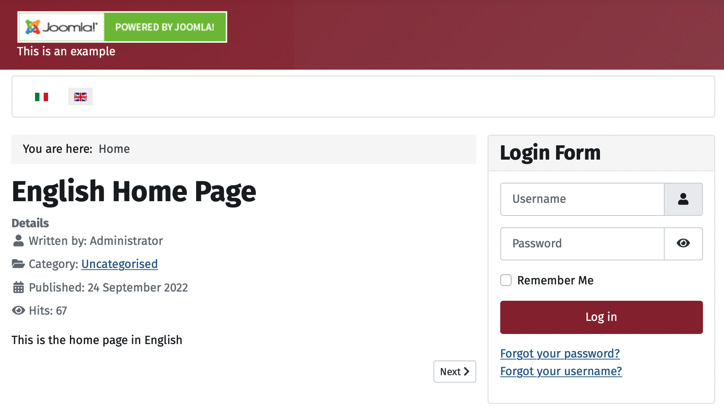
Figure 12.11 – Cassiopeia template, alternative color scheme, custom logo
In this section, we have explored the customization options offered by Cassiopeia. As mentioned earlier, the number and type of options offered may vary depending on the template. In Chapter 15, Template Frameworks, we’ll see that some templates offer a wide number of customization features, including layout builders and style variations.
We have completed the exploration of the Cassiopeia template options. In the next section, we’re going to discover the features dedicated to backend templates and their customization options.
Exploring backend templates
The same features seen in the template manager for frontend templates apply to backend templates, including template file and folder modification functionality and style management options. You can access the backend template management screen by clicking on Administrator Templates in System Dashboard, as shown in Figure 12.12.
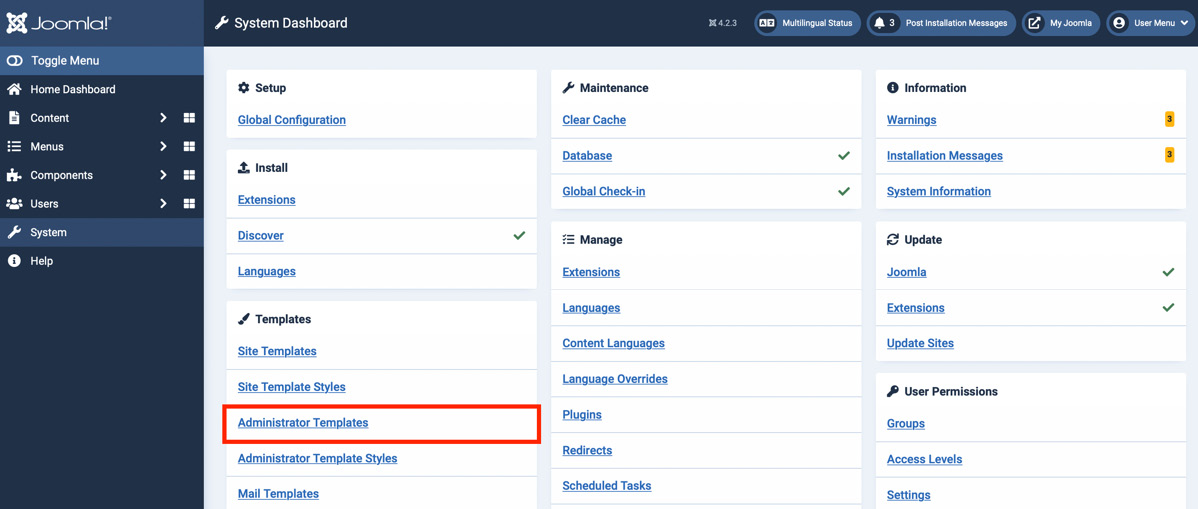
Figure 12.12 – System Dashboard | Administrator Templates
You will then see the list of installed backend templates. By default – and in most installations – you will see only one template, Atum, as shown in Figure 12.13.
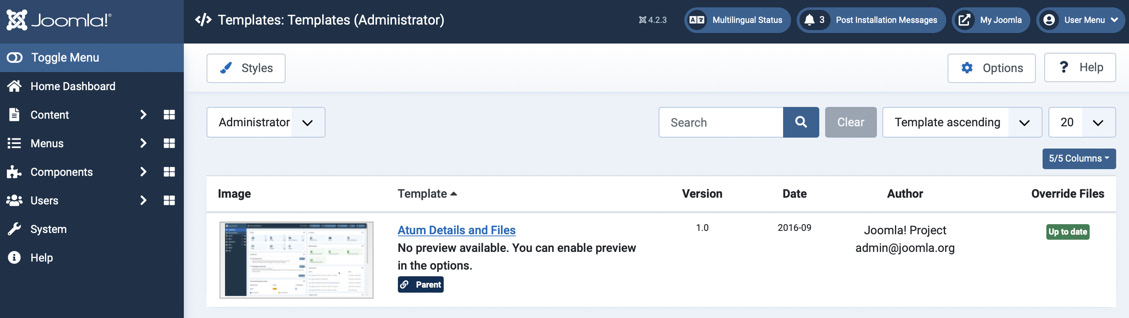
Figure 12.13 – Templates | Administrator Templates
You can open the template’s list of files and folders by clicking on the name of the template, as shown in Figure 12.14.
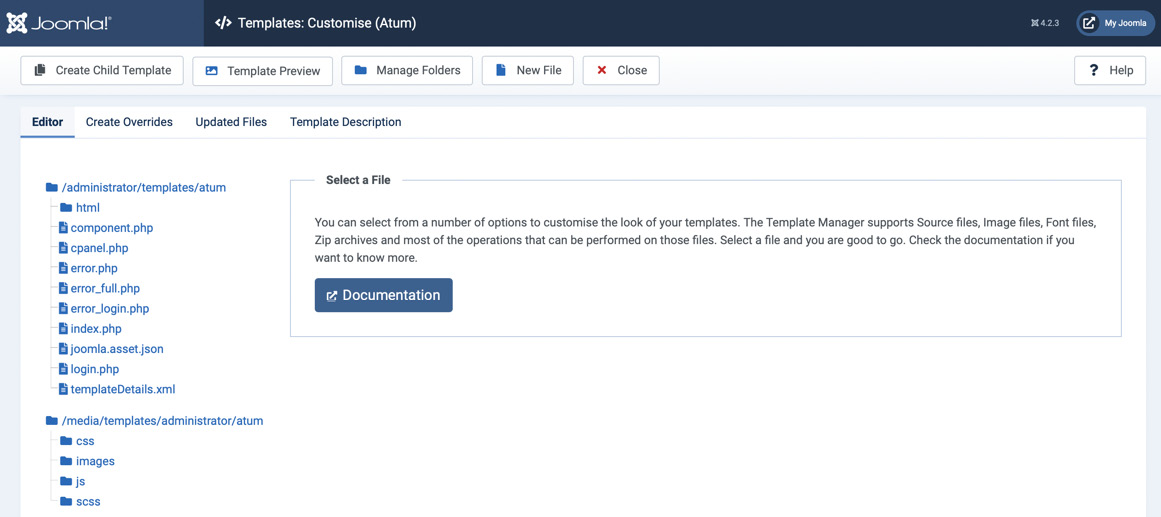
Figure 12.14 – Administrator Templates | Atum Details and Files | Editor
The available features are the same as those offered for frontend templates. In fact, you can edit each of the template’s files directly online, you can click on New File to create new files and folders within the template structure, go to the Create Overrides tab to create an override, or click on Create Child Template to create a child template.
Going back to System Dashboard, let’s now discover the backend template style features by clicking on the Administrator Template Styles link.
You can then see the list of backend template styles, as shown in Figure 12.15.

Figure 12.15 – Templates | Administrator Template Styles
In the list of template styles, click on the name of the style – Atum - Default – under Style to open the customization options offered by the template, as shown in Figure 12.16.

Figure 12.16 – Templates | Administrator Template Styles | Atum - Default
The number and name of the available tabs may vary depending on the template.
On the screen shown in Figure 12.16, we can see the name of the style, its description, whether it is set as Default, and the name of the template to which the style belongs.
The Atum template offers the following two tabs of options:
- One related to colors
- One related to images
Let’s start exploring the options of the Colour Settings tab, shown in Figure 12.17.

Figure 12.17 – Atum backend template options | Colour Settings
All the options available in the tab allow you to change the color used in the backend template. Default colors have been chosen to ensure WCAG-AA compliance so that the website backend is also accessible to users who suffer from different types of color blindness. You can even disable all colors, setting the whole backend template to use a monochromatic color palette.
The Image Settings tab offers several options to customize the images shown in the backend of the website. Those options are organized into several groups.
The first group of controls is related to Login Logo, as shown in Figure 12.18.
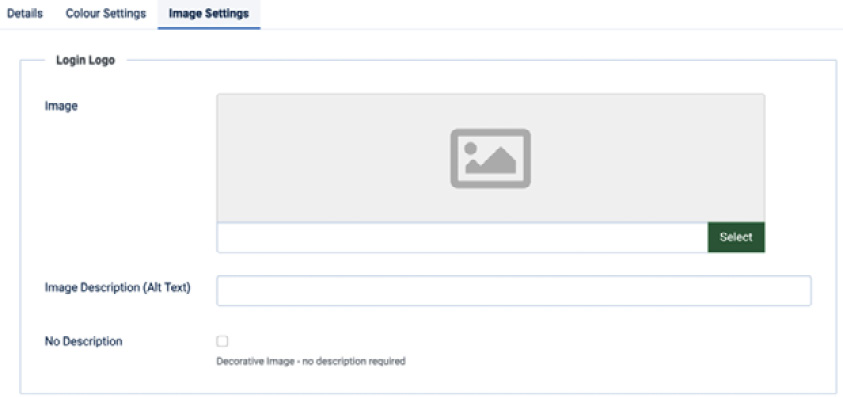
Figure 12.18 – Atum backend template | Image Settings | Login Logo settings
You can upload a custom logo/image in Image, which is shown on the login page of the website backend, and specify an image description in the Image Description (Alt Text) field that is used as the alternative text for the image for accessibility purposes. The No Description option allows you to disable the image description.
The second group of options is related to brand logo, as shown in Figure 12.19.

Figure 12.19 – Atum backend template | Image Settings | Brand Large logo settings
Image here logo replaces the Joomla logo in the website backend. It’s useful to customize the logo for large websites and intranets so that you have a white-label system. Again, you can set up a description for the logo using Image Description (Alt Text) or disable the alternative text.
The options of the last group are related to Brand Small, as displayed in Figure 12.20.
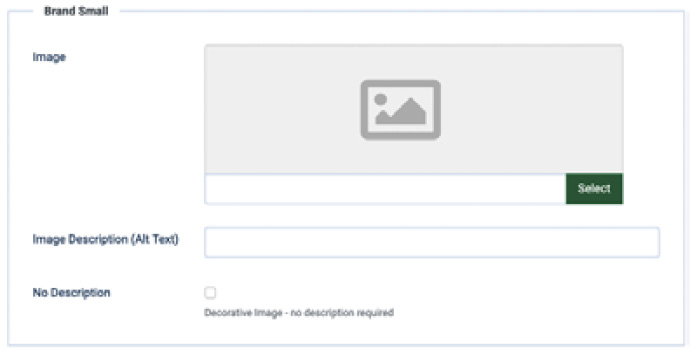
Figure 12.20 – Atum backend template | Image Settings | Brand Small settings
Image in Brand Small replaces the Joomla logo on the website backend when the sidebar menu is collapsed with a small, square image. Also, in this case, it is possible to specify a description in Image Description (Alt Text) to be used as the alternative text or disable the description.
With this last group of controls, we have completed the options offered by the Atum template.
Going back to the list of administrator template styles, it is possible to duplicate, edit, and delete template styles. But differently from frontend templates, backend template styles can be set as the default for the whole backend and not assigned to specific pages or menu items.
In the next section, we will discover how to see the positions offered by a template.
Template positions
Each template offers several module positions, depending on its layout. You can find out which positions are available in a specific template by checking its developer’s documentation or using the dedicated feature in the Joomla backend.
To preview the positions from the website backend, we need to enable the functionality first. In System Dashboard, click on the Site Templates Styles link, then on Options.
We need to enable the Preview Module Positions option, highlighted in Figure 12.21.
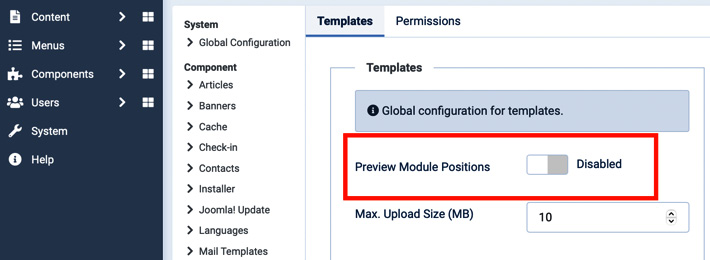
Figure 12.21 – Templates | Options
Click on Save and Close to go back to the styles page. You will now see an icon near each template style in the Preview column, as shown in Figure 12.22.

Figure 12.22 – Templates | Template Styles | Preview link
By clicking on the Preview link, you will see a page that shows all the module positions available in the template, as in Figure 12.23.
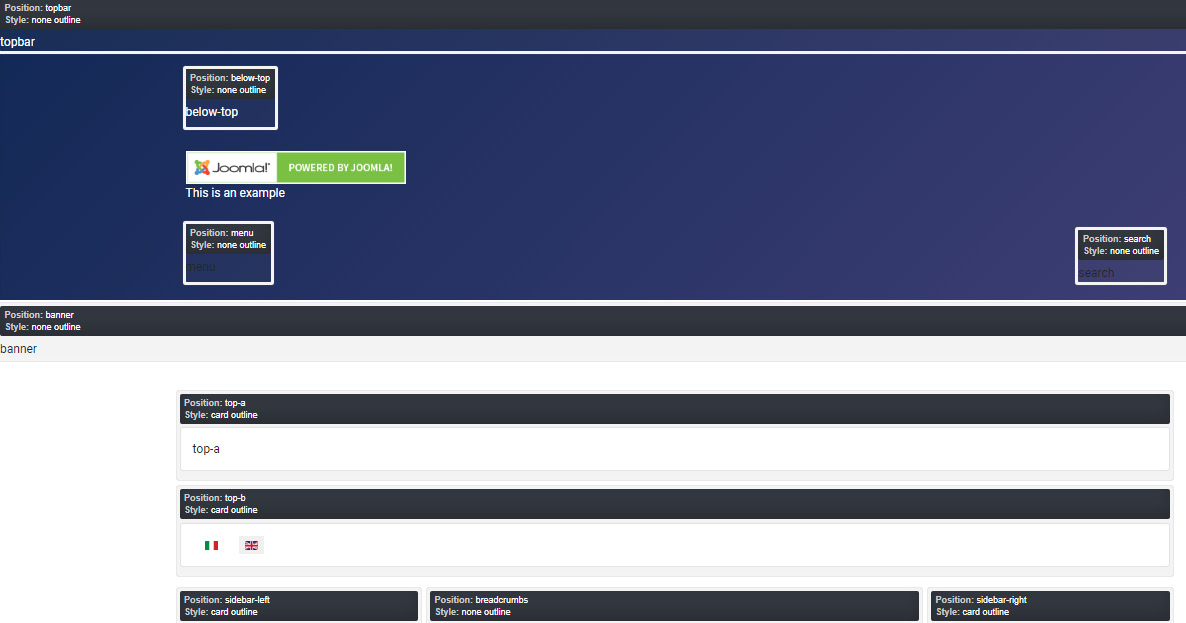
Figure 12.23 – Templates – module positions preview
As you can see in the screenshot, there are many module positions in the Cassiopeia template, as follows:
- topbar
- below-top
- menu
- search
- banner
- top-a
- top-b
- breadcrumbs
- sidebar-left
- sidebar-right
There are also many other positions. You can place one or more modules in each of those positions.
How to view module positions
You can check the module positions by adding the?tp=1 string to the URL of your website or page, for example, https://mysite.tld/?tp=1, when the Preview Module Positions option is enabled in your website configuration.
It’s generally recommended to keep the Preview Module Positions preview option disabled, to prevent other people from discovering which positions are available in your template.
We have completed the exploration of the template management features. Test your knowledge of templates with the proposed exercises.
Exercises
It’s time to apply your knowledge about templates acquired in this chapter.
Exercise 1 – customizing your frontend template
In this exercise, you are required to customize the default template style for your site, upload your logo, and add a personal tagline:
- Open System Dashboard on your website.
- Click on Site Templates Styles and open the Cassiopeia – Default style.
- In the Advanced tab, enable the Brand option and upload an image in the Logo field.
- Specify some text in the Title field. You may type your full name.
- Type some text of your choice in the Tagline field. Remember that this text will be displayed right after the logo.
- Enable the Back-to-top Link option and save your changes.
- Now, look at the website frontend to check the result.
Exercise 2 – creating a new template style
In this exercise, you will create a new template style for the Cassiopeia template. Starting from the default one, you’ll customize it and assign it to a specific page:
- From the Site Templates Style page, select the Cassiopeia – Default style by checking the checkbox near the style name. Then click on the Duplicate button in the toolbar.
- The new style will be automatically named Cassiopeia – Default (2). Click on the style name and rename it, by typing Cassiopeia – MyStyle in the Style field.
- In the Advanced tab, change the Colour Theme option to Alternative.
- Now let’s assign the template to the English home page of the website. Open the Menu Assignment tab and select the English Home menu item.
- Now open the website frontend and navigate to the English version of the website. Then switch the language to Italian. You’ll see that the template will look different between the two languages, based on the changes we’ve applied during the exercise.
Summary
In this chapter, we have explored the template management features of Joomla, focusing on templates and styles for both the frontend and the backend of the website. We have discovered the differences between a template and a template style. We have understood how to customize a template style, how to duplicate a style, and how to check and edit the template files.
In the next chapter, we’ll go deeper into the template management functionalities, introducing overrides and how to deeply customize the style of the website.