Every online store's success depends on promotion and public relations. As a marketer, the more you promote your products to the target market, the greater the chance of getting more customers. Good online stores have built-in promotional activities and public relations tools. Zen Cart has a set of tools for promotion and public relations. In this chapter, you are going to be introduced to these tools.
On completion of this chapter, you will be able to:
Use Zen Cart's promotional tools such as banner ads, discounts, salemaker, cross-sell and up-sell, specials, and featured products.
Use gift certificates and coupons to attract more customers.
Use newsletters and product notifications to keep in constant communication with your customers and reward their loyalty.
Optimize your site for search engines.
By now, you should have learned how to add products to your catalogue and how to manage customers.
For any business, promotion is a must and Zen Cart has built-in tools for promotional activities. Features such as banner ads, promotional discounts, salemaker, products on special list, cross selling, and up selling can be used effectively for promotions. In this section, we are going to discuss how these features can help to promote your products.
If you have been operating a shop or have started building a shop using Zen Cart, you will know what a banner ad is. A banner ad is a form of advertising on the Web used frequently to display product advertisement into a web page. Clicking on a banner ad takes you to a site or a webpage.
Banner ad tool in Zen Cart can be used for advertising both external and internal products. You can display any banner ad through this tool. In Zen Cart, there are three places where you can display banner ads.
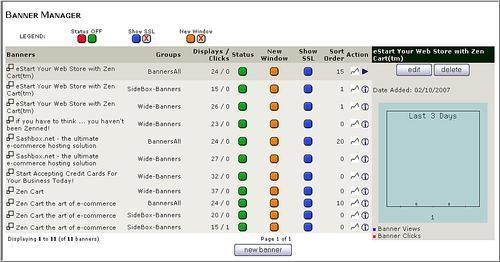
You can control banner ads in your Zen Cart shop from Tools | Banner Manager. From here, you can add, delete, and edit the banners:
To add a new banner, click the new banner button.
To edit an existing one and change its link, its picture, and so on, click on the banner you want to change, and click the edit button.
You can enable and disable any particular banner by clicking on the red/green status button.
Two types of banners can be used in Zen Cart: sidebox and wide banners. Sidebox banners are just like a sidebox suitable to be shown in the left or right column. Wide banners span the width of your page.
Each banner is assigned to a group, and you can give it any name. A group contains multiple banners and one from the group will be randomly shown at a time . For each group, you also need to indicate the position where it is to be displayed. This is done from Configuration | Layout Settings.
By default, Zen Cart has three predefined banner groups: BannersAll, SideBox-Banners, and Wide-Banners.
Banner statistics are also tracked on a day-to-day basis. You will see the banner views and clicks statistics for the last three days on this window.
Each group is assigned to be displayed in a position on the shop front-end. You define this position by editing the Banner Display Groups position group names under Configuration | Layout Settings.
For sidebox banners, only one banner group on a particular sidebox can be displayed at a time. For others, you can have multiple banner groups.
By default, the BannersAll group is assigned to be displayed in SideBox—BannersAll position. This means that banners from the BannersAll group will be shown in this sidebox, one at a time. SideBox-Banners group is assigned to two sidebox locations —SideBox-Banner Box and SideBox—Banner Box 2. Wide-Banners group is assigned to be shown in footer position 3.
Note
Remember that, wide banners are only suitable for showing at the header and footer positions. Assigning such a banner to a sidebox will create a layout problem, and is hence should be avoided. Similarly, assigning sidebox banners to the header or footer positions will result in too much blank space at both sides of the banners.
Banner sizes are of your choice. However, there are standard sizes of banners to be used on websites. You should use these standard sizes for consistency. But you can make them any size that you want as long as those sizes match your template layout.
Standard sizes for banners and their suitable display position are shown in the following table:
|
Size (pixel) |
Style |
Zen Cart Position |
|---|---|---|
|
468 x 60 |
Full Banner |
Header, footer |
|
728 x 90 |
Leaderboard |
Header, footer |
|
336 x 280 |
Square |
Sidebox, if layout permits |
|
336 x 280 |
Square |
Sidebox, if layout permits |
|
300 x 250 |
Square |
Sidebox, if layout permits |
|
250 x 250 |
Square |
Sidebox, if layout permits |
|
180 x 150 |
Square |
Sidebox, if layout permits |
|
160 x 600 |
Skyscraper |
Sidebox |
|
120 x 600 |
Skyscraper |
Sidebox |
|
120 x 240 |
Small Skyscraper |
Sidebox |
|
240 x 400 |
Fat skyscraper |
Sidebox, if layout permits |
|
234 x 60 |
Half banner |
Sidebox, header, footer—depending on layout |
|
125 x 125 |
Square button |
Sidebox |
|
120 x 90 |
Button |
Sidebox |
|
120 x 60 |
Button |
Sidebox |
|
88 x 31 |
Button |
Sidebox |
You can add/edit banners from Tools | Banner Manager from the administration panel. To edit the properties of a banner, select the banner and click on the edit button. For adding a new banner, click on the new banner button. This will open the following screen:
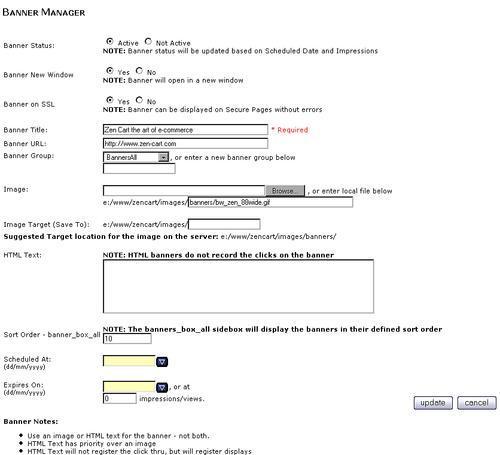
You have to fill or edit the following information in the banner editing/adding screen:
Banner Status: Select Active or Not Active to indicate the banner status. If Not Active is selected, then the banner will not be shown.
Banner New Window: Indicates whether the banner will open in a new window when clicked, or open in the same window. Selecting Yes will open the banner in a new window.
Banner on SSL: To display a banner in secure pages without any errors, select Yes in this field.
Banner Title: Type the title of the banner. Each banner must have a title.
Banner URL: Type the URL to which the browser will be redirected when the banner ad is clicked.
Banner Group: Select the group for this banner. If you do not see appropriate groups in the drop-down list, type a new group name in the text field next to this.
Image: Indicate the image to be used in the banner ad. This file needs to be uploaded or the path of the image should be indicated in the textbox below this field. For uploading the banner ad image, click on the browse button and select the appropriate banner ad image which you want to upload.
Image target (Save To): Indicates the folder where images will be uploaded to. Type the name of the folder relative to your
imagesfolder under the Zen cart installation directory. The directory name should end with a slash, as inbanners/.This directory must exist at the server and should be writable.HTML Text: If you want to show a HTML banner instead of an image banner, type HTML text in this box. Remember that the HTML text will take precedence over the image banner. This means that if you type HTML text and provide the image banner link, only the HTML banner will be displayed. The clicks for the HTML text banners will not be counted.
Sort Order-banner_box_all: As there are multiple banners under the banner _box_all category, a sort order or each banner needs to be specified here. The banners will be displayed in that sort order a lower order banner will be displayed first. For other categories, this field does not carry any importance.
Scheduled at: You can schedule a banner for a specified date. Select the date from which you want to start showing the banner. Keeping it blank will immediately activate that banner.
Expires on: Select the date on which you want to stop showing the banner. If you want to show the banner for a number of impressions, type the number of impressions in the impressions/views field. You have to fill either the expiry date or the number of impressions/views. If you don't want to stop showing the banner, keep the expiry field blank.
Promotional discounts are often used in online shops. You can offer special discounts to customers on different occasions such as the New Year, Christmas, and so on. Zen Cart has built-in tools to configure promotional discounts on products in specific categories or on selected products. You can also configure the promotion start and end dates.
Special prices can be configured from Catalog | Products Price Manager. First, select a category to show the products under it. Once the product list is shown, select the product for which you want to assign a special price. Then click on the install button to the right of the Special Price Info field.

A special screen will display a list of products in the Product list box. Select a product from the Product list box. Then assign the special price in the Special Price field. You can assign a new price for the product, or assign a percentage discount (say 20%) in this field. Then select the start date at the Available Date field and the end date at the Expiry Date field. If you want to start the discount immediately, keep the Available Date field blank. Similarly, if you want to keep the discount continuing for an indefinite period, keep the Expiry Date field blank.
Cross-selling, up-selling and better-together are some of the sales techniques used widely in online shops. Although Zen Cart has no built-in capability of doing these, you can implement these features by adding contributed modules. In this section, you are going to learn how to implement cross-sell, up-sell and better-together features.
The idea of cross-selling is to sell additional products or services to a customer. Cross-selling may be of different forms. For example, while you are selling a novel, you may try to sell other novels by the same author; while selling a computer, you may try to sell other accessories; or when you are selling a product which requires maintenance, you may sell servicing and extended warranty along with that product. The idea of cross-selling is to sell relevant products—not substitutes for that product.
Zen Cart has no built-in capability for cross-selling. However, several modules for cross-selling are available at the Zen Cart website. You can use one of those and start cross-selling. We are going to discuss one such module—Cross Sell by Tony Corbett. This module allows you to add up to 6 products as relevant in your product information page.
The installation process of the module is described in the Install.txt file in this package. Follow the instructions for installation. First, you have to apply a patch (in products_xsell.sql) from Tools | Install SQL Patch. Then, upload the files in to the appropriate directories. Replace YOUR_TEMPLATE with your template's name, for example, packt. Then you have to edit two files:
Add
define('TEXT_XSELL_PRODUCTS', 'We Also Recommend :'); just above the final?>inincludes/languages/english/product_info.phpand save it intoincludes/languages/english/packt/product_info.php.Edit the product-info template file
/includes/templates/template_default/ tpl_product_info_display.phpand insert the following code at the point where you wish the Cross-Sell box to appear. Usually, best at the end of the file:<?php require($template->get_template_dir ('tpl_modules_xsell_products.php', DIR_WS_TEMPLATE, $current_page_base,'templates'). '/' . 'tpl_modules_xsell_products.php'), ?>Save the file as
/includes/templates/packt/ tpl_product_info_display.php. Add the above codes for any other product type for which you wish to enable cross-sell display (for example, files such astpl_product_music_info_display.php).
After successful installation, you can configure the options for this module from:
Configuration | Minimum Values | Display Cross-Sell Products - This is the minimum number of configured Cross-Sell products required in order to cause the Cross-Sell information to be displayed.
Configuration | Maximum Values | Display Cross-Sell Products:This is the maximum number of configured Cross-Sell products to be displayed.
Configuration | Product Info | Cross-Sell Products Columns per Row: This refers to the Cross-Sell Products Columns to be displayed per Row. A value of 0 means off. You can set a sort order.
Configuration | Product Info | Cross-Sell - Display Prices?: Select whether to display prices in the list of cross-sell products.
Once you have configured these options, you can start using the Cross-Sell module from Catalog | Cross Sell Products. The screen will list all the available products. Select a product for which you want to assign cross-sells. Another screen will appear, where the selected product will be shown at the top, and you will have the option to check the products that you want to sell with the selected product. Select all the related products and click the update button.

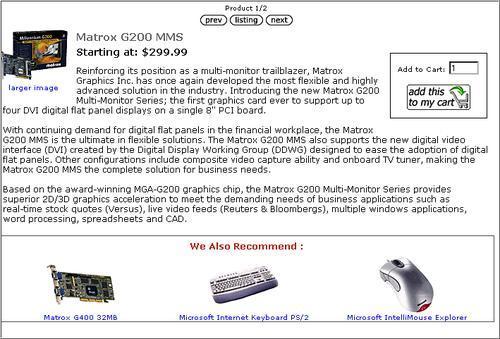
Once you have configured the cross-sells, you can work on the product details page. Click on the product for which you have configured Cross-Sell, for example, Matrox G200 MMS. Another centerbox, which looks like the following, will be displayed at the bottom of product description page:
One of the limitations of the Cross-Sell module is that the cross selling is configured one way. If you configure product A to sell with product B and product C, you will get cross-sell listing only for product A. When a customer clicks on product C, she will not see product A as a recommendation. This can be solved by using Cross Sell - Just Another Cross Sell Mod, available for download from the Zen Cart website.
The Read_me.txt file with this package describes the installation of this Cross-Sell module. Before installing this module, you must have installed Cross-Sell module first. Upload all the files to the admin and js folders. Then, apply sql_patch.sql through Tools | Install SQL Patches. With the patching of SQL, the installation would be complete, and you will see one option in Configuration | Cross Sell and a set of options under Catalog | Advanced Cross Sell.
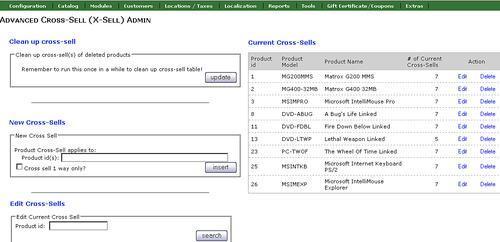
In Configuration | Cross sell, you will find the field Input type to be used in form. If you set this to id, you have to use the product ID when you insert new cross-sell in the cross-sell form at Catalog | Advanced Cross-Sell. If you set this to model, you have to use the product model when you insert a new Cross-Sell. You can insert all Cross-Sells from Catalog | Advanced Cross-Sell. The screen looks like this:
Now, let's talk about up-selling. You may have seen up-selling several times in your life. When you go to buy a dress, the salesperson may recommend you buy a dress that is of a better quality and higher price. So, up-selling is a sales technique where a salesperson attempts to have the consumer purchase more expensive items, upgrades, or other add-ons in an attempt to make a more profitable sale.
Upselling in Zen Cart can be implemented by the Cart Upsell/Cross sell module available from the Zen Cart website's download section. The installation process for this module is described in the install.txt file. First, you have to upload all the files as per the directory structure. Then, edit the tpl_shopping_cart_default.php file and add the following code before the last </div> tag:
<?php
require(DIR_WS_MODULES . zen_get_module_directory(FILENAME_CART_UPSELL));
?>
The last thing you have to do is edit the includes/modules/YOUR_TEMPLATE/ cart_upsell.php file, and replace YOUR_TEMPLATE with the name of your template, for example, packt. You will find the following set of variables defined in this file:
// number of upsells/xsells to display
define('NUMBER_UPSELLS_DISPLAY', '9'),
define('NUMBER_XSELLS_DISPLAY', '9'),
// number of upsells/xsells columns to display
define('UPSELLS_COLUMNS_DISPLAY', '3'),
define('XSELLS_COLUMNS_DISPLAY', '3'),
// upsells/xsells box title to display
define('UPSELLS_TITLE_DISPLAY', 'Customers who selected the items in your cart also chose...'),
define('TEXT_XSELL_PRODUCTS', 'To go with the items in your cart we also recommend...'),
Among these some are for displaying the number of up-sells, and some are for defining texts for the up-sell headings. Change these to suit your needs.
If you have installed the Cross-Sell module, edit the includes/languages/english/packt/product_info.php file, and add the following line (if it is already not there):
define('TEXT_XSELL_PRODUCTS', 'We Also Recommend For: '),
By doing this, your installation is complete. Now, you can see the up-sell feature in the product info page. Just below the product description, you will find the 'Customers who purchased this item also purchased...' box as shown here:

Note
Don't panic if you do not see the box for up-sell after installing this module. If you have no successful record of a completed order, then the 'also purchased' box will not be displayed. As there is no buying history based on which "customers who purchased this item also purchased..." can be displayed. Add some orders first, and then you will see this box.
The single configuration of this module is setting the number of columns per row to display in the up-sell box which is done under Configuration | Product Info. Set the appropriate number in the Also Purchased Products Columns per Row field. You can also change this value by editing the includes/modules/YOUR_TEMPLATE/ cart_upsell.php file.
If you have ever visited Amazon.com, you will know what 'Better Together' is. Whenever you view a product description, the 'Better Together' title will suggest more products to be bundled with your chosen product. Packt online shop (www.packtpub.com/books) also suggests better-together products. You can implement this feature in Zen Cart by using the Better Together module written by Scott Wilson and available from the Zen Cart website's download section.
For installing this module, upload all the files as per their directory structures. Then, login to the administration panel. In Modules | Order Total, you will see Better Together listed along with all the other modules available. Click on Better Together to highlight the module, and click on Install. Then, you have to assign a sort order. You may also decide whether to show taxes with the Better Together offer, or whether taxes will be calculated based on the better together price offer.
One of the pitfalls of this module is that you cannot configure the discounts from the Administration panel. For this, you need to edit the includes/modules/ order_total/ot_better_together.php file. You have to provide links for the products and mention discounts. Find function setup() at line 497 in this file. You will see some commented examples. First, uncomment the examples and provide your product ids and discounts. You may add the discounts as follows:
// Buy product 10, get product 11 at 50% off
$this->add_prod_to_prod(10, 11, "%", 50);
// Buy product 21, get one free
$this->add_prod_to_prod(21, 21, "%", 100);
// Buy product 1, get an item from category 3 free
$this->add_prod_to_cat(1, 3, "%", 100);
// Buy an item from category 1, get an item from category 2 free
$this->add_cat_to_cat(1, 2, "%", 100);
// Buy item 14, get a second one free.
$this->add_twoforone_prod(14);
// Buy any item from category 3, get a second identical one free
$this->add_twoforone_cat(19);
// buy two and get one free
$this->add_prod_to_prod(11, 12, "%", 100);
//buy 14 & 15, get 50% discount on 15
$this->add_prod_to_prod(14, 15, "%", 50);
// buy item 16 & 17, get 25% discount on item 17
$this->add_prod_to_prod(16, 17, "%", 25);
//buy two items from category 2 & 3, and get another item from these categories free
$this->add_cat_to_cat(2, 3, "%", 100);
//buy two and get another item at 50% discount
$this->add_prod_to_prod(22, 25, "%", 50);
After adding the discounts, save the file. Now, you need to edit tpl_product_info_display.php to advertise your discounts. Add the following code in this file below the product description block:
<?php
require($template->get_template_dir('/tpl_better_together_marketing.php',DIR_WS_TEMPLATE, $current_page_base,'templates'). '/tpl_better_together_marketing.php'),
?>
Save the file in the includes/templates/<Your Template>/templates directory. Replace <Your Template> with your custom template directory, for example, packt. Be sure that you have installed tpl_better_together_marketing.php in this same directory. Now, the better together module is ready for use. Browse to a product and you will see the following:

Remember that you have configured to give DVD free with a Matrox G200 MMS. You can make it vivid by adding the following declaration in the stylesheet.css file:
#betterTogetherDiscountPolicy {
font-weight: bold;
font-size: 1.5em;
color: red;
}
Now, the better together discounts screen will look like this:
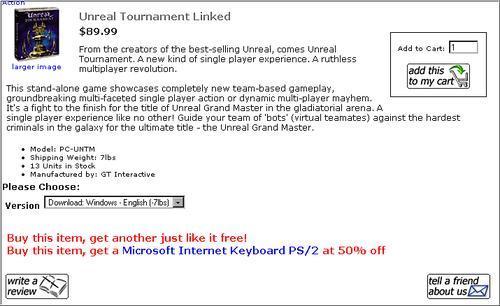
When you order both Unreal Tournament and Microsoft Internet Keyboard PS/2 together, you get a 50% discount on Microsoft Internet Keyboard PS/2. This discount will be shown in the Order Total Section in the Payment Information Step (Step 2) during checkout:

Online shops often introduce a sale for special events, or a season, to attract more customers, or to clear stock quickly. For example, a book shop may offer a 35% discount on all books for the New Year. Zen Cart has an excellent tool called SaleMaker to manage such sales. You can access SaleMaker from Catalog | SaleMaker.

In the SaleMaker screen you will see the list of sales including the deduction amount, the Start Date and the End Date, and the status of those sales. Selecting one Sale will give you the option to edit, copy to or delete that sale. You will also get information about that sale by selecting it.
You can add a new sale by clicking on the new sale button. It opens a screen that looks like this:

Suppose that you want to offer special discounts on all books during Christmas for two weeks. Type the sale name, Christmas Book Discount, in the SaleName field. Then, type the discount. You can specify the discount as a percentage of the price, or as an absolute amount. For example, if you want to offer a 35% discount, type 35 in the Deduction field, and select Percent from the Type drop-down list. You will get three options here: Deduct Amount, Percent, and New Price. This means that you can specify a new price for the product. In the product price range field, you may specify the product price range for which the discount is applicable. For example, you may want to apply a 35% discount on books whose price ranges from $ 30 to $ 150.
Some products may already be having specials. In that case, the sale discount to be applied can be configured from the If product is a special drop-down list. You have three options: Ignore Specials Price-apply to product price and replace special, Ignore Sale condition-No Sale applied when Special exists, and Apply SaleDeduction to Specials Price-Otherwise Apply to Price. Choose one option from these.
Then select the Start Date and the End Date of that sale. If your sale is open-ended, keep the End Date blank. Keeping the Start Date field blank will activate that sale immediately.
You may apply the sale to a whole product catalog or some specific categories. If the sale is only for books, then check the Books category. Remember that applying the sale to a parent category automatically applies it to its child categories. Therefore, if you apply a sale to the Books category, that will also be effective for other sub-categories under Books. While selecting categories, you can also see the categories that are already on sale. A more link will be shown beside such categories to display the details of the products on sale.
By this time, you may have already noticed on the homepage a center box that shows New Products for that month. It also shows a center box called Monthly Specials for that month. New products are displayed according to the date when they were added to the product catalog. But for Specials, you have to specify the products that fall under that category. Specials often have discounted prices. This is another way of attracting customers.
You can decide whether New Products, Special Products, Featured Products, and Upcoming Products center boxes should be displayed in the main page or not. To do this, select Configuration | Index Listing from the Administration panel and find the following options:
Show New Products on Main Page
Show Featured Products on Main Page
Show Special Products on Main Page
Show Upcoming Products on Main Page
A value of 0 means that the center box will not be displayed. If you want to show the box, just type the sort order. A lower sort order will display that center box in a higher position.

As said earlier, new products are chosen based on the date they were added to the catalog. However, you can define what the New Products, Featured Products, and Specials Products mean. Select Configuration | Maximum Values and find the following options:
Products on Special: From here, you can configure the number of products that will be displayed on the Specials box. The default is 9, and you can change it to another value.
New Products Module: From here, you can define the number of new products which will be displayed in the New Products Module.
Upcoming Products: Assign the number of upcoming products to be displayed. The default is 10.
New Products Listing- Number Per Page: Assign the number of products to be listed per page. The default is 10.
Maximum Display of Featured Products - Main Page: Assign the number of products to be displayed in the Featured Products box. The default is 9.
New Product Listing Limited to: This option defines the products that will be considered new for displaying in the center box. A value of 0 indicates All Products, 1 means Current Month, 7 means 7 Days, 14 means 14 days, 30 means 30 days, and a value of 60 means 60 days, 90 means 90 days, and 120 means 120 days. Therefore, if you want to show new products for that month assign a value, 30.
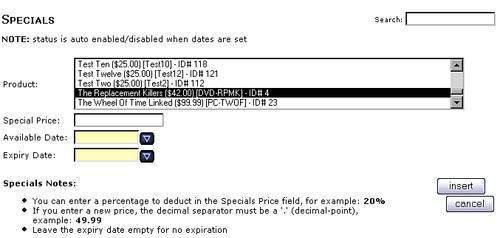
You can manage Special products from Catalog | Specials. The screen will list the products on Specials and display their special prices. You can add, edit, or delete a product from Specials, or manage special prices from this screen.
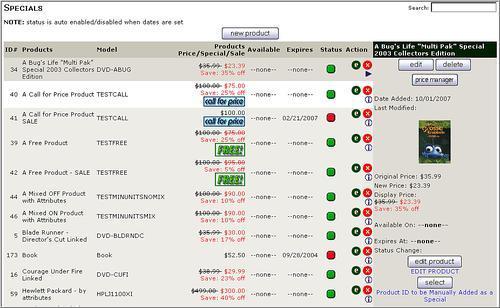
To create a new special product, click on the new product button. Then, select a product from the list of available products, assign special prices, available date and expiry date. Special Price can be set as a new price or as a percent deduction (for example, 14.70 or 25%). Once the values are set, click on the insert button.

Featured products are like special products but they have no discount price. You can add some products to the Featured Products to draw the customers' attention to them. Featured Products are managed from Catalog | Featured Products. The screen is similar to the Specials screen. You can add a new product to the featured list by clicking on the new product button. Then, you have to select the product, assign an availability date and an expiry date.

For a large product catalog, it's difficult to select a product from a list. For such product catalogs, you can add a product to the featured and specials list by clicking on the select button on Catalog | Specials or Catalog | Featured Products screen, and then typing the product id.

New Products and Upcoming Products lists are built dynamically based on the product availability. When you add a product to the catalog, you assign Product Availability Date. If the product is already available, it will be shown in the New Products list. If it is expected to be made available in the future, then that product will be added in the Upcoming Products list. You can see a list of Upcoming Products from Catalog | Products Expected.
Gift certificates and coupons are excellent ways to attract customers to your shop and to make them buy your products. Zen Cart has built-in features for Gift Certificates and Discount Coupons.
Gift certificates are sent by the shop owner to a group of customers. Customers can use that certificate while buying from that shop. Gift certificates can also be sold as a product, where customers can use them later for purchasing products from that shop.
Discount coupons are slightly different from gift certificates. Shop owners can give discount coupons to both individuals and a group of customers. Customers can use the coupons to get a discount while purchasing products from that shop. Unlike gift certificates, a customer cannot buy a product using only the discount coupons.
You can configure the discount coupon options from Configuration | GV Coupons. Here, you can configure the default Order Status when a gift voucher has a zero balance. By default, it is set to Processing[2]. You may change it to Pending[1]. Also configure Length of the Redeem Code. Remember that the longer the redeem code, the more secure it is. The default value is 10, You can change it to 20 or more. You may also like to offer a discount coupon to new customers who sign up. If you want to do so, select the gift voucher in New Signup Discount Coupon ID#, and assign the amount you want to give through this voucher in New Signup Gift Voucher Amount.
As a shop owner, you can send Gift Certificates to any customer, whenever you want. To send a Gift certificate, go to Gift Certificates/Coupons | Mail Gift Certificate. The Send Gift Certificate to Customers screen will be displayed.

Fill in the following fields:
Customer: Select the individual customer or the appropriate group to whom you want to send this Gift Voucher. Options in this drop-down list are All Customers, All Newsletter Subscribers, Dormant Customers (>3 months) (Subscribers), Active Customers in Past 3 Months (Subscribers), Active Customers in Past 3 Months (Regardless of Subscription Status), and then individual customer names. Select the appropriate option for sending the Gift Voucher.
Email To: If you want to send the Gift Certificate to a non-customer, then type his/her email address in this field. This will go to a single person. For sending to multiple customers, select the drop-down in Customer field.
From: By default, the shop owner's or administrator's email address is shown in this field. You may type a separate address in this field.
Subject: Give a subject to your Gift Voucher email. For example, Special Gift from Packt Publishing.
Amount: Specify the amount you are giving to the customer by this gift voucher. The amount you type in this field will be in the default currency of the shop. Remember that your total gift amount will be the amount typed in this field multiplied by the number of customers you are sending it to.
Rich Text Message: If you are using Rich Text Editor, such as HTMLArea or FCKEditor, then type the formatted text in this field. This field may contain graphics, links, and so on.
Text Only Message: As all email clients may not render the rich text message, it is always advisable to type the message in a text-only format. The message typed in this field will be shown to the text-only email clients.
Once all these fields are filled up, click on send mail to send the gift voucher to the customer.
You can sell Gift Certificates through your shop, just like your other products. Customers who buy Gift Certificates can redeem it and pay for their purchases. They can also send that Gift Certificate to others. Therefore, it is a convenient way to send gifts to friends and family members—you send the Gift Certificate—and your friends and family members can buy the product of their choice.
Gift Certificates can be added from Catalog | Categories/Products. First, create a category named Gift Certificates. Then add a product named Gift Certificate and configure it as follows:
Products Status: Set to In Stock.
Date Available: Leave it blank.
Products Manufacturer: Leave it blank.
Products Name: Gift Certificate
Product is Free: No
Product is Call for Price: No
Product Priced by Attributes: If you want to display products priced by attributes, then select Yes. You may opt for this because, pricing by attributes only needs one gift certificate product. Then by attribute you may change the price only.
Tax Class: Choose the appropriate tax class in this field.
Products Price (Net): Set the price here. If you choose Yes in the Product Priced by Attributes, set zero in this field.
Products Price (Gross): It is figured automatically based on the value in the Products Price (Net) field.
Product is Virtual: As virtual products like gift certificates do not need shipping address and shipping charge, select Yes, Skip Shipping.
Always Free Shipping: Select No, Normal Shipping Rules.
Products Quantity Box Shows: Select Yes, Show.
Product Qty Minimum: Leave it blank.
Product Qty Maximum: Set 0 (Unlimited) so that customers can buy as much as they want.
Product Qty Units: Leave it blank.
Product Qty Min/Unit Mix: Select No.
Products Description: Give a description of the product. Try to explain the benefits that the customer will get by purchasing this gift certificate.
Products Quantity: Type a large number so that you can track the number of gift certificates sold. When customers cannot add a Gift Certificate to their cart, check the stock and try adding a quantity here.
Products Model: Type GIFT-0001 or something similar.
Products Image: Upload an image for this Gift Certificate. Although the Gift Certificate is virtual, it is good to have a nicely designed image for it.
Upload to directory: Choose the directory to which the image will be uploaded.
Products URL: Leave it blank.
Products Weight: Leave it blank.
Click Preview and then Save the Gift Certificate.
Now, go to Modules |Order Total and click install to install or the edit button to configure the Gift Certificate (ot_gv) module. Define whether tax is to be included and how to recalculate tax.
Once the Gift Certificate product is added to the catalog, and the Gift Certificate module is enabled in Modules | Order Total, that will be displayed in the catalog. Customers can see it through the Gift Certificates category in the main page. However, you may draw attention to gift certificates on your store by creating a homepage graphic with a link to your Gift Certificate category. A new sidebox for displaying such graphics can also be used.
Customers can buy a gift certificate just like the other products. They can add it to the cart and pay for it through the checkout process. When Gift Certificates are purchased, as an Administrator, you have to log into your administration area and release them. Once a Gift Certificate is released by an Administrator, funds will be made available to the customer.
Upon the release/approval of Gift Certificates, emails with a redemption code are sent to the customers. Then customers can redeem that code either by clicking on the link, or by keying in the code on the checkout-payment page (or the Gift Voucher Redemption screen). Once a gift voucher is redeemed, funds for that gift voucher will become available to the customers, and they can use them in future transactions. Customers will see their gift voucher balance in their My Account page.
Customers can use those funds for themselves, or send it to their friends and family members. They can email as much as they want, to various people, for the amount they have purchased. Whoever they email it to will receive a new redemption code and must follow the same redemption process. They can in turn email the code whoever they wish to.

In Zen Cart, discount coupons are managed from Gift Certificates/Coupons | Coupon Admin. The coupon list is displayed in this screen. You can insert a new coupon, delete old one, send a coupon already configured, and view Report of coupon usage.
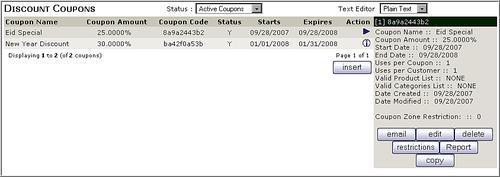
You can edit, copy or delete a coupon by clicking on the edit, delete or copy button respectively. Click on the email button to mail a coupon to the customers. You can also assign restrictions on the usage of this coupon.
To create a new coupon, click on the insert button. The Discount Coupons screen will be displayed as follows:

The following fields have to be filled up for a new coupon:
Coupon Name: Give a short name for the coupon, for example, Happy New Year Discount.
Coupon Description: Type a description of the coupon. This is your message to the customers. Explain why you are giving this coupon, and how they can use it for shopping.
Coupon Amount: Type the value of the discount for the coupon. This can be a fixed amount or a percentage discount. Use a % sign to denote the percentage discount.
Coupon Minimum Order: Specify the minimum order value for which the coupon will be considered valid. For example, if you want to give a 35% discount to customers who buy books for US$ 100 or more, the discount coupon cannot be used for a sale value lower than US$ 100. .
Free Shipping: You may use this coupon to give customers free shipping on the purchase of some products. If you want to do so, check this checkbox. While using the coupon for free shipping, the discount amount will be overridden, that is, the customers will get only free shipping, not discounts on purchases.
Coupon Code: Every discount coupon needs a unique code. You may type your own code, or keep it blank to auto generate the code. It's better to auto generate the coupon code than write your own. Auto generation ensures uniqueness.
Uses per Coupon: Specify the number of times a coupon can be used. Leaving it blank implies that it can be used without limit.
Uses per Customer: Specify the number of customers can use the same coupon. Generally, a single coupon is for a single customer. It is better to keep the default value 1 in this field.
Start Date: Specify the date from which the coupon will be valid.
End Date: Specify the date the coupon will expire on. The coupon will never expire if you keep this field blank.
Coupon Zone Restriction: The coupon can be restricted for a specific zone. Select a Zone from the drop-down list. Keeping this field blank will allow the coupon to be used for all zones.
Once the above fields are configured, click on preview to see the discount coupon, and click on the confirm button to save it.
Creating a coupon does not send it to customers instantly. To send a coupon to customers, select that coupon, and click on the email button in Gift Certificates/Coupons | Coupon Admin screen. The Discount Coupons screen will be displayed. Select an individual or a group of customers, just as in Gift Vouchers, type, subject line, and a message. Then click on the send mail button to send it to the customers.
Another way of creating similar discount coupon is to copy that coupon and change some properties as needed. You can copy a coupon by selecting that and then clicking on the copy button.
As a shop owner, you may want to see which of your discount coupons are used. You can see uses of discount coupons by clicking on the report button. You will be able to know which customer has redeemed the coupons, and on which date, and from which IP address.
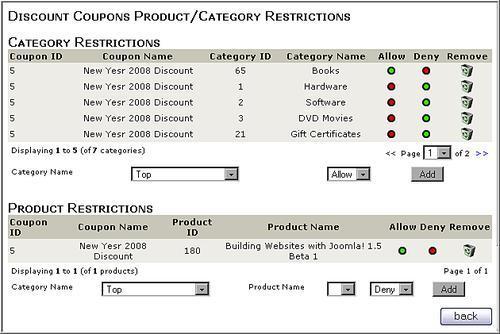
You can apply restrictions on using this coupon by clicking on the restrictions button. In the Discount Coupons Products/Category Restrictions screen, you can assign the products and categories for which the coupon can be used. For example, if you want New Year 2008 Discount Coupon to be used only for the purchase of books, limit the use of this coupon to the Books category—allow for this category and deny for all other categories.
Newsletters/Product notification is an excellent feature of Zen Cart for keeping the customers informed about new products and products of interest to them. Zen Cart's built-in newsletters/product notification management system allows you to send newsletters and product notifications to your customers as and when required. Effective use of this tool may boost your sales. You are going to learn about the newsletters/product notifications feature of Zen Cart in this section.
Product notifications can be sent to customers who have opted to receive them. While browsing products, customers can sign up for product notifications via the notifications sidebox. This sidebox is visible only on actual product pages (if it is enabled by administrator).
You can also subscribe to product notifications by clicking the checkboxes shown upon checkout success. Checking the boxes and clicking the submit button will allow the customers to view the notifications for a product. For this, the customers should have an account with the online shop. The customers can also manage the products for which they want to receive notifications.
As an administrator, you can also enable/disable the Product Notification System for the customers. To enable/disable the Product Notification System, go to Configuration | Customer Details. Change the setting for Customer Product Notification Status to on or off. If Customer Product Notification Status is on, the customer will be asked about product notifications after checkout success and in account preferences.
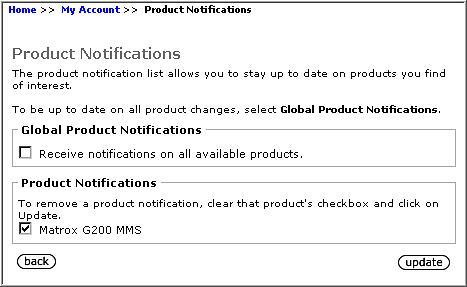
Customers themselves can modify their product notification subscriptions from their My Account area. Click on View or change my product notification list link to edit the subscription to product notifications. If you have subscribed to any product notification, it will be shown here. You may subscribe to Global Product Notifications by checking the Receive notifications on all available products checkbox.
Newsletters/Product notification system is not automatic. You have to send newsletters/notices to the people who have subscribed to newsletters and product notifications.
To send notifications to those who have signed up, go to Tools | Newsletter & Product Notifications Manager. Then, create a newsletter/notice by clicking new newsletter button, choose product notification as the module. While sending the notifications, it will ask you for the products which the notice applies to. Select products to which the notification applies and click on the send button. You may click on the Global button to indicate that the notification is for the whole product catalog.

Newsletters also need to be created and saved first. The process of creating a newsletter is the same as creating a product notification, except that you have to select newsletter in the Module field. Then, you will see the newsletter on the Tools | Newsletter and Product Notification Manager screen. Select the newsletter you want to send, and click on the send button. Then, you have to select an audience to whom the newsletter will be sent. The options in this drop-down list are: All Newsletter Subscribers, Dormant Customers (>3 months)(Subscribers), Active Customers in the past 3 months (Subscribers), Active customers in the past 3 months (Regardless of subscription status). Once a customer group is selected, click on the select button. A preview of the newsletter will be displayed in the next screen. Click on the send mail button to mail it to the customers.
The Product Review system in Zen Cart can be used as a promotional tool. Customers registered with the shop can write reviews for a product. It also has a rating system. The reviews by customers help attract other customers to the product. You may encourage customers to write product reviews and award gift vouchers to top reviewers.
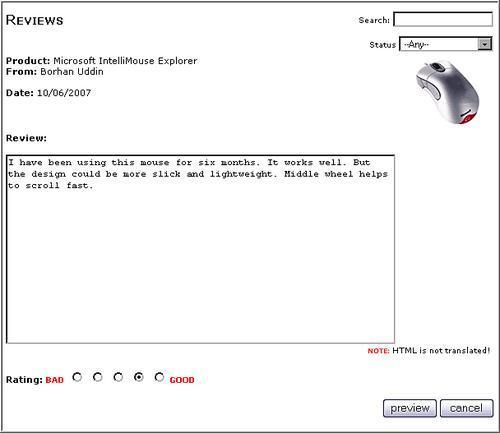
Customers can write a product review while they are in the Product Details page. Clicking on the Write a review on this product link in the Reviews sidebox will open up a Reviews screen.
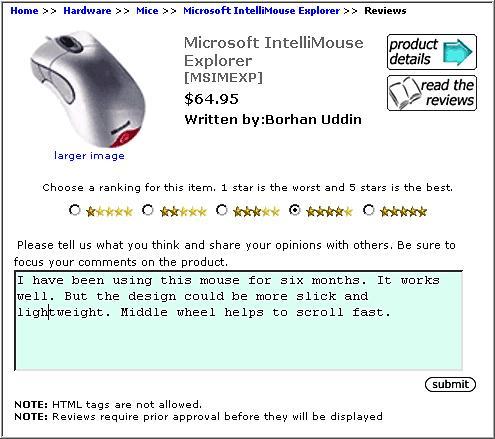
Select a ranking (1 to 5 stars) and write your review in the text box. Then, click on the submit button. Remember that customers cannot use HTML tags in writen product reviews. This is disabled to strengthen the security of the shop. Review needs to be a minimum 50 characters. Once a review is submitted, the review will be available to other customers only after approval by the administrator.
As an administrator, you can approve the reviews from Catalog | Reviews. All product reviews are listed in this screen indicating their status. A red box indicates disabled. You need to read the review first to approve it. Select the review from the list and click on the edit button. The Reviews screen will show the product review. Here, you can edit the review and ranking, and change its status. To publish the review, select Approved in the Status drop-down list.
Once the product review is approved, it will be displayed in the Reviews sidebox while the customer is in the Product Detail page of that product.
Once written and submitted by the customers, Product Reviews can be published instantly. To do this, you have to change the option in the Configuration | Product Info screen. Click on the Product Reviews Require Approval option, click the edit button and set its value to 0 =Off. If you want to approve the reviews before publishing, set its value to 1 =On.
People come to know about your online shop mostly through search engines. Therefore, it is imperative to have a good ranking in the search engines, or at least ensure that your site can be found through a search engine. Some techniques are used to optimize your site so that it gets listed in a search engine and appears first in the search results. Using meta-tags for products and categories is one way of optimization. Another way is to use search engine friendly URLs. We are going to learn about these in this section.
The first step in search engine optimization is to use meta-tags properly. Zen Cart has a built-in feature for adding meta-tags for categories and products. You can add meta-tags to each product and category so that a search engine can index them appropriately.
You can define site-wide meta-tags such as charset, keywords and description from the includes/languages/english/meta_tags.php file. Edit the file for keywords, site title, site tagline and site description and save them to your override template directory, for example, packt.
Some of the meta-tags you want to add may not be present in the above file. To adding your custom meta-tags, copy the includes/templates/template_default/common/html_header.php file to your includes/templates/packt/common/ folder. Open it and add your own meta-tags to those already there by default.
You can define meta-tags for each category from Catalog | Categories/Products. Here, you will find a list of all defined categories. Now, click on the meta tag icon, which is the last one to the right. A new screen will be displayed where you have to provide the following information:
Title: The title of the page will be defined in this field.
Keywords: Add the keywords that will be used for searching products in that category. These are the keywords that are going to be used during a search. Appropriate keywords result in better search results.
Description: Give a description of the category. Try to accommodate as many keywords as you can. The description should be brief, but comprehensive, so that customers know exactly what is in a category.
Note
A meta-tag must contain keywords and a description, or it will not be considered complete, and will eventually be ignored. Do some research about the keywords for each category beforehand. You may use some online tools for such keywords and get synonym keywords. One such tool can be found at: http://www.webmaster-toolkit.com/keyword-research-tool.shtml.
You can also define meta-tags for each product. Go to Catalog | Categories/Products and browse to the individual product lists. Then, click on the meta-tag icon to define it. Here also, you have to define the title, keywords and description. Your descriptions need to be content-rich and keyword-rich. There are custom settings in Product Types that can include the Product Name, Title, Model, Price and Title tagline in the meta-tag title. You have to select Yes/No for these fields.
Note
Generally, search engines will index all your pages in the shop. Therefore, build your pages with proper text to increase their content value for search engines. Although meta-tags are helpful, they are not the be all and end all. Content is more significant than meta-tags. The content should also be relevant to the meta-tags. If there is a difference between the keywords used in meta-tags and the actual content, a search engine may consider it keyword spamming. Remember that the lack of content is the major issue if your site is not getting good search engine rankings.
If you are a long time user of the internet and have some interest in search engine optimization, you will find that one of the drawbacks of using shopping carts such as Zen Cart is its URLs. If you look into your browser's address bar, at the first sight, you may be perplexed. The URL reads something like: http://www.yourdomain.com/ /index.php?main_page=product_info&products_id=12. In fact it is a link to a DVD titled Die Hard. As a human, you cannot remember the URL. On the other side, robots from Google and other search engines also dislike these types of URLs. URLs with ‘?' are usually not indexed by search engines. This means your shop may be out of the search engine, or in the worst case, Google may index only your store's homepage, and not all the products. This is awful!
Several attempts have been made to use Search Engine Friendly (SEF) URLs in such shopping carts. Although other CMSs like Joomla! have built-in SEF feature, Zen Cart is yet to develop such SEF URLs on its own. However, third-party contributions are available for implementing SEF URLs in a Zen Cart shop. We will know how to use the Ultimate SEO URLs module in Zen Cart.
The Ultimate SEO URLs module can be downloaded from Zen Cart's download section. It is located in the Other Modules category. Its installation is simple, and works perfectly in most of the cases.
After downloading this from the web, extract it on to your computer. Then, upload the files from _zen_cart_folder to your Zen Cart installation directory. Now see the files in the v137-specific-files folder. Backup these files in your Zen Cart installation. Then, upload these files to your Zen Cart installation. A sample .htaccess file is included with the package. Rename it to .htaccess, and edit the word /shop to reflect your site's installation directory. Once done, you can configure this module from Configuration | SEO URLs.
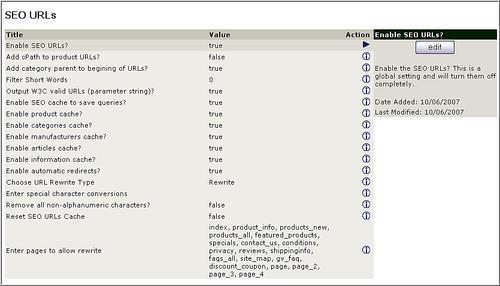
You have to configure the following options for Ultimate SEO URLs:
Enable SEO URLs?: You can enable or disable search engine friendly URLs from this option. Select true to enable, and false to disable SEO URLs.
Add cPath to product URLs?: Selecting true in this option will append the category path to the product URL. In such cases, the URL will look like http://yourdomain.com/matrox-g400-32mb-p-2.html?cPath=xxx. Keep this setting to false.
Add category parent to beginning of URLs?: This setting will add the category parent name to the beginning of the category URLs (that is—parent-category-c-1.html).
Filter Short Words: This setting will filter words less than or equal to the value from the URL. For example, you want to keep the filenames 20 characters long. Then type a value of 20 in this field. Longer product names will be shortened to that having 20 characters.
Output W3C valid URLs (parameter string)?: Enabling this setting will output W3C valid URLs.
Enable SEO cache to save queries?: This is a global setting and will turn on/off caching completely.
Enable *** cache?: There are five options for enabling cache for. These settings will enable/disable cache for products, categories, manufacturers, articles and information pages.
Enable automatic redirects?: Enabling this will activate the automatic redirect code and send 301 headers from old to new URLs.
Choose URL Rewrite Type: Choose which SEO URL format to use. At present you will get only one option, Rewrite. In future, there may be more options.
Enter special character conversions: This setting will convert special characters in URL into normal characters. The format must be mentioned in the form char=>conv,char2=>conv2, etc.
Remove all non-alphanumeric characters?: This will remove all non-letters and non-numbers from rewritten URLs. This should come in handy while removing all special characters with one setting.
Reset SEO URLs Cache: This will reset the cache data for SEO. From time to time, you may need to refresh the SEO URLs to get updated SEF URLs.
Enter pages to allow rewrite: This setting will allow the rewrite only in the specified pages. If it is empty, all the pages will be rewritten. The pages must be mentioned in the following for at: page1,page2,page3. The pages mentioned by default will be alright in most cases.
Once you have configured the SEF URLs, you can browse products in your store and see their rewritten URLs. These will look like: yourdomain.com/matrox-g200-mms-p-1.html, yourdomain.com/hewlett-packard-laserjet-1100xi-linked-p-27.html, and so on.
Note
There are some other modules for SEF URL in Zen Cart. For example, SEFU is one of the modules which modifies Zen Cart core files and database tables. While using any third-party module, always keep track of the files which are being modified. Module which do not modify any core files or database tables are safer to use. For Ultimate SEF URLs module, it only replaces three files for v.1.3.7: admin/categories.php, admin/product.php, and includes/functions/html_output.php. Before uploading these files to the server, rename the original files with a suffix .SEO. When you want to remove SEF URLs, you can get back to the original files by changing their names to their original ones.
In this chapter, you have learned about several promotion and public relations tools available for a Zen Cart shop. Use of these tools effectively, and in a planned manner can enhance your sales dramatically. Amongst the tools, Featured Products, Special Products, SaleMaker, Cross-sell, Up-Sell, Gift Certificates, and Gift Vouchers can be used for the promotion of your products. On the other hand, tools such as Newsletters/Product Notifications manager can be used to communicate with your customers and inform them about new offers. The Review system can also contribute in promoting your products and acting as testimonials. Finally, you have learned how to get the attention of the search engines by using meta-tags for the site, category, products, and using search engine friendly URLs in your online shop.
After knowing all these attractive features of Zen Cart you may be tempted to move your existing shop to Zen Cart. In the next chapter, you are going to learn how to migrate from osCommerce to Zen Cart.