
One of the good features of Zen Cart is that, with some knowledge in HTML, CSS, and PHP, users can customize its look and feel. As an administrator, you can customize its look and feel through the administration panel. But for further customization and matching it to your own style, you need to edit template files. This chapter is going to show you how to customize the look and feel of a Zen Cart shop.
On completion of this chapter, you will be able to:
Configure the look and feel through the administration panel
Apply different templates to your Zen Cart store
Change the texts and graphics displayed in the store front-end
Customize the look and feel by editing files
Understand the override system
Modify templates to suit your needs
Create new templates for the front-end
Modify templates for sending mails to customers
Each of these topics will be discussed to enable you to perform the tasks of customizing the look and feel of your store.
Zen Cart templates define the look and feel of the store through different graphics, colors, and fonts. By default, only the Classic template is shipped with Zen Cart version 1.3.8.x. However, you have the liberty to download and install new templates from the Internet and also develop your own look and feel of a Zen Cart store and configure it through the administration panel.
Zen Cart provides great design flexibility. You can see the design showcase on the Zen Cart website www.zen-cart.com. The website lists Zen Cart shops throughout the world. Visiting these shops will give you an idea about the extent to which you can change the design of a Zen Cart shop.
Note
You can download lots of templates from the Zen Cart website: www.zen-cart.com. There are some other sites from which you can download Zen Cart templates, free of charge. http://www.zencarttemplates.info allows us to preview and download free templates. However, professional looking Zen Cart templates are also available from some other template stores such as www.templatemonster.com. You can use Google to find such templates.
For the exercise in this book, you are going to design a template that will look like www.packtpub.com. You will use the same logo and design scheme.
Zen Cart templates reside in the /includes/templates directory. Before applying any template, you need to copy the template files to the /includes/templates directory under your Zen Cart installation root directory.
To start building your customized template, copy the /includes/templates/classic folder to a new folder of /includes/templates/packt. Now, open the /includes/templates/packt/template_info.php file in your favorite text editor and change it as follows:
$template_name = 'PACKT Publishing';
$template_version = 'Version 1.0';
$template_author = 'Suhreed Sarkar (c) 2008';
$template_description = 'This template set is designed for packtpub.com,
as an illustartion of Zen Cart template design procedures.';
$template_screenshot = 'scr_template_packt.jpg';
Save the file when you have made these changes. Now, your template is ready for use in your Zen Cart shop.
Note
Note that the template is not complete yet. You have only created a skeleton. While going through the following sections, you will gradually customize this template.
Generally, you need to set the template for each language. You can change the template used by your shop via Tools | Template Selection in the administration panel. The screen lists the installed templates. The template in use is selected by default.

To change the template for a language, click on that language. Then, you see a right-arrow in the action column for that language. On the right, information about the selected template is shown. To apply the template, click on the edit button, select the template of your choice from the drop-down list, and then click on the update button.
To apply your newly created template, select PACKT Publishing from the drop-down list, and click update. Your new template will be applied. As you have still not changed much in the template, it will look similar to the previous, classic, template.

If the language for which you want to assign a template, is not available in the list, click on the New Language button. Then, select the template name and language from the drop-down list. If the preferred language is not available in the drop-down list, you will need to add it via Localization | Languages.
Note
Any template that you have copied to the includes/templates/ directory is generally displayed in the drop-down list accessible via Tools | Template Selection. If the template is not displayed in the drop-down list, it means that something is wrong with the template files. Check that all of the files have been copied to the templates directory, and ensure that the template_info.php file is in that template directory.
A Zen Cart shop layout consists of left and right column sideboxes, a header, a footer, and the main content in the middle column. You can define which sideboxes will be shown where. You can also choose the width of the left and right column sideboxes. The following sections will show us how to do this.
A wide variety of layout settings can be defined via Configuration | Layout Settings. The screen provides an array of configuration options for defining the column widths and other layout characteristics.
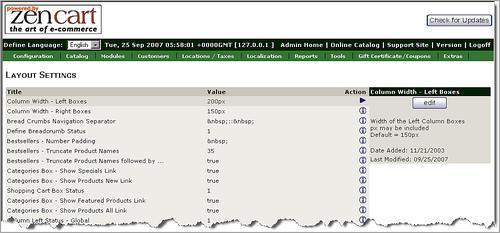
The column width for the left and right boxes can be defined in the Column Width - Left Boxes and Column Width - Right Boxes fields respectively. The default width of these boxes is 150px. You can extend this setting to whatever width you prefer, for example 200px, based on the availability of screen space.
Breadcrumbs (showing our current location) status can be specified in the Define Breadcrumb Status field. Although the default value is 1, you may set this value to 2, which will show the breadcrumb on all pages except the homepage. In fact, showing Home on the homepage looks odd, so this should be turned off for the homepage. You can also set the breadcrumb separator in the Bread Crumbs Navigation Separator field.
You can hide the left or right column by setting the Column Left Status - Global and Column Right Status - Global fields to 0.
If you want to show the categories on the homepage, you must change the Categories - Always Show on Main Page field's value to 1. To speed up the page loading, you may also be tempted to use CSS buttons, instead of gif or jpg image buttons, to speed up the page loading. Set the CSS Buttons field's value to Yes to use the CSS buttons.
The layout of the store front-end can be defined via Tools | Layout Box Controller. Clicking on this, you will see the boxes and names of the files that can be assigned to the left, right or center position in the front-end.
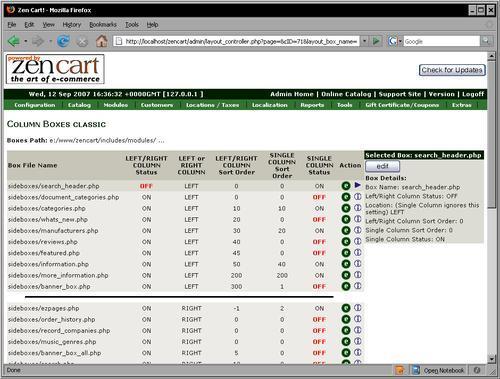
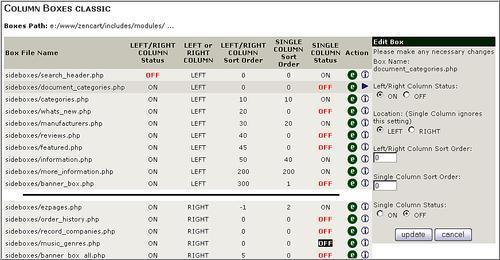
Sideboxes are generally located in the includes/modules/sideboxes directory. All the files in this directory will be shown in the Tools | Layout Boxes Controller screen. You will find five fields to the right of each sidebox. You can change the value of these fields by selecting the sidebox and then clicking on the edit button to the right of the fields.
The configuration options are available for each sidebox:
Left/Right Column Status: If you need to show a sidebox in the left or right column on the store front-end, select ON in this field. It is displayed on the left or right column, as you indicate in the Location field.
Location: Once the Left/Right Column Status is indicated here, you have to indicate the column in which you would want to show the sidebox, whether left or right. For sideboxes with the Single Column Status ON, this selection will not be effective.
Left/Right Column Sort Order: This field indicates the order in which the sideboxes will be shown in the left or the right column. A lower value indicates a position nearer the top, and a higher value moves it down.
Single Column Sort order: This field indicates the order of the Single Column sideboxes. A lower value puts the sidebox nearer the top.
Single Column Status: If you want to show a sidebox in the center column, you select ON in this field.
You can customize the location and order of the sideboxes through this screen. You can also hide or show the sideboxes in the left and right columns from here.
Another way of hiding some sideboxes from a page is to edit the page's template file. For example, if you want to hide the right column sideboxes on the Privacy Policy page, follow the instructions given here:
Open the file
includes/templates/template_default/common/ tpl_main_page.phpin your favorite text editor.Find the line which reads as:
if (in_array($current_page_base,explode(",",'list_pages_to_skip_all_right_sideboxes_on_here,separated_by_commas,and_no_spaces')) ) {
$flag_disable_right = true;
}
Change the above line to:
if (in_array($current_page_base,explode(",",'privacy, contact_us,shippinginfo')) ) {
$flag_disable_right = true;
}
Note that the names of three pages have been entered here. For these pages, the right column sideboxes will not be shown. You can add more page names here separating them with a comma (,).
Save the file as
includes/templates/packt/common/tpl_main_page.php.Open your browser and point it to
http://yourdomain.com/index.php?main_page=privacy. The page will now look like the following screenshot: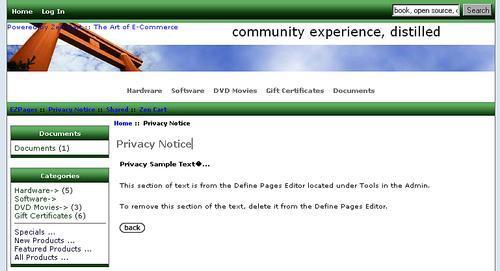
Designing a template for the first time is not an easy job. But once you have understood the basics and worked out some hacks, the process will be much easier. Getting to understand the logic behind Zen Cart templates is the first step towards developing templates for Zen Cart.
A Zen Cart template consists of a set of PHP files containing HTML and PHP codes. Each page consists of a header, a footer and sideboxes. While you are designing any page or module, you should keep in mind where you are going to show that page or module.
Whereas HTML and PHP codes give the structure of the page, CSS styles control the presentation of the page components. You need to edit the respective CSS to get the appropriate look and feel of a page.
While tweaking the Zen Cart template, you will often have to change the layouts and try them on the local server. Upload the tweaked or new template files to the production server only when you are fully satisfied with their output.
Note
Remember how Zen Cart handles images. There are two ways of inserting images into the page output. You can use a relative path to the images directory, or use PHP variables to declare the images in the template. Also remember that there will be shops using https server, and if you use relative image paths, it is likely that the https server will throw up warnings about insecure items. One solution to this is to keep a copy of the images inside the images directory at the https installation directory. To be on the safer side, I recommend you always use PHP variables for images.
In this section, you are going to understand how Zen Cart templates work, and what you need to change to get your desired look and feel.
The Zen Cart templates are located in the includes/templates directory. The typical structure of the templates directory is shown in the following figure. Note that by default there is a default template named template_default. This template contains most of the files needed for any template, and can be used as a base for all new templates. Therefore, it is wise not to modify or replace any file in this template directory. Instead, create the new template in a separate directory and apply the template override. Through this template override, all new changes will be applied along with this default template.

The template files used in Zen Cart provide the structure and layout of the various pages of your cart. They make use of the definitions from your language files.
The template files of Zen Cart are located in the includes/templates/template_default directory under the installation root of the shop. Template files have a tpl prefix (for example, tpl_filename.php). They provide the structure and layout of the various pages of a Zen Cart shop.
You will find three types of template files:
Common: These template files are located in the
includes/templates/template_default/commondirectory. These are common to every page used in Zen Cart. Generally, these files consist of the main page, header, footer and box files for the sideboxes.Specific pages: There are some template files specific to certain pages. These are located in the
includes/templates/template_default/templatesdirectory. For example, the display for the Login page is defined by thetpl_login_default.phpfile. If you want to change the display of a particular page, change the respective template file in this directory.Sideboxes: Display of the contents in the sideboxes is defined in the sideboxes template files. You will find these files in the
includes/templates/template_default/sideboxesdirectory.
Besides these three types of template files, there are also CSS stylesheets and graphics files in the template directory. Editing the template and CSS files will not be too hard as most of the sections in those files are commented for your understanding.
Zen Cart uses CSS for layout and display of the store's front-end. There are several CSS stylesheets for different purposes. Generally, CSS stylesheets are located in the CSS folder within the template directory. You can change most of the layout and display characteristics, such as color, font, and so on, by editing these stylesheets.
The names of the stylesheets and their descriptions are given in the following table.
|
CSS file Naming |
Purpose |
|---|---|
|
|
These stylesheets load at the very beginning and define site-wide properties. |
|
|
These files are for language-specific properties. For each language, you may need to define a separate stylesheet. For example, while using the Bangla language, you need to use the appropriate fonts, instead of default Arial or Helvetica. In this case, you have to define Bangla language-specific style properties in the bangla_stylesheet.css file. On selecting the Bangla language from the front-end, language-specific style information will be used from the bangla_stylesheet.css file. |
|
|
These files are for page-specific styles. You can define different style properties for each page through these stylesheets. |
|
|
These are language-specific style definitions for a specific page. When a page's language changes, the style definitions from these stylesheets are used to display that page in the selected language. |
|
|
These files are for a specific category. On changing the category, the style information from these pages is used. |
|
|
These files contain language-specific style information for each category. |
|
|
These files define style properties specific to a manufacturer. |
|
|
These files contain language-specific style properties for a manufacturer. |
|
|
These files define style properties for a specific product's info page. By adding these stylesheets, you can display the product information pages differently for each manufacturer. |
|
|
These files define the language-specific style properties for a product's info page. |
|
|
These files contain site-wide style properties for generating printer-friendly pages. |
The stylesheets mentioned above are listed in the order in which they load. stylesheet.css always loads first, and should contain the majority of your CSS selectors. Files loaded later takes priority over previously loaded file(s).
Note
You can speed up loading time by including only new selectors or selectors whose properties you wish to change in the optional CSS files. You can also have different overrides for the same page, in different languages, because the two would never be called at the same time.
Language-specific stylesheets are of great use while considering the localization of your store. As you know, fonts may need to be different for different languages. Fonts used for English will not be enough to display the contents in Bangla or in Hindi. For these languages, you need to define the bangla_stylesheet.css or hindi_stylesheet.css files. These files should contain only the site-wide changes that you want to make to stylesheet.css. For example, you may only need to change the background-image and font-family for Bangla or Hindi.
You can also set different stylesheets for different pages. For example, you may set a different background-image for different pages.
Note
Although you have the flexibility to add new stylesheets and selectors, it is better to use existing CSS files and the standard tags as much as possible. Only change their properties when needed. It is also suggested that you do not change the core code. Use the existing CSS files to do the work for you. Keeping your custom design in custom CSS files will later help you upgrade Zen Cart easily.
One of the useful features of Zen Cart is its override system. This feature allows template designers to use existing templates as a base, and apply new or modified designs to the template system on an incremental basis. Overrides also allow you to make and save changes to your cart without the fear of losing them when upgrades and patches are released.
The override system is applicable to:
Language Files (
includes/languages)Module Files (
includes/modules)Template Files (
includes/templates/template_default)Extra Definitions (
includes/languages/language_name/extra_definitions)Extra Data Files (
includes/extra_datafiles)
This means, that you can customize these files without modifying them directly. Creating some new files and adding modifications to the new files will help you achieve the desired customization. All of these new modified files can be saved in the custom_folder, say my_mods.
Let us consider an example for modifying a language file. Generally Zen Cart uses the language strings from the includes/languages/english.php file. You can make site-wide changes to this file. For example, you may want to adapt the language to suit a book store. As you sell only books, you can use 'Books' instead of 'Products', and also 'Publishers' instead of 'Manufacturers'. You can also change languages for specific pages. For example, you can change the language for the Featured Products page (featured_products.php) by applying overrides as follow:
Create a new directory
/includes/languages/english/packtCopy
includes/languages/english/featured_products.phpto this new directory. You now have/includes/languages/english/packt/featured_products.phpOpen the file
featured_products.phpin a text editor, then find the following lines of code to modify:define('NAVBAR_TITLE', 'Featured Products'), define('HEADING_TITLE', 'Featured Products'), define('TEXT_DATE_ADDED', 'Date Added:'), define('TEXT_MANUFACTURER', 'Manufacturer:'), define('TEXT_PRICE', 'Price:'),Replace 'Manufacturer' with 'Publisher' and 'Products' with 'Books'. Now the above lines will look like:
define('NAVBAR_TITLE', 'Featured Books'),
define('HEADING_TITLE', 'Featured Books'),
define('TEXT_DATE_ADDED', 'Date Added:'),
define('TEXT_MANUFACTURER', 'Publisher:'),
define('TEXT_PRICE', 'Price:'),
Save the file.
Similarly, open the /includes/languages/english/index.php file and replace all instances of products with books and all instances of manufacturers with publishers. Also, replace all instances of models with edition.
Now, the Featured Products page of your Zen Cart shop will look like the following screenshot. Note that 'Books' is shown instead of 'Products'.

As with Language overrides, you can apply overrides to module files located in /includes/modules/sideboxes/. Each .php file in this folder represents a sidebox. If you want to make changes to a sidebox, the best way is to use an override. For example, in your book shop you may want to use a custom Information sidebox. Instead of modifying information.php, you can use an override. Follow the given instructions:
Create a new directory,
includes/modules/sideboxes/packt.Copy
includes/modules/sideboxes/information.phpto this new folder.Now, open the file
includes/modules/sideboxes/packt/information.phpin your favorite text editor.Modify the file to suit your needs.
Save the file.
Whenever you develop a new module for this bookshop, you can put it in this directory. The module will override the modules in the other directories, when you apply the Packt publishing template.
Overrides can also be used for page-specific template files. Page-specific templates are located in the includes/templates/template_default/templates/tpl_*.php files. If you need to modify some part of a page-specific template, for example tpl_product_reviews_default.php, follow the given instructions:
Create the directory,
includes/templates/packt/templates.Copy
includes/templates/template_default/templates/ tpl_product_reviews_default.phpto the above directory.Open the file in your favorite text editor.
Find the appropriate sections and modify them to suit your needs.
Save the file.
The changes you have made to tpl_product_reviews_default.php will now override the previous design.
You may need to include additional definitions during customization of your Zen Cart. Additional definitions are generally kept in the includes/languages/english/extra_definitions/ folder. To add your own definitions, open your favorite text editor, create a definition file named my_own_definition.php and save it in an appropriate folder. Write all of the definitions that are needed for customization of your Zen Cart shop in this file.
Sometimes, you may also need to create extra data files for some modules or for customizing your Zen Cart shop. Follow the same method used for creating your own definition file. You can define extra data files and save these in the includes/extra_datafiles/ folder. For example, you have created a custom page (about_us) and need to reference the filename. You can do this by creating a new file (about_us_filenames.php) which will include the following:
<?php
// About Us Filename Define
define('FILENAME_ABOUT_US', 'about_us'),
?>
Now, save the file as /includes/extra_datafiles/about_us_filenames.php.
One of the benefits of using the override system is that you don't have to worry about over-writing your custom files when you upgrade to a later version, because all of your modified files are in the custom directories. If you do not use override, but directly modify the core files, it will be difficult to save or recreate your changes during an upgrade.
For safety, wherever you see a classic folder, you can add another custom folder, where custom is the name of your customized template. You can do all the changes in this custom folder, keeping the original files intact. This will help when you are upgrading to later versions.
The preferred way to customize the look of a page is to do so with a stylesheet. It is much easier to keep track of a stylesheet than hacks in the source code.
When Zen Cart loads a page, it first looks for a stylesheet with the same name as your page. You can see what Zen Cart calls each page by looking at your URL. It should be something like your_domain/index.php?main_page=index.main_page. It tells the cart which page to display. For example, if you want to hide the breadcrumbs on your homepage, you can do so by adding the following stylesheet:
Create a new stylesheet (
.cssfile) in your templatesCSSdirectory namedindex_home.css.Add the styles for your homepage. The style required to hide the breadcrumbs is:
#navBreadCrumb{ display: none; }Save the changes to the file.
Now, refresh your browser to your shop's homepage. If the new style is not applied, try emptying your browser cache. The homepage will be shown without the breadcrumb.

Another example of using a page-specific stylesheet may be for the Privacy page. Suppose that you want to show the heading of the privacy notice in red, and the background of the notice in silver. For this, you can create a stylesheet named privacy.css and place the following style declaration in that file:
#privacyDefaultHeading {
font-family: Arial;
color: red;
text-transform: uppercase;
}
#privacyDefaultMainContent {
color: red;
background-color: silver;
}
In this way, you can create stylesheets for each page. However, it is convenient to add only those style declarations that are unique to that specific page.
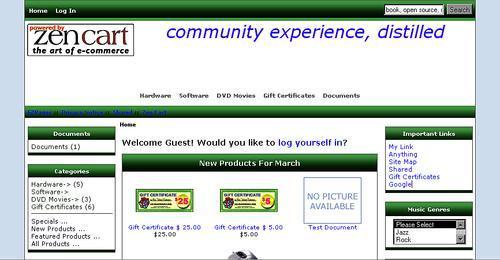
After installation of Zen Cart you will find the Zen Cart logo in the header of the store front-end. In the main body, you will see 'Congratulations! You have successfully installed your Zen Cart E-commerce Solution'. An advertisement for the Zen Cart manual follows that. You have to customize this page before starting your online shop. In fact, the first step towards customizing your look and feel will be to change these texts and the logo of the store.

The first thing that you may want to change is the statement 'Congratulations! You have successfully installed your Zen Cart™; E-Commerce Solution'. To remove this statement, open the includes/languages/english/index.php file in your favorite text editor and find the following code:
/*Replace this text with the headline you would like for your shop.
For example: 'Welcome to My SHOP!'*/
define('HEADING_TITLE', 'Congratulations!
You have successfully installed your Zen Cart™ E-Commerce Solution.'),

} elseif ($category_depth == 'nested') {
// This section deals with displaying a subcategory
/* Replace this line with the headline you would like for your shop.
For example: 'Welcome to My SHOP!' */
define('HEADING_TITLE', 'Congratulations! You have successfully
installed your Zen Cart™ E-Commerce Solution.'),
In the highlighted lines in the preceding code, replace the text starting 'Congratulations...' with your own text. Make sure that the single quote marks are not deleted. You may put a welcome message here, say, 'Welcome to Packt Publishing'. However, if you do not want to show anything, just delete the default words and keep one space. Then save the file as includes/languages/english/packt/index.php, to use the overrides.
Another default text you need to change is 'Sales Message Goes Here'. You may also need to change the 'Tagline Here'. To do so, open the includes/languages/english/header.php file in your favorite text editor and find the following line of code:
define('HEADER_SALES_TEXT', 'Tagline Here'),
Replace 'Tagline Here' with your own text, such as 'community experience, distilled!'. Make sure that the single quotes are not deleted and the text you specify remains inside the quotes. Save the file as includes/languages/english/packt/header.php.
If you see 'Zen Cart!, The Art of E-Commerce' on your browser title bar, you need to edit another file includes/languages/english/meta_tags.php. Open it in your text editor and find the following lines of code:
// page title
define('TITLE', 'Zen Cart!'),
// Site Tagline
define('SITE_TAGLINE', 'The Art of E-commerce'),
Replace the title and tagline texts with your own texts, making sure that the single quote marks are not left out, and new quote marks are not added. Save the edited file as includes/languages/english/packt/meta_tags.php.
Note that after changing the above texts, the advertisement placed on the homepage is still visible. This is defined in the /includes/languages/english/html_includes/classic/define_main_page.php file. Open the file in the text editor and delete all of the contents of file. To be safe, you may apply override by creating a file named /includes/languages/english/html_includes/packt/define_main_page.php. Enter your desired text in this file using HTML markup, or keep it blank to show nothing.
You may use the pages in the /includes/languages/english/html_includes/ folder more intelligently. You can add any HTML content to any page by creating a define_page_name.php page in this folder and sub-folder. For example, the texts to be displayed in the Privacy page can be put in define_privacy.php file in the HTML format. Similarly, define_checkout_success.php, define_conditions.php, define_contact_us.php, define_page_not_found.php, and define_discount_coupon.php can be of great use if you want to display related information as nicely-formatted text.
The header image of Zen Cart is one of the first things you will want to change. By default, Zen Cart uses a graphic named header_bg.jpg for its header, but you have the freedom to change its name as you wish. To do this, create a new background graphic using an image editor—GIMP or Adobe Photoshop—and save that image as includes/templates/packt/images/header_bg.jpg.
Note
For Zen Cart customization, it is better not to change the original files. Zen Cart uses an override system which can be used to add customization to templates, modules, sideboxes, and so on. Let us start using the override system for the following exercises.
From Zen Cart 1.3.7.x, stylesheets are used to define the background image for the header. Therefore, you need to edit the stylesheet. Open the stylesheet.css and find the following lines:
#logoWrapper {
width:760px;
height:110px;
background-image:url(../images/header_bg.jpg);

background-repeat:no-repeat;
}
In the highlighted line above, specify the name of your header background image, for example, my_header_bg.jpg. Save the file as includes/templates/packt/css/stylesheet.css.
As Packt website does not use a header image, you can remove this as well. To do this, change the preceding code block to be as follows:
#logoWrapper {
width:90%;
height:110px;
background-color:#ffffff;

}
As www.packtpub.com uses a fluid design, you have to make it much more flexible by defining the width as a percentage. Instead of the background header, display a white background. Now, your store will look as shown in the following screenshot:
Before using any new image as background , make sure you resize its height and width to fit the header region. Also note that you can specify its height and width from this style declaration.
You need to change the logo of your store to make it branded. One easy way to do this is to replace the includes/templates/template_default/images/logo.gif file with another logo.gif file of the same dimension. But often, you would want to do more by creating your own image of different sizes and in different image formats (that is, .jpg, .png). You may also want to change their position. Now, you are going to learn how to do this.
First, prepare your logo using an image editor of your choice. Save the image to includes/templates/packt/images/packt_logo.png.
Now, you need to adjust the height, width and logo name in the language file. To do this, open includes/languages/english/header.php and find the following lines:
define('HEADER_LOGO_WIDTH', '192px'),
define('HEADER_LOGO_HEIGHT', '64px'),
define('HEADER_LOGO_IMAGE', 'logo.gif'),
Make appropriate changes to these lines and save the file as includes/languages/english/packt/header.php. You have to do it for each language. For example, for the Bangla language, you have to copy header.php file to includes/languages/bangla/packt/header.php.
By default, the logo is left-aligned. This alignment is defined in includes/templates/template_default/css/stylesheet.css. Open the file and find the following:
#logo, .centerBoxContents, .specialsListBoxContents,
.categoryListBoxContents, .centerBoxContentsAlsoPurch, .attribImg {float: left;}
Because this is a collection of several selectors (#logo, .centerBoxContents and so on), split this into two separate statements as shown here, so as not to interfere with the layout of the other sections:
.centerBoxContents, .specialsListBoxContents,
.categoryListBoxContents, .centerBoxContentsAlsoPurch, .attribImg {float: left;}
#logo {float: left;}
To center the logo, use text-align: center; or to align it to the right, use float: right;
Save the files as includes/templates/packt/css/stylesheet.css. After adding the logo, the logo area will appear as follows:

If you open any page of your Zen Cart in a text editor, you will find that the page is broken into smaller pieces called 'classes'. The style for each class is defined in the stylesheet.css file. You can control the look of your shop by changing the fonts, colors, text sizes, borders, background images, and so on, by changing the class styles. You can change the colors by using standard HTML color numbers for the text and background colors. You can also change the text size by increasing or decreasing the size, and change the typeface by using a different font name.
For example, you want to change the font size and the color of the Tag Line. If you view the source code, you will find the tag line in following code:
<div id="tagline">community experience, distilled</div>
If you want to change its style—font, color, and so on—you have to change the style definition of your tagline ID in stylesheet.css.
To do this, open the includes/templates/packt/css/stylesheet.css file in your favorite text editor, and find the following lines:
#tagline {
color:#000000;
font-size: 2em;
text-align : center;
vertical-align: middle;
}
Let us change its color and font as follows:
#tagline {
color:#6600FF;
font-size:3em;
font-style:italic;

text-align : center;
vertical-align: middle;
}
Now, reload the homepage in your browser. You will see the difference in the display of your tagline.
You have the freedom to edit the stylesheet. You can remove a CSS element, such as a border, simply by commenting out the line with a "/*" (slash, asterisk) at the beginning of the line and "*/" (asterisk, slash) at the end of the line. You can add new style properties and make your Zen Cart shop more attractive. But what you need to know to do this is how CSS works.
Note
The Web Developer Toolbar extension for Mozilla Firefox may be of great help to you while editing stylesheets for Zen Cart. This will help you identify classes and IDs for HTML elements, and show you associated style declarations and stylesheets in use. It will also help you see the source code and identify document object models.
As you want to make the site similar to www.packtpub.com, you have to change its look and feel by changing its fonts and colors by editing stylesheets. The following changes are to be made to /includes/templates/packt/css/stylesheet.css:
#mainWrapper {
...
width: 90%; /* instead of 750px, we make it fluid */

...
}
#logoWrapper{
/* background-image: url(..);
background-repeat: repeat-x; */
background-color: #ffffff;
height:100px;
}
#navMainWrapper, #navSuppWrapper, #navCatTabsWrapper {
...
background-image: url(../images/tile_back.png);
...
}
#navCatTabs li {
...
background:url("../images/tableftI.gif") no-repeat left top;

...
}
#navCatTabs a {
...
background:url("../images/tabrightI.gif") no-repeat right top;
...
}
#navCatTabs a.category-top {
...
background:url("../images/tabrightI.gif") no-repeat right top;
...
}
#navEZPagesTop {
background-color: #abbbd3;
background-image: url(../images/tile_back.png);
...
}
h3.leftBoxHeading, h3.leftBoxHeading a,
h3.rightBoxHeading, h3.rightBoxHeading a {
font-size: 1.2em;
color: #cd6601; /* for Packt */
}
.leftBoxHeading, .centerBoxHeading, .rightBoxHeading {
...
/* background-image: url(../images/tile_back.png); */ /*for packt */
...
}
A.category-top, A.category-top:visited {
color: #008ccf; /* packt */
text-decoration: none;
}
.productListing-rowheading {
background-color: #abbbd3;
background-image: url(../images/tile_back.png);
...
}
After all of these changes have been made for the two image files, tile_back.png and tabrightI.gif, and these images are added to /includes/templates/packt/images directory, the site now looks quite similar to www.packtpub.com, though it may need some more tweaking. Look at the following screenshot:
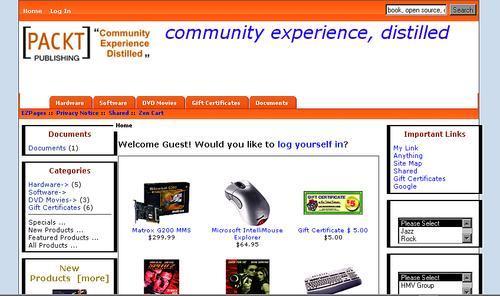
Note that now the color scheme has been changed to look similar to Packt's website. The borders of the sideboxes also look similar to Packt's boxes. You may try to fine-tune its design after learning more about changing buttons and page layouts.
You can change the buttons and icons used in your Zen Cart shop. This will help you customize the Zen Cart shop as you wish. In Zen Cart, the buttons and icons are generally located in the following places:
/imagesfolder: This is where your product images are kept. Whenever you upload a product image, it goes into this folder. This folder may have subfolders to contain product images by manufacturers and/or types./includes/languages/english/imagesfolder: The language icon (icon.gif) is located in this folder. For each language, create such a folder and put your language flag there./includes/templates/template_default/buttons/englishfolder: This folder contains the buttons used by the Cart. You need to add buttons for each language. First, generate the buttons in your language, and then put them in the appropriate folders. For example, the buttons for the Bangla language should be in either theincludes/templates/template_default/buttons/banglafolder or theincludes/templates/packt/buttons/ banglafolder./includes/templates/template_default/imagesfolder: This folder containsheader_bg.jpg, logo.gif, and other images required by the template. Your template-specific image files should be put in the images folder under your template directory, for example,includes/templates/packt/images./includes/templates/template_default/images/iconsfolder: This folder contains additional images used by Zen Cart. The delete icon, warning icon, and so on can be found in this folder. Put your template-specific icons in theincludes/templates/packt/images/iconsfolder.
Once you have generated the custom buttons and icons for your template, the names of these buttons need to be defined in includes/language/english/button_names.php. For each language, you need to set the names in this file. For example, the names of buttons specific to the Bangla language should be defined in the includes/languages/bangla/button_names.php file.
The editing of button_names.php will be straightforward. It has two sections: one for defining the button image files, another for defining alt text for those images. The following is a code snippet from button_names.php:
/** define the button images used in the project */
define('BUTTON_IMAGE_ADD_TO_CART', 'button_add_to_cart.gif'),
define('BUTTON_IMAGE_ADD_ADDRESS', 'button_add_address.gif'),
define('BUTTON_IMAGE_ADD_PRODUCTS_TO_CART','button_add_selected.gif'),
define('BUTTON_IMAGE_BACK', 'button_back.gif'),
define('BUTTON_IMAGE_BUY_NOW', 'button_buy_now.gif'),
...
/* ALT tags used for buttons */
define('BUTTON_CREATE_ACCOUNT_ALT', 'Sign Up'),
define('BUTTON_LOG_OFF_ALT', 'Log Off'),
define('BUTTON_ADD_TO_CART_ALT', 'Add This to My Cart'),
define('BUTTON_ADD_ADDRESS_ALT', 'Add Address'),
...
You can use your favorite image editor for creating the buttons in your language. The buttons may be saved as GIF, JPG or PNG, but if you are not using the same format and names as the original buttons, you need to edit the button_names.php file to reflect the new names of the buttons, and save this edited file in your language override directory.
Note
There are some online tools which can be used to generate buttons for the Zen Cart store, simply by specifying the background and foreground color, font, language and button template. One such tool is available at http://www.advancewebsoft.com/downloads/free-scripts/free-oscommerce-cre-loaded-zen-cart-oscmax-button-generator-p.html. This online tool can generate buttons for Zen Cart, osCommerce, CRE-Loaded, and oscMax.
Changing the layout of a template mainly involves changing its width and showing/hiding sideboxes. You have already learned about showing or hiding sideboxes. Now, you will learn how to change the width of a template.
In Zen Cart version 1.3.x, CSS are used for layout, instead of tables. Therefore, you only need to edit the main stylesheet for that template. When changing the width of a template, it is better to use an override. Open the /includes/templates/packt/css/stylesheet.css file and find the following style declaration:
#mainWrapper {
background-color: #ffffff;
text-align: left;
width: 750px;
vertical-align: top;
}
The highlighted line specifies the width of the page. To make the template fluid, that is, fit it in the available browser window space, change its value to 100%. You could also choose any other desired value.
In Zen Cart version prior to 1.3.x, changing the width was tricky. For such a template open the stylesheet.css file for editing, and find the .centershop, TABLE.header, .main_page, and TD.headerNavigation declarations. In all the declarations, you will find a line saying, width: 750px !important;. Change the width in this line. Remember that all four instances need to be changed.
Page-specific templates are located in the /includes/templates/template_default/templates/ directory. For each page there is a tpl_*.php page. The layout of the page is defined in its related tpl file. You can change the template for each file by editing these files and applying overrides. For example, you may want to change the layout of the Product Information page. Information regarding a product is shown in this page when you click a product link. By default, this page looks like the following screenshot:

Note that the Add to Cart block is shown after the product description. You may opt to put this just after the product name to persuade customers to buy it. To do this, you need to edit the tpl_product_info_display.php file. Open it in your favorite text editor, and find the following block:
<!--bof Add to Cart Box -->
..... <
!--eof Add to Cart Box-->
Select the whole block and cut it. Now, locate the following block:
<!--bof Product Name-->
<h1 id="productName" class="productGeneral">
<?php echo $products_name; ?>
</h1>
<!--eof Product Name-->
Paste the <!—bof Add to Cart Box --> block just after <!—eof Product Name -->. Now save the file in your override directory /includes/templates/packt/templates/.
Refresh the page in your browser. Now, you will see the Add to Cart block just after the product name. You can edit other files in the same way.

The product catalogue in the Zen Cart shop consists of dynamically-generated pages. Of course, the product catalogue is the core of an online shop. However, besides product catalogs, a good shop also needs to have some static pages that describe such things as privacy policy, shipping & return policy, frequently asked questions, and so on. These pages generally do not change frequently and need to be linked to the homepage so that customers can access these pages whenever necessary.
A feature called EZ-Pages provides the flexibility of adding static pages to a Zen Cart shop in a fast and easy way. It also helps create links to other internal and external pages. You can also create related links to form a group or a chapter.
EZ-Page can be added to your store via Tools | EZ-Pages | New File in the Administration Panel. Options for creating an EZ-Page are shown in the following table:
|
Option |
Description |
|---|---|
|
Page Title |
Type the name of the page in this field. The page or link you are creating will be referred to by this page title. Page Title is mandatory, and all EZ-Pages and links need it in order to function. |
|
Open New Window |
Selecting 'Yes' for this field will open the page or link in a new window when on in the Header, Footer or Sidebox. |
|
Page is SSL |
Select 'Yes' to indicate that the page or link is using Secure Socket Layer (SSL). |
|
Link placement locations |
Although you have the option of adding additional links to the Header, Footer and Sidebox with EZ-Pages, you are not limited to only these three link locations. Links can be placed in one or more locations simply by enabling the Order for the Location(s) where the Link should appear. The Link Location Status for the Header, Footer and Sidebox is controlled simply by setting these to 'Yes' or 'No' for each setting. Then, set the order in which the Link should appear for each location. |
|
Chapter and TOC |
The Chapter and TOC, or Table of Contents, are a unique method of building Multiple Links that interact together. While these links still follow the rules of the Header, Footer and Sidebox placement, the difference is that only one of the links, the main link, needs to be displayed anywhere on the site. |
|
HTML Content |
Add HTML content that will be shown on the page in this text area. HTML editors will often add the opening and closing tags for sections such as |
|
Internal Link URL |
Internal Link URLs are links to internal pages within your shop. These can be to any valid URL, but should be written as relative links such as |
|
External Link URL |
External Link URLs are links to pages outside your shop. These can be to any valid URL such as: http://www.zen-cart.com. For an external link, you need to include the full URL. You can also mark these to open in a New Window or the Same Window. |
After typing a page title, if you provide an internal or external link, it will be considered as a link, and not a page. In that case, the text you have typed in the HTML Content box will be ignored.
Creating a new template for Zen Cart is fun. You have already learned the basics of how a Zen Cart template works. Prior to version 1.3.x of Zen Cart, some HTML tables were used for layout. But in version 1.3.x onwards, Zen Cart has fully abandoned the use of HTML tables for layout, using a CSS-based layout instead.
Let us start building a new template for Zen Cart by creating a new folder under includes/templates/. Let us name it Packt (or whatever you like). But remember to use underscore instead of spaces in a long name. Avoid using Book Shop. Instead, use book_shop or BookShop.
Under the packt template folder, create the following folders:
images: this folder will contain all the images needed for the template.css: this folder will contain all the CSS files for the template. It's better to copy all the files from theincludes/templates/template_default/cssdirectory to thiscssfolder.common: this folder will contain the common files for the template. You may copy the files from theincludes/templates/template_default/commonfolder, and edit those to suit your needs.sideboxes: this folder will contain module-specific sideboxes. Here, you can add new sideboxes, which you are going to use.templates: this folder contains page-specific templates. Whenever you want to change a page's layout, copy the template for that page to this directory and modify it as required.
Information regarding a template is located in the template_info.php file. You need to create a new template_info.php file for the new template. Copy the file called includes/templates/template_default/template_info.php into the new template folder, and then open the template_info.php file in your favorite text editor.
Change the text between each set of single quotes to suit your new template.
<?php
$template_name = 'Packt Publishing';
$template_version = 'Version 1.0';
$template_author = 'Suhreed Sarkar';
$template_description = 'This template is designed for Packt Publishing';
$template_screenshot = '';
?>
Remember to keep the single quotes. Your template name does not need to be identical to your folder name, and you can use spaces to make it read well, but it is best to keep them similar. Leave the space between the quotes for the template screenshot field empty for now, as you don't have one yet.
When you've finished, your new file structure should appear as follows:

Open your Admin panel and navigate to Tools | Template Selection. Click the Edit button, then choose Packt Publishing from the drop-down menu and click the Update button. Now, navigate to Tools | Layout boxes controller, and click the Reset button at the bottom of the page.
Your new template is now enabled and ready to be customized.
When building a new template for Zen Cart, you can use its powerful overriding feature. Overriding means using some template as the base and extending it by adding different properties through separate templates. For example, you may want to make some modifications to the default template, template_default. You could modify the files in the template_default directory to do this. But due to its overriding character, you can add the changes in the new template, say packt, which will apply the changes to the shop.
In fact, you can override any file in the path includes/templates/ template_default. Files in this directory generally determine the layout and the HTML formatting of your web pages. By default, Zen Cart has two standard templates: template_default and classic, both of which are located in the includes/templates/ folder.
Out of these two standard templates, only template_default contains a full set of files. Every other template contains only the files that differ from template_default. If your template does not contain a particular file, Zen Cart will pull that file from template_default.
You need to add your templates graphics to the appropriate folders as discussed previously in the section on Changing Buttons and Icons. The header image, logo, background image, background image for sidebox headings, and so on should be placed in the images directory under your template directory. If you want to change the buttons and icons, create the graphic files in the GIF, JPG or PNG format and put them in the /includes/templates/template_name/buttons/language_name folder. Then, update the button_names.php file to define the button image file name, and the ALT texts for those images.
You do not need to copy existing sideboxes from the template_default directory, as these will automatically be displayed. If you are planning to develop a new sidebox, put the template for that sidebox in the sideboxes folder under your template directory.
A sidebox consists of three files, which are located in the includes directory:
modules/sideboxes/template_name/name_of_sidebox.phplanguages/english/extra_definitions/template_name/ name_of_sidebox_defines.phptemplates/template_name/sideboxes/tpl_name_of_sidebox.php
You need to replace template_name and name_of_sidebox with you template name and the sidebox name respectively. For example, let us build a sidebox named my_sidebox. Then, my_sidebox.php file will read like this:
<?php
$show_my_sidebox = true;
if ($show_my_sidebox == true){
require($template->get_template_dir('tpl_my_sidebox.php', DIR_WS_TEMPLATE, $current_page_base,'sideboxes'). '/tpl_my_sidebox.php'),
$title = BOX_HEADING_MY_SIDEBOX;
$left_corner = false;
$right_corner = false;
$right_arrow = false;
require($template->get_template_dir($column_box_default, DIR_WS_TEMPLATE, $current_page_base,'common') . '/' . $column_box_default);
}
?>
This page actually defines what is to be shown in that sidebox. Note that this page also includes the corresponding template file. Here, we have used a constant BOX_HEADING_MY_SIDEBOX. You need to define this in the includes/languages/english/extra_definitions/packt/my_sidebox_defines.php file. This file will look like this:
<?php
define('BOX_HEADING_MY_SIDEBOX', 'My Sidebox'),
?>
Now, you have to build its template file includes/templates/packt/sideboxes/tpl_my_sidebox.php, which will read as:
<?php
$content = "This is my first Sidebox. I have created it in 5 minutes. Although it is not of practical use yet, I hope I can eventually build a good sidebox.";
?>
If you have created these files for the packt template, you can try it by going to Tools | Layout Boxes Controller in the administration panel. From here, turn the sidebox ON and set it up to display in the left or the right side column. This sidebox will look like the following figure.

All stylesheets for your new template should be placed in the /includes/templates/template_name/css folder. You should follow stylesheet naming conventions as discussed earlier in this chapter. It is a good idea to copy an old stylesheet and then modify it to suit your needs. As discussed earlier, you can have multiple stylesheets for your shop -you can even add a stylesheet for each page.
As a design rule, try to keep the declarations minimal, simple, and self explanatory. Try to restrain yourself from changing the class and ID names in the core files.
As a store owner, you need to send several mails to your existing and potential customers. You will learn about promotion and public relations activities available in Zen Cart in Chapter 6. All these emails use some templates that reside in the /email folder under the Zen Cart installation directory. To change these emails to your style, you may edit these templates.
The email's structure is determined in one of two ways. If you are sending plain text emails, the email structure is determined by the way you put together the various items (customer greeting, order number, link to detailed invoice, and so on) in a string variable that is then passed to the zen_mail() function. If you are sending HTML emails, the structure is determined by the template you use.
You can rearrange, add, or delete items in a plain text email. To do so, you will need to edit the Zen Cart files where the email is created. For example, if you want to edit the order confirmation email, you will need to edit the file includes/classes/order.php.
In your example, open up includes/classes/order.php and scroll down to the bottom of the file, in the function send_order_email(). There, you will see the lines that construct the plain text email message:
[Line 827]
$email_order = EMAIL_TEXT_HEADER . EMAIL_TEXT_FROM . STORE_NAME . "

" . $this->customer['firstname'] . ' ' . $this->customer['lastname'] . "

" . EMAIL_THANKS_FOR_SHOPPING . "
" . EMAIL_DETAILS_FOLLOW . "
" . EMAIL_SEPARATOR . "
" . EMAIL_TEXT_ORDER_NUMBER . ' ' . $zf_insert_id . "
" . EMAIL_TEXT_DATE_ORDERED . ' ' . strftime(DATE_FORMAT_LONG) . "
" . EMAIL_TEXT_INVOICE_URL . ' ' . zen_href_link(FILENAME_ACCOUNT_HISTORY_INFO, 'order_id=' . $zf_insert_id, 'SSL'
[Line 848]
$email_order .= zen_db_output($this->info['comments']) . "

";
[Line 855]
$email_order .= EMAIL_TEXT_PRODUCTS . "
" .
EMAIL_SEPARATOR . "
" .
$this->products_ordered .
EMAIL_SEPARATOR . "
";
In this file, the variable that holds the plain text email message is called $email_order. It generally has a different name in each file, such as $email or $email_text. Whatever its name, this is the place where you will make your changes. You can add, delete, and rearrange the order of the items to suit your wishes.
HTML Email templates have two parts: embedded CSS and HTML codes. You may be surprised to see the embedded stylesheet in each mail template and may want to know why linked stylesheets have not been used. One reason for not using the linked stylesheet is that you may not know how the email clients will behave. Most email clients used today can handle HTML emails and stylesheets to some extent. But there is no guarantee that every customer will have an email client that can retrieve linked stylesheets and render the emails in the desired format.
The first portion of the email template is devoted to defining styles for different parts of the mail. Open the /email/email_template_welcome.html file in your favorite text editor to examine the stylesheet in an email template. The stylesheet in this template will appear as follows:
<style type="text/css">
.body {background-color:#ffffff; color:#000000; font-family:Verdana, Arial, Helvetica, sans-serif;}
...
.header {font-size:10px; padding:0px; width:550px;}
.content {font-size:10px; padding:5px; width:550px;}
.content-line {padding:5px;}
.coupon-block { padding: 5px; border: 1px #cccccc solid; background-color: #FFFF99; }
...
.disclaimer1 a:link {color:#666666;}
.disclaimer1 a:visited {color:#666666;}
.disclaimer2 { color: #666666; padding: 5px; }
.copyright { border-bottom: 0px #9a9a9a solid; padding: 5px; }
</style>
Style declarations in this stylesheet are straight-forward. First, it has defined style for the body and hyperlinks. Then, it defines the content and email related styles. Most of the style names are self-explanatory. You will find the HTML blocks with these names in the template.
The main part of the email template is the HTML code with style classes and variables. The following are some of the variables used to construct content for the email:
$EMAIL_GREETING$EMAIL_WELCOME$COUPON_BLOCK$GV_BLOCK$EMAIL_MESSAGE_HTML$EMAIL_CONTACT_OWNER$EMAIL_CLOSURE$EMAIL_FOOTER_COPYRIGHT$EMAIL_DISCLAIMER$EMAIL_SPAM_DISCLAIMER$EXTRA_INFO
These variables are defined in several PHP files, such as create_account.php. Once you have found the files that need to be edited, you may want to add a definition for your new HTML item to each one. For example, you have added an item called $EMAIL_HOURS_OF_OPERATION to the email_template_order_status.html template. One of the files that you will need to edit is admin/orders.php. Find the part of that file where the email message is being constructed. In this case, it begins around line 100.
You can see that the HTML message is constructed with several statements such as:
$html_msg['EMAIL_CUSTOMERS_NAME'] = $check_status->fields['customers_name'];
$html_msg['EMAIL_TEXT_ORDER_NUMBER'] = EMAIL_TEXT_ORDER_NUMBER . ' ' . $oID;
All you need to do is add a new statement under all of these, to define your new item:
$html_msg['EMAIL_HOURS_OF_OPERATION'] = 'We are open from 9 AM to 5 PM every day of the week.';
Note
Use a $ in front of the name of your new item in the HTML template, but do not use the $ where you define it.
To change the text displayed in your emails, edit the corresponding language file. You can change an existing text, or add a new one (if you've added it to your email structure). You add or change text values using the define() statements:
define(EMAIL_LOVELY_YOU_DROPPED_BY,'We are just so immeasurably delighted that you stopped by our store today!'),
There is another language file you need to modify when altering text for your emails, includes/languages/english/email_extras.php. This file contains several text strings common to all emails sent from your store.
In this chapter, we have learned about customizing the look and feel of a Zen Cart Shop. You have seen how Zen Cart templates can be used to change the look and feel, and have also understood how the template override system works. We have discussed assigning template to a Zen Cart shop, changing default text and logos, changing fonts, colors and other styles. We have also discussed customizing Zen Cart template by editing template files and using overrides. Then, we learned how to create a new template based on an existing template. We have also learned about using side-boxes and customizing email templates.
With this knowledge, you are now ready to move forward to next chapter, which will discuss localization of the Zen Cart shop.