
Maintenance and troubleshooting are important aspects for any web application. You need to perform some regular maintenance activities to keep your Zen Cart shop active, and trouble free. Sometimes, you also may face problems operating the shop. This chapter discusses maintenance and troubleshooting issues in Zen Cart. In this chapter, you will learn:
How to backup and restore files and databases for Zen Cart
How to harden security for Zen Cart
How to solve common problems
Only common problems and troubleshooting techniques are discussed in this chapter. As a user of Zen Cart you may face different types of problems. For more information and solutions of such problems, the best place to raise the issues is Zen Cart Forum (http://www.zen-cart.com/forum). You may also consult the sites listed in the Appendix.
Some maintenance activities to your Zen Cart online shop may interrupt its service. For example, when you are backing up or restoring databases and files, and installing and configuring some third-party contributions , the site may become unavailable to the customers, or it may be malfunctioning. Plan the maintenance activity in advance and schedule the activity for the time when the website traffic is expected to be minimal and the least number of customers will be affected.
Zen Cart has a built-in mechanism to notify visitors about scheduled maintenance. You can configure these settings in the administration panel from Configuration | Website Maintenance.
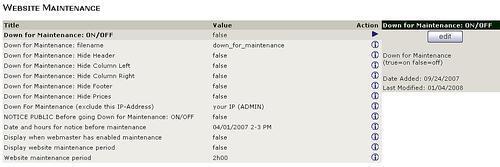
Whenever you want to do some maintenance, first take the shop offline. Click on Down for Maintenance: ON/OFF and set its value to true. Visitors to your site will then see a message on the front page about the maintenance.

By default, the name of the file displayed during maintenance is down_for_maintenance. You can change the messages shown in this page by editing its language file, /includes/languages/english/down_for_maintenance.php. Its display can be customized by editing a corresponding template file /includes/templates/template_default/templates/tpl_down_for_maintenance.php. You can also decide whether the header, footer, left column, right column, and the product price will be displayed or not by configuring these options from the Configuration | Website Maintenance page.
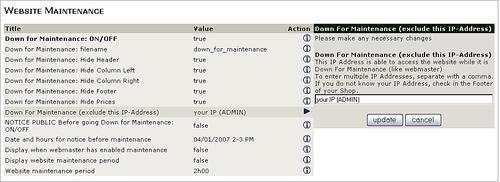
Bringing the shop down for maintenance means you want to do some activities and also experiment with the shop. Therefore, it is necessary that at least you access the shop while it is blocked for the others. You can exclude yourself (admin) from being blocked during this down period by entering your IP address into the Down For Maintenance (exclude this IP-Address) field. You can type multiple IP addresses separated by a comma (,).
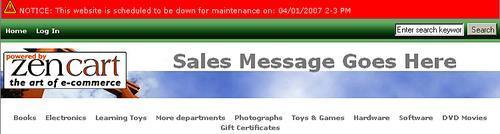
It is good to inform the visitors about your scheduled maintenance in advance. Set the NOTICE PUBLIC Before going Down for Maintenance: ON/OFF field to true. By default, it is false, and whenever you set the Down for Maintenance: ON/OFF field to true, the value of this field becomes false automatically. Setting this value to true will display a notice for scheduled maintenance. Now is the time to set the schedule. Click on the Date and hours for notice before maintenance field, and set the date and time of maintenance. Then, a notice will be displayed in the header of your online shop before taking it down for maintenance.
You can show visitors when the shop was taken down for maintenance and what the estimated downtime is. Informing your visitors about this will encourage them to come back. Set the fields, Display when webmaster has enabled maintenance and Display website maintenance period, to true. You can also set the duration of the maintenance period in the Website maintenance period field.

Backing up files and databases is the first step in maintenance activities. While setting up the Zen Cart shop and customizing it, you will change a lot of files which will not be the same as the original ones that came along with the Zen Cart installation package. By this time, you also know that all information you enter into your Zen Cart shop are stored in the database. Therefore, to be on the safe side, it is better to back up the files and databases regularly.
Backup has no value in normal time, but it seems invaluable when you have a problem. When your store is not working due to some recent changes in the files or databases, and you want to revert to the previous version of files and/or database (which was working fine), backup seems to be worth a million dollars.
For the following reasons you need to back up your files and databases regularly:
Your web server may be compromised, or it may be out of order any time. In that case, you can start your online shop on another web server if you want to have a back up of all the files (modified
.phpfiles, product images, and so on) and databases.Sometimes, you may have a problem after modifying files. For example, you are customizing the look and feel of your Zen Cart shop, and suddenly you find that after editing some files and uploading them to the web server, your Zen Cart shop is not displaying the front page but is throwing errors. The backup of the files will help you revert to the previous version of files, and resolve the problem.
Problems may also occur after installing third-party contributions. Some third-party contributions may overwrite some core files of Zen Cart. In which case, the backed up files will help you revert to the working version.
There is no built-in mechanism in Zen Cart to backup its database. You have to use phpMyAdmin, other MySQL tool, or third-party contributions to back up whole databases for Zen Cart. If you have access to phpMyAdmin, please follow these steps to backup your Zen Cart database:
Login to phpMyAdmin.
From the list of databases, select the Zen Cart database. Usually, it is zencart.
Click on the Export tab.
In the Export section, click on Select All, or select your desired tables by clicking on the table names. For selecting multiple tables, press Ctrl and click on the table names in the list.

Uncheck the Structure checkbox for not including table structures. If you want to include a table structure, select Add IF NOT EXISTS in the Structure section. This will add a statement which will ensure that a table is created only when it does not exist. Selecting this option is especially advantageous for backups.
In the Data section, keep the default settings, that is, Complete Inserts, Extended Inserts, Use Hexadecimal for Blobs checked.
Click on Save as File, as you are going to save the export on your computer. You can also use a template for the filename. The default is __DB__, which names the file after the database. You can save the file as zipped or gzipped by selecting these options in the Compression field.
Click on the Go button. If you have selected Save as File, a Save To dialog box will be displayed. Browse a location on your computer to save the file.
There is a third-party contribution for Zen Cart to facilitate backing up of the Zen Cart database from within Zen Cart. Download Backup Admin MySQL Plugin v.1.3 from Zen Cart website's download section. Installation is as simple as extracting and copying the admin folder to the Zen Cart root folder.
Backup Admin MySQL Plugin v.1.3 uses two MySQL programs: mysql and mysqldump. These two programs usually reside in the /usr/bin directory. This path is indicated in the /admin/includes/languages/english/backup_mysql.php file. If you are using a windows server, you may need to edit this. If MySQL backup Admin Tool is not working, open the /admin/includes/languages/english/backup_mysql.php file and change the following lines:
define('LOCAL_EXE_MYSQL', '/usr/bin/mysql'),
define('LOCAL_EXE_MYSQLDUMP', '/usr/bin/mysqldump'),
Usually, on a Windows server, these paths will look like c:/mysql/bin/mysql.exe and c:/mysql/bin/mysqldump.exe. Be sure about the actual path on your Windows server and replace the previous lines accordingly.
Note
For creating backups, the admin/backups directory should have read/write permission. If you are using a Linux server, apply CHMOD 777 on the admin/backups directory.
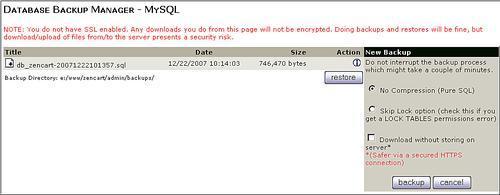
You can run this backup tool from the administration area. Select Tools | Database Backup—MySQL. The Database Backup Manager—MySQL screen will be displayed.

If you are not using SSL, a warning message will be displayed saying that any downloads from this page will be unencrypted. Click on the backup button to create a new backup of the Zen Cart database. The New Backup dialog box will be displayed. If you want to skip the locking of the database during a backup, check the Skip Lock option radio button. Generally, the backup generated is stored in the admin/backups folder, and you can download that by clicking the down arrow icon before the name of the backup. If you want to download the backup file directly to your computer without storing it on the web server, check Download without storing on server.
Backing up files is as simple as backing up any web application. You may need to keep a backup of the initial snapshot, then do some backup for only the changed files. Once you have set up a Zen Cart shop, take the base snapshot. Then after customizing the shop, that is customizing the look and feel and installing third-party modules, you need to take backups.
Zen Cart themes are using overrides, and this override system does not modify or replace original files. Therefore, while adding a new template, you can just care about those new files in the template. Similarly, after adding Zen Cart third-party contributions, you can take a backup of the new files.
Note
Although, in principle, no third-party contribution is supposed to touch the files in the original installation, some contributions still do some modifications to the original files. Be sure about such overwrites or modifications before installing the contributions. Also, keep a backup of the original files before installing such contributions.
Product data are very much important for any online shop. You must ensure that product data are always backed up and readily available for restoration whenever necessary. While product information such as description, price, and so on are stored in the database, product images are not stored in the database. Generally, product images are stored in the images directory under the Zen Cart installation directory of your web server. Therefore, you also need to backup this folder whenever you see that a large number of products have been added to the catalogue.
If you are using Linux hosting and cPanel, you can back up files (and also Zen Cart database) easily from cPanel. Follow these steps to backup files and database from cPanel:

Click on the Backups icon in cPanel's main page. The Backups page will be displayed. You can download the directory and database backups from this page.
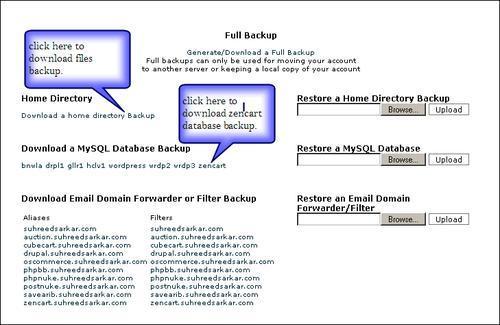
In the Home Directory section, click on the Download a home directory Backup link. This will start download of the backup. Save the file on your computer.
To back up the database, click on the Zen Cart database name under the Download a MySQL Database Backup section. This will save the SQL dump of the database in a compressed format. Save the file on your computer.
If you have backed up the database using phpMyadmin or Database Backup Tool Plugin, you can restore those backups from phpMyAdmin, or the Database Backup Tool Plugin.
Restoring database from phpMyAdmin is actually executing a query or importing the dump. Follow these steps to restore from a backup:
Login to phpMyAdmin.
Select the zencart database.
Click on the Import tab.

In the File to Import section, click on the Browse button and select the backup file which you want to restore.
Click on the Go button.
The database will be restored. If there is any record existing in the database, an error message will indicate the problem with that record. Remember that importing a large database may take some time.
Restoring database backups made by Database Backup Tool Plugin is much easier. Once the backup is generated, that will be listed on the Database Backup Manager—MySQL screen.

For restoring a database backup follow these steps:
Click on the database backup which you want to restore. On the right side, two options will be shown: restore and delete.
Click on the delete button to delete the database backup. You may delete it if you are sure that you will never need the backup in future.
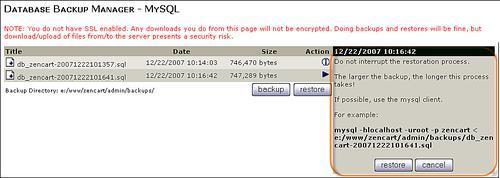
Click on the restore button to restore that database backup. Details of information about that backup set will be shown.
Again, click on the restore button on this dialog box to restore the backup.
Finally, the database will be restored. It may take some time depending on the size of the database you are restoring.
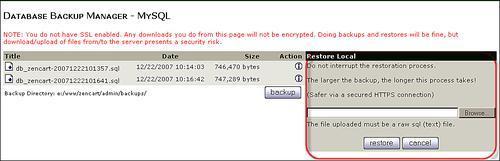
Note that, you have to click on the restore button shown to the right side box. If you click on the restore button shown in the following screenshot, the list of backups will show you options to restore from a file on your computer. Click on the Browse... button, select the .sql file from where you want to restore, and click on the restore button.
Restoring file backups is as simple as uploading the files from the backup set to Zen Cart's directory on the web server. You can do this using web-based uploading tools or FTP programs.
As you have seen you can use cPanel for database and files backup and restoration. We have discussed how to backup home directory and Zen Cart database from cPanel. Follow the steps below to restore those backups:
Login to cPanel.
Click on the Backups icons in the cPanel main page. The Backups page will be displayed.
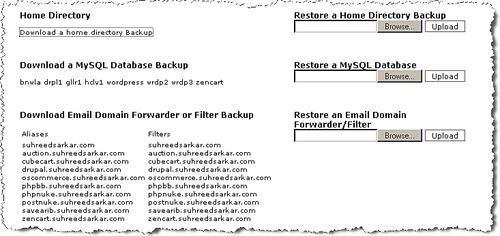
To restore files, click on the browse button in the Restore a Home Directory Backup section, select the backup file saved on your computer, and then click the Upload button. The file will be uploaded, extracted and restored as per the directory structure.
To restore a database, click on the browse button in the Restore a MySQL Database section, select the database backup file saved on your computer, and then click the Upload button. The database will be restored to its original.
Auditing is the process of examining logs to ensure that there is no security breach or attempts to compromise security. While using Zen Cart for online stores you must ensure that it is secure and safe for both the customers and the owner. The following sections discuss ways to ensure security of your Zen Cart shop.
After installation and configuration of Zen Cart, you need to take appropriate security measures to protect your online shop. The following sections highlights some common steps for securing your online shop.
Secure Socket Layer (SSL) enables your site to communicate securely over the internet. Plain HTTP is not secure as it sends information over the internet unencrypted. Anybody on the internet can capture the data stream and know what you are sending or receiving. This is especially insecure for changing the passwords for the Zen Cart admin account. As you know, the Zen Cart admin account password is the key to controlling your online shop. If anybody can capture this password, he or she gets the controls of your shop.
For safeguarding communication over your online shop, use SSL. SSL sends and receives data, which you exchange with your online shop. It ensures that the configuration options you are using and the changes you are making to your site remain confidential by encrypting all transmissions from and to your computer.
For using SSL on your Zen Cart shop, you need a SSL certificate. Some hosting providers give you the shared SSL certificate at economy rate. But using such certificates is not secure, as compared to using a dedicated SSL certificate. Although there are some added expenses, it is recommended that you use a dedicated SSL certificate for your online shop. While you are searching for hosting for Zen Cart shop, also check whether that host supports SSL, and can install the SSL certificate. Whenever possible, also try to have a Secure FTP service such as FTP over SSL/TLS (FTPS) instead of the non-secure FTP.
Some folders in Zen Cart are more sensitive than the others. The first folder you should take care of is zc_install. The installation scripts remain in this folder, and anybody can start the installation of Zen Cart by pointing the browser to this folder. This folder should be removed from your web server on finishing the Zen Cart installation. Delete this folder completely instead of renaming it.
The second folder that you should take care of is the admin folder. This is the administration area for your Zen Cart shop. As hackers know that Zen Cart uses this folder as an administration area, they may attempt to access this often. You can make their attempts unsuccessful by renaming this folder. Give a name that is hard to guess; do not rename it as myadmin, or newadmin. Instead, use some randomly generated names, say ctkobn. You also need to reflect the name in the /admin/includes/configure.php file. Open this file in text editor, and find all instances of admin and replace them with the new name, that is, ctkobn. You need to change the following sections:
define('DIR_WS_ADMIN', '/admin/'),

define('DIR_WS_CATALOG', '/'),
define('DIR_WS_HTTPS_ADMIN', '/admin/'),

define('DIR_WS_HTTPS_CATALOG', '/'),
define('DIR_FS_ADMIN', '/home/suhreed/public_html/admin/'),

define('DIR_FS_CATALOG','/home/suhreed/public_html/'),
After the admin folder is renamed, the previous lines will look as follows:
define('DIR_WS_ADMIN', '/ctkobn/'),

define('DIR_WS_CATALOG', '/'),
define('DIR_WS_HTTPS_ADMIN', '/ctkobn/'),

define('DIR_WS_HTTPS_CATALOG', '/'),
define('DIR_FS_ADMIN', '/home/suhreed/public_html/ctkobn/'),

define('DIR_FS_CATALOG', '/home/suhreed/public_html/'),
Note
Always remember to keep the ending '/' intact while you are typing the new folder in the above lines. Deleting the ending '/' will create problems.
You have to use new URLs to access the administration area after renaming the admin folder. Point your browser to the new URL such as, http://www.yourdomain.com/ctkobn and check whether you can access the administration area.
Permissions set to sensitive folders are files that can enhance security of your online shop. Some files needs to be read-only while some folders may have write permission. The first file you should secure is configure.php. If you are using Linux hosting, then apply CHMOD 644 on both /admin/includes/configure.php and /includes/configure.php. If you need to change these file in future, first change these permissions, and then edit and save. Once the changes are made, apply CHMOD 644 on them again. On the Windows server, set permissions to these files as read-only. Also ensure that the IUSR_machine_name account has limited access permissions to these files.
For all other directories and files, set them as read-only, except for the /images and /cache directories. The /images directories and sub-directories under it should be writable by the server process as product images are uploaded to these directories. If you make these directories read-only, you will not be able to upload product images while adding a new product from the administration area. The /cache directory is used to cache queries; therefore, it needs to be writable by the server process.
From the Tools | Define Pages Editor in the administration area, you can edit pages for Zen Cart. Once you have finished editing define pages, you should make the /includes/languages/english/html_includes/ directory read-only. When you make them read-only, others cannot change them. However, if you want to modify some files from Tools | Define Pages Editor again, you have to make those directories and files writable first.
Another way to protect your folders from being browsed directly is by using the .htaccess file. In several directories, you will find that there is a .htaccess file and a blank index.html file. These are there to ensure security for those folders. The .htaccess file in a particular folder generally prevents direct access to that folder or some .php files. The blank index.html file is there for added security. In case .htaccess is not uploaded to that directory, index.html protects the directory from being browsed directly.
As mentioned earlier, security of your whole online shop depends entirely upon the strength and privacy of your admin password. If the password is well publicized and/or can be guessed easily, then the security of your entire online shop is thwarted. For strengthening the security of your shop, follow these guidelines for passwords:
Always use a complex password—a complex password should contain alphanumeric characters and some special characters.
Never use your name, or the names of your spouse, son, or daughter as the password. Do not use a birth date, telephone number, social security number, and so on for the password. These are known to others and can be guessed easily.
Do not write down your password in front of your computer, or in public places. Always keep the password memorized. If you really need to keep it in writing, keep it under lock and key.
Do not share your password with others. If necessary, create separate admin account for others and ensure that they are also aware of the security and importance of their password.
Generate random passwords. There are lots of free password generators that can be used for this purpose. You may also use some tools to test the strength of your password.
Change your password time to time. Changing it frequently lowers the risk of being discovered by others.
Do not send your password to someone by email, or over the telephone.
Remember that your online shop is secure as long as you protect your administration area by maintaining a strong and secret password for your admin account.
Unlike osCommerce, the administration area of Zen Cart is well protected by default. Whenever anyone wants to access the administration area, he or she needs to provide the username and password for an administrative account. Normal users or shoppers cannot login to this area. You do not need to edit .htaccess or any other file for securing this area.
The main administrative account is created during installation. The master administrator has full access to all areas of the administration area. Using this account name and password, you can login to the administration area.
It is not wise to use the same username and passwords for all people administering the online shop. Instead, create a separate administrative account. Once you are logged in to the administrative username and password, you can create other administrative accounts. Follow these steps for creating administrative accounts:
Login to the administrative area.
Select Tools | Admin Settings.

Click on the insert button.
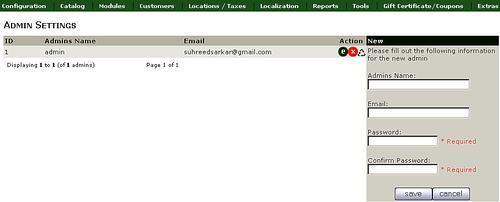
In the New box, type the name of the account, the email address, the password, and confirm the password. The email address used for this account is very important for the retrieval of the forgotten password.
Finally click on the save button when done.
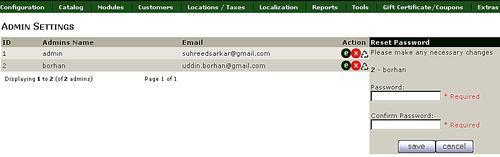
You can also reset the password for administrative accounts. For resetting the password for any administrative account, select that account and click on the reset pwd button. Then, the Reset Password box will be displayed. Type the new password and confirm that by retyping it. Then, click the save button.
Zen Cart has built-in user authentication and security mechanisms for controlling access to catalogues. You can configure your store to allow product browsing by all—both registered and unregistered users. At the same time, you can configure your store to require registration for placing orders. Unregistered users can browse the products, and even add products to their carts, but they must register and log in to Zen Cart to check out. This is a standard setting for online shops.
Unlike osCommerce, Zen Cart runs with Register Globals on or off. It is not required to be on, as it is in osCommerce. Although, Zen Cart can run with register globals on, for better security, it is recommended that you keep it off. However, you may find some hosts which enable this setting to support other applications.
During Zen Cart installation, you will be notified whether Register Globals is on or not. If it is on, you may make it off through editing .htaccess. In the .htaccess file in the webroot, you have to add the following lines:
# to turn off register_globals
php_value register_globals 0
Session handling is an important aspect for any web application such as a shopping cart. Zen Cart has its built-in mechanism to handle session. In fact, Zen Cart uses session handling infrastructure of PHP. It handles login security and keeps the information on each visitor to the Zen Cart shopping cart separately.
Zen Cart stores session information in a directory. This directory needs to be writable by the web server process. The session save path is configured during installation. If you forget the path and want to know the session save path, open phpMyAdmin, click on SQL tab and run the following query:
SELECT configuration_value FROM configuration WHERE configuration_key = 'SESSION_WRITE_DIRECTORY';
As a result of this query, a directory path will be displayed. This is the session save path. If you see that the directory does not exist, or you want to change the path, just replace /path/to/session/save in the following query and run it:
UPDATE configuration SET configuration_value = '/path/to/session/save' WHERE configuration_key = 'SESSION_WRITE_DIRECTORY';
When you have the correct session save path set, you need to make sure that you have the correct permissions set for it. Set permissions to 777 for this directory. Remember that if you are using a prefix for your database tables, you will need to apply that to the above queries.
Make sure that session.referer_check is disabled. You can check this with phpinfo(), or from Tools | Server Info. If it is enabled, turn it off. You can disable session.referer_check by any of the following methods:
php.inifile: Edit yourphp.inifile and setsession.referer_check = off..htaccessfile: In your.htaccessfile, addphp_value session.referer_check none.ini_set()command: You can also use theini_set()command to disable it. Open theincludes/application_top.phpandadmin/includes/application_top.phpfiles, and addini_set('session.referer_check', ''); after the license information in these files.
By default, Zen Cart will be able to handle the session correctly unless the session.use_trans_sid setting is enabled on your server. If this setting is enabled, Zen Cart will not be able to hook into it properly to access its services in a way that lets it identify data related to Zen Cart.
As it is absolutely required for proper session handling of Zen Cart, you must keep this turned off on your server. Sometimes, your webhost provider may permit you to configure it through .htaccess. In that case, you may resolve this issue as follows:
In the webroot, that is the directory where
index.phpandinstall.txtare located, create a new file named.htaccess. If you have an existing file named.htaccess, then you just need to modify it as stated in the next step.In the
.htaccessfile, add the following lines:# to turn off session-trans-sid php_value session.use_trans_sid 0
Adding the above lines and saving it will allow your server to allow Zen Cart to use PHP session handling mechanism.
While running your Zen Cart shop, you may face some common problems which can be broadly categorized as PHP and configuration related problems and Zen Cart related problems. The following sections highlight such problems.
If there is any problem in configuring your Zen Cart shop, you may encounter various error and warning messages. Some of the common warning messages, their causes and remedies are discussed below.
Note
Warning:
Cannot modify header information—headers already sent by (output started at <path/to/output_file>:<line number>) in <path/to/current_file> on line <number>.
You may encounter this message after modifying some .php files. This warning shows up if you leave a space or extra line at the beginning, or the end of a .php file. The file causing a problem is indicated by its name and line number. Look at after output started at and within brackets in the error message above. Fixing this error is as easy as removing that extra space or extra line. Open that file and go to the line number as reported in the error message. Then ensure that no space or extra line is present before <?php or after the ?> tag.
Usually this kind of error happens when you are working with some custom editors such as Dreamweaver. For example, you have edited files using Dreamweaver and uploaded the files via Dreamweaver without using check-in features. You can avoid this error by using check-in features in Dreamweaver.
Sometimes 'header already sent' error appears after other error messages. In that case, always resolve other errors first, as the other error messages may cause the 'header already sent' error.
Note
Warning:
Variable passed to each() is not an array or object in .../includes/classes/db/mysql/query_factory.php on line 100
This error may be displayed if magic_quotes_runtime is enabled. To be sure, check your phpinfo and see if magic_quotes_runtime is enabled. If it is enabled, you need to turn it off. You can do this by editing the following files:
includes/application_top.php
admin/includes/application_top.php
Open the files in the editor, and just after the licensing terms, add the following lines:
if (get_magic_quotes_runtime()) { set_magic_quotes_runtime(0); }
This error occurs when some files included in the.php files are not found in the set path. For correcting this, first ensure that you have uploaded all files and set correct permissions, especially for the file in question. If that does not fix the problem, check your PHP include_path. You can see these paths along with the error messages you have received. You can also check this setting with phpinfo().
On a Windows server, the include_path needs to start with .; and on a Unix/Linux server, it must start with .:. If the include_path does not contain this, you must configure it in php.ini, or in a .htaccess file.
In the php.ini file, add the following lines:
include_path = ".;Drive:path	ophpincludes" //for windows server
include_path = ".:/path/to/php/includes" //for linux/unix server
Similarly, you configure it by editing the .htaccess file.
For Windows host, add the following line in the .htaccess file:
php_value include_path ".; Drive:path ophpincludes"
For Unix/Linux host, add the following line in the .htaccess file:
php_value include_path ".:/path/to/php/includes"
Note
Warning:
<restricted function>: open_basedir restriction in effect. File (<path to file>) is not within the allowed path(s): (<allowed paths>) in <file producing the error> on line <line>
This error occurs when you try to access a directory on which you do not have access permission. To get rid of this error message, ensure that the directories listed in the error messages are configured to be accessible by Zen Cart. On a Windows server, the directories are shown separated by a semi-colon (;) and on Unix/Linux servers, these are separated by a colon (:).
This may happen when you are typing a wrong username or password. Remember that passwords are case-sensitive. So, ensure that the Caps Lock is not ON while you are typing your passwords. If you have really forgotten your password there is still hope to recover it, even if it is your admin account password.
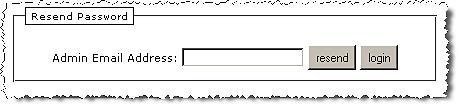
The first attempt to recover a forgotten password will be to click on the Resend Password button and enter the admin email address. You will find this button on the admin login screen. Usually, you will get the password in your email box. If, for some reason, you do not receive the password, you can create a temporary password to login only if you have access to a Zen Cart database.
Login to your webhosting control panel, open phpMyAdmin, select the Zen Cart database and click on the SQL tab. In the query box, type the following query and click on run:
DELETE FROM zc_admin WHERE admin_name = 'Admin';
INSERT INTO zc_admin (admin_name, admin_email, admin_pass, admin_level) VALUES ('Admin', 'admin@localhost', '351683ea4e19efe34874b501fdbf9792:9b', 1);
Here zc_ is the prefix for the Zen Cart tables. Your database may use different prefixes or none. In that case, replace zc_ with the prefix you are using. Running this query will create a temporary admin account with a username admin and a password admin. You can now login to the administration area using these usernames and passwords.
It is important that, after you log in, delete this temporary admin account and create a new one from Tools | Admin Settings. Click on the insert button to create a new admin account. You have to provide the username, email address, and password for creating a a new admin account.
Note
Warning:
session.auto_start is enabled—please disable this PHP feature in php.ini and restart the web server.
Enabling the session.auto_start setting starts a session automatically which creates a problem with proper session management. If you receive this warning, you have to disable this setting. You can do this by editing php.ini or the .htaccess file.
If you have access to the php.ini file, set the directive session.auto_start to 0, as follows:
session.auto_start = 0
In most of the cases you can edit the .htaccess file. If you do not see the .htaccess file in your Zen Cart directory, create one. Then add the following line to that .htaccess file and save it:
php_value session.auto_start 0
Your last resort will be to contact your host provider and ask them to disable this setting on the server.
Note
Parse Error:
syntax error, unexpected T_CONSTANT_ENCAPSED_STRING in /home/Suhreed/public_html/zencart/includes/languages/english/packt/product_info.php on line 17
This error occurs when you forget to put a backslash () before a single quote (') in one of your define() statements in the language file. For example, the following line will result in similar error:
define('TEXT_SOMETHING','This is something simple that's used as an example'),
Here a ' is not escaped, so this will fire an error message. To correct this error, escape the character as follows:
define('TEXT_SOMETHING','This is something simple that's used as an example'),
Note
This page contains both secure and non-secure items. Do you want to display the non-secure items?
Sometimes, you may have a symptom whereby clicking on a login link will result in a message saying that the page contains both secure and non-secure items. Usually this happens on all secure pages, especially in My Account and Checkout areas.
You have hard-coded actual URL links such as
http://xxxxxxin your templates, instead of using relative paths to objects.You have added banners with the
http://links and not marked them to skip display on the SSL pagesYou have added click-tracking tools to your site via JavaScript, which link to
http://pages somewhere.
To solve the problem on your browser, view the source of the pages creating the problem and search for src=http://. When you find the links, edit the corresponding template files, and remove the hard-coded links. If they are caused by click-tracking scripts somewhere, try converting them to https:// links, or contact the vendor for assistance with alternate scripts.
Note
To be on the safe side, never hard-code a http:// URL into any page on your site, always use the relative URL in such links. You can hard-code such URLs only when you are sure that doing so will not produce this sort of error, or when you are using only a non-secure mode, that is, without SSL. Be especially careful about the <img src=...> and <script src=...> tags.
You may face problems during login as a customer, or in the administration area. These problems are mainly due to some settings which control session handling and the authentication of users. The following sections highlight some common problems related to login.
It has been said earlier that Zen Cart's sessions are managed using the PHP session handling features. In general, it works as follows:
A session is generated upon login of a user. For customers, the session's name is
zenid, and for admin users, it iszenAdminId.On starting the session, PHP attempts to set a cookie in your browser. The cookie stores that session ID so that it does not need to be shown in the browser URL all the time. If the session ID is not in the cookie, it is shown as part of the URL; something like
&zenAdminID=243524524524525is appended to the URL. If a cookie is set, the session ID is in the cookie, and the session name and number don't need to be appended to the URLs. Zen Cart needs this session ID to keep you logged in.When you log out, or the session ID is lost, the session data is reset and your authentication data is removed. As the session ID is lost, you need to login again. This generates a new session ID.
Note
Starting from Zen Cart v 1.3.8, a security token is generated, and embedded in the login form to identify that same person while logging again.
Understanding this session management helps you identify the cause. As discussed earlier, you may identify a problem while generating session ID, storing it in cookies, retrieving it from a cookie, or while re-using it. Session management problems may occur when Zen Cart cannot recognize the user's session ID:
When cookies are blocked by a firewall, or a browser configuration. If you are using a firewall, first check whether it blocks cookies. If not, suspect the browser. By default, browsers receive cookies. However, in case of a problem, you should check the browser's configuration options.
When PHP is configured wrongly, or has certain session settings set to methods incompatible with Zen Cart, such as
session-auto-startandtransitive-sid. You will get warning messages during installation if these PHP settings are found at that time. However, these may change after installation, and create problems to your Zen Cart's session management.When you have configured your site to store session data in files but your file system does not have permissions to write on the files. Appropriate permissions to the session file may be the problem.
When you have configured your site to store session data in the database but the database table (that is zc_sessions) is corrupt, or the database storage is full and new records cannot be added.
Sometimes this may occur that you cannot remain logged in to the admin area. This shows the problems of handling PHP sessions in Zen Cart's administration area. First, try closing the browser windows, clearing the browser cache, cookies, and restart your computer. In most of the cases, this will solve your problem if that is due to caching of cookies in the browser. If the problem is not related to caching, it may also be due to incorrect SSL configuration. To solve such problems, edit your /admin/includes/configure.php file and change ENABLE_SSL_ADMIN to false. Then, clear browser cache, cookies, and try again.
If you have upgraded to Zen Cart v 1.3.8, you may receive an error message while trying to login, "There was a security error when trying to login".
This happens due to the fact that Zen Cart v1.3.8 has an added security feature to prevent spoofed external logins. All login forms have been designed to include a security token field. When a user tries to login, the security token is also submitted with the username and password. This security token needs to be current in order to login successfully. If the security token field is not the current one, or is outdated, then an error will be thrown.
If you have a customized template's login files, there is a possibility that the old files don't have that security token field with the login form. You need to merge new security features into the login file template.
In general, the following files are affected by this new security feature:
/includes/templates/CUSTOM_TEMPLATE/templates/tpl_login_default.php/includes/templates/CUSTOM_TEMPLATE/templates/tpl_timeout_default.php
And for admin area the file will be: /admin/login.php.
In tpl_login_default.php, you find the following code block:
<label class="inputLabel" for="login-password"> <?php echo ENTRY_PASSWORD; ?></label>
<?php echo zen_draw_password_field('password', '', zen_set_field_length(TABLE_CUSTOMERS, 'customers_password') .
' id="login-password"'), ?>
<br class="clearBoth" />
</fieldset>
You have to insert the following line of code before the code block shown above:
<?php echo zen_draw_hidden_field('securityToken', $_SESSION['securityToken']); ?>
Similarly, you have to add the above line in the tpl_timeout_default.php file.
Additionally, if you have customized your /includes/functions/sessions.php file for some reason, you'll also need to merge the new changes for this core file into your customized version. In your old customized /includes/functions/sessions.php file, you will find the following code block:
function zen_session_start() {
@ini_set('session.gc_probability', 1);
@ini_set('session.gc_divisor', 2);
if (defined('DIR_WS_ADMIN')) {
@ini_set('session.gc_maxlifetime', (SESSION_TIMEOUT_ADMIN < 900 ?
(SESSION_TIMEOUT_ADMIN + 900) : SESSION_TIMEOUT_ADMIN));
}
return session_start();

}
For Zen Cart v 1.3.8, you need to change the line return session_start();. Now the code looks like this:
function zen_session_start() {
@ini_set('session.gc_probability', 1);
@ini_set('session.gc_divisor', 2);
if (defined('DIR_WS_ADMIN')) {
@ini_set('session.gc_maxlifetime', (SESSION_TIMEOUT_ADMIN < 900 ?
(SESSION_TIMEOUT_ADMIN + 900) : SESSION_TIMEOUT_ADMIN));
}
$temp = session_start();
if (!isset($_SESSION['securityToken'])) {
$_SESSION['securityToken'] = md5(uniqid(rand(), true));
}
if (ereg_replace('[a-zA-Z0-9]', '', session_id()) != '') session_regenerate_id();
return $temp;

}
The password for the administrator account is assigned during the installation of Zen Cart. Once the installation of Zen Cart is finished, you can log in to the administration area by using the admin account and its password. If you forget the password for the admin account, there is an easy way to get a new password. In the admin login page, click on Resend Password, and then type the administrator's email address and click on the resend button. A new password will be sent to that email address. You then can log in using that password.
If for some reasons you cannot retrieve the admin password using the Resend Password feature, you have to create a temporary admin password for logging into the administration area. However, you need access to your MySQL database. Usually, you get cPanel and phpMyAdmin installed on your server.
For creating a temporary admin account and password to login to the administration area, follow these steps:
Click on the SQL tab and run the following query:
DELETE FROM admin WHERE admin_name = 'Admin';
INSERT INTO admin (admin_name, admin_email, admin_pass, admin_level) VALUES ('Admin', 'admin@localhost', '351683ea4e19efe34874b501fdbf9792:9b', 1);
If you are using a prefix to the Zen Cart database tables, add that prefix with the table name, for example,
INSERT INTO zc_admin.Running the above query will create an admin account with the password as admin. Now, you can log in to the admin area using the username admin and password admin.
Change the password and email address once you have logged in to the administration area.
Zen Cart templates are located in the /includes/templates/ folder. Under this, you will find a folder named classic, the files that exist there can be overridden by placing a copy of the file you wish to alter inside another folder named after your custom template. The name of custom template is defined in the template_info.php file.
The folder with the template_info.php file, a css folder and the .css files needs to be located at includes/templates/your_template. The other folders that are in the template_default can be created in your_template folder, such as includes/templates/your_template/css and so on.
Once this is done, you should be able to see the template name from your administration area in Tools | Template Selection. If you do not see it there and cannot select it, you have done something incorrectly.
Remember that you need to put only the edited files in an override folder. As you edit more files in other locations, you will have several folders that are named after your template name. Note that, wherever there is a classic folder, you can create a template folder to keep your copied and edited files to have an override effect.
Sometimes, the images shown on your online shop may have problems due to inappropriate configurations related to image display or changes in the images directory. The following sections highlights two categories of problems related to images in the Zen Cart online shop.
When you are adding products to the catalogue and uploading the product image which is uploaded to the /images directory, or a sub-directory under the /images directory, the /images directory needs to be writable by Zen Cart. In other words, it means that you need to apply CHMOD 777 on this folder (including sub-directories) for write access. This should include all subdirectories for /images as well as their subdirectories such as:
/images/large/images/medium/images/attributes/images/dvd/images/large/dvd/images/medium/dvd
If you do not set appropriate permissions (that is write access), you will not be able to upload product images.
The sub-directories in the /images directory needs to be created manually to be shown in the drop-down list while selecting image upload location, when adding products. Whenever you add a sub-directory, make sure that the sub-directory is writable to Zen Cart.
Sometimes product images on your online shop may appear distorted. This happens when the size of your product image is large, but in your configuration display sizes have fixed height and width specifications. Distortion happens when your product images are not sized in the ratio of the specified height and width.
To get rid of image distortion, first set the image height and width proportions that you want to use throughout the online shop catalogue. Then, specify the height and width in the administration area from the Configuration | Images screen. Problems occur when any of the value for the following option pairs is set to 0:
Small Image Width & Small Image Height
Subcategory Image Width & Subcategory Image Height
Category Icon Image Width—Product Info Pages & Category Icon Image Height—Product Info Pages
Product Info—Image Width & Product Info—Image Height
Image—Product Listing Width & Image—Product Listing Height
Image—Product New Listing Width & Image—Product New Listing Height
Image—New Products Width & Image—New Products Height
Image—Featured Products Width & Image—Featured Products Height
Image—Product All Listing Width & Image—Product All Listing Height
Also ensure that Calculate Image Size is set to true, and Use Proportional Images on Products and Categories is set to 1. Choosing these options will allow your images to be resized according to their own proportions.
Emails are very important for an online shop. Customers are notified about the status of their orders through emails, administrators are also notified by e-mail about new orders. Email communication in Zen Cart works fine, once it is configured correctly. However, sometimes you may experience troubles in communicating through emails. The following sections highlight the email related problems in Zen Cart.
Sometimes you may face problem in sending emails from your Zen Cart shop. This may happen for various reasons. Mostly, it is related to mail server configuration. Sometimes, your mail server configuration requires a particular format in which messages are to be sent. In such cases, you may try the following options:
First check whether email transport methods are configured correctly. You can see email configuration options from Configuration | E-mail Options.
Enable the Emails Must Be Sent From Known Domain? option and also set the appropriate email address in the Email Address (sent FROM) field. Zen Cart will only send emails from domains specified in your from address.
Try a different E-mail Transport method. First try php. If that does not solve your problem, try SMTP and other methods. If you are using sendmail, try using sendmail -f. If SMTP does not work, try SMTPAUTH and provide correct login credentials for the SMTP server account.
Try to send the email to more than one email account. It may so happen that the problem resides in the receiving server. Try to send emails to a non-free email address; do not test only with Yahoo, Hotmail, or Gmail accounts. These email servers have built-in spam protection, and it is likely that the mail sent from your Zen Cart shop is redirected to a spam folder, or blocked entirely. Checking with some other email accounts will possibly help you find the exact cause.
If your email system has junk mail filters or spam protection, try searching for your mail in junk mails or spam folders. Try disabling the protection or filter temporarily, and send mails from Zen Cart again.
Another way to check whether a mail has been sent from your Zen Cart shop is to look at email archives. First, enable email archiving by setting the E-mail Archiving Active? option value to true. Enabling this will archive all emails you are sending from Zen Cart. However, there is no built-in mechanism to see archived emails from within the Zen Cart administration area. A contribution named Email Archive Viewer can be used for viewing archived emails. Download this contribution from the Zen Cart website, install it, and use it to see whether Zen Cart has really processed the email for sending. If it has been sent, and the email is not delivered to the recipient, the problem may be in some other place.
Remember that sending a mail involves PHP script for processing the email, email transport and network connectivity. You have to investigate and find the cause for non-delivery of the mail, and then take appropriate action to resolve the problem.
Your emails may not be transmitted if you have not configured appropriate email transport. You can select email transport in the administration panel from Configuration | Email Options. In the E-mail Transport Method field, you can select the following methods:
php: If you choose this method, Zen Cart will send emails using the email transport method your web server is configured to use for PHP mail commands. In most cases, this will work fine. If this does not work, it is possible that the mail host for PHP is not configured.
smtp or smtpauth: Selecting this transport method will use simple mail transfer protocol (SMTP). Use smtpauth if your SMTP mail server requires authentication. If you are running your web server on a windows operating system, then smtp or smtpauth is your only choice. Remember that when you are using the smtp or smtpauth methods, you have to configure mail server address in SMTP E-Mail Mail Host and SMTP E-Mail Mail Server Port. For smtpauth, you need to configure SMTP E-mail Account Mailbox and SMTP E-mail Account Password. Double check these settings if you have problems with sending email using smtp or smtpauth transport methods.
sendmail: If you are not running the Windows web server, and the php transport method is not working, then you can try sendmail. Selecting this method will use sendmail as the email transport method. Before trying this method, be sure that your web server has sendmail installed. If you are using cPanel for linux hosting, you can see the sendmail path and be sure that it is installed and configured for email transportation.
sendmail—f: You should not try this at first. Use it when sendmail transport has some difficulties. This is usually used in some cases where your web server configuration has some tighter security requirements. For example, busy shared-hosting environments may need this option.
You may face problems with bounced emails from newsletter subscribers. By default, Zen Cart has no mechanism to handle bounced emails. If you see that newsletters/emails have bounced back, the first thing you should do is turn off that particular subscriber. You can unsubscribe someone by going to the Customers | Customers screen. Enter email address in the search box in the upper right corner, and then press Enter. When you find the customer with that email address, click on that and edit the settings for that customer. Turn off subscription to newsletters.

Database connection errors are very rare if you continue to use the same server after installing Zen Cart. However, connection errors may occur when you are migrating to another server, or when you have upgraded your MySQL database server.
In case of database connection errors, you will get exact error messages indicating connectivity problems. This error may be connected to the server, or a specific database. You will find database connectivity related configurations in the /includes/configure.php file. Check the following settings in this file:
// define our database connection
define('DB_TYPE', 'mysql'),
define('DB_PREFIX', ''),
define('DB_SERVER', 'localhost'),
define('DB_SERVER_USERNAME', 'root'),
define('DB_SERVER_PASSWORD', ''),
define('DB_DATABASE', 'zencart'),
define('USE_PCONNECT', 'false'), // use persistent connections?
The above defines mean:
DB_TYPE: Database type—this ismysqlin most of the cases.DB_PREFIX: If you are using the same database for some other application, using a prefix for Zen Cart tables will be useful. If you are using a separate database for Zen Cart, you may keep this blank.DB_SERVER: This is MySQL database server name. If the MySQL database server and the web server are the same, the value of this field will belocalhost. If the servers are separate, mention the hostname of that server.DB_SERVER_USERNAME: This is the username which will be used to connect to the database. Ensure that this user has appropriate permissions to connect to, select from, insert into, delete from, and update from the Zen Cart database. If you are using cPanel in Linux hosting, a prefix is used before each database username. For example, if your hosting account name issuhreed, and you create a database user named user1, then the full name of the database user becomessuhreed_user1. Also remember that while installing Zen Cart from Fantastico, a database user and corresponding password are automatically generated which are used for connecting to Zen Cart database. This user account is automatically deleted when you uninstall it using Fantastico.DB_SERVER_PASSWORD: This is the password for the username mentioned inDB_SERVER_USERNAME. Always remember that passwords are case sensitive, so you need to type them carefully. The key thing in any connectivity problem should be to ensure the password's validity.DB_DATABASE: This is the type name of the database used for Zen Cart. Generally, it is named as zencart or zc. Be sure that database name is correctly mentioned in this field.USE_PCONNECT: Database connection can be persistent or non-persistent. Persistent connection remains open for some time. For a small number of users, this saves time in establishing connections again and again, and thus improves performance. But for a large number of requests to a database, a lot of memory may be used for maintaining persistent connection to database. If you see that a lot of memory is used up for a database, you may check this setting and set it tofalse.
If you are facing a problem with database connectivity, check whether the database itself is running. Try connecting to the database from another application. If you can connect to the database from other applications, then it is likely that you have a problem with the database configuration for Zen Cart. Check the above variables and test the results.
In this chapter, you have learned about common maintenance and troubleshooting activities in a Zen Cart online shop. Once you have set up, configured, and customized your online shop and taken it to live production, you need to carry out some routine maintenance tasks to keep it running. During maintenance, your shop may be down, which can be notified to your customers, from Zen Cart configuration. Regular maintenance activities help your shop to run smoothly. However, trouble may crop up any time. We discussed some common problems that you may face, in this chapter. This chapter has also introduced you to some security features of Zen Cart and ways to improve security.