
In the main text of this book, we have discussed how to install, configure and customize a Zen Cart shop. As you are customizing the Zen Cart shop, it is recommended that you do all development work in a development environment. In the whole process of customizing the Zen Cart shop, we have referred to several third-party contributions and web resources. This Appendix shows you how to setup a development environment in Windows PC and where to get the third-party contributions and other resources on the web.
You need Apache-MySQL-PHP for running Zen Cart. You can use a hosting server for hosting Zen Cart shop. However, it is recommended that you do the customization of Zen Cart in a development environment. If you are using Windows PC, you can use one of the Apache-MySQL-PHP packages. Here we are going to discuss how you can set up and configure WAMP on your Windows computer.
Step 1. Get WAMP Server. WAMP server gives you Apache-MySQL-PHP. Point your browser to www.wampserver.com and download the latest version of WAMP Server.
Step 2. Install WAMP Server. Once WAMP Server is downloaded to your computer, double click on the installation file. It will be installed, by default, on C:wamp. Under that, there will be a www directory, which is known as the web directory. This means all web applications you want to run, should be put inside this folder (c:wampwww).
Step 3. Run WAMP Server. You can configure your WAMP Sever to run when Windows starts. Alternatively, you can run it as and when needed. You can start WAMP Server from Start | All Programs | Wamp Server | Start Wamp Server. When WAMPServer started, you see WampServer icon in the system tray. Click on that icon, and you get the Wamp Server menu:
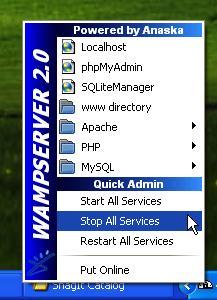
For starting all services (Apache, MySQL and PHP), click on Start All Services. For configuring PHP, go to PHP. You can create databases through phpMyAdmin. To see the default page in the web root, click on Localhost, or type http://localhost/ in your browser's address bar. It will display a page like this:
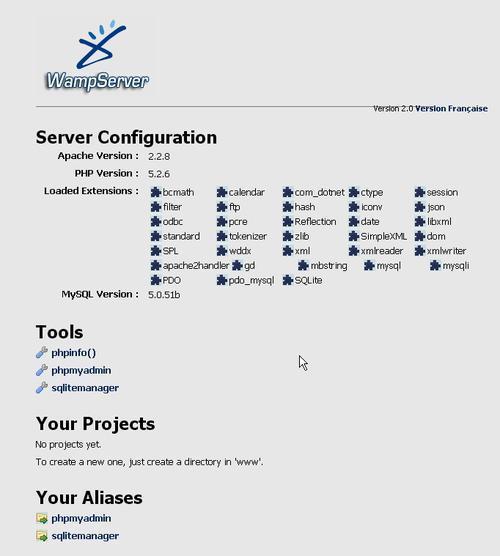
If it works fine, you are done! Your Wamp Server is working—so get ready for the next step.
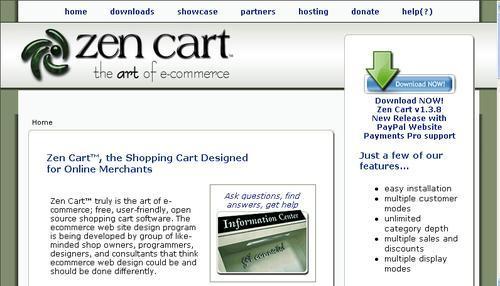
Step 4. Get Zen Cart installation package. Now it is time to get Zen Cart installation package, by which you will install Zen Cart on your local computer. Open your browser, and type www.zen-cart.com in the address bar. You will see the Zen Cart home page. On the right side there is a download link for latest release (at present v.1.3.8a). Click on this link to download the latest release of Zen Cart.
If you want to download another version of Zen Cart, for example Zen Cart v.1.3.7, then go to http://sourceforge.net/project/showfiles.php?group_id=83781. Here you will get download links for all previous versions of Zen Cart. Click one of your choices and wait for completion of download.
Step 5. Unzip Zen Cart package files. Once download is complete, extract the Zip file on to your local disk. Generally, you will get a file named zen-cart-v1.3.8-full-fileset-11302007.zip. I hope that WinZip, WinRAR or some other compression utility is installed on your computer. If so, right click on the file and choose Extract here. It's better to copy the file in a folder named zencart. Unzipping the files will take some time. When finished, go to that zencart folder. You will see the admin, includes, and so on folders and some .php files. These all are needed for installing Zen Cart.
Step 6. Copy Zen Cart installation files to WAMP web root. Once you have unzipped the installation package, the whole folder should be copied to WAMP Server's webroot, i.e. C:wampwww. Wait until all the files are copied.
Step 7. Create database for Zen Cart. Before proceeding to Zen Cart installation, first create a database for Zen Cart. To create a database, click on WAMP Server icon and choose phpMyAdmin or type http://localhost/phpmyadmin/ in your browser's address bar. This will open up phpMyAdmin.
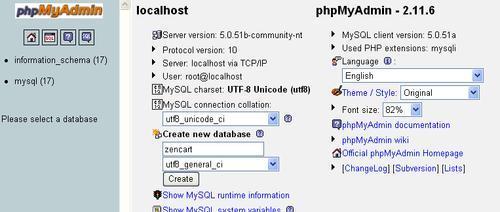
In the Create new database text box type the name of database you want to create. In this instance, type zencart. Now select collation from the next dropdown field. For the zencart database, select utf8_general_ci. Then click Create. You will see the zencart database listed in the left pane. You are done with creating the database, although no table has yet been defined. Zen Cart installation routine will create the necessary tables in this database.
Step 8. Start installation of Zen Cart. Now it is time to start installation of Zen Cart. Open your browser and type http://localhost/zencart/zc_install/ in the address bar. This will start Zen Cart installation. Most of the options you can configure easily. In the database setup step, type the database name as zencart, and username root. Password will remain blank. The whole process of installing Zen Cart is detailed in Chapter 2, Installation and Basic Configuration.
It is good to know about the default directory structure of Zen Cart. Following, is a list of directories and sub-directories, and a brief description of the directory contents. Remember that you may need to relocate or rename these directories for strengthening the security of your Zen Cart shop.
admin: This directory contains files and sub-directories which are essential for the administration panel. This directory is, in fact, of same structure as the catalog part of the shop. It includes modules, languages, and all other sub-directories and files which are only used for the administration area of Zen Cart.cache: This folder is for caching SQL queries and only used when you have configured Zen Cart to store session information in files.docs: This folder contains some documents for providing help on Zen Cart installation and configuration.downloads: This folder is for storing downloadable contents of your online shop. You have to specify this folder byDIR_WS_DOWNLOADSandDIR_FS_DOWNLOADSdirectives in/includes/configure.php file.editors: This folder contains WYSIWYG editors for HTML text areas. Each editor will be in a separate subdirectory and configurable from the Zen Cart administration area.email: This directory contains e-mail templates only. All HTML files for templates and associated images will be in this directory.extras: This directory contains some extra files like PayPal IPN.images: This directory contains images for the Zen Cart online shop. Images for products, categories, and manufacturers can be stored in sub-directories under this. You can specify this folder byDIR_WS_IMAGESandDIR_FS_IMAGESdirectories in/includes/configure.phpfile.includes: This directory contains many important files for the Zen Cart online shop. It has a couple of sub-directories. You can specify this directory byDIR_WS_INCLUDESandDIR_FS_INCLUDESdirectives in/includes/configure.phpfile.includes/auto_loaders: This folder includes a file namedconfig.core.phpwhich lists files that requires automatic loading while Zen Cart shop starts.includes/classes: This directory contains class files for Zen Cart. Details of classes are discussed in the next section.includes/classes/db: This directory includes database related classes. The Zen Cart database abstraction layer will be found in two filesdefine_queries.phpandquery_factory.phpundermysqlsubdirectory.includes/classes/support: This directory contains support language files, such asphpmailer.lang-cz.php, phpmailer.lang-pl.php, and so forth for PHP mailing.includes/extra_cart_actions: This directory is for containing files manipulating extra actions for Cart. This directory is for overrides.includes/extra_configures: This directory contains extra configuration files. This is used for overrides.includes/extra_datafiles: This directory contains extra data files needed for contributions, and is used for overrides.includes/functions: This directory contains.phpfiles which have functions defined for using in a Zen Cart shop. It has several functions in several files.extra_functionssub-directory in this directory gives you the opportunity to store extra functions for overriding.includes/index_filters: This directory contains functions used for filtering by product types.includes/init_includes: This directory contains the files needed for init subsystem. Whenever Zen Cart process starts, files in this directory are needed for initialization.includes/languages: This directory contains language files and directories for each language including template specific sub-directories. By default,english.phpfile,englishandclassicsub-directories are found. This directory has a lot of opportunities for applying overrides. At each level, you can apply template-specific overrides by putting modified language files.includes/modules: This directory contains files for modules. Some files are in the root of this directory whereas others are in sub-directories.includes/templates: This directory contains template directories and files.js: This directory contains JavaScript for Zen Cart.media: This directory contains digital products like music, songs, and so on.pub: This directory contains products which are publicly downloadable.zc_install: This directory contains files and sub-directories which are essential for installing and upgrading Zen Cart.zc_install/demo: This folder contains.sqlscripts for demo products for Zen Cart installation.zc_install/includes: This directory contains necessary function and class files for the installation of Zen Cart.zc_install/sql: This directory contains.sqlscripts for creating databases for Zen Cart shop and upgrading it from previous versions to a current version.
You can get most of the information from Zen Cart's main site at http://www.zen-cart.com. This site has the following top links:
downloads: This section contains categorized lists of contributions, modules, language packs, buttons, graphics, and templates to be used in Zen Cart.
showcase: This section lists shops using Zen Cart. It's a good place to look into the design of Zen Cart shops used worldwide. You may visit some of these listed shops, to see the design flexibility of Zen Cart. You can also list your online shop by maintaining the Powered by Zen Cart link at the footer of your shop.
partners: This section lists partner sites whose services can be used with Zen Cart. You will get domain registration, payment processing, affiliate programs, logo designs, google services, fun geek stuff—all in this section.
hosting: This section gives you a list of hosting providers specializing in Zen Cart hosting. If you are new to Zen Cart and want to start a shop quickly, choose one of these hosting providers to get Zen Cart installed and configured quickly.
donate: This section gives you options to donate to Zen Cart programmers through PayPal, mail check, or money order.
help(?): This is the FAQ section for Zen Cart. Before searching for help in the forum, first search in this section. This section will answer your questions in a more organized way and in article format, rather than the forum's conversational style.
Most of the support for Zen Cart is available through the Zen Cart Forum and other related forum. Whenever you need support for Zen Cart first search for solutions in the following forums:
http://forum.zen-cart.com—Main forum for getting support on Zen Cart. Your first place to search for help on Zen Cart.
http://www.zencartforum.com—At Zen Cart Forum, you will find specific forums and threads for you to post your questions so that you get the most specific and focused responses.
http://wiki.zen-cart.com—Zen Cart WiKi will provide you with clean documentation of Zen Cart installation, configuration, and customization. It is under development and many sections are yet to be written. A good place to search for information on Zen Cart.
You can download Zen Cart packages from the homepage of Zen Cart's website. On the upper right side you will find a link to download the latest version of Zen Cart. You can download Zen Cart from the following links:
http://sourceforge.net/project/showfiles.php?group_id=83781&package_id=171544 This is the link for downloading Zen Cart v.1.3.8.
http://sourceforge.net/project/showfiles.php?group_id=83781. From here you can download any version of Zen Cart. This page lists all versions of Zen Cart and enables you to choose your desired version. Follow this link, if you want to download any version of Zen Cart other than the most recent one.
http://www.zen-cart.com/index.php?main_page=index&cPath=40 This is Zen Cart's download section. Community-contributed additions for Zen Cart can be found here. However, remember that these contributions have no warranty expressed or implied. You have the freedom to download and use any contribution. You don't need to sign-up to downloading any contribution. All downloads are free to the public and you do not have to sign-in to download. You can also submit your contribution by creating an account and then logging in.
In the download section, contributions are stored in categories. Clicking on a category will show a list of contributions in that category. At present you will find the following categories:
Admin Tools
Buttons and Graphics
Language Packs
Marketing Tools
Other Modules
Payment Modules
Pricing Tools
Privacy and Condition Statements
Product Types
Shipping Modules
Sideboxes
Template Alterations
Template Packages
Troubleshooting Tools
Zones
There are plenty of contributions to extend Zen Cart's functionality. Some of the important contributions are discussed in the main text of this book. Following are the list of such contributions:
Backup MySQL Plug-in <http://www.zen-cart.com/index.php?main_page=download_contrib&contrib_id=81&update_id=2>: This will allow you to backup and restore Zen Cart database from within Zen Cart's administration panel.
Easy Populate Free <http://www.zen-cart.com/index.php?main_page=download_contrib&contrib_id=395&update_id=1>: This contribution allows you to add or update products from a tab delimited text file, which can be edited in Microsoft Excel or in
OpenOffice.orgCalc.Email Archive Manager <http://www.zen-cart.com/index.php?main_page=download_contrib&contrib_id=198&update_id=5>: Zen Cart archives e-mails sent to customers. However, there is no built-in feature to see these archived e-mails. This add-on will enable you to look up e-mails sent to customers. A great tool for Zen Cart shop administrators.
Better Together <http://www.zen-cart.com/index.php?main_page=download_contrib&contrib_id=309&update_id=9>: This contribution allows cross-selling at a discount. A product can be linked with another product, another product from a specific category, or any other product, with an associated discount (in dollars or % off) if both are purchased together. The associations must be hard coded, but once they are generic, logic can be added to the
product_infopage to display any available better together discount.Cross Sell <http://www.zen-cart.com/index.php?main_page=download_contrib&contrib_id=76&update_id=4>: This module will allow you to add up to 6 optional products on your current products pages.
Cross Sell Just Another Cross Sell Mod <http://www.zen-cart.com/index.php?main_page=download_contrib&contrib_id=694&update_id=7>: This is an advanced cross-sell module which supports bi-directional cross-selling. Needs the original cross-sell module installed. Recent versions include both original and advanced cross-sell modules.
Cart Upsell/Cross-sell <http://www.zen-cart.com/index.php?main_page=download_contrib&contrib_id=283&update_id=5>: This module is for upsell and cross-sell during checkout.
EZ Thumbnails <http://www.zen-cart.com/index.php?main_page=product_contrib_info&cPath=40_47&products_id=704>: This module creates products and category thumbnails on the fly. Also creates sub-directories for storing thumbnails (if the source images are found in a sub-directory).
Image Handler 2 for v1.3.x <http://www.zen-cart.com/index.php?main_page=product_contrib_info&cPath=40_47&products_id=117>: With the help of GD libraries or ImageMagick installed on your server, this contribution generates and resizes small, medium, and large images instantly on page request. This enables you to simply upload a single image or different images of medium and large sizes. This also enables you to watermark your images and create hover effects.
osCommerce Data importer <http://www.zen-cart.com/index.php?main_page=product_contrib_info&cPath=40_41&products_id=918>: This script by Albert Savage is for importing osCommerce data into Zen Cart. You can import customers, products, product description, categories, category descriptions, category structure, specials, and reviews using this script. This script will run even when you have not completed installation of your Zen Cart shop.
osCommerce to Zen Cart migration script <http://www.zen-cart.com/index.php?main_page=product_contrib_info&cPath=40_41&products_id=946>: This script by Michael Morris imports data from osCommerce to Zen Cart. However, it also erases all existing data on Zen Cart. Therefore, this script is suitable for importing data to a new Zen Cart shop.
Adsense Control Center <http://www.zen-cart.com/index.php?main_page=product_contrib_info&cPath=40_60&products_id=780>: This module allows you to display Adsense ad on your shop. Through this control center, you can configure different ad units and configure them to be displayed on your pages.
Zen lightbox <http://www.zen-cart.com/index.php?main_page=product_contrib_info&cPath=40_47&products_id=273>: This contribution adds lightbox support to Zen Cart. All large product images will be displayed within a lightbox. This eliminates the need for pop-up windows and makes your website much more user-friendly. Additional product images are displayed within a simple gallery interface.
Following sections give you some links to integration modules—for integrating Zen Cart and other CMS.
So far, there is no integration module for integrating Zen Cart with Joomla! However, an equivalent Joomla! component, VirtueMart <www.virtuemart.com>, can be used for an online shop attached with Joomla! website. You can import osCommerce or Zen Cart catalog to VirtueMart by using osCommerce - Zen Cart Catalog Import Utility in VirtueMart. For download and detail information, please visit: http://extensions.joomla.org/component/option,com_mtree/task,viewlink/link_id,3387/Itemid,35/
You can find discussions on Zen Cart - Joomla! integration at the Zen Cart forum thread: http://www.zen-cart.com/forum/showthread.php?t=47269
You can also follow development of JFusion plugin for integrating Zen Cart-Joomla! at http://www.jfusion.org/phpbb3/viewtopic.php?f=8&t=584.
You can use a Drupal module, still in its development status, which integrates Drupal and Zen Cart. This module works with Drupal 5.x and Zen Cart v. 1.3.7. To downloading this, please visit the module's project page at http://drupal.org/project/zencart.
WordPress-Zen Cart installation has been discussed in Chapter 8. Required resources for this are as follows:
WordPress on Zen Cart module—You can download the WordPress on Zen Cart integration module from http://www.zen-cart.com/index.php? main_page=download_contrib&contrib_id=681&update_id=1.
http://www.sharpbrains.com/—example of a WordPress and Zen Cart integrated site where WordPress is master and users can place orders through Zen Cart.
http://www.sharpbrains.com/get-started/brain-fitness-guide/—Product pages are displayed in Zen Cart, although the users are redirected from WordPress.
Gallery2-Zen Cart installation has been discussed in Chapter 8. Required resources for this are as follows:
Gallery2 Zen Cart Integration module is available at http://www.zen-cart.com/index.php?main_page=product_contrib_info&cPath=40_47&products_id=581.
You can get details about gallery2 Integration module at http://codex.gallery2.org/Gallery2:Modules:zencart.
Download link for Gallery2/Zen Cart integration module is http://dakanji.com/g2stuff/zcg2-3_2_1a-full.zip.
XOOPS can be integrtated to Zen Cart by using the XOOPS Zen Cart integration module. This module is available at http://www.xoops.org/modules/repository/visit.php?cid=22&lid=1626.
e107 is a content management system written in PHP and using the popular open-source MySQL database system for content storage. It's completely free, totally customizable, and in constant development. You can integrate Zen Cart with e107 by installing Zen Cart Bridge and Zen Cart User-Sync Plug-ins for e107. Download these from the following links:
Zen Cart Bridge http://plugins.e107.org/e107_plugins/psilo/psilo.php?artifact.178
Zen Cart User-Sync http://plugins.e107.org/e107_plugins/psilo/psilo.php?artifact.172
There are lots of templates for Zen Cart, which may be suitable for your shop. The following are the sources where you can get such templates:
Zen Cart Templates Preview <www.zencarttemplates.info> - You can test drive all the free templates available for the current version of Zen Cart at this site. This is a good place to view the template before downloading and customizing it for your shop.
Powered by Zen Cart <http://www.poweredbyzencart.com/> - PoweredbyZencart.com provides premium Zen Cart templates to set up your own Zen Cart store. You can buy professionally designed templates suitable for your store from this template store.
Template Monster <www.templatemonster.com> Zen Cart Templates available in Template Monster provide you with simple solutions in setting up your own Zen Cart store. From its large collection, you can easily find a Zen Cart template that best suits your business.
Zen Cart Hall of fame <http://www.zencarttemplates.info/hoff.php> Look at this site to see some of the innovative designs for Zen cart. This page lists famous and much praised design innovations for Zen Cart templates.
While customizing and extending your Zen Cart shop, you need consulting services for Zen Cart. The following links will help you find consultants for Zen Cart:
How to hire a Zen Cart consultant: Tips for hiring a Zen Cart consultant and looking at skills in such hiring. Read at http://thecartblog.com/2008/01/13/how-to-hire-a-zen-cart-consultant/.
http://www.zencartconsulting.com: Zen Cart Consulting provides Zen Cart customization and development services. It has developed a bunch of modules for Zen Cart to enhance it's features.
http://www.zen-cart.com/forum/forumdisplay.php?f=146: Check this forum for searching Zen Cart hosting services. Normally you will find a linux host supporting Zen Cart. Zen Cart has some certified hosting service providers, which can be used for hosting Zen Cart-based shops.
Besides these, you can get competent consultants at www.elance.com, www.getafreelancer.com and www.getacoder.com. Visit these sites and search for Zen Cart experts.