
Localization is one of the important features of Zen Cart. Although our online shop serves globally, it can also be localized to a specific community or customer niche. For example, when customers from Bangladesh connect to the online shop, the language of the shop could be changed to Bangla, and customers from France may have French as the store's front-end language.
This chapter discusses the localization features of Zen Cart. After finishing this chapter, you will know:
Why localization is necessary
How to localize regions and taxes
How to use multiple currencies for a store
How to add a new language
How to translate the front-end into another language
How to modify or add order status to suit your need
Most of the tasks discussed in this chapter need to be completed before opening the shop for online selling.
As opposed to globalization, localization is the process of customizing software and documentation for a particular country. Localization includes the translation of menus and messages into the native spoken language as well as changes in the user interface to accommodate different alphabets and cultures. It also includes using appropriate locales (for example, date and time formats.) for that country or region. For example, for customers from Bangladesh, an online store's front-end language may be changed to Bangla, but only changing the language will not be enough for localization. For successful localization, appropriate locales—including currency, date formats, time-zone, and so on—for Bangladesh will also be used. So, a localization attempt for Bangladesh will automatically translate the website interface. The prices will be shown in Bangladeshi Taka (with a symbol ৳), and the date will be shown in the dd/mm/yyyy format.
Localization plays an important role in attracting customers—especially for a niche market. When a store is localized, customers from the niche market are easily attracted to that store, because they think that it is their 'own' store. Localization also helps in understanding the content of the store in a better manner. As for Bangla, customers speaking Bangla will be more comfortable reading the product description in Bangla.
The first step in localization of the Zen cart shop is to define the zones and zone-specific taxes. As you may know, sales taxes vary across countries, and also across regions. If the shop can be adapted to the customers' regions, and can appropriately calculate the taxes based on the tax rates applicable to their regions, it will be of great help to the customers. They will also think that you, the shop owners, are more responsive to their needs.
Locations can be configured into two entities: Countries and Zones. The first identifier for a location is a country. You can see the list of countries from the Locations/Taxes | Countries screen.
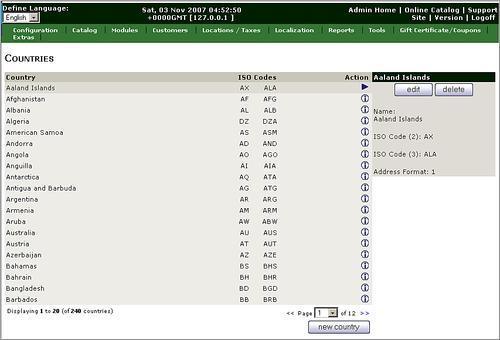
Each country has a name, a two-letter ISO Code and another three-letter ISO Code. For example, Bangladesh has two ISO country codes: BD and BGD. These ISO codes are based on globally accepted standards. Another field associated with each country is the address format. These address formats are also based on the ISO standard formats for addresses. These range from 1 to 5. If you explore a little bit, you will find that most of countries is use address format 1.
The five formats are as following:
|
Format 1 Firstname Lastname Address line 1 <optional second address line> City, Postcode State, Country |
Format 2 Firstname Lastname Address line 1 <optional second address line> City, State Postcode Country |
|
Format 3 Firstname Lastname Address line 1 <optional second address line> City Postcode - State, Country |
Format 4 Firstname Lastname Address line 1 <optional second address line> City (Postcode) Country |
|
Format 5 Firstname Lastname Address line 1 <optional second address line> Postcode City Country |
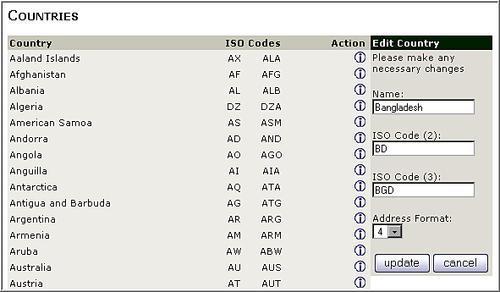
You need to choose an appropriate format for the country. For Bangladesh, an appropriate address may be format 4, as state names are not used in addresses in Bangladesh.
Usually, all countries are listed with their associated ISO Codes. However, if you want to add a new country, you can do so clicking on the new country button. For each country, you need to enter the name, and the ISO-3166 codes (two and three digits) for that country. You also have to select an address format used for that country.
Rarely do you need to edit country information. However, you may like to change the address format for countries. In that case, select the country from the list, and click on the edit button. Then change the country information—Name, ISO Code (2), ISO Code (3) and Address format—as appropriate. Click on the update button to save your changes.
Generally, all countries are listed in the Location/Taxes | Countries screen. If you are sure that you do not need a country, you can delete it from the database. Remember that once you delete a country, it will not be shown in the Country drop-down list during account creation. You can delete a country easily by selecting it and clicking on the delete button. A confirmation dialog will be displayed to check whether you really want to delete the country. Confirm the deletion by clicking on the delete button.
You may need zones in order to calculate shipping costs, taxes, payment methods and discounts. There may be multiple zones in a country. By default, there are two kinds of zones in Zen Cart: zones and zones definitions (sometimes referred to as geo zones). Zones are local; that is, zones can be defined for countries or provinces within a larger entity such as a state or a country.
For example, you can have a zone defined as SAARC, for all the countries in the SAARC region, that is, Bangladesh, India, Pakistan, Nepal, Maldives, Sri Lanka and Bhutan. Then you can define zones for each of these countries, containing the provinces for that country. In Bangladesh, there are six divisions, which can be defined as six zones.
You always have to define at least one zone, and every location (country or state) in which you plan to sell should be included in your zone definitions. However, unless you have to distinguish between provinces or countries (for taxes, or shipping, for example), you don't really need to define additional zones.
The zones and zone definitions (geo_zones) are used to tie Tax Rates and Tax Classes to geographic locations. For example, you may ship to all of the states in the USA, but if your store is located in Florida, you only need to charge sales tax to the customers in Florida. You can define two zones, one containing all the states except Florida, and one containing only Florida. Then, you can specify the Tax Rate that the Florida zone should use.
Now, if your state has separate tax rates for different cities or countries (say California), then you need to establish one for each city or country in order to account for sales across cities, or countries, according to your sales tax return.
Note
Some Shipping Modules (such as the zones shipping module) also work with geographic zones. These zones are specified in the module itself, and are independent of the zone definitions you make. This means that you can specify different shipping rates, for example, for countries in the same zone definition.
You can create a zone via menu option Locations/Taxes | Zones. Click on the new zone button. In the Zones Name box, type the name of the zone, enter a code in the Zones Code field, and select the country in which the zone is situated. For example, you may type a district name, assign a code to it, and select Bangladesh as the country. After typing this information, click on the insert button to save the zone.

You can create as many zones as you need. For example, you may create 64 zones for 64 districts in Bangladesh. These zones can be used for calculating shipping costs by courier service. Remember that creating a zone alone will have no effect on the shipping costs or taxes until you use the zones for those purposes. The uses of these zones are defined via menu option Locations/Taxes | Zone definitions.
Zone definitions are zones used for shipping, payment and taxes. To create and use a zone definition, you first have to create geo zones in the Locations/Taxes | Zones screen, as described earlier. Then, you can use the zones in zone definitions.
By default, you will see one zone definition—Florida, which is used to ascertain local taxes. You can create new zones from the Locations/Taxes | Zone definitions screen. You will see a list of Zone Definitions in this screen with three status indications: Taxes & Zones Defined (green), Zones Defined but not Taxes (yellow), and Not Configured (red).

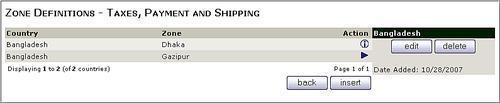
To create a new zone definition, click on the insert button. Then, type the zone name and a description of the zone. In Description, indicate the purpose for which you have created the zone, for example, for shipping to the Dhaka division. Click on the insert button to save the zone.
The status of the zone will be shown as Not Configured (red) after creating the zone definition. You need to configure it by adding geo zones to it. Select the zone, and click on the details button to list the geo zones under this zone definition.
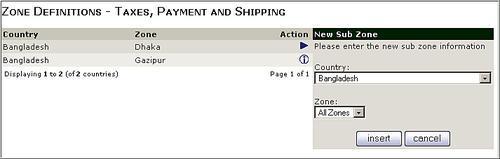
Click on the insert button to add a new geo zone to the zone definition. A New Sub Zone box will be shown. Select the country and the zone from the drop-down list, and click on the insert button. The zones must be defined beforehand. You can add multiple geo zones from multiple countries. For example, you may create a Zero Tax zone and include all geo zones where you don't need to add taxes.
As discussed earlier, taxes can be applied to a specific zone definition. Therefore, first create a zone definition for tax purposes. Tax Classes are typically used to differentiate between the types of tax calculations that apply to a given product. Typical tax classes would include: Taxable Goods, Non-Taxable Goods, GST-Only, and so on. You can see a list of tax classes via Locations/Taxes | Tax Classes.
To create a tax class, go to Locations/Taxes | Tax Classes, and click on the new tax class button. Now, enter a title and description for this tax class. Click insert to save the tax class.

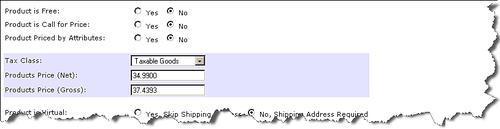
When entering new products via Catalog | Categories/Products, it is necessary to select the appropriate tax class for that product. Otherwise, taxes won't be calculated appropriately during checkout. To assign a tax class, select the appropriate tax class from the Tax Class drop-down list. The result of changing the tax class is immediately reflected in the Products Price (Gross) field.
Instead of assigning a tax class for each product, you can assign a default tax class for a product type. This will apply a consistent tax class to all the products of the same type. For example, Music may be tax free. So, it will be wise to set the default tax class as Non-Taxable Goods for Music product type.
Before assigning a default tax class to a product type you need to identify the Tax Class ID number. To identify the Tax class ID, do the following:
From Locations/Taxes | Tax Classes, select a tax class and click edit.
Now, look at the URL in the browser address bar. You will find something that looks like:
&tID=2, which mean Tax class ID number is 2.
Once you get the Tax class ID, it is time to set that ID in the product type's default tax class field. To do this:
Go to Catalog | Product Types.
Select the product type from the list, for example Product Music, and click on Edit Layout.
Click on Product Price Tax Class Default - When adding new products?
Enter the number of the tax class ID determined above (that is, 2).
Click on the update button to save the setting.

Creating a tax class will not automatically add taxes to the products sold. You have to create tax rates for the specific zones.
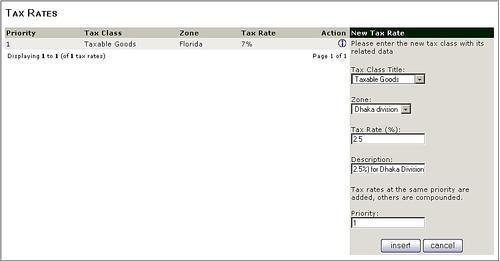
You can create a tax rate for a zone, for example Dhaka, via Locations/Taxes | Tax Rates and clicking on the new tax rate button. You have to define the following information in the New Tax Rate box:
Tax Class Title: Select a tax class from the drop-down list. The tax classes you have defined earlier will be shown in this list. If you do not find an appropriate tax class, go back to the Locations/Taxes | Tax Classes page, and define a new tax class.
Zone: Select a zone from this drop-down list. Zones you have defined earlier will be listed here. The Tax Rate you are defining will be applicable for the zone you select in this drop-down list.
Tax Rate (%): Define the Tax Rate percentage that will be applied to the products.
Description: Type a description of the Tax Rate in this field. This will explain why it was created and where it will be used.
Priority: Set a priority for Tax Rate. You may have several tax rates for a zone. In that case, tax rates with the same priority will be added to the product price. On the other hand, tax rates with different priorities will be compounded. That means a lower numbered tax rate will be applied first, then the next priority tax rate will be applied to the resulting amount.
Once you have entered all required, click on the insert button to save your changes. This tax rate will be automatically applied based on the shipping or billing address zone.
Localization | Currencies screen allows us to add new currencies or edit existing ones. The predefined currencies in this module are U.S. Dollar (default), Euro, GB Pound, Australian Dollar and Canadian Dollar. You can add a new currency, or edit an existing one.
By default, only five currencies are defined in Zen Cart. You may need to add other currencies, if you want to trade in those currencies, or want to show prices in those currencies. To add a new currency, click on the new currency button in the Localization | Currencies screen.

In the new currency screen, you need to enter the following information:
Title: This is the name of the new currency, as in Canadian Dollar, Mexican Peso or Bangladeshi Taka.
Code: This is the three-character ISO 4217 international name for the currency CAD for Canadian Dollar, MXN for Mexican Peso, USD for US Dollar, JPY for Japanese Yen, BDT for Bangladeshi Taka, and so on. Note that to use the automated currency conversion feature, this code must be correct.
Symbol Left and Symbol Right: If you need to display some symbol to the left or the right side of the currency amount, you need to type that symbol in this box. If no symbol appears before or after the amount (as in CA$ for Canadian Dollar), leave these fields blank.
Decimal Point: This is where you indicate the symbol that appears between the whole and fractional amounts of a currency. For U.S. and Canadian dollars, this is a period; in some countries it is a comma.
Thousands Point: This is where you indicate the symbol that appears between the figures of a currency, in thousands. For U.S. and Canadian dollars, this is a comma; in some countries it is a period.
Decimal Places: This indicates the number of decimal places that appear to the right for this currency. The U.S. and Canadian dollars have two digits after the decimal point. Some currencies may have others, such as zero, four or six.
Value: This is the value of the other currency relative to the default currency of our store. Our default currency should have a value of exactly 1. If you are going to use the automatic conversion feature (see the update currencies button below), then you can simply leave this field blank (or enter zero, both are the same) and let the website update the value.
Set as default (requires a manual update of currency values): If this is the default currency for this store, you need to check this box. Note that this may require some manual changes, as indicated in the box. Thus, you might want to set this before loading any pricing data.
After you finish entering the new information, click on the insert button to save this new currency entry.
Zen Cart has a built-in facility to update currency exchange rates from the exchange rate server. For this to work, all currencies defined in our shop must use the correct ISO 4217 codes in the code column.
To update currencies, click on the update currencies button. The site will request current exchange rate values from various conversion sites on the Internet for all of the currencies that have a correct ISO 4217 code. Within a few seconds, your shop will obtain current values, and automatically update the exchange rates.
Rates that are correctly converted will be listed with a green background at the top of the page. Rates that were not correctly converted will be listed with a red background. Zen Cart shop will try more than one converter if it has failed in converting a particular currency. If you see a red item after updating currencies, you have to pay attention to it. It may be caused by misspelling the ISO 4217 code for that currency. Currencies that were not correctly updated because of the unavailability of exchange rates at the exchange rate server will have to be manually updated using the edit feature.

If you do not wish to use the automatic conversion feature, you can set the conversion rate manually by selecting the currency and clicking edit button. From Localization | Currencies screen, you can see the sample conversion rates. Note that these are sample values; you need to know the exact conversion rate at a given point in time, as currency conversion rates can fluctuate.
If you only need to correct the exchange rate, you can use the update currencies button to change all the conversions on our website. If, however the automatic conversion does not work for some reason (for example, you entered Russian Rubles using code RUS instead of RUB), you would need to change that. To do this:
Click on the line showing the currency that you want to change. A right-arrow will appear in the action column.
Now click on the edit button. A series of entry fields, the same as provided for the add new currency button, will appear, but this time those fields will be loaded with their current values.
Change any field as required.
Once you have finished, click on the update button to save your changes.
If you decide not to save the changes, click on cancel to keep the original values intact.
If you no longer want a particular currency, you can delete the currency as follows:
Click on the line showing the currency you want to delete. A right-arrow will appear in the action column.
Click on the delete button. You will be asked to confirm if you want to delete the currency.
Click on the delete button again to delete the currency, or click the cancel button if you do not wish to delete it.
If you only operate with one currency, the US Dollar for example, you may wish to delete all other currencies and set the exchange value to 1.
With only one currency in use, you will most likely want to stop the currency selection box from being displayed.
To do this:
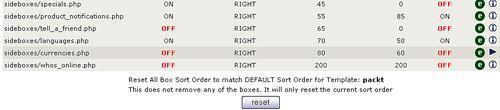
Click on Tools | Layout Boxes Controller.
Find sideboxes/currencies.php in the list. It may appear at the bottom.
Click on it, and then click on edit and set both Left/Right Column Status and Single Column Status to OFF.
Finally, click Update.
Zen Cart has a multi-lingual feature which you can use to provide multiple languages for your online shop. This feature allows us to add and translate the Zen Cart interface into new languages. By default, the store will be shown in the English language. You can add another language and translate the strings into that language. When you activate this new language, Zen Cart shop will be displayed in that language. The following sections describe how to convert a Zen Cart shop into a multi-lingual shop.
You can set locales for the site from the language file. For each language, there is a file named after that language. For example, for the English language, you will find the includes/languages/english.php file. For viewing a locale, open this file in your favorite text editor, and find the following line:
@setlocale(LC_TIME, 'en_US.ISO_8859-1'),
For the English language, the locale is set to en_US.ISO_8859-1. For other languages, it may be different. For example, for the Bangla language it is bn_BD.
For each language, you can set the character set encoding. The character set encoding needs to be set correctly, otherwise, the language characters shown may be wrong. To change the character set, find the following line:
define('CHARSET', 'iso-8859-1'),
For the English language, the character set ISO-8859-1 may work fine, but for languages that use Unicode or some other encoding, you must set the appropriate character set. For example, to use the Bangla language, the character set must be set to UTF-8.
You can add a new language from the Localization | Languages screen. Click on the new language button on this screen, and a form will appear. Now, enter the following information in the form:
Name: This is the name of the language, probably best expressed in itself, for example, Francais for French, Español for Spanish, Deutsch for German, and so on.
Code: This is ISO 639 two-letter language code; for example, en for English, fr for Francais, es for Español, bn for Bangla, and so on.
Image: This would be a small icon used to identify the language. This would most likely be a
.gifimage of the national flag for a country commonly associated with that language.Directory: This is the directory where the translated
.phpsource files for this language are located. For example, if www.example.com is running Zen Cart, and its files are located in the zencart directory, then the directory for English is located at http://www.example.com/zencart/includes/ languages/english. The value for other languages needs to be changed to the appropriate values.Sort order: This is the order in which the languages should appear in. Lower numbers are shown higher in the front-end.
Set as default: Check this box if this is the default language for your shop.
Once you have provided this information, click on the insert button to add the new language. Alternatively, click on the cancel button if you change your mind.

Although you can create a language without uploading the language files to the appropriate directories, the language will not work until you do so. Therefore, before creating a new language in the Localization | Languages screen, you need to download a language pack from Zen Cart's website and copy those files to the includes/languages/ folder with the language name.
Before creating a new language, make sure that the following files and directories are uploaded to the appropriate places:
includes/languages/<language_name>.phpincludes/languages/<language_name>/*admin/includes/languages/<language_name>.phpadmin/includes/languages/<language_name>/*includes/templates/template_default/buttons/<language_name>/
Replace <language_name> with the name of your language. Also remember that although most of the files go in the includes/languages directory, language-specific buttons need to be placed in the includes/templates/template_default/buttons/<language_name> folder.
To change information about an existing language, do the following:
Click on the named language so that the right-arrow appears in the Action column.
Click on the edit button.
Now edit the settings. The fields on the screen are the same for adding a language.
After you have finished editing, click on the update button to save the changes, or click on cancel to discard them.
To remove a language, click on the named language so that the right-arrow appears in the Action column, and then click on the delete button. If this is not the default language, you will be asked for confirmation. Click on the delete button again to delete the language, or click on cancel if you do not wish to delete this language. If this is the default language, only the cancel button will appear, as you cannot delete the default language.
At present, more than 25 language packs are available for download from the Zen Cart website. Packs for most of the major languages are available, including Arabic, French, Spanish, Portuguese, Norwegian, Japanese, Simplified Chinese, and so on. If you do not find your language pack there, don't be upset. You can always create your own language pack.
Zen Cart gives you the flexibility to translate any language. In fact, translating language strings in Zen Cart becomes very easy if you understand the basics of its language structure. In Zen Cart, all of the language strings are defined as constants in the language files.
The best way to start translating the language files is to copy the English language files into a new directory. Then, open each file and translate the strings.
For each language, there is a file in the includes/languages/ directory named after the language name. For example, you will find english.php. Rename this file to your language name, for instance, bangla.php.
First change the locale in @setlocale(LC_TIME, 'en_US.ISO_8859-1'); line. For Bangla, change en_US.ISO_8859-1 to bn_BD. Remember that you have to change the string inside the quotation mark keeping the constants in UPPERCASE unchanged.
You can also change the date format via the DATE_FORMAT_SHORT and DATE_FORMAT settings. For some languages, dates are expressed as m/d/y and for some, it is d/m/Y. Set the appropriate format for your language.
The language strings for each front-end file are located in similarly-named .php files. For example, language strings used in create_account.php page are located in the includes/languages/english/create_account.php file. You will find lines such as:
define('NAVBAR_TITLE', 'Create an Account'),
You have to translate only the second part, that is, Create an Account. Make sure that the quotation marks are intact after translating the strings. You will need to change all of the strings in all of the files, one by one.

Every order has a status. For example, when an order is placed by a customer, it is assigned either a pending status, or a processing status. This may be expressed in different ways for different languages. Therefore, Zen Cart allows us to add new order status entries, edit existing order status name entries, or delete an order status name entry, in the Localization | Order Status screen.
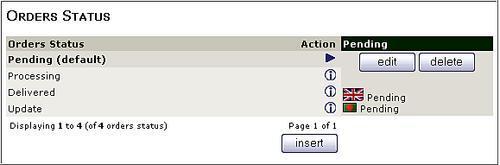
By default, there are four order status defined:
Pending(default)
Processing
Delivered
Update
When an order is placed, Pending is the default status of that order. Of course, you can set the default order status for each type of payments while configuring the payment modules. Processing means that the order is currently being processed, and will be shipped soon. Once the order has been shipped and delivered to the customer, you may set the status to Delivered. Similarly, a status of Update can be assigned to any order when you are updating it for some reason. You may like to inform the customer of any order status change. This is done from the order editing screen.

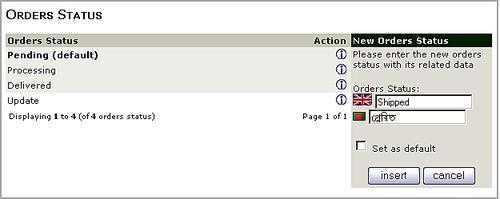
You may need to add a new order status. For example, you may want to add a Shipped status, so that you can inform the customer when their order has been shipped. Adding this order status is simple. You can add a new order status from the Localization | Order Status screen.
To add a new order status, click on the insert button. A box allowing you to enter the name of the status will appear. You will find one or more text boxes to type the name of that status in all installed languages. Give a meaningful name to the order status. If this is the default status (applied to all new orders), check the set as default checkbox. Click on the insert button to save this new status, or click on the cancel button if you want to discard the changes.
You may need to edit an existing order status to reflect the actual meaning of that status. For example, you may want to change Pending to Waiting for Payment, to explain why the order is pending. For other installed and supported languages, you also need to edit the order status.
To edit an existing order status, select the status and click on the edit button. The Edit Orders Status box will be shown. Again here, you will see one or more text boxes, each showing a language icon alongside it. You can change the name of that order status for any or all of the languages in these text boxes. If you want to set that status as the default status for upcoming orders, check the Set as default checkbox. Once you have finished editing the status names, click the update button to save your changes, or click cancel to discard the changes.

Note
Order statuses can be very useful for your online business. First, plan the status of the orders according to your selling process. Then add appropriate order status in Localization | Order Status. For example, you may add Returned and Refunded statuses to indicate that the product has been returned for a refund, and has subsequently been refunded.
In this chapter, we have discussed important configuration options for localizing Zen Cart. First, we discussed how to define countries and zones. Then you learned about defining zones for taxes, tax classes, tax rates, and assigning tax rates to specific zones. We also discussed adding, editing and updating currencies in a Zen Cart shop that uses multiple currencies. You also learned about creating and editing languages for the Zen Cart shop and translating language files into another language.
With this knowledge in localizing the Zen Cart shop, you will be able to make the shop online after localizing it. In the next chapter, we will discuss how to promote your products and maintain public relationships through Zen Cart tools.