
What’s New in iOS 16 and iPadOS 16
If you’re experienced with iOS and iPadOS and just want a rundown of how to use the new features, this chapter is for you. Apple publishes lists all of the new features in iOS and iPadOS, but doesn’t offer more beyond basic descriptions. This chapter closes that gap and gets you started fast.
We’ll start with the marquee features and then cover the rest in alphabetical order.
iPhone Lock Screen Customization
You can now customize the iPhone Lock screen by choosing fonts and adding widgets of useful information like astronomy and weather. The Lock screen is also smart enough to put the subjects of photos above the time and other onscreen information. See Customize Your Lock Screen for details. Along with the Lock screen customizations, Apple has added live, interactive notification; see Understand Live Activities
Focus Enhancements
Apple has overhauled the Focus feature to make it easier to set up and so you can filter out unwanted Safari tab groups, messages, and more. See Find Your Focus.
iCloud Shared Photo Library
It’s now possible to create a separate iCloud Photo Library that you share with others. This is different from a shared album in that you can automatically share new photos to the library. Also, photos you add to a shared library are moved out of your personal library into the shared library, while with a shared album a separate copy of the photo is added to the album.
To get started, go to Settings > Photos, tap Shared Library, and follow the prompts:
Tap Get Started.
Tap Add Participants and enter contact information for whomever you want to invite to your shared library. They don’t have to be members of your Family Sharing group. You can add up to five other people total, but make sure they’re using iOS 16, iPadOS 16, or macOS 13 Ventura.
Tap Next.
Select which photos and videos to move to the shared library. You can add all photos and videos, choose by people and date, or manually select the photos. You can also tap Move Photos Later if you don’t want to add any at the moment.
Tap Next.
Tap Preview Shared Library to see what the library will look like and what photos are in it. I highly recommend doing this so you don’t inadvertently share anything embarrassing.
Tap Continue when you’re ready.
Finally, you’re asked to invite people to the shared library. You can do that either via Messages or by copying a link and sending it another way.
In Photos, tap the More ![]() button in the upper-right corner and choose either Both Libraries or Shared Library. When viewing both libraries at once, photos and videos in your shared library are marked with a shared library
button in the upper-right corner and choose either Both Libraries or Shared Library. When viewing both libraries at once, photos and videos in your shared library are marked with a shared library ![]() icon in the upper-right corner.
icon in the upper-right corner.
To move a single photo or video between libraries, open it, tap the More ![]() button, and choose Move to Shared Library or Move to Personal Library. You can move multiple items by tapping Select, checking the ones you want to move, tapping More, and then choosing one of the move options.
button, and choose Move to Shared Library or Move to Personal Library. You can move multiple items by tapping Select, checking the ones you want to move, tapping More, and then choosing one of the move options.
You can set Camera to automatically add new photos to your Shared Library. See Learn Camera Fundamentals.
Messages
You can now edit or unsend iMessage messages. See Learn What’s New in Messages.
iPad
The iPad gets a window management system with Stage Manager, which unfortunately only works on M-series iPads. For more, see Manage the Stage. Many iPad apps have been updated to have more in common with their desktop counterparts.
Safari
Safari saw some radical changes in iOS 15 and iPadOS 15. These updates are more subtle. The option to sync extensions and website settings will likely be useful for everyone, while shared tab groups are a bit more niche but some will find them helpful.
Sync Extensions and Website Settings
When you install or uninstall an extension on one device, Safari can now sync those extension changes to your other devices. If you want to turn that off, go to Settings > Safari > Extensions and disable Share Across Devices.
Even if you want to leave extension sharing enabled, you should visit Settings > Safari > Extensions on each device, because you may have to manually install the related app by tapping the download ![]() icon.
icon.
Likewise, Safari now syncs website settings like zoom level and Reader View between devices. If you don’t want those settings to sync, you can turn off Share Across Devices in Settings > Safari.
Shared Tab Groups
You can collaborate on tab groups with others running iOS 16, iPadOS 16, and macOS Ventura. You and any other participants see the same tab group and can open and close tabs in that group, which could be useful for things like vacation planning.
To share a tab group, tap the pages ![]() icon while viewing the tab group you want to share, tap the Share
icon while viewing the tab group you want to share, tap the Share ![]() icon in the Safari window, and then tap a Messages contact to share with. A new message is created with the collaboration link. Tap the send
icon in the Safari window, and then tap a Messages contact to share with. A new message is created with the collaboration link. Tap the send ![]() button.
button.
When you tap the pages ![]() icon again while viewing the tab group, instead of the share icon you’ll see the profile picture of anyone the tab group is shared with. Tap the icon and then Manage Shared Tab Group to see options to share with more people or stop sharing the tab group (Figure 3). You can also tap the name of someone you’ve shared with to restrict their access to view only or remove their tab group access entirely.
icon again while viewing the tab group, instead of the share icon you’ll see the profile picture of anyone the tab group is shared with. Tap the icon and then Manage Shared Tab Group to see options to share with more people or stop sharing the tab group (Figure 3). You can also tap the name of someone you’ve shared with to restrict their access to view only or remove their tab group access entirely.

Website Push Notifications
Coming in 2023, you’ll be able to allow websites to send push notifications to your iPhone or iPad. This means websites may prompt you to allow them to send notifications to your iPhone or iPad, even if you’re not current browsing the site. This could be helpful—like getting news updates from a website without having to check the website or install an app. It could also be super annoying.
Here’s a quick tour of what’s new in Mail.
Smart Search
Search is now smart enough to ignore your spelling mistakes (like searching for “cheese” if you type “cheez”) and search for synonyms for your query. At least, in theory—I haven’t been able to get those to work in my testing.
It’s also supposed to offer more helpful search suggestions, but in my testing it’s not much different than iOS 15/iPadOS 15, though it can now search attachments for your search term.
Missing Recipient and Attachment Notifications
Mail is now supposed to warn you if it thinks you’ve forgotten to include a recipient or an attachment. In our testing, this is based on specific phrasing in your emails like “I’m copying name on this email” or “I’ve enclosed the document.” If mail thinks you forgot something, a message appears at the bottom prompted you to add the missing recipient or attachment (Figure 4).

Scheduled Send
Instead of sending a message instantly, you can delay it until later. For example, if you think to draft an email late at night, you may want to schedule it to send in the morning so it’s at the top of the recipient’s inbox. Instead of tapping the send ![]() button, touch and hold it and a menu appears letting you adjust the send time (Figure 5). If you tap Send Later, you can set any custom time and date.
button, touch and hold it and a menu appears letting you adjust the send time (Figure 5). If you tap Send Later, you can set any custom time and date.

Undo Send in Mail
After sending an email message, you have 10 seconds, by default, to undo the send by tapping Undo Send on the bottom toolbar (Figure 6). That reopens the message. You can either edit and resend it or tap Cancel to change your mind entirely.

After scheduling a message, a Send Later mailbox appears on the Mailboxes screen (iPhone) or in the sidebar (iPad). Tap it to see your scheduled messages. Tap the message and then Edit to set a different time and date or cancel.
Mail Reminders
Do you have the bad habit of forgetting to respond to emails because they get buried in your inbox? You can now have Mail remind you of those messages. Swipe a message from left to right and tap Later, then choose when to have it remind you. Tap Remind Me Later to specify a time (Figure 7).

When the designated time comes, the message should float to the top of your inbox with a Remind Me label.
Mail is also supposed to remind you about sent messages that haven’t received a response. I haven’t been able to get that to work yet.
Rich Links
You know how in Messages, when you paste in the URL of an article, it shows a little graphic preview of the website? Now you get the same thing when composing a Mail message.
Passkeys
Apple’s new operating systems aim to make passwords obsolete with passkeys, which are encryption key pairs stored on your devices and secured with Face ID, Touch ID, or your device passcode.
You can use passkeys with compatible apps and websites, though you may have to dig into security settings for that app or website to convert your existing logins to passkeys.
This conversion to passkeys may happen sooner than you think: Apple has partnered with Google and Microsoft to make them a standard. The following websites already support passkeys:
Best Buy
Carnival
Cloudflare
eBay
Microsoft
Nvidia
PayPal
Once you figure out how to get the passkey prompt, setting one up is easy: you’re presented with a prompt asking if you want to set up the passkey (Figure 8). Tap Continue, scan your face or finger, and you’re set. When you return to that login later, all you need is your username and to authenticate with Face ID or Touch ID.

But how do you handle logging in to a website with a passkey if your device doesn’t have the passkey or doesn’t support passkeys? You’re given a QR code that you can scan with the Camera app or the QR reader in Control Center (see Other Control Center Functions). (Figure 9) You then authenticate on your iPhone or iPad with Face ID or Touch ID.

You can learn more about how they work in Glenn Fleishman’s TidBITS article Why Passkeys Will Be Simpler and More Secure Than Passwords.
Weather for iPad
Today’s forecast: hell has frozen over, as the Weather app is finally on iPads! Additionally, the Weather app offers severe weather notifications for your location. Tap Enable Notifications in the Weather app. On an iPad, it’s in the sidebar.
The sidebar lists your weather forecast locations. Your current location is at the top. You can use the search field to look up other locations, which appear on the right. Tap a location to see the weather there, and if you want to add it to your sidebar, tap Add.
To delete a location, swipe it from right to left in the sidebar and tap the trash ![]() icon.
icon.
While viewing a location, the right-hand panel shows:
Hourly forecast
10-day forecast
Weather map
Air quality
UV index
Sunset time
Wind direction and speed
Expected precipitation
“Feels like” temperature
Humidity
Visibility
Air pressure
You can tap any of the data panels to see more detail.
Use Your iPhone as a Webcam
Apple insists that Mac webcams should be mediocre at best while iPhone cameras are outstanding. Ah, but now Apple has a solution: you can attach an iPhone to your Mac and use it as a webcam as part of its Continuity Camera feature set.
This is more of a feature of macOS 13 Ventura, but you can find the Continuity Camera Webcam setting in iOS 16 under Settings > General > AirPlay & Handoff. You also need to make sure that your Mac and iPhone are logged in to the same Apple ID and that two-factor authentication is on.
Once the setting is enabled on your iPhone, all you have to do is select the iPhone as a camera in whichever video app you’re using (like FaceTime or Zoom). You can also enable effects like Portrait mode and Studio Light from macOS Control Center, under Video Effects.
For more, see the TidBITS article Continuity Camera Turns an iPhone Into a Mac Webcam.
That covers the marquee features. Now let’s move on to the rest…
Accessibility
There are so many new accessibility features in iOS 16 and iPadOS 16 that I dedicated an entire chapter to them. See Learn New Accessibility Features.
AirPods
There are a couple of noteworthy changes in iOS 16 and iPadOS 16 for owners of AirPods. First, AirPods settings are more prominent in the Settings app. When your AirPods are connected, there is an AirPods entry near the top of the Settings app. If you don’t see it, try opening the case.
The other big change for the iPhone is Personalized Spatial Audio. If your AirPods support Spatial Audio, you’ll see a new Personalized Spatial Audio entry in Settings > AirPods. With Personalized Spatial Audio, iOS uses data about the shape of your face and ears to optimize Spatial Audio for you.
Scanning your head for Personalized Spatial Audio is an aggravating and finicky process. Block off at least 15 minutes and bring an extra dose of patience. However, the improvement in sound quality is well worth the trouble.
Here’s how to set up Personalized Spatial Audio:
Go to Settings > AirPods > Personalized Spatial Audio and tap Personalize Spatial Audio.
Tap Continue (if you have AirPods in your ears you’re prompted to remove them).
Tap Start Front View Capture.
Move your face into the frame. You want a circle to form around your face—otherwise your device isn’t scanning—and slowly rotate your head in a circle until the dashes around the circle turn green. It may help to move the camera further away from your face.
Tap Continue.
Tap Start Right Ear Capture. This one is kind of tricky, because you have to aim the front-facing camera at your ear, so you can’t look at the screen. Again, it helps to move the camera further away from your ear. Slowly rotate your head to the left and right until you hear an approving ding.
Tap Continue.
Tap Start Left Ear Capture and go through the same song and dance as for your right ear.
Tap Done.
If later you decide you don’t like how Personalized Spatial Audio sounds, you can return to Settings > AirPods > Personalized Spatial Audio and tap Stop Using Personalized Spatial Audio.
Battery Percentage
The iPhone battery indicator can once again display the battery percentage remaining. Turn on Battery Percentage in Settings > Battery. Note that it’s not available for every iPhone model.
Books
Apple has redesigned the book-reading interface in Books. Here’s a quick rundown of how to use it:
The
 icon closes the book and returns you to your library
The menu
 button accesses most other functions. The slider on the right lets you quickly jump through the book (Figure 10).
Figure 10: This menu in Books offers access to most functions while reading. When you jump ahead in the book, a button
 appears in the upper-left corner that lets you jump back to where you were. If you jump back in a book, a button
  in the upper-right corner lets you jump back ahead.
If you don’t see the controls, tap the screen to reveal them.
Also see the TidBITS article “How Apple’s Books App Has Changed in iOS 16.”
CarPlay
Apple has announced a next generation CarPlay that will take over a vehicle’s entire dashboard (Figure 11). However, it will be late 2023 before any announcements are made as to what cars will support this.

Contacts
You can now merge duplicate contacts. Tap Lists in the upper-left corner of the Contacts app and then All Contacts (or All iCloud). If you have duplicates, a Duplicates Found entry appears at the top. Tap it, and then you can either tap each duplicate and then Merge or tap Merge All to merge them all at once.
Dictation
Apple has overhauled the dictation feature in iOS 16/iPadOS 16. If you have an A12 Bionic processor or later (refer back to Device Support), the onscreen keyboard no longer disappears when you start dictation by tapping the dictation ![]() icon on the keyboard, which means you can alternate between dictating and typing.
icon on the keyboard, which means you can alternate between dictating and typing.
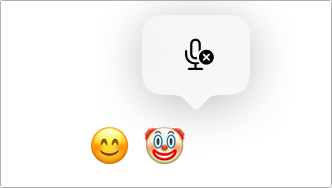
There is also now a new dictation popover in the text field that you can tap to end dictation. Additionally, you can use dictation to insert punctuation and emojis (Figure 12).
Finally, the voice message button in Messages has been replaced with a dictation ![]() icon that you can tap to dictate a message. Voice messages have been moved to the Messages app bar (Figure 13).
icon that you can tap to dictate a message. Voice messages have been moved to the Messages app bar (Figure 13).

FaceTime
FaceTime has a few improvements in iOS 16 and iPadOS 16:
Live Captions: As part of Apple’s accessibility efforts, FaceTime calls can now display what people are saying as text. To enable it, tap the info
 button during a FaceTime call and turn on Live Captions. Also see Enable Live Captions.
Share links: You can share links and start collaborations (where you and another person can edit a document at the same time) directly in FaceTime. Tap the info
button and tap Share Link to expose the share sheet.Handoff support: You can now hand off FaceTime calls among iOS 16, iPadOS 16, and macOS 13 Ventura. For the basics of Handoff, see Hand Off FaceTime Calls.
SharePlay app discovery: When you tap the SharePlay
 button during a FaceTime call you’re presented with a list of installed apps that support SharePlay.
Family Sharing
Family Sharing’s location has changed in Settings. It’s now found in Settings > Family. On that screen, there is a new Family Checklist option, which presents a list of Family Sharing features to review, like communication limits, settings for children, location sharing, and recovery contacts.
Apple has overhauled setting up child accounts to make it easier to set restrictions right away, and Screen Time requests from children now appear in Messages instead of a notification to make it harder to miss requests.
Fitness
The Fitness app used to appear only if your iPhone was paired to an Apple Watch, but now it’s available for all iPhone users. It uses your iPhone sensors to calculate steps, distance, and calories burned, plus it can integrate with third-party exercise apps.
Game Controllers
iOS and iPadOS already support PlayStation and Xbox controllers. Apple’s latest operating systems now support Nintendo Switch controllers like the Joy-Con and Pro Controller. These controllers have small, black, recessed pairing buttons that you may have to press with a pen or other small object. Press and hold the pairing button until lights start flashing, and then select the controller in Settings > Bluetooth.
Apple has announced a Buddy Controller feature, which lets you use two controllers as one in a game. The main idea is to help someone with motor issues control a video game, but it should also be useful for adults help young children control video games (or vice versa). Unfortunately, no one seems to know how this works yet.
Health
The Health app can now track your medications, including prescription drugs and supplements. Health can remind you to take your medicine and warn you of any negative interactions.
To try it out, open Health, tap Browse > Medications, and then Add a Medication. You can either search for a medication by name or attempt to scan it with your device’s camera. In my experience, it does a pretty poor job of recognizing even prescription medications.
Here’s how to add a medication:
Select your medication, and then you may be asked other questions, like dosage.
Specify how frequently you take the medication: at regular intervals (like every day, every other day, every week, and so on), specific days of the week, or only as needed.
You’re prompted to specify a time of day to take the medication. Doing so lets Health send you a reminder when it’s time to take it.
Specify the shape of the pill, assuming the medication is a pill. There are also icons for injectable medication, creams, powders, suppositories, and other medication types. On the next screen, you can also choose a color for the medication.
On the next screen, you can enter a different display name for the medication alongside any notes.
Finally, you’re asked to select potential interaction factors, like alcohol, tobacco, or marijuana use.
To add medications in the future, go to Browse > Medications and tap Add Medication.
To log when you take a medication:
Go to Browse > Medications.
Tap the medication name.
Tap Log.
Tap Taken.
Finally, if you need a printable list of your medications to provide to your doctor, go to Browse > Medications and tap Export Medications As PDF. You can then save or print the PDF.
Home
The Home app has been rewritten from scratch in order to support the Matter alliance, which will interlink home automation accessories across ecosystems like Apple HomeKit, Amazon Alexa, and Google Nest. I’ll cover the new app in the next update to Take Control of Apple Home Automation, but rest assured that the new app isn’t radically different from the old one, so it shouldn’t add too much confusion.
Live Text
Live Text was perhaps the most useful feature of iOS 15 and iPadOS 15, letting you copy text straight out of images. It gains a few refinements in iOS 16 and iPadOS 16.
Live Text in Videos
The Live Text feature now works in videos, at least in the Photos app, and possibly in other apps in the future. To get it to work, you must first play then pause the video; then you can either select text directly or tap the Detect Text ![]() button.
button.
Quick Actions
After selecting Live Text, you may see buttons in the lower-left corner that let you quickly take action on the Live Text, like copying all text or converting currency (Figure 14). These appear somewhat sporadically, but if you see them pop up, at least now you know why.

Translate Camera
The Translate app now has a camera feature that can pick up text and translate it directly:
Select Camera in the Translate app (it’s in the sidebar on the iPad).
Set your input and output languages at the top. The left-most language is the input language and the right-most language is the output language.
Point the camera at the text to translate.
Press the capture
 button.
Identified text is highlighted and automatically translated. Tap a highlighted block of text to see more details.
This could be a useful feature when traveling.
Keyboard Haptics
You can now make your iPhone vibrate with each tap of the keyboard. Turn on Haptic in Settings > Sounds & Haptics > Keyboard Feedback.
Maps
The Maps update is pretty minor, but multi-stop routing is a long-missing feature.
Multi-Stop Routing
You can now add multiple stops to a trip when getting directions in Maps. This is handy when you’re going on a road trip and need to pick up somebody or have a side destination you want to visit.
When planning a route, tap Add Stop to enter an address or search for another location (Figure 15).

Transit Fares
When planning a public transit route in Maps, it now shows you how much the fare will cost—at least, if you live in a supported area. (Figure 16)

Transit Cards in Maps
If you store a transit card in the Wallet app, you’ll be prompted to reload it from Maps if it’s running low.
Notes
Here’s what’s new in the Notes app. For more detail on using Notes, check out Take Control of Notes.
Quick Note on iPhone
The Quick Note feature is now available on iPhones. Just as the name implies, this feature lets you take a quick note. It’s accessible from Control Center. See Other Control Center Functions.
Lock Notes with Device Passcode
Until now, if you wanted to lock notes, you had to come up with a separate passcode, and if you forgot that passcode, access to locked notes was lost forever. Now you can use your device passcode to lock notes. To do so, go to Settings > Notes > Password > Account and tap Use Device Passcode or Use iPhone/iPad Passcode.
Collaborate with a Link
You’ve been able for some time now to share documents with other iCloud users so that you can all work on them at once, but now you can send out a URL to let anyone jump in on a note:
Tap the Share
 icon to reveal the share sheet in Notes.
Keep the pop-up menu set to Collaborate.
Tap “Only people you invite can edit.”
Tap “Anyone with the link.”
Under Permissions, leave it as “Can make changes” or “View only.”
Tap Done.
Tap Copy on the share sheet to copy the link so you can paste it elsewhere. The top of the share sheet should look like Figure 17.

Enhanced Smart Folders
Apple has greatly expanded filtering options for smart folders. Previously, you could create them based only on tags, but now you can also add dates, mentions, checklists, attachments, and other criteria. To play with these new options, go to the folder list, tap the new folder ![]() icon, tap iCloud, and then tap Make Into Smart Folder.
icon, tap iCloud, and then tap Make Into Smart Folder.
Straighten Handwriting
It’s easy to take handwritten notes in the Notes app, and it’s also too easy to write things down at weird angles. You can now easily straighten out your handwriting. Unfortunately, it won’t fix sloppy penmanship.
Here’s how to try it out:
Tap the markup
 button to enter drawing mode. Tapping an Apple Pencil into the note does the same thing.
Write some words in the note.
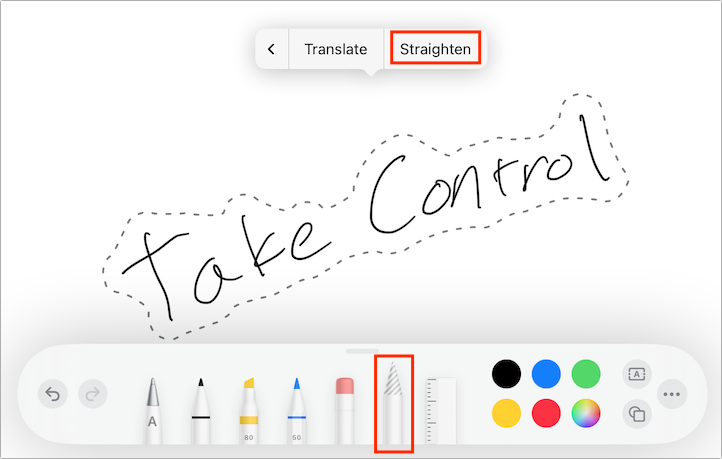
From the tool palette, choose the selection tool (highlighted in red in Figure 18) tap the markup
button if you don’t see the palette).Draw around the handwritten text with the selection tool. A dotted outline appears around the handwriting.
Tap the selected handwriting to display the text popover.
Tap the right-hand arrow if necessary to reveal more options.
Tap Straighten (Figure 18).
The selected handwriting rotates so that it’s straight (Figure 19).

Shapes and Typed Text in Drawings
You can now insert shapes and text boxes in the drawing area. These tools have been available in Markup for years, but are now finally available in notes.
There are two new buttons in the tool palette. The first one is text ![]() , which displays options to add a text box or a signature. The other is shapes
, which displays options to add a text box or a signature. The other is shapes ![]() , which quickly lets you insert a shape like a square or speech balloon.
, which quickly lets you insert a shape like a square or speech balloon.
For more, see my book Take Control of Notes.
Add Screenshots to a Quick Note
You can now add screenshots to a Quick Note on the iPad. Swipe up from the lower-right corner of the screen to bring up a Quick Note. In the Quick Note window, tap the More ![]() button and then Add Screenshot.
button and then Add Screenshot.
New Drawing Tools
In addition to the other new features in Notes, Apple has slipped in a few new drawing tools: Monoline, Fountain Pen, and Watercolor. The Monoline tool is placed prominently in the palette (Figure 20), but where are the other two?

Swipe the tools from right to left and you’ll reveal the Fountain Pen and Watercolor tools (Figure 21).

Photos
Besides iCloud Shared Photo Library, the Photos app has some other welcome new improvements.
Duplicate Detection
Photos can now help you clean up duplicate images. Under Albums on an iPhone or in the sidebar on an iPad is a new album under Utilities called Duplicates. Tap that and the detected duplicates are presented to you, alongside a Merge button for each set. Review the identified duplicates carefully before proceeding, because some sets may not be exact duplicates but rather similar images. You can tap an individual image in a set to see a larger version.
To merge duplicate images, tap Merge next to a duplicate set and then Merge X Duplicates, where X is the number of duplicate images. When you do that, Photos keeps one image, combining what Photos considers the “highest quality and relevant data” and moves the other images to the Recently Deleted album. If you want to restore the duplicate image, you can go into Recently Deleted, tap the image, and then tap Recover.
Hidden and Recently Deleted Albums Locked
Speaking of the Recently Deleted album, both it and the Hidden album are now locked with Face ID or Touch ID by default and you must provide authorization before viewing these albums, which keeps your most private photos private. You can turn this off in Settings > Photos by disabling either Use Touch ID or Use Face ID.
Sort People Alphabetically
You can now sort the People album by name. Previously, you couldn’t sort it at all. Tap the More ![]() button and then Name.
button and then Name.
Disable Memories and Featured Photos
The purpose of the Memories feature is to resurface old photos that we’ve long forgotten about. But not all of us are nostalgic for the past. To disable these, go to Settings > Photos and turn off Show Featured Content. You can turn it back on at any time.
Copy, Paste, Undo, and Redo Edits
Are you finding that you’re applying the exact same edit to multiple photos? You can now do that faster by copying the edit from one photo and pasting it into another. While editing a photo, tap the More ![]() button, tap Copy Edits, and then open another photo, tap the More
button, tap Copy Edits, and then open another photo, tap the More ![]() button, and tap Paste Edits. That also works when selecting multiple photos (tap Select when browsing photos, tap photos to select them, tap More
button, and tap Paste Edits. That also works when selecting multiple photos (tap Select when browsing photos, tap photos to select them, tap More ![]() , and then Paste Edits).
, and then Paste Edits).
You can now also undo and redo multiple edits by tapping the undo ![]() and redo
and redo ![]() buttons repeatedly.
buttons repeatedly.
Copy Subject
A new feature of Photos lets you touch, hold, and drag out the subject of a photo. You can then switch to another app and drop in the subject. To try it, choose a photo with a clear subject that’s differentiated from the background. Touch and hold the subject for just a moment and—while keeping your finger on the screen—drag your finger away (Figure 22).

If you touch and hold too long it triggers the Live Photo animation, so it takes some practice. You should see a white flash across the subject when it’s selected.
You can also touch and hold the subject until you get the white flash, and then release. A Copy option appears, which copies the subject of the photo so you don’t have to drag.
You can also use this feature in other apps, like Safari.
Privacy and Security
iOS 16 introduces new features to protect your privacy and security, most notably Safety Check for the iPhone to review privacy settings and Lockdown Mode for the iPhone and iPad.
Safety Check
Apple has implemented a new Safety Check feature on iPhones to help victims of domestic violence quickly review and reset privacy settings. It can be found in Settings > Privacy & Security > Safety Check.
There are two options in Safety Check. The first is an Emergency Reset, which:
Immediately stops sharing your private information— like your location—with all contacts and apps
Prompts you to change your Apple ID password
Prompts you to review your emergency contacts
The second option, Manage Sharing & Access, is less severe and helps guide you through what information you’re sharing. On any screen, you can tap Select All & Stop Sharing to immediately stop sharing the information. Alternatively, you can tap Skip to skip that section.
Here’s how to manage your sharing and access settings:
Go to Settings > Privacy & Security > Safety Check > Manage Sharing & Access.
Authenticate with Face ID or Touch ID.
Read the Manage Sharing & Access screen and tap Continue.
Review what you’re sharing with other people. You can filter by either people you are sharing with or the information you’re sharing, like location sharing, shared albums, and shared calendars. Tap either People or Information, select people or information to review, and tap Review Sharing. Follow the prompts to change your sharing settings.
You’re asked to review what you’re sharing publicly, like shared albums in Photos. You can select an option and then tap Stop Sharing to stop sharing that content. Otherwise tap Skip.
Step 1 of the Safety Check is complete. Tap Continue.
Review is your third-party app permissions, which again, you can filter by either app or the information shared. Many apps can leak your personal data. For instance, Google Maps might be recording your location to your Google Location History.
Step 2 of the Safety Check is complete. Tap Continue.
Select devices to remove from your account. For example, let’s say you flee your home with your iPhone but left an iPad behind signed into your Apple ID. An abusive spouse could read your messages on your iPad. Tap Remove Selected Devices to remove them from your Apple ID or tap Skip.
Finally, you’re prompted to change your Apple ID password, review your emergency contacts, and change your device passcode.
Tap Done to complete the Safety Check.
Lockdown Mode
In response to state-sponsored spyware, Apple has introduced Lockdown Mode, which maximizes the security of your device by:
Blocking all Messages attachments except images
Disabling “certain complex web technologies” like just-in-time JavaScript compilation
Blocking incoming invitations and calls except from known contacts
Preventing the installation of configuration profiles
Lockdown Mode is a massive pain and you shouldn’t enable it unless you believe yourself to be targeted by a state-sponsored actor. To turn it on, go to Settings > Privacy & Security > Lockdown Mode.
Paste Permissions
When pasting content from one app to another, you may be asked if you want to allow the app to do so (Figure 23). This is because otherwise, app developers could read what’s on your clipboard and use that to extract personal information.

Face ID
Face ID now works in landscape mode on the iPhone 13 and later.
Reminders
Reminders gets a few welcome refinements in iOS 16 and iPadOS 16.
Pin Reminder Lists
You can now pin reminder lists to keep them at the top. Swipe one from left to right to pin it. That list will then appear as a tile at the top of Reminders, along with other lists like Today and Scheduled. To unpin a list, touch and hold its tile and choose Unpin from the menu.
Save Reminder Templates
You can use the new templates feature to create duplicates of lists. To create a template, tap a list, tap the More ![]() button, and then tap Save as Template. You can tap the template name to change it, and you can also flip a switch to include completed reminders. Tap Save to finish.
button, and then tap Save as Template. You can tap the template name to change it, and you can also flip a switch to include completed reminders. Tap Save to finish.
To see and use your templates, tap the More ![]() button in the sidebar (iPad) or on the Lists screen (iPhone). Tap a template to start creating a new reminder list from that template. Enter a name and tap Create.
button in the sidebar (iPad) or on the Lists screen (iPhone). Tap a template to start creating a new reminder list from that template. Enter a name and tap Create.
Tap the info ![]() button while viewing Templates to see options to edit or delete a template.
button while viewing Templates to see options to edit or delete a template.
View Completed Reminders
There is a new Completed smart list at the top of Reminders that displays all of your complete reminders. You can use this screen to quickly clear out old completed reminders. Tap Clear and then choose one of the options (Figure 24).

Create Rich Notes in Reminders
When you tap a reminder, there is a field named Add Note that you can tap to type in a note about the reminder. You can now add rich formatting to the text in the note by selecting it, tapping the selection to reveal the text popover, and then tapping Format. You can set bold, italic, underline, bulleted list, dashed list, or numbered list.
Shortcuts
If you’re interested in using Shortcuts, but can’t think of what shortcuts to create or are unsure of, iOS 16 and iPadOS 16 have a solution for you. App developers can now automatically install starter shortcuts for you when you install the app. The Shortcuts app now has a new section called App Shortcuts—which you can find on the Shortcuts screen (iPhone) or the sidebar (iPad) that contains folders for apps with pre-made shortcuts. Inside the folder you can enable those shortcuts for Siri with a tap (Figure 25).

Siri
Siri doesn’t have any major changes in iOS 16/iPadOS 16, but there are some small refinements.
Skip Message Send Confirmation
Tired of having to confirm to Siri before sending a message? Turn on Automatically Send Messages in Settings > Siri & Search > Automatically Send Messages. When you enable that, two more options appear: Headphones and CarPlay. They’re enabled by default, but you can turn them off to disable automatic send whenever you’re connected to one of those devices.
Emojis in Text
You can now include an emoji when sending a message with Siri. In my testing, you have to be careful with how you phrase this or Siri gets confused. The format “Send an emoji name emoji to name” works.
What Can I Do Here?
You can ask Siri “What can I do here?” on any screen to see suggested Siri commands.
Hang Up Phone Calls
You can use a “Hey Siri” command to hang up a phone call if you turn on Siri Call Hangup in Settings > Siri & Search > Siri Call Hangup. Note that the other party will hear this. See Hang Up with Siri and Adjust Siri’s Pause Time.
Expanded Offline Support
Support for offline Siri commands has been extended to HomeKit commands, speaking over the HomePod Intercom, and listening to voicemails. Being able to issue Siri commands offline means you don’t need a cellular or Wi-Fi connection to use those commands, which also translates to better privacy and performance.
Spotlight
Spotlight has some search improvements, like improved Siri Suggestions and support for image search in more apps. You can also trigger certain actions from Spotlight, like starting timers or turning on a Focus.
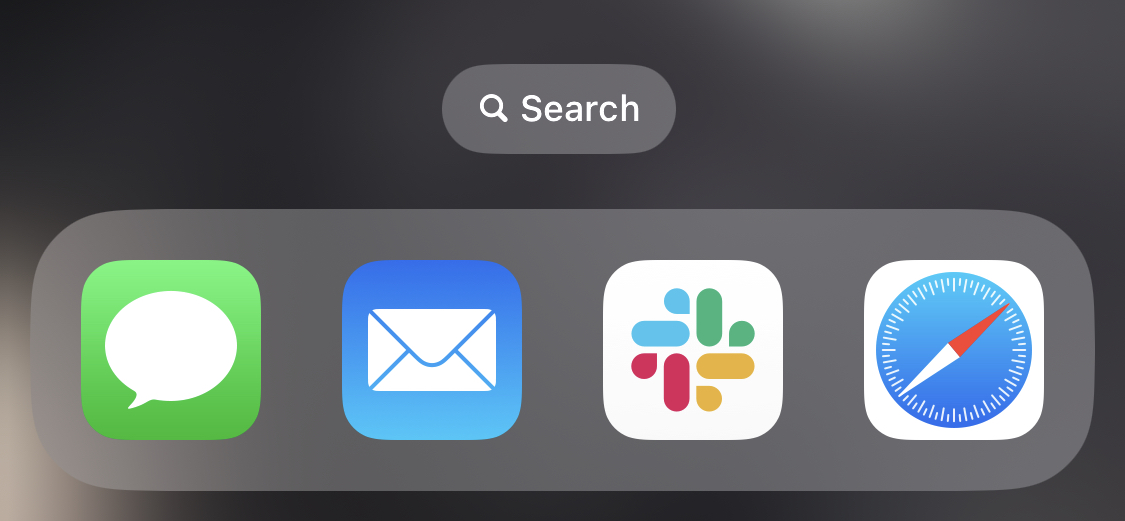
However, the most notable change is on iPhones: the page indicator icon just above the Home screen Dock now doubles as a shortcut to Spotlight search (Figure 26). Tap it to initiate a search. You can also swipe down on the Lock screen or Home screen.
Stocks
You can now create multiple stock watchlists. Tap My Symbols followed by New Watchlist. Enter a name for the watchlist and tap Save. You’re then prompted to search for ticker symbols, which you can add to the list by tapping the add ![]() button. Tap Done when you’re finished adding stocks.
button. Tap Done when you’re finished adding stocks.
To switch watchlists, tap the name of the list to reveal a menu with your watchlists. In that menu, you can also tap Manage Watchlists to add, delete, or rename watchlists (Figure 27).

Wallet
The Wallet app has a few new features:
Apple Pay Later: Vendors supporting Apple Pay can offer the option to pay off the total in four equal payments over six weeks (Figure 28). You’re subject to credit approval and can borrow only $1,000 at a time. There are no fees to use this service.

Figure 28: Apple Pay Later lets you split up the cost of a purchase over six weeks. Image credit: Apple. Order Tracking: Apple Pay merchants can enable you to track the shipment of your order in the Wallet app (Figure 29). Tap the new Order
 button in the upper-right corner of the main Wallet screen to see your orders.
Figure 29: Wallet lets you track orders made via Apple Pay. Image credit: Apple. Share ID Cards with Apps: If you have a state ID stored in Wallet (supported in only a handful of U.S. states), you can share those IDs with apps—for example, if you’re ordering alcohol from a delivery app. When ID is needed—like ordering alcohol through a delivery app—you’re prompted to authenticate to verify your identity with Touch ID or Face ID (Figure 30).

Figure 30: How you verify your ID in an app. Image credit: Apple. Share Keys: If you store any virtual keys in Wallet, such as for a smart lock, you can share those with others through messaging apps like Messages, Mail, and WhatsApp.