Capture Camera Basics
Camera is one of the most popular iOS/iPadOS apps. Thanks to the ever-improving quality of iPhone and iPad cameras, many people have abandoned point-and-shoot cameras entirely, instead using their iPads or iPhones to capture cherished moments.
Learn Camera Fundamentals
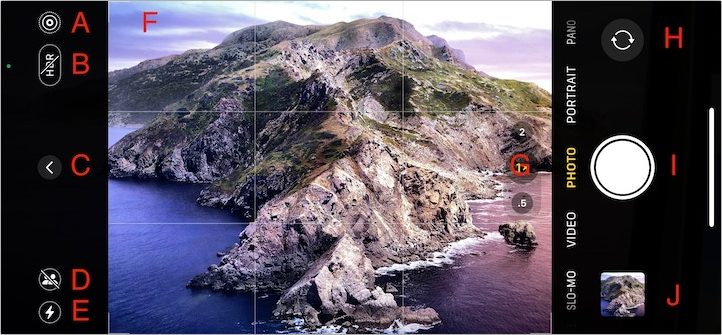
Before you take a photo or video, you should review the elements of the main screen of the Camera app (Figure 97). Read more about most of these in Pick a Camera Mode, ahead.

Let’s quickly explore what these controls do:
Live Photo: Newer iPhones and iPads can take Live Photos, which are otherwise normal photos that embed a brief video clip (think of the moving pictures in the Harry Potter series). When Live Photos is enabled, video is captured automatically whenever you take a photo, which you can play back by touching and holding on a photo.
Live Photos take up significantly more storage than regular photos. You can toggle Tapping the Live Photos
 button to toggle the feature.
HDR: High-dynamic-range imaging, or HDR, is a way to capture more light in a photo by combining several photos into one. When HDR is enabled, Camera takes two photos with different exposures and merges them to produce, in theory, a better final image.
Shared Library: If you set up an iCloud Shared Photo Library to share photos with others, you can automatically share them from the Camera app by tapping the Shared Library
 button. When Shared Library is on, the line through the button disappears, the button lights up in yellow
  , and SHARED LIBRARY briefly flashes next to the viewfinder.
Flash: This turns flash (really just a bright LED) on and off. (On the rear camera, the LED flash is also used as your flashlight.) On the front camera, the screen flashes white. It’s usually best to keep this off unless you need it because it can create washed-out photos and red eyes.
Night mode (not pictured): By default on newer iPhones, when taking pictures in low light, the iPhone activates Night mode, signified by the Night mode
 icon. You can tap that icon to turn Night mode off. When you take a picture in Night mode, the icon shows a count, in seconds, indicating how long to hold the camera still while it takes the picture.
Zoom: Some iPhones have multiple camera lenses set for different zoom levels and these buttons let you quickly switch between them.
Swap Camera: Switch between front and rear-facing cameras.
Take Picture: Tap to snap a photo or record a movie. In Photo mode, touch and hold to quickly take a video. Slide the button toward the Last Picture icon to take a burst of photographs.
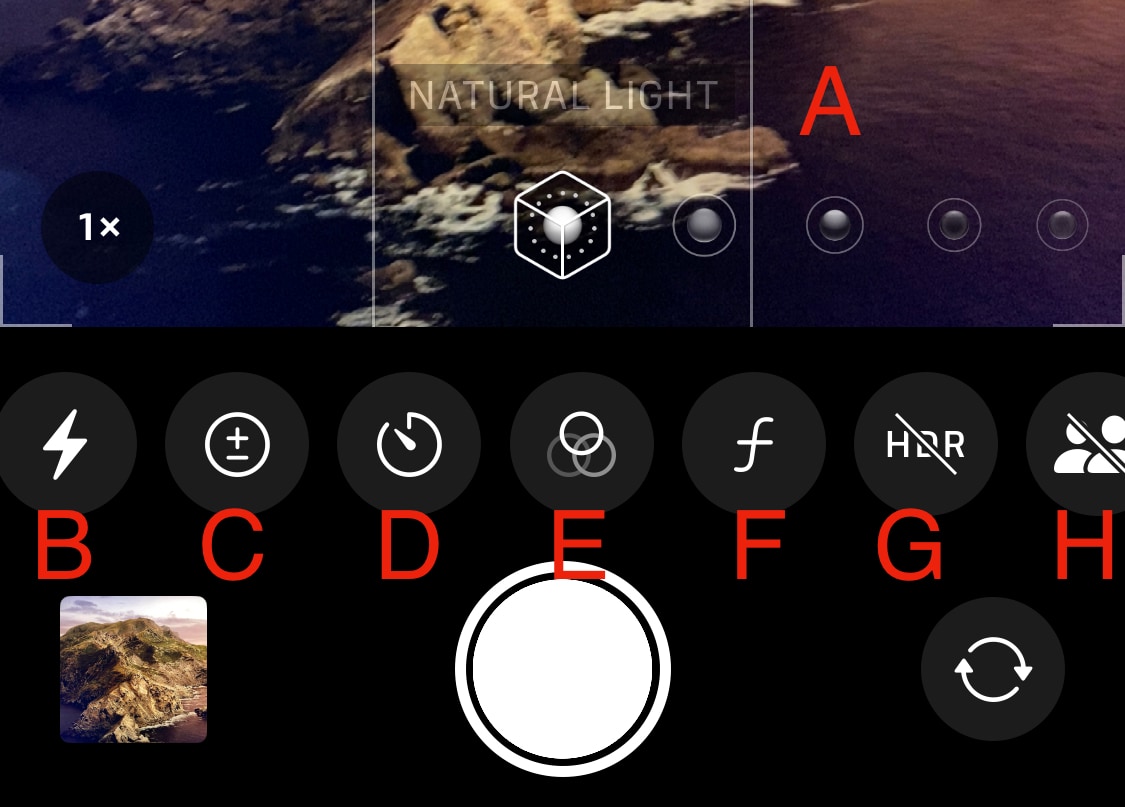
You can swipe on the bar between the Viewfinder and Take Picture ![]() button to switch between capture modes. Swipe up or tap More Controls (pictured in Figure 97) to reveal more options (Figure 98).
button to switch between capture modes. Swipe up or tap More Controls (pictured in Figure 97) to reveal more options (Figure 98).

Many of these are repeated from above, only with more options. Here are some unique aspects:
Portrait Lighting: Newer iPhones let you swipe this to add different lighting effects.
Exposure: An advanced control to further adjust lighting.
Time Delay: Set the camera to wait a set amount of time before snapping the picture.
Filters: This lets you add colored filters to the photo.
Aperture: Adjust the f-stop or aperture size to adjust the amount of light captured by the camera.
Pick a Camera Mode
Before you press the round Take Picture ![]() button (Figure 97, I), you want to set up your shot. Start by picking a mode.
button (Figure 97, I), you want to set up your shot. Start by picking a mode.
The mode is indicated by a yellow label between the Viewfinder and Take Picture ![]() button.
button.
Switch between modes by swiping across the Viewfinder (vertically if your device is in landscape orientation, as shown above), or by tapping a label.
Here are some common Camera modes:
Time-Lapse: The camera snaps a series of images at dynamically selected intervals. It then combines the images into a time-lapse video (see Take a Time-Lapse Video).
Slo-mo: On supported devices, this mode records video up to 120 or 240 frames per second—adjust this in Settings > Camera > Record Slo-mo. During playback, you can choose a snippet of this high-frame-rate video to be played in slow motion.
Video: This mode lets you record video. To change resolution and frame rate, see Settings > Camera > Record Video (see Take a Video).
Photo: This mode takes standard photos.
Portrait: This mode, available on newer iPhones, takes photos in which the subject is in sharp focus, but the background is blurred, emphasizing the subject. Portrait photos must be taken up close and require a lot of light to turn out well—the onscreen instructions tell you what to do.
Newer iPhones also feature Portrait Lighting, which lets you apply various lighting effects to a Portrait photo. You can add or remove these at any time (Figure 99).

Figure 99: Portrait Lighting can apply different lighting effects to a Portrait Mode photo. Image credit: Apple. Pano: The camera takes a continuous stream of photos as you move the device horizontally, and then it stitches those images together to create a super-wide image—ideal for capturing landscapes. Follow the onscreen instructions to capture the perfect panorama.
To take a vertical panorama, hold the device in landscape orientation and move it up instead of to the side.
Tap the white arrow to reverse the direction in which you move to capture the panorama.
Snap a Photo
Taking a photo isn’t rocket surgery, but the Camera app has some subtle features you may miss. Follow these steps:
Choose a camera mode.
Make sure you’ve set the options described above, like the flash.
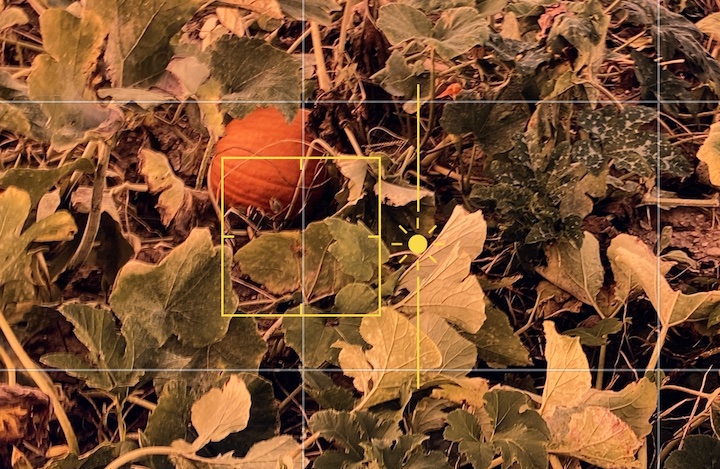
Tap an object in the Viewfinder to focus on it. A square reticule appears, indicating where the camera is focusing. You can change the focus by tapping on another part of the Viewfinder. Slide your finger up or down the screen to adjust exposure (Figure 100).

Figure 100: Tap the viewfinder to show the focus reticle, which tells the camera where to focus and lets you adjust exposure manually. On most devices, zoom by pinching in or out on the screen. A slider appears, showing the zoom level; once visible, you can adjust it manually as well. On an iPad, there’s a slider to the side of the viewfinder that lets you adjust the zoom level.
Take the photo: tap the Take Picture
 button or press either of your device’s volume buttons.
The camera saves your photo to the Photos app. Burst-mode photos are collected under a single thumbnail; tap it, and then tap Select to see all photos in the series.
Take a Video
Your iPhone’s video camera is no slouch—entire motion pictures have been shot with it! I don’t have the skill to help you win film festivals, but I can show you how to get started:
Switch to Video mode.
To begin recording, tap the record
 button or press either of your device’s volume buttons.
A counter at the top of the screen lets you know how long you’ve been recording.
Tap the stop
 button to stop recording.
Camera saves your video in the Photos app, in Albums > Videos.
Take a Slo-mo Video
A Slo-mo video is great for capturing actions scenes where you want to emphasize the action by slowing it down—like your kid swinging a baseball bat or going down a slide:
Switch to Slo-mo mode.
To begin recording, tap the record
 button or press either of your device’s volume buttons.
A counter at the top of the screen lets you know how long you’ve been recording.
Tap the stop
 button to stop recording.
Camera saves your video in the Photos app, in Albums > Slo-mo.
Camera automatically sets slow-motion points in the video. To adjust them, open the video, tap Edit, and move the handles (Figure 101).

Take a Time-Lapse Video
Time-lapse videos let you capture events that happen slowly—like cloud movements—and display them at regular speed. Here’s how to take them:
Try to rest the device on a ledge or other solid base, or use a tripod.
Switch to Time-Lapse mode and either tap the record
 button or press either of your device’s volume buttons, and hold the device still.
Camera starts shooting and continues until your device runs out of space or battery, or you press the stop
 button.
The Camera app stitches the images together to make a time-lapse video and stores it in the Photos app, in Albums > Time-lapse.
Learn Some Camera Tricks
There are many tricks to the Camera app. Here are some of the most useful:
Scan QR codes: iOS and iPadOS have a dedicated QR code scanner (see Media Platter), but the regular Camera can scan these codes just fine. Simply point the Viewfinder at the code and a notification appears that you can tap to see the linked information.
Change capture formats: By default, the Camera captures photos in Apple’s HEIC format and videos in Apple’s HEVC format. In theory, these are open standards. In reality, they can make sharing photos and videos with other platforms a headache. You can choose Most Compatible in Settings > Camera > Formats to capture photos and videos in standard JPEG and H.264 formats, though they’re not as space efficient as Apple’s formats.
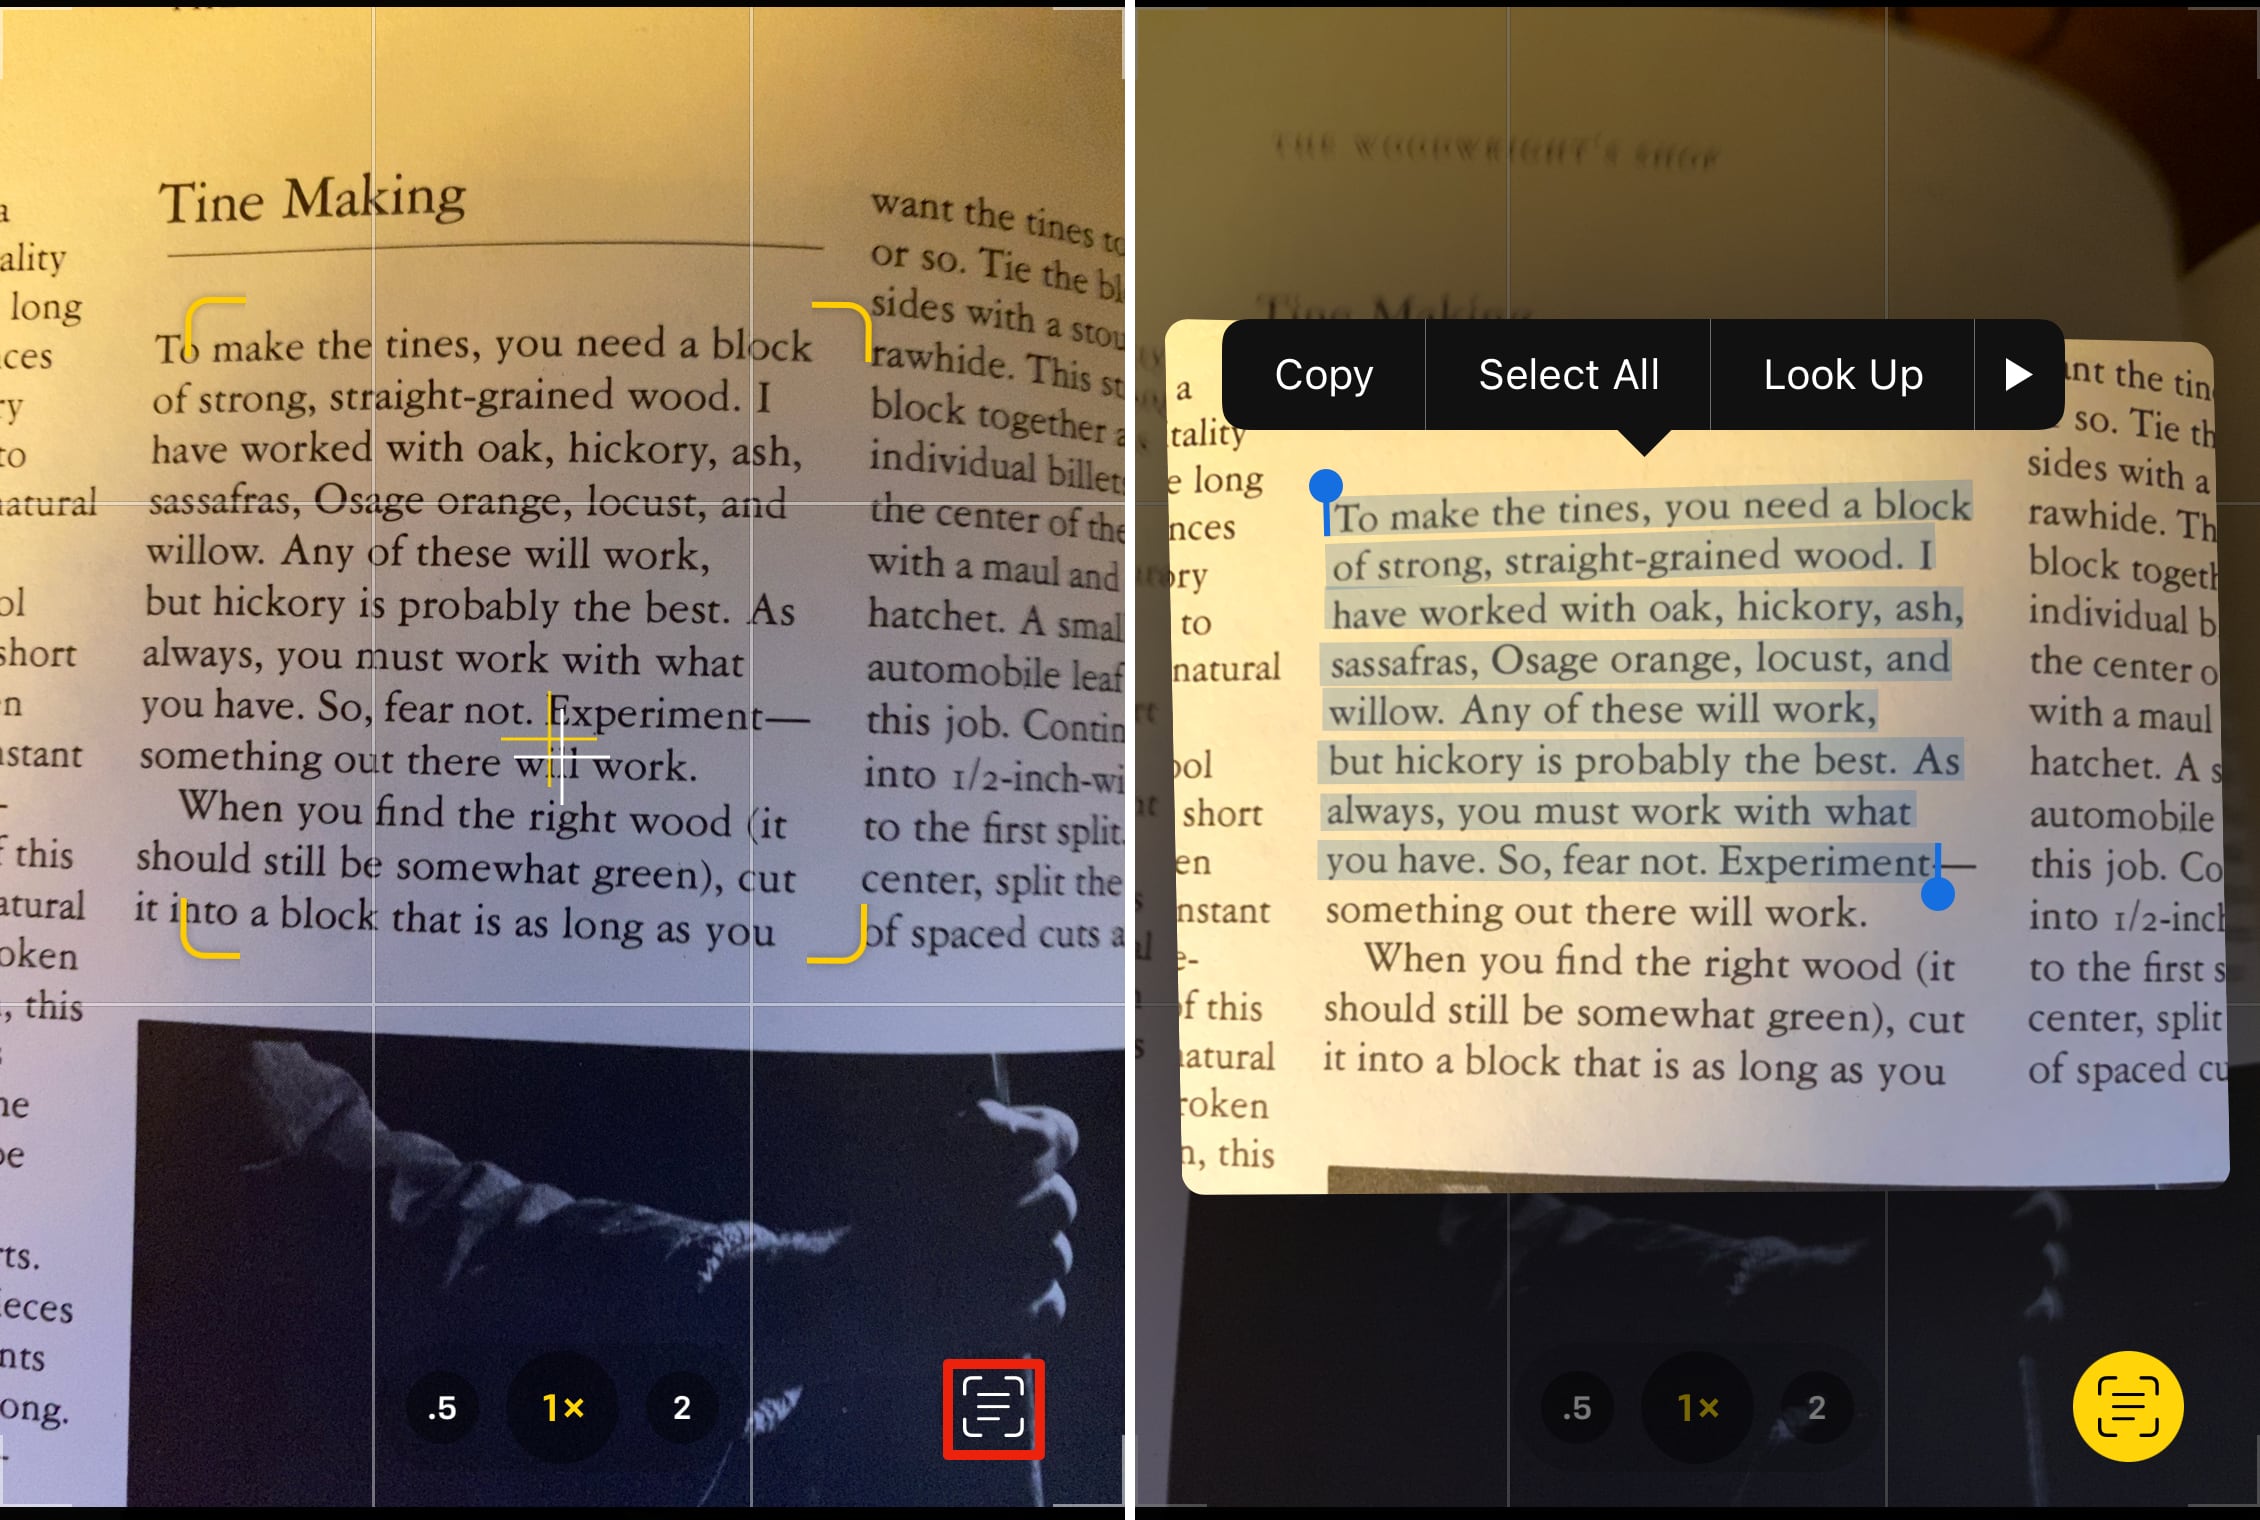
Live Text:You can also point the camera directly at any text in the real world to capture it. While in the Camera app, simply point the camera at a book, receipt, or any sort of text. A yellow outline appears around detected text. With the desired text highlighted, tap the Detect Text
 button to zoom in on that bit of text. You can then touch and hold to select text (Figure 102).

